Transcripts
1. Intro: Welcome to my class, the painting tropical leaves and houseplants in watercolor series. In this first class of the series, we're going to paint a Monstera leaf using simple watercolor techniques. Even if you are a beginner in watercolor illustration, By the end of this class, you'll be able to create your first watercolor Monstera leaf. Hi, I'm Soo Ling from Malaysia and I'm a self-taught watercolorist. I started to paint with watercolor few years ago, and it has become my favorite creative outlet. My artworks are mostly inspired by flowers and plants and sometimes food. I enjoy exploring different painting styles. But my favorite is always realistic watercolor illustration. So that's a little bit about me. I hope you'll enjoy and learn something from this class. I look forward to seeing you inside.
2. Your Project: Your project is to paint a watercolor Monstera leaf using the techniques, demonstrated in the class. To help you get started, download the reference image, drawing and supply guide from the resource section. You can paint along with me or finish watching the entire class before you dive in. After you've completed your painting, don't forget to upload a photo of your work to your project area. I would love to see what you have created. See you in the class.
3. Supplies: In this video, I will go through the basic supplies you need for this class. 300 GSM cold-pressed watercolor paper. It has a slightly textured surface and can be used for most watercolor projects. The one I'm using is Canson Aquarelle. It is a budget friendly option for beginners. You'll need a pencil and eraser. For the eraser. Preferably used a kneaded eraser, if you have one. A light pad or tracing paper to transfer the leaf drawing onto your watercolour paper. A jar of clean water to rinse your brushes and to mix watercolour paint. You will need paper or cloth towels to absorb excess water or paint from the brush. Watercolor paints, either in tubes or pan set. I'll be using watercolors from the Winsor and Newton, Cotman and Professional series. Here are some of the colors that I like to use for painting leaves. If you don't have these exact ones, you can choose colors that are similar to these. Last but not least, watercolor palette and brushes. I have with me Princeton Heritage brushes, sizes 6, 4, 2 and 1. For this particular project, Even if you only have brushes 6 and 2, you are good to go. For more detailed explanation on supplies, Don't forget to download the PDF guide in the resource section.
4. Transferring Sketch to Watercolor Paper: The first thing we're going to do is to transfer the Monstera drawing onto the watercolor paper. A PDF file of the sketch is available in the resource section for you to download. I'm going to trace the drawing using a light pad. But you definitely can do it with tracing paper. So, I'm placing the printed copy of the drawing onto the light pad, then I placed the watercolour paper on top. I'm going to put on some masking tape to prevent the paper from moving out of place. The reason I'm not drawing directly on the watercolor paper is to avoid damaging it through repeated erasing when I sketch. So if you want to draw your own Monstera leaf from scratch, remember to first draw it on any white paper, then only transfer the final drawing onto your watercolor paper. So, I'm using a HB pencil to trace the drawing. You would want the pencil lines to be visible, but light enough so that they are not obvious after watercolor is applied. So I'm going to speed up the video and finish this up. Okay, I'm almost done with the tracing. Next, I'm going to use a kneaded eraser to lighten the pencil line. You first knead the eraser into a malleable ball. Then you just press repeatedly on the pencil lines to lift up excess graphite. Again, if you don't have a kneaded eraser, you can always use a normal eraser. Just remember to rub gently so that you don't damage the paper. Now we have our plant drawing ready to fill in with watercolor.
5. Basic Watercolor Techniques for the Class: Before we start to paint, lets practice some basic watercolor techniques that you could use when painting your Monstera leaf. We'll start by drawing a few simple leaf shapes. We draw one larger leaf, then four smaller ones. For the first one, we will use the wet on wet technique to fill up the leaf it simply means applying wet paint onto wet paper So we are going to wet the paper with some water first You want to make sure the surface is evenly moist and not accumulated with puddles. Also be careful of not going over the border. I personally don't use this technique often. But I think it's useful when you want to fill up a larger area quickly with one color. To check if you have wet the entire leaf area, tilt the paper so that you can look at the surface at an angle. If the paper is wet, you can see a layer of sheen on the surface. Now we apply watercolor. I'm using brush no.6 and the color Hooker's green dark. you can use any color that you like. But using darker colors will let you see the difference more easily. When the paper surface is wet, you have more time to fill up the entire area before it dries up. So that you won't feel like you have to hurry up. Also, the paint is more evenly spread this way So now we'll leave this to dry and then we'll come back to add darker tones later. For the smaller leaf, the first one, we will do a wet on dry. Meaning, we apply the watercolor paint directly on to the dry paper. I'm using the same color. which is Hooker's green dark. I'm starting off darker at the lower end of the leaf. And I dip the brush to pick up a bit of water before I continue to fill up. If you feel like there's too much water on the paper or on your brush, you can always lightly dab your brush on the paper towel to dry it up. You then use the brush to absorb excess water from the paper. As you can see, now the leaf has a darker side and the lighter section. I think I want to darken just a bit more at the lower corner. For the next leaf, we're going to do the same wet on dry technique, but this time I will add another color on the other end. I'm starting off with Hooker's green dark again. I rinse the brush to pick up another color, which is Hooker's green light. It has a yellowish tint to it So I hope you can see the difference. For this one, it's quite similar to the leaf above But what I'd like to highlight is the bleeding effect. I'm putting down some wet paint, which is Hooker's green light I then rinse the brush And if the wet brush touch the edge of the paint, sweep across from one end to another. You can see that the pigment bleeds, and this helps to spread the paint to produce darker and lighter tones quickly. For this last one, I'm going to show you how to lift color off the paper after you have painted, a technique called lifting. The color that I'm using is indigo. Lifting is best done when the paint is still wet. For example, I painted this leaf, And then I remember I need the center part to be much lighter in color. So what I can do is to first clean to remove excess water by dabbing on a paper towel. then sweep across the area a few times where I want the color to be removed. Now that the first leaf is already dry, I can add darker layers to it. I'm still using the color Hooker's green dark. If you can remember, I'm now actually applying the techniques I demonstrated earlier. I can use the same color but with more pigment, meaning the paint is less diluted. I can also mix some indigo to my green to produce an even deeper green. As you can see, in watercolor it's all about layering and gradually building up the tones as you go. Lastly, I want to show you a technique called glazing, which is basically applying another layer of paint over an already dried layer. The additional layer paint of paint is very light and transparent. The color I'm using is lemon yellow hue Oops, I need to paint on a dry layer. So I will demonstrate on another leaf. Glazing is useful for darkening or brightening up colors of a selected section of a painted subject. I'm using a lemony yellow here to add more warmth to the green at this corner. But you could also use a darker color if say, you are painting shadows. So now we can move on to paint our Monstera leaf.
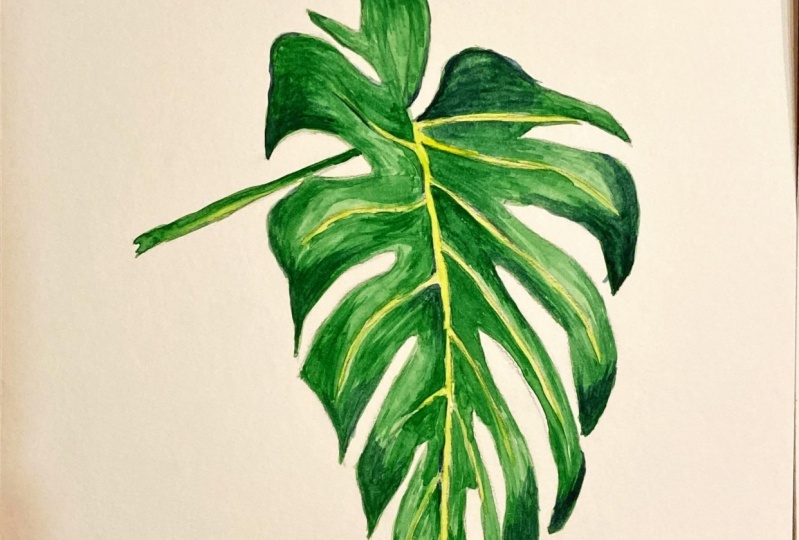
6. Painting Monstera: Base Layer: We can now start to paint the first layer of our Monstera leaf. I'll be using four colors for this particular project. Lemon yellow hue, Hooker's green light, Hooker's green dark, And indigo. If you don't have these exact colors, you can use colors that are similar to these. This is the traced leaf on watercolor paper, and this is the reference photo. I'm not going to try to replicate the same colors as in the photo. This photo is here to help me identify where to apply the darker shades. where are the brighter areas or where there is a different tone that I need to apply. Once you've learned how to paint, you can always explore painting your leaf with other colors. So in this first part, we will apply the first layer, or the base color. We're going to do it section by section. So it's nice that structure of the leaf conveniently allows us to do it this way. I'm painting the base layer with Hooker's green light using brush number six. So I'm just basically mixing water into my paint. You can test the color on a strip of paper. So it's handy to have some of that by the side. I will do the wet on dry technique first, meaning painting directly on the dry paper. And see how it turns out. Okay, I'll try the wet on wet now, to see which method I prefer better. Sorry about the glare if you can't see clearly, I'm basically just applying water, and then green paint I think I prefer the wet on wet technique. So I'll continue with this method. You see, I didn't really stick to just one painting technique. It all depends on what I'm painting, or the size of the area I'm painting, or the effect I want to create. Also different watercolor paper behaves differently and can affect how fast or how slow the paint dries. And that will also determine the technique I use. The more you paint and practice, the more you'll get to know which technique to apply to give you the desired result. With this wet on wet technique, I can easily add some very subtle shade on areas that are still wet. By doing this, it gives me a general indication of the darker and lighter areas once the first layer is done. I'm going to skip the section next to the one that I just finished because it is still wet, and I want to avoid the color from bleeding. So, I'll work on this one first. Oops. I painted in the wrong section. If mistakes like this happen, you can quickly mop it off with a clean damp brush. Because everything is green. So I wouldn't be too worried about this. Just wash it off slightly. Then let's move on. Here. I'm doing the wet on dry again. I'm applying the paint directly onto the paper because it's a small area. And I can fill up the area very quickly. I'm going back to fill up the ones I skipped earlier. And I'll speed up the video. So as you can notice, I apply different techniques throughout my painting process. Sometimes I do wet on wet, sometimes wet on dry. Sometimes I start with a darker color than lighten it. Or sometimes I start it off light and add shades after. For this tip of the leaf, I'm going to mix in a bit of a lemony yellow. So I'm done with the first layer or base color on the left side of the leaf. I will proceed to finish up the right side of the leaf and come back after. Now I have completed the base layer on the right side I'm going to fill in the veins with a light lemony green. I'm using a small brush to paint the veins. My brush is brush no.2. So, now the first layer is done. I'll leave it to dry and come back to add the second layer and darker tones in the next video.
7. Painting Monstera: Adding Tones: Now the first layer has dried, we can add tones and shades and deepen the colors. I'm still using Hooker's green light. with brush no.4. You can continue to use brush no.6 if you want. What I'm doing is softening the edges and blending the paint with a slightly wet brush. I want to add some Hooker's green dark now. You can also try this with other shades of green that you have. I usually like to paint with a variety of green colors from my watercolor pan when painting. But in this project, I'm limiting the colors to make it easier for beginners. You can't see it in the screen, But I'm still referring to the Monstera photo in front of me. I shall speed up the video now. Although I have completed the second layer of colors on this side of the leaf, I think I can still deepen and enhance it by adding another layer, so that the darker areas will be more prominent. As I mentioned in our basic technique video, it's all about layering and gradually building up the tones and shades. So I will speed up the video. I'm almost finishing up this side of the leaf. I will stop the video for now to continue to work on the other side. And I'll see you later. Alright, I have painted the top sections here. I will continue to work on the remaining parts of the leaf. I'm kinda doing everything in one go, meaning I'm adding tones and shades as and where they are needed as I paint Otherwise this process and video will take a long time to complete. I'm finishing up adding tones and shades on the right side of the leaf as well. If you see on your painting any areas that might appear to light and you think you want to darken it further Don't be afraid to add another layer. So I'll see you in the last video to add final touches to the leaf.
8. Painting Monstera: Finishing Touches: By now, I have applied to first and second layer of colors and added shades and tones to the entire leaf. I have also painted the stem. It's basically a similar process where I first apply a light layer of fresh green color. Then add on darker tones along the bottom part of the stem. At this section of the stem I darken it further by mixing green with a bit of indigo. I have also enhanced the veins with a second layer of fresh yellowish green. So now we will continue to the last bit of our process to finish up the painting. Looking at the reference photo, I need to darken and enhance these areas. Also, to make the veins stand out more clearly, I will darken the areas along here as well. So let's start. I'm going to start with this area. For the final darker shades, I'm mixing more indigo into my green. I'm using brush no.4 You can test the color on a strip of paper. Oops. If something like this happens, just quickly Take a slightly damp small brush to mop it off. I'm keeping my eyes on the photo to know where to add the shades. Other than that I'll be practically using my own judgment to add lines or shades to areas I think necessary. At this stage of the process, you can refine or smoothen the edge of the leaf By adding a a very fine outline Add some shade around the curve here. I need to change to a smaller brush, brush no.2, to paint the finer lines I'll speed up the video and see you in a bit. Even if you are a beginner, do know that you don't need advanced techniques to do this. What you need are simple watercolor techniques, observations, lots of practice, plus a bit of patience. After completing this side of the leaf, I'll go on and add final shades and touches to the right side of the leaf. And I'll see you back when I'm done I'm now going to tidy up the veins using brush no.2. With a paper towel ready to dab my brush clean. You can lift up colors from the veins with the paper towel. Okay. I'm done with the veins. Next, I want to add some light yellow glazing onto these areas. Using yellow lemon hue, and my brush no.6 Remember to use just light strokes to layer the color on top. Trying not to go over it too much. Just once or twice will do. Or else the brush will lift up the green pigment as well. At this point of time, if your Monstera leaf doesn't look like mine, it's OK. Even with the same techniques, colors and process, every piece of artwork will turn out differently. What's important is to practice often to achieve the results you desire, and it need not be the same as others. Lastly, I'm just touching up the stem with a bit of yellow wash on top. And a darker color at the bottom. So here it is. We have completed our Monstera leaf in watercolor.
9. Recap & Thank You : Congratulations, you have made it to the end of the class. Let's recap what you have accomplished so far. You have traced a Monstera leaf drawing onto your watercolor paper. You have practiced some basic watercolor techniques and you have painted your leaf by gradually adding layers of colors and shades to finally give you a beautiful Monstera in watercolor. Thank you so much for joining me in the first of my watercolor tropical leaves and houseplants series. I hope you have enjoyed the process as much as I have. I look forward to seeing you again in my next class. Finally, don't forget to upload your progress and final artwork in your project area. I can't wait to see what you have created. Bye and see you soon.
 Soo Ling Loo, Watercolorist | My Little Oasis Studio