Transcripts
1. Introduction: [MUSIC] There's a Japanese
tradition called Kintsugi where the Japanese
take the cracks of old pottery and fill it in
with gold and lacquer it rather than throwing
the old pottery out as a piece of trash. I really love that they do that because then the gold
highlights the cracks and the pottery and
makes it stronger and beautiful and
highlights that we're all broken and imperfect. I absolutely love this theme. I've read a whole series of Louise Penny books
from there Mysteries, about Inspector Gamache and
the crimes that he solves. The running theme all
through this book are where we are broken, we are made stronger. I absolutely love that too
because we're all imperfect. We've all had lots of different trials
throughout our life that we have survived. That's where the theme
of this class started. I'm Denise Love and
I'm an artist in photographer out of
Atlanta, Georgia. Today we're going to
create some art that represents the things that we have come through in
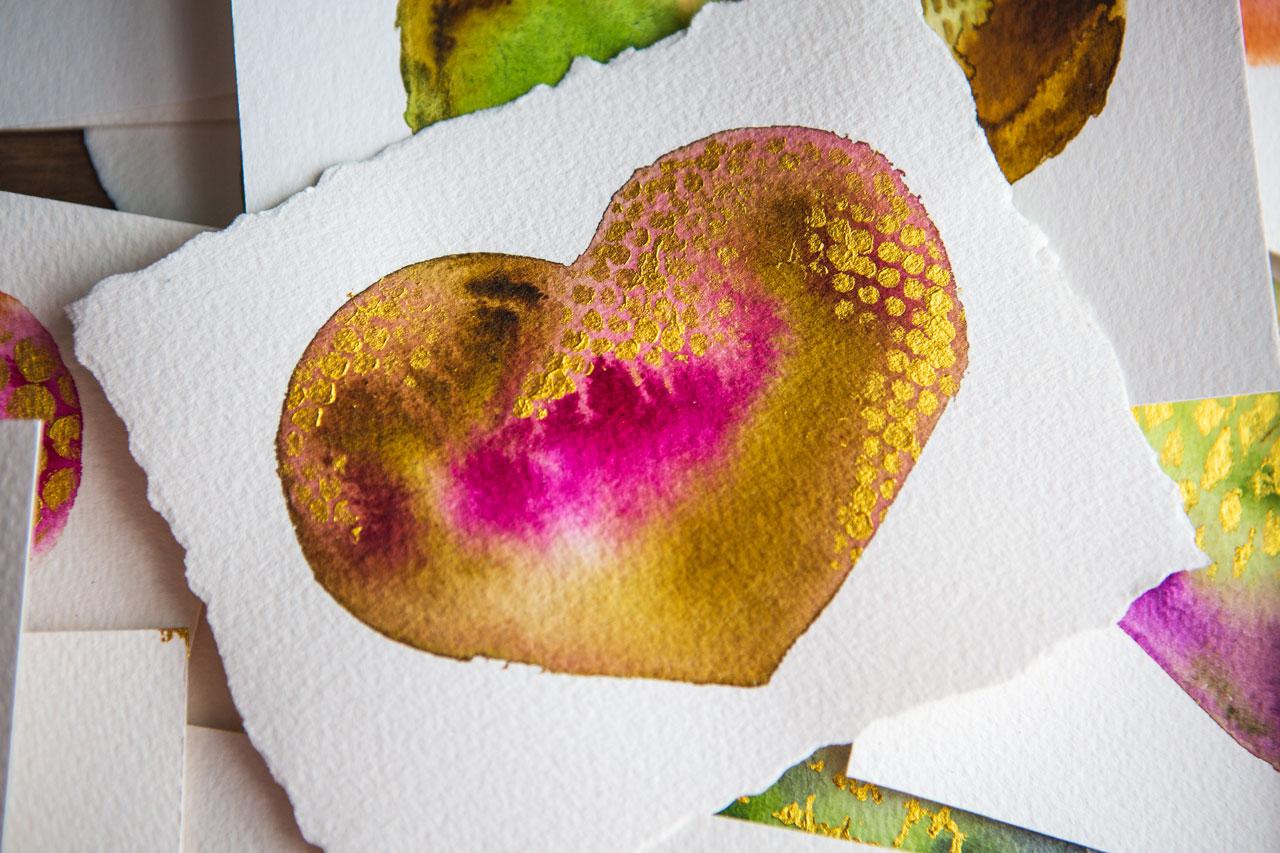
our life and survived. I'm going to do that in
the shape of hearts. The hearts are going to be different colors to represent the different events
that might have happened in our life
and then they're going to be highlighted with gold decoration just to
symbolize that we've made it through to the other side of all the trials in our
life and we're stronger. These are actually really fun. You can do a ton of
things with these. I've done lots of yummy samples in
different colors with different gold markings. I'll be using my favorite
gold paste to do that which happens to be a Japanese mica
paste and I'm like, how appropriate was that? Because it's a Japanese-themed
philosophy thing that I was inspired by
how beautiful are these. I know hearts are maybe a little bit kitsch
but I love kitsch. [LAUGHTER] Some were like
my heart shirt for you today to go along
with our heart theme. I hope you enjoy doing
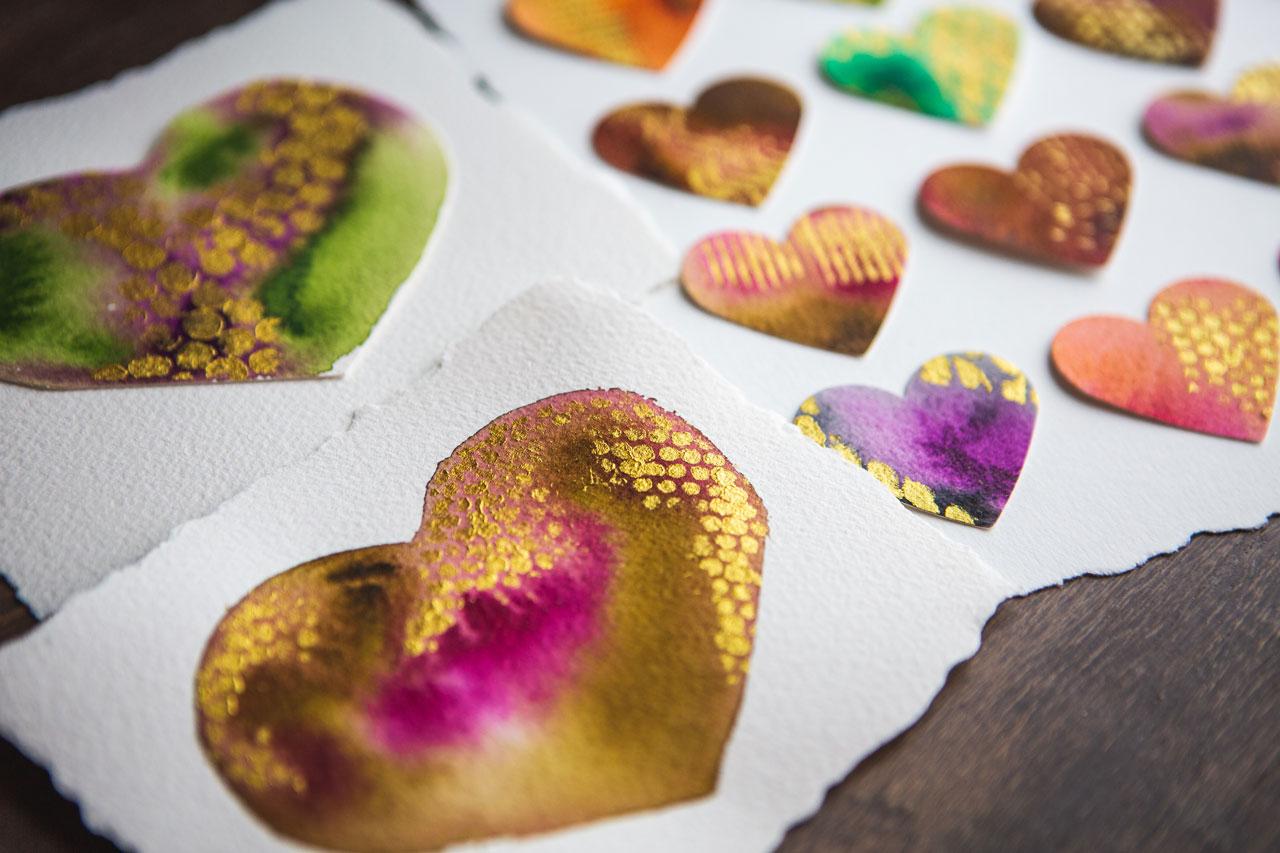
some of these projects. We're going to do some
larger hearts like these and fill in our
cracks with gold. We're going to do
some smaller color sampling projects and then turn those into beautiful
little hearts that we can create a piece of
art out of or we can gift away to other
people when we give them cards or gifts or we can make
gives tags out of these or we can make these the front of a car that you
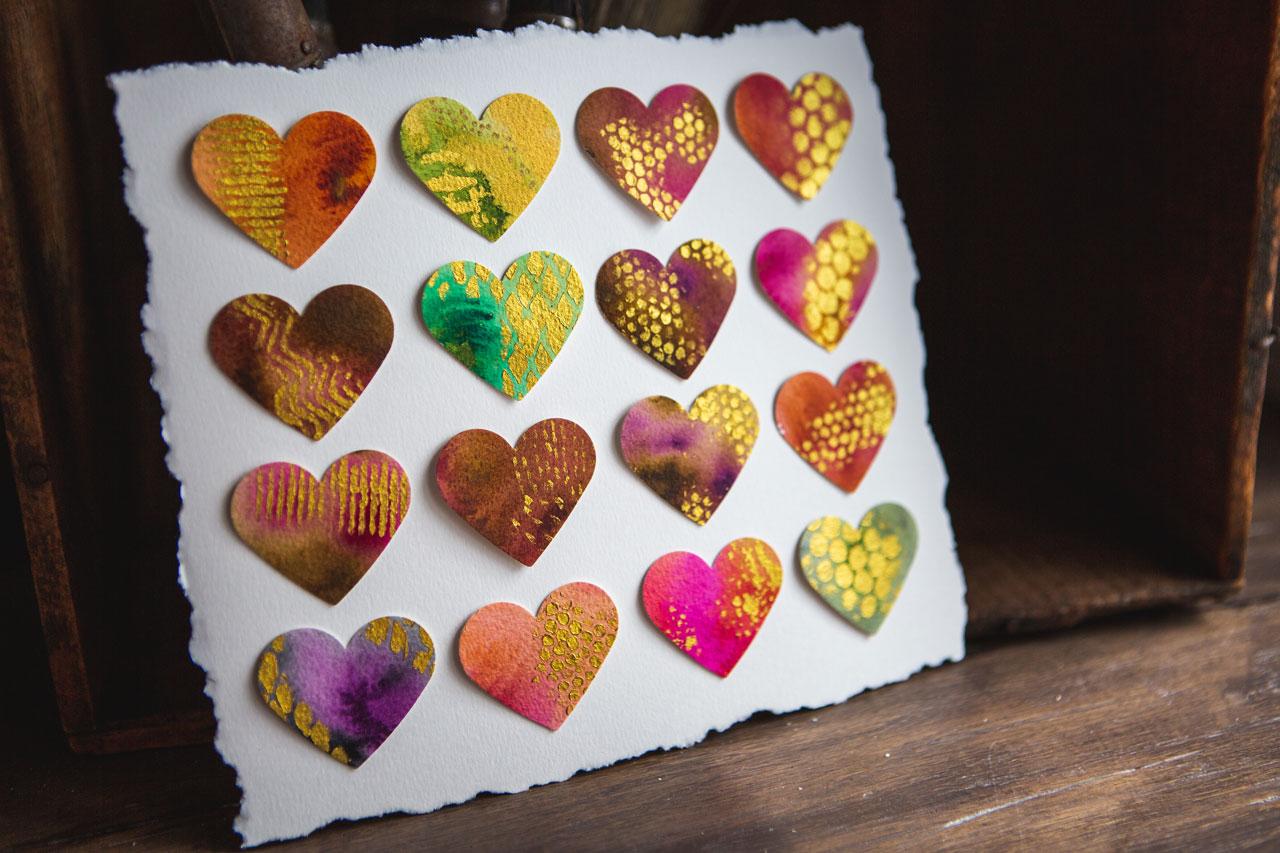
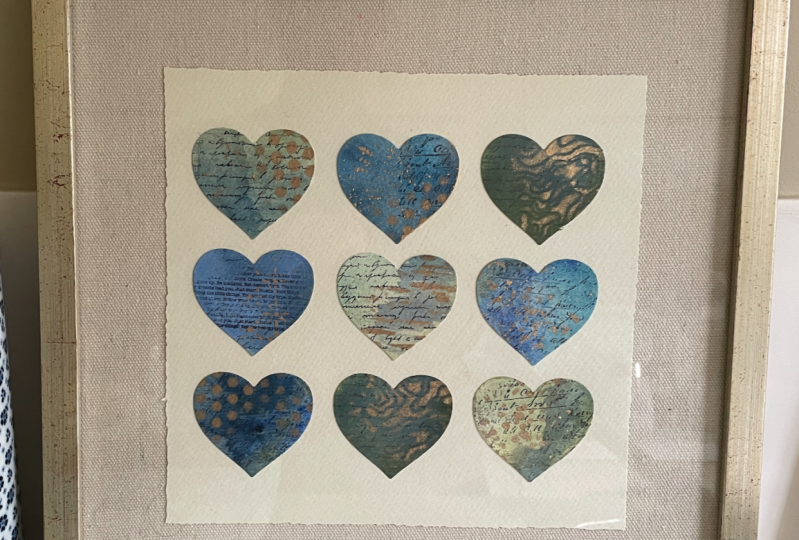
could send somebody. I've turned mine into
an actual piece of art. I had enough hearts created from my color samples
that I actually took a really nice piece of
heavy-duty watercolor paper, I decorated the edges, mounted the hearts and
now this is ready to be framed as a float
frame piece of art. You can do a lot with these. They're really beautiful. I like the meaning behind it. When you share these pieces
of art with other people, I want you to share the meaning behind these with other people. I hope you enjoyed
today's projects. I'm really glad to have you here and I'll see you
in class. [MUSIC]
2. Class project: [MUSIC] Your class
project today is to come back and show me what you've
done with your hearts. I want to see your
pretty hearts that you've decorated in gold
and I would love to see if you did some type of project with your
little sampler pieces. I can't wait to see what
colors that you tried out, the marks that you made, and what you came up with
for your project today. Come back and share
some of those with me. I'm looking forward
to seeing them and I'll see you
in class. [MUSIC]
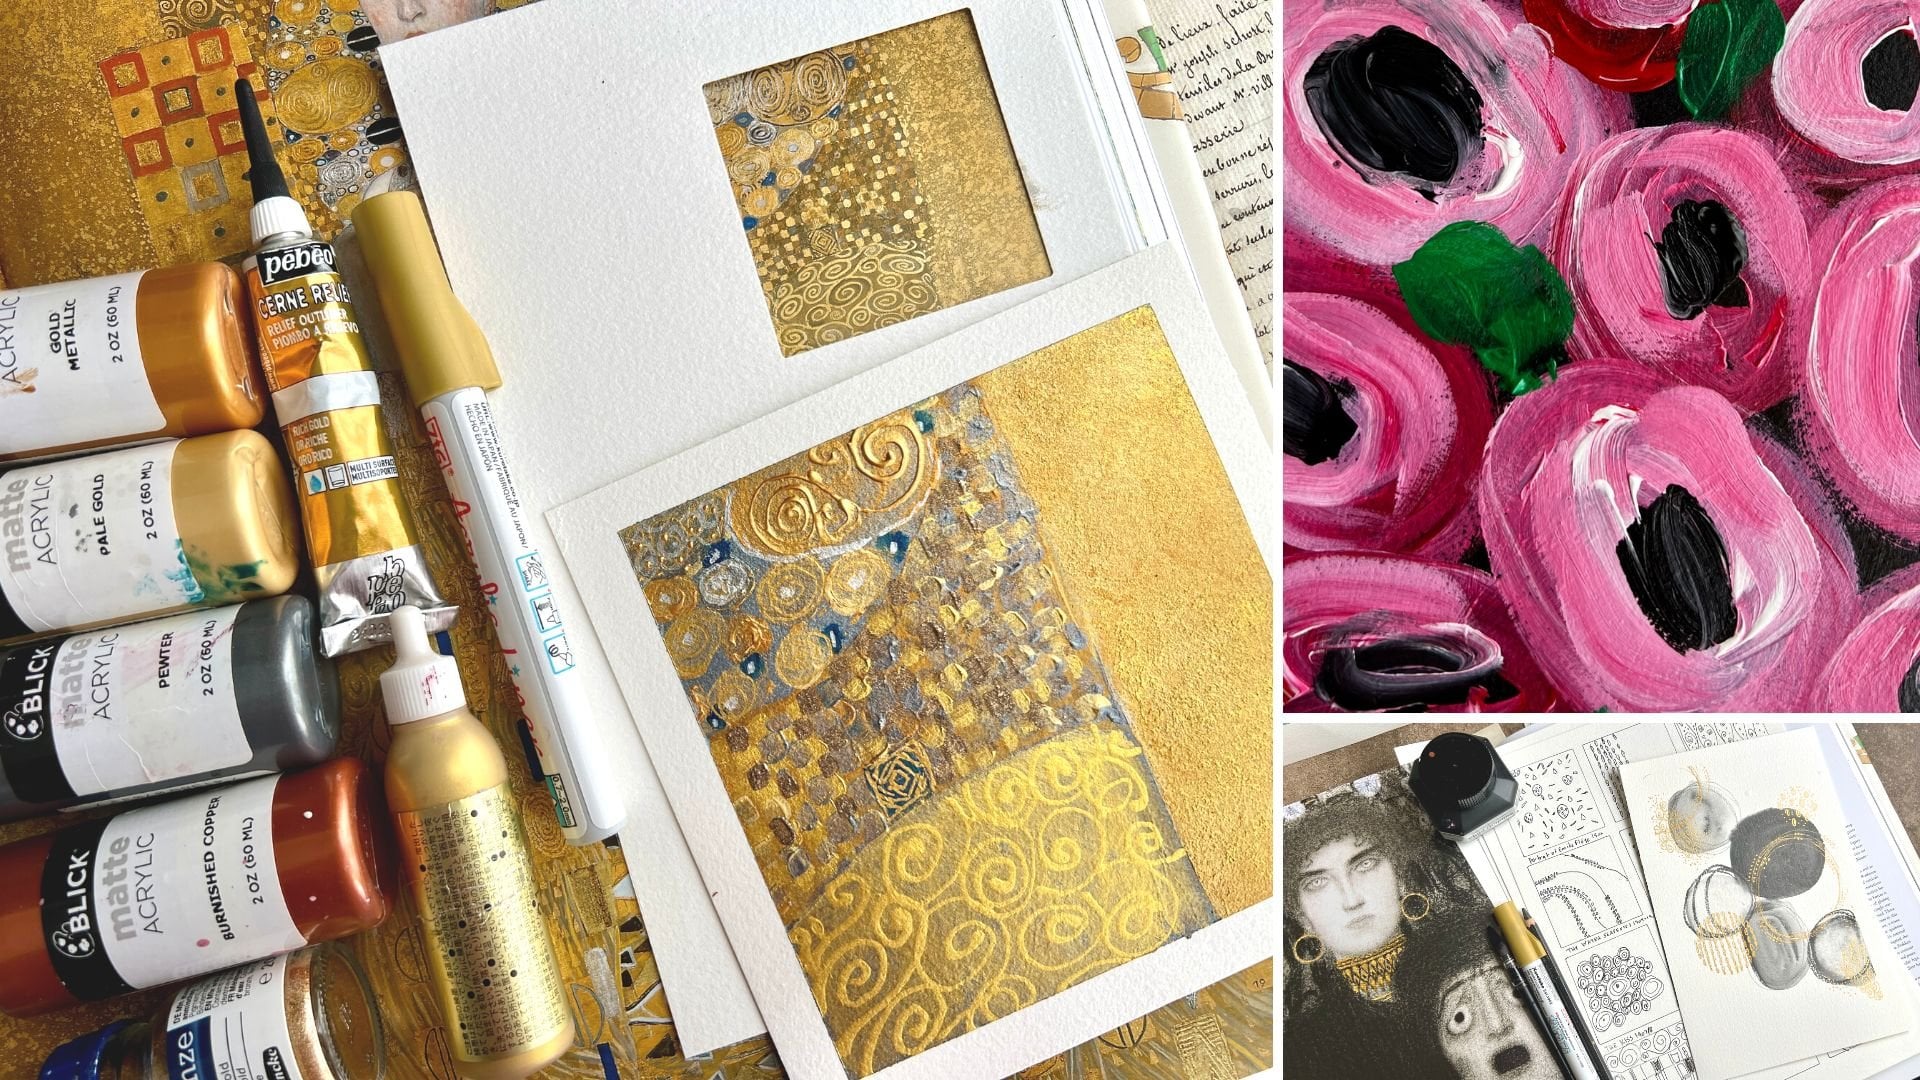
3. Supplies: [MUSIC] Let's take
a look at most of the supplies that I'll
be using in class. I've got some paint and
something shiny and some paper, and that is the bulk
of our project, but I also found that I liked a few stencils
and a paper cut out for just some fun
things there at the end after we
put our paint down. Let's just take a look
at some of the things that I thought made this
project really fun. I loved having some stencils. The punchinella is
one of my favorite. It's not really a stencil. It's the stuff they
punch out sequins. It's the leftover part of a sequin cut-out
called punchinella. This makes the best stencil, and it is my favorite. I love having some punchinella. If you don't have punchinella, you can get fake-made
punchinella. [LAUGHTER] I have
several stencils that I pulled out of my stash that come from the
craftersworkshop.com. This is basically
punchinella and then this beehive
stuff was pretty, I'm not sure I'd want
the stars on my project, but you may love the
stars for your project. I really liked the ones that
had multiple things in it. That's a fun and this smaller
template size was good. I also liked this random one that looked like
little diamonds. It looks like this might
have been part of a bigger, grungy stencil set. I'm pretty sure this came from the ranger products that
you get at like Michaels, some of those decorative. Go to your craft stores and look at some of the
stencils they have over there in that section. Then I also have some writing. I've got some circles with lines through it
that I particularly like. These are all from the
Crafter's Workshop too, and I've had this
for a long time. Then I really loved
this one with different little
grungy elements on it, and this little circle
one that looks like a smaller version of
punchinella is my favorite. [LAUGHTER] This one is
called mini textured. This one is striped dots. This one is Mini Believe Script. This one with all of them on
here was mini punchinella. If you're like, how do
you spell punchinella? That's how they're spelling it. I've also looked it
up like punch ella [LAUGHTER] on the internet
and you can randomly find it on lots of places like Amazon. [LAUGHTER] We're going to be also making our own stencil, and I've done this just
out of watercolor paper. I'm going to show you
how I did it with a very old drafting stencil because when I was in school
a very long time ago, drafting was still [LAUGHTER]
[inaudible] my end. [LAUGHTER] I have one of these yummy circle stencils and you can freehand a heart and
cut a heart out that way, or you could do it with
a stencil like this, like a circle stencil. You can see how this is
going to work when I show you how I cut
one of these out. You just need one, and
then I just kept reusing this one over and over
again, and I loved it. We also have our paper, so I'm using a little
variety of papers in class. I liked some of the rough paper. Then this is the
cold press paper, 140 pound for both those. I like rough paper
because it grabs the paint a little differently and you
get different looks. I like how vivid
the color is on it, and it's just my preference. I've decided that I
like rough paper. When I say rough paper, I mean rough watercolor paper. I'm using the
Arches rough paper, which is a better quality paper than cold press that I'm using, which is more of a in-between student grade and artist grade. Whereas this Arches is
my artist grade paper. The graded paper does
matter a little bit. You'll get a better print
overall from a better paper. You don't have to do
that to start with, you can start with just
your paper that you play and practice on
because this will work on any of the papers
really nicely. I also have a stencil cutout and this is a cutout that
I've had for a while, and you just might
look at the Michaels. I think that's where I got
this was the craft store, and get a large
heart paper cutter or you can google heart
paper cutter for these. I don't know why they don't
put their brand name on their stencils on their
[LAUGHTER] little thing. It's just a heart-shaped
paper cutter and you cut the heart out and it
pops right out there. I did like having this because in one of our projects we will be baking
lots of color swatches. Then later in class, we can turn those color swatches into beautiful little
pieces of art, which we could then turn
into little micro collages. We could have single hearts mounted and cut
that around there. We could have a whole
collection mounted, and what's nice about these is no matter what color you use, they all tend to blend. We can make these
gigantic like you can have rows of hearts with the beautiful glittery stuff on it in a great big piece and framed these make beautiful little mini prints
and big prints, you just make more
and more hearts and make the piece
bigger and bigger. [LAUGHTER] Let's
see how many hearts I end up with when we're done. These are some that
I've just done for myself playing with
different techniques. The heart punch is fun. I'm also for this class
using my acrylic inks, but you can do this with
watercolor just as easily. I'm just obsessed with my inks. I want to play with
them as frequently as I can until I get tired of them. [LAUGHTER] I like the
inks because they're very vivid in color and they spread around
the water really nicely. As we're doing this,
you can very easily see how you can substitute
watercolor. You could do watercolor inks. You could do the India ink, the Bombay India ink ones that look like this.
You could do that. You can play with lots of different products
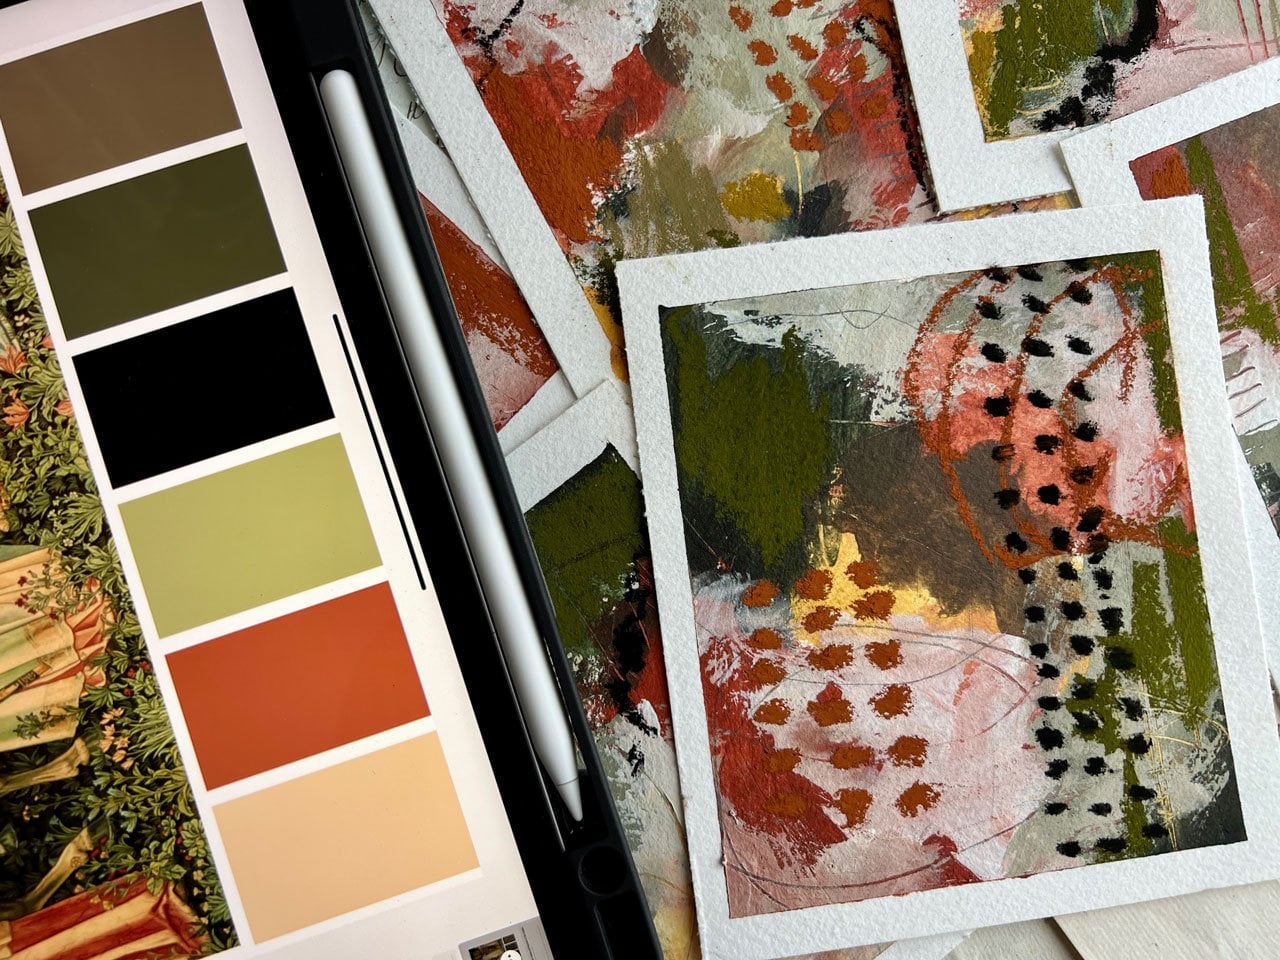
with this technique. I'm using some Liquitex colors. I particularly liked
the ones that have the antelope brown and
the quinacridone magenta. I also like the
quinacridone magenta and the burnt sienna, which is a Liquitex color. I also really like this payne's
gray by Daler-Rowney and this olive green by
Daler-Rowney the FW series. Also love this purple lake. I've just got lots of
different choices to play in, and I was just pulling
some of these out. You can see on my little samples some of these yummy colors. These are ones that I've done
for myself, just playing. In class, I may use
some other colors, but these are some of
my favorite colors, so we'll just see
what we end up with. Then I also have some posca pens and my
favorite gold mica paste, the cure take or cure taky,
however you say that. Mica paste, this is my favorite, and I've done a little bit
of both on these samples and the ones that I've
painted with the paste versus did with my gold
posca pen are just shinier. I'm just obsessed with that extra bit of shine and yumminess
that we get with that. I am going to be
using my stencils and that paste on the pieces
that I make in class, because I just think
they're so beautiful and dynamic for the finished piece. I'll put that name of
that in the supply list. Then other than that, we need a couple
of paintbrushes. I've got just a random
brush that's stiff, this one is three-eighths
inch crystal angle brush. It's not an expensive
one, I don't believe, and I like using it with
the stencils and the paste. The other brush I have is just Raphael soft aqua brush and the zero because I
just use it to spread water and color around and
then you need some water. That folks, besides
making my stencil, this is made with just
watercolor paper. The circle stencil
that I have and X-Acto knife and I cut that out with my X-Acto knife once
I draw my shape. You are more than welcome
to freehand your hearts. You can make your
own little stencil. Freehand or any way
that you'd like. Then that's the stencil
I'm going to use to just make a consistent
heart-shaped on mine. You don't have to have a
consistent heart shape. You can freehand all
of them if you want. [LAUGHTER] That's
just the route I decided to go because I
liked the heart shape. Then once you do this,
see this project, you're going to be able to see that you can do any
shape with these. This would be beautiful
as a big square with different elements in
gold and the colors moving. This could easily
be the egg shape, which is a particularly fun
shape to experiment with. You could do an egg and switch up your colors
and add your gold. Any of those would
be fun and amazing. The reason I chose gold, it's because it's that
Japanese tradition of filling the cracks with gold of broken pottery,
making it stronger. That's exactly the
idea that I had behind these hearts was all the things that we go through in life. The gold is going to be those broken parts that we
filled in and made stronger as we pushed through any of the different difficulties
that we've had in life. I really thought gold with the heart shape
symbolized all of that. Your strength and how
you've made it through all the trials and tribulations
throughout the years. You can certainly do this
with any color that you want. Because like the white
posca pen is one of my favorite things
to make marks with. You could play with your different color paint
pens and do some other stuff. I just had a specific feel and direction that I wanted to take with this
project personally, so that's why I've chosen gold. You could use any
gold craft paints. If you're going to
do the stencils, you might get some fun go
craft paint or silver. I like the gold because
I'm really following that traditional Japanese
feel for that, but any color that you'd want, bronze would be pretty,
silver would be pretty depending on the
colors that you used. Just go for the craft
paint if you want to use that and some stencils. That's most of the supplies
that I'm using in class. I hope you really
enjoy making these, and I'll see you
in the next video.
4. Heart Template: Let me show you how I've made this heart stencil for myself. This is just a piece
of watercolor paper. I use that Canson pad of
paper and had a big piece, and I just cut that
piece into quarters, and this is a quarter
piece of paper. Because I think this is
the size heart that I want all my little finished
pieces to possibly be. It comes out to about this size and if you wanted bigger pieces, you can make a bigger
hearts obviously. This works out to roughly, I think about a
four by six size, [NOISE] which for this project, six about
four-and-a-half by six. Which for this project
is really nice, but a five by seven
might be nice. If you do that, then start off with a five by seven
piece of paper because this size that I'm cutting is basically the size that I want to end up with for a print. Decide on your size and
then we can figure out [BACKGROUND] what size heart we want by just cutting
the paper in half. I'm not going to be so super strict that I make
multiple marks and stuff. I'm just going to eyeball
it because it's alright. Then this way, might not have been
exact, but it's close, this way, about right
here, it's halfway. Again, I'm just eyeballing it. I think I'm a little bit off that's okay, let's
turn it this way. Then what I do is I
want my heart shape to be right here and then the long shape to be right here. This circle is going
to be in this part and then this part of
the heart here, you can see even where
I've drawn my lines. I've draw my circle to the point where I think it can
then go straight. Draw my circle to the point where I can then go straight, it's how I'm doing that. I have a cutting mat
underneath here. Just by looking at the
different sizes of these, I can tell that like
this is too big, this one-and-a-half
heart too big. There are different size like
you've got five-eighths, one and a quarter or one and three-quarters
one an eighth, like that. I believe on this one, I thought the one in the
eighth was the right size. Yes. This one right here, the second circle on this side. I've lined up the point with the line that I drew to
cut the paper in half. Then this one actually has
a line coming this way, and I've lined that line up with the edge of my paper over here, just so that I can get the
right shape and direction. Then I just draw half
of that right there. Then I'm just going
to turn it around, do the exact same thing, line it up with where I stopped over here and
line this line up with the edge of my
paper and then I'll know that I've used
the wrong one. If you use the wrong one
just doesn't really matter. We can just go to the right one. [NOISE] It turned and then got
confused, there we go. Let's go. It's the
second little line, let's line that up.
Now we're lined up. Got this lined up
with the corner, this lined up with where I was, and then I'll just go
ahead and draw that out. Now you can see that we've
got two little half circles. Then I'm just going
to wherever that stopped or wherever it is that I want that heart to come down. I'm just going to draw a line, [BACKGROUND] and same
thing over here, crossing it at that center
line [NOISE] and draw my line. Then we can take our
exact dough knife. I found it easier almost to go ahead and
line this up again, and just let this be my cut. Line that right up and then use this to cut
through my paper. I'm pressing fairly hard, going slow because I want to actually cut
through the paper. I'm using a really sharp
exact dough knife, so If you've got one
with an old blade, I would swap that
out for a new blade. I just wanted to get it lined
up again and then I'm just going to let this be my
cut for my template. It's easier to let the stencil
help you [LAUGHTER] like this than it is to try to free hand that without
the help of the stencil. I already tried that one time and I'm like, this
ain't the right way. I just trimmed all my
stencil a little bit. That's okay. I've
had this stencil for a very long time [LAUGHTER]
and I'm sure it will survive. [LAUGHTER] Any abuse
that I can throw at it. Had to go find my drafting
supplies to be like, I know I got a circle creator. See, and then it just
comes right out, look at that, and
we have our heart. Now I can tell that I used a smaller circle than
I did originally, so I must have used the
one up the first time. But you can make these in
any size that you need, if you make one and you think, that's too small, let
me make a bigger one. I'm glad that I just made a different size because
now I have options. [LAUGHTER] That is how I
made the circle stencil. You're welcome to
create a heart and draw on your piece
of paper that heart. You could draw it out and try to follow it without doing
the stencil if you wanted, that's another way to do that. But I'm going to use the
ones that we cut out. That is basically how I create my own stencil and then now
I have two different sizes, so I'm pretty
excited about that. You can make several
of these and then just see which one you want end
up using for your project. I thought just in case
you didn't want to make your own
stencils like we did, I would go ahead and
trace my stencils onto a piece of paper and give you that PDF for the different size hearts
that I'm using in class. You're welcome to
print this out and then you cut the heart out and use that edge as
your template if you have thick enough
paper that you've printed on, if you didn't, cut it out, and then draw that heart onto your piece of watercolor paper and cut it out, or free hand or whatever
that you'd like to do to get your heart shape
or you could paint it and then there you go. I thought I'd make it easy [LAUGHTER] and I'll include
this on your resources and downloads as a PDF that you can just print and use. [MUSIC]
5. Color Samplers Testing Our Colors: [MUSIC] Let's start by
painting our samples. For the samples,
I'm just trying to figure out what
colors do I like. Let me put these
brushes out of the way. I'm going to paint some
water into little squares and I'm going to
dip inks on them and just see what
we can end up with. I love doing these because we are in a later project going to make little
bitty hearts out of these so it's not like it's a waste that
we're doing these. I do before I use all my inks. I do make little swatch cards and then save those
and then I know what color I'm using and
I can select from those. So if you've never watched out your inks or you're new to inks, go ahead and paint little
squares of water and dip ink in it and see what
colors these even are. By doing that, I know that I love this turquoise
and indigo, the sepia, olive green, Payne's gray antelope,
purple lake, Quinacridone magenta,
yellow oxide. I know by doing this, some of these colors that
I particularly love. Now, that I thought
of that yellow oxide, I'm going to pull that out. I've got some of those, the ones that I've
just called out, that's the ones I've
got sitting over here, Payne's gray,
antelope, purple lake. I got that olive green. I've also got thylo cyan green and I've got some burnt sienna because it's a pretty orange. I like these orange,
yellow, pink combinations. I like this green and
antelope combination and this green and
purple lake and I like, Payne's gray with any of these. I thought the blue and green
was a fun combination. That's a personal favorite
color combination of my own that I love. I also haven't
used these before. This is new to me. I have
some light gold ink. I thought maybe
we'll just see what that looks like because
the light gold ink looks like my [inaudible] paste that I love so much,
my Micah paste. What I'm going to
do is use my paper, that's future use there. I almost pulled the stencil out, but we're not ready
for that yet. It doesn't matter if any
color gets on there, and I'm going to make these big enough with the intention later. Then I'm going to cut
little hearts out of it. I'm going to make it
big enough that I know I can get a little
heart out of it and now I'm just going to
start dropping the inks on the square just to test out color and see
how much is too much. What did I end up really loving? We'll come back with just a little bit of
water and tap that in there, and then we'll
move on to the next one. This is our little sample tests for our bigger hearts to
see how did these work? What did they look like? How did they blend? Did we love them?
Did we hate them? [LAUGHTER] Let's just
try this purple. The secret here is
to not go overboard. I don't want too much ink, I don't want too
much water and then let's just see if we spread
that out a little bit. What colors we end up with. I do like it when you can
see the separate colors, because when we make
these as big hearts, those separations are
where we're going to decide to put our gold. I can read to you my
inspiration here on that gold. These were inspired by the Japanese art of mending
ceramics with gold, it's an old tradition
called Kintsugi. It dates back to the 15th
century and consists of highlighting the
cracks and breaks in ceramics with lacquer and gold. The objects stars come to life and they become an ode to the passing of time
and to imperfections. It represents to
me the strength, the things that we have survived in our life to
get where we are now, the different things
that we've learned. I love that. That's why I'm going with the
gold in our later projects. That's how I decided on that because I want the gold to fill in and to be that
representation of all the things that we've survived to get
where we are today, we're not perfect creatures and this helps us see how
far have we come. Let's do the antelope. Look what we have survived and I love that this represents
that strength. We're not perfect. We've survived things and I love the strength
that this represents. I'm going to move those around a little bit if we
want, that's fine. It looks like I've picked the
same too, but that's okay. What we're going to do on top of these is some gold mark-making for that representation
of the gold. That's where that is
going to come in. We'll be able to see visually are strength and the things
that we have survived. That was not quite the blue
green I was hoping for. This is exactly why we do this, so that now I know maybe that
wasn't what I intended and perhaps the Payne's
gray is going to be closer to that
look I was hoping for. I do love that. Let's see. I want to get in here
maybe with the antelope. I like the antelope, I like the brown properties
of the antelope. It's the prettiest brown. Maybe we'll come back in
here with this purple. Just take our paintbrush and
spread these a little bit. Then as these dry, they're going to do some
little magical things and that's what I love about the
inks and the watercolor. If you decide to go
with watercolor, that is gray too, and I could do one of these
squares with watercolor just to get an idea of
what that looks like. Let's do this green and test
out this metallic gold. This might look more like we've already
got our paste on it, but it'll be interesting to at least experiment a
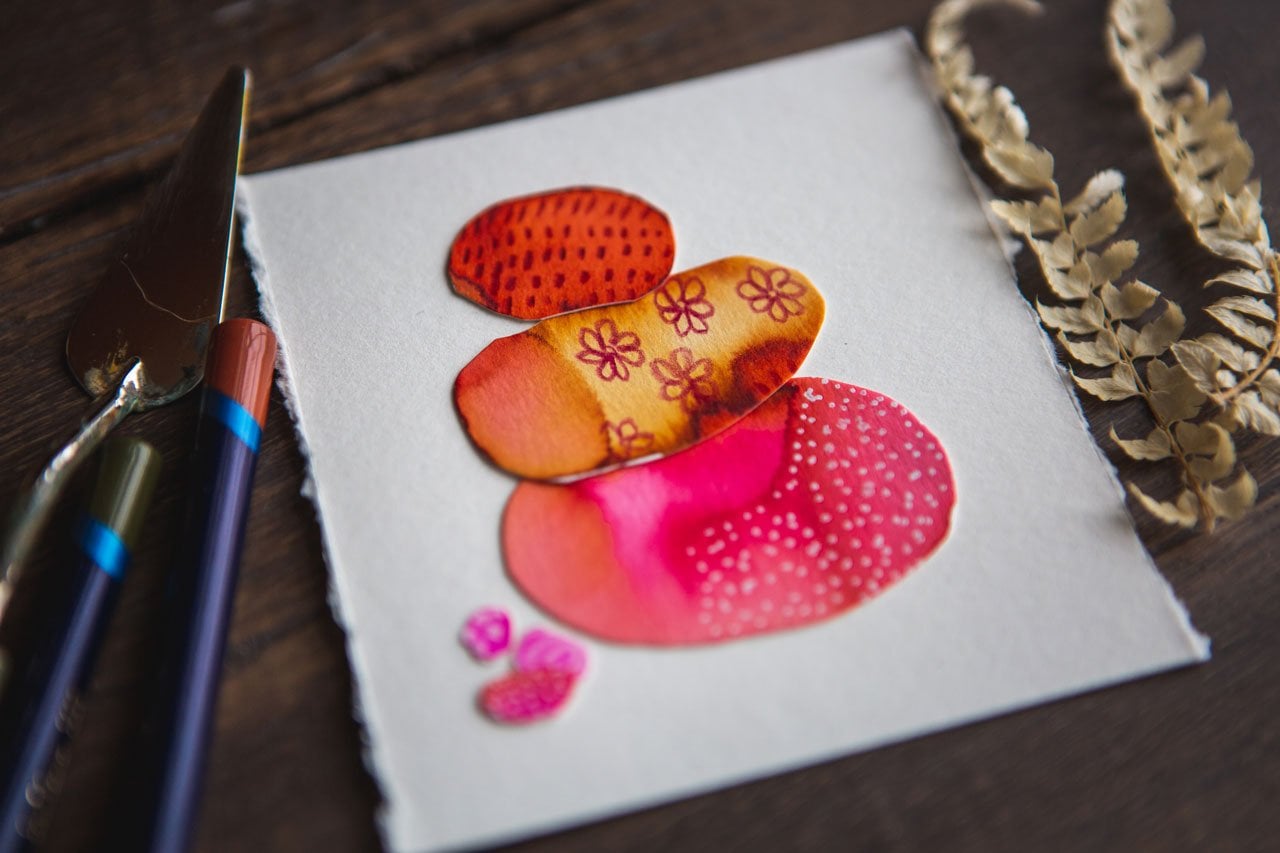
little bit with it. I like pinks and oranges
and reds together, so let's try this burnt sienna
with this Quinacridone. Yes, look at that, I'm loving that one. I might do it again with a little less ink just
to see what we can get. Maybe I'll start with
the Quinacridone. Bring in the magenta. Because it's really nice
to do these because you'll figure out how these are going to really work
for you when you get to your bigger projects and you'll see the ones that you did that were too
heavy and you're like, that's what that looks
like and maybe that's the look you're going
for and maybe it's not. But how are you going to
know it if you don't try it? Let's try this gold
and the sienna. Not gold, that is
the yellow oxide. Just realized I have
gold over here, so we don't want
to say the gold, it's the yellow oxide. Let's do one more.
What do we want to do? We have any colors over here in our little special
bin of colors. We could even go
just crazy color. We don't have to do anything. This is a pretty
color, look at that. What is this? This is red, violet. Let's try this one. It's going to go
crazy with the aqua but now that I've
got this red violet, this looks like
the Quinacridone, though, it's what
we're about to see. Let's do that with this sienna. Then we might move that around. That actually looks like
it's a different brand, but it looks like this
Quinacridone. Now we know. That's pretty. Now we have a whole page full
of color samples. There's a few that I'm like, I love this or I love that. Particularly, I love
that blue green one. I love all of these
with the antelope. I love this with the
orange and pink. I feel like for my big hearts, those are going to
be some directions that I go but we'll just see. We have to set these
to the side and let them dry and then we'll come back and do some fun
mark-making on top of these. [MUSIC]
6. Using Watercolor for your projects: [MUSIC] I thought I would do a real quick demonstration on using inks versus
using watercolor. Just in case every
time I say, you can use watercolor, and
you're thinking, how? [LAUGHTER] I thought
I would just do a real quick little demo on how. I've got some colors I
haven't opened in a while, so let's just soak
up the extra liquid, but I'm just putting
two random colors down. I'm using the tube watercolors, but you can use any watercolor. The pen watercolors
are just fine. You just want to have some
water and some color, and we're going to
just do a little test. This is what we're
doing when we're making our color swatch samples. Let's just take these
same two colors, this is a magenta and this
is that yellow oxide. When we're doing our
little color tests, we'll put some ink
on the page and we'll just let those spread
and do their things. We're going to do the same
thing with the watercolor. I'm going to start off
with a watercolor square. I'm going to pick up some
color here on my brush. You'll notice as you
tip that in there, that the watercolor
spreads around just as easily as the ink. The secret is to have a lot
of water on your brush and to have some of that water there
on that sheet of paper. The main difference
you're probably going to see is the intensity
of the color. You can come back with the
watercolor and continue to drop color into your squares, and then you would let that dry, just like we're going to let the other ones dry
as we're going. But you can see, as I'm like, that's just not enough color, I can come back in
here and continue to add some color to the
watercolor if I want, because the reason I like the inks [LAUGHTER]
is their vividness. I do love that about them. The main difference too about the two different watercolor versus ink is the
ink, once it's dry, water cannot reactivate
it, so it's permanent. Once the watercolors
dry, we can keep coming back and adding
water to it and reactivating and pulling off color and doing some
stuff like that. Water can be reactivated, the watercolor, the
acrylic ink cannot. But you can see very
easily how I can get basically the same look
out of either medium. If you don't got acrylic ink, but you've got lots of fun
watercolors to play in, this is what I mean by use the watercolors
if you've got them, and then if you feel like
your colors are disappearing, just come and drop a
few back in there, and then set that to the
side and just let it dry and continue on with
our projects in class. I hope that gives you a good idea of what
I mean when I say you can use watercolor or ink, and it doesn't even have
to be the tube watercolor. You can use the pen colors, just get it nice and
wet, activate it. Get plenty of color
on that brush to start dipping on your page. I'll see you back in class. [MUSIC]
7. Color Samplers Mark Making: So I made myself
leave for a bit so that this could
completely dry without any influence from
myself or my heat gun. Because I think some of
these turn out better if you just let them naturally do
what they're going to do. What I'm going to do now
is on each one of these, come up with a
different stencil, or it could be the same stencil, find the mark that you like
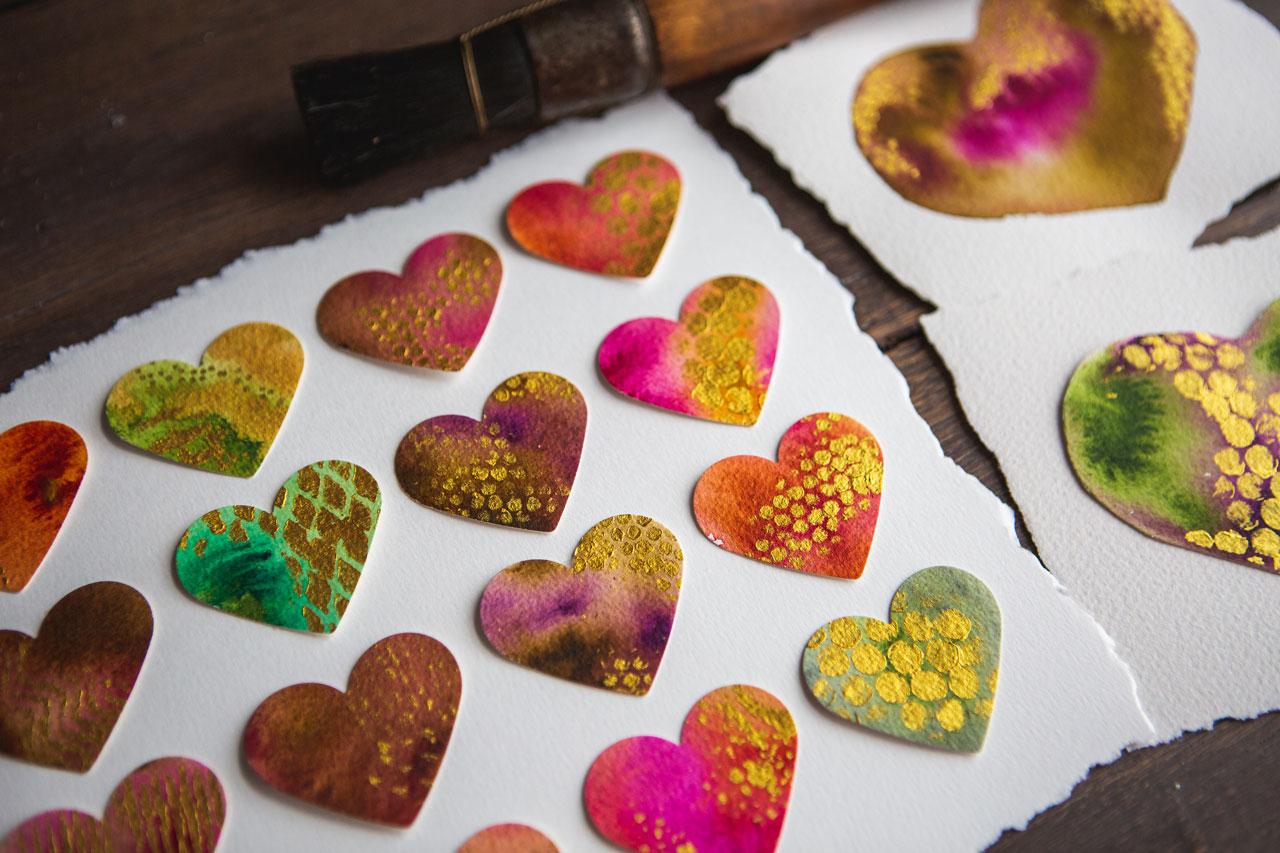
or the stencil that you like. I'm going to strategically put gold along
certain colorways. I'm going to let the piece
talk to me basically like where does
this piece want to have the major bit
of gold in it? I'm going to use my favorite
Kuretake mica paste, but we could also use our
paint pens, our Posca pens. You could use craft paint. If you've got some craft
paint that you want to do. I have an idea sheet
of different marks that I could consider
doing in some of these, or I could use my stencils. You just decide based on
what you've got and what you see that I do that
you think you'd like and do your thing. I really love punchinella. I'm definitely
going to use that. I love this grungy sheet here. That is the mini textured of the crafter's
workshop collection. It says the
craftersworkshop.com. This says mini textured. That's what my favorite one
is that I think I'm going to use here today because
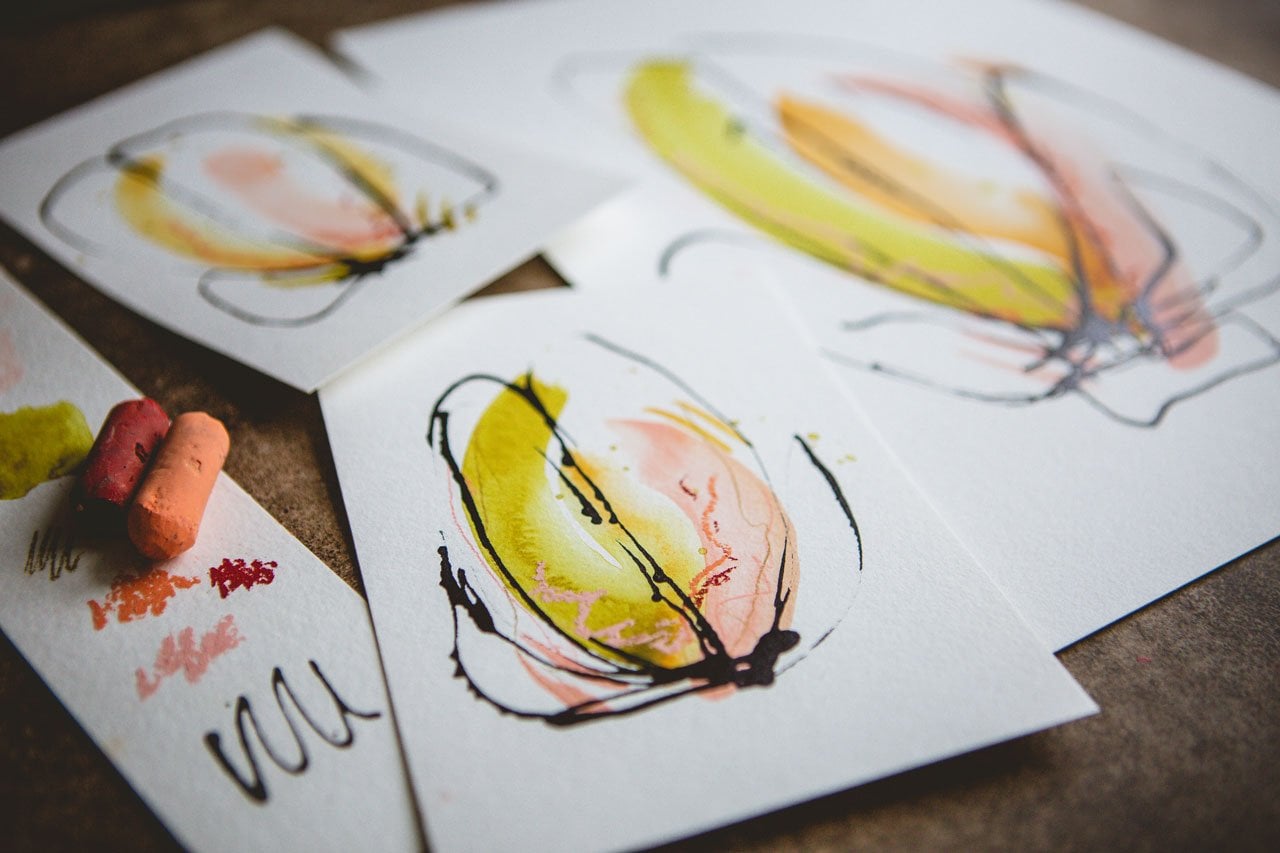
I like some of these. I like my punchinella. I like this where it looks
like little diamonds. If I were going to draw some, then I would take some
inspiration off of my mark-making
inspiration sheet. I love having these and
as I think of more marks, I can add more to this, or I can add another sheet, and then I can have
these hanging behind me in my art room just for ideas. But I really like dashes, I really like dots. I really like these
where it's a bigger, almost like the
punchinella look, where you're drawing heavy dots. You choose, but what
I'm going to do, is start with this. I've got a dry brush
and I'm going to take this and decide where would
this be the most dynamic. For this one, maybe
it's in the center. With a dry brush, I'm just going to let my stencil and the
color here guide me. I don't want
stenciling all over. I want this to be
an area of impact. Look at that, because we're going to take
these as number 1, our idea sheets, and test out all our ideas. Then number 2, we're going to do another project with these, that I know you're
going to love. I also love this diamond thing. I'm just going to
maybe on this one, I want the diamonds in the gray. Maybe I want the purple
to be doing its thing. These really do work
better with a dry brush. If you put water on your brush or your clean your brush off, get as much water off
that brush as you can. The stencils look better
with a dry brush, a paint right on. Whether it'd be a craft paint or whatever that
you've decided to use. Look at that. That's
pretty, I like that. Let's see. This is fun. We've got a little
area right through here that's different
than some of the other. What if, we can take this little dot one
and fill all that in? Then I'm following the
line of the lighter color. I like that you can see the
colors through the stencil so you can be more strategic about where
you're putting these. Look at that. That's going
to be pretty on something. That's what we're
going to do there. I like that they're all
a little bit different. On this one I'm thinking, let's do this pink. Let's try this crazy line. Maybe even angled, we don't have to do it straight. I'm just going to
put the gold where I can see that pink
paint shining through. Look at that. Super fun. I love how shiny the stuff is. On this one, thinking
on this green, maybe we're going to do
a big swash of gold. I don't like the green actually, but let's go ahead and
do something on it because in our future project that we're going
to use these on, we might like it. Even if you think, I
don't like this one, go ahead and decorate it up
because you might like it later once we do some
fun stuff with it. See, that's more
fun right there. See, a little bit of
paint fixes everything. Let's do our punchinella here. I think it's called punchinella, but you get my little Southern skip some
letters twining there, sorry. Look at that. Let's just go right along
that. Look at that. Yummy. I love it. Let's go back. I think this little
dot one is my most favorite out of everything. Maybe I want to come down
on this lighter brown here and fill this in. Look at that. Just putting this little bit of gold
makes everything better. I'm being real careful to hold the stencil out
but keep on going. I'm not hopefully
moving it all around. Look at that. That
might not show up in our future thing that we're
doing, but that's okay. It looks pretty right there. Look how pretty that is. A little bit of gold
there. That's okay. Let's put some gold down here. If we do get some gold somewhere we didn't intend because it's on the
back of my stencil now. We can just add some color there even if we
didn't intend to, but I don t think on our future
project that we're doing, it's even going
to matter, so I'm just not worried about it. I did that gold ink on this and so I think
what I'm going to do, I think we'll take the diamond. Maybe we'll take this one. I haven't used this thing here. Maybe we'll come back
in on the green with some gold and just see. See? That might be too much
gold with the other gold, but how would we know
if we didn't try it? Let's come back down here. Look at how crazy fun this is. I'm loving the pink
and the orange. What do you say? I'm
going to do the dots. I like this one so much. Of course, I just smeared it. Well, it is pretty
common down there. Let's see. I like that one. Then I'm going to do
the dot right here in this big light area. This one's crazy. What if we do these lines
down the side of this? If you've got some
definite color definitions where something
stops and starts, use that as your guide. If you don't, just make
something interesting right there in the middle of
it, that's really cool. I like that. I will
stop it right there. Then this is a weird just, I don't know, like spotty thing. It might go pretty
common right in here. Let's just try it. I don't even know
what that really is, but we're just going to
go ahead and try it. Some random grunge.
Look at that. Let's do some of
that over here then. Oh, yeah, look, that's fun. Once we have a little collection of marks and dot making and any type of
thing that you want, and if you choose to
go with the paint pen, let me just do them as green one because it's my least favorite, but let's say you decide
to draw with paint pen. I'm doing gold because I'm
working in with my idea of the Japanese tradition of filling in the pottery with
the cracks with the gold. That's why I'm using gold. I'm going to stick to the gold. You know, what's funny is
this is Japanese mica paste. How appropriate is that? But if you want to use a different color
or a paint pen or do something different and do your marks and fun
things like that, perfectly great
for this project. I just love how
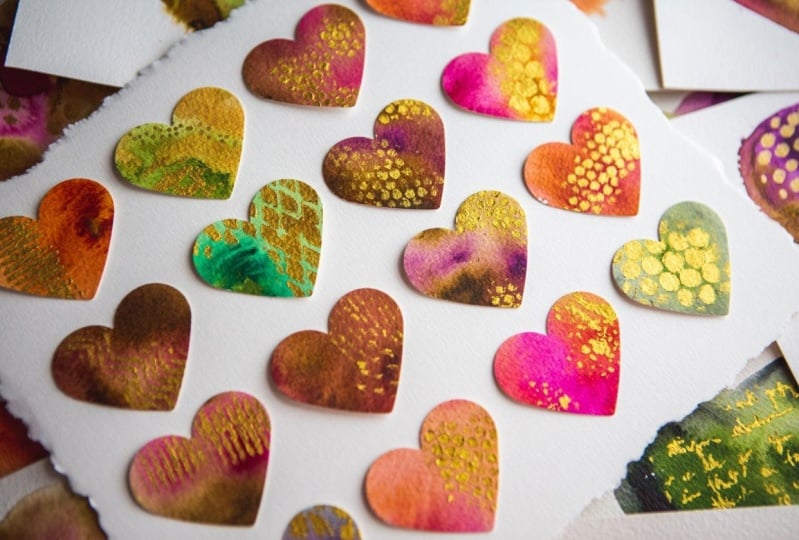
shiny the gold is. I love that it fits right in with our theme of the project. Now I have a whole lot of examples to go and make
some bigger hearts out of. I can now say, I
really love these. I actually really
loved this one. I love this whole row. I love these with the antelope and the
quinacridone magenta. I like the green and the
blue, weirdly enough. I think if I got some good color separation on a larger heart, that
would look good. I do actually like
this green one now that I have gone
and added polka dots. Look how beautiful these are. They're so striking and
they're going to look good in our next little project that
I'm going to do with this. But this lays down a foundation for colors that I'm going to use
on my bigger hearts. I can tell you right now, I don't really think that this is going to be one that I love, but I love all the
other ones just about, that one I wouldn't have
loved until I added the dots. Out of all of those, I love that collection and the greens are
not my favorite. Go ahead and start your samples. I want these samples to be
big enough for a future, something that we can cut out. I have made these about two-and-a-half inches by
two-and-a-half inches, somewhere around there, and start playing with color. The more of these you
make, the better, because you can make big
projects out of these if you have more squares to work with in a future little project. I hope you have fun with your color swatching
and you're testing of your marks and whatever it is that you decide
gold-wise and mark-wise, and I will see you
back in class.
8. Another Gold Option: [MUSIC] I thought I would show you one more
option on the gold because sometimes the mica paste is out-of-stock at
the different places, Blick or Amazon,
that you might look. I actually had
somebody ask me about the gold mica ink by the same company, the
Kuretake company. I found it was actually usually in stock when
the paste was not. The main difference with this is it's very watery and liquidy, so you have to mix it up
really well when you get it. Then I just take a dry brush
and whatever my stencil is and tap that into the
ink that's in the lid. This is water-based, so it's
easy to clean up with water. Then I very gently tap that
around my paint surface. Then it seems to dry
just as bright and brilliant and beautiful as
the paste of the same color. Then look how
beautiful these are. These might be my favorite one. [LAUGHTER]. I got some
rather beautiful gold and this particular company, these just seem to
be the vibrant, most shiny when they're dry out of all the different
gold things that I've tried. I wanted to give you a second option for something
that was super vibrant. If you've tried some
other gold options in your craft paints
and they haven't been as shiny or striking
as my paste was, try the brilliant gold ink in the gold mica by that
same Kuretake company. It's another option that's extremely beautiful
on our pieces. I just wanted to throw that out there to give
you another option. If you're looking around and
you see this is in stock, but the paste isn't, then either option
really seems to be exceptionally beautiful
in this technique. All right. I'll see you
back in class. [MUSIC]
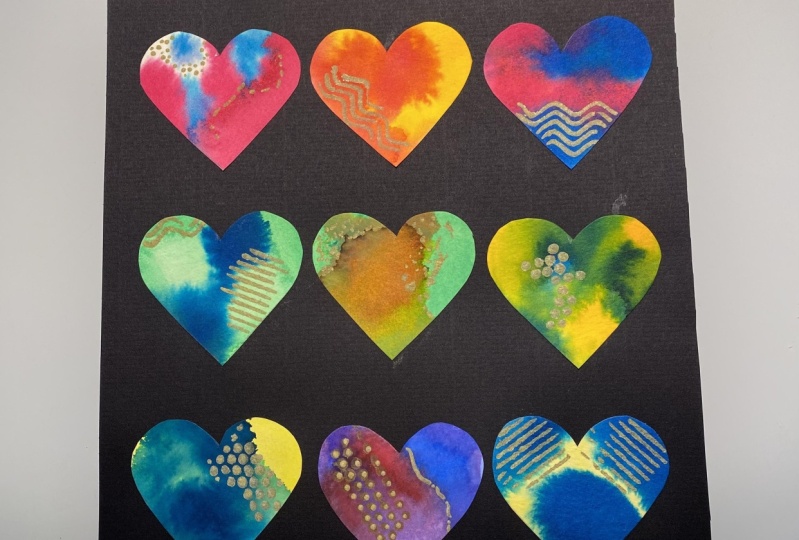
9. Mini Heart Art: [MUSIC] Let's get back to our
yummy little sampler here and we're going to turn
these into, if you want, little hearts of
their own because how beautiful are these
when they're cut out? They're so pretty and there's lots of different things
that you can do with these. We can mount these
on their own piece of paper and make little
miniature collages. That's super fun. We could make a whole bunch of these and make a
gigantic collage, a finished piece
of art and the way the colors run and
do their thing is super fun, so I might go ahead and cut a bigger piece of
paper into a larger collage. You can make these gift tags. You could include these in cards that you're
sending to people as a little tiny piece of art
that they can be surprised by. Lots of fun things that
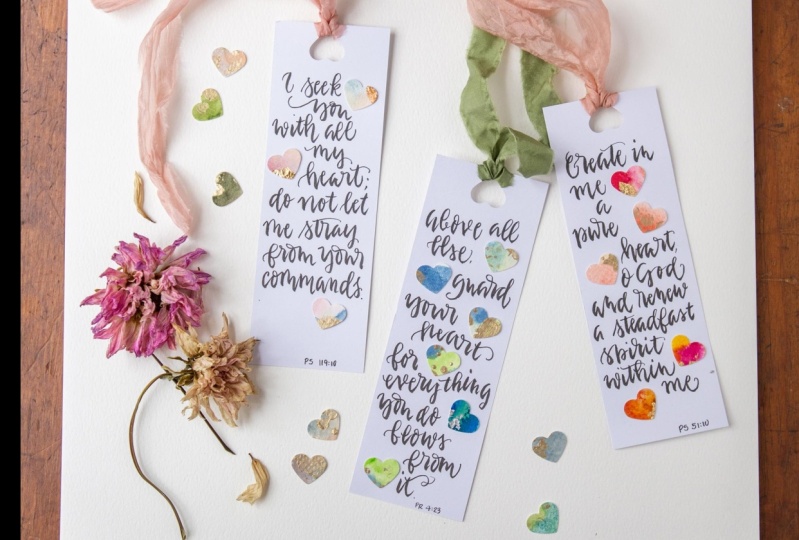
you can do with these. You could just cut a
thin strip and do three or four on here and
make a bookmark. These can be the front of cards. If you've got some of those pre-made like watercolor cards that you can get at
the craft store. You can make this a
handmade front of a card somehow so lots of fun things that
we can do with these. I'm going to make them
into little pieces of art and I will show you
how I'm going to do those. Basically, I start
off by cutting up my strips, my
squares [LAUGHTER]. I want to get pretty close
to the color because my paper cutter needs to be pretty close to the
color to slide these in. You can slide them in and see exactly where you're
getting this. I left a little more
room I guess and then you can decide where exactly to position your yummy gold and then look how
pretty that is. [LAUGHTER] You can of course take my little drawing that I've included in your resources and downloads and you can
draw your little hearts, cut that out of the paper and then use that as
your template and draw the hearts and cut
them with scissors. You could do that too
if you don't want to get a paper cutter. But I love paper cutters. They make everything go faster. [LAUGHTER] Look at that. Let's
cut that out. Now, I should have
left some more room. A little edge on these papers. Look how pretty that one is. That one's much
prettier cut out than it was starting out. I like that a lot now. I always doubt, like am
I going to like this? Is it going to turn
out how I want it? Look at that right there. I like that one right there. I always wonder,
especially color testing. Am I going to like these colors? Does that make a bad choice? [LAUGHTER] I'm always pleasantly surprised when things
work out and I'm like, much better than I thought. [LAUGHTER] I love that little
surprise, part of that. Because then I have that little high
of yummy surprise. Yummy surprise high. Look at that. I like that right there. Look at that. Let's
cut that one out. [LAUGHTER] Look how fun that
is, oh my goodness. [LAUGHTER] This might be my favorite
part of the project, cutting out little tiny hearts. I wish I had a great
big heart paper cutter. Let's put that one right there, so I could cut these out of those bigger pieces,
but that's okay. We'll work with what we've got. [LAUGHTER] Now, I'm wondering, let's cut this here and
see if I would like it the other way. Let's see. No, I don't like that. We're going to just edge
that one out just like that. Let's see right there. Let's take a look
at it on the edges. Super fun. Oh, my goodness. Yeah, this is just as good as my paper cutout
pieces of art. Yellows come right over here to the corner where I make the pieces of art
and I cut the heart out. This is just as fun as that because you don't know
what you're going to get, where is going to fall, and
cutting of art is my favorite. Look at that right there. Should we go right
there where it's on the edges or should
we come over further? I'm filling that one. What do you think? Let's
go. I like that big corner. Having a goal, via pop out, and then you're like
look how pretty that is, and just make cutout art
for everything I ever do. Let's see. Tiny bit of
green on the edge there. Lumped all they can about right
there. Let's do that one. Look how pretty [LAUGHTER]. I know you think I'm crazy. I say that in every class,
but I got no shame. I'm an old lady, right there, and sometimes it's the simple pleasures
that make your day. Look how pretty that is. It's almost like paint splatter at that point which, by the way, paint splatter would be
another good choice. Look at that. I like this craziness
right here. That's really pretty. I like that shine, so I'm going to cut that
in half right there. Let's do that. No, I like
watching them pop out like that. Look at that, so amazing. Let's see what we got here. Right there, go on
that right there. [LAUGHTER] So pretty. Look how pretty
these leftover things are too. You could just maybe make
that a piece of art, your little leftover strips. [LAUGHTER] Now, we have all of our yummy little pieces
that we tried and you can see I get a big
piece of paper here. Takeout our one that
we're going to use. But you can see I use
these as a larger piece. How pretty this would be, especially if I had to
cut up the torn edges, the deck all the edges. Look how pretty this would be as a finished piece framed with
the deck all the edges. You could float frame it
and when I say float frame, I know I've shown you
this in other classes. This is a float frame
where it's floating. This is the edges
where it's torn. Imagine this piece float
framed with the torn edges. All the hearts evenly
spaced in perfect lines. Look how pretty that is and then we could even
have like one random on skewed for just
like a surprise, but I like them all the same direction and glue them down and then deck all the
edges and frame it float framed and then
as the light hits it, look what the light does. So that would be
really beautiful. So I do believe I'm going
to mount these and tear the edges and have it
ready to take to be framed because I love
that, it's beautiful. This can represent a lot
of different things. All the different trials that
we've been through in life. Let's put this one here. This was one with the paint pen, and it's not as shiny, and I want all the
little edges to shine and you just get an idea like all the things that we
have survived and made it through in life to come out on the other side stronger,
and how beautiful is that? Hope you enjoyed this project. You can make these into just about anything
you can imagine, and they're so beautiful that
you could send them to people as a little piece of
handmade art from yourself. I think that would be
a really particularly beautiful thing
for you to do and a nice surprise for
somebody that's getting it and
then these things, I would not throw these out. These are really pretty
and if we did something like this where we
had just the color, that would be beautiful
in a collage. So save your pieces like this
with the hearts that you cut out and use these
in a collage later, lots of uses for that. So I hope you enjoyed
this project, and I'll see you back in class. [MUSIC]
10. Large Heart Art Adding Colors: Let's start making some
of our bigger hearts. Then once we get
our ink on these, we'll have to let
these dry really good. I might take a little break overnight after we paint these. I've just taken two pieces
of my watercolor paper. I'm just using the rough
watercolor paper, 140 pound. This is a nine by 12 sheet. I'm using the rough because I want to play with
the rough paper. You can use any watercolor
paper that you have. The Canson watercolor paper, 140 pound is my go-to a lot because I have some big pads
of it that I got on sale. But just to show you, these were done on the Canson paper and this
was done on the rough paper. It's just a different texture, but you can see it works just fine on the different
paper textures. I just like to experiment
with different papers. At some point, I
ordered a pad of each paper that arch is offered so that I
could experiment. For some reason, every time
I pull out the rough pad, I'm like, man, I
love this paper. I love how it looks
when we're done. It's just something fun
to experiment with. But definitely just use your regular watercolor paper to figure out your technique and how you're going to do this. Then if you decide, oh, I love these. I want to make some
art out of these. I want to maybe
frame some of these, like look how pretty this one
is that I did a while ago. I have the torn paper edges which I actually tore
this out of one of these. I find it hard to tear
the paper after the fact. So if you really love
doing these and you want it to be pretty
with torn edges, you might do some individuals that you've already
torn the paper. When you'd peel the tape, it's like done because
it's hard to tear the paper on the edges of these. But these are beautiful. This would be really
beautiful framed. It'd be very beautiful
as the front of a card that you can just
stick on the front of a card as a finished
piece of art. I love how these turnout. I've just taped down two
pieces of paper so I could do a whole bunch at the
same time and let them dry. So that then when I get to my playing in my stencils and my goal paste
or mark-making, whatever it is that you end
up deciding to do there, we're ready and we have
lots to play with. Then if you have some
that don't work out, then it's not the
only one you painted. This is why I made
the stencil this size because I knew I
would be working on this size piece of paper and I can just move it from
piece to piece as I go. If you're right-handed,
I would start in the left side and
work your way over. Do these four first and
then do these four, and that way you're not putting your hand on top of wet paint. If you're left-handed,
go the other way. I'm going to start up here. The reason why I love
having this little stencil, and normally, I would work with the paper turned towards me, but we're going to work
with it on its side. Is now I can judge where it is and I can paint
a water heart. I can fill in the
heart with water, just like we did on
our little samples. It is easier to see the
water if you can see the light shine
in from the side. I'm just guessing a little
bit trying not to stick my head in there. Then let's just get started. I like this yellow
and the quinacridone. I should throw in
some of this orange. If they're not spreading
as much as you want, then you just come back in
and work some of the color. This is why it's easier too if I were leaning where I could see that light where that shine is for the water
that I just laid down. That's all right. We'll
just play in there. Move that color a little bit, and then don't overwork it. Once you get it to a point where it's going to be
doing some fun stuff, leave it and move
on to the next one. That's how fast these can go. It is easier if
the water is dirty because then you can
actually see the heart. But if the water is dirty, it's also going to leave
an edge to the color. Sometimes, I don't want
the edge of that color. Let's do a Payne's gray. I don't want a pink edge to some color of whatever
it is I'm doing. Some dirty water is fine, but don't overdo it
with the dirty water. Let's come back in with
some of this green. I'm putting a little
more ink on this one. I want it to be dynamic. I want the colors to move. I do want some dark spots
and some light spots. I want some areas where
the color blends. That one is pretty. See while
we're working this way, now I can keep going
without it being a problem. You see how this just makes it super easy to make
a pretty heart, and all I'm using is a piece
of paper that I cut out. Hoping I got a heart on there. Let's go in with the antelope. See how pretty that
antelope spreads. There's like no doubt where your colors are
with the antelope. Let's do the quinacridone. Magenta. Look at that. That magenta is insane. We let that do its thing. Let's come over here
to this last one. I really liked that. Let's just go ahead with
another one of these. Let's use this Amsterdam
permanent red violet. It's about the same color. But once we actually use it, it may end up looking
a little different dry than the quinacridone, so let's just try it because now that it's a little bigger, I can see the color is a
little more different. That was not good
English, sorry. I can see the difference
there though of that. That's pretty amazing. Let's just dip some more
of that in here and see. That looked like a lip. I guess you can leave
a lip in there, but I don't want a lip in there. Now that I've used it, there is a definite
difference in the Amsterdam pink versus
that quinacridone. Cool. I love discovering
different things. Again, just the same
heart template. Now, my water is getting nice and dirty and I
can really see it, and it's closer to me so
now I can see the shine. I really love this one with the raw sienna. I'm going to do
some more of that. It doesn't matter if
you do different colors on every heart or you pick the same colors and just do a bunch of those hearts because they're all
going to look different. Then as you add in
different marks and things, they're all going to have
their own level of interest. Like that one's going to
look completely different than that one. I love that. I think we actually put some
yellow on that one up there. Let's go to the next one. Let's fill this in. I just dropped some stencils. My little table is not big enough when I get
it set up for filming. Let's do this antelope and maybe some of this purple. I like this purple lake. Let see if we can
get those to move. I'm thinking a little
bit about composition. I want some of these to the color to slice
through the middle so that when I come back later with some interesting
stencils and stuff, that will have
interesting colors and directions to follow. I am a little bit thinking, what can I do to add some interest in the
piece as I'm going? That was fun. Let's
see. Two more. We're going to
stick in my little fun color palettes here, maybe the purple and
the green because I did an abstract piece in another
class with those colors. They're amazing together. Maybe a purple-green heart, which that's not what
a heart really is. This is art, we're representing. Look at that. Let's see if we can get that to move a little
with some water. We got one last one. What do we want to do?
I need a vote here. I'm really feeling them
orange and magenta ones. I think I'm going to go and
do another one of those. Raw sienna magenta, I guess
is technically what that is, but it looks orange
to me and I love orange and pink together. It's a color combination
I particularly like. This heart has a
little edge outside. Let's get a little magenta. I just love watching
these colors spread. Made it fun. Then once you're all done, once we've got all the
hearts we're going to do, and I'd love for you
to do at a minimum of eight, try different colors. Because when they're dry, you're going to find
that you're drawn to some and not to others possibly, although they're all beautiful. Then as we're going, you're going to have a few
that are going to pile up really heavy with a piece of ink somewhere, like right here. It's fine if you
leave it right here. It'll give you a
really dark spot. But sometimes, it's not like of the right thickness to
match the rest of it. It looks like it was a
spot where stuff pulled up instead of an interesting
spot that you wanted. So I take tissue paper, Kleenex, because
it's really thin. It's not going to affect
the outcome of my piece. I just very lightly tap it
and let it soak up some of that very heavy bit of ink because I don't want to do it with
anything with a texture. I don't want to do it
with a paper towel because it's almost too thick. It might leave a bad
spot on my piece of art. But if I just touch it with
a little piece of Kleenex, it just soaks right
up perfectly. Now we've got our
eight little hearts that we're going
to be decorating. So we have to let
these dry completely. You might as well set them to
the side and go eat lunch. Then we will be back when these are dry.
11. Large Hearts Mark-making: All our little hearts are dry. I'm just going to go
ahead and remove the tape before we continue on because I don't want to
work on these sideways. I want to work on each
piece separately if I can. I'm going to go ahead and move my tape and separate these. If you want to create some that have the very pretty
deckled edges, like I've got on one that I've done for myself
a while back. Then, you want to have that
paper cutout up front and make your piece right on
that finished piece of paper so that you get
that pretty cut look. Because I found it
extremely difficult to tear the edges on the sides where I didn't have
much paper to grip. Just an FYI for you there. I'm just going to for now take this piece and just let my
ruler hit each heart there. I know I've got the equal
amount of paper for each one. Then you can go back later
and trim these to a good size if you need to or make them even once you find
one that you like, you can go back and fix your spacing by trimming
some more if you needed to. Just going to trim
all these out. Then we are ready to go. Look how pretty
some of these are. Like, look at that. I
love that right there. Basically, what I'm
going to do for these is use my stencils. If you wanted to, we could have done like
a great big square, just like we did on our
little tester pieces. We could have been colored in our gold where we wanted it. Then, we could have
just cut that heart out of there like if we
had wanted that to be all paint and then do this part and then cut the
heart out with a stencil. We could have done that. That's
another option for you if you find it hard to
watercolor our heart. But I love that these came out so good with my
little paper stencil. Now, basically what I'm
going to do is take that stencil and do gold on top and see what we can get. One thing I want to
mention, I always do this, I've left my
paintbrush in my water overnight and I try
not to do that, but sometimes I get distracted when I'm finishing up
because I'm trying to like clean up or somebody
calls me or who knows what. I have like one of my
very favorite paint brushes that I did that too. It actually the water
went up into the wood and cracked my paintbrush
and it's not ruined. I can still use it,
but I came back that next day after
forgetting that the paintbrush was in
the water and this was all swelled and big crack
in the woods and I thought, oh crap, I didn't
mean to do that. I'm going to do is a dry brush. I'm going to try not
to leave that in my water when I leave
out of here today, I'm going to put some of my
favorite gold paste here on just a little piece of
disposable palette paper. I'm going to stencil
on all of these. What I want to do is
follow some of the color. On this, maybe I'll follow the purple if I want it to
come through the heart. Or I could follow the
green if I wanted it to have a dominant purple field when I'm done and I want
to cover up the green. I'm trying to decide
for each one of these, what is it that I want? Like do I want the
purple on this to be gold and the brown show up. This one, look how
pretty that is. This one, do I want the pink? Maybe because it's such
a fantastic vivid color, do I want that? I'm looking at this thinking. I really feel like on this one, this red, look how
beautiful that is. We have a tiny bit right there. I love this blue-green, so this is going to be pretty. Maybe on this one, I either do the Payne's gray or I come through the
center where the green is. This one, look at
this yummy color over here and the way that these
color swaths in here. This, I could either do
the brown or the magenta. This one has a really great, I love how this fires
through the center there. Love that. This one
I probably will do. This is that other magenta, this is that Amsterdam,
red-violet light. I can definitely see
the difference in the red-violet light and
the quinacridone magenta. I do like the Liquitex magenta. A tiny bit better. I like this bright color for
maybe something else, but in the heart, I thought it looked better with that magenta. Even though those
colors look the same, each company probably has
a different formulation and the colors are
coming up different. But I'm feeling like maybe
a swath of gold through that red would be really pretty and make
that interesting. Let's start with this one. No. Let's go back
to the other one. Let's go back to this one. I'm feeling a swath
of something. Do we want it to be? I really loved my punchinella. Let's go ahead and
do punchinella. Dry brush, plenty of little ink. I'm going to use the stencil
to follow the edge of the color and try my best
to not go over the edge. I certainly may go over the edge accidentally just doing my best. This too could be a
reason why you make a big square and cut the square out rather than do
it like I'm doing. Because if you're having a
really hard time keeping within your heart shape when you go back with your decoration. Then, that might be the reason to do a big piece and cut
it out. Your choice there. These are whatever ends
up working for you. Wait to you see, this just ends up so dynamic
when we get the gold on it. Look at that crap. I gold on my stencil. But look how pretty that is. See that's exactly what I want. I do want to be careful not
to have gold on the paper. But perfect scenario
if you do get it on the paper or in all the areas
that you weren't expecting, then we could still cut this out and mount it on
a piece of paper. Now, that I've done this, let's just go ahead and see
what this looks like cut out because it's easy enough to do and I will be extra careful going forward
how to do that. I hate that I got
that on that paper, but I want to show you
that if you do that, it's not ruined and
we can always fix it. Look how pretty that is. Then if you have, say, a pretty piece of deckled paper, we're ready to mount that
on its own piece of paper. Even if you mess up the edges or you get
something on there like I did on that one with the
gold that I didn't expect. It's not ruined. We can then just cut
the heart out and mount that to its
own piece of paper. Don't fret. Look another stencil. If you do that, save these, and then that can be your
stencil for the next thing, you can just tape
that back together. Now you got to stencil
for the next time. You just save your
little stencils. Let's try not to do that again. Let's see, I really love
the little swath of dots. I'm going to be real
careful not to get that over on the edge like I
just did on that last one. But if you do, you can fix it. Part of the problem is is
I'm really pushing the paint down hard and it gets
up under your stencil. Look at that. Then, as you move this around, that gold is not dry yet. It gets up under your, so that's when you
end up putting it places you didn't quite expect. Just be careful as
you're doing that, look how beautiful that is. I'm just trying to
align the dots up really so that I can continue on in the same direction if my stencil is smaller
than my piece I'm doing. Look at that, it's so
pretty, my goodness. Then you see the
shimmery over there. We'll come back up here. Try not to touch things
I shouldn't touch. Holding the stencil up over here, I'm not touching. The other stuff I've
already painted. So pretty, look at that. I could come back
through and still add a little more of
this pink area here. Just line and our dots up there. I couldn't come further. I don't want to get it all over the paper
but look at that. I'm loving that one. Set that one to the side. Let's see, on this
one I might want to do the red on this one too. Maybe let's do these
yummy diamonds. I'm going to do the red. Let's just see what we can get. Helps on your stencils if you have a couple of
stencils that you can play in so that you can maybe let the paint dry on
the whatever stencil you were working or you could go clean that
stencil off maybe. Because if you've
got wet paint on your stencil and you're
going from piece to piece, you're definitely going to get paint in areas you
did not intend. Look at that. That's pretty. You can also use your paintbrush and just paint patterns
that you like. If you find a particular
gold that you like that's not in a paint pen, don't be afraid if you're good at painting patterns
with just a brush, don't be afraid to just get in there with your brush and do it. Look at that. I think we're going to go for
that. I like that. Pretty. I really
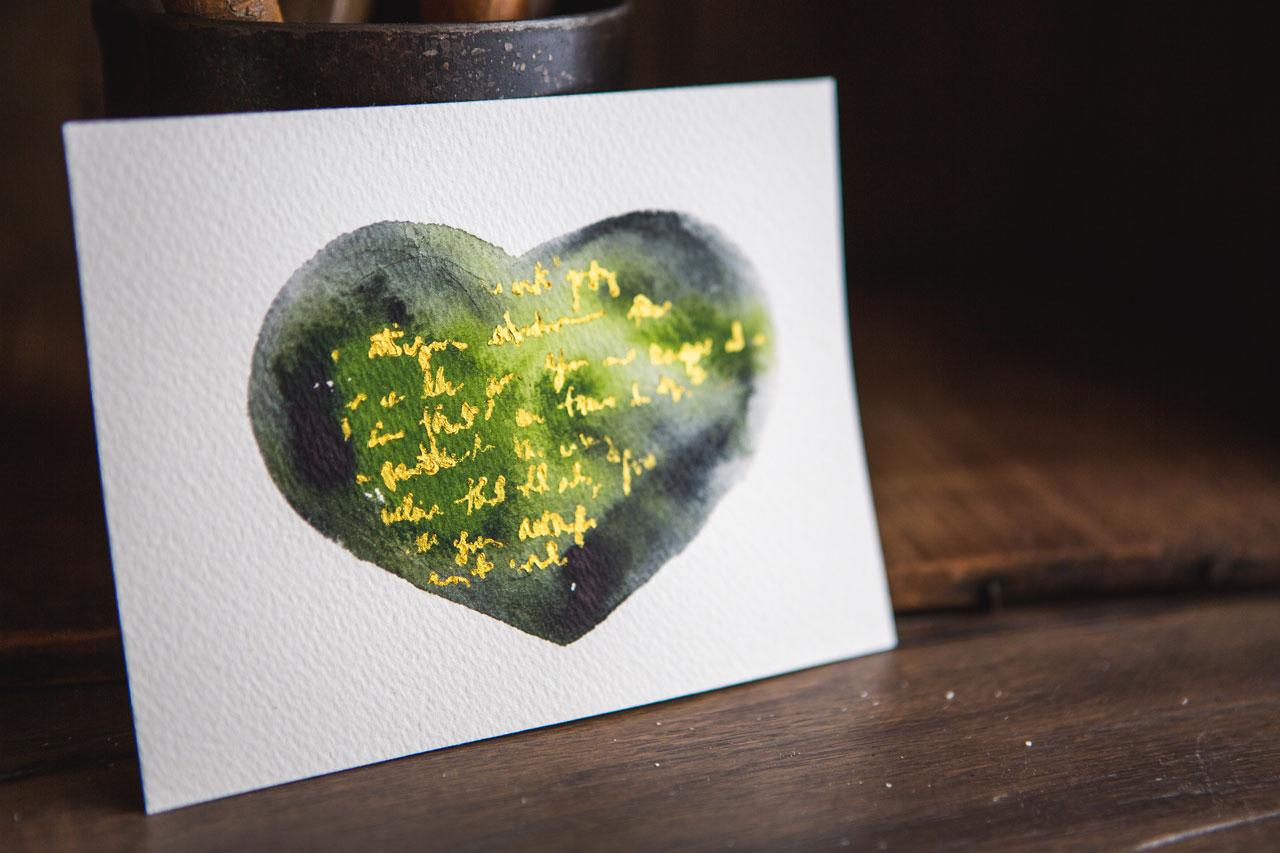
like our circles. I've got some other stencils over here too I could pull out. Let's see what else I've got. I really like this one
with writing on it. This one is called mini believed script from the
crafters' workshop. We could come through here and do some
writing across there. Let's do the writing. Filling the writing. Just make sure I got enough of this. Just as something different, it can be the writing on your heart and the
experiences in life and the mark that they've made, that's still there that
only you know about. Again, I'm just trying
to mostly follow the green before I pick this up. Hopefully, I got it everywhere I want it before I pick it up. Then we'll just see what
do we get. Let's see. Oh, look at that,
that's super fun. You can see its
shimmer in there. That was super fun. You could come back in
here and decorate with some dots or some other
shapes if you wanted, but I think that's
pretty cool right there. I'm going to just set some of these up so they're not
all touching each other. All I need is to just run them
all by stacking them. This one I really want
some more punchenella. Let's make sure there's
no color here on the back that's still wet
before we get started. There we go. I think I want
the punchenella on here. I'm going to go ahead and do the rest of
our little hearts. Then, we'll speed that
up so you don't have to sit through that, then we'll see how
they all turned out. Let's take a look at some
of our finished hearts. I particularly love the
ones with the small dots. So I must say that this
was my favorite stencil. I believe this was the
one that was the mini texturized stencil from
the crafters' workshops. Look around for little stencils, especially at the
craft store that's got a little pattern on it
that you think you'd like. Because the little bitty
punchenella pattern is my favorite, but I do like the larger
punchenella pattern too. I thought the one with
the writing turned out particularly fun
because that could be the writing on our heart. But look how fun little
tiny dot popped out. I love that. I went ahead too. Pretty. I like the
big one on there, the dots seem to be my favorite. This is that one that had some little distressing
to the circles, the stencil that did that. Script dots and it's got
some writing in it there. Remove this paint before I
paint everything with it. This one was that diamond pattern
that was super cool. This one, I went ahead and used my paint pen on
it so you can get some really cool patterns and
textures with paint pens. I'm still using the gold, but you could do any
of these projects in gold, silver, white, black. I'm using gold to represent that Japanese tradition
of filling in the cracks with gold
to make it stronger. I'm using my Japanese mica paste because that's my favorite gold, but you can use craft paint. You could use some
of the gold inks, like for calligraphy,
those would be great. There's a lot of choices there. You could use the gold that comes in the acrylic
ink for some of those, just put some of that
out on your palette. Use a dry brush to do
just like we did with this stuff. Get creative. If you've got some of these
supplies already on hand, then you don't have
to go out and buy new supplies and see
what we can create here with our hearts and
the strength and the tribulations
that we have come through and how
we have survived. That gold is going to
be the representation of filling in those cracks
hence our survival. I love that mental idea and theme that comes
along with that. I hope you enjoy this project. It's super easy. It's definitely going to give you some really
beautiful art. Then these are ready
to frame or you could put this on a card
and send that to somebody. They can be gift tags, they could be all kinds of wonderful little
surprises for people. I really love doing
this and I can't wait to see what some of your
beautiful hearts look like. I'll see you back in class.
12. Final thoughts: How fun was this project today? I mean, come on
admit it, you like making hearts just
as much as I do. Probably, going to sit
up here and make a few extra because I'm
in the heart mood. I get so excited when
I'm making a piece of art and they
end up so pretty. Then I get inspired and I love the shine that comes out
of some of these pieces. I'm like, "I think I'm
going to sit up here and enjoy this art high that I'm
on and make some more stuff." I hope you enjoyed the symbolism behind the project that I came up with today. I hope you share
that symbolism with other people when you share with them the hearts
that you created. I can't wait to see the
pieces that you make. Come back and share
some of those with me, and I'll see you next time.
 DENISE LOVE, Artist & Creative Educator