Transcripts
1. Welcome: [MUSIC] I'm inspired by
lots of different things, and some of those inspirations
come from nature. I don't know if you've ever
been to the river and seen the beautiful flat stacks of stones that somebody creates, that are a temporary beautiful tiny little
art installation. Finding just the
perfect stones and just the perfect stack so that
they stand so beautifully. Sometimes you'll see
photographers take the most wonderful
photos of the shooting towards a sunset with
those and silhouette. I've just always found
them fascinating. That's what this class
was inspired from. I'm calling it Rolling Stones, and we're going to
create some wonderful, lovely little pieces of art inspired by stacked
river stones. I'm Denise Love and I'm a photographer and artist
out of Atlanta, Georgia. I cannot wait to
show you some of the wonderful little projects
that we have in class. We're going to start off by
making ourself a super fun, a little mark-making guide
that we can then use over and over through the years to inspire us to be a
little more creative, think a little more
outside the box on the marks that we might
consider using in a piece, and to remind us that we
can just look up and say, let's try this mark this time in the piece
that we're doing. I love making this because I'm going to hang
it in my room and I liked making it pretty because
now I can put it in a little frame and stick it somewhere
here in my gallery, and be able to very
easily look up at it and be inspired
when I'm creating. So we'll start off with a
little mark-making project. I love doing that. Then we'll get into the different
a little projects. We'll work with some watercolor on paper or different paints, whatever inspires you and some mark-making and
create stone pieces. We'll also create some pieces where we cut up some
pieces that we painted or we cut up scrap pieces of old paintings and things
that we've got leftover, which is some of my favorite types of art
to make where I make big pieces of art and
then I cut them out and then I've got leftovers
and then you're thinking, what do you do with
these leftovers? This is one of the projects that I like to do with the leftovers. We'll experiment with lots of
different little colorways. I've got lots of fun examples and pieces
that I've done for myself that I think are really
going to inspire you to create some beautiful
rock art for yourself. So I'm really excited
to have you in class. I can't wait to see
what you're creating. So let's get to it. [MUSIC]
2. Class Project: [MUSIC] Your project today is
a little bit twofold. I want to see what
mark-making you came up with as part of your
little mark-making project. If you put it together in a
fun little format like this, I'd really love to see
it because I want to be inspired by the things
that you thought up to. Then your other assignment is to do one of the projects in class, whichever technique that
you ended up really loving. Come back and show
us what you created. I'd love to see all of them
if you create a bunch, [LAUGHTER] but at the minimum, come back and show me one. I want to see these. I find them so delightful. They just make you happy to look at them and I want to see
what you came up with. I can't wait to
see those projects and I'll see you back in class. [MUSIC]
3. Supplies: [MUSIC] Let's take a look at the supplies that
I'll be using in class, and I encourage you
to use what you have and to pick what you
want to use in class, because this is some project that you can truly use
anything you've got. Some of my very favorite
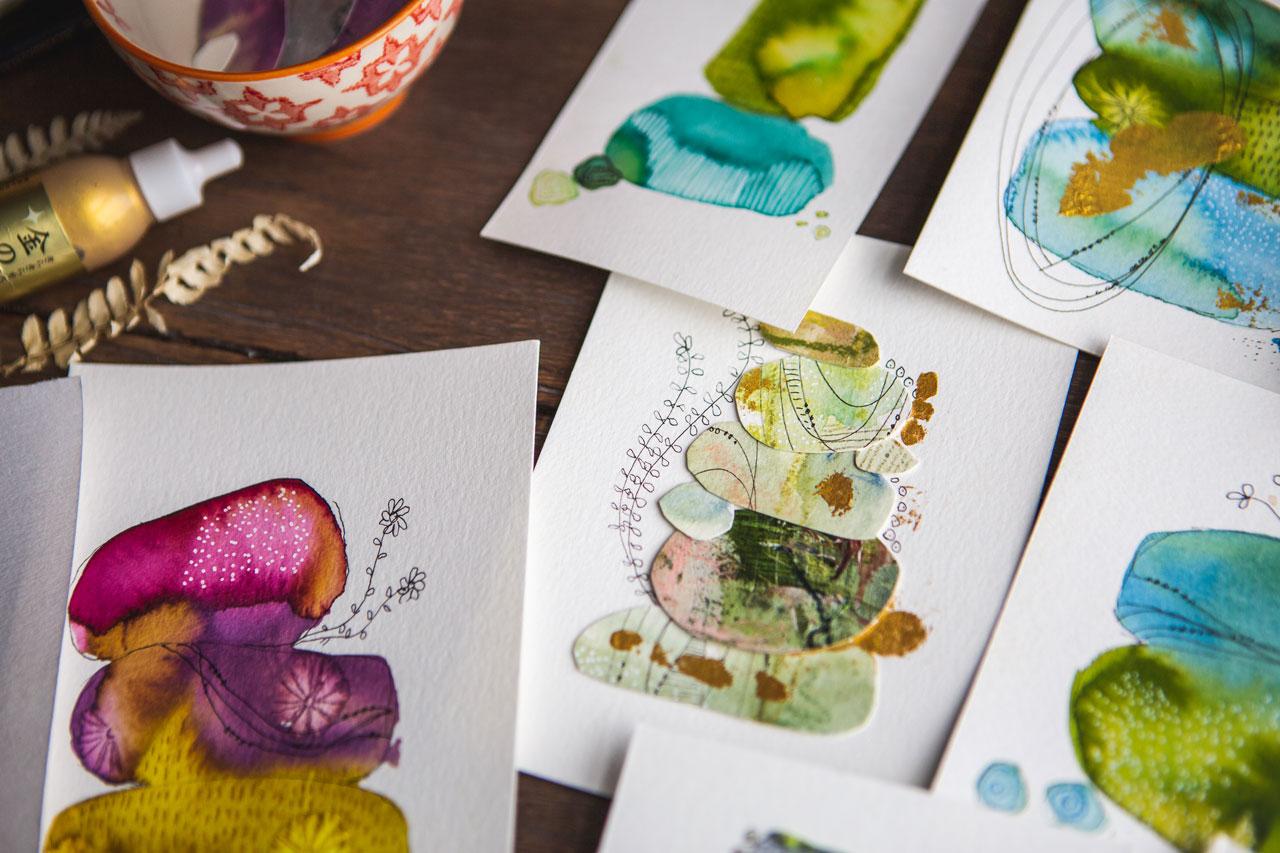
pieces are ones that I use collage material with. This is some pieces that I have done for myself
way before class, so I'll be doing other pieces inspired by the ones
that I've created. But some of my very favorite
ones are the ones where I use cut up pieces of
art to create these. They have the most detail and
the most fun little marks, and they have definition of different stones in a way that the solid watercolor wants, for me don't, and from my own
personal preference, I do like doing the
cut-up pieces the best. We'll actually be doing a
couple of different projects on the cut-up pieces because I've done those a couple
of different ways. One of the ways is using old collage material from other pieces of art that
I've created and cut up. That's a technique that
I love to use a lot. I will then cut pieces out of these pieces I've saved from the past art
projects I've done, and create yummy
delicious little stones with the most wonderful detail
and color out of those. I want you to collect all your old art
that you don't love, that you're willing to cut up, or if you've done some
of the abstract projects where you might get
a big piece and you cut little pieces out of it, these are leftover
scraps of those. Those are the best, the best. It makes me even more excited
to do some more of that because I use those things
for all good stuff. [LAUGHTER] This is like a
collage project but it's not, the abstract collage
we're making some rolling stones with
ours, but super fun. I'm going to do a couple of different cut-up projects here to show you the
different ways that I've done those and really enjoy. Collect all your
collage materials, that's going to be a
really fun project. I like to glue the
collage stuff down with Yes paste, it's acid free. You could use glue sticks, you could use whatever
glue that you want to use. I like have an acid free because then it's going to
be more archival, and it's going to stay really
nice for a peace throughout time once we frame these
in hang-up because I loved framework hanging
up in little gallery, settings in my own house, and then you can of course, give these away as
gifts and sell them because they're
just so delightful. I like Yes paste. You can use glue sticks, you could use a liquid glue. Some of these are too
thick for matte medium, but if you've got the
thicker matte medium, that could be a
good glue for you. Just decide what glues
that you're interested in. I also have some water and a watercolor brush because I will be doing some
painting and one of the projects will be doing
some painting and gather up whatever paint material that you would like to
experiment with, but I absolutely love
experimenting with my supplies, and finding stuff that maybe I wouldn't
have normally used. I get the monthly
art box subscription that I turn off internal
and depending on, [LAUGHTER] how many art supplies I have that I haven't used. But in that sketch box, I got one month these perilous
transparent watercolors, which is watercolor on paper, That's really vibrant and you just get that wet
with the brush, and that is putting watercolor on your
brush to paint with. These have just
turned out fabulous. I have the big set and then the smaller
bonus set of colors. I love these colors in
this little bonus sets. I'll probably be playing
with those in class today. These do get on your fingers
when you're using them. You have to be really careful about touching pieces of art after you have those all over your fingers because that
will smear on your paper, but I'll try to be careful here. What I really like about these, is the vibrancy of the color. There's so much more vibrant than just a standard watercolor. Just to give you an example of a piece that I've
done in the past, they're just so
vibrant and yummy, versus this one that
I had done with like a Daniel Smith watercolor and a transparent
metallic watercolor. You can see the
difference in how much more vivid these are. I've also done them softer. This is another one I've
done with those same colors. It doesn't have
to be as vibrant, but they really are like
super exciting to me. I wanted to just introduce
them to you and show you just another art supply
that you might consider. These go a long way. I know this little
piece of paper you're thinking,
there's not much paint. But I have done tons
of projects on these, and you can see they've got like a little
spot where I may be I hide some water on there and then I just keep using them. You do have to like set
these out and let them dry, you can't just put water
on it and then stack them. That's like I'll have
paper all over my desk, [LAUGHTER] the different
colors that I've experimented with, but they do go a long way. I've really enjoyed
playing with these. If you've never heard
of these or you've come across them in art store and
you think, what is that? These are super fun, but
they are just watercolors. If you don't have
these or access to them or you don't
want to check them out, then just use your regular
watercolor that you have or your acrylic paint
or whatever it is that you're wanting
to experiment with. You could use your
water-soluble crayons and use those as watercolors like I
did in one of the classes. This is a leftover
piece of art from that. See how pretty those
are. I love that. When you make the water
soluble crayons wet, they give you a different look. [LAUGHTER] Definitely play
with supplies you have, but I wanted to introduce you to these fun peerless watercolors. I've also got my Derwent
Inktense pencils over here. They are also water soluble. I love those because they're
more intense in color. Because I was thinking
intense watercolor, I wanted to do
Inktense pencils and mark-making and fun
stuff to go with it. I do play with these a
little bit in class just to show you some fun things
that you could do pencils, but you can use whatever
pencil or colored pencils, watercolor pencil, anything, neo-color crayons, you
could use any of those in the same fashion as I use
these for this class. Then I've also got just a
couple of mark making tools, I like the Micron
Pigma black pens, this one happens to
be the one size. I also liked the O5 size. I'm going to have to
dig through my box of pens and find the larger one, but this is fun and I've used
this quite a bit recently. I also have a Faber
Castell walnut brown, Pitt Artist Pen, and this is a brush rather
than just a little tip. That's fun getting little
different marks with those. I also loved my posca pens, and so I've got a gold one and a white one out
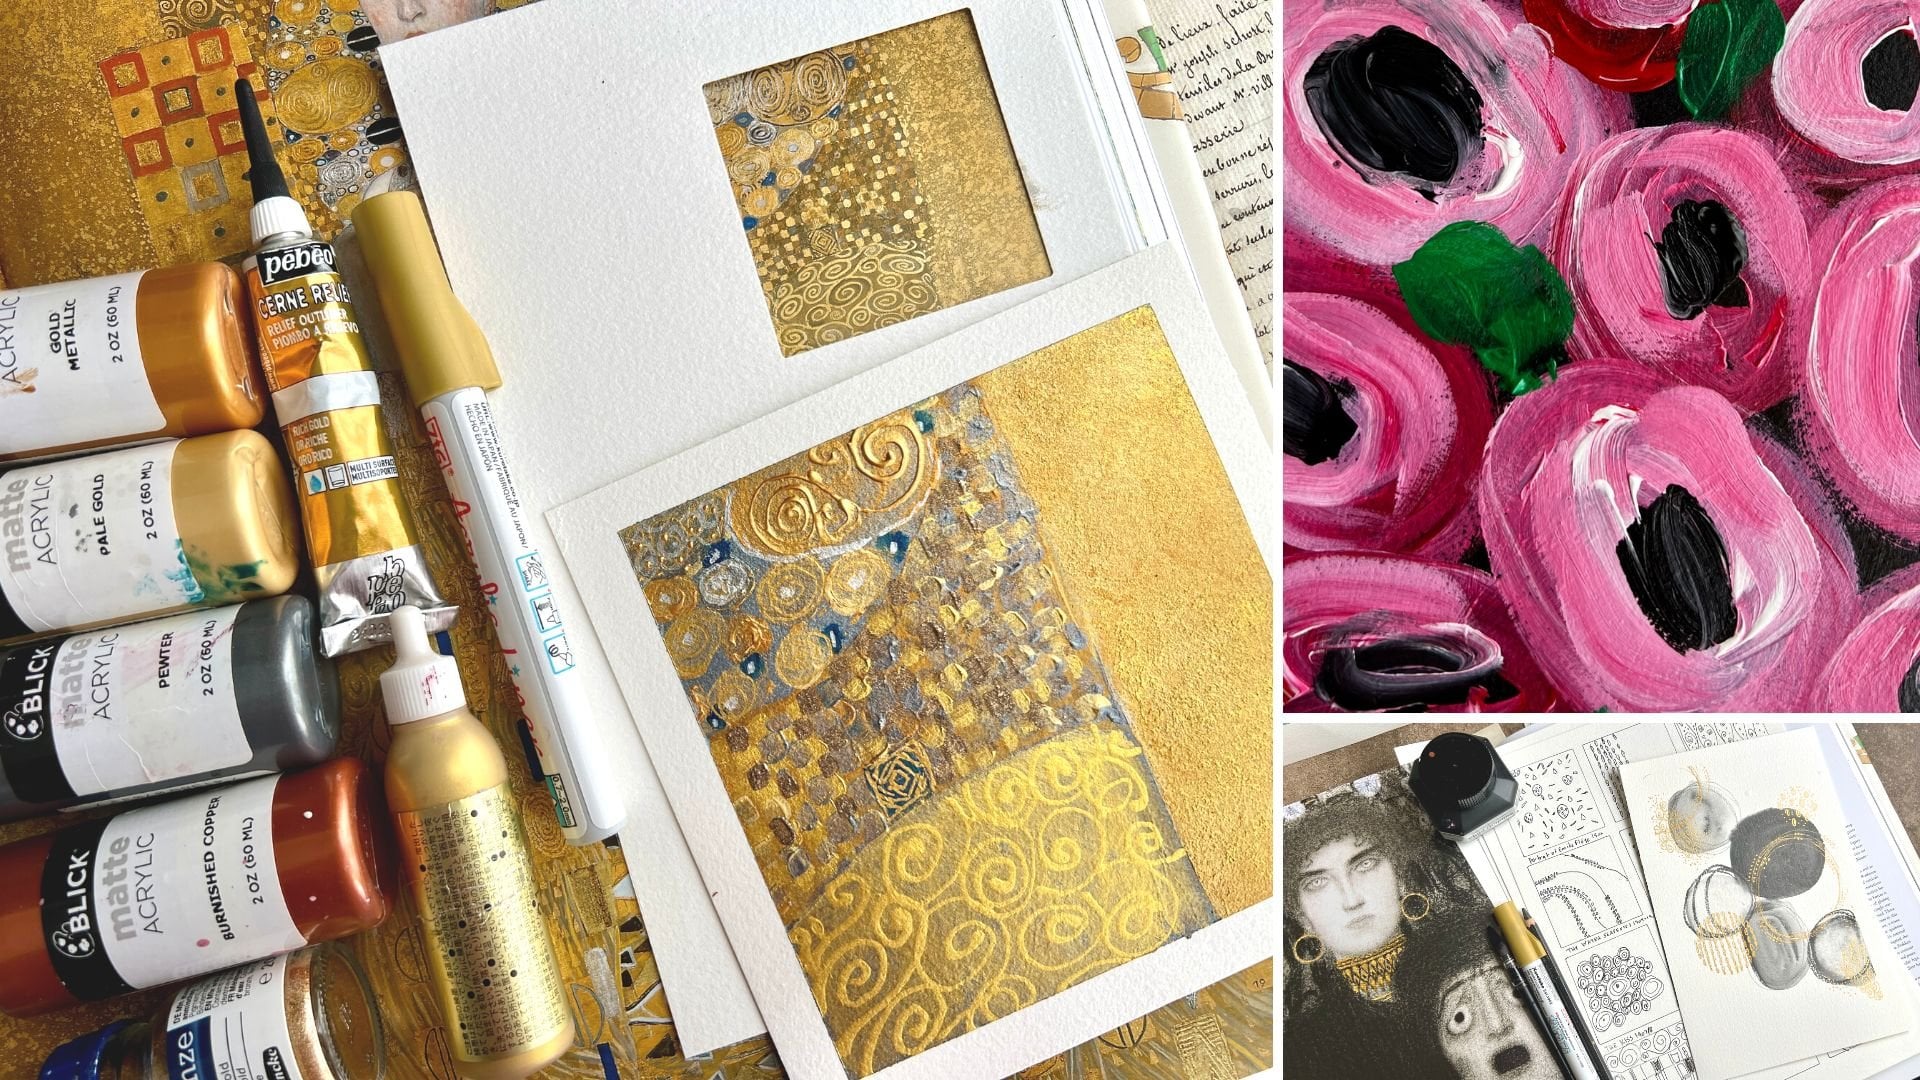
here to play with. We'll see what we get. I also like my gold paste, so I'm using my little
fun thing of gold paste because it's so
beautifully shiny in the pieces that I do that it's just my very
favorite art supply, and I did a discussion on my
main profile page on what this art supply is for my
favorite art supplies, and I found this at ****
Blick and on Amazon. You can check that out. I think that's going to be
the most of the supplies you can make these on any type
of paper that you'd like. I like it to be at
least a 140 pound, or the 110 pound. Watercolor paper I've been
using cold press paper myself, playing in these before I dived into projects that I was
going to make for class. They're really fun. I
do like the paper to be a nice enough
watercolor weight that it's not going to warp
on the ones that we might do as pure watercolor. Any cold press watercolor
paper is fine. I've been using the Canson because I got a great
big pad of it and just cutting out the sizes
that I wanted off of the big sheet of it. I encourage you on this project, use any supplies that you have. We're going to experiment
with mark-making and watercolor in
different materials for our nice little
mixed media pieces, but you can see how
this really lends itself to anything that you'd
love to experiment with. If you play with the
peerless colors, I'd love to see
your projects that you do because I
love how vibrant, beautiful those colors turnout. Hope you're excited to make some rolling stone
art with me today, so let's get started. [MUSIC].
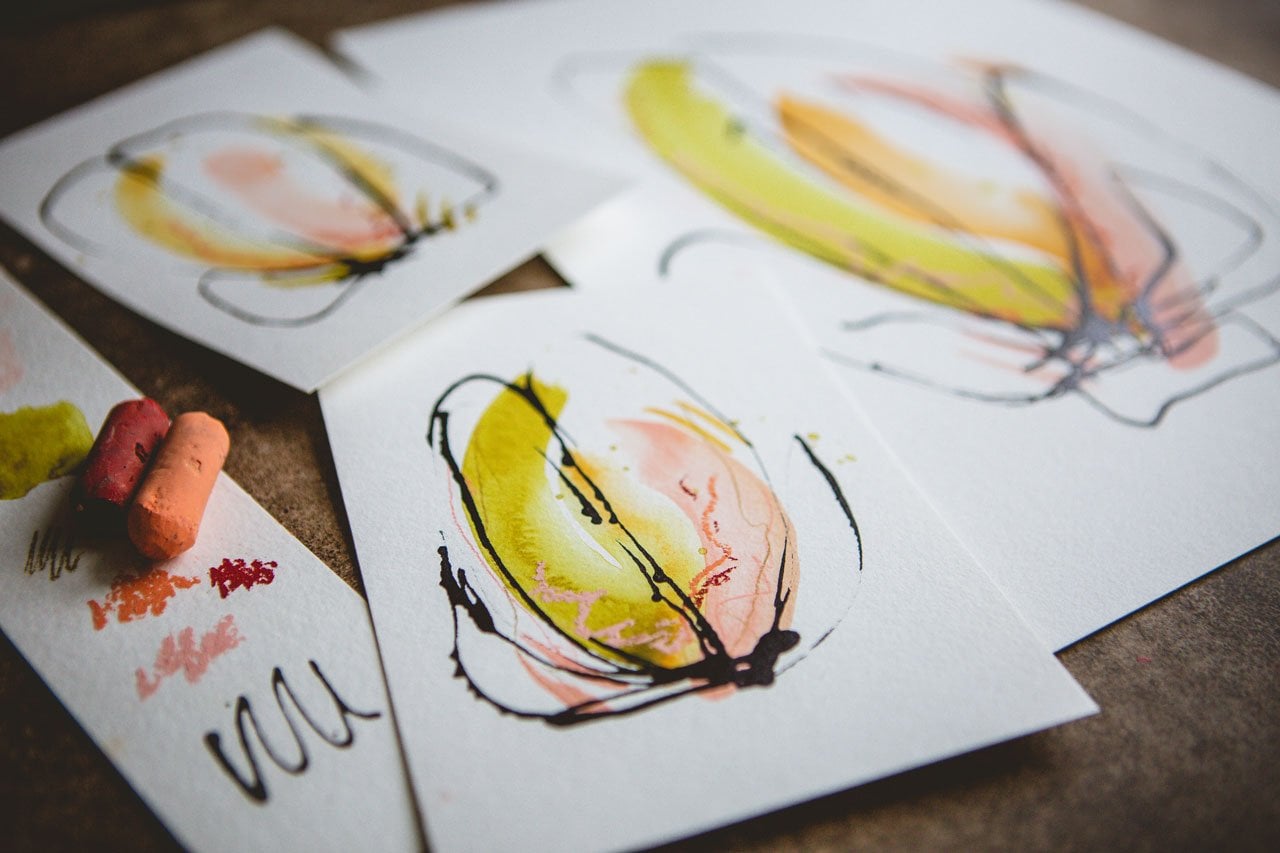
4. Mark-Making Project: Before I get started
with our projects, I thought it would be
fun to come up with our own little
mark-making guide. I used to have a little
one that I had up on my studio wall
behind me here. But I read that
wall and I hung up framed pieces of art
from different classes. I've hid my little cheat sheet for different mark
making things from myself. I don't know where it
got too and I pulled everything down to rearrange and I thought this would
be the perfect time just to make myself a new little mark-making idea guide
and start fresh. I thought, why not make
it fun and pretty? Just see what we
can come up with so that we have a guide
to look at so that when we make some of these
pretty little art pieces, were not thinking, I
can't think of a mark or I can't think of an
interesting thing to do in this blank
space of whatever it is that we're creating in class. I just want to start
off with these. I've got some
watercolor paper that I have just divided up
into like a little grid. Then I thought I was going
to just do a big grid. Then I thought,
well that's no fun. Then I thought, let me make little
grids and use one of my paper cutters to
cut out a fun shape. I have this viscous cutter. That makes this
really fun shape. This is what the piece looks
like when it cuts it out. I thought I need to use that and create my own little
mark-making page. What I did was just thought up two dozen different marks and
dots and lines and shapes. Then cut little piece
out of the center of that to put on my big sheet
over here that I'm creating. I've got one more here
that I messed up on, but then I thought, does that really matter? Let me just go ahead
and finish this out. I'm basically putting
a little triangles on this piece of paper. I'm going to cut a little center out of here because
triangles are fun. Interesting marks to make. These don't have to be perfect. They can be messed
up in the middle. It's just something
to give yourself an idea that you can
glance at and say, oh, I love these vines or oh, I love these triangles or oh, I love these lines
and to give yourself some mark-making ideas as we're creating our
rolling stones. When you sit down to your table, you you know how many
times I've sat at my table and then
my mind goes blank. Then I'm like, oh, what
do I want to create? I don't know, It's not
working out for me. I'm feeling discouraged. I'm just going to not create anything because now
I'm overwhelmed. I find if you have things like this guide of some
of your favorite marks, I mean my favorite marks. I love dots, I love
lines, I love scribble. I don't necessarily think to do shapes like this shape
I'm doing right now, but maybe if I had it
here in my idea guide, maybe I would use this shape because I don't know what
it is about sitting at your art table to create some great masterpiece
that your mind goes blank. Especially if you're
looking at a white page. Some of these little
techniques and secrets or how I get past
white page paralysis. That's what I call it. A
lot of times getting me past white page
paralysis could just be scribbling on the page
for my first layer. Just scribble and mess up that white page and then
see what can I create. Let me just go ahead and finish out these
little triangles. We will create our little page. These are not stuck down, I was just experimenting, thinking what do I want
this to look like. I was moving these
around and see some of these are really light
and some are really dark. It's fun to move them around to where you
want them and then I'm going to glue them down
to the page and then you could frame that and
hang it. It's so pretty. You could have a different
color background. You could paint the
background and glue these little squares on top of the random background
you painted. Now, that I've thought of
that it's such a great idea. Why didn't I think
of that before? But nothing's glued down yet, so we're not locked into
anything currently. But we could do a whole messy
background with paint and pencil and marks and whatever
and then glue these on top. How beautiful that be. Not ruling that out. We'll give it a moment to percolate there while I'm
drawing these triangles. I'm not good with patterns that require
thought while I'm talking because then the pattern then end up like
it's supposed to. I do the triangle the wrong
direction, but that's okay. This is just our idea guide. Doesn't have to be perfect
unless you want to make it perfect because
you're going to frame it and enjoy it forever. Some of the most
interesting art are some of the experiments
like this that we do. Let's say you get it all in
there the way you want it. What I love about
this is then you can just cut that piece right out. Lookup on that was
and now we have our little random triangle
piece that we created. What I thought I would do, which I could still
paint the back of this. Wouldn't that be fun. But I think for the moment, I'm going to go ahead and attach these on my paper just
randomly like a habit. I can scoot these around until I get a
layout that I like. I can switch out dark and light pieces to make it like a more pleasing flow. You can get pretty
creative with this. As it's just your
little sample piece that we're creating
for ourselves. That's so pretty right there. Look how pretty that is. Then I'm just going to take a little bit of yes
pace when I get them where I want them
and glue each piece down. This would be the perfect
project for a glue stick. The glue sticks I have though, I don't know that
they're very sturdy. Then just glue each piece down. You could leave enough room to write more making guide
above if you wanted. Could do all stuff with
a project like this. I'm not even worried about if all of these are
perfectly placed. I just want something that I can then tack up and refer
to and enjoy for years. Once I make one of these, I'm using this thing
for a long time. Just to give you an idea of different things
that you could put in your little box to come up with your mark making things. I have done triangles
with a big heavy pen. I've done with a
lighter weight pin, some botanicals,
I've done some dots, some squiggly lines, some very heavy lines
with a thicker pen. I've done heavy lines
that I purposely smudged. That was fun actually, smudged one and then I thought, oh, I like that smudge. I've done scribble, so to remind myself, loosen up and scribble. I've done little
boxes of hash marks, one-way hash marks in other
way hash marks in other way. I've done little squares, I have done dots, I love dots. I've done really
light lines that vary in the pattern and
the way that it did. I've done some very heavy dots. I've done some dashes, the little dashes are one of
my own favorite go-to marks, where it's just like a
series of lines there. Even though I do a lot of these quite
frequently in my art, as you're sitting to create, you might just not remember what some of your favorite marks are like I don't know how to. You might be thinking, I'm
never going to forget, but sometimes you do. Then these are just
some little v's. You might pick a letter
that you like, a v, a w. These are little rainbows or little use whichever
way you want to do those. That's fun or you could
do it side-to-side. A nice random recognizable
shape is fun. Little circles, that's fun. I'm just giving you some ideas of different marks
that you might make. Then we have it put together
in a guide here that we can refer to for our art. These are just lines
hashed back and forth. This our triangle one
that I just made. Got some little daisies
that I drew out. That's a fun little shape. Also got like almost
like a gingham look. Heavy lines crossing
each other just like a whole series
drawn this way, whole series drawn that way. Also got some little
raindrops, that's fun. You can do all these in a
square grid if you don't want to go to the trouble of making this little sheet like this, but I just love it. This is like a brick wall. That's fun. Just some lines
that's nice and easy. Then I really love lines. I think I got them all. Let's take a look at these
lines with dots in them. I love those heavy dots. If we just take a look here at some of the ideas
that I came up with. I will photograph this
and put it over as a PDF for you to download
on the projects page so that you can enjoy make use of all of the ideas
that I thought up. Then you can create some more of your own that
you could think of. It really does help to have a sheet like this to
refer to that's hanging in your art room
or maybe sitting somewhere where you can
see it quite regularly. Because then you
could think, oh, I like dots or, oh, I love the botanical
or, oh yeah, let me do some of
these lines, oh, I really loved the ones with
the lines and the dots. It reminds you of some of
your favorites or to step outside the box and do something that you wouldn't have
thought of otherwise. This as a little first project. I thought it would be really fun because I was going to go ahead and just make one for
myself and set it back here. That when I'm making
my rolling stones, I'd have something to look
at without having to stop the tape and think
what I want to do here and then start
recording again. I thought, what if I'm going
to make this for myself? I might as well make
it for all of us. Then hopefully inspire you to create one of
these for yourself. I did it all in black
because I thought, well that's going to be
fun to see which pins are still working and to
experiment with line weight, which I've haven't
done in a long time. You can certainly
do these in color. I almost got out my
pastels and I was going to do some
marks with pastels. But then I reminded
myself that I don't normally finish those with
finishing spray often enough. I'd probably smear
my wonderful design before I ever got to use it. So I was trying to
use things that didn't smear that I can then maybe frame up and
look at it over and over. Here is our mark-making guide, McCall on our project because I did turn it into a project. I hope you find that
these little marks and this little guide is useful when we get to our rolling
stone projects. I'll see you back in class.
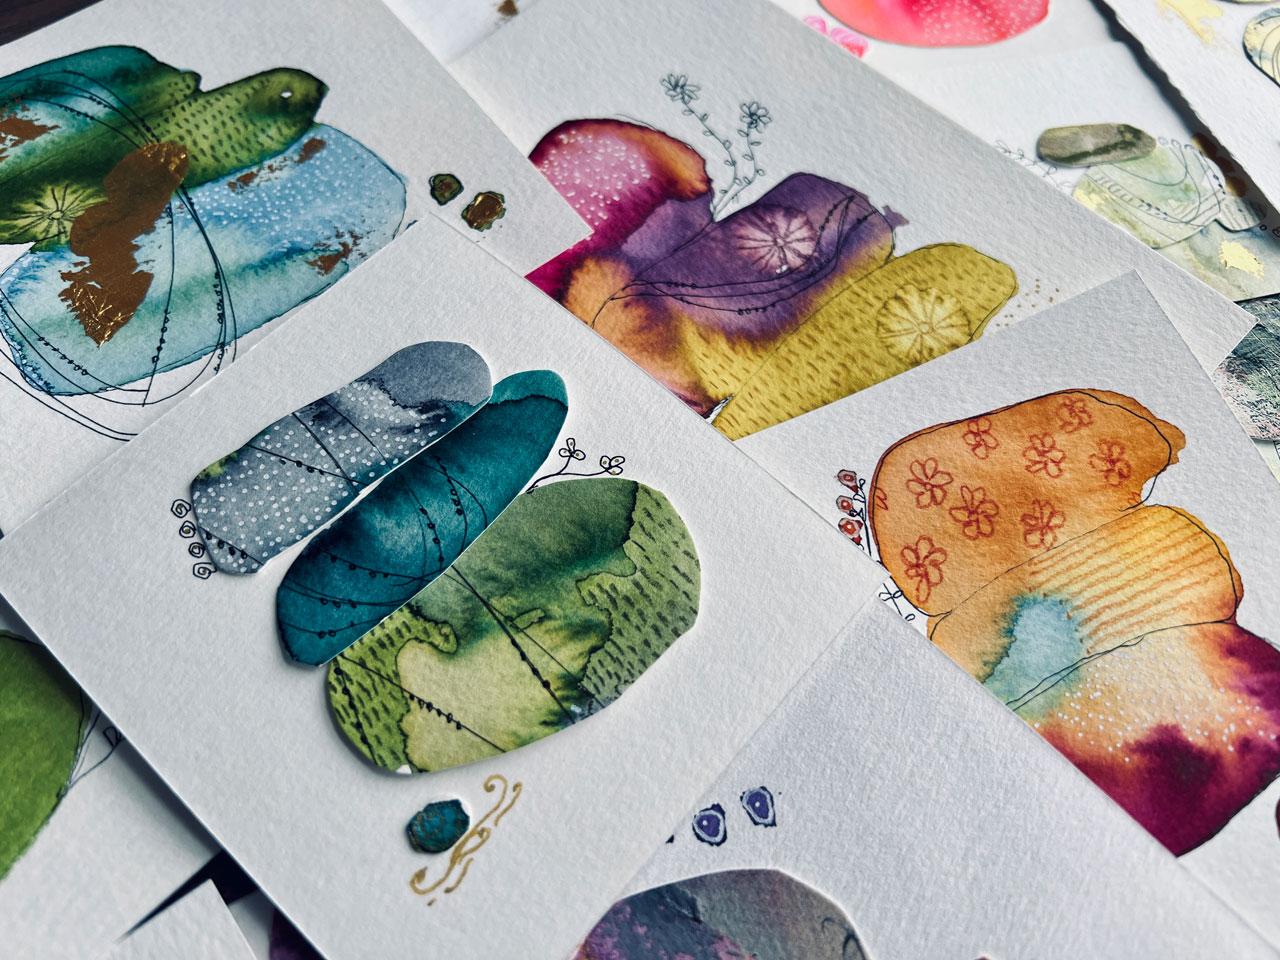
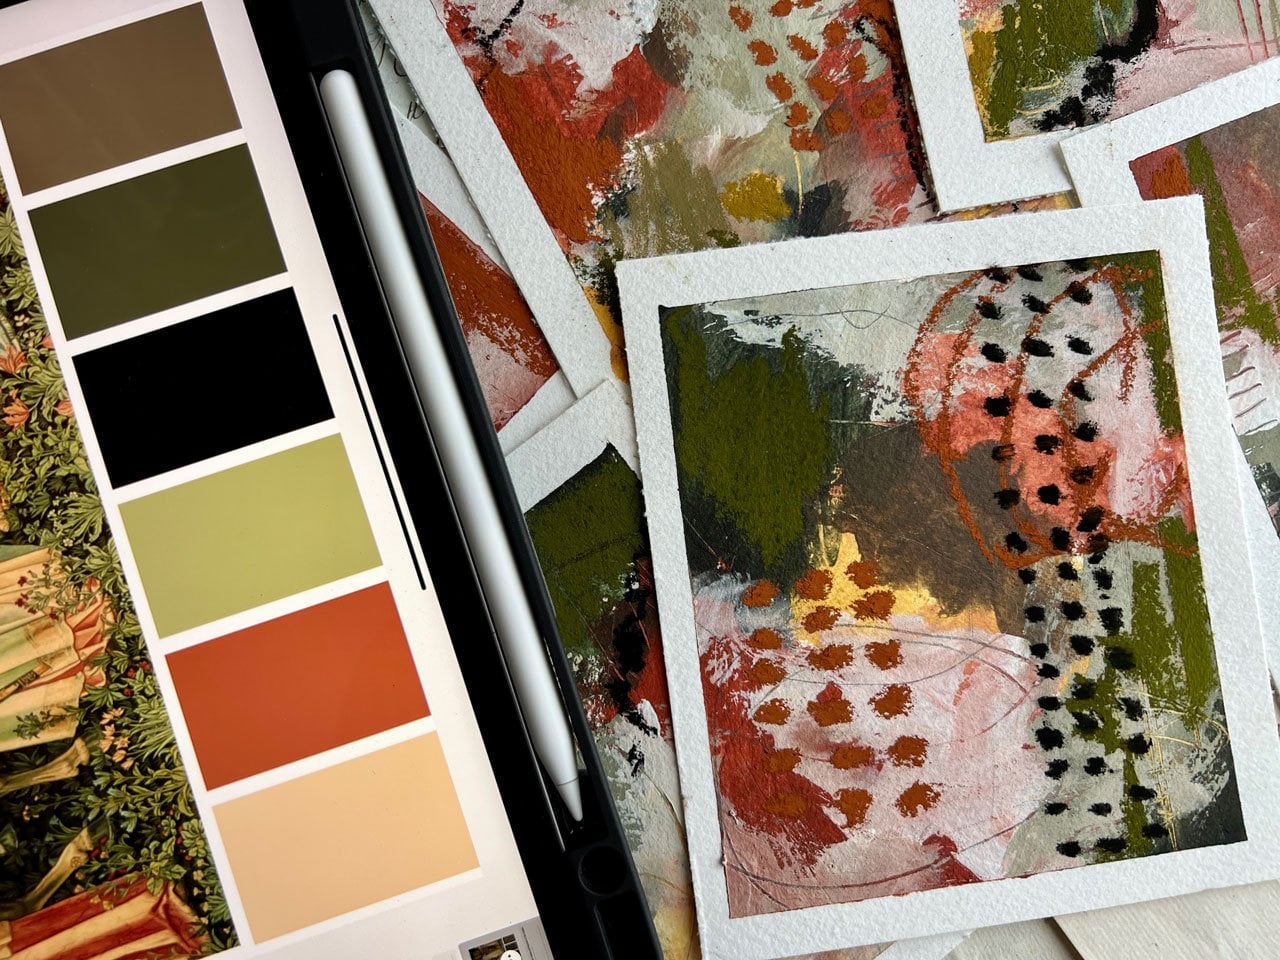
5. Experimenting With Color: I want to start off our project. This is actually
could technically be project one and two because I do this in two different ways with the same
technique basically. These are some projects
that I've done in the past where I
just paint right on the paper and create my
stones and let them dry and then come back and do fun mark-making and such
in it and around it. But I also make fun little stones just like this and then go ahead
and cut them out, and I will tell
you that actually, these are my more
favorite pieces to do because I like the definition
of each stone that the cut gives the stones
and so I actually start both of these
techniques in the same way. We'll call this project
1 and project 2. I've got all these fun, little peerless watercolors
over here to play with. The big one is the
complete edition, so it's got lots
of colors in here. The thing about these
is if I use a color, I can't just shut it
because then this paper's wet so I actually needed to cut these out of here somehow. You can see some of
these I've used. This go a very long way. You get a little bit of an idea of what the color
is on the back, but not exactly, but it's close. I like this green a lot. Look at that, it's bright. It tells you a little bit about the colors in the transparent. This is a fun set. I also have the bonus set
which I'm going to use because these are lots of little
squares that I can say, oh, let's try this,
and let's try this, and I can then see
the little colors. That's why I think
I need to just cut these out of this book, which I might do if we see a color in here that
we want to use, like, look at this
yummy pearl gray. That's really pretty
with stereo violet. Look how crazy that
looks versus the color. I might do that, but what
I'm going to do is I've got just some 140 pound cold
press watercolor paper. I'm just going to eyeball it and tear the paper into
strips that I can then paint. You got to be real careful with these watercolors if
you go this route. If you don't go this
route and you just use whatever
watercolors you've got, that's fine too, do the project, however,
it inspires you. These get on your fingers
as you touch them, and then you touch your
paper and you get this on your paper so that
is a drawback to it, so I do keep a little
microfiber cloth over here to rub my fingers on and I have some baby wipes if I feel like my fingers
get too dirty. I feel like I've already made this whole piece of paper dirty, so what I'm going to do
is go wash my hands. I'm going to cut my paper up
just like I'm doing here. I'm just going to tear it and
then tear this in half and just have some
different sized papers to paint on and
I'll be right back. Now I got a whole bunch of just random size pieces of paper that I cut
the bigger piece into. I can make a whole bunch of
these in different sizes. This is a really fun
way to color swatch, and then once you've got the colors you think
you want to go with, see how they blend and
how they work and how these different materials
blend and work together. I'm thinking I want to do
something with some reds and oranges so let's just go
ahead and start painting. I'm going to do a bunch
of these and then we're going to use these
in different ways. Then the reason I
like to do a bunch, because then if we get
something we don't like, we can very easily just throw it to the side and use it for one of
our cutout pieces. I really like yellow ocher. I want to do a yellow ocher. I did one a while back
that was yellow ocher and some red and I was
like, oh my goodness, I love the way these blended, and so in my mind, I want to do that again
but I'm not seeing it. There it is. Look how
pretty that color is , I like the ocher. I want to do ocher and a red, so I'm just putting
my brush in my water, smearing it around this
highly pigmented watercolor and I'm going to make things that look like a stone because we're calling
this rolling stones. If you want your stones to be individual separated stones, then you need to stop
in between each color. If you want your stones to have colors that
bleed a little bit, then you can go straight
from one color to the next. I want this, let's
try the scarlet. That's a weird color in it. Exactly why we do stuff like this so we can
figure out what these are. This is chrome orange. Then once I get the
colors on there, I actually want these to do some fun blooming
and separating, so I'm going to go back in
and dab water on parts of it, and then if I think
I don't like that, we'll just see what
we end up with later and we might love
it you just never know. Once these dry, they look completely different. I could come back in here
and dip some color in. If I thought, oh, I'd like to see a little bit
of this over here, we can dip color in. Then let's say that's done for this one and
we're going to set it to the side we have
to let these dry. I would encourage you with the watercolor no matter
what brand you're using, if you're trying these
out or if you're trying out your own, set them to the sun, let them dry for
hours or overnight. Don't beat tempted
to heat gun these because really it's like you didn't let the
watercolor do its thing. Let's just move on
to some other ones. I want some pink and
orange and stuff so let's just see. Look at that color. I'm just drawing,
this is azure in red. I'm just going to
draw lots of stone looking shapes and we may end
up with some that we like, like you could do tall stones. We can come back in here and
draw some little stones, and on the side, and don't worry if you
don't love it at this point because we can cut these
up if we don't love them. A lot of these I've done and
I thought, that's terrible. Then I've set to the side and I let them dry and I'll come
back and thought, oh, that's not so bad at all. I want a blue and green. That's not the green I want. Let's just see. There's
a mountain green. This is how you get it all over your fingers too
because you have to touch them and it's
so highly pigmented. That's the color I
want right there. That's olive green. I've decided that's one
of my favorite colors. Then there's a real pretty
blue that I like, also. Mountain green is pretty. Not the one I was
thinking though. There's a real pretty
blue that from the backside really draws
me towards that green. This one right here, Alice
blue and olive green, look how pretty those are. So let's go ahead and do
something with these. You got to be careful with what you've got on your fingers when you
go to touch your paper, but I can already tell
that this olive green, when I use all of it, that's going to be a sad day. We've got a bigger paper here so I'm going to do
just bigger stone shapes. I'm just going to do
some round shapes and we can come off
here to the side. We could do some little
stones off to the side down here. Be creative. I'm thinking of river rocks almost that you see at the river and there's
these flat stones stacked on top of each
other and you see these wonderful photos
that people take of those at the sunset with
the stack of stones, that's what I'm thinking here. That one's probably not
going to be my favorite, but we'll see because once
we cut some of these out, I think I'm going
to do another with the blue and the green. When we cut some of these out, we can totally
change what we did. Just going to stack these. You could do some
fat, some skinny, some big, some small. Get real creative here in
how you're doing these. Touch some water in. Don't be afraid to
let the colors touch. When you're thinking, what
colors do you want to use? If you don't know what
colors you want to use, think of colors in
the color wheel. I'm using blue-green, so those
are complimentary colors. You could also think opposites. We could do orange and blue, or I also like pinks
and reds together, which are colors that
sit next to each other. Get out your color wheel to
on some of these and think, what can I do to make
these colors more exciting if you're not getting what you're thinking
you should be getting. Then dip some water in there and see how you can get those
colors to move and balloon. Then set it to the
side and don't touch it again until they're
completely dry. Let's try this rose red see what color that is.
Look at that color. Now I want this with an
orange, look that daffodil, yellow is a yellow.
How about this one? This one is cadmium yellow. That's not quite the
orange I had in my mind, but let's just go with it. This is scarlet lake. This is why I like
doing small pieces like this as like
little color samples almost because scarlet
lake or it's nothing like that color that
just got on there. I'm also, while I'm doing it, making a few extra marks too, which are fun because
we might use those as little bitty rocks
sitting outside our piece if this is
something that I cut up. We could just come in here with a totally different
color and dip it in and see what that does to our overall piece
when we're finished. I love doing stuff like this. I just could color sample all
day on a project like this. This is how you're
going to figure out what your colors do. Here's a turquoise. This is blueberry wing blue, blueberry butterfly wing blue. Look at that color. This is how you figure
out what your colors do. I like doing it in this format. Let's go with this Myrtle green. Because I'm going to
end up with stuff that I might think I
don't like that color and then I can set that
to the side and not use it again. Let's try this golden yellow, since this one is apparently
going to be crazy anyway. Again, just drawing
stone shapes. I just want to see, and if you got any
dots out here, you might come back and
add some more dots. We might or might not keep those if we cut this up. I'm just setting all
these to the side. I would normally throw
them on the floor or behind me to give myself a whole bunch
more room to work. It's hard to do that when
you're tethered to a camera. Turquoise blue. Look at this, this is neutral tint.
That might be fun. Let's try a neutrally one. Oh, yeah, this is
like a Payne's gray. Again, just doing some
fun stone shapes. I love this olive green. Let's do that. Come back in here
with this blue. Now I can't read the color, but it's that pretty blue
that I like so much. You can just tap
that color on there. We've got some mountain green. Let's see what this color is. Mountain green, look
how pretty that is. That is pretty, that's even prettier
than I expected. It's a little turquoisey. Some of these I'm thinking, the composition is
not what I'm wanting, but in my mind I'm
thinking it doesn't matter because I like
to cut these up anyway. If you're getting splotches like this and you're thinking
there's no composition here, like here, is there
a composition there? Maybe not. But in the end when we're
cutting our little stones out, we can create our little
composition and create something into the piece that we want, when we're finishing. We don't have to have a
composition right up front here, but I will say, when you go back with
you mark making, that'll dramatically change what the entire piece looks like, so don't get discouraged. And you want to
look at it today, because what you're
getting tomorrow. That is hiliotrope
and yellow ogre. But look at that color. That just made me excited, now I'm hesitant to put
another color on it. But I almost want. a redish. Look how this is blending in, that little bit of blue
that we dipped in, pretty. I liked the mountain green. I don't know, maybe we'll
just do, that one is pretty. This is Rose red. That is pretty, let's
put that there on that side there, pretty. Then what was this yellow? That was this one
wasn't it? Yeah, it was the yellow ogre. We might come back in and just tap some of that ogre around, and see, what are
we going to get? Because the goal really, for me, is not a perfect
lay of water color. The goal here for me is
color that's blooming and giving me some excitement and merging in with
some other colors. Look at this one, I hope when it's dry, I love it as much
as I do right now. The problem for me is, this is when I'm doing
my photography too, is I'm looking at the back of the
camera thinking, I'm going to love this, It's the best photo ever, and then I'll see
some other ones, and then I'm like, "This is terrible, I'm going to hate it." When I get to the computer, it's the exact opposite. Let's try this peacock blue on. Let's do this chrome orange. The colors I ended up
loving, the compositions, and the pieces that I
thought were going to be my very favorite like maybe
that one that we just saw, when they dry I'm like. Same thing with the pictures, when I get them on the computer, and I'm looking at the pictures, the one's that I thought were
going to be my favorite, are never my favorite. Little oval shapes there, don't think I'm going
to like that one, but we'll see. I'm doing as many
as these as I can, and you can be a lot more exacting with your color
than I'm being right now. Look at that great color, this is point center red. This is my time to
play and experiment and just see what I get, and if I end up with
something that I really love. Look at that color.
That's rose red. Then I can come
back and get more serious with what
I have going on, what I want to accomplish with pieces that I'm doing for real, that I'm serious about. That's a yellow. I really
want a good orange, That's a yellow.
6. Finishing Colors & Adding Marks: [MUSIC] Let's go with this pink. I want a pink and an orange one. That's my goal. Let's do this up here.
Let me go for that. Maybe we can tap some of
this chrome orange up here, let that grab on
in a spotter too. Look at that, that's
pretty more than that. I really think I'm
going to love this one. [LAUGHTER] I'm just using all my little pieces
of paper here. Then tomorrow, when
all of these are dry, we can decide which ones
are going to be stones, which ones are going
to be cut up for other stones and see what
do we end up loving. Here's a purple. This
is called mauve. That's a bright
purple, look at that. Let's do chrome yellow,
let's do yellow. That's more orange.
Let's do cadmium. Maybe I'll come back
with that mauve. Let me just dip some in. Other places, this is
that chromium yellow. Then we'll dip
some water so that we get it to bloom
in pretty ways. I love water color blooming. I'm just not one of those people that wants all the
watercolor to sit there and be solid
and it's own thing, I want it to bloom out and
give me something to be like, oh, there's a spot for a mark. [LAUGHTER] What
have we not used? Here's ecru, and how
about ecru and blood red? [LAUGHTER] I have some
called grass green. What else do we got in
here? Look at those. Look at that. Let's try this. We've got Jacqueminot red, that's a weird name,
and blood red and ecru. Let just see what we get. Again, just drawing
some stone shapes. That's a pretty bright
pink, that reminds me of, I think it's called Opera pink in the Sennelier.
Look at that. I think that might be the
blood red because that looks like dried blood. [LAUGHTER] Now we know. Look at that. That's the ecru, that's more of a
dark ocher almost. I'm actually going to take that red and rolling
it into the pink. Maybe we'll take
some of this pink. Well it ended up here
in unexpected spots. You know what, that
one that was so pretty with that
blue tint in it, let's just take some of this
butterfly wing and see if we can't tint some blue in
there to just be a surprise, like a delightful
little color surprise. Then we're going to
tap some water in here to make that
color bloom out. I want to see what that gets. I don't know, that
blood is a blood red, it's not doing what I expected. [LAUGHTER] Now, I think I've got some
splotchy colors to work with. I can maybe see one or two that might be a good for stones, tomorrow we'll see, and we'll just see
what we get when these are dry tomorrow. So I'll be back. These are dry and I got to
tell you so super exciting. I'm definitely a
rich color girl. Look how pretty some of
these are, beautiful. [LAUGHTER] I like
these colorways. Well, some of them
don't necessarily look like the stones at the moment, so you might be going, oh, I don't like these, my stones
don't look like stones. These are going to turn into yummy little projects like this. A few of the ones
that I really love, I'm going to do
like this where I actually keep the stone on
the paper I painted it on. But some of these that
I think, oh I love it, but I want it to really
look like tumbling stones, I'm going to cut up and put
on paper by themselves. That's why I said that
this a two for project, we can do some on
the paper and keep them like they are
and we can do some that we cut stones out of it and attach it to a different
piece of paper. I'm going to use my
inspiration card of different patterns and marks to give me
an idea of what I might want to draw on
my watercolor pieces. I have made this
into a PDF for you. If you want some ideas, you can print that out and
then you can continue adding to your library of
marks after that, and just see what you
can come up with. I'm thinking that you
might have a goal, like set yourself a
goal of using say, three different marks in a piece to push yourself
past your normal, what you might normally do. If for instance, in
one of the pieces, I might do these lines
with the dots on them, I might choose to do
some little dots, I might choose to do some pretty botanical
lines, I love lines. I also love these
little daisy flowers. Look how pretty
those little flowers are in this little piece. I wanted to challenge
myself to do at least three different
types of marks. We'll see in this piece, I went with the colored pencil and I have some larger dashes, I have some pretty
little daisies, and then I have
some white dots and some little decorations on
our little sides stones. On this one, we can
see I have dots. I have circles with a dot
in it. That's a great mark. That's not in my idea sheet, but it is a great one
to add to your sheet. I also have lines with a dot at the end of it.
That's super fun. I have some botanical
leaves with some dots running in them. Then I have some little
swirls inside of a piece here and then I've used my little
botanical pieces, so you can see you can
definitely use more than three. But I want you to set yourself the challenge of at least three. Here I've done white dots, botanical piece, little swirls. I've also done colored
with the color pencil. Consider that too.
You don't have to do everything in white or black. Here I've got some dashes
with the colored pencil, lines, I've got
some little swirls here in my little rocks. This one is a bigger piece
of art that I cut up. But I have some
botanical in here. I have those lines
with the dots. I have some little swirls
out here to the side. In all of these pieces, I have at least gone with three different
types of marks in here just to add interest and to keep
your eye moving around. Then this piece is
a big piece that I've cut up for pieces of art before and was in my
bin of scrap paper, and so a lot of these are just
going to go with what's on them and maybe some extra marks or some botanicals
coming out of it. I want you to think how can you add interest to your
different pieces? Consider at least three
different types of mark-making. Consider using something other than wider black sometimes, and we'll go from there. Then one good way to define the stones if they're all blended like this
and you're like, oh, it doesn't really
look like stones, one good way to make those really look like a
stone is to outline each stone with a black
marking pigment pen, and then let's just start
going through some of these. I zoomed in a little bit so we can see what I'm doing here. But let's just say
that I want to make three different stones out
of this mesh of colors. I could easily just come
through with a thin line around the edge of what a stone might be and turn that into a stone. We can just outline all three
of them like that and just visually turn that into some
different stone shapes. They don't have to be perfect, you don't have to keep
your lines inline, you're just mentally turning that into a shape that you might visually recognize
as a stone shape and then we'll do our
mark-making inside of that. We could come back
with some lovely dots, which I always like. I really love how
these colors blend and do their little
thing there in this piece and that little
yummy surprise of blue. This one is just so delightful. Just fine, little
delightful surprises. That's how I'm going to
think of these pieces. They're just so delightful. [LAUGHTER] When I look at them, they bring me joy. The colors are wonderfully vibrant and they
just make me smile. [NOISE] It really is
the little details that we tack on here at the end that are going to make
these so wonderful. I think here in our yellow and orangey
colored stones here, I'm going to draw some of
those lovely little daisies. I did dots, let's
do some daisies. Let's see what color
do I want the daisies. How about I want it to
be like an orangey red. Maybe we'll go with
this Derwent color. This is cherry. [MUSIC] That's really lovely. Maybe I want some lines in here, or let's see, what do I want? Maybe we do want some
orangey colored lines. This is Sienna gold in these pencils and
maybe I just want to get some lines in there. I'm using the watercolor as my guide for stop
and start points. If I see a natural bloom of color in there
before it swaps to a darker color or before
it changes color, it's almost like a really
pretty natural segue for me to start
and stop a color. We could put a little dot at the end of these
if we wanted to. Just visually have
that stop at the dot, that might be fun. That's really pretty. We
could also take our pin. You know what I want to do? Maybe we will do
some white on these and maybe do some
different shapes on the little bitty at rocks. Maybe we will have little swirl, maybe some little cross
hatches or little plus signs. Maybe some dots in there. We've got some up
here at the top. I could maybe circle
those with a dot. You can see I'm really doing more than just
three patterns, but I want you to
challenge yourself to do at minimum of three. Then maybe if we want some pretty little vines
coming through here. I have actually found
the vines easier to do if I draw a leaf on all one side and then come back and draw the leaf
all on the other side, they're more uniform
and match up better than they were when
I was doing leaf, when I was trying to get them
all go in at the same time. Really works out better, and more even if I do one side and go
back and do the other. Look how pretty that is. You can also make these little dots here
almost look like flowers. I could extend that up like it were a little set of
flowers out there, add some leaves around that
and it's like we've turned those dots into
little roses there. That's really lovely. Then I could also come out
to this other side and do dots and lines and more
decoration if I wanted to. Almost feel like that needs one other little
leaf to even it out. Look at that. That
is really pretty, and delightful, and fun. The goal is to do this
with all of them. But the very first
project is to pick the ones that you like and say, these are going to be my actual
stones. Look at this one. This one I'm going to go ahead and turn into little stones, by just giving them a
really light outline. You could do this with graphite or pencil if you don't
want to do it with pen, if you're not confident with using a pen or
you just feel like, I'm going to mess this up. Then you could do
this with a pencil, graphite, anything like that. I figure if I'm going to
mess it up, that's okay. We've visually delineated
those as different stones. At this point too I could already know that I'm
going to want something coming out of this
pretty rock right here. We could do some
flowers out of there, we could do some dots
to imply flowers. I like to look for opportunities
where I'm thinking, oh yeah, that's a good spot
for something to be there. Whether that be a
vine or a flower or a set of dots or
another little rock, some kind of decoration,
just something. Look how pretty,
that is. So pretty. Now I've got wonderful gradients and blooms here with the
way these colors did. I love that. I'm going to do some dots, and I'm going to use the
little swaths of colors to determine my
start stops points. I love how this one goes from this maroon to this
soft goldy color with light pink in-between, I just love that. [NOISE] I love the interests that you get with all the
balloons of colors. So pretty. I'm going to do some lines
with dots and just go around that little
area right there, because how fun is that? I just draw some intersecting lines and then I just come back in and add a few dots on top
of that for the interest. It almost looks
like we're draping the stone with a
beautiful necklace , this little decoration. Look how pretty. [LAUGHTER] That's really fun, we can come back in and just see what else do we want here? Just keep on adding and
decorating and making things. Layering. It's the layering
that makes these so pretty. I almost want to go with
this mustard color. Maybe we'll come
back in here with some dashes. Look at that. I like this color
on color when I do these dashes because
then you can add some more
decoration and interest in there without overwhelming what you already have going on, and I love that
because maybe from a distance you don't notice
these little details, but as you get closer
you're like, "Look at this. I didn't even see
that from way back. That feel I love that." [MUSIC]
7. Final Touches And A Surprise Piece: Here we go. Look at that. We picked one color out of this, this lighter shade of watercolor and put the
dots in there and we can see a separation of some other colors that
just add to the interest. We could make these
other colors into like daisies or
flowers if we wanted. That might be interesting. We could also do
something like this, or maybe we do a circle, but maybe we do
some lines and we let this little balloon be
the outside of that flower, which I'm liking that. Let's just do that here and we could do
that in black too, but let's just do
that in the gold. Then we can just
let the outside of that be the edges
of the flowers. Then I want to do
it over here too, because there's another
bloom right there. You can do it with
contrasting colors. You can do like I'm doing with similar colors. Look at that. I love it when I think of something and then it does what I was
hoping it would do. Get this red, violet, this lavender color and we'll
do one of these right here. It's almost like we have
little flowers sitting on the rocks just from the natural formations
of the watercolor. Maybe we'll put one right here. Look how pretty that made that. I love that one. I'm not sure I'm
done with this one. Maybe we want some, let's see, what do we want? We could do some little swirls. We could do gold. Do something in gold. I could do some little rocks, I could do some little swirls. I could just do dots out here if I wanted
some little dots going. Get creative with some of these things that
you're thinking and try to use as
many, that's pretty. It's like the underside of the
rock that these dots give. That's really pretty.
Look how pretty that is. I want you to think of at
least three different patterns to do on your rocks. I want you to think of
if you're going to have any little botanical
pieces coming out of here, if you'd like to draw, maybe you could put a bird or a butterfly sitting
on your rock. Maybe you can have some dots or other little rocks
here on the bottom. If this were a piece
that I were cutting out, I might cut out some
little pieces of rocks to be on the edges. Let's think about some
of those fun things. Look how really yummy
and delightful, just these two are. You can see how fun you can
sit and do these for hours. Great for color swatching
and then turning your color swatch into
pretty little pieces of art. You can frame these, you can make them into
little gift cards, gift tags, anything like that. I really love this blue, so let's make something out
of this blue and again, we can make these into their own little rocks
by just circling them. See I like how this one, they are really wonky, that is really fun to me. If you need to just draw
part of the line and turn the paper,
definitely do that. I'm trying to leave the
paper still and obviously, that's not the best
thing sometimes. Then if you've got
some that come outside the lines like this, let's turn this one into its
own little set of rocks. Maybe we have some
extra rocks out here. We have some little side rocks
down here. Look at that. We just turned that into a
super yummy little stack and then I really loved these lines. I'm going to follow this little
bit darker blue color in here and give my next rock a Pretty little necklace I think out here, I'm going to do some dots. Looking at this, I'm thinking, do I want the dots in this little swell of
color here or do I want the dots in this larger
swath of solid color? What's going to make that
the most interesting? I feel like I'm going to
do the dots in the swell. I want in the lighter
part of the swell. The dots have a
little ending place and you can see the
darkness around it. I don't want to cover up
some of that darkness. I want to just follow that line. That's my own
personal preference. You can decide when you're doing yours how you want to
follow the color or not follow the color Be careful when you're doing lots of dots
or something repetitive, especially like on some of these that are
super repetitive, my hands get tired and my
marks get really sloppy. Especially with dots, if you're doing a dot, you got to be careful to
go straight up and down. Sometimes I have a tendency
to want to come in from the side and then the
dots are more like lines. They're not nice clean dots. Just keep that in mind
as you're doing dots. How you're holding your pen, if you get lazy holding
it and dotting down, you get lazy dots that don't look crisp and
clean and like a dot. It looks more like a lazy line. That really ruins your pattern. Look at that. A little swash of dots
in there. I love that. We could also come in here and maybe I'll do that
with a color though. Let's come in here
with some blue. What blue do I want? This is bright blue.
Let's just do it. I like the little daisy
flowery look here on that other piece that we
just did where we did a circle and some lines out. I'm going to go ahead and
give this one a big flower. That's pretty, look at that. Maybe a little dot at
the end of that flower, maybe that's the stamens and it's splattered onto the rock Then we could come back too and just
go ahead and give some pretty dashes out
to the rest of this. I call it dashes because
it's longer than a dot. I'm doing it in the
color on color look. Not only do I want
you to consider using at least three different
pattern choices in your piece, I also want you to
consider one of those pattern pieces not
being white or black. Do a tone on tone or a color on color and show me what
you've got with that. I'm thinking over here, I could do these
little bull's eyes like little swirlies
on these rocks. Look at that. Super fun, I love that. Then you just got to
look at it and think, am I done or do I need
some more decoration? What else can we do
to finish this off? Maybe around these little
rocks I have little dots possibly just as an interest
for that little area, it doesn't have to be all exact, but [inaudible] We can add some little pieces of greenery coming out
from the bottom, like something's growing
out from underneath it. That would be fun. I do like these little rocks here that we have on the sides, so maybe I'll give them
some little decoration. Look at that, super fun little extra details and decoration.
Love that one. Some of my very favorite. We're going to call this
one the first project, where we just decorated the rocks on the
watercolor paper. That's going to be
our project number 1. But because we had
so many that we did, and I want you to do
just as many as I did, a whole little pile, take several pieces
of paper and cut them up into these yummy
little piles, I want to do the second project
using our leftover pieces here to see how we
did a little bit different and how it delineates the rocks a little
bit differently. This is the first project. Let's take our leftover
color swatch samples and rocks here and move on to the second part of this project. For the next part
of this project, we need to have some of little pieces of
clean paper cut up, so that's what I've done. I've just taken one big piece of paper and cut different
sizes out of it. I was a little more random
cutting that for this. But if you know that
you're going to be doing several pieces that you all
want to be the same size, then you could be more specific about the way that
you're cutting these up. Now, I want to take some of our pieces and do our
mark-making and our designs. Then we're going to cut these
up because I can't tell you how much I love
to cut stuff up. Cutting up art is
probably the most fun of all the art that I
enjoy doing because then I'm not thinking
about composition, I'm not really thinking about how are all the pieces
meshing together, I'm thinking more
of, let's play, let's have some fun, let's do some things that
we might not normally do, let's test out
colors and supplies, and I'm not trying to
create a masterpiece. Then when I'm all done, I know that I can then
cut up some part of that random mess making and
make something beautiful. I can change things up, and I can swap things out, and then I can add
final details to get that masterpiece that
I might have been hoping to get when I
sat down on my table. We all create in different ways. Some people are very
exact and want to do things in a specific way, and some of us are not as exact and want
to work a little bit more serendipitously and I am that little bit
of serendipity. When I work, that's
what I enjoy. Let's use this color. That's how I get pieces
that I love in the end. This is called leaf green. But let's see what we
can get here because this one has these crazy
yummy spikes of color. Look how amazing those are. That's what I like about some of those handmade watercolors
that are made with pigment. They separate and give these really yummy
strong spikes of color that sometimes I don't get with regular
watercolors as easily. For this part, I didn't
delineate the stones like I did on the pieces that we were going to keep on
our piece of paper. I drew the stone out to
visually hone in the edges of each rock so that you in your mind made those into the
stones that you intended. If you want your stones to be more defined when
you're painting, then you're going
to need to paint the color, let that dry, paint the next color, and then you'll have
definite circles, whereas I wanted
colors to blend and mesh and move and
do funky things. In doing that, I'm going
to get patterns that I wouldn't get any
other way. Let's see. Like this right here, this is delicious, it's super delicious. What do I want to do here? Let's see how different looking over here at
my mark-making board. I've done dots and
I've done dashes. Do I want to do some yummy pattern up
in here, do some vines. I do like my little lines
with the dots in it. That's one of my
favorite things. What we could do
that I've done on a piece in the past is I did a bunch of those lines with dots and then we cut these out and then you can
just randomly see those. In doing something like this, we don't have to
confine ourselves to the little pieces of color. We could go outside
the lines and have those lines coming into the frame because when
we cut these out, we're going to be getting
some decoration and things that are exciting
and unexpected. Why don't we do that? Let's
just do something crazy here. That's crazy. That totally went in a direction I
wasn't expecting, but I was so inspired by my personal project
piece that I had done that I just showed
you because some of these, I do a lot of these projects as my own personal
little projects. I like to just play at my
art table and experiment, and then when I hit upon
something that I'm like, this is fun, I think people
would like to play and experiment with me on this, that's how a lot of
these classes end up happening because
then I just can't wait to share what worked
out at my art table for me. Little bit of
serendipity in there. While this is maybe not some amazing art project that I'm going to
put into a gallery, it is an art project that got
me working at my art table, practicing with my
supplies and having fun. I think I'm going to
step outside the box again here and use my favorite gold paste and
just smear some of this somewhere as a decoration because I figured out if
I smear it beforehand, it'll be the same
level as the paper, if I smear it afterwards, which I did on this one, it's hard to get
my palette knife to smear from one
level to the next. I'm going to try some smearing here and then we're
going to cut this up. But look how pretty that is. You might do this and you're thinking, I'm going
to cut this up, and you might get
done and think, no I love it like it is. I don't know how many times I've done that thinking, I'm going to create
this and it's going to be a piece that I cut up and I surprise myself. The surprising myself
is the best part. Let's get ourselves a little
palette knife here and do some yummy little
metallic smudging. I love all of that, my goodness. Now I don't want to cut this up. So lovely we might
keep it like that. Then if you want to
keep it like that, let's just say
that you surprised yourself and you thought, look at that, we could
actually come in and define the stone after the
fact if you wanted so. I actually love this one
so much that we might just do this and then I'll do
the cut-up piece next. But look at here, let's just go ahead and define this stone. I'm doing it really lightly, I just want that edge truly. I love it when a
project just takes a different direction
and you're like, never mind, I'm not going
to do what I intended here, I'm going to let this project
do what this project needs. This project needs to
be a stack of stones. We'll cut up the next one. If you do like I did and
you do something like some pretty metallic
piece on top and you don't want to draw
on top of the metallic part, just draw around it. This blue and green, look how pretty that is. We defined those little stones. We have that yummy
little brightness. We could also come back since
we're going to keep it, go ahead and do something fun here on our little bitty stones. Let's just go ahead and define
those out as little rocks, maybe we'll put some
dots around them. Look how pretty that is. We're going to keep
that as it is. I'm going to start the cut-up
project after this one. Once you've put something
wet on top of these, you need to set that
to the side and dry, don't stack it with
your other things. That was a delightful surprise. My point on this
is don't be afraid to get outside the
lines on that. Just see if you create
something yummy and spectacular and different
than you even expected. That's mostly dry. It
dries pretty fast. Maybe we want a little tiny bit of gold down here on these. I just like this little bit of shimmer that they used to do. We get that. Look at that, now those little
rocks shimmer too. Super fun. I have a little bit of gold
left here on my palette. Let's just go ahead and let those do their
little thing there. We're going to call that one our little delightful surprise
as we were working.
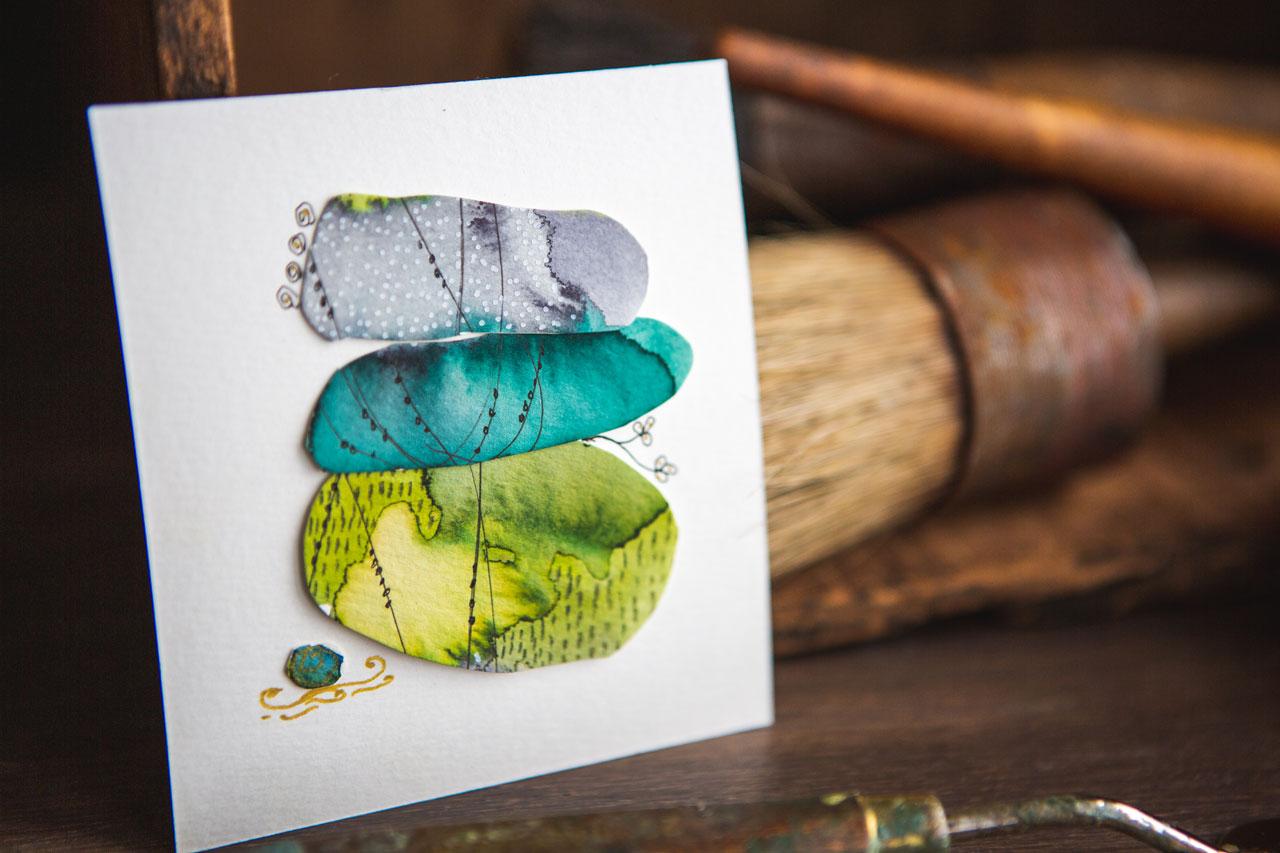
8. Cutting Out Stones: [MUSIC] Let's actually get one that we're going to cut up. This one looks like a
bunny rabbit to me. I really like this
one and these two, and I love the
colors in this one. Now the point really is to
draw as much pattern as we can and just see what we
can get. Let's start again. [LAUGHTER] I'm just going to come in here with my marks
and decorate this piece. The more of these you do, the more likely you
are to end up with a delightful surprise
that ended up so much nicer than
you even expected. You're like I'm going to change my mind on what I
do with this piece. That's why you need
to do more than one. When you sit to do
these projects, do 15 of them and
all different colors and let them all dry overnight and then
come back and say, ''What are we going to
create with these?'' Look at that. [MUSIC] I really like that
where we've got it. Let's go ahead and say that this is going to
be one that I cut up and we can always decide to add more details to it
after the fact. But look how pretty
these already are. What we want for this is we want some random sized pieces of paper where we can
decide what we want to do for them
when we're done. Also, want some glue so I've
got my YES paste over here. I say yest, but it's YES. Y-E-S. Basically
what we're going to do is cut stone shapes out of here and I'm not trying
to be super exact. I'm just following the line of the color and cutting some
ovals like it's a rock stack. I don't want any
sharp lines and I don't want big whites-spaces, but I'm looking for
something like that. I'm going to do this on each of the little color separators
that I've got going here. You'll see when we start
to put this together, how this really just gives us such beautifully
dynamic pieces. There's this super sweet
little color right here that I think would be a fun little mini piece of rock. We're going to just cut
that out too. Super fun. Let's take these pieces
and see what size piece of paper this needs to
be on. Look at that. I think it needs to be
on the smaller piece of paper though. You can see too now we
can change up the layers. I don't have to put them down
the way that I painted it, which I technically painted
it like this didn't I. But as you're looking at it, you're thinking that's lopsided. It might not be the
right formation. We can change up
where these stones go now on our piece of paper. Then we have this
little bitty one is the little cherry on top. Or maybe that's a little piece that goes down here
at the bottom. Maybe our stones are
wonky on each other. Super pretty. I'm digging
that right there. Let's go ahead and
glue this down. [NOISE] I get wonky so let's go ahead and let
this be a little crooked. Now, this paste you can still, you have a minute or two
before it's completely down. We don't like where it's at. We could come back and do
some shifting. That's there. I have some wax paper that I like to use
when I'm gluing stuff down just as protection
for the piece as I smash. [LAUGHTER] Smash it down nicely
to be all nice and flat. Get some wax paper out of
your kitchen to do that with. I love that. Then we can
look at this and decide, what else does it need? Do we have enough decoration? Do we now need to add any
additional little elements or something coming
out of a crack? Or maybe we want
some pretty vine. Just something pretty
maybe coming out. It's your choice
there on what ends up being your little fancy. Look at that. Sometimes there's just the tiniest little details that really make those sparkle. Then we can come back in with our paint pen and we could add some pretty little decorations
and dots if we wanted. [MUSIC] That's really pretty. Look how pretty that is. I just like all of this and the way it turns into
a stone and look how different that
looks from the one that we did that we
painted that's flat. You get a completely
different look and feel because now these are
almost three-dimensional. We could change the direction of the stones to something other
than how we painted it, and it makes it exciting. When I say rolling stones now you can feel the movement in the piece maybe
they were tumbling down the hill and that's
where they landed. That's the feel that
makes me so excited. I really love the
pieces where we do cut-ups of bigger
pieces of art or bigger pieces of the stones that may be just
merged into a blob. This is what I love
doing with those. This was a piece of
art that I cut up, and so in the next project, I want to actually
just get scraps and collage material and create something with the cutup pieces, not something that I painted
specifically for this class. I hope you enjoy the difference in these two little projects using color swatches that we created and just
different colorways. I want you to do lots of
different colorways and when you get pieces that look like this that you're thinking
no, it's ruined. Then I want you to cut
the stones out of it. If you get a surprise
where you're like, wait, I'm loving it before I even cut it
out, don't cut it out. [LAUGHTER] Take a different one and cut it out because
look how fun all of these are and something like this is going to be the most
exciting cut-up piece, so definitely don't
throw it out. [MUSIC]
9. Painting Scrap Art: All right, for this next piece, let's do something like what some of these cutout pieces that I've shown you that I've done in the past that I really love. These are some of
my favorite pieces when we do stuff like that. Let's take a look at
some ideas that I have, and the way that these cut
up pieces really come about is this is the leftover scrap
pieces from other projects. Some of my classes, I'll show you where
we'll paint big pieces. Just all over the place. Painting on the piece of paper, not even worrying about
composition and color. We'll just go on while
having fun and we end up with the ugliest piece
of art you've ever seen. Then we cut little pieces
of art out of that. Just to give you an example, which I love pulling these off the wall to show in
class like this is one where I did a great big giant
piece of paper and I cut this little piece of art
out of that piece of paper. When I do that, I have lots of leftover scraps. People ask a lot of times, what do you do
with those scraps? I tell people those are
perfect for collage. So I did a collage class on how wonderful these scraps
are in pieces of collage. I also have done a dot class where you cut dots
out of these and make a wonderful piece
of art out of it. Then this is another thing
that I love to do with scraps or maybe I'm just setting out to create some yummy
rolling stones. I'll paint a big piece of paper and just cut it up
for this reason. I've got some in that purple
color way that I had cut up for that project
and not used. Basically, what I
do when I'm cutting these up is I just
cut odd shapes of stone as big as a particular
piece of paper might allow. The smaller the paper gets, the smaller the stone I cut. You can see these little
tiny stones down here are normally the little edge of a piece of paper
that you're like, okay, this is no good. I'm going to throw it out. Like maybe this right here. You can see if we pick
the right spot out of it, we get some pretty little
decoration and patterns, so it's not, don't
throw these away. I thought this one's
really pretty with that. This is a handmade paper, so don't forget
or just be aware, maybe some of the pieces in
here are pieces of your art, like on this one, this
is pieces of my art. This is a handmade
piece of paper. So treat these a little bit like collage and use pieces
of your own art. Use pieces of handmade
paper, perhaps. I particularly love this paper. It's one of my favorite. I'd like to find another
big piece of it because it's the most delicious texture and it works in so many things. I love this paper. I also like to have
little pieces of art that maybe didn't work out
to what I was thinking, maybe that day I wasn't
in a good drawing mood. I also have some little
collage bits that I've created for making
collages with, so get all of your
collage further together. That's perfect for
this type project. You could use old book pages. This is another one and
I particularly like it, where I was experimenting with water-soluble crayons and
seeing how they turned out, so I think I'm going
to make a stone out of this paper to show you how I might cut up a piece of art that may be I
love the colors, but I didn't quite pull the idea to finish with different
pattern and stuff. At this point, rather
than starting from scratch and painting this and waiting a couple of days
to see what I can do. I'm going to go ahead and paint one that I've already
just thrown to the side. We're going to put some
decoration in here, and then we're going
to cut lots of little stones out of this and create our composition
on our paper over here. I just love these colors, and this is the
prettiest piece to me. But I don't feel
like it's finished because I was doing
color swatching for another workshop and this is what turned out from that
color swatch experiment. Then I'm not one of those people that color swatches
little squares. It just sucks the
life out of my soul. I cut up a piece of colored paper and I will do color swatching this way
to see what color is this? How does that work? How does it mix with
the next color? What does it do if
I add water to it? If I really truly love it and I need to
remember the colors, I will put this in a little
sketch book of ideas and keep the colors written on the paper beside it because
if I want to do this for say, a whole project like
a whole series, maybe then I want to have my color swatch and
my pieces and all. I want to formally
know what they are, I guess is what
I'm trying to say. Then I'd write the colors out beside it and I'd have
a record of that. If it's just something
where I'm like, I actually love this, but I'm not going to do
anything with it right now, then I'll throw it in
my little scrap bin of stuff that I use
for collage material, and then when I have
a project like this. I'm like, now is the moment for this yummy piece of paper,
because it is yummy. Look how pretty that is. This is basically an
olive green and a blue, which must be the
colors that I'm feeling right now since
the other pieces that we did in class that was my very favorite are
these blue-green pieces. I must be feeling in
a blue-green mood. I'm trying to still keep in mind
what I was thinking there on those projects. I want to do at least three
different patterns in here and just make this
a little more exciting. I want to have at least one
of those patterns in a color. That's what I'm doing here
with our little color. Depending on what mood
you're in and how long you've been doing
different projects. You'll get to the
point where you have favorite marks and
favorite things that you love to do
and at the moment, I think one of my
favorite things is those lines with the
pretty little dots, so why not just go ahead and
throw some of that in here. Because I'm doing
such a big piece, I could actually have a
second one of those in here. I'm just crisscrossing lines, and then we're going to add some pretty little dots or pearls or however we
want to think of those. Because when I cut this up, those are just going to be
nice little crosshatches, like in this piece I had done. It's just little detailed
areas that then show up. Can already tell
this yummy piece of paper that I hated to throw to the side
because I thought, man, I love these color so much, I can't wait to
think what this is going to turn out one day. I'm glad I came across it digging through
my little pile over there. It's a nice little
serendipity find, this was meant to be today. When you're going to do
something like this, make your piece of paper, color swatching experiment, make it fairly large. We can get lots of
stones out of this, and then we have choices. Then I just keep
the little stones in our pretty little
kitchen dish. These, I got at the
world market and they're just the perfect little dish
to keep little cutouts in. You can keep it for
a project like this, or you can keep it for
a project like collage. That can sit on a counter and be like decoration
because I have things sitting over here on my
dresser that's in this room. That dresser's full
of art supplies. Then there's art supplies
on top of the dresser as decoration because
they're so beautiful, I want to look them him day. When I come in here, I get excited,
what can I create? Look how pretty that is. I just want these lines
with dots everywhere. Something else that we can do is we could pick one
little area and do lines. That will break this
up very interestingly. Now I've got dots,
I've got lines, I've got some other color, not just white and black when
I did those green things. Then my third little pattern is these lines with the dots in it. I've done at least
three patterns. Look how pretty that turned
out with those lines in it. I'm just trying to give
you some good examples of how you can make things interesting in your piece By saying give
yourself some goals, XYZ, whatever those
goals are going to be and then you'll have something interesting when you're done. You won't then just stick
to one line or dot. Because I'm a dot person
and if I didn't think, what else can I do in
here for interest? You might just get dots. But I also like that the original piece of
this art has scribble, it has water where it
moves stuff around. Look at that, I love that. I like that there's
variation in color. There's lots going
on in this already. Let's make this
something glorious. I got several pieces
of paper over here. I'm going to not even be super concerned about the
stones that I cut out. But if you see something
that you love more than anything else, cut that first. I'm just going to cut ovals out of these, following where the color is. Some of these ovals, I might make a little bit
squattier and some of them, I might make more round. I don't want any rough edges. So if I got a rough edge, I'll just go back and clip that. Look how pretty that is. I'm going to cut little
stones out of all of this. Then if we end up
with splotches of color that you're like,
what do I do with that? You're thinking, throw it away. We're going to make
little bitty stones out of something like that, so don't throw it away. You can make them look
like a peanut shape. They don't have to
be completely oval. Because if they've got
that little peanut shape, then there'll be
a good stone for doing that little
back-forth stacking, and that can add
to some interest. You could do
something like that. They don't have to be oval. They don't all have to be round. They don't all have
to be the same size. If you get it done
and you think they're all too much samey samey, then we can think of adding in other
things like some contrast, some handmade papers, maybe
another piece of art, maybe I should cut some
pieces out of this to contrast the pieces in that. We have options. Because now that we're stuck
in these, I'm almost like, do I want it all matchy
matchy or do I want it to have some contrasty
bits in there? What do we really want
to have going on here? I love this one. Look how
pretty that one is with those little lines with the
dots in there. Love that one. I'm going to get rid of some of
this extra paper. That one's really,
really pretty. Love that. Then I'm not going to use all of
these little cutouts in the same piece. That's why I like having
a bowl to keep some of these pieces for future pieces. If you make these and you think, I love these and I want to do a 100 day project
of rolling stones, perfect thing to have a little extra stone
pieces available. Then if you've got
little pieces where the clump is big enough to make a little bitty rock out of it, cut those little bitty rocks out of there and keep those too. Any bit of paper with
color or pattern or mark can be a rolling stone. Then I just cut off any
pieces that look sharp, that don't look like a
nice little smooth stone, make a little stone out of it. We do have enough little bits leftover to have some
yummy interesting stone. Any piece of color left, cut little stones out of them. Don't throw it away.
Look at that one. See, pretty. I love this one has this little
orange bit on here. Look at that. It's got
that little bit of orange. We're going to somehow
have to save this. Maybe it's going to be a long
flat rock. Look at that. Got a little bit of orange
in there, I love it. It's a little rock stack
that is super interesting. Love that. This one has little bits of some blue
and green marks on it, so maybe we've got another
little long stone out of that. We're just trying to use every scrap of
color that we can, don't throw it
out. Look at that. I've got enough to play with. I like that this one has
lines in it already. You could just sit here
and cut these down to nothing and then you can throw away the little tiny bits that are leftover
if you have to. Look at that stone. We've got five little stones. We're going to set all
these pieces over to the side because there's still
some color left on them. Don't throw out the colors. Now I'm looking at
it and I'm thinking, do I want it all the same or do we need some
other choices in here? Let's go ahead and cut up a random piece of art that I have and see if
those are contrast enough or do we need
to do something else? This is the creative, what do you want to end up with? How do we want to make
this when we're done? I like having some choices. That one's pretty. Again, here's where I'm talking about. Don't throw away these
little scraps because that right there could
be a little stone. That's enough to cut
out for a little stone. This right here could
be a little stone. Actually, I like that
bit right there. Let's make a little stone out of this one because
it's darker and it's a nice contrast to these other little
bitty stones that we have created. Look at that. See, it's a darker
stone in there. Who knew that we were
going to have so much fun playing like little
toddlers cutting up paper. Because even though
I'm thinking, this is not some
great masterpiece, some big piece of whatever
that I'm putting a gallery, some of these are
pretty enough to frame and hang up and enjoy. Now we got lots of paper choices here and
just need to decide. What I like about the stone
project is you can scale these up or down depending on the paper
that you're cutting up. For instance, in this original
piece that I had done, and in this second
piece that I had done, those are fairly large stones. Those were big enough
pieces of paper and color. They were wide enough that I
got bigger stones out of it. This one right here that
we ended up not cutting up and this one right here
that was just decorative, those are bigger, wider stones. But on the piece that I
just added decoration to, I was sticking to the width of the color of those pieces, and so that might determine the size of the paper of
the piece that we create. Because I don't want too
much paper, personally. If I did this six by six piece, that's almost like there's
too much paper leftover. But you might want to have a larger bit of paper
to then frame around. So maybe it's not
too much paper. Or maybe you want more than
a three stack high stone, maybe we want a four
or five high stack. You don't have to
stop at three stones. I've done a lot of the
three stone things, but maybe we want a
larger stack there. Look how pretty that is. Now we're really
going fun and wonky.
10. Cutting Out Scrap Art Stones: Now that I've thought of this and
said it out loud, it might be the way that
we go for this piece. I like to place it, look how pretty that is, with little stones out here
to the side, super fun. I like to visually
place things to say is that where I want it or is that too much or
did I overdo it? That is pretty. Now that I've got more stones in my thing, maybe this is the way that we need to
go, feeling like this. I'm feeling like more
than three stones here. Let's glue that down
and we can decide, but let's say we
have some left over. You're thinking, what else
can I make with this? Now we can look at it like, maybe I've cut enough to be two stone pictures and let's just see what we
can get out of this. I'm almost liking this with a little extra
stone peeking out, how fun is that? Look at that. Little extra stones poking out of there, that's super cool. Another thing that
we might consider, because I mentioned having something like these
fun pieces of paper, what if we did something on the background that
was completely different? Like what if that were
behind the stones? Now we have even more three-dimensional
something going on. Could be something
with a lot of color, could be something like
this with some pattern. Like maybe this is the
start of our piece. Then I need a spatula so
I can pick all these up. There we go, a piece
of paper will do it. There we go, so I don't
have to relay these out. What if we want to do that? We can then replace
these if we wanted. But I want you to think a little outside the box and think, now I've done this as
a straight project, what can I do to
make this my own? What can I do to
change this a bit? Look at that, see now,
that's super fun. Now we have something
in the background. Instead of our painting or
our drawing or whatever, we have something going on back there that's a little different. We could still paint
and draw on it or add some metallic
or do something, but I want you just to think outside the box on some
of your pieces and think, what can I do to give
that extra dimension? You could also consider
something like the wax paper, look at this as like
a translucent paper. If I just take a piece of that. Maybe that's behind
my stones instead of plain paper because it's
like a three-dimensional. You could do handmade
papers back there, like a rice paper
would be really cool behind a stone stack. Just different stuff
to consider there. I really love this one. Let's go ahead while I
think about this one, let's attach this one. I like the wonkiness and little stones worked
into the crevices. That's super fun. Then we might come back and do some extra little
decoration on this. I really love this piece. Look how beautiful
that piece is. It's so lovely with the
lines and the dots. I think that's my
favorite element on some of these pieces is the little bit of lines
and dots that we can see. I'm placing these lightly
because I want to be able to do a tiny bit of adjusting. Now I can see that I
might want one more going up because I stopped it. A little short there, let's see. What else? Do like
maybe a little piece, like a long piece let's see. That might be too long, we
might need to cut that again. You've got to be
careful not to do that. Yeah, be careful on some of these pieces of
art that you pull out because this one has
pastels all over it and it is not got a finishing spray on it so
you want to be real careful, oh yeah, there we
go, about getting art supplies all over
your paper that you didn't intend because of that. Because when you're doing this, you want that piece of paper
to be fresh and clean. You don't want, look
at that right there, you don't want bits of color stuck down where
you didn't intend it to be. Now I can go back in and
I can just tweak it. Look how pretty that is. Then when I think, yes, I like where these are, then I'm going to
take my piece of wax paper so I can just press down without
doing any damage. We're spreading any art materials
that I didn't intend to spread. Look at that. That's really pretty. Now we can come back with any extra final decorations
that we want to do. We could do some gold, we could do some black ink, we could do all kinds of stuff. Now we can finish this off
with any little whatevers. Like maybe I want to
have come out of here, a vine with some leaves. I can just have that come
right on up here like this. Then we can get our little. Again, on a piece like this
where I think I love this, I don't want to
get sloppy on it, I do think it's easier to
draw the leaves on one side, moving the paper
as you need to go, and then go back and draw
them on the other side. I'm just drawing a teardrop
shape there when I do that. It's not a specific
flower I've got in mind. If you're a true botanical lover and you like drawing botanicals, you could definitely go
forward in the yard and get some ferns or ivy, anything like that and you could mimic those more closely than a random generic
plant that I like to draw with just pretty
scrolls and leaves. That's what turns things into your style and your
art and the things that define your pieces are the extra little details and things that you add to your art. That maybe I don't
think of or I wouldn't do or I'm not good at or
I don't have around me. That's the stuff that's
going to turn these pieces into something uniquely you and yours are those
extra details that you do unique to you. Look how pretty that
is, super pretty. This would be pretty good
with a butterfly or a bird. If you were really
talented like that, you could draw a
butterfly on a piece of extra little art and cut that out and stick that on there. I think I'm going to do just some extra little
maybe circles with dots. Just some extra little
doolallies here on this side. Just something visual. Doesn't have to be anything other than just a little extra whatever you
happen to want. I like gold, I don't want to try to get
some gold in there. Where is the gold? I've hid it from myself. There's the gold. This is my favorite gold. It is the Curie taky gold paste. I'm just going to
add some random gold in there, look at that. See, it's just enough
to give it a sparkle, but not to be anything special. It doesn't need to
reason more than anything that you like it. That's reason enough, just because you like it. It doesn't have to
have a purpose. But look how pretty that is. I like that a lot. I'm going to go for that. I just want things that shine on my pretty piece of art.
I'm going to go for that. It wasn't anything specific, but I like the way
it shines on there. That's really beautiful. We're going to go for that. This one, I'm still thinking, do I want the decoration
underneath it? Do I want the paper not underneath it? I
shouldn't have done that. Do I want the
stones to really be a little river stack there and be doing their
crazy, funky thing? Little stones on the side. Because we could make it wider. If we did two doing this, and we actually made
our little stack wider. If you're trying to
go on a bigger piece of paper and it's
not big enough, you can really
offset these quite a bit and make them
look like they're precariously perched
on each other, and that would make
a really fun stack. Then we could throw
some little ones in here to really make it seem like these little ones
are holding up that stack. That would be fun. Look at that. See, now, that right there is super fun. It's talking to me. Then we got enough for our
little stack here on the side. Look how pretty that is. I'm filling this. Do we
want to move up a tiny bit? Look at that. I'm filling
that. Let's glue that down. If you think that you're going to
forget where stuff goes, you could always fill out your composition like this and take a picture of
it with your phone, and then follow it. That's really popular
collage technique, is to then follow your
picture so that you don't forget what you were thinking
and where things went. I like to place it
really lightly with the paste before I stick it down good so that I've still got the option to move stuff
around for a moment. Then even with the little
stones here to the side, I'm keeping a low horizon line, like it's sitting on the ground even though I can't
see the ground. I'm wanting that to imply
that is the ground, and I don't want to put these other stones in a weird,
awkward lower position. One want them to all be at the same ground level
so that visually, you're thinking, that's the ground even if I don't
have a ground in there. Let's just make sure that's
where we wanted everything. I'm filling that, and
then stick it down. This piece of paper that
I'm sticking down on now is just a six-by-six piece of paper with a torn
edge at the bottom, because I think it's a
really nice presentation. This one was just cut on my little cutting
mat, four even sides. Look how pretty that one is. That one just makes me happy. The vines make me happy, the colors make me happy. In this one, we'll just
go back again and decide what extra little
decorations can we do that will finish this off. Maybe I want some flower. It doesn't have to be
any recognizable flower, but maybe we've got some actual botanicals
coming out of here. I just totally made
up that shape and hoped that I would like
it, and look at that. It's actually really pretty. I know you think I'm crazy, but I'm getting old. I got no shame. I had a neighbor tell
me the other day, I didn't think you
were out of your 30s, and I was like, My, God, thank you so much. made Made me feel so young. I'm just drawing a pattern. These are just circles
with a dot in it. I don't want just
drawing on one side. I want it to even out somehow, but I don't want it
to be the exact same. Then you can do some
swishes of color. You could come back
with color pencil. You could keep on adding
till your heart's content. I think I'm going
to add the gold because it's what
I'm obsessed with. Pick whatever art supply you're obsessed with and just ride that obsession out. That's pretty. Just let that
obsession do its thing. Look at that. See, now, that gives me little
finishing touches. I get my little bit of shine. I've got something
on this side and something on that side,
and they're different. So they're even, but they're not even
thing. I'm loving that. Super fun. I hope this
project is fun and gives you an idea
of how you can take pieces of art that
you've already created that maybe
you don't love, or color swatching
like I've done, or handmade papers, or big pieces that
you've cut up and you want to still
keep that piece. This could make a good bookmark. But maybe we want to
still keep that piece and make some little
rolling stones out of it or some
collage out of it. Hoping that you're inspired by the fun rolling stone
project to create some of these really
beautiful pieces out of some of these scraps
of art that you've got. I hope you enjoy cutting the pieces out and making
your own stone stack. I'll see you back in class.
11. Final Thoughts: [MUSIC] I hope that you were
inspired by some of these delightful little
Rolling Stone projects, and I can't wait to see what your Rolling Stones
look like too, so don't forget to
make up a few pieces, have some fun in your
art room and then come back and show
us what you created. I'm looking forward to that. I can't wait to see it. I'm super excited
to have had you in class today and I
hope you had fun. I'll see you next time.
 DENISE LOVE, Artist & Creative Educator