Transcripts
1. Introduction: [MUSIC] Let's imagine light and shadow as the salt and pepper in a painting. Add a pinch of shadow here and a pinch to light there, and the art comes to life. Hi. I'm Francoise and I am a watercolor oil pastel, a mixed media artist based in France. I teach art here on Skillshare, YouTube, and Instagram. I've collaborated the multiple art brands in the process. [MUSIC] In the first half of the class, we're going to focus on techniques. You can use it to pick the light and shadow in a painting. There are many ways to go about it, from using simple watercolor techniques for the beginner to unexpected tools or tricks to get you the effect you want to create in seconds. Later in the class we'll pay to close the Autumn landscape using some of these techniques so you get to see why and how implement what you've learned in a painting. To do that, we'll study the reference photo and spot the dark and light parts. Then we'll prepare this sketch. You'll learn what to draw and what not to draw to plan for light and shadow. Next, I'll show you how I pick colors with the end result in mind. We'll start painting the background, the first foundational layer and you'll learn how to improve light and shadow there with the second one. With painting our main subjects, a table and a coffee cup, you'll get to experience exactly why, when, and how to start with light, finish with shadows, and vice versa. Last, I'll teach you how to amplify your work with small yet powerful touches. All along, we'll be using many of the techniques taught in the beginning so you've finished this class with confidence to implement some of those in your own projects. I have crafted this class to make us get a clear picture in our mind of how to depict light and shadow with watercolor whether we're talking about a loose or more realistic style. A more experienced watercolor artist will find techniques they may not have thought of and solutions to help fix a flat or dull paintings. Meet me next for more about the class project and thoughts about how you can level up your skills for watercolor painting using this class.
2. Class Project and Your Path to Leveling Up : [MUSIC] Today's project is a peaceful atom scenery with a beautiful play, a light, and shadow. Painting light and shadow can feel pretty abstract as to where to start and how to actually create that effect when you first get into watercolor. I remember feeling puzzled with how to make it work for watercolors since it is a wet medium and the techniques are quite different from pencil drawings, for instance. There's also more spontaneity and planning involved and can feel quite intimidating. This is why in the first part of this class, I'm going to show you ways you can leverage 70 days to create light and shadow in a painting. I have categorized all techniques that I know of and have used in my watercolor paintings all in one piece. You will finish this class with a clear and comprehensive picture of what can be done to create light and shadow in watercolor painting. You can use the techniques that fit you best for your current painting stage and your preferences. This is literally a toolbox you can use whether you're a beginner or more experienced and it will benefit any painting style. For example, there are techniques here I rarely use, others I use all the time. However, all of them can become handy at one time or another to create this or that effect in a painting. Once it's my style, might not to yours, so I highly encourage you to watch all technique lessons before jumping into the class project. In the second part of this class, the class projects, we will use some of the techniques I'm about to show you. It's going to be a great way to practice and to see and feel how you go from learning about something all the way to actually knowing by doing. Download the techniques summary sheet in the resources section of the class and the reference photo if you need them and you're ready to begin. If you'd like some feedback, you're welcome to share your progress with everyone in the project of resources section of the class. We're ready to dive in. See you in the next lesson where I'm going to elaborate on the first technique to create light and shadow in a painting. [MUSIC]
3. Technique #1 : Ways to Preserve: [MUSIC] Let's explore our first technique you can use to depict light and shadow in a painting. In watercolor, there are several ways to preserve the paper. By preserving, I mean, to leave it untouched free of any paint. If you're a beginner, you can preserve the paper to start a new painting with more control and less overwhelm and I will dive deeper into this as we progress. If you're more advanced, you will learn from this lesson and from today's project how to fully leverage this to apply in watercolor landscapes. The most common way of preserving the paper is used to depict the light. That's because a vast majority of watercolor papers are white in color. Let's look at ways we can do that. The first way to preserve paper is to simply avoid a specific area so it stays paperwhite. To do this, you simply pick up any color and paint an area while avoiding the shape you want to preserve like so. If it helps, you can sketch the shape before painting so it's obvious to you what to paint or not paint. To know that technique, all you need to remember is that with watercolor, the paint will always stop wherever the water stops. If you avoid an area completely small or large, there shouldn't be any paint spreading in there ever. If it does, I'll show you more ways to preserve paper with more accuracy. [MUSIC] Something challenging with avoiding certain areas is that when you target several of them at once, it's possible you lose track of what was already wet and what was not, especially when there is no sketch. If that happens, tilt your paper while it's still wet and you will be able to tell what's still dry. This technique works wonders to give a painting strong and bright white highlights. However, it will also create very harsh edges. Many artists with a loose style leave the edges, but if like me, you prefer a softer edge, a variation to that technique is to use a clean and slightly wet paintbrush to soften them while the paint is still wet just like that. It's up to you to decide how you like it. Personally, I rarely preserve the paper in this way because even though paperwhite highlights give paintings a strong and fresh glow, for my more realistic style, I prefer highlights that blend in a bit more. However, I still use it for things like painting snow or other big elements that are mostly white. These paintings are great examples of that. Another way you can preserve the white from the paper while getting more precise results is to mask it with masking fluid or drawing gum. Both are quite similar in the way they work and they come in bottles like this or a pen like that. But also more economical to cover large areas, the fluid is easier to get, but pens are more convenient for precision and small touches. A similar and an expensive tool to use instead is wax. I'll start with masking fluid. Mine comes in a bottle, so I sometimes use an old worn-out brush, but I prefer a color shaper because the masking fluid is latex-based and they'll easily ruin a paintbrush unless you prep it with dish soap right before using it and clean it fast after use. Color shapers are made out of silicone and the fluid peels off very easily and I like it a lot for that. What the fluid does is it prevents the water from creeping underneath where you apply it, which makes it easy to preserve areas of the paper and never worry about them while painting. For a beginner, it is a convenient way to focus better on the painting process. I recommend to mask the desired areas before you start painting, not while you are already painting, as masking fluid needs time to dry. When you're done painting what you want and that's dry, you can remove the masking fluid with a paper towel or a cloth by pressing hard and going in circles. It works with fingers too, but it's not very agreeable on the skin after a while. Take your time when removing masking fluid as pulling on it could damage the paper. You can see here the shape has been fully preserved that's why sometimes it can be better than avoiding one area. I use masking fluid for parts of the painting that need to stay sharp because you're going to be painted later on and not so much for parts that need to remain white because the edges are so strong and harsh. Here for instance, I really wanted to keep most of it free of paint, as it was going to be the only white part here to contrast with the background. Because the shape was so intricate, I masked it and I finished it later with some black and orange paints to make it a believable part of the painting. I mentioned wax as another way to preserve. It works similarly as masking fluid as it is applied before painting in the areas that need to remain white. The main difference is it's not going to be as precise as masking fluid as you can't clearly see where it's been applied. But that can be used to add texture while preserving most of the paper to make that shape you're preserving less perfect. It's like the best of both worlds between avoiding an area and masking it with fluid. I use it rarely but I find it's a great and cheap alternative to know about. I also like that it's not necessary to remove it afterward. Also, the paper won't ever get damaged and it's not very obvious that wax was applied on paper once the painting is finished. However, unlike previous methods, once it's there, it's there so take that into account. Masking tape is highly effective to mask an area of the painting. It's not the most convenient one to mask something other than a straight line to be honest. But if that's all you have at home it works. I mostly use it to tape my paper down onto the surface I paint on and at the same time, it helps me get those clean and nice edges around my paintings. Occasionally I'll use it to separate the sky from the sea or earth when I paint if it's a straight line. You can consider taking it a step further and cutting pieces to mask an area in the painting too. It's possible to apply these techniques with preserving shadows too. This will work with black watercolor paper, even though it is not as widely used as white paper, but it's something to consider. Meet me next for ways to preserve whites by lifting the paint rather than avoiding or masking the paper. [MUSIC]
4. Technique #2 : Ways to Lift: In this lesson, we're going to explore the ways to lift paints so we can create highlights and therefore place more light in a painting. The lifting technique means we're removing paint that has already been applied on the paper. It will suit anyone as it can be used at any point in the painting to create more light, but also to fix mistakes. For that, it's a very helpful watercolor technique. It can be used with spontaneity, whether you're into loose or realistic painting. It also makes highlights look more subtle than they do with preserving the paper. This is because when lifting paints we're only returning most of the white from the paper in an area that has already been painted. Let me show you several ways to do this. You can lift while the paint's still wet. To do that, it helps to grab a paintbrush that is clean and just damp. Then you press down with it and remove the paint. Rinse, take the excess water out and repeat to increase the highlight. It's important that a paintbrush is just damp as if it's still wet, you might get a bloom like this. A thirsty brush is far better as it will better soak up the paint and water that rests on the surface of the paper. You can also lift paints when they're dry as long as they lead you. Since not all paints and shades are equal. Some will be easy to lift, some will be tough to lift and that is something you can test out on the colors you plan to use. To lift dry paints, you'll need to wet the area you want to lift the paint from and then use a paintbrush or a paper towel to remove the paint. You might need to press a bit, rinse the paintbrush, or change the side of the paper towel each time to get back to lighter version of the color that you're lifting. Be cautious with this method not to insist for too long as the paper might start peeling. Also remember that in general with lifting paints, whether wet or dry, the paper won't go back to being completely bright white. I like this technique a lot though, as the whites, the highlights some getting are subtle and they look natural. It's also a great technique to create a nice gradient between the painted area and the lifted area. Unlike the masking fluid or avoiding the paper methods, the edges are quite soft here. I use the lifting technique for things like painting skies, the sea to create a bouquet fact, and for pretty much every subject I paint. In the next lesson, I'll teach you another way to create light in a painting, so see you there.
5. Technique #3 : Ways to Repel: If you enjoyed the file only watercolor has to offer, and you like to feel free and creative while painting, let me show you some ways to repel watercolor while creating highlights and texture all at once. To repel whites on the paper, it's best to use clean water. You want the area you use this technique on to be covered in paint and whetstone. We're going to scatter clean water on there with a paintbrush or your fingers, whatever you prefer. This extra water is going to push the pigment away and let the whites on the paper show again. A name for this type of effect is bloom. You might also hear cauliflower or backrun. Creating blooms is a widely used technique to add texture to a painting as well as highlights and it's a fun one too. The difference with the one I showed you in a previous lesson is that this time, we are intentional with that effect. The amount of water you use is what makes us different from lifting the piece and you can see the outcome also differs. Like lifting, creating blooms may not get you the bright whites back in the paper, but it will add character to a painting. This is a painting I have made using this technique. An alternative is to use salt. You can sprinkle the salt on the wet paint and in a similar way, it will push the pigment away. Texture from the salt technique will look a bit different than the one using water. It also takes longer as you'll need to wait for the painting to dry to remove the salt. This is a painting I created using salt to create the impression of snowflakes. I like to use water and salt from time to time. I noticed that they work better when they're used with one single layer of paint as the whites will show better. A fun tool to repel water and create fun shapes that bring a little light into a painting is to use plastic wrap. To try this one, simply apply the plastic on the wet paint press to create shapes and wait until it dries. Next, we're going to talk about getting those white back by completely removing, embracing what was done. Maybe there to find out how to do it.
6. Technique #4 : Ways to Remove: In this lesson, I want to show you how to get your paper black or when you found that you've made a mistake. Technically, it's not used to create more light, but it can be very useful and serve that purpose too. Try and have a light hand with the two ways I'm going to demonstrate as they can damage the paper easily. First, I can suggest a special tool called a Magic sponge or magic eraser. It's something you'll find in art stores or online, and it can be used on dry paints. Wet the sponge then rub it into the paint. You can rinse and repeat, this tool will help you fix a mistake pretty efficiently as you can see here. I have used it in the sketchbook illustration that I had completely varied with too many layers and I managed to clean it all up and start over as so. I can only vouch for it although like I said before, it is to be used carefully as the paper could start peeling with too much back and forth. Another way that I used on the same sketchbook page is sanding paper. This one will make it difficult to get back to a fully white surface that can be painted on as it will quickly wear down the paper. It's best for fixing mistakes or a stain maybe. Here, I used it to remove the harsh edges I had created all around this painting. I didn't like the looks of it and I managed to soften them out and make it look better. Let's meet next to talk about how we can increase light and shadow.
7. Technique #5 : Ways to Increase : There are a few magic tools to help increase the light and shadows in the painting. These are ideal for final details and a little improvements. Even though they are best used in small touches, they will make a huge difference in the final outcome. A white gel pen or white Posca pen work wonders to add bright white highlights. These are examples of paintings I have made using these tools. Simply use them directly or the end of the painting on those areas that need an extra highlight after the paint has dried. [MUSIC] They're ideal to increase the light as they are precise, and it is difficult to leave bits of paper this small with the technique I showed you before. They can also be as white as the paper would be. Keep in mind they're better use very lightly. If the highlight seems a bit too bright, you can tone it down with your finger. It's also possible to scratch the highlight off with a fingernail once the gel or ink is dry. However, it will be difficult to remove it completely. I use white gel pens regularly. I find them brighter than Posca pens. I add some where when there is very sharp and bright highlights, they make a great before and after difference on the painting with just a few strokes. Similarly to gel pen or a Posca pen or white colored pencil or a white Pastel Pencil will help add small and precise highlights. These won't be bright white, they will be a lot softer. I don't use them a lot because I often use cold press, watercolor paper. The texture on paper doesn't allow me to blend those pencils as much as I'd like. But it's still a great tool for finishing touches. [MUSIC] White gouache is my all time favorite way to add highlights in watercolor painting. It's extremely versatile. It can be used very pure when is out of the tube and create very bright highlights. [MUSIC] Mix with more or less water. The effect will be as you like it, bright and opaque, or light and transparent. Gouache pairs of very well with watercolor too. It's easy to remove when you make a mistake, for instance, and will leave hardly any trace, just wet and dab the excess off gently with a paper towel. You can choose to make large strokes, thick strokes, whatever you want really as Gouache has to be applied with a paintbrush. [MUSIC] Gouache spreads out just like watercolor does, and this is fantastic to create flawless highlights. Mix with watercolors, you can even make a certain color opaque, even if it's a yellow that you want to layer on a dark brown. [MUSIC] Finally, for added fun, you can splatter white gouache. It looks beautiful on a painting that can even make from magical snowy scenes like this one. Another way to increase the light in a painting is to use a sharp cutting tool like a cutter. This one is called X-Acto knife. It is great to create a fine highlights in the shape of the lines. [MUSIC] I have used it to create highlighted hair and to create the veins of the leaf. Be very cautious with this tool, it's very sharp. Let's talk about shadows now. A way you can create more shadow is to use brown or black markers or Micron Pens. I enjoy using these Faber-Castell Sepia Pens. Sometimes to emphasize the shadows in the painting, or even draw some fine texture. Make sure your pens and markers are waterproof, especially if you want to use them to outline your sketch and paint over that. Here are some works I did for [inaudible] using a Faber-Castell Pitt Pen to create fine details and draw texture. You can get a similar result with colored and pastel pencil, and just like white pencils, they won't be as strong as a marker or a pen. [MUSIC] Another fantastic tool for shadows is ink in a bottle. I have applied it before with a q-tip in order to create shadows. I enjoyed myself a lot and I found it's easier to paint afterwards if you are more used to pencil work. Ink can be used before or after watercolor as long as it's waterproof and it will give your painting a certain flavor. A simple tool you can use is to splatter some paint to the paintbrush. Add dark or a colorful spatters to painting and it will nicely enhance it. It can also contribute to texture and of course helps the shadows. The sand here is a good example of how a dark splatters can make a painting look more interesting and balanced light tones for the darker parts of the painting. Please share your experiments and on findings with us in the Project Section of the class. I love to see what you come up with and what your favorite techniques are. In the next two lessons, we're going to talk about how to build up light and shadows for color. See you there.
8. Technique #6 : Ways to Balance : [MUSIC] In this lesson, let's see how colors contribute to light and shadow. There are no rules in art, but in general, a good balance between light and shadow will help a painting alive. Have color without much light nor shadow and the painting might feel flat and cartoonish. Have a lot of shadows but not a lot of lights and it might feel heavy and maybe even gloomy. Have a lot of light and hardly any shadows and maybe it'll feel like it's lacking a little bit of saturation. How can we find a good enough balance to build up contrast in a painting between the light and the dark parts so that it looks more agreeable to look at and even more realistic? A good rule of thumb is to make sure that along with your main colors, you have a dark shade and a very light one to work with. A safe way to go about it is to include white in that painting, and you can do it using any of the techniques I've shown before. For instance, I'll often use the lifting technique and white gouache and [inaudible] here. Yours can look different. Remember, you can mix and match the techniques from one painting to another. For shadows, I recommend to work with brown or black that you can add to your main colors to make them look darker. Indigo, which is dark blue, also works beautifully for this. Any other dark tone will work, perylene green, neutral tint, a dark purple. I like to use brown and indigo the most. As I know, I'll be able to mix them to other colors, but also use them on their own as well, since in landscapes, you'll often find blues and browns. I rarely use black on its own because of that, but I find it is useful to make darks like brown and indigo even darker. This painting is an example of how I've used brown to add shadows. Brown is mixed to yellows and oranges in order to make them look darker in places, but it also stands on its own and contrasts nicely with a much lighter sky and the water. We will work with red as our main shade for an example, as if we were to paint a red monochrome. Take red alone and the painting would be quite flat and boring. Add white and it becomes a bit more interesting. You can use any technique we talked about before this to add whites. For shadows, let's add a brown shade, and from there, I can mix it to my main color, use it alone or even add black to it to make it even darker. There really are several ways to go about this. Now, you can see we would be able to paint something using mainly red and still enhance it beautifully with light and shadow. I use this exact technique when I painted this blue rose and it doesn't look like I used anything else than just blue at first glance. As a beginner, I would test my colors on paper first and plan everything in advance. Nowadays, I've developed a habit to play with all the tools I'm giving you today to create the end result I'm going for, because I know them well, but the framework remains the same. At least one light shade or technique for creating light, dark shades using colors such as brown, black, indigo, and my main colors in between. Another way you can create light in a painting without worrying about preserving or adding whites is to pick luminous colors and play with color mixing. Let's take red again. It's quite bright, which will help give a painting some life. For added brightness, why not mix it with a bright yellow shade and equally bright color variation. For added shadows, let's create a dull version of this red to balance with the brightness. To dull any color, mix it to a bit of the opposite color on the color wheel. Green is opposite to red on the color wheel, so let's try this. Indigo or brown are still interesting choices and you're welcome to experiment with all techniques you learn here. I hope to have shown you with this lesson that with color alone, there is a lot of room for you to play and experiment here and you will get to apply some of these techniques to our projects as well. There is one more thing you can do to leverage color for great light and shadows, so let's meet in the next lesson before we get started on our project.
9. Technique #7 : Ways to Apply : [MUSIC] Previously we saw how certain colors, as well as color mixing can help with light and shadows, and in this lesson, we're going to look at ways to apply color, and how that affects a painting. How much you dilute pigment with water can impact light and shadow? Let's take indigo, a pretty strong shade that can create nice shadows in a painting. The more water you add, the lighter indigo becomes, the more transparent. On the contrary, the more pigment to add, the darker it becomes, the more opaque. The power in this technique is that with a lot of water, the paint will become transparent and the whites of the paper will come through. Notice how in this painting I used indigo, but I diluted it so much it is looking very light, and it contributes to adding light here. The strongest shadow here is a brown shade I applied in a very thick layer that was very little water there. It looks very opaque and because it's also pretty dark, it adds to the shadows in this painting, which goes to show that even with dark tones like brown and indigo combined, you can still create a light and shadows that will beautifully contrast with each other. Another way to change the intensity of a color is done with layering. Layering is when you apply a coat of paint, let it dry and add another coat of paint on top of the same or of a different color. Adding layers, will make the color less and less transparent. Depending on what color you layer on top of another you will create new variations. Let's layer orange here and see. The first layer it looks quite light. A second layer makes a look noticeably stronger. A third layer makes it become quite opaque. Now I'm going to show you how adding a different color on top of the first one can impact light and shadow. This brownish shade it looks quite tan here. But by adding yellow on top, it becomes slightly more luminous without altering the original shade too harshly. I use this technique from time to time when I feel my painting lacks some vibrancy. This is called glazing when you layer a color on top of another one like this. This desert scene is an example of that. I used the bright orange to give the sand a nice and vibrant glow, and the painting went from tan to vibrant with a few strokes. The opposite can be done to tan down a color that you find that a little bit too bright. Don't forget to download the summary of all techniques to keep them at hand, and I'll meet you over in the next lesson to talk about supplies and see what we're going to need to paint today's project. [MUSIC]
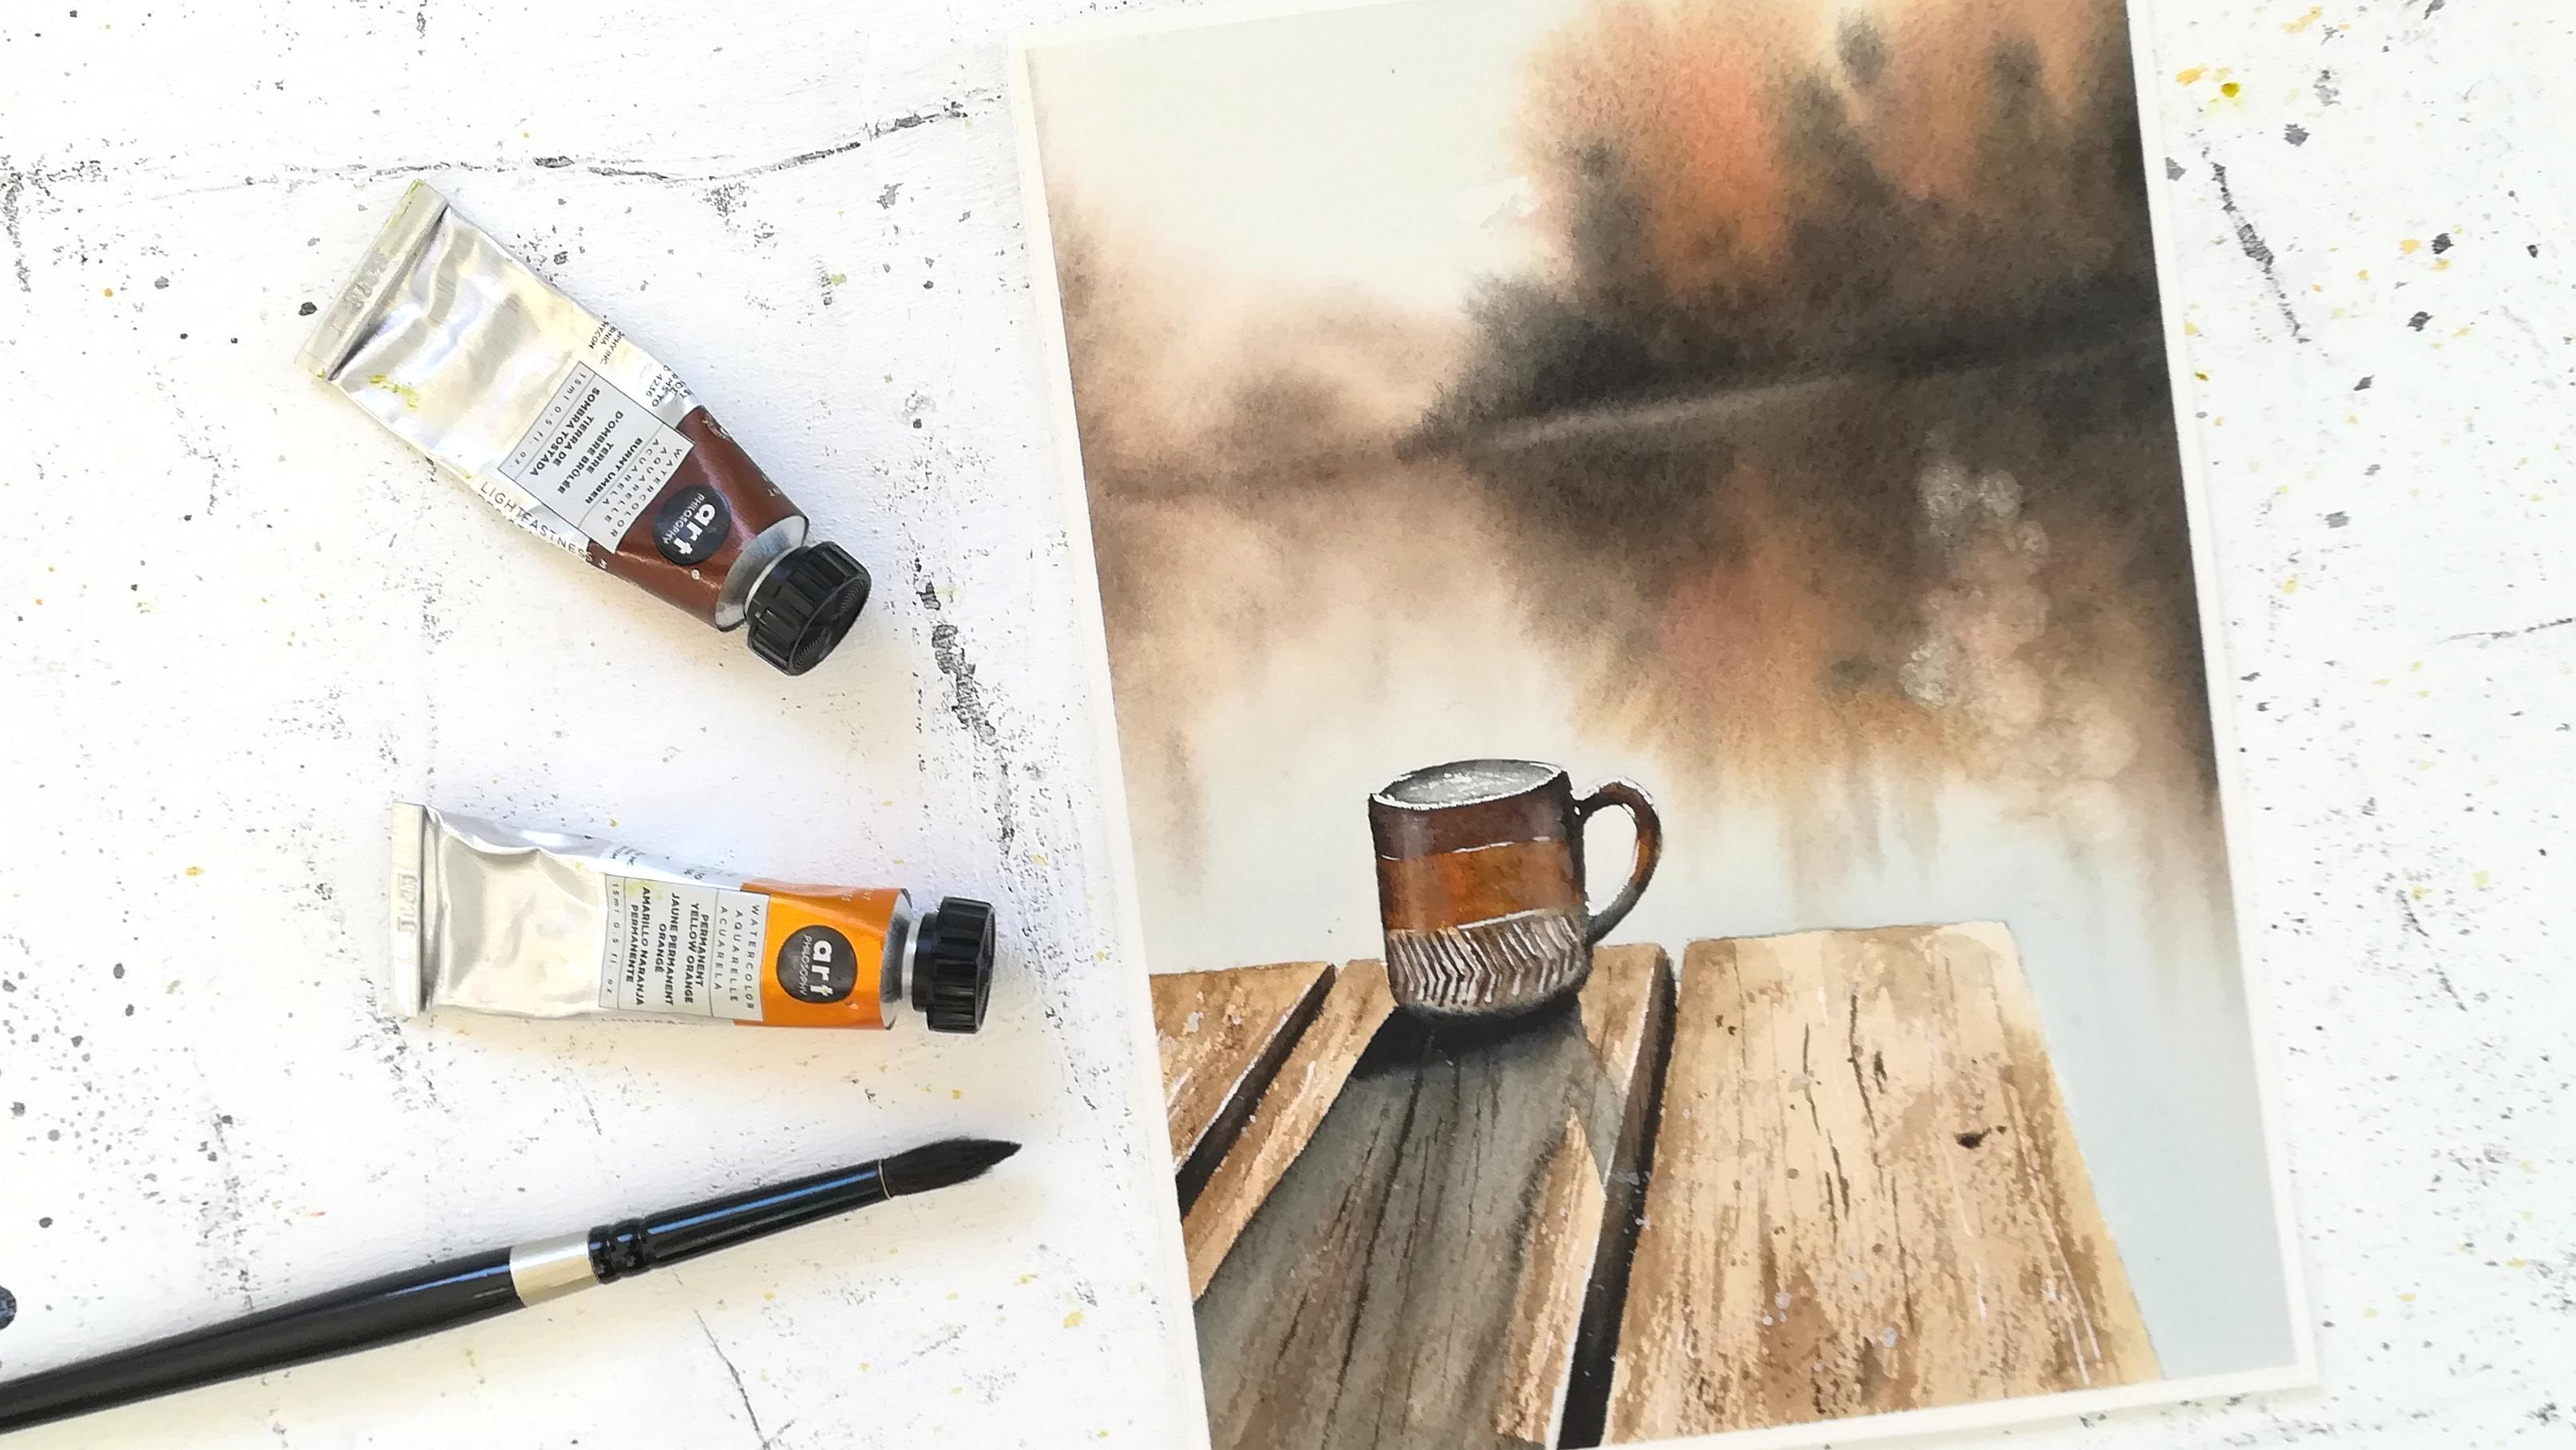
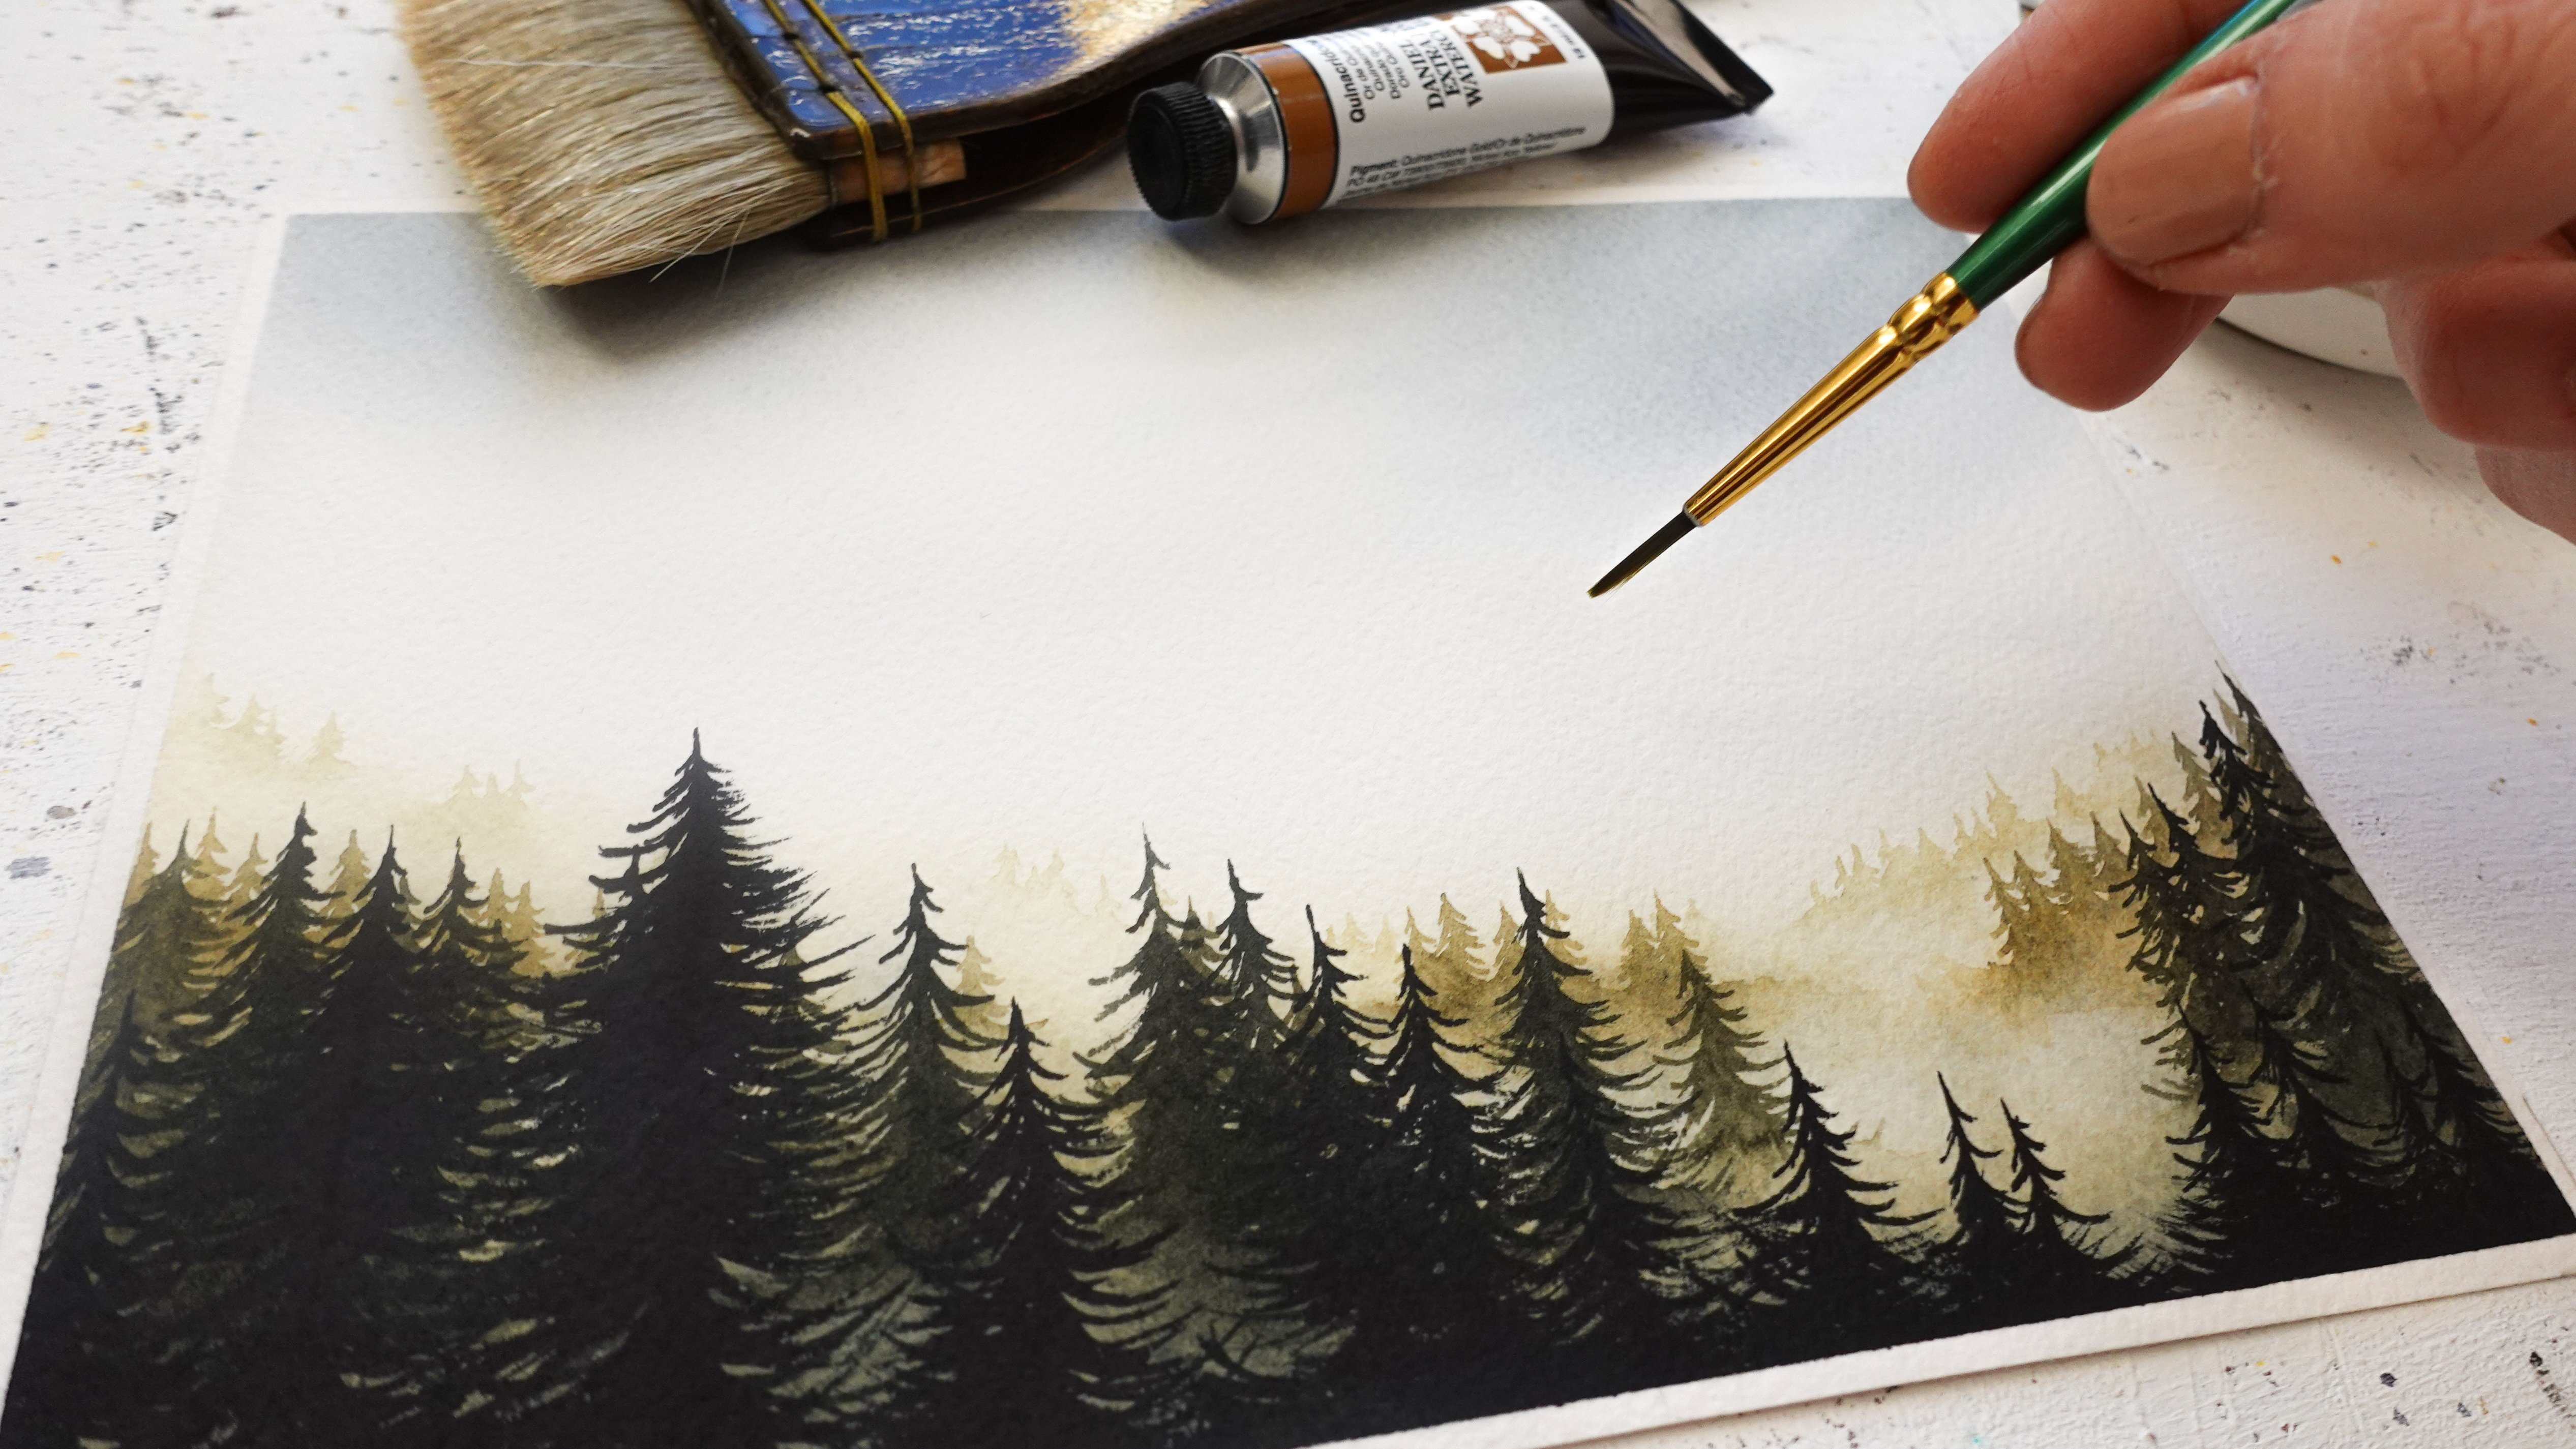
10. Useful Supplies for Today's Project: [MUSIC] In this lesson, I'm going to go over the few watercolor supplies, we're going to need to paint today's project. This is watercolor paper. I've cut out a six by eight inches piece. It is made of 100 percent cotton. Don't forget to download a detailed list in the resources section, but to give you pointers, I can recommend brands like Arches, Winsor, Newton, Canson I'Heritage and Saunders Waterford. Overall I strongly recommend 100 percent cotton cold pressed papers if you get to try, as they make the whole process easier and the outcome better in my opinion. [MUSIC] Masking tape is very useful to tape watercolor sheets down so they don't move around while painting. They're great to create those nice and sharp edges on around the piece too. [MUSIC] We will need a pencil, a ruler, and eraser to draw a quick sketch. [MUSIC] For paintbrushes today I'll use a large round brush for the background, [FOREIGN] size 3. For small strokes and fine details, I'll use two small around and pointed paint brushes, the silver brush black velvet sizes 4 and 8, and [FOREIGN] size 2/0 round paintbrush. [MUSIC] We will need only four colors today, a burnt umber shade or any brown you have, yellow or a yellow, orange, red, and indigo. The ones I'm using today are art philosophy, artist grade paints, student watercolors will do just as fine here. I have poured them into half paints and I like to use this to store my paints and mix colors in these large wells. [MUSIC] Next we will need a paper towel to dab our paintbrush on and remove masking fluid. [MUSIC] Have two jars of water ready, one to wet the brush, one to rinse. [MUSIC] To mask a part of my painting, I'll use this Pebeo drawing gum bottle. [MUSIC] To apply it, I'm going to use this color shaper. If you have an old paint brush, you can use that instead. [MUSIC] To increase the highlights will be using white gouache and a gel pen. [MUSIC] To increase the shadows that is not mandatory if you don't have one, I'll use a Faber-Castell waterproof Pitt Artist pen. This one is very fine as you can see here. Finally, to speed up the drying time, I like to use a heat gun. If you have a hairdryer or if you used to letting things dry on their own, it's an option too. [MUSIC] We're ready to start and next we're going to study the reference photo for our painting. I know we will take the painting step-by-step. If you're a beginner don't worry, just sit back, relax, immerse yourself into the painting process and take each lesson at your own pace. See you next. [MUSIC]
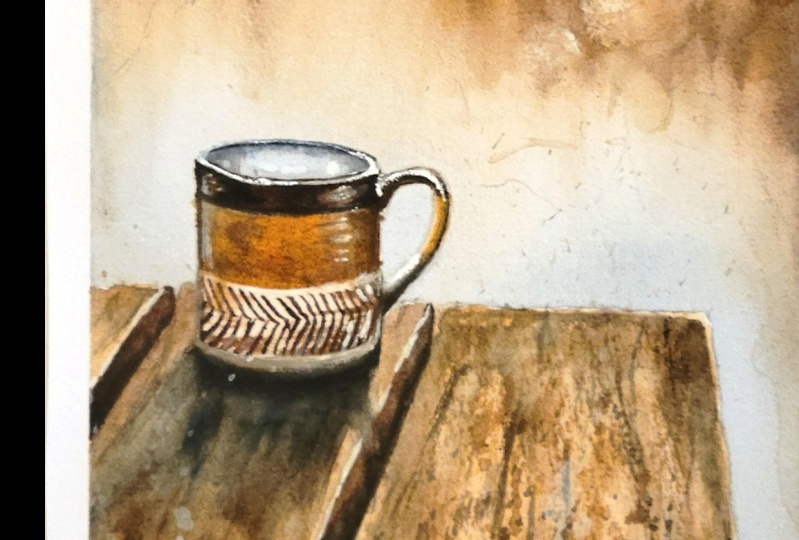
11. Part 1- Reference Study : [MUSIC] In this lesson, we're going to identify a light and shadow and the reference photo for our painting and later on, we'll see how to translate a photo like this one into a painting using the techniques from the previous lessons. The choice of the photo itself is very important when you paint from reference. As far as I'm concerned, I've noticed that if I'm not feeling the photo, if it doesn't inspire me a lot, then the painting might not turn out that great, it happened to me before, and all it takes sometimes is just to change the reference. This photo already sets us up for success as the high contrast between the light parts, the sky, the water and the table, and the shadows, the trees, and the cup is pretty obvious. There are also bonus elements to increase light and shadow even more, the bokeh effect, and the reflection of the trees, and the large and long shadow underneath the cup. Looking at this photo, I can already tell that for the painting to be successful, we will need to render this amount of contrast while adding a little bit of color so it doesn't look like a monochrome. That color is what I'd call the main shade in the painting to balance between light and shadow. Here it's orange and variations of it. There is some in the trees and the reflection, which is great for the shadows there to not look too gloomy, and I spot some more in the cup and a little bit for the table. Light and shadow is closely linked to the depth we're able to build in a painting. Depth will make a painting more believable. With landscapes, the pattern is always the same for that. Blurry backgrounds and light colors towards the back and detailed elements in the middle ground or in the foreground with bolder shades. If you take a close look at the photo, you can see the trees are blurry and colors in the photo look transparent for the most part, which indicates this part isn't in focus and quite far away, so we can already plan on staying loose there on keeping our paints quite transparent to render that same effect. In the cup, however, because it is much closer and in focus, the same colors look noticeably opaque. Rendering that with more layers or just a thicker wash of paint will do the trick and helps place the focus on our cup too. The table is quite light in color, which we can translate by using more water there, but there are small cracks and wood marks that we can place to make it more realistic with texture. We don't want to overdo it there to let the cup remain the star of the painting. Finally, the bokeh effect, the shadow underneath the cup and between the planks and the good contrast between sky, water, and trees, and cup will help us paint a piece that should look realistic and pleasing all at once. Lightened shadow will also help us make the cup and table look 3D. I hope this small analysis has helped you understand how to approach a watercolor landscape when painting from reference. In the next lesson, we're going to start drawing the sketch. See you next.
12. Part 2 - What (Not) To Draw ?: [MUSIC] We're ready to draw a sketch. First, make sure your sheet is firmly taped onto the surface you will be working on as we'll be painting right after that. I was very surprised to find out with One Accord Painting that a sketch doesn't need to be very complex, especially for landscapes. Most of the times, the simple line for the horizon will do the trick. In this painting, we have a little bit of detail, the cup on the table, and that's what we're going to need to sketch. [MUSIC] I'll start with the horizon line as always. You can clearly see it in the photo as its separate sky and the water. I'll place it at about a third of the page starting from the top. The table looks like it's located around the lower third of the page and you see the line isn't straight, so I'm tracing it so it looks accurate. Although, don't worry as we don't need to be extremely precise either. There's a little bit of perspective showing with the table. The planks look bigger when they are closer to us and they get smaller towards the end. Make sure to render this with your own lines. We already have a great base. Because there will be strong shadows between each plank and because the lines are so harsh in the photo, I decided to trace them so I know exactly where to paint those shadows. As a general rule, you can draw anything that already shows a very harsh line in the photo. It is the case with the horizon, with a clear separation between sky and water, and also the cup and the table. Anything else like the trees or the tiny details like the cracks in the table, we can paint without sketching first as you prefer. [MUSIC] For more guidance, I'm going to draw a light line where the trees end both in the sky and in the water but I know I could do without. [MUSIC] A very important element in the painting is the cup. It has a detailed shape and the star of the painting, so we want to include it now. This will also help to make sure your proportions look good since for now you can still erase and start over. [MUSIC] I don't draw every shape in a painting depending on what it is. For instance, if I'm painting a forest scene and there are rocks in the foreground, I might add them directly with the paint last, but that depends on the painting techniques you like to use and also how light or dark those elements are. If they are really light and contribute to the light in the painting, it might be a good idea to plan for these elements, right from the sketching phase. That's because you don't want to spoil them with dark colors. [MUSIC] You see there is no one size fits all here. The way to tackle a painting is a very personal thing and it will change over time. There will be techniques you prefer. For my realistic style, I want this cup to look sharp and that's why I'm going to be using a drawing gum. [MUSIC] Remember you can use an old paint brush that you rub this soap on first. If you don't have drawing gum or masking fluid, you can also avoid the cup and table, although I don't recommend that in this specific case because the cup is too small and detailed, it will be difficult. [MUSIC] From experience, I know I could avoid the table, but I'll have a hard time keeping those lines looks straight and sharp and it will slow me down. Plus the table is very light in color too, this is why I prefer to mask the areas. I might get my paint brush, I'm not painting the water. Since we are masking the cup, we might as well mask the table too. [MUSIC] Now, I'm going to let this dry completely and when it does, let's meet next and mix colors.
13. Part 3 – Winning Color Choices : In this lesson, we're going to mix the colors so we can focus on painting afterwards. My wells are ready. The colors for today are yellow-orange. You can have yellow or orange instead. Burnt umber, red, and indigo. Burnt umber and indigo are going to help us build up shadows. Red and yellow, orange will be our main colors. The ones that help brighten up this painting a bit. For lights, we'll use many of the techniques I showed previously, including white gouache and a white gel pen. Let's wet our paintbrush and we'll mix orange first. You see mine is called a yellow-orange and it looks more like an orange. What your own shade looks like is not very important for the end result, it's having your main colors, some light, and some shadow. I like to start out with water and mixes. Not only will we need transparent colors, remember that it is achieved by using more water than pigment, but it also is safer to start with light washes of paint. It helps to see where you're going with a painting and correct it if you need to. I repeat with burnt umber and mix more of it because there's a lot in the trees. The same with indigo. Not only will we use indigo for the shadows, but also for painting the sky and water. Here, indigo will serve two purposes; the lights and the shadows. Let's add a little bit of red that we can add here and there in the trees. We're done, see you next for our foundational layer.
14. Part 4 – Background Layer 1 : Set a Solid Foundation: [MUSIC] Now the paper was taped, the sketch is done, the colors are mixed, let fully relax into painting as we're going to take it step-by-step. If you were able to use masking fluid on the cup and table in your painting, see it at extra help for you to be able to fully focus on painting the background, that first foundational layer in the painting. This first layer is going to allow us to place the colors where we want them to be and even place the first subtle light and shadow. In this early stage, I like to use my round paintbrush size three, and it's a perfect size for the six by eight sheet I'm working on. First, let's wet our paint brush generously and apply the water on paper. Since this paper is raw right now, I recommend to wet it really well by going back and forth to reach all the nooks and crannies and insisting for some time. This way the water can sink into the fibers and if you add some more, there will be some on the surface too for paint to blend well. [MUSIC] You can see I paint over the cup since I want the small area inside the handle to be wet, I do avoid the parts in the table I didn't mask, and this is not because I want to use it for light, but because it is so light in color and such a precise shape, I want to keep it clean and intact so that later we can paint it with our light brown orange shade. With my round and pointed paint brush, the bigger one of the two that I'll use in this class, I'm getting ready to paint sky and water. We're going to use indigo with the transparency technique, meaning this is a watery version of indigo and it will contribute to adding light into the painting. To start, you can see I add very little. It is very light. We will increase the color in some areas later and take care to leave some of those very light areas showing. Now, let's apply burnt umber for the mountains on both sides of the horizontal line. You want it to look symmetrical and if it's not perfectly the case, it's okay. [MUSIC] Remember we want some of our main colors, orange and red to show, so this painting is not a brown modal crown, so I'm adding orange now. Remember at this stage the paint will be spreading out so try not to apply it too close to the top of the page, as the sky might not show anymore. [MUSIC] I am now slowly adding more painting into my mixes. This is because the sheet is drying even though you might not notice it yet, so we don't want to keep using too much water. This is also because we want to start building light and shadow. With a thicker brown mix and next a thicker orange mix, we will add depth to those trees, those top parts looking very light, sunburned, and those bottom parts deeper, darker. Adding more pigment to the mixes and some parts of the painting will also contribute to more vibrancy, since as you might have heard, watercolors dry lighter. [MUSIC] I am happy with the looks of those trees, so now, let's add some straight lines in the water to emphasize the fact these are reflections. [MUSIC] You can let this dry or use your heat gun or hair dryer like me. It does look lighter and we do have a nice subtle bluer shade showing for the sky and water. Let's meet next for a second layer. [MUSIC]
15. Part 5 – Background Layer 2 : Impactful Adjustments: [MUSIC] I enjoy working in layers, and certainly as this helps make small adjustments and little by little. I strongly encourage you to work in this way especially if you're a beginner. Let's wet our paper again in the same way we did before, except that this time around it won't take much time since the tooth// and the paper has already been filled with paint. We also don't want our second layer to keep spreading out so less water is great here, and since we already added pigment to our mixes, we are good to go. [MUSIC] I'm starting with the water. Some parts of darker towards the bottom. Remember layering contributes to adding shadows, and here this will contribute to depth too. [MUSIC] The closer the water to us, the darker. Notice that I leave that area in the middle untouched for added light. [MUSIC] Now I want to work on the trees some more, to increase the vibrancy of our orange shade to spice the painting up a bit, and also make the burnt umber shadows a lot darker. [MUSIC] With burnt umber, I avoid the top sub burned part of the trees. [MUSIC] In the exercises, I explained that you can make a dark color even darker with another. This is the case here with burnt umber and indigo. See how adding indigo to burnt umber turns into an intense and dark brown shade. This is going to maximize our shadows as would be quite limited by using just burnt umber. I start from the horizontal line and I make sure to add it in places too at the top to build a contrast between the vibrant oranges and this brown shade. [MUSIC] Lets adds some red for our vibrancy, just a bit for me. I will prefer for my [inaudible] just to stay mainly orange in color to match the cup and the table. [MUSIC] I increase the impression of reflections. Now the paper is drying and the paint is thicker, they will show more. [MUSIC] I know the paint will look lighter when dry, so I'm not afraid to add a thick mix indigo now at the base of the trees. [MUSIC] A cool way to show how the trees at the bottom are part of the water, is to create a small highlight beneath the [inaudible] line, to separate both set of trees in a very subtle way. If you look at the photo, you can even see it there. To render that I use a lifting techniques on wet paints. With a clean and thirsty brush, I simply press to soak up that paint in that area and create a highlight. Notice here how all these techniques I've shown you come handy in their own way. Lifting is my favorite because it's so useful and discrete all at once, and here it is perfect. It looks great. Let's try this. [MUSIC] I can't wait to get started with the main elements in the painting. See you in the next lesson to paint the table. [MUSIC]
16. Part 6 – Table : Painting Light First: [MUSIC] In this lesson, we're going to paint the table. But first, let me take off the drawing gum. All even on the cup, so I'm sure the shape remains intact. [MUSIC] Painting subjects that are in focus, such as the table and the cup, is a different story than painting far away elements that are not meant to look detailed. This is why here and for the rest of the class, we're going to paint without wetting the paper. We're just going to fill out the shapes we drew with color. We're going to paint the table on a different way than the cup. If you look at the reference photo again, you will notice the table is very light in color. This light brownish-orange tone makes the most of it. The only dark tones are the shadows between the planks and the shadow from the cup and the few cracks. This is why for this table, we want to start light and later add the shadows. I'm going to use this round and pointed paintbrush again. I don't use the smallest size I own yet, as the table is quite big and this size of brush feels more suitable. I noticed the shade in the table is a brownish-orange and it's convenient as we do have all these colors in our palette. Let's just mix them up. [MUSIC] Notice I'm using the transparency technique once more to paint this table. For it to look light and contribute to enlightening this painting, it's best to dilute the pigments into a lot of water. Remember, you can always adjust later with another layer. [MUSIC] To avoid this table to look like it's one same exact shade and make it a bit more interesting, I'm adding a few strokes of the same mix only it's a tiny bit darker. [MUSIC] As long as overall, the table looks a lot lighter than the cup and the trays, it will contribute to balancing shadows really well. It's okay to add a little bit of pigment in your paints. [MUSIC] We're done here, so let's meet next to add shadows on the table. [MUSIC]
17. Part 7 – Table – Adding Shadows: To paint the shadows on this table, I'm going to start with burnt umber to make them a lot darker than the mix we have made previously using burnt umber, orange, and a lot of water. This time we want the mix to be pretty dark. You can see that burnt umber mix is also a bit creamier than the latter because there is a bit more pigment in there. I'm simply filling up the lines there to make it look like there's a gap between the planks. [MUSIC] Before it dries I add this mix of burnt umber and indigo that we used in the trace before. It spreads into the other color, creating a nice gradient between the burnt umber and dark brown shade. Remember, this is our darkest shade and it's very effective to emphasize shadows. As you'll notice, we don't need to add a lot of it. Just a touch will be enough. It's just the same with a very bright highlights we will add at the very end. [MUSIC] It's looking great, but you might see how the planks look bland and boring now, out of balance where the strong shadows, this is when texture comes in. Let's mix more of burnt umber and orange. This time we're not adding water. For texture to show and contrast with the base layer of the same color we painted before, it needs to be thicker with paint. We talked about it when I mentioned that the more paint there is in the mix, the more opaque it becomes, and the more it can contribute to building shadows. We are going to use the dry brush technique here, which is great for texture. This is why you see me dab my paintbrush on the paper towel a few times to get rid of most of the mix and make sure what's left on the brush isn't this wet. Now, let's brush the surface of the planks and some texture starts shelling. Make sure to do it in the same direction as the planks. [MUSIC] Next, let's use this finer paintbrush for more detail. I want to add a tiny bit of the strong shadows for texture so I'm using a dark brown shade we got with burnt umber and indigo. Let's paint the cracks with it. There are not a lot of them, so it will enhance the light shade from the planks nicely while balancing with the shadows that separate each one of them. [MUSIC] For adding texture and fun, I'll splatter some paints too. As seen in the technique section of the class, you can use splatters to both highlight and to add a bit of shadow. In this case, I'm using it for shadow and texture so a darker mix than that of the table is required. Early I mentioned that if you find your first layer too light, it's possible to layer more paints to make it darker. I'm going to do just that, but in some places of planks, not everywhere, because as such it's still missing something. I find the base layer. It looks like one solid shade still and I want to add some variety to that. [MUSIC] Let's use layering to increase the shadows and the spaces between planks as well. The right side should be darker as it is to one in the bottom of what we can see of those paces. [MUSIC] I'm mixing more of the burnt umber and indigo now to paint a long shadow that we can see beneath the cup. Try not to make it too dark and opaque as we want the table and texture to show still. Even though it's a pretty transparent mix, it's still a shadow because the color is a lot darker than the table is. This is why I keep talking about balance between light and shadows. [MUSIC] We're ready to paint the cup, so see you in the next lesson.
18. Part 8 – Cup : Painting Shadows First: In this lesson, we're going to paint the cup. First, let's remove the drawing gum. For the cup we're working definitely from the table. This is because if you look at it, it's the majority of dark tones and a little bit of light ones and the highlights. It makes more sense to start with the shadows first and add the highlights later. You can see the shape of the cup is preserved nicely by the drawing gum. The bottom of it looks a bit off, but that is absolutely fine as we can emphasize the shadow there and make the edge better. Watercolor is known as a difficult medium, but I find that when you train yourself to work with the water, when you play with mixing colors and when you make sure to start light, it becomes easier to paint. Anything you set your mind to with time and practice. You're on the right track practicing as right now. I don't want a harsh edge on the shadow. I'm reinforcing beneath the cup, so I make sure to soften it with a clean and slightly wet paintbrush. Let's make some more burnt umber and also burnt umber and a lot of orange to create this nice color we can see on the cup. You can make your mixes quite creamy with pigments as here, we want these colors to be opaque and make this cup stand out. Now the lighter parts have been painted in this piece. I know I can use opaque paints with confidence. I want to do it the other way around. I feel safer, I'll start in light and adjusting little by little to create a nice balance in the painting. [MUSIC] The bottom part of the cup is lighter for now. [MUSIC] Since I used indigo and burnt umber to create the shadow beneath the cup, I'm using this too, to make the inside of the cup that we can see looks hollow. I'll add a bit more at the bottom too and a few details on the cup. [MUSIC] I'm going to keep adding to the handle and parts of the cup. [MUSIC] We're getting really close to finishing this painting so let's meet next to add some light to this cup.
19. Part 9 – Cup : Adding Light: [MUSIC] This lesson and the next are where the magic happens, where everything comes together in the painting as now we're going to be adding highlights to the cup and later we'll be adding some final touches. [MUSIC] I'm going to work with my gouache here. [MUSIC] I recommend to pick it up straight from the tube so it's thick and shows as bright white even after it dries. [MUSIC] I'm going around the edge of the cup first and next I'm going to use the reference photo to place highlights on the handle and the cup itself. [MUSIC] On the cup itself, the highlights are not as the others. I'm diluting the gouache with water a bit. [MUSIC] It's not shown on the reference, but I think adding some white gouache next the patterns will help enhance it better. I'm going to do that. [MUSIC] Let's meet in our final lesson and finish amplifying line and shadow.
20. Part 10 – Amplify with Details: In this last lesson, we're ready to make this painting even more beautiful with added light and shadow and some cool techniques we talked about previously. First, let's splatter some white gouache for added highlights on the table. [MUSIC] Look at how pretty it's looking already. It's really adding to the overall light. Make sure to dilute your gouache a bit, as you do this, otherwise they won't come out easily. Remove water from the brush or the splatters come out too big. With a white gel pen, I'm going to add a few sharp highlights in places, I'm doing it spontaneously where I think it's needed. This is really the stage in the painting where I'm having the most fun and impatiently waiting to see the final looks. [MUSIC] With my Faber-Castell brown Pitt pen, I'm strengthening some of the shadows. I could have done without honestly, but for the class I wanted to show you how I use it. [MUSIC] I love this technique here to draw smaller, final cracks in the wood highly effective. [MUSIC] Now a cool one is to lift the dry paints. It was one of the first techniques we talked about. Wet the paper in the shape of a circle and rub a paper towel in there to remove the paint to create that bokeh effect. [MUSIC] I would love to see your version of this painting and your exercises, so please share them with us in the Project and Resources section of the class. See you one more time with a few final thoughts.
21. Some Final thoughts: [MUSIC] Congratulations for completing this class. I hope you had a fun time painting along and learning about these light and shadow techniques. Before you go, don't forget to share your project and your techniques practice in the project and resources section of the class, I'll be glad to help you out if needed and give you some guidance. You may also leave me a class review here on Skillshare to let me know what you thought of the class, and follow me so you get updated every time I upload a new painting class. I'm active on YouTube and Instagram with loads of sizzle inspiration. You can find me there as well and use the #createwithfrancoise to connect. Thank you so much for painting along with me today and see you in the next class. [MUSIC]
 Francoise Blayac, Professional Artist