Transcripts
1. Class Introduction: We're going to continue
painting our gouache postcards. We've covered one season
in the previous class, the winter and now it's time
for spring after winter. Spring counts. We're going to paint a lovely color wash
spring painting together. Now if you haven't
done the first-class at all, don't worry, you can just join this class
because I'm going to take you step-by-step through
this whole process. Once again, we're
going to highlight some different parts than what we've done in the
previous lesson. For spring, we of course, need a lot more colors
than for winter. And I want to show you
how to mix colors and how to just use the
three primary colors, adding black and white to it. And how we can get
a great range of colors with just only using. As with the previous class, we're not going to paint a highly detailed postcard
because a postcard is small, so we don't want to add
all kinds of details. We want to give a nice
impression of the spring. We're going to just do
one more challenge, add one more challenge
to this class. And that is, we're going
to use two references. And one actually is a
fall, autumn reference. And we're going to turn
that one into a painting. Also, we're going
to paint an animal, which we haven't done before
in the previous class, which only focused on
the landscape itself. But we're going to add
now two swans to it to info that spring feeling
even more in this painting. Well, I would say move
to the next lesson where I'm going to explain
what you need for this class. And then we're going to
have some fun paintings.
2. Setting up: In this first lesson, I'm going to give
you an overview of the supplies
we're going to use. Now, I'm gonna give you
a list of supplies, but you don't have to use
all of these supplies. Pick what you need depending
on the level you're at. You may need some more supplies,
awesome less supplies. But I'm gonna give
you some necessities and some possibilities
that we can use. Alright, let's do that. You already see a number
of materials on my desk. Now let's start
with the easy part. You may need a pencil
depending on your level. If you want to paint right
away with the brushes, without drawing, you can
do that if you want to. More security and say, I'm not that comfortable with painting without having a guide, then you're going
to need a pencil. You may need a ruler, and you
may need some masking tape, but this depends on which
paper you're going to use. Now, that brings me to papers, but I'm going to do
the brushes first. I'm simply going to
use these brushes. And that is a round
brush 12th, round brush. And I'm going to use
a flat brush 12th. Now, if you don't have
these exact sizes, somewhere around a
flat brush, 12th, if it is a ten or
14, that's fine. Same with the round 12th, around the 12th
and with the five. If you have a four or a
six, that's okay too. Basically we're going
to use one flat, a bit larger, flat, larger round brush,
and we're going to use a small round brush. These are just regular,
inexpensive brushes. You don't need very
expensive brushes. I'll leave that up to you.
Whichever brushes you want. Inexpensive ones,
expensive ones. The next thing, paper. Now you see a number of papers. What do you could use
is something like this. Those are ready-made
cards already. Under watercolor paper. We're going to use
watercolor paper. This is a totally
GLUT1 and this is, as you can see, you can
just flip through it. Both are fine texture. I wouldn't go too too rough. This is still pretty
okay because it's red. It's a bit smooth steel. If there's paper with a lot of texture and you
feel love texture, you may not want to use that. So a bit of a fine-grain paper, and this is also a
regular, regular paper. So you could use
something like that. These are 300 g. I think these are 200 g
and these are very smooth. This would work but it might bulge a little bit
if we're going to use water. I would say 200, 300 g, if preferably 300 g.
So ready-made paper, I'm not going to use those, but that's an option. That explanation just an
inexpensive watercolor paint, a block like this. I'm going to use this one now this one is glued all around. And I'm going to use the
tape to set my cart size. So that's why I have the ruler and I have a postcard size here. This is from a previous
pouring painting that is a postcard size. I'm going to use
this as a guide to draw on that in
the first lesson. This is the first lesson, but it's not really
less than an overview. Regular watercolor paper, just Dadi quality
300 g I'm using. And then we have some
different watercolor paper, 300 g hundred 40 pounds,
it says on here. So I will use that as a guide. If hundred 40 pounds or 300 g. This is hot press paper. You can use hot
press paper to you get a slightly different effect. But if you don't have cold pressed and you
could use Hub dressed. So what I'm using
is cold pressed. You could use hot press
to the other alternative. You could use mixed media paper. And I've got two of them here. This is a smooth one. I need a paper. There's everything on. It's probably a nice smooth one and this is 250 g
hundred 15 pounds. That is good too.
That would work too. Or you can get
something like this. A bit rougher with a texture, but the paper is not too rough. So that would work
too mixed paper. Now if you don't have any of this watercolor
paper laying around, either hot press or cold press. You could use card stock to, but makes sure you get
sturdy card stock, preferably white,
or you could use some light gray color
or even a light blue. That would work
too because we're going to work with some blue. So that worked pretty well. I'd call us I would
not use I think. So around 300 g
wanted 40 pounds, 250 grounds hundred 15 pounds. That will work for a card
stock to or a paper. Alright, we need one more
thing, and that's the paint. The next thing which we
of course need is paint. Now that is actually not
the last thing I said, but almost the last thing. We're going to need some paints. You see all kinds of paints
here, gouache paint. You can get various
qualities, various brands. And if you have
followed the first one, you see me use this
inexpensive brand that is laying here. Add philosophy, premium
quality, just regular. I have the arteries are set. You could use something like
the royal Thailand's fine. What is it? Designer quality? This is designer gouache, or the artist squashed by Santa Fe or any brand
you want to use. Winsor, Newton, Schwinger, whatever
brand gouache you have. And if you don't have
a brand gouache, then I would suggest get the little starter set
like this or this, or this is expensive. This is a lot less expensive or you could just
get a set like this. The cost, I think $20. You'd set like this with
all kinds of colors. You could buy that too if
you would like to use debt, of course. I'll leave
that up to you. What I'm going to use
in this class is, I want to put this aside. I'm going to use this set with only five tubes in it and
three colors. Actually. I'm going to open that
since I'm going to use it. So these are gonna go, but if you have the set, whatever sent, you have
whatever said you like, use, go for it. And if you have a set with
a huge range of colors, then you please
use those colors. I want to mix my colors since I don t know what kind
of set you have. So let me just
assume you just have a little set like this starter
set with three colors. And in here is then
surrealism blue. And of course it
should be reading. This is a ruby red. We have a lemon know, a cadmium yellow,
light lemon yellow. We'll do black and white. That is all I'm going to use. And I'm going to show you
how to mix all kinds of colors with this and
how we're going to get a nice spring painting. But I said, if you have a huge range of colors
and I'm going to mix a light green and please pick your light
green, of course. So blue, red, and yellow. And depending on the shade of
blue and red you use, that. Of course, determines
if you're going to get bright colors are a little
bit more muted colors. So serene blue,
just a regular red. I would say this is a ruby red, but irregular red would be fine. And a light yellow or a
lemon yellow would be good. And then a black and white. Well, that's it for the paints. The next thing
we're going to use, we're going to put our
paint on something. I'm going to use a
glass plates for this, but you can use with
a metal pellets, a plastic palette, or just regular plate to
mix your paint on it. I'm going to use these
regular brushes. If you have just a
water brush like this, which you fill with water, just a regular round one. You will get away with that
too. That is fine too. So if you don't have
a regular brush on a use something like
that, that is fine. No, that is not. We need one more thing, of course, actually
two or three things. We need to reference photos, which you can't just
start painting. We need a reference guide,
which we're going to use. Let me show you that there's
another thing we need. We're not going to use
these colors just pure, although we will do a little
bit of pure painting, we're going to need
some water, of course. Two jars of water, two cups of water
to moles of water, leaves it up to you.
What you put it in. One of them is to
rinse the brush. The other one is to
use for the painting. So rinsing the brush and
use two of them so that we don't adopt with very
dirty water while wrenching. We don't want to use
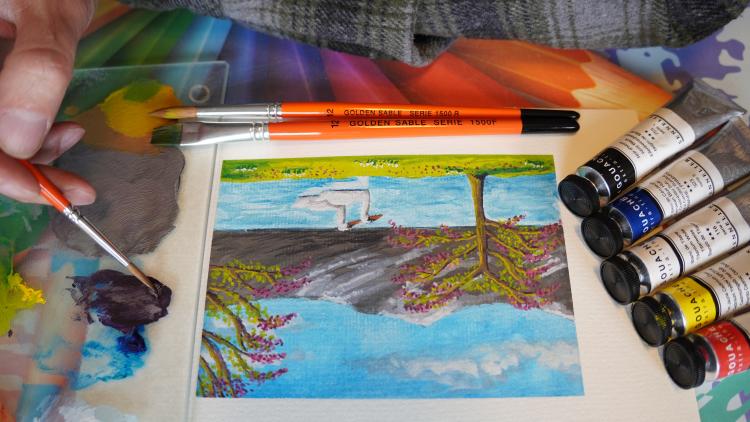
that same water. Alright? Then of course, the next thing we
need is a reference. Alright? This is a reference
we're going to use now, you notice probably
one thing right away. This is not a spring painting. We're just going to change
the colors on it. Simply. We're going to use Spring
colors instead of four colors. What we're not going
to paint this, these people and these benches. I'm going to leave them out. But then we end up with a slightly empty scene
if we take them out. So what we're going to
add in is this one. So we're gonna put
the swan somewhere there in the water to get a nice spring seen actually we're gonna
do to swan center. So I'm going to paint
right from this reference. But with the class supplied,
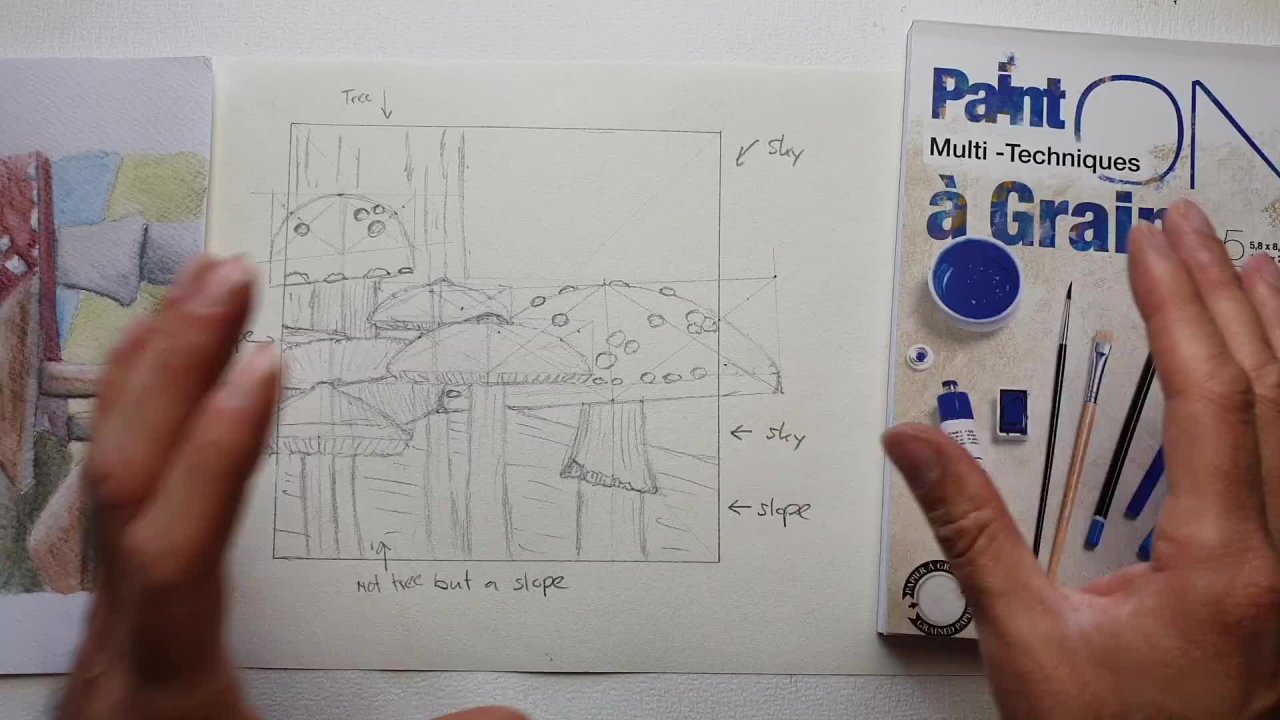
there is a sketch, and this is the sketch that, that is supplied with the class. You can just use this to draw. Now, if you're going to
draw this right way on the paper, I wouldn't do that. I would wait with
that until we do our first layer and then
draw something on top of it. I'm going to show you that
in the lesson anyway. So don't start with drawing. Go to the next lesson first. Let me explain some things
before you start drawing, and that is really
it for the supplies. So now we know what we need, what we can use. Let you pick the options
you want to use. And then we're going to start painting in the next lesson.
3. Preparing to Paint: Now that we have our supplies, we can start painting. Well, actually we need
to do a little bit of preparation before we
actually going to pay. At least. I need to do some preparation because I have a
different paper size. Then the postcards
I want to work on, we again are going to
work on a postcard. This is the postcard go
wash painting series. And the first time
we did a winter, now we're going to
do a spring one, but I'm going to prepare
my postcard first. So let's do that. I'm going to use this
block to paint on just a simple study quality. But this is of course
a larger size. Then postcard, I want to use an, a postcard here in Europe
is ten by 15 and I think in the US it's four by 6
", something like that. So what I could do,
I could measure it and then draw a box and then
start painting in that. But the other more easy
way is just to get a ready made postcard already. This is CO2 postcard size
gets some masking tape. One will do. I'm going to
put one on the bottom first. So this will be my
guide on the bottom. Put it in line with the paper. They go. And now
I'm just going to tape around this postcard. Put a postcard there. I do one on the top first. Let me make sure
I'm getting this pretty much straight since I'm a little bit away
from the camera. So you can do it extra
Leanne, get closer to it. I need to do it.
Estimated little bit. Hopefully, that goes well. I think I'm okay. One on the sides. So if this is the side here, the ego and the last one, I need one on the other side. And then I basically
have a postcard size. Push that up a little bit
thicker paper around this edge. And Diego. And that's what the
size I'm painting in. And then later on when I
remove the paper tape again, I get a nice straight edges
and I can cut it out. Alright, so that's the
preparation of mine. Said, we're not going to
use the pencil right away. If we're going to
draw on this and then paint our
first layer on it. Chances are that you have drawn is either con or pretty faint. So we're not gonna do that. We're going to start
with our first layer. I've set up everything and I'm going to get
the reference with it. Now the first thing,
what we're gonna do is we're going to paint the blue when we're
going to paint the sky and we're going
to paint the water, but we're going to actually put the blue on the whole page. That is why we don't draw, start with the drawing. So for that, we're
going to get that blue. I've got a really in blue and that should be
reasonably light blue. I'm going to put that on my
little bit of my palette. Now, what do we could use
with this is a scrap piece of paper and to test our colors, That's basically
what we're gonna do. Just a simple script
piece of paper. I need to make sure
that the blue that I'm getting here is to blue I want I'm going to
use the flat brush, going to add some water to it. I'm gonna make this
reasonably wet. Want to check out the
pure color first. Now normally you would
make a color swatch, but since we only
have a few colors, we can just do it and test
our colors like this. Now that would be the
color starting with, and that would be
pretty much okay if I smear this
out a little bit, I'm fine with this color. Put that aside. I'm
going to pick this up with some water and I'm
going to do my first layer, almost like a watercolor. Make it nice and wet
and start painting. Show you pages clean
and get this on. For the first layer. Now, contrary to watercolor, gouache will run
out a lot quicker. So I need to pick up the paint a bit more than if I would use watercolor on
spreading this out nicely. And I'm blending it in
just easily like this. And this gives me right away
the first layers I need. Pick up some more. If you don't get all the
same color everywhere, that is actually not a
problem since the sky is not one color anyway. So there you go. Here's our first layer, almost. And there we go. Now we need to dry, wait for this to dry. And that should be since
it's a more water, this paint is not
spreading on the edges, showing that these
edges good too. I'm spreading it out, Diego and all the ones. I want an even layer. So I don't want these blocks. Let me do it like that on it. I don't want to smear them
out and get nice even layer. And then this will
blend in very nicely. Alright, and that's
the first layer. And from here now you can, if you have done this, I need to do the edge
them with better. I see you go. If you have done this, then you can now do draw
the sketch on this. If you do this with gouache, you could do this really thick. Self, this watery than your sketch would
basically be gone. Alright, Now this guy of course, is not completely
blue like this. There is some clouds in
it, things like that. So what we're gonna do next, we're going to bring a
little bit of color into it. So what I'm gonna do on top and pick up some
of the paint again. I'm going to make this
slightly darker on top and just painting it in quite rough like this. And I know the mountains will
be around here somewhere. So close to the mountains. Now of course not
gonna do that dark. Alright, and then I get a
nice color nuance right away. You might get a little
bit the idea of some clouds in it where I
don't put this dark color. And that will be
my second layer. Some darker color
on this side here. Alright. Now the water I'm going to think we're
gonna do later on. We're going to leave
really light like this, and we're going to add our
things on that later on. Okay, I think I'm okay
with this first guy. Very simple. You could add, of course a little
bit of clouds. Then you'd get some white. I should have some white here. Little bit of Titanium white
will use more later on. Rinse my brush. Underwater is still
reasonably clean. Pick up some white dab in a
little bit of white in here. Play that. Do some hair
to just a simple Cloud. Nothing fancy since it's
just a simple postcards. I think we're going to
leave it like this. Good. I'll let it dry. Alright,
I'm gonna leave this to dry. Now if you work wet like this, dry and we'll take a little
while to speed it up. You can use a hairdryer. We're gonna do the
hairdryer to speed it up. Now, what are you gonna
do with your hairdryer? Make sure you don't
put it on the hardest. Like if I put this
on really hot, I'm putting on the middle. And I'm putting it on the middle here and just go over it. I'm assuming you can still
hear me a little bit. And that speeds up
the drying nicely. And that's almost right. Dario, that speeds
up the drying. Now this is dry. This is ready for
the next layer. Now the downside of using a hairdryer when
it's really wet, it might buckle a little bit later on that all
straightened out again. What we're gonna
do next is we're going to do the sketch on it. Now if you know how to sketch, then I would say just do that. Or if you don't even want to
sketch and paint right away. And I would say, move
to the next lesson, but I'm just going to quickly
show how to sketch on this. Now. This is pretty much dry and I'm okay with the car like that. I'm okay with the sky
since this is gonna be a simple, simple. Postcard. We might add some
clouds later on again, some more white, but for
now we're going to leave it like this and we're
gonna do the mountain. Now if I take the
photograph with it, I clearly see that the photo
is divided into three parts. I would say that the horizon
line is about a quarter. Might be a quarter
from the bottom. And the mountain comes around
the top of the mountain, the third from the top. Now, it's going behind there. So what we're gonna do,
we're going to sketch this in very roughly. Now for this, you could
use the sketch or you could just do as
me. You could do. You could of course, use a ruler for this, or you could just estimate and you could actually
measure up everything. But this photo is probably not
totally on the right size, so you need to compensate
a little bit for that. I'm going to put my photo there. I'm going to decide where
I'm going to do that line. So a set, the horizon line
is around a further quarter. I'm going to put it at a third to make it myself slightly easy. So I know this is
ten, more than 10 cm, so I would need 3.5 for this, the ego, and this will
be my horizon line. I'm going to put
my ruler straight. You could of course, measure
on the other side too. So that will be my
horizon line above here on the top of the mountain
would then be around there. So the half in half of that. And I'm just going to
sketch in that mountain. Since this doesn't need to
be completely accurate. There we go. And that will be my mountain
range behind them. Then we have a little bit of the ground and it's
not totally straight. So I'm putting down the ground. Not totally straight. And this will be the water. This will be the mountain range. And here would be the tree. Now the first tree, I want to say, look
at the photograph. Now this is an easy tree. This tree, I would say if I would measure this accurately, this will be 26 cm. This is on 6 cm. So there will be
around that would be around a quarter from the sites. Less, but we're
gonna do a quarter. So if I have 15, 14 cm than a quarter will be three-and-a-half centimeters
to around 3.5 cm meters. Here. I would get
the tree there. What I'm going to
do next is I'm just going to sketch in the tree and I know it comes at
the top of the mountain. Now I need to know
where my 3.5 is. Keep on talking and then
you lose your points. I think it was at this
point, it was here. Okay. So the tree comes around here and I'm not going to do the
width of the tree, just the guideline for the tree. The ego, and the Trish has
quite a lot of branches. I don't want to draw
in all these branches, so three splits
basically at the top. And then we're having
a branch right there. And then there's a branch there. And then I'm gonna do one
branch in the middle. And we've got a branch
in-between here that goes up. And then there's a branch going down a little
bit like that. And that's what I'm
gonna do for the tree. And then we have the
tree around here and those are just branches. And now I'm in my paint. Shouldn't do that because
now I have blue fingers, so I got to get rid of that. I will leave that to dry
carefully now around here. So around here we have
those branches from the tree going in front
of it completely. And starting here
at the mountain. Here's the first one. We have one forking
away. And there you go. Now if we're going to
paint in the mountain, this first one, this
probably will be gone again. So, but just to show you where everything a little bit goes, this is roughly the guide
we're going to use. The last thing we need,
of course, are the swans. And I want them around here. So what I'm gonna do
is I'm going to draw in the bottom of the first one and
I'm gonna give him a nice long neck like that. Head will be around there or her head depending
on which one this is. And there you go. As you can see, I'm not
painting, coloring, coloring, drawing this
in really accurately. Just get the impression
of the swan. And Diego. That's gonna be my swan. And later on we're going to
do this nicer of course. And then the second one I'm
going to get behind here. We're gonna give that
a nice long head to be around there. This one, the beak I'm going to remove and make that
slightly smaller. There you go. That looks better. All right, and now I've
got my sketch ready. Now, part of the
sketch will be gone once I'm going to paint, but I will paint
it in right away. But if you need to
reach catch parts while things have our painting and things have
disappeared and yes, of course please do so. Now we have everything ready to start doing the rest
of the painting. We only have the background now, but from here we have our guides ready and we can
do the painting. So I'll see you in
the next lesson where we're going to
add the mountain. Probably do the foreground here. Okay, see you in
the next lesson.
4. The Mountain and Foreground: Well, I keep my hands. All the blue is gone
again so I can start painting and messing up
my hands again. Probably. We're going to paint, we're
going to continue to paint. We've got our background, we've drawn in the elements. And now we're going to
start actually painting. We want to start with
that mountain gives some nice color and also take
into regarded it is spring, so the weather is not thick
yet, not totally warm. There could be some
snow and we're going to add that to the mountain to show that we have a nice that it is springtime with some of the weather that changes
once in a while. Okay, well let's start painting. Looking at the reference. We're going to need some
gray, some brown tins. Now if you have some
gray and brown tints in your set, please do use them. I'm going to mix some
colors and mix some colors, which I do like what I
want to start with this, I want to pick some yellow. I'm going to add
some red to yellow. Just a little bit of red, and that makes some orange.
You got that right? I want to pick up
some of the blue. I'm going to actually
mix all three of them. Now I'm going to switch
to the large round brush, the round brush 12th. So some of this red, some of this yellow with it. Actually, lots of yellow, clean, create this orange color. And now we're going to need some brown within one we're going to do
is actually I might just use this flat brush. Since that is clean, I'm
going to get some blue and add that to it into the mix
when I get this column, now, you go, it's a bit too green, perhaps. Slightly. On the green side
though it is a nice color, but two on the green side. So I'm going to do is I want to add a little bit of
black to it now. And some more red. They go a little bit of black. I want some water. And there you go. Now we're gonna get mixin the
rest of these colors too. Now. That's an interesting
greenish, grayish color. I think that will do
for the mountain, but it's way too dark. I agree. Way too dark. So we're going to
need some red to it. I'm going to make
it slightly more. I'm adding some
more water to it. I want some white. Find a white. Because I want
this definitely to be on the lighter
side than it is now. There you go. Now we're gonna get nice, lighter gray tone color cereal in there, mixing some colors. And now we're ending up with a nice light gray color that
will do for the mountain. Brownish gray, I
would say warm gray. That would be a
good name for this. Alright. I'm going to add some
water. Make sure I mix it. Well. Otherwise didn't read
comes through too much. And I'm going to paint in next slightly more water,
that mountain range. And as said before, what happens now is unfortunately
my sketch will be gone. So it's basically
the same color. So we may need to
bring them back, add it to the bottom. And there we go. And that would be our
mountain range on the back. So if you have a great
warm, grayish color, even a lighter tone than this, that is actually totally fine. Now I can paint over
the tape a little bit later on when we get
a nice straight edge. So I'm actually going to
paint on it a little bit. I've got some different tones already and that is totally
really nice and fine. Might add a little
bit of peak there. Alright, and that's
my mountain range. Good. Want to add some of
that light color here to add some on top there too. Don't mind it to be
dark at the bottom. I wanted slightly lighter. And here we have
our mountain range. At least. We have one big, large mountain. Let's add the horizon
line slightly better. There we go. I'm going to leave this to dry. Now. You can let it dry air. So just wait a little
while for it to dry. I'm going to speed
this up a little bit and I'm gonna get
my hairdryer again. And I'm going to
cut the noise now. But when you use a hairdryer, make sure you're only
drying your paper and not your paint on this side because 10-year having a
problem, of course. Alright, I'm going
to cut the sound. Right? That's dry enough. What I'm going to do next is I've got some dark color here. I'm actually going
to rinse rinse my brush and let me see. Can you see it? Yes,
I'm going to squeeze out the water that you go. Should have some paper with it. Clean my hands again. Clean the brush a little. And now you will probably notice there's still some
of the color in it. That's okay. Pick up this darker color here. And I'll put some
on the bottom here, create a little bit of a mountain side effect here. Some loose quick
strokes like this. Here too good in the directions, Let's say, which the mountains basically goes like
that, so that's good. And on the bottom, I
like some darker color. There we go. That looks nicer. I like a bit of a
mountain range. And now we can add some
of that white to it. Let me see. Do I want to do
that with the same brushes? Why not? Now I need to clean
it really well. So that all that black and dark color mount
is not really black, but a dark color is out. If you do this with
regular paint, I would start with a
lighter gray and then start adding a slightly darker gray and the snow you
could do with a white or a very light gray, can choose that of course, whichever one you prefer. So I'm gonna put down
some white here. Pick up some water. Not too much in this case. You go, I don't want to add some snow on the top
of the mountain. I want some snow
right there too. And I'm loosely following the reference or creating a little bit of that impression
of having mountains. Now I don't see this
part on the photo, but we're going to add
some snow there too. Let's add some snow
here at the bottom. In the direction of the
mountain a little bit. I think I'm okay with this. I'm going to leave this to dry. Pick up some of the white and want to add a little
bit of cloud here. Some stippling, more or less
stippling that in giving the impression that there
are some clouds and even get some stronger wise here. Good. Now we may do that on this site to giving the impression
of some clouds. They don't need to be perfect. Here we go. We're going
to leave this to dry. And that adds a little bit of
interest to this here too. And what we're gonna do is
let's add some right here too. Alright, that's good. Now this is dry.
While this is drying, I'm going to clean my brush. The next thing which
I'm going to do is to foreground. The foreground. I'm going to actually
do nice green, a nice light green. And for that one I'm going
to need is some yellow. You probably know that if
you can mix yellow and blue, you're gonna get a green. Make sure that
brushes clean nicely. Picking up some water, picking up a little
bit of the blue, picking up some of that. Yellow. And I'm mixing that
in till a nice lights. Greens are actually need
more yellow than green. Sorry, ten blue. This will be great color
for a first layer. And I want to paint
that in 0, that is, nice color, might want to
actually go slightly brighter. And of course, we
could have tested this on the test paper first, I'd like to spend a
bit of a sprinkler. And there we go. And now we change the
whole photograph. Here's the photo. Can't put it down right
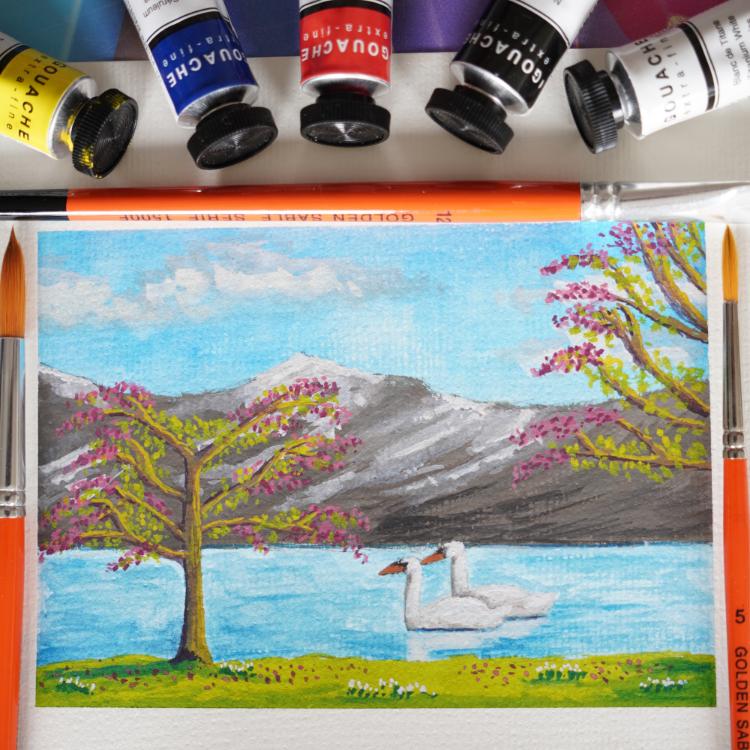
away into something else. As you can see, you should
be able to see both. Let me check. You see that there's quite a difference by just
changing a simple color. We're adding a light
green and now we're giving that spring impression. Now you also see the nice
thing about gouache, how nicely it covers the colors that are under
it, those are gone. W is now totally gone. And with watercolor,
I wouldn't get this whole results at all. Alright, that is dead. And what I'm gonna do right away is painting here a
little bit of shadow. So I'm going to
get some of that. Blue, the dark blue. Now I've got quite a little bit of dark blue because
I know there is here, there is three. So I want some
shadow around here. And I know this tree. If I imagine that the light comes a little bit
from this side. I know this tree
is going to cast shadow right there and I want to create a little bit of that hill to where the tree is
standing on day you go. This doesn't it need
to be accurate at all? Just some streaks of
shadow and I want to have that on the bottom too. You know, just create a
little bit of interest. And I'm looking at my mountains, I'm seeing the drain
nicely while I'm painting. I think I'm pretty
much actually, I'm pretty okay with that. The only thing I want to change
probabilities, add some, rewinds, some
stronger white there. Okay, I'm gonna leave
this to dry too. Okay. Well, I need to add this on the bottom slightly
better since one I'm going to pull
off that paper. The tape. I want a nice line there. Okay. The rest I'm going
to just leave for now. Clean my brush and
I wanna get some of the pure wide shot. All the yellow to
greenish color is out. Pick up some of that white now. Make sure I'm not touching my green. They're basically adding another layer of this white coats and on the mountain tops,
it must be dry. I'm going to add
some stronger white. Just a little bit. I might do a little bit there to just create slightly, a little bit of interests
on this mountain. I would say. This looks pretty good. I'll leave this to dry
and I'll rinse my brush. This dries nicely. Well, I'll let that dry. And then in the next lesson, I'm actually going
to add the tree. Okay, that's it for this lesson. In the next lesson, we're going to actually do that trick. Make some more
colors. Of course, you get a nice spring tree, one tree that is in blossom. So I'm going to paint
the tree and then add some nice pink, reddish colors to it. Purple perhaps, just to get some nice sub tree
that is in blossom. But that's for the next lesson. For now. If you have not done that, I would say catch up with me and I'll see you in
the next lesson.
5. Painting Trees: Time for the trees. Now I don't have brown. I only have just cause I have to work with if you have brown, I would say for the tree, pick a light brown
and a bit dark brown, perhaps tab with
ocher color and get a dark brown sepia color for the darker
tints on the tree. And of course, the light brown ocher for the bright
side of the tree. Okay, well, let's start. My tree might be slightly challenging to get a nice brown, but I'm going to pick up
that large brush for now. We're going to get this yellow. Put it all there. And what am I do
I have disagree. So let's see. If I
mix these two in. Would I get an acceptable, nice, lighter brown
color? Yes, there we go. See, I might just use this
color for my three bit hotter. Pick up a little
bit more yellow. And that works. So I've taken this brown or this color and I like this actually
might work for a tree. Okay, there we go. We have a little
bit of red to this. This is a little bit
not enough Brown. So what I'm gonna do is
we're going to add some red, pick up a little bit
and mix that ran in. And now we're getting
surely to the brown site. There we go, See now, then I like just a
little hint of red. Mixed it in nicely and
I'm getting a nice brown. See, there we go. So I started from this
gray I already had. And I use quite some yellow
to mix with and slightly little bit of red
to get this color. Now I don't want
to use this brush. I want to go to the next brush. And I want to paint
in that tree. Now. If you need to draw
it back, you can do so. Now, the only problem now
is probably this grade. My just show up. I think it would work still. If not, you can
take a white pencil or pastel pencil
and paint that in. Let me see. I'm going to start
at the bottom of course. And painting this brown. And this color can be too wet because otherwise
it's not strong enough to go over the
mountain we have there. So let's see. Around here. I'm
splitting it and this probably is not going
to be completely like the photo because now I
don't have a guide anymore. But that's fine with me. There you go. There's my tree. At least the first
parts of the tree is are there thickening trunk? A little bit. Since it's not a really thick tree.
I'm okay with that. I'm going to add just some
branch is around here. Got to do the same right there. I need that first
branch going out. Day. That's branch should
not have been dead. I know I need to
put this one in. Comes out slightly lower. That's the next branch. And I'm forking this
branch. There we go. I'm not going to add
all of the branches set because then this
will get really busy. I'm just adding some
of these branches. I want nice branch here
to going over branch. There we go, and we definitely need the branch around here. There we go. Okay. I think
I'm okay with these branches. Yeah, I think I'm fine with
having this Let's see. This one. A little bit. Slightly, some water because
this paint is drying. And the next thing is what we're gonna do is we're going to paint in these branches here too. And there we go. I like that. And now
there is one here. Alright, good. We've
got the branches here, we've got some branches here. Nice, and now the
tree looks good. May need some more. Right there. Turn these really into branches. I might do actually one there. Alright, good. Now I've got my basic setup
for the branches. The next thing I'm gonna
do is clean this brush. With that same brush. Pick up some of this
yellow I've got here and mix that
in with the brown, basically creating some water
for this, a lighter tone. To hago, nice. It doesn't I don't
want to yellow see, I'm getting close to
the yellow ocher now. That is what I do want. I want that obviously on the
lighter side of the tree. I want to paint and
debt in a little bit. Branches too. Not too thick. Just the impression of the tree. We need nice impression of this tree and this lighter color does
stand out slightly better, of course, from The Dark
Mountain behind it. There you go. Good. Use really, really thin brush for this. If you just only use
the tip of the brush, don't press too hard. Make sure you get to keep
that nice point on the tip. We should be okay. All right. There we have the lighter
side of the tree. This tree slightly thicker. Okay, Good little bit there. Alright. I'm going to clean my brush and now I need
a very dark color. So what I'm gonna do, I'm gonna pick up some of that blue. We're going to activate
that with the water again. Mixed it in here. That's going to get
definitely to green. What I'm gonna do that that
is getting to the green side. I don't want that. I
need some new blue. Some blue there. Now if I put on the pure blue, this might be too crazy. So let me add some red to it. That will be good. So
I'm creating a purple, reddish purple, and I'm
going to make use of my black if I can find it. Put some on my palettes, pick it up and put that in it, and that creates a nice
dark brownish color. That is good enough. I think. I'll get away with this. Rinse my brush a little bit. Not too wet. We put that on this paper for
yeah, That will do. There's no black,
black to brown tone. This will be a good tau. Now, on add this to the
other side of the tree. But carefully that I don't do
really thick fixed strokes. They got C and that looks nice. So now we've got these
three tones on the tree. And I want to keep
these free tones, or light and dark and a midtone. Now at the bottom a little bit. Make it stand out
from the background. So stand out from the mountain. Think I lost my paint. There is Still we go CNO bit here. The branch is fork. And that's good. Alright, good. I'm going to use
that on this tree to four lights, call this branch central working quite small. We don't need all these details. Now while I have this
color is a nice color too for the swollen and minutes, but I want to add
some more right here. Okay, Good. We're going
to my Swan reference. That is off the site. And what are we
going to do next? This one carefully on the swan, bring in the dark parts of the swan. And with the sworn to. What we're basically
doing is we're going to give an impression of the swan. I don't want to
add some water to this color and do only
the bottom of the swan. Degas. I may want some on the bottom of
the tree to know this. So I'm going to leave
to dry this one. I'm going to leave like that. That's good. And this will dry.
While this is drying. I could go to the next part, but that will be for
the next lesson. This lesson, we're going
to leave it like this. We've got our three now. We've got a little bit of
the swans, little bit. And we're moving on
to the next lesson. What we're going to add,
of course, the blossom, but also we're going to add to ground some flowers, right? I'll see you in the next lesson.
7. Working on the Swans & Water: We're going to work on the swans and the water in this lesson. Then in the last lesson
we're gonna just take a look at the
painting and see if I need to change anything. But let's do those ones now. This one's now I got to swans. And is it obvious that
I have two swans? Yeah, that is a good question. What I'm gonna do first of
all, we get some water. I still got that gray here. I want to activate
that a little bit. And we'll use this to add
some shadow to the swans. And because I've got
now one blurry here. First thing is carefully, I'm going to that around here. And I'm gonna need
that around there. Then you go to bring back
that first swan. Little bit. I'm gonna get rid
of most of this on the brush so that it
is reasonably dry. Again. They can
actually blend this in slightly. Get that swarm. See, now I'm getting to
swans here to blend this in. Slightly better. Get some shadow here, get some shadow right there, and create rid of the
wing effect on this one. And don't worry, we're going to get colors back in a minute. Once it dries. We go see, and now that is looking a lot
better right away. Need a little bit
at the bottom here. There you go, Good. Well, now we're gonna
get some white. I'm going to blend in
some of that white again. Now I'm using pretty
much pure white, but it's a little bit of
water with it drying out. I'm going to add
that bit over that. Gray showed that the swan gets its white color back again. Here too. But not under there. If I do it too much under there, then you don't have the impression that we
have two swans anymore? Yeah, good. Alright. The next thing is
we're going to need some weeks for the swans. We need orange and yellow, or we have yellow here, sorry, we need red and yellow. Let's see if we can
get some orange Diego. And we've got some orange
carefully onto the beak. And now we have two
swan swimming around. There you go. See, now
it looks like swans, so we're going to leave this
to dry and see what we're going to do that in a minute. We're going to get some of
that blue that still here. I want to activate that. And what I wanna do next is I want to work on
the water a little bit. We have the pure blue add some
right at the bottom here. Careful with this one, Let's head that it
doesn't disappear. We need some right
under there too. Now, want to get some water on an empty piece of the plates, are going to get this
nice and watery. And I do want to add
some of it like this. Make sure it's not too dry. You go bring in some
color in the water. Wet my brush it over it too. Act of faith, reactivate this
so-called towards the tree. I'm using water
or wet brush too. Mixing this color just a
little bit better than I have done here. Not mixing it. That dark color
there two days ago. And that looks better. I might do it
slightly more here. Even down here, we'll bring
back the shadow in a minute. Shadow not but the swamp, the reflection in a minute. I need some paint right there to create a better contrast. Now this one are getting more of these than they
were going to need some paint on top of here too. And right there to
bring back those tails. A lot better see now
the Taylor's back. And now let's spread
this a little bit without adding
water to the brush. How about death? Death looks
a lot better, doesn't it? Gonna get some of that pure blue and add some nuances here and there. Right at the shore. We might need it
slightly stronger to know we go Good. That's bad. Alright, now
let's undo this one, creates nice dark blue line
and do that on this one too. And add a little bit of
shadow. There we go. Good. Now on the ground, I'm picking up
some of this blue. I want some shadows obviously
to and because it's wet, it should mix in nicely
with the ground, careful with the snow drops. But under the snow drops, I definitely want a
little bit of shadow. The hint of shadow. There you go. So he doesn't look so long
that might go slightly stronger here to give
that impression. The shadow of these
branches over there. I see, that looks nice. Now very carefully on the swans. Also a little bit of the blue, right on the bottom. And we're gonna do it
right there to hear a little bit on the beaker, little, little bit of shadow right there to create
a little bit of depth. Now you don't need
much detail on this. Let's see where some
black we do have black active faded again, but I don't want it. You got this wet, so I'm gonna get rid of it. So I have a little bit
left on the brush. I'm going to just get
rid of it like this. But there still is some on it. And create a little bit
on that Swan again. I'm gonna get rid of most of it. Let's see on the beak, that's not gonna work. Let's kinda point. There you go. Good. And we're going to
leave the swans like this for now and let them dry. This is good. I like this. I think that is fine. That's some of the black around the bottom of
the mountain right here. And move up there just to create a little bit of
structure on the mountain. Yeah, it's two blends, the Egon that helps
with the swan to, to get a nice contrast
with this one. And let's see what
might do a little bit. Around here to there you go. Just a little hint more. I've seen, I think I'm
pretty much okay with these swans will
leave them to dry. I'm going to dry these ones now. And then I'm gonna see
if I'm going to add some more bright orange or if I'm going to
leave it like this, I'm going to clean
my brush. Let's see. Pick up some of
that orange again and just add a little to
the beak, right? Good. That's better. And
I think the rest, I'm going to clean my brush
when I get some white, I'm pretty much okay with let's see if we
can pick up some white, right, and add that to the swan. Right there. Too wet, but let's do that. It's something is too wet. You can take this
simply carefully kitchen paper and get
rid of it like this. I'm basically start over again. If you're quick
enough, There you go. See that makes it better. Good. Not too much there. Then I'm losing the gray. I don't want to lose to gray. Here we go. Good. I'm going
to leave it like this. I'm letting
everything dry again. And then in the last lesson
we're going to just look at this and see if I want
to change something, perhaps bring him
some darker tones. We're going to just
take some time to just discuss the painting we've
done in the next lesson.
8. Improving the Painting: Welcome to the last lesson, the site for the project. This will be the last lesson. We're going to take a look
at the painting, discuss it, and see if we need some more
changes or if this is fine. Most of it, I like
this. A few things. I'm going to change. Actually. The first of all, now the swans are floating
actually on something, but there's no reflection. I need to bring in
that reflection here a little bit with some white. And what I want this to be
a little bit more in shadow and I'm not sure if I like
those up there, the Cloud. So what I'm gonna do,
I'm going to clean my brush and just
with a wet brush. I'm going to dab this, mix this in a little bit, right, and bring back
that bottom contrast. Or I liked that. A lot better. Make this a bit softer
than it is Degas. I'll leave that strong as it is, just the bottom and make
a little bit softer. Now Derek, looks good. Around here. Might soften this. Just a little bit
too. I like that. The snow. I think I'm okay with
that contrast here. Swans, let's see. I want to pick up some white and not right
under the swans, but a little bit down. I got to create that
idea of reflection here. There you go. A little bit of
an idea of that reflection, little bit here too. Straight, they're
going to let this dry. That might add some dark
blue to it in a minute. Now, right here, while
I have some white, I want to create a little bit of a hit it off a shoreline
to some white. This white is quite dry. There. I already have that here. I want slightly not
too close to this one. A little bit of the
idea of a shoreline. That's better. I like that. Now the water, I think
I'm going to leave it like this on the tree. Cleaning my brush on a pickup. Some blue should be now. A little bit on it up too much. And a little bit of a shadow
right there on the tree. And I'm going to leave
that to dry here to the rest I think. I'm okay. Yeah. Just
mainly wanted did here. Right now I get a nicer
transition and the swans, I'm gonna leave like this there. Okay. The ground
shadows are okay. I think Mike one at
just a little bit more. On the good the
rest I'm okay with. So now I've corrected
the clouds, I've corrected the tree. I liked that a lot better. The swans, the reflection see now that looks a lot better. Could actually see now we're getting the hint
idea of a reflection. I'm going to dry it in
and see how that looks. I think that looks
pretty decent. Yeah, a lot better. I want some dark blue still
again. On the water. Mainly here where
there is the tree. Some of it right there. And this I'm going to spread now a little bit. That's better. And I want to have some
dark blue around this edge to walk away a little
bit of that Swansea. And now that reflection
becomes a lot more obvious by just simply adding some
darker tone around it. Had slightly a little bit
to get some movement in it. Alright. This might
be too strong. That's work that
away a little bit. There we go. That looks
better around here to get rid of that
too white color here. And the opposite side
of the tree here too, but it's push it into
the water. There we go. That looks a lot better. That's looking a lot better. Now the one thing I
still want to add, the last thing, the blossom. Now there's not blossom
only on the tree. Of course, the blossom
is on the floor to our having still
that blossom color. I'm going to make sure
there is no none of that. Blue hair. I don't want to
get that dark blossom color. I'm going to add some blossom that fell off the tree. And around here, we're going
to add a little bit too. There we go. That
looks a lot better. So I really like
that bit there too. Now, let's see if we can
get that really light. Blossom back to what I
want to dry this first. Because if I don't dry it
and then it's going to blend in with the lighter color. I'm going to move
this a little bit. Let's see. This
is still working. That's should be working. When it dries probably gonna
be a bit darker again. I think I'm fine. And now it looks more like the wind has
blown a little bit. Some of this blossom
is coming down. Now I think I'm okay with this spring image. I
think I like that. One thing that we're
going to change, clean the brush, get
some of this gray, but I don't want it that way. But I'll definitely want
solve this gray, this S1. See if that's going to work. Bringing that one carefully
down a little bit, drying my brush norms, getting rid of the water. Then go and let me
pick up this column, move it there a little bit. By having a dry brush. I can spread this a
little bit better. There we go. Now, obviously going to need some white
there. There you go. Now, this, this one looks good. Alright, I'm going to dry this. Alright, good. Picked
up some wider already. I'm going to add that right there on top of
the head of the swan. And at this site,
they're right there. There we go. I'm gonna
leave this to dry, I think. And I'm okay. Yeah. Now that's a distinction between
the two swans. Less. There we go. Okay, I'm going to
leave this like it is. Now. Does is good. This is good. I think
I like it like that. I'm okay with the
snow like that. You could blend in. That snow. Got some white on. It's still just a little bit nicer. The ego than the
top. Blend that in. Slightly more to go,
that looks good. I'm doing is just around there, slightly a little bit. And perhaps around there, create a better mountain. Okay. Good. No, I think I'm done. The next thing is
I'm going to remove the tape, of course. And she wanted to easily remove what you could do
is take the hairdryer, make the tape
really dry and then it should get off really easily. There we go. Now that is hard sticking
anymore and most likely I've got sensitive
sensitive tape. So if you've got the
regular masking tape, you may indeed want to take the time to dry the glue on it. And then easily goes off. And there I have my painting. Look at that. Alright. Now, let me move this. This painting is stuck on the
paper since that is glued. So I'm going to show
you how to get it off. If you've never
done that before, what you need is a knife. And I should have a
knife here somewhere. Just a regular kitchen knife. And always somewhere
on the paper, either under here or
on one of the corners. And I know it's this corner. It's loose a little bit. And once you're going to do
the blunt side of the knife, you're going to just push on the reds and just
slide off the tape. Paper like this. Until you around this side. I'm gonna do from
this side actually. Now the paper should be
off and then you go. So that's the way you get
your glute all around paper. Now there's some residue. This is definitely cheap paper. The regular paper,
get that as much. The glue residue. I couldn't have cut
this side and I've got my postcard ready. There we go. And that ends this lesson in
painting gouache postcards. We've got now a spring one
and we've got a winter one. In another one we're
gonna do D summer, of course, we need to
do about them too. We have all the seasons ready. Alright, What I would say, if you haven't done everything, then catch up with me, create it and I'll see
you in the projects.
9. The Project: Welcome to the project. Now the project for this class
is gonna be pretty easy. We've painted this and I just love to see
what you've created. I want to see your colors to be your colors might be completely
different than mine. See which colors you use, how you mix your colors. Or if you perhaps got
very close to mine too, or if you use a broader
range of colors, I just would love to
see your painting and see how your spring
painting came out. How to squash
postcards of yours. You don't have to send it to me, of course, will be lovely. But you don't have my address, but you can just post
it here at Skillshare. Really easy at the project
section, at your postcard. And after you posted
your postcard here in the project
section on Skillshare, I would love to get some
feedback on the class too. So you could start a
discussion for that, letting me know what you thought about the class,
but even better, leave a review so that others will hear
your opinion about the class and can
find the class too and are encouraged to
start the class as well. Well, thank you for being
with me in this class. There's more to come
on this series. But since it's not
summer and not autumn, might postpone dose a little
bit until those seasons. But I forgot also other
classes here on Skillshare, traditional ones, digital ones. So if you want to discover some more an art
than I would say, check out my profile and
see the other classes. And I might see you
in another class.
 Benjamin A, Art Teacher, illustrator Art by Benjamin