Transcripts
1. Goldfish Welcome: Well, hi, welcome
on into my studio. My name is Carrie Sanders, and I'm an artist, a teacher, and a creative here
in Farmington, Utah. And today, I'm so excited to be kicking off my summer
series of classes. And the first one we're
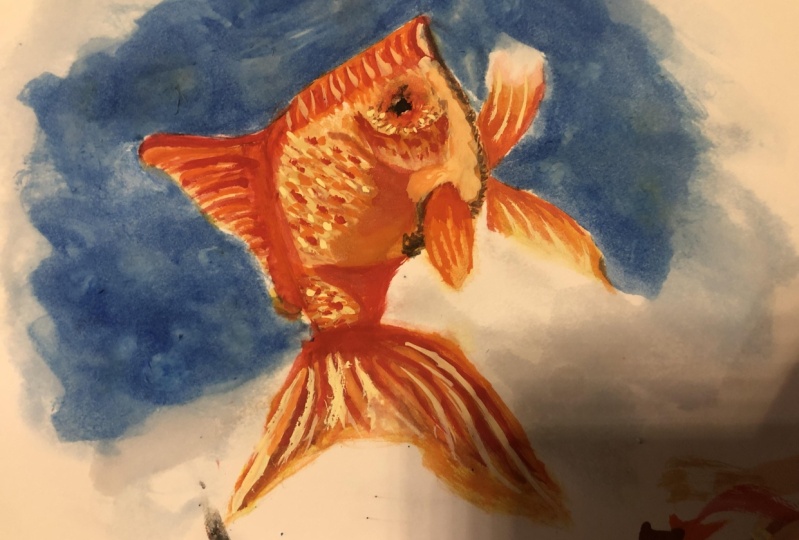
going to be doing is what I'm calling
glorious goldfish. There is something for
everyone in this piece. We're going to be
doing things like color mixing and
washing and glazing, and we'll be taking a deep
dive into wet on wet. We'll be doing different
things with paint brushes, we'll even be using tips. There is something for
every ability here. And you know, the way I teach is I record this in real time
and that's the way I post it, but you have the controls and you determine how fast
you go through the class. That's the Bato skill share. It is in the bottom left
hand corner of the screen. You can speed up the video. You can slow it down.
You can stop it. You can start it if
you're painting real time because we want you to have
the best experience possible. So you're in control. You know, I have been teaching for years and years
since I was 19, and I just have such a love
for instilling art in others, and I get such a
thrill when I have students that come out with a piece that
they're so happy with. I was fortunate enough to be picked up by a Big Box store, and we published my
pattern book and went out to over
10,000 copies sold. I also had pattern packets with supplies and whatnot that
went out across the nation. I have won awards in art
exhibits and contests, and in other words, I've just been very
fortunate and blessed to be able to share my
love of art with others, and I feel so happy to
be here with you today. If you would like to
click this follow button, you will get a little notice whenever I release a new class. And if you would like to take
some of my other classes, then all you need to do is go
to the search bar and type in Carrie Sanders and all
my classes will populate. I've actually put some of my most recent classes
here so you can have a little sneak peek of
what was recently released. But today, we're going to
do our glorious goldfish. I hope that you'll join me, go grab your supplies, and let's get started together.
2. Goldfish Class Project: A Well, hey, my fellow
friends and artists. Today's project is to complete
one glamorous goldfish. And after you have finished, if you could snap a pick and upload that into the
class gallery below. All you need to do is
look for this button, and they make it really easy
for you to just upload that. And the beauty of that is it allows us to communicate
freely back and forth. It's great forum
for you and I to have a conversation or to
talk with other students. And it's so fun for us to see what each other
has accomplished. Each one of you is unique and you have your special
talents and gifts. And what a great place for us to be of support for one another. It's kind of like baking a cake. We all have the same
recipe and they all turn out different and wonderful
in their own unique way. Why not share it
with one another. I'd love to see what
you've accomplished. Nothing to love here, guys. No harsh judgments, none at all. I would love to be
able to communicate freely with you right
here on skill share. Snap apicplod that and I'll
be talking to you soon.
3. Goldfish Supplies: Welcome on into my studio, guys. Thanks for joining
me this morning. I'm so excited to share
this goldfish with you, and we're going to
have so much fun painting all the bright
colors and the bubbles, and we're going to use
different techniques and tools, and it's going to be a blast. Today, you're going to need to go to this page of Skillshare, download the PDF that
has the pattern and trace that onto
some tracing paper and have a piece
of graphite paper. And that's how we'll be
applying our pattern. Or of course you can
free hand it onto your watercolor paper
that's always wonderful. And I'll show you how to
do that in the next video. And we will be using
some watercolor paper, 140 pounds, whether that's
hot press or cold press. It doesn't matter for this
project. I did it on both. I'm going to be using
hot press today, and that is just a little
smoother surface than the cold press personal
preference. That's all that is. I always recommend doing 140 pound watercolor paper for your project because you
will have a better result. And if you're going to put
in the time and the effort, I want you to have the
best result that you can have And honestly, your watercolor paper choice
is more important than your paint brand or your
brushes that you use. So I always recommend using 140 pound watercolor
paper or better. We will also be
using Q tips today. Yes, we're going to do
bubbles with Q tips, and we are going to be
using a variety of brushes. I'm going to be using
a six or an eight. This is also a six,
and of course, number four, you know, that's my very favorite round always. We'll be needing a
long line of brush. This is a one ought.
And then you're going to want a brush that
has a finer tip. This is a 20 out. So something along those lines. I always recommend you use whatever brushes that you have. And you may want a small flat to be working on our bubbles, and I'll be using a stylus to apply the pattern. That's
in the next video. And since we'll be doing
a lot of wet on wet, I always recommend
my favorite tool ever are handy tissue. We'll be using a
lot of this today. You're going to want two
containers of water, one for dirty water, one for clean water
because you don't want to put dirty water onto
your white paper. And of course, some shop
towels will be needed and a spray bottle to keep your paint nice and
wet, ready to go. And here are our color
choices for today. And again, I recommend using
what you have at home, so something similar
would be fine. I'll be using indigo blue, thalo blue, cobalt till
blue, cad red light, orange, cad yellow medium, lemon yellow, Naples
yellow, and yellow ochre. And then we're going to
be doing some mixtures. We're going to need white guash. We'll be mixing that with
yellow ocher and lemon yellow. I'll show you that
later. We'll also need some bleed proof white to
do some strong highlights. Just as a matter of info, we'll be doing some
other color mixing on our backgrounds with
our different blues. I did add black on our palette. We'll only be using that
for the pupil of the eye. If you don't have
black, that's okay. We'll do a mixture with
indigo blue and thalo blue, and you'll come out with a nice, dark bluish eye. That's fine. So go ahead and gather
all your supplies, and in the next video, I'll show you how to apply the pattern and we'll
get started painting.
4. Goldfish Pattern Application: We're going to go ahead
and apply our pattern, and I just want to point
out to you that our fish because of the bubbles is a little bit higher than halfway, and it's also a little
more to the right because we want to have this trail of bubbles that comes up
on the left hand side, and our eye is drawn almost
in an arrow to his nose. So when you're
placing your pattern, Just keep that in mind. Here is our square, and this would probably
be about halfway. So keep him on the higher end, and this is probably halfway and keep him on the
right hand side. All right. So I have traced my
pattern onto some tissue, and I have secured it with
a little piece of tape. I'm going to slide my graphite under there's two
sides to graphite, so make sure the
right side is down. And just going to
slide that under, and I'm going to use a stylist. I use a stylist so that I can reuse my pattern over and over, and it doesn't destroy the integrity of my pattern
by using a pencilar pen. But you can use a pencilar pen. That's totally fine. I'm going
to go ahead and speed up the camera as I apply my pattern and you can
apply yours as well. Go ahead and apply your
pattern for the fish, and in the next video, we'll get started painting together.
5. Goldfish Fins: Who's ready to get started. Me. All right. So I have started by
putting on my palette, the yellows and the
red and the orange. In other words,
none of the blues. We'll be using blues only on the background.
Well, that's not true. We'll be using a
touch of the blues on some of the shading
that we'll be doing. But let's go ahead. I'm
starting with my number four, and I'm just going to
put in a little bit of water to get the paper going. I'm not putting in
enough to make a puddle. But we are going to use a
wet on what technique on the sin make sure that you're careful and staying
within the lines. Oh. We're going to pick up some
of this naples yellow. This is probably a 9010 mixture, 90% water, 10% paint. And as I teach guys, I'm keeping it real time, you have the ability to speed up the tape in the bottom left
hand corner of the screen. If you're just watching it
instead of painting with me. Go ahead and speed it up if you want to. That's totally fine. If you're painting with me, you can stop and start
it as you need to. You're in control,
which is really awesome about the way they
do this on steel share. Okay. All right. That's just a nice wash. A wash is when you put it in all one value and it's just
lightly wet, which is great. We're going to go ahead and
pick up some of our orange. This two is going to be a 9010. And I put this on screen for you so that if you
miss me saying it, you can see it on screen. I'm just going to touch down here towards the
body where it will be And then I'm going to
pull up all the way on the outer edge and just
make a few streaks. And let that start to blend. While that's blending, let's
come into our cad red light. This is probably more
like a 955 mixture. Again, lightly touch, you can see how strong the
pigment is in this color. I blend so beautifully with
the orange and yellow. Now you'll see me touch
my paper frequently, and I'm touching
just the bottom edge of the brush to pick
up some of the water. I'm just going to bring
that up a little bit. See how that's blending nicely. And we'll come in and work
on that a little bit more, but what we want
to do right now. I'm just going to
soften this tiny bit. We don't want this hard edge. Putting just water on your brush and just working it a little
bit to soften that edge. Nice. Let's do it again. I'm
starting on the smaller fins, just to kind of get a fill
for things. Get warmed up. Pick up some of
our Naples yellow. Now, this one, I'm going to keep it just a little bit lighter, so I'm going to pick up some
of this cad yellow medium. And I just have
water on my brush. I'm just lifting
off a little bit. I'm touching, pressing, and touching my tissue,
you can see it comes off. Now, because the paper is wet, it's still going
to blend nicely, but we just want a touch
of that transparent. I'm picking up a
little bit of orange, probably a 955 down here where
it connects with the fish. I bring that out a
little bit on the edge. That one. Beautiful. Gorgeous. Okay,
let's let that try. Hey, coming into our
next I love water there. Coming into our
next. Same thing. We should be feeling a
little more confident now. You got a little better
feel for things. All right, back to our Naples
Naples yellow, 9010 mix. We're going to do all one value, float it in. Nice wash. Make sure you're coming out, even if you go over a little
bit on the outer edge. It will help us when
we do our background. We want to try to cover up those lines a little
bit. Great. All right. Let's pick up a bit of our I'm going to do a touch
of the cad yellow again. 9010 mix. Just streaking some in there and picking up some
of our orange. You notice I didn't
clean off my brush. I just picked up
at such a water. We get a little
bit of a mixture. I'm going to bring that
down some streaks. Now notice I'm not doing
a straight line, guys. I did a smooth line here, but we want it to look like
it's kind of bending in the ocean where your fish bowl or wherever
your goldfish lives. All right. Great. And this one, I think we can add just
a tiny bit of this red. 955 right up here
where it connects with the fisher bit. Notice I'm letting some
of the cad yellow show through here and even some of the Naples yellow
is showing through. So don't bring it
all the way down. Leave some of those
nice highlights to show through on their own, and we can help
them along later, but try to leave them
as you paint along. Coming in with water. Now, I'm not going to paint
this little tip right here. We want that to
stay super light, so I'm not even going to
put water on it right now. That's where the fin rolls up. Coming in with maples. Thank you. Make streak
the binge on this. It's actually on the
other side of the body, so it can be a little bit. I see a little shadow
streak it down a bit. Trying to keep my hand
out of the way of theme. Okay. A touch of red, red up against the bodies. Don't you love wet on wet. It's so fun to watch
it bloom and grow, and then you can just push it a little where
you want it to go. But it does so much
of the work for you. Love it. Okay. I just
have water on my brush. It's pretty dry, actually. Just pulling out down
some of the streaks. You bring this down
that edge stop. Here we go. Now, I'm
going to put a touch of cad yellow medium on that tip just to keep
it nice and bright. And we'll come and
enhance that in a moment.
6. Goldfish Basing in Body: A I'm going to switch
to a larger round. Just because we're going
to do a larger area. Well, let's come
up. Let's just do the top half of the tail first. So don't get the
hotel wet just yet. Of course you folks in
a more humid climate. Maybe you could do
the tail at once. It's too dry here in Utah. By time we finish the top half, the bottom would be dry.
I wouldn't do it a good. All right. So here we
go with our Naples. We're just doing a wash. I love Naples yellow.
I use it all the time. I use it a lot in buildings, and stones, rocks, sandy beach. It's just such a wonderful base. It has this beautiful
yellow underton to it. It's not a bright. It's
a nice neutral color. Okay. Now I'm going
to the bottom half of this fish. Ping it wet. I can add the Naples yellow. 9010 mixture, just
flop that right in. So again, this is a wash. We're just doing
all one value here. It's okay that I went out of the lines there a little bit. It's not a problem. All right. So I'm going to add add yellow. I'm not going all
the way to the edge. Notice I'm leaving
Naples yellow. Streaking. Okay. Let's add a
little bit of yellow ocher. Mine has completely
dried on the palette already. There we go. All right. At a few streets. We're going to add
lots of layers. So make sure you're
leaving space between darken it here towards
where it meets the body. All right. I'm going to
pick up a little bit of the orange 9010. I'm going to start by
just tapping it in. Okay. I just the tiniest amount
of red at this point. What we're going to do is
we're going to let this. Then we'll come in and we'll
start adding some glazing. Glazing is when you put
another color on top of one that's and that changes
your color value. So I was really particular. I know it's hard to see, but
this is the body right here. So that's where the body ends. This section is where it attaches to the
body of the fish. I did not bring
the red down here. I kept it up here, where
it attaches to the body. And there, I will just streak. Get out. Just to start that pattern. I'm going to let that dry. Okay. If your fins are dry, we can go ahead and come
back to your four round. I'm going to pick up
some maple yellow. And we're just going to wash in the bottom half of the body. I'm going to go around the gill. These two gills here, we're just going to go around those. Come up under the mouth. And leave that white
part of the under eye. And we can come up
on this first gill. Notice my hand. I'm
giving it a curve stroke, but we're curving that
side of the fish, and I'm going to do just
this edge of the deal. Okay. While those
scales are drying, let's come in and do a little bit enables
yellow on the tail. We can pretty much wash this in. I'm only going to come over and do the back of the
tail for a moment here. So I'm being very aware of
the curvature of his tummy. Great. I'm going to lift off just a
touch of the highlight right there where the scales will
be catching that highlight. I'm going to come in with a
little bit of yellow ochre. Is going to add a thing where that curvature of his tummy is going to
create a little shadow. Then I'm going to
add a few scales. They're just going to blend
because it's still wet. It's just going to blend,
but it'll add depth. Awesome. While it's
still a little bit wet, let's do the same thing
now with our orange 9010. What Great. How to do? Isn't that fun how it's
just taking shape already. Now I'm coming into red light. I'm just going to enhance this
deeper shadow right here. And I'm going to bring it
out along the bottom edge, pulling it from what
we just put in. Blend it in a little bit
where it meets the tail. Just pulling it up a little bit. That looks good. All right. And I might put to. Not much because this
is the top of the fish. Just a hint to blend it in. Now, it looks like it's
standing out a lot right now, but that's because we haven't enhanced our fins, so
don't worry about it. I'm going to soften
this edge to touch. You can soften using
water on your brush. Great. Okay, I'm making sure my
brush is really clean. Because we just used red
and now we're going to come back in with more naples. And I'm going to
wash in this body. I'm going to lift
off just a touch. Not much, but just a
touch on the top there. And let's leave
this gill for now. We're going to get some
special treatment, so let's leave it for now. Let's pick up some of our yellow 910 still using
my number four brush. And this area is
going to be a bit. Right on top of that using
a curve going behind the gell I basically just
washed in right there. Now I'm going to add
an individual scales. Sorry. I guess I can't paint
and talk at the same time. These are going to blend with
our wet water underneath. I'll give a hint. Awesome. Come in
with some orange. Now, I'm being aware of that
bottom half of the belly. We're going to come in
and treat differently, so there's like this
invisible line. But I'm keeping it uneven. Coming in behind the hell. Go ahead and add
some of the scales. A little bit. I like
that. That's great.
7. Goldfish Details on Body and Gills: All right. Let's
pick up a little bit of our ad red light. I'm just going to touch
a little down here. See how that blends. This is probably 955 now. And we can just add
a bit on the sales. No, that's too dark. Let's go 98982. Great. All right. Now, let's take some
of our naples yellow, probably 955, very, very light. And now we can
just bring some of this into some of
these highlights. Come up when we want
to leave white, but not all I want that to blend down
into the body of the fish. Again, we're not going to touch this gill or this
one for a minute. If the orange starts
to blend down too far, just clean out your brush, Okay. Good. All right. Great.
Now, let's pick up a little bit of
yellow ochre, 9010. I'm going to add just a
few marks on the bottom of his my that's too strong. If you get one that's
too strong, just touch it with your
tissue and it'll lighten up. Water on the brush. We're just adding a few scales to the tummy that
are really muted. I'm going to bring some up under his mouth along the outer edge. All right. And I put out the
tiniest amount of indigo, and this would be
like 98% water. And I'm just using the tip of my brush taking most
of that water off. And we're going to
add a little shading to those scales down here on this t. Right. I realized just now
that I forgot to do the yellow ochre
underneath this. We don't want to
have we want this to show through his thin hair. So it's okay to add some super light though because we don't want to
detract from the fin either. I'm just using yellow ocher to kind of give that
line of the body. All right. Coming
back to my indigo. I'm just going to add
touch of shadow under the mouth. There we go. I don't know if you
can see this is almost like a tenth
of a percent. It's almost like dirty water. But I'm touching on this light because
we're putting on this light light naples yellow. It just gives a
nice hint of yes, there's still scales here, but no, we don't want to
emphasize them too much. I'm just bringing that up. I'm going to do the
same thing right here. Just gives a nice touch. A little more added dimension. Beautiful. All right, guys. Let's flip that dry
for just a moment. Let's go ahead and start
working on our gills. Now, I have yellow ocher
and it's probably 95%. Go ahead and flip
that right on top of Naples yellow
we put in earlier. I'm coming right up to the
edge of the forward gill. And I'm going to
soften this upper edge a little bit with
some water bend in. Nice. Now, while
that's still wet, I'm going to add in some orange. I'm going to take that up to the edge of the forward hill. I'm just going to work
it out a little bit. Because it's wet, it should do a little traveling by
itself, which is great. I'm going to just use
water on my brush. Because it's so dry here, I have to help it
out a little bit. You judge whether
you need to or not. I don't want to straight edge. I want it here or there. And I am going to bring it
out towards the top now. Nice. It stronger down here. Beautiful. All right. So you notice I used in
I was kind of pushing, I was bouncing, and that
was so that I could get this gorgeous edge that's
just kind of like this. Now, before it's dry, we're going to pick up
a little bit of red. And here's the magic. I'm keeping it on the tip
of my brush, basically. This is probably a 9010,
so a little strong. Time for us to start laying in some stronger
higits and shading. I'm staying close to
the edge of that gill. I'm just going to
go pretty slow, but we're going to add
up just a few dots. They're going to make
it look so cool. All right. Let's
see what that does. I don't want to get carried
away because it's very strong and it's wet, so
it's going to travel. Now just have water on my
brush and I'm at the ready. If it starts to go too far,
I'm going to pull it in. If it's not going far enough, I'm going to nudg it along. So you do the same with yours. What we want to maintain
is like this where it has that jaggedy edge that came naturally
from the wet on wet. That's the look we're
going for. So cool. I'm just going to help this along a little bit right here. That also makes it like
dark and then light, dark. So you have this awesome variety that looks natural and organic. Bouncing my brush. Ah. I love it. I hope
you're having fun. I know I am. Again, I'm making it a little more heavy on the bottom down here,
the darker side. I bring this now to touch more. This kind of play with your own. But the hard part is to
know when to stop, right? So I'm going to stop. I lied. I'm going to
bring this over a little more. Attach it. That one was kind of floating
and I wanted to touch it. Now I'm going to
stop. We can't do this gill until that red
dries. Let's stop there. And while that is drying, let's stick with
our red since we're feeling really bold
and brave now. You've got this and let's just
float in a little glazing. Again, glazing is when we are going to put a different value
on top of a value that is dried and we're just going
to float in a little bit darker here where it connects
the body and the fin. On the body side, let's
work that so that it's not a straight line
and bring it over. Remember we're making
it look curved. Using some water now. Great. On the thin side, go ahead
and pull some out. Yes. And we're still going
to come back and do more on this fin, but
that's enough now. Let's do a little bit
on our other fins. I'm starting by just laying in a little bit here and there
because it's so strong. Then I'm going to
come in with water. This water on my brush. I'm going to push. What that does is
gives us light and dark so that all our
strokes are not the same. They're all different.
I'm going to bring it up higher on the spin edge. I'm going to down where it
connects with the body. Talking that much just to Tad. Water on my breast here. Rate.
8. Goldfish Glazing and Gill Details: I'm going to turn my
board. Forgive me. If that makes you
dizzy for a minute. But sometimes it's just
better to turn your board. Don't be afraid to
turn your board. I have a fine tip on my brush
and I'm back to the red. I'm just going to
emphasize ever so gently. Part of the fin. Great. And while I'm here, I'm going to do that
same thing with orange. If you notice on the palette, I am rolling to roll
and pull and lift, and that's how you get a
fine tip on your brush. You could use a line
of rush if you want, but I prefer the roundness of a thicker brush for
this. Does that make sense? I use a line of brush on this
almost too fine of a line. I'm going to take
water on my brush and just soften a little bit. Always remember that
watercolor dries one value lighter than
you see on your paper. Hey, I'm liking
that much better. This is so fun to
me to be able to layer on layer on layer
and you see the depth, especially now it's
coming to life here. Let's go ahead and add
some more depth to our little fin here that
goes over the body. Now, we don't want to
lose sight of the body. We do want to just add
a little depth here where it and only connects on this one
little spot right there. So you decide how much you
want to emphasize orange. I'm just using water
on my brush to soften. This one is such a
delicate little fin. I'm leaving a nice big
highlight right there. I think I am for the
sake of continuity. I think I am going
to add to touch of red. Not much. Great. All right. Let's add
some more on the next fan. Don't lose your yellows
that we put there. They're so beautiful. It's
just water on my brush. And since I'm starting on
this end and pulling up, it lives and softens just a little bit on that
edge, that tip. I'm adding a little bit of red. I'm going to pull it down. E. Six next one orange. This is where I'm making
the shadow a little bit longer remember because it's
tucked behind the body. Really careful. Note that tip. Soft water. Beautiful. Little bit of red. Just touching it in it's wet. Bring it down. Good. And I'm rinsing off. I'm just going to use
some of that red. I don't have to give like
almost a soft outline. I'm going to soften
that with some water. I don't want to outline with it. Okay. On the outer edge
that highlighted in. Great. Before we
do our big tail, your gill should be dry.
Hopefully, it's dry. Don't do this if it's not
dry yet, but if it's dry, let's go ahead and we're going to wash in some
orange around the eye. Now, remember that we've got this little spot
that remains white. This is a 9010. I'm using the tip of my brush. It's going to start
out as an outline. Okay. And I'm going to rinse out, take off most of the water, and then I'm going
to push it out. We don't want to cover up all
of that yellow underneath. We're basically outlining
the eye to sink it in. Okay. Curve it up, bring it out
a little bit to blend it. Here we go. So some water to soften
the outer edge here. Great. Okay. Now we
can use just a touch. Finish outlining right here. Been the eye and this. It's not the white of his eye. It's kind of like
where it pokes out. I am going to soften
it with water, bring it down a little
bit. I didn't have enough. I'm going to bring it
down a little bit. There we go. I'm going to
leave that sliver of white. If you lose your sliver, you've lost all your white. That's okay. You can put
it in with white after. And let's go ahead and just put the lightest amount of orange. I'm going to try to
leave a sliver of white. Again, if you lose it, that's all right. Don't worry. Put it to orange
underneath. It's mouth. Just trying to soften and shave and shape it a little bit. Now, I'm going to add
a hint on the inside. Just to soften that a bit. If you can leave, do. If you can't, we'll
add it back in. But the center part is black, and then there's a white ring, and then it kind of
blends into orange. So this is the blend into
orange part we're doing. Great. Okay. Let's come back to this small g, the forward gal
that we just did. Picking up some yellow ocher and probably 9010 on
the top of my brush, we're just going to put in
a few dots, so to speak. I'm just going to push in a few little indicators scales around the eye,
just a little bit. I'm not losing my
nice highlight. I'm just going to add in a
few I don't know scales. I don't know what else
to call them, guys. So around the eye a little bit. I'm going to let some of
this yellow ocher glen out. Me around. What do I have here? Okay. Let's add some red here on this top now. Just slide. This is a good time. I feel like my mouth is a
little misshapen. That's why I was trying
to work on it a bit. This is a good time to do that. We're not outlining the mouth, but we're putting a
shadow behind the mouth. That makes sense. And so it gives you a little latitude
to kind of come in and go, I need to fix that a little bit. I'm going to soften
this up a little bit. I'm sure you're
leaving some orange, you're leaving some white.
Making this length. Okay. And we can put
a little bit under the mouth. Dark spot here. Little up here. Sorry, I'm all over the place, but you know this is we're at the point where
you just kind of step back and look and see
where it needs to be added. All right. Let's put
a bit around that I. And lit it out real good. Then we'll ge it out like
we did with the orange. Is that a technical
term? How about soften? We'll soften it how? No, I
just did not want to do that. Touching it with water, lifting it off, and it's all better. Mm. I didn't have enough paint down. Paint. There we go. We don't want to lose all
the beautiful orange we did. Just adding depth, and we're
bringing unity to our peace. All right. Let's step back, take a look before we move on to our tail and
see if there's anything else that
we want to do to this portion of it
before we move along.
9. Goldfish Highlights: Okay, we stood back. I didn't feel like anything needed to be added or changed. We still haven't come in with
our highest highlights yet. So I think we're looking
pretty darn good there, guys. I've turned my board
sideways. It's me. It's not you. It's me.
So let's go ahead. Sometimes again, it's easier
to pull towards yourself. And don't be afraid to even when I'm working on my
easel on the wall, I will turn my canvas
board sideways. All right. I've picked up
yellow ocher, 9010. I'm rolling my brush to a fine tip and taking
off some of the paint. And I'm just going
to come in and emphasize Some of
the lines like that. I'm going to keep them
pretty far apart. And I'm making sure that
I'm contouring them. Beautiful. I do it again with some orange. 9010. Notice I'm coming on top or right next to my yellow ocher. Now, I'm going to just
blend a little bit. I'm picking up some
watered down orange starting where it
meets the body. And I'm using just the
lightest touch guys because if you press down, then what you do is lift
off instead of add on. And use the tiniest
amount of pressure. Gorgeous. I'm sorry. I moving my board. I hope you're moving your board, too. Great. Okay, just a touch of the red. Mine doesn't need much more red. So you gauge yours. You want it to be incongruency with the rest of your fish. So mine needs a bit more. Yours might already have
enough, I don't know. I am so sorry. If you're hearing all the
airplanes overhead, I live fairly close to Hill
Air Force Base here in Utah. And I don't know what's
happening today. They're doing some kind
of drills or something, and I hope my microphone is
not picking up the planes. Goodness. We love
the Air Force here. We appreciate them so much. Oh, wow. Isn't that
looking beautiful? Ah. Stunning. Okay,
finish that off, guys, and let's let it dry and
then we can come in with our highlights and our bubbles. Whoo. I'm so excited. All right. I have pulled
out some white wash, and I'm blending with
some yellow ocher. And need to touch more water. White wash is quite thick
as you may have noticed. So I'm going to take a little bit of water
to thin it down. What we're going
to do is just add some highlights of scales. And we're going to start up
here in the lighter area. Just a few. And we're going to put
some lighter ones on top. Let's go ahead and mix up some white wash
with lemon yellow. This probably feels like
a 70 30, 70% water, 30% paint just because
it's white wash, it's thicker, that's
just the way it goes. Let's start by just adding
a few little shiny, not many and we don't want
these to look like eyelashes. But just a few little
highlights around the eye and a little
bit on this upper lip. There we go. And we
can add some here. I'm sure you're curving them? And, you can just go right over the top of some of those
that we just put on. That's okay because that
adds depth and dimension. Great. Okay? And I'm
going to turn my board. Now, towards this outer edge. I add. Stronger highlights here. I'm taking the opportunity
to cover some of my lines. And that's okay. All right. Well, I am going to have
a few that come down. Lower. Great. Hey, how do you do? We're going to stick with our lemon yellow and guash mixture and add some highlights
to our fins now. And. Just a few. This is where we can really
make this little tip pop. But I'm letting that
little remember we've put that little touch of
orange on the outside. Leave that intact. And I don't think I'm
going to put any of this strong highlight on the sin at all because it's darker. So. Okay. And sorry, I'm gonna have to
turn my board upside down. All right. Make sure
you're curving your lines. I know I've said it a few times. Sorry, but hard to remember
sometimes a moment. All right. So step
back and take a look. If there's somewhere you want to emphasize that we haven't yet, you might want to
put a little bit on the edge of this skill. That's fine. I'm not sure we did this one or not, but for some reason,
I needed it. Great. Now, I'm going
to take more white. I didn't clean my brush, so it's going to have
a hint of lemon yellow cause you don't
want stark white. And I'm just going
to emphasize right here. Okay. Let's step back. I think we may want to add
a few right there, but let's step back
and take a look.
10. Goldfish Background and Bubbles 1: Okay. I think I want to add just a
touch up a highlight there, but I'm cleaning out my
breast really good because I don't want the highest
test that we just did. I want just a little bit
maybe some cad yellow medium. And just maybe a few. I've still got some white ones, hopefully you do.
That's still too dark. That's more yellow, maybe
even a touch of orange. Yep. Okay. I like that color. So just keeping in
the same curvature and not losing the white
ones that we have. We still need to do
that eye by the way. I amn't forgotten. There, I like that, a subtle highlight. So we took lemon yellow, d orange and white guash. I think we can go ahead
and work on the eye now. So first of all, let's
add the other eye. We're just going to
use orange and floated in. Just real soft. It's basically going to
pick up a highlight. I'm not going to
add anything to it. Let's go ahead and mix up. Are you using black or are you using indigo with thalo?
Either one is fine. Sometimes I like to start light. I'll use a watered down version. It's kind of a safety net. I usually fill in the center, and then I start working around. And I feel like to
get the best circle, you always have to
turn your board upside down halfway through. Maybe that's just a Cary thing. Okay. All righty. That's good. Now, I did that with Indigo.
I'm going to let it dry. I'm going to come back in with
a mix of indigo and thalo, and it'll go in nice and dark. So, we have to do that, and then we'll add
the white after. Which means we can go ahead and get started on
the background. Okay. So if you need
to make room on your palette or clean
your palette or whatever you need to do
to get started for that. I'm just going to turn mine
in the opposite direction, and I'm going to get
out some cobalt. Tho using my larger brush number 6810, is what I would recommend. And we're going to go
ahead and wash in some of our coalqaltel carefully going around the fin and
part of the fish. Don't touch the orange.
You can help it. All right. Now, important
rule, guys, pro tip. Remember that paint flows,
where the water goes. Wherever you're putting water is where your paints can go. We want to have a
nice a fun edge. And remember we're trying
to bring it to a tip, so don't go too
far from the fish, but I'm going to stop right
here where the eye is. Now, let's bring out some of
the turquoise on our brush. And then see how that just goes right
wherever our water is, which is awesome,
which means, you know, it's not going to
get on the fish unless we got the
water on the fish. All right. Great. Now, here's
where the fund begins. While it's still wet,
we're going to work this edge and just kind of make it look kind
of lumpy bumpy water. I'm just going to keep
bringing this down a little bit beyond
where we put our water, but I did that on purpose so
that I have control. We go. We want it to be quite
light around the nose. Okay. And we don't
want a hard edge here. I like this hard edge
where it bubbles out, but where we're going
to join up in a minute. We're just going to
let this notice I got it we pulled it out.
Now I'm going to tap. And that's a nice soft edge now, where we can meet
up in a minute. It doesn't matter that it stays. The way it is for a
minute. All right. Now, while that's still drying, we're going to pull off
some of our bubbles. And this will just be the
first phase of our bubbles. I'm going to switch back to my number four for a
smaller six would work. Now, most of the bubbles. Let me pull this over for you. Most of the bubbles on the top half are
going to be a little bit smaller than the large
bubbles on the bottom half. So we're just going
to lift some off. I just set my brush
down and gently twirl. And then I neutle
it a little bit. It doesn't have to
be a perfect circle. There are other
ways to do bubbles. This is the way I want
to do them for this. Okay. And I'm going to use a
Q tip for the smallest one. So I'm just dipping into water. I'm just going to lift off
a couple of small ones. I'm not pressing hard. You don't want to damage your paper. But it comes off really easily, especially while it's still wet. And you decide how
many bubbles you want. I'm going to lighten up a
couple of these big ones. Oh. You want to even
lighter, you get it wet, and you touch it
with your tissue, and more of that
paint comes off. What I want is a mixture of
light and faint and large, medium, small, you
want a nice mixture, and that's why we're doing
it in sections at a time. I know there's other ways people use bottle caps and dip it and paint and then pull
the paint out from the outer edge. And
that works too. It's just this is the
style we're doing today, and it works quite well. Okay. I'm ready for
the next section. Coming back to our large. Now, we're going to
do light turquoise, Light turquoise moving into a mix of thalo and down here
more a thalo and indigo. Coming back to our larger
brush and some clean water. Let's just come do the
next section here. How about the edge of the tail? We really careful to
not touch your fish. If you touch your fish and
some orange floats out, quickly touch it
with your tissue, let the area dry. When you get that orange off, you have to let it dry before
you go into some blue. And I'm coming up into that
area that we softened out. And again, I'm going to be
really aware of the edging. And let's put it in.
We're going to start out with our turquoise over here
where we met up with before. And then we'll start
to bland in a minute. Isn't it pretty up
against the orange? I just love these
complimentary colors are beautiful together. Okay, this is about where
we're going to start mixing. Oh, so pretty. So
pick up some Thalo. And let's start adding that in. Notice I mixed it
with the turquoise on my pale. You don't
want straight Thalo. That would be too strong.
Start blending in up here? All right. Now, we don't
want to have a halo around our fish like
I have right here. So go ahead and bring
that water down. If you do. Okay, this is where
we're going to meet up. So you know the drill now. We want to soften that edge. Bring it down a
little bit. That way, we'll have a nice soft blend. Let's touch it with our tissue. Great. All right. Let's go a bubble up.
11. Goldfish Background and Bubbles 2: All right. Let's go
ahead and bubble up. Oh, it looks like I need to
soften this a little bit. Yeah. Okay. So if you're worried that
this is ruining my breast, I'm not pressing hard. But I like that I can
get a big one and a medium size one
using the same brush. And I can come in and define
it better with my Q tip. Okay. If your Q tip in water first. And I kind of use the
side, not the tip. Keep in mind that we will
be coming in and doing some highlighting and some shading on these
cute little bubbles. What we're doing now
is just making them. Just making them appear. And this is great because
we'll bring some forward, we'll keep some in the distance, and it's all going
to look great. And you can have some
on top of each other. You can have half bubbles. They can bump into each other. You. All right. Let's roll on. I'm just going to make a
puddle of Indigo first. And I want a puddle of
Indigo and Palo together. Okay. Let's come back
to our large brush. Down. There we go. All right. Come in with our mixture. Now, I'm going to start to
add a little more palo. A little darker. Indigo. Mmm. All right. I have two spots
where it came up on my fish. I'm not happy about it.
I'm going to touch. With water and my tissue. Yeah is clean water. There we go. Touch with tissue. Okay. And I wanted to make this a little
bit darker down here. This is where we're
really going to transition into the indigo. So, I wanted to lend this out
so that we can transition. Really soften that. And that will allow us to meet up with it
in just a minute. Okay, that. Great.
Spo some bubbles. Hey. The Q tip almost
outlines it for you because it's lifting off that
paint and leaving an edge, a hard edge, which is great. It makes it easy for
us in the long run. Good. Okay, we're
ready to move on. Now, up in the body, I'm going to come back
to some turquoise because we're in more
in this turquoise area. Some of that mixed up, mixture.
12. Goldfish Background and Bubbles 3: I'm going to switch
to my number four. Just 'cause it's
such a tight area. I turned my board. Milo here. All right, let's pick up
more of our mixture now. Bring that in. And I am going to switch
to my bigger brush. As soon as I get
around this fin. Whoo. I know I was
holding my breath there. Take a deep breath. All right. Now, I'm just going to
blend this with water. I know we've got a trouble
there. That's okay. Blend You know, I paint these multiple times
getting ready for a class, and I've done it both painting the background
first and painting it second like we're doing now, and I just felt like the look of it being painted
second was better. If you're wondering
if you're like, why didn't we just
do this first? It's a little bit tricky
either way, to be honest. But it felt like less of an outline when it
was painted this way. So I'm not going to do a ton of bubbles
right in this area because I don't want to
detract from the fish. And I will clean them up a
little bit here more around. Okay. I we go. We will come back and
finish the e y, don't we? I have not forgotten. When we do the details
of the bubbles, one we'll come in
and finish that eye. Okay, remember we're
trying to maintain kind of a wedge here
around the nose. And for poise. You're here. Right. Hey. Now is where I want
to maybe have so be out. There we go. I'm going to make this a
little bit stronger. Let the water, do it.
What's the work for you. Great. Okay. Let's do
some bubbles there. I'm, I'm not going
to do a bunch, so I'll probably do just
a few bubbles there. Pose too. Yeah. All right. We're almost done with
the background, guys. Now, step back and
look at the shape of your piece and look at the finished piece
I have on screen here. We're going to bring this
down and let it float up. We're going to leave
this area plain. It's easy to lose track. That's why I bring
your attention to it now. I'm going to. I actually going to bring down just some lightly
tinted paint for a second. Because I don't want
to lose track of This piece is pretty
important, this last leg. I don't want to Love it. Something like that. Okay. Yeah. So can go ahead. Dark. Pop in to go. The mixed grip. Boys. This piece is important. You can see it just has some
of all of our colors here. And you want to make
sure they blend well. Oh. M. This work it until you get the
color that you want. I'm adding a little more palo. I like that deep color. I think it's so pretty
mixes with the indigo. As I'm bringing it up here
towards the cobalt teal, I'm letting it lighten up. I'm bringing in some more of the teal so that
it can blend well. I'm adding water to
help those blend. I know I'm covering some
bubbles. That's okay. Yeah. Oh, that's pity. Isn't that beautiful
how's yours looking. I want to see all of yours. Please post a picture in the class gallery so that we can see each other's outcome. It's just so fun to see. I'm making this one really dark. This is the bottom of
the sea, so to speak. And I'm just in
straight in to go. Then I'm going to let
that blend up with the To
13. Goldfish Background and Bubbles 4 Fish Highlights: So on one version of
this that I painted, I splattered water on
this, the background, while it was still
wet, at this point, and it lifts off some paint, and it looks really cool
if you want to do that. I'm not going to do it. To me, it was too much
with the bubbles, and, you know, the deep colors we're using along
with the oranges, it was like distracting. But it is an option. I always like to
help you understand different ideas and techniques
and options that you have, which it's really pretty cool. Okay, I'm doing some
bigger bubbles at the bottom here sticking
with my large brush. I'm cleaning my brush
off frequently to to clear out this darker paint. You don't want to press
harder on your paper, you just want to
be more patient. This is where you
really appreciate good watercolor paper. This is what it's meant to
do is work with your paint, work with the
water, and hold up. I like that big medium, small over here.
Not many of them. I'm going to do a
little cleaning up. And then maybe maybe
this one is more in the background. Oh. Okay. Step back and see if there's anywhere else
you want to add bubbles, and if not, we're going
to finish up our fish. While our background is drying. Let's go ahead and use these dark colors
that we have out. Let's do a mixture
of goal really dark. Come over our eye one more time. Unless you use black,
but even with black, I tend to do two codes. Just take a look at
yours and see how it looks and if you
need to darken this, we just want a nice
really good coating before we come in
with our highlight. Second coats easier because you don't have to go all the
way to the outline, right? Okay. That looks wonderful. I might want to add
just a touch of orange. Here. We'll keep letting
our background dry. We need to pull
out our lead proof white and do our final
highlights on the fish. And then we'll do our
highlights on our bubbles. I have picked up
my 20 out liner. It's just a fine liner, and I've picked up some
lead proof white. I'm going to thin it
down a little bit. I have it on this car just so it's really
close to the piece I'm working on rather than going clear over to my palette. So I'm just going to thin
it down a little bit. It's probably a, I don't know, 60 40, even a 50 50. And we're going to do that
white ring around the eye. And then we're going to
just do a reflection. And a little highlight on our
highlight on the upper lip. Do you fish have
lips? I don't know. Okay. I stop being silly. And let's add just
a bit more sine to the little highlights
around the eye a bit on the h. A little bit more on
the scales back here. Keep bunched up together. I need more water. This is
why I like to keep it close. This bleed proof white
dries very quickly, which is awesome, but you got to keep
everything handy, right? So I'm going to just pull out a bit more highlight.
Just here and there. We don't want to look like
we have zebra stripes. Sometimes I touch it with
my finger just to blend it real quick on the
point of contact. Oh. Hey, I'm definitely going
to turn to this one. Okay, now we want to keep
these really subtle. Again, we don't
want to overdo it. I basically going
to where I do it is going to be on top of
our brightest highlight. I think that's all I'm
gonna do on that one. Okay. All right, just kind
of step back and see if that's all the
highlights you want to add. I might add just the
slightest hint here. Good. Alright, let's get
ready for bubbles then. Let's that dry so
we don't smear it. H.
14. Goldfish Shading Bubbles: Now, I'm picking up
my number four round, and I'm going to start with
some of the cobalt teal. And this is going to be
pretty watered down, like 9010, maybe even a 9510. And I'm just going to put a gentle let's start up here away from the face so that
we get a feel for it. The tiniest amount
of an outline. And I'm not worried about doing a perfect
circle at this point. So in drop it in and pick
up some clean water, and come back and play with it. And that adds shading and makes it look
dimensional. Here we go. Not every bubble has to be perfectly round, don't
get caught up in that. If something goes in too dark, here's your Q tip, lift it out. Don't be concerned. Just
relax and enjoy the process. And I'm using teal on this side. I'm going to use the
mixture in the middle, and I'll be using a little bit darker on the
bubbles down low. And you don't have to
do all the bubbles. Like, I could leave
that one or I could do the
slightest indication. Like it's in the
background, it's far away. This one, our Q Tip
did the work for us, so I only have to just
a little bit here. And there. That's why
I like using Q tips. They're so easy.
And it's not messy. I've done the bottle cap before. It's pretty messy. I don't like panting
with my fingers so much. But that's just a
personal preference. You get a good outcome, but you get a better
outcome with those when you don't have a lot
of paint around them. Now, see how we have
painted in the background. We have really bright,
that's the foreground. This one's medium. That's what I'm going
for is just find your balance of what's
in the foreground, what's in the background.
They're all different. I'm going to make this
one pretty forward. I'm going to let it
fade out right there. So I've picked up a lot of
paint so that I can now use water and add that
dimension. Bring that out. Water. Isn't that great? Love it. Okay. And keep in mind
that we're still going to come in and highlight these,
too, so we're not going. We're going to keep adding. How are you doing? We're getting the hang of it by now, yeah. This a little dry a little more. You want more shading,
just have more paint? You want a little
lighter, lift some off. Beautiful. Okay, now we're going to get to
this mid section. I'm going to do more
of a mixture of. I want to match your bubbles. Whatever your bubbles
are match it. I'm going to put this
down to protect my fish. If. Okay, I'm going to make this
set a little bit darker. That might be a little too dark. I'm playing with just
one first to see. Remember it dries
a shade lighter. A little teal to it. That's better. I'm gonna leave that little
one back there. All alone. Do you do anything to it? Yeah. Oh, I like that. I'm gonna
leave that one alone, too. Okay. Great. He's it looking. Now, if this starts
feeling tedious, you start rushing
through, take a break. Give yourself a snack. Whatever it takes, refreshed. Because I know it can
start feeling tedious. This is like the
third or fourth. I don't know how many
times. I understand. We're almost done. Hey, we
are down to the darker ones. Throwing in a little more silo. And I think I'll leave that
one against the body alone. I always squash my circles, and I have to go back and put the bottom on
round. Oh, my gosh. Hey, I like this richer color. Hey, we're almost there. Bit darker now. Just to give you something
to shade them with. No. Just a couple more. Read that one. Okay. And this is more light. I'm going to go
over here to deal. Just a few more guys. Thanks for there. So worth it, though, isn't it? These bubbles are adorable. And just add so
much to our fish. Hey. Step back, six feet. Take a good look at your
piece and see if there's anywhere else you want
to add some bubbles, and if not, we're going to let this and then we'll
come in and highlight.
15. Goldfish Highlighting Bubbles and Sign: All right. Let's
go ahead and come back to our leave proof light. And we're going to add our
highlights to our bubbles now. And then I think
we're going to be finished, guys. So close. We're going to do
some dry brushing. And if you haven't dry brush before, I'll show
you how to do that. We're going to take our flat. And dry brushing is
literally using a dry brush. So I'm not going to
different from water first. I'm going to pick up some plate And then I'm going
to wipe most of it off. I have a very dry brush. And then I'm just going to add a little bit of a highlight. It's going to be very subtle. You don't want to
overpower our bubbles. And it goes on kind of rustic, almost like an old barn
door or an old wood fence, you know, that has that
brush stroky look. Can you see that? I'm starting over here on the light
side of our board. Just to get a bill for things. But I think now we can move to the dark side and
work our way over, so our hands not in wet paint. How about that? So you
probably see it better now. Yeah. So if your brush gets gummed up, you know, it out, but dry it off really well before
you start again. And you notice that I'm not always doing them
on the same side. And I'm putting a little
highlight on some that I didn't outline mix it up
is what I'm saying. Oh. And if that's too
strong for you, then just go over it again with a water brush and smooth it out. I might do that on some of these just to mix it up a little bit. Or maybe you don't
like the dry brush look and you just want
to paint in a highlight. That's fine, too.
Make it your own. Just giving you ideas. Okay. Oh, go on. Oh. M. Step back, take a look at your bubbles, see if there's anything
else that you want to add with a highlight. Or if you lost some
of your shading here, let me show you what
you can do. Let's say. All I have to do is touch
it with some water. And your tissue, and it
just comes right off. For you can soft blend
it in like this. So you have options.
Just play with it. This is a learning
experience, right? I mean, I know you want to come away with a beautiful
piece obviously, but but we're learning. And you can make some like that and keep some with
the dry brush look. If you like the softer,
do some better softer. I'm just using a
water brush here. Blendingle bit. And that looks great, too. You follow this line
now a little bit. And then you could add
a stronger highlight as a line if you wanted to. Look at that. So you have different options
that you can play with. And I'll just go ahead
and add it here too. This one's too wet, you
have to have it more dry. I could add it up here
where it's more dry. So different options
for you to play with. So once I demonstrated
how to settle down some of the white dry brushing,
it looked funny. I had to go I had to do a couple more bubbles so
that it didn't stand out. But I think it turned out great. It has a nice mixture of hard dry brushing and some soft blend here and
a couple that are mixed. Anyway, I am finished, and I hope that you have
finished your piece and that you had a great time doing this
and enjoyed the process. I think it's time for
us to sign our names. Let's go ahead and sign
our name together. I hope you always take the
time to claim your piece. I hope you're really
proud of what you've accomplished. I am proud of you. This was not a
really easy piece. There were a lot of
challenging factors in it. And I hope you will take
time to look in the mirror and tell yourself how talented
and wonderful you are. You have a gift that
not many people have, and I'm so proud
of you for taking the time to invest
in yourself and pursue what you love doing and to improve and practice and
have fun along the way. So thank you for spending
your time with me. I'm always tickled to
have you in my class, and I really do
appreciate your time. It's valuable. Thank you. All right. I'll see you in the next video. We'll
be wrapping up.
16. Goldfish Congratulations and Bloopers: Congratulations. You did it. You finished your
glorious goldfish, and I hope that you had
a good time doing it. I hope it was fun for you and
that you learned something new or you sharpen the
skills that you already had, and that you walked away feeling edified and like you're
a better artist. You know, if you know somebody who would benefit
from this class, if you look for this
link on this page, then all you need
to do is share that link with your friend
and both you and your friend will benefit financially from skill share, which is
a pretty cool thing. Also, as I mentioned in the class project video,
if you wouldn't mind, just snapping a pick and uploading your finished project
into our class gallery. That's such a great
forum for you and I to talk back and forth easily. But also, we love to
support one another, and we want to see what each
other has accomplished. So please take just a moment to share your piece
with all of us, nothing but love guys. We just want to support
one another here. Also, if you could
take a moment to look for this button and
follow me on Skillshare, I would love to have you
join me in another class. You could also type in my name, Carrie Sanders in
the search bar, and all of the classes I have here on Skillshare
will populate. And maybe there'll be something interesting for you that
you'd like to paint. And lastly, you can find me on the Internet at
are Sanders rt.com. This is my website where you can see maybe more extensive
work that I'm doing. And certainly find
me on Instagram at Carrie Sanders Art and I'd love to have you join
me there as well. All right, guys. Thank you
so much for joining me. I know your time is valuable, and I appreciate that you've spent your time with me today. Oh, I guess that means
it's time for Coopers. If you can't laugh at yourself, who can you laugh with, right? It's okay. I won't hold it
against you. Take care. You could also type in my name, Carrie Sanders on on the one. Take a moment to snap a
pick and upload that into our class gallery
goal below Gal. G O fish gal. That's a wreck. Cut.
 Kerrie Sanders, Artist, Teacher, Creator.