Transcripts
1. Welcome: Oh, there's nothing
more soothing and sitting on the beach
and just watching the waves crashing around your feet and feeling
that cool water. And just kind of meditating and enjoying the peacefulness. And today I have for you
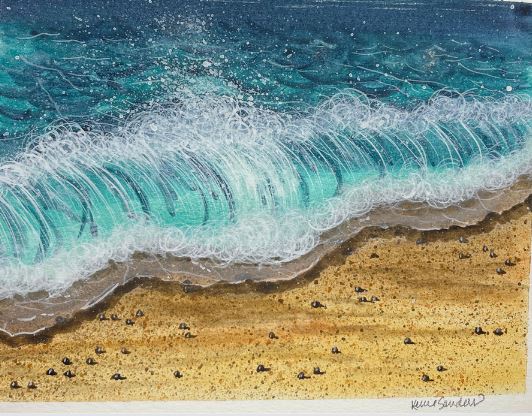
a summer fun project. It's ocean wave coming in
and it's foamy and frothy. And it's at turquoise water. It's just so beautiful. And this is a great
piece for those who have had a little
experience painting. So maybe some experience
beginners on up. And I think that
it's going to be something that will not
only be fun to paint, but it's going to
challenge you in ways. It's going to teach you some
new techniques hopefully. Or if you already
know how to do it, you're going to enjoy sharpening the techniques and skills
that you already have. I'm going to be doing a
three-part series this summer. And this is the first of three. So we're going to
have an ocean wave. And then we're
gonna go into some beautiful colorful
tropical fish. And we're also going to do
a lighthouse scene from a beautiful photo
that I took when I was doing your last summer. I'm excited to do this with you. I hope that you'll join me. Hi everyone. I am curious
Sanders and I'm an artist, a teacher, and a creative
here in St. George, Utah. I'm just outside of beautiful
science National Park. And I have a studio here. We'd love to do
plein air painting and urban sketching and
some in studio painting. And I hope that
you'll take a moment. Visit my website. It's carrying Sanders
art.com and you can see some of my portfolio
they are and what we're, what we're doing here. And if you're ever
in our neck of the woods, come join us. We'd just love to have you here. I've had the privilege of having a painting book published
and went across the nation as well as
some painting packets. And I just really enjoy sharing the love
of art with others. I just simply said that's
what I love to do. So I hope that you will
have some interests in the summer fun projects
that I've got coming. And if you grab your paints and let's head back to my studio
and get started together.
2. Wave Supplies: I know we're all anxious to
get started on our piece, but before we do, let's take just a moment
to go over supplies and gather them together
so that once we start we are good to row. So the first thing
that you're going to need is some good paper. I did this one in my sketchbook. This sketchbook is
140 pound paper. But today I'm going to be
using Canson watercolor paper, which is also 140 pounds. And I've kept my
piece out and taped it to a board which helps
me with videotaping. That's also what you would
want to do if you want to display your piece or
put it into a card. But just always make sure
guys that you're using 140 pound paper or better
if you're able to. Because it's designed to be interactive with your paints and your water and your brushes. That's what a good
watercolor paper does. It holds up well, it has
a special surfacing. And so you'll have
a better result. And when you put a lot of
effort into a beautiful piece, you want it to have
a great result. And this is the best
investment out of all these supplies that you can make is your watercolor
paper first. Alright, let's move on
to our other supplies. So I always, my handy-dandy
tissue is my favorite supply. I use it in every single water
colored piece that I do. You're going to need some
clean water and shop towel and just some things around you that will
help you succeed. I always have some
scrap watercolor paper to test out my values before
I put it on my actual piece. Now, let's talk a
moment about brushes. I always say, use what you have. Don't go out and
buy something new. But for this piece there
will be a few brushes that I think you'll be really happy
if you have them on hand. So I do recommend
that you have at least one flat that you
can use for this piece. I think it will be very helpful. You also just a
variety of rounds, but a couple of
suggestions would be either a long rigor or a nice long scripting
brush. Both, both. These are very fine tip
and hold a lot of water, but allow you to do
some fine detail, which is what we're going
to need one of those. And then also we're going to do for that frothy
look on our ocean. We'll start with a base of stippling or doing this
up and down motion. Like we need to use stencils on the wall or something and you
do that up and down motion. That's what this
brush is made for. It's very stiff and
kind of flat tip. So you need something like this. If you don't have one
specifically for that, these are a couple of my
oil painting brushes. They would do the same thing. They're not as stiff. Give us the same effect. If you don't have
anything like that, you could probably get
away with doing it using an old brush
that you have, but it would have to be an old one that you
know is gonna get ruined and see if that
would work well for you. And then the last thing that I really recommend for this piece is an old toothbrush because we're gonna
do some spattering. Yes, you can spatter with your brushes. I do
it all the time. But a toothbrush does
give you a really fine, fine spray, which is what
you're going to want. For a granular look. We want that sand to really
look fine on our beach. And that's what we're going
to use our toothbrush for. And then we'll pull
up some rocks. So I highly recommend an old
toothbrush for this piece. Then as far as pains go, you're going to want the following colors
or something similar. Use what you have at
home if you need to. We're going to use
three different blues. Indigo, blue, Mayan
blue, and cobalt teal. Now this is not the same as the cobalt blue that
you typically use. This is cobalt, teal, Naples, yellow or yellow ocher, burnt sienna, raw umber. You could also use
a burnt number, just a deep chocolate
brown would be fine. Then of course, we're
going to use lots of white gouache to help
us with those waves. So go ahead and gather
your supplies together. And I will see you
in the next video and we'll get started painting.
3. Wave Sand: It's time to get started. I'm so happy about this. This is such a fun piece. The first thing
we're going to do is create the line of our ocean. Let me give you a
quick look here. So basically we're just going
to draw a squiggly line. And the best way I think to do is just put a little
starting point here. There are a couple of
inches from the bottom and then an ending point up here and maybe just a
couple inches from the top. And there's no right
or wrong to this. This is just going to be
the curve of your way. Just very lightly. Your pencil line, something
along those lines. And a note on that. Again, we're doing
the actual curl of the wave here where it
crashes into the sand. Not the white water that comes down kind of
flows from it afterwards. So we are going for
this middle line here. Okay, so go ahead
and add that in. And then the next thing
that we're going to do is just take a flat brush and we're going to do wet on wet techniques that go ahead and just add
water to your paper. Great. Just a nice even coat. We don't want color
flowers, big puddles, just nice even coat that. So Ken, just a tad. While that's doing now, go ahead and make sure that
you have your Naples yellow, yellow ocher, burnt sienna, and raw amber ready to go? Now with watercolor,
as you know, we always start
light and go dark. So we'll go ahead and start
with our Naples yellow. And I'm adding some
more water to it, even though we already
have a wet paper. We just want to go ahead and do a light coat of
our Naples yellow. Great, while that's still wet, just prints out your
brush a little bit and pick up some of
that yellow ocher. And we're going to start
at the upper portion. And I'm not going to bring it
all the way to the bottom. All ease some of
that Naples yellow. And while that's still wet, we're going to add some
of my burnt sienna. Don't worry about
these brushstrokes. Brushstrokes, just great. And now we're gonna go ahead and take some of this raw umber. Once that is completely dry, we're going to go ahead and
bring out our toothbrush and add some of
this granular sand. We're going to do several
different colors. So first we're going to
start with our yellow ocher. Again, we're gonna go
from lighter, too dark. But you still, you don't want
to water it too far down. You want to ensure that
you have some good color and good place to test
it out on your paper. Great. Can you see how that
has some nice value to it? And just the right
amount of water. So you can get it up
in your water area. But I'm just going to try to
avoid it for the most part. Anyway, I have some
bigger droplets here that I don't really want, so I'm just going to
lightly tap those. Let's do a straight
up and down motion. Don't want to
swipe. Okay, now we can do the same thing
with our burnt sienna. Again, I'm just going
to test it out. Okay, and last we're going
to do it with our raw umber, burnt umber, whatever
you decided to use. Hazardous Kevin along. Fabulous. Now, I'm not going
to just tap that. I'm not going to flatten these larger ones because we're actually going to
turn those into rocks. And we will be using a smaller brush to actually
add in more rocks, more petals in a few minutes. So let's go ahead and
let that completely dry. And I'll see you
in just a moment.
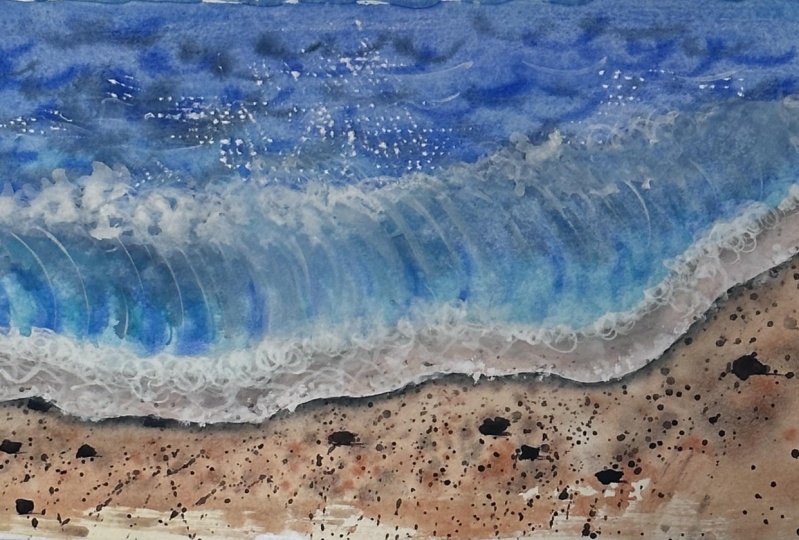
4. Wave Base Ocean: Now that our sand is
completely dried, we can go ahead and
Bayesian our ocean. And so I have gone ahead
and put out my blues, which is the indigo blue, Mayan blue, and
cobalt, turquoise. And so again, I'm going
to start with my flat. And I'm gonna go ahead and
just get my paper wet. We'll do a wet on
wet technique here. I'm just working out some of the splatter that
went into my wave. Alright, that looks really good. And we're going to start light and go dark
as we always do. We'll go ahead and start
with our cobalt turquoise. I love this color so much. This always makes
me feel like I, I want to go to the
Caribbean ocean. If you've ever been down to the Caribbean, You
know what I mean? This water is stunningly turquoise color. Alright, now we're going to
pick up some of this Mayan. And this is, this is one of the newer colors
by Daniel Smith. And I just love it because
it's got a lot of green in it. It's kinda green, blue. It's perfect for seascape water. And we're just going to
work that in the top. Let's start at the top. I'm not going to bring it
all the way to the bottom. I want to retain some of this beautiful turquoise where
the wave is going to turn. Some of the light we're
filtering through the wave. I am going to soften
this and see that I have a pretty hard line
there because it's wet. It's just going to blend nicely. Just let the water do its
thing the paper do with Spain. While this is wet. I take a medium-size round. I think this is a 61 of
my favorite brushes. I love 46.8 rounds,
those are my favorites. And I'm going to stick
with this myelin. And I am going to put, so this is where the wave is round and
it's crashing down. So I'm just going to put a few to start a few indicators here. And I know it looks
silly right now. You know how every painting
goes through its ugly phase. We're just hitting
the ugly phase, folks. So don't panic. It's going to be okay. And we're just doing what's
called the comma stroke. It looks like a comment. Alright, and then
while it's still wet, I come back to my flat. You could use your
round if you want, and then pick up some
of this indigo bloom. And we're also going to take, round up some of that indigo. So now I'm going to take more of a 5050 ratio, water and paint. So it's, it's fairly
mid value 5050. And so our wave crashing in is going to have some white
frothy on the top. Let me just show you. It's going to have this white where
it starts to crust over. We went a little bit of shadow. There's actually
shadow underneath it if you want
something to stand out, light, meaning this frothy, you did put something
dark behind it. And so let's go ahead and put a little bit of dark
value under it. And I'm just wanting
you to kind of gauge. It's about, I would say
two-and-a-half inches. And then it kind of tapers as
it goes into the distance. It gets smaller, smaller, smaller till it hits
about maybe 1 " or so. So just kinda keep that in mind. We're just going to float in
a little bit of shadow here. It's not, it's not
a straight line. Notice I'm going up here, I'll probably have my wave go up a little higher as crest snare. So I'm going to make it
a little darker there. A little bit smaller because
it's further away from me. Relaxed with it. Don't be afraid. Just speaking of water. Just want to soften
this line a little bit. And still coming back to
this indigo and now I'm probably 70% water, 30% paint. Very light. But I still
want to have dark things. Floating, maybe some
seaweed shadows or something kind of curling
over in that way. They get caught up
and thrown over. All right, Let's let that
dry and we'll come back. Actually, while this is drying, we can go ahead and put
some pebbles in our sand. For that. I'm going to go ahead. Just use a very fine tip brush. You can use whatever you've got. I'm going to pick up
some of this raw umber. And I'm going to start with some of my bigger
spots like this one. And I'll just bring it up
a little bit, shaping bit. And then I'm going to
pull out a little shadow. All right, Just stop when
you feel like you have enough pebbles for your
liking, for your piece. And I think I'm about there. We'll let that dry now.
5. Wave Foam and Pebble Highlights: Switching to a number four round and I'm coming back
to the raw umber. And your rocks
have to be totally dry to start this next step. So be sure that they are. What we're going to do is add the shadow under
our crashing wave. And at this point, we're going to get rid of
this ultra smooth look. Even though when we
add the white is when it'll really be
able to tell that, but there's no need
to have that now. Go ahead and bring it up
a little, down a little. What's a little more natural? Now that we've defined that, I'm going to more
of a 5050 ratio. I'm going to extend
that a little bit. If you're oceans completely dry, then take a look. You should have a nice mix of lights and darks
and turquoise is. And if you would like to add
more of one or the other, this is a good time to do it. I would like to have
more turquoise. So I'm just going to stick with this number four round
because it's handy. And add foot that dry. Alright, I've gotten
some of my white gouache out and the next thing
we're going to do is add this layer of
translucent foam. It's just a little sheen
on top of our sand. And I'm going to use kinda
larger, flat or round. So 12. Use whatever you've got. So let's test it out. And I'm actually
going to test it on top of my indigo blue. And when you first put it on, you're going to panic
and think, Oh my gosh, it's too much, but
when it dries, it dries lighter and more
translucent because we have so much water in it
and it's going to be fine. So but I would still
test it out and let it dry and make sure it's
what you want it to be. But I'm going to
go with about 60, 40 ratio, 60 water, 40, paint, if that's helpful, and work it into your
brush really well. You can see that
pressing down on my brush. I'll do it up here. You can see that I press down because the brush is
going to do the work for you on this and it's
going to be fine. And we're just going to add, you can see where our shadow is. We've already done the
work with our shadow. And we're going to
put, lay the white over the top of that. And so we're just going to have to be very
careful really. If you overwork it, you're going to lift up the
brown that's underneath it, which we don't want to do
is try to go over it once. And then just making
my thicker so twice. And then let that dry completely. And we'll
come back to that. I'll see you in just a moment. All right. Now that are white gouache
is completely dry. You can see how
transparent it turned. And so breathe. If he stopped breathing, I know I hold my breath a
lot during that process. Take a deep breath, everything
worked out just great. So I've switched to my
number one script brush. It has a nice fine tip and
I'm using lots of water, so probably more like
70 water, 30 paint. And let's just test it out. I'm going to test it again on the indigo blue here so that
I can see how it looks. And I need to give
more paint off. That's better. You noticed I rolled this rule, this between my thumb and my finger as I pull up and
that gives me a nice fine tip. And that's what we want is
just a really fine, fine tip. So we're going to
add a little edge to our water and makes sure
that it's not a smooth, make sure it's lumpy, bumpy and also you
don't want it to be one continuous line. So lift your brush
up and then set it back down and then
lift it up again. It's kinda where
the light catches the edge of that phone. And then we're going
to pick up mixture. And we're going to put
almost like veins or spider webs on the
surface of the phone. And while that is drying, we're going to pick up the same light mixture here on the tip of
our brush and add just a little highlight on
the left side of our rocks. Just a little indicator. I'm not going to clean
my brush because I'm hoping that
some of the brown will mix in with the light in
some places and soften that white wetland pebbles and
then glistening in the sun. Okay, Grab your stippling brush and some more white gouache, and we'll get started on
the next phase of our wave.
6. Wave Wave Curls: Now, before we get started on
the next phase of our wave, I want you to just kind
of plan a little bit. So this is the widest point or the focal point of the wave. It's almost just off
center of our piece. And we've made it
the widest spot. And so it needs to
be highlighted. It needs to be more
of a focal points. So I'm just picking up, I'm using a flat brush, just picking up
water on my brush. And I just want to pull
off a little bit of this blue and some of the white paper come
through a little more. Just so we have a
little more glistening. I want that wave to look
a little bit see-through. I'm using a curved stroke. So don't press hard to get it wet and then touch
it with your tissue. And boom. All right, that looks good. Let's take our stippling
brush and pick up some of our white and loader up and then
go ahead and test it out. Just go straight up and down. You're gonna get an
effect like that, which is just what we want. You will notice that I'm
not doing a straight line. I'm coming down. I'm kinda coming up and down. So don't just do
some straight to, we want to have some
movement to this wave. So we can go ahead
and rinse out. Let's give her hand arrest. That was a little bit
of work, wasn't it? So let's rinse that out and pick up our
scrolling brush again. Or you could use your
rigor if you want. Pick up a nice inky mix. So probably 60, 40. For this motion, we're
going to do a swirling. So that's the kind of motion
we're gonna be doing. And I would definitely if you
haven't done that before, definitely practice it a
little bit on your paper. And we're not going
to do a whole bunch. We'll do a little bit
of indicators here. And we'll do a whole
bunch down at the bottom. Alright, and then it stops. So you get the idea here. Now, let's go ahead and pick
up more by white gouache. And we're going to add some indicators of
the curl of the wave. And we don't want
to put in a ton. But we do want to indicate
that that water is going over. And in the middle is where we want that main
focal point to be. And we want it to look like
it's kinda see-through. So we've got a lot
of white going on. I think what I'd like to do is add some fairy, very
light turquoise. I think we can go ahead
and add in some of our, some of this down
here at the bottom. It's gonna go right
along this edge here. My hands a little
tired. How about you? Let's let this dry
and then we'll come in and do some more
curlicues like that. Down on the bottom. I'll go ahead and put the
video in fast motion. And we can do that together. And I'll see you
in just a moment. All right, while this is drying, I'm gonna go ahead and
take just a number four and just water on my brush. And I'm just going to soften. You see, as soon as you
touch the gouache with water, it reconstitutes it. And I just wanted to soften that edge a little
bit in places. It just seemed a
little too curly. Q also, I'm going to pick up a
little bit of gouache and just add more white. I'm just dabbing it and then I'm touching it with my
finger to soften it. Let's let that dry for a moment.
7. Wave Final Details: We're going to go ahead
and pick up more white. I'm going to switch over
to my scrolling brush. And we're just going to add some little white
strokes out here in the, in the background of the ocean. These are those spidery
like we did down here. Some are the C strokes. Just a little of everything. I'm staying away from this top background
that's far away. Alright, I'm going to use a very small flat and just
water on my brush. And I am going to just pick
up a little bit of pain, just lift off a little
bit here and there. Not hardly anywhere. Just to get a little highlight. All right, So that drive, okay, we've reached the point
where it's really a great idea to step back about 6 ft and take
a good look at your painting and see
what you want to add. For me. I'm going to add some
more frothy at the bottom here and maybe just a few strong strokes right here to highlight
the focal point. I'm going to speed up the
camera so you can watch me and take care of what
you need to do as well. Okay. I think I'm done with
the top and let's go ahead and assess the bottom. I'm gonna do the same thing. I'm going to strengthen some of the fluffiness and then
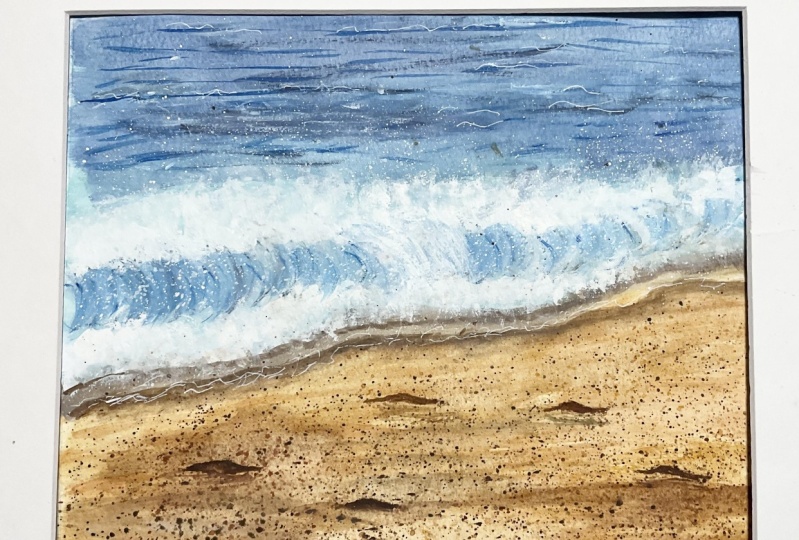
I will stop the video. Alright, the last step
that I like to do when I'm doing water is to use an exact dough
knife or something similar to this where you
can do some scraping. It, it just looks like the light is glistening
off the tip of a wave. Now, does that ruin the
surface of your paper? Yes. Duly. And that's why we do it last. So after you've painted everything that you're
going to paint, then you can go in and rough it up a little bit with
the tip of a razor blade. Alright, let's go ahead and
move on to our next stage. The last stage really is to
just take one last look at it from 6 ft away and see if there's anything else that you would like to add. Before we remove our
tape and sign our name. When I looked at mine, I felt like I didn't have
enough contrast in the sand, so I just picked up
the lightest amount of raw umber and just added
a few contrasting areas. All right. I think it's
time to take off the tape. I don't know why, but
it's just so satisfying. Taking that tape off and seeing a beautiful ad and
finished to your painting. Let's go ahead and
sign our name. Always sign your name
and claim your artwork. It's something that you
created that is unique to you and your talents and your abilities and
your creativity. And you should be proud of it and claim it with
your signature. And I'm so pleased that you took this class with
me and I'm so proud of you for having the courage to do this when it was
a little bit tricky. And I'm so happy to have
taken this journey with you. Thank you so much for
giving me that privilege. I'll see you in the next
video to start our wrap-up.
8. Wave Project: Alright guys, your class
project today is to complete one ocean wave by following the videos and instructions
that I have provided for you. And my hope is that
you will have learned some new techniques
and improved on techniques that you already have and talents and skills and abilities that you have and
had some fun along the way. So please snap a picture
of your finished project and upload it for us in the class gallery is the
bottom of this page. Just look for the green
button that looks like this, the Create Project button. It's fairly easy to just
go ahead and upload that. But what that does, it allows us to communicate
well with each other. They're more importantly,
it's so fun for us to see each other's
accomplishments and share in the joy there. So I hope you'll
take a moment to share your class
project with us. And I will see you in the
final video for our wrap-up.
9. Wave Congrats and Bloopers: Well, you did it. Congratulations everyone. You've finished your ocean wave. I hope that you were able
to learn some new skills or sharpen up and fine tune some skills that
you already had. And most of all that you had a good time doing
this along with us. If you wouldn't mind just taking a moment, snap a picture, and load that into our
gallery so that we can all see what each other has done and we can communicate together. That would be really
awesome if you enjoyed this class and no someone else that
would enjoy it as well. All you need to do is
click on this button that shows that's on this page. And they make it really easy for you to share this class with them and both you and your friend will
benefit financially, which is pretty cool
thing from Skillshare. Lastly, if you feel like I
did a good job teaching, then I would really
appreciate you posting that for us
on this page so that others who are investigating
the class can see your opinion and take heart in knowing how you feel
about the class. That would be awesome. Alright, I hope that you'll join me for the next
couple of classes. Again, we will be doing some beautiful colorful
tropical fish, as well as a lighthouse
on the ocean, which is always fun to paint. And until then guys, I'll see you soon. Bye, bye. Take care. If it's going to be
a fun summer theme. And today I'm really dry, good. Focus, carry focused.
 Kerrie Sanders, Artist, Teacher, Creator.