Transcripts
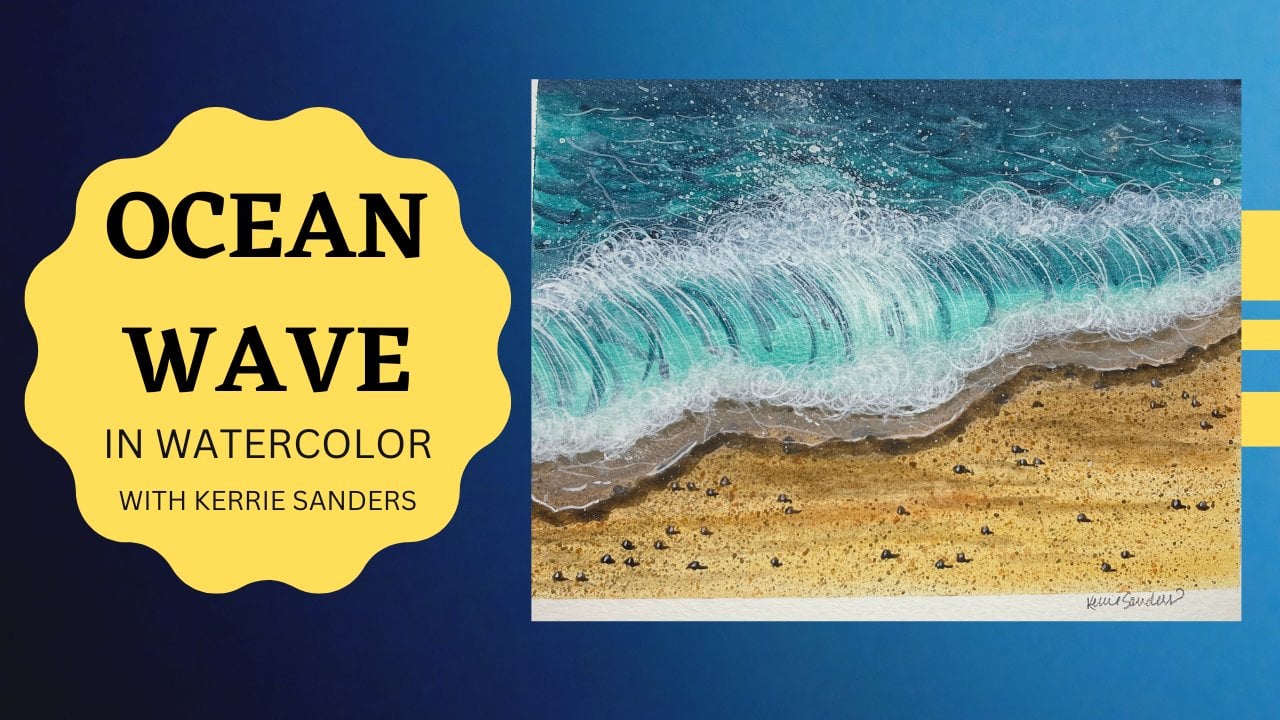
1. Welcome: There's just something about the ocean that calls
to me sometimes. And maybe it's because I
live in Cactus country. But I love putting
out a snorkel mask and looking under the
sea and all these beautiful tropical fish are swimming around your feet that you had no
idea where they're. Today. We're going to be doing part
two of my aquatic series. Part One was the ocean
that you're seeing there. And part two is going
to be these beautiful, bright orange and yellow
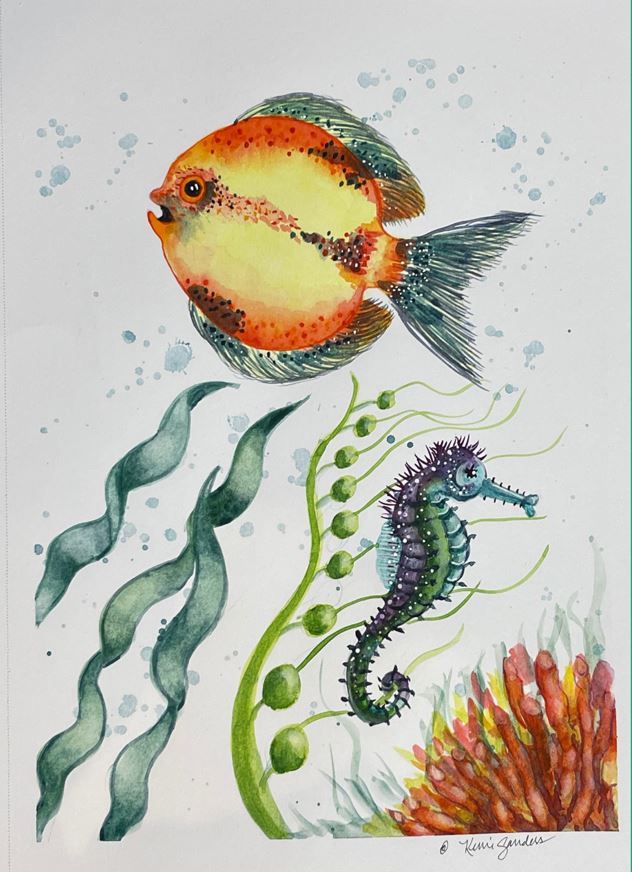
and blue and purple, fish and sea horse and coral. We are going to be doing a piece that's going to
teach wet on wet. I'm lining since flattering, lifting off of highlights. Some great basics of glazing, some bright basics that you
will use in this piece, as well as all your
future watercolors. I'm going to walk you
through step-by-step. So if you're on the
beginner side of things, you're going to have a great
outcome if you're more experienced and you're
going to have a lot of fun with this piece
and make it your own. Hi everyone. My name is Carrie standards
and I'm an artist tier and a creative here in beautiful
Sunny St. George, Utah. I live just outside of Zion National Park and I
have an in-house studio. And if you're ever in
our neck of the woods, I would love for you
to come and join us. We do plein air painting, we do urban sketching, and we do a little bit of in studio painting if the
weather's not good. If you'd like to check
out some more of my portfolio and see what's
happening in our studio. Look at Kerry standards. Art.com would love
to have you join us. I've been fortunate enough to have a big-box store pick up my pattern book and publish
it out to over 10,000 copies, as well as some holiday patterns of packets that were
sold across the nation. In other words, I just loved sharing with others and
instilling that joy within them and helping
people understand that you can draw and
paint. Yes, you can. Alright. If you would like to join
me for this piece today, I would love to have
you grab your paints and let's head over to my studio and get started together.
2. Class Project: Your class project
is to complete one tropical fish seen by following the videos
that I provided for you. I'll take you through everything step-by-step, beginning to end. And for you more
experienced painters, you can zip through those. For those Lydia more
on the beginning side, I'll have all the
information you need to have a very successful outcome. Once you've finished your piece, if you could please
take a moment to snap a picture and upload that in our gallery below in this page by looking
for this button, just click on the
Create Project button. And it's very easy to upload, but it's so fun for
us to be able to see what each other
has accomplished. And that's also a
great way for us to be able to
communicate together. And I can comment on your piece. You can ask me questions. And I'm so excited to see
the outcome of your piece.
3. Class Supplies: I know we're all anxious
to get started on this beautiful tropical
fish and sea horse. But before we do, let's gather our supplies together
so we're ready to roll. So first of all, if you plan on transferring your pattern over, then you're going to need some graphite paper and
some tracing paper. And I have provided for you
the pattern of the sea horse and the seeth, the
tropical fish. You'll just trace that
onto your tracing pad. And then you can
apply that using the graphite paper onto
your watercolor paper. Of course, you could always
use a light box as well, or you could just
freehand sketch it since it's such a simple pattern, I always recommend that you use 140 pound watercolor paper. You will get the best results if you invest well
in watercolor paper, even more so than paint. So this is where the
golden egg is, guys. So I'm going to just be
using a sketchbook today. But of course you can do it on an ice sheet of watercolor paper and frame it today for brushes. I would just say
have a good variety of rounds and maybe
a couple of flats. So for rounds, I'm just
using some maybe one large, one couple of small
ones I have here. You're definitely going to need a rigor or a scripting brush. And number one, then I have
just a couple of flats, a medium-size and a small one. Gather what you have to
get your favorites out, and we'll see how that goes. I always recommend my favorite dual, that handy-dandy tissue. This works for everything. It's very absorbent and of
course it's inexpensive. You'll need some clean water and shop towel or
something to dab it on. And then as for
our paints today, I'm always advocate for
using what you have, but this will be what
I am using today. And I like to share that with you in case you
want to try something new or if you're trying to do it exactly the way that we're
doing it in the video. I'm a big fan of Daniel Smith. As you can see, most of these
are Daniel Smith colors, but any substitute
will be just great. So I will be using Mayan blue, genuine indigo, blue, cobalt, teal blue, quinacridone, violet, sap green, terre verte day. It's kind of a blue-green. It looks different than
that color right there. Organic vermilion,
orange, lemon yellow. And then It's a tiny little
bit of gouache, white. And I do mean tiny. So if you don't have this, please don't go out and buy it. We're just gonna do a little lip on the eye and maybe here
and there and that's it. So a white gel pen would
be just fine for that. And then always, always have a strip of watercolor paper that you can use to test out your
values or your color blends. I just used. If I've
messed up on something, I cut it into strips
and then that becomes my test strips and I just
keep them in a little box. So have your test strip handy. Go ahead and gather all
your materials together. And I will see you
in the next video and we'll go ahead and
get started painting.
4. Applying Pattern & Splatter: The nice thing about
the pattern that we're doing today is it's
a really versatile. So you can choose to
do your seahorse or your fish in either
direction that you want or tilted up
or tilted down. And so I encourage you to, if you're tracing the pattern or if you're sketching it out, sketch it out on a
different piece of paper. Or if you're tracing it, do like I have done and just do them
individually, like this. And then you can kind
of play with it on your paper and make sure you have it placed
the way you want it. So do you want it facing
this way or do you want one going this way
and one going this way? Do you want it kind
of slanted like the current of the ocean
is going that direction. Or do you want your fish
kind of going upward? There's just so
many variables and I really want it to be how
you would like it to be. So go ahead and play with that, and I'm gonna go ahead
and apply my pattern. I'll speed up the cameras so
that you can see me do it, but I'm going to
use graphite paper. You just make sure that you
have the mat side down, you place it underneath,
just a little tip. I always use a stylus
to apply my pattern. And that way, I mean, you can use a pencil, but if he's a stylist
and that way you're not destroying your pattern and you can reuse it
over and over again. I say my patterns for
the future, so, alright, I'll go ahead and stop and speed up the camera
and place my pattern. You do the same. And then we'll go ahead
and get started painting. We've applied our pattern. And what I've taken is some of this handy-dandy tissue
that we love so much. And I'm just covering the body of the fish because the first step
that we're going to do is to splatter some just it's gonna look like little
splash spots of water. And we're using the Mayan blue genuine and watering
it down quite a bit. I'm using my largest round. I also have some tissue
handy to block it so that it lifts it out quickly and
doesn't look really dark. We want this to be, we're starting in the very background. We don't want this
to stand out at all, but it's just going
to add some texture and background to our piece. So you can see, I'm working this into the
brush by pressing it down. And that brush can handle all the water and all the
paint that we give it. And I'm just going to
put some big drops. I don't want little drops. That's why I'm
using a big brush. Because this is big splashes
of water under the ocean. And we don't want a ton, but just a little
bit probably about that much in before
it dries too much. I'm going to put this
tissue down and press. I'm not wiping, I'm just
pressing and it lifts off the excess water
and you can see how that blends into
the background. And we didn't get it on
our seahorse or our fish. So we're in great shape. Let's let that dry
and we'll move on.
5. Tropical Fish First Layers: The first thing I would like to do as we start painting is to just test some color
swatches because you're going to be using the
lemon yellow as your base. And then we're going to be doing a lot of colors on top of it, and I want you to feel
comfortable with that. So I have put out on my
palette lemon yellow, orange, organic
vermilion, indigo, blue. And I still have
the Mayan blue out. So what we're going to do is just take some of
this lemon yellow, just do this along with me. And just do a nice strip
that we can test with. And then let's just
pick up some of these colors and
see what happens when we put them on top. So not a super wet brush. Let's pick up a little
bit of this orange and just put that on top of
that while it's still wet. Stays pretty true. Let's pick up some of
this organic vermilion. Love that color. It also stays pretty true. Let's get that all the way out. All right, let's pick
up some of this Mayan. Now. This one, my friends goes a little green because
it makes us with the yellow. I want you to be
comfortable with that. Then the last one
is indigo blue, yellow is a little dry. We'll still get the idea here. Okay, so test those out, see how they blend together. And once you're comfortable, we'll go ahead and get
started with our fish. Alright, let's go ahead
and get started with our fears. This is gonna be fun. It's gonna go pretty
quick because we're going to do a lot of wet on wet. At the very beginning. I'm going to be using
my number 12 round. You can use some things similar abusively that you're
comfortable with. And we're going to
start by picking up some of our lemon yellow. I'm going to work that
into the brush nicely. And it's probably about a 60, 40 ratio with the
paint to water. And just go ahead and
put that right on. You can go right to the
edge of your pattern. Don't worry about the eye or
the mouth or anything else. Just go right over it. And we're gonna
go fairly quickly because we want
this to stay wet. Great. Let's pick up just a
little bit of the orange. We're going to touch. Wants upper pinch. Let us start to blend
beauty of watercolor. It'll do the work for you. Now. I live in St. George, Utah, down in the south, east susan, southwest corner. And it is desert country. It is absolutely
stunning and beautiful. But I tell you this because
my paint dries fast. And so I'm hoping this along, those of you that live in more humid country might not have to work
at quite so much. But my paint is already drying. I'm going to add a little
more water, help them along. To stay wet. Clean water. We're going to actually,
I'm going to darken that orange just a
little bit at the top. Just a little and make it the point that
you want it to be. But we are going to put some of that vermilion on top
just so you know, get it too dark just yet. Right? You can see how the water does, takes that and blends it with the yellow,
which is awesome. Alright, I'm cleaning
out my brush. I'm going to pick up some
of this organic vermilion. It's a very strongly
pigmented color. So I'm going to just pick up
maybe 5050 ratio on this. And we can always come
in and darken it. But this is one of
those colors That's difficult to lift out
if you get too much. So it's a good one to test and see if it's about the
value that you would like it. That's right where I
wanted to keep that. So I would say about a 50 50
ratio and I'm just going to touch it right on
top of that orange, on that upper edge. And it's going to blend with
the orange and the yellow. And it makes it pop. Isn't that beautiful
and you can see how it's just coming down, it's blending the water's doing the thing that it's supposed to do with your watercolor
paper, your paint. This is the fun of wire. Hey guys, you don't
have total control, but what you can control
is the amount of paint and water that you put in so that you learn to anticipate
the outcome. L Isn't that beautiful? So look how beautiful this blend is coming
with the water. Just what we want. Love it. I'm going to bring it up
just a little higher. I wanted a little bit
closer to his tail, so I'm just going to I'm
just lightly touching it with the tip of
the brush. Here. I'm going to bring this down
a bit further to his tail. Now. I'm going to go a little
bit around the high. And guys, there is
right around here. This is a fantasy fish. Yes. It's based off of a real fast and I'll
show you the picture. But they come in all
different colors. And so I kind of chose what I liked and decided that's
what I was gonna do. Awesome. Alright, I'm gonna
pick up a little bit, actually going to use
a smaller brush now, because it's a number eight
up a little bit of orange. I'm going to shape up
that eye a little bit. I is gonna be the dark
indigo blue blob. Do that until everything is dry. Great. Okay, Let's let this dry completely and then
we'll come back in with some of our Mayan blue. All right, everything
is completely dry. The next thing that we're
going to do is just pick up a real light amount
of the lemon yellow. And this is a 50, 50 or even a little bit less. And just go ahead and base
in a wash of this fin. Alright, while that is drying, we can go ahead and get
our number one liner out. And we're going to firm up
the circle around his eye. You notice I take this
and I roll it between my fingers and pull and
lift that to a fine tip. That allows you to do a nice fine line with
your scripting brush. And I'm gonna go ahead
and pick up some more. I'm going to add some
little dots for interests. And I'm going to flatten it. These brands. Not flattens them
out a little bit. Okay, I'm gonna pick up
some of this vermilion. Let's let that dry so we
don't smear our dots. I'm doing it kind of streaky
because this is where his tail really starts
to become defined. I want his mouth to be
a little bit darker. So while that is drying, I'm going to I'm actually
going to keep that. I'm using a number four. I'm going to add some dots
along the slower edge. This is completely dry
and it has to be dry. If you're gonna do this, I'm going to start with some orange. And then I will be
putting some rebellion. I'm going to pick
up some vermilion. Slow and go guys. Again, this isn't something
you can lift out easily, so I'm going to sparingly, you can see how much darker that vermilion is, then
one challenge. So make sure you place
them where you want them. Now while we have the vermilion, I'm gonna go ahead and just add, make sure my fingers okay. A tiny bit of shading here, a little bit of a wash. This is so strong. Be very careful with
how much you put out. I'm coming in with clean
water to just soften. That's great. Okay. I'm going to put
some on the tail mostly because I'm in
love with this color. Seem to stop. So I'm going to put
some up here where the tail kinda starts to soften. It tends to touch. Let's let that dry
completely and will come in next with some of our blue.
6. Tropical Fish Part 2: All right. Everything should be dry now. And I'm going to
go ahead and use my number one liner
brush script your brush. And I'm going to pick up this Mayan blue at
about a 50, 50 ratio. You want it pretty thin. With what we're going
to do is define the fins on this
cute little fish. Let's test that out. Again. I'm rolling this, bringing it to a fine
tip. That's nice. So when I'm doing something that has a direction that I
know I have to follow. I start with just a
few directional lines to make sure that
I stay on course. And then I can go
back and fill in. So I want to make sure hopefully
turn this the wrong way. So these thin lines, we're gonna go this direction. Otherwise, if they go like this, you're going to have a porcupine or maybe a lion
main or some big, we want this beautiful,
elegant, you know, pretty fish, so great. The tail. Same thing guys. Now, it's up to you if you want to know how far up
you want to go, I want to leave this
orange stripe intact. So at least for now, I'm just going up to the bottom
edge of my orange stripe. Alright. Oh, he's getting cute. So cute. Alright, let's let that dry. While the thins are
finishing drying. I'm going to take my number four and I'm going to just
pick up some clean water. And this is the time to, I always say step
back 6 ft and take a good look at your project and something might stand out
at you that you want to change before you get too
much further in the project. And for me, I would like to intensify some of the
coloring here and here. And then I also will be ready to take
the next step with you, which is putting some blue, some of the blue
spots here and there. So what I'd like to
do first is just put a little bit of
water on my brush, just not a lot on the fish. And I'm just dabbing
up and down. I don't want to smear, but I want to do some
wet on wet right here. And I'm going to add just a
touch more of this vermilion. Just softening that
edge a little bit. But that's going to
dry one value lighter. So don't let that worry you if you're
feeling like it's dark. Okay? So do whatever you need to do, maybe yours is already
the way you love it. That's great. I'm going to pick up some of
this Mayan blue. I'm not touching the vermillion. The vermillion still wet. I am going to put just a, just a smidge on his note. Let's let that dry. All right guys, we
are almost done. Let's go ahead and use our
number one scripting brush. And I'm going to dive into
this indigo blue now, this is a very strongly
pigmented color. It's one of my favorite colors. And I'm going to use 5050 ratio. Let's just give
it a little test. I'm going to put some
detail on his fins. Now we don't want
this to overpower everything that we've done. And you wanna make
sure that this is completely dry before
you paint on top of it. Okay. I'm happy with that. And this looks like it's dry. It's dry now, so we
can do the same. Now on the Span, I'm not going to
go as intense as I did the backs and I'm going to let more of the
yellow show through. And definitely not some
of that myelin sheath. That's why we put the spots. With this indigo. I actually didn't really go
all the way up to the body. I left a little bit of a
margin there just because I wanted color to show through. I'm going to use this
indigo, blue, white, dark, dark and inky
to do the eye. Check that out. And we're also going to do
the inside. Now. Going to take some
of this mine blue. And I'm using my number four. And we're just going to
put a few dots, not a lot, but we just want
to tie those dots down into the body of
the fish here and there. Just a few, probably in areas that it already has some
of the blue showing. And if you wanted to, you could put some on the fence. I saw plenty of fish with spots on their fields when
I was researching this. So I'm going to add a
well, let's let this dry. Then we'll pull out some
whitewash and we'll put on our finishing touch and we'll
be finished with our fish. Okay, I have my number one. Well, this is a double ot
and it says white gouache. And if I know I'm not going to be doing any blending
and not using any water. Then sometimes I cheat
and just go straight to the tube for my white gouache. And I'm just going to put
the tiniest hint of an eye, a little shine for the eye. And I'm going to put just a
few little dots on his tail. If there's anywhere
else that you feel inclined to put a
highlight and go for it. See it's your fascists,
your project. Make it yours. Let's let that dry and then we'll come
back and we'll get started on our cute little seahorse.
7. Sea Horse First Layers: Let's get started
with our seahorse. I'm just adding to the palette
that we used for our fish. I've added some
cobalt teal blue, and Winsor violet and sap green. I'm just picking up
some clean water. I'm using a number six brush and we're going to do a
wet on wet technique. And I'm going to just go
ahead and get his head wet. And we're gonna go ahead
and pick up some of this turquoise and go ahead and just touch
it here and there. And while that's still wet, I'm going to add just a
touch of Windsor violet. And it's okay to let those
two touch blend together. Now, I'm going to
add some more water. You go down the outer
edge of its tummy. There's three
sections, the back, the middle, and the front
section to his tummy. And that front section, I'm going to add
some that cobalt. And go ahead and middle section down
just a tad lower there. And I'm going to pick
up some sap green. And this outer section, right up that Windsor violet. Now I'm not going into the
stem that back in more violet. Now, let's pick up some water
and finish out this tale. Green. Violet. And I'm going to pick
up some of this teal. And guys just pick the colors
that you love so much. I will show you my
reference photos. And what I found is seahorses come in all different
colors, which is awesome. Like the fish. They just
have a life out there under the water that is very
colorful and beautiful. So you kinda do what
you want to do, but I'm just waiting
for a moment. So let's let this dry before we go in and
do this back fin. So now I'm going to go
ahead and just do a wash, a light wash using our
teal on this back fin. Now, while I have
this tail going, I'm going to
strengthen his tummy. I'm also going to now take
a little bit of the sap green and strengthened
that as well. I don't even really want to
tell you which colors to use because each one of ours is going to be a little
bit different. That's what happened, was wet on wet has a life of its own. Now we will do the same thing
with some of the Windsor. Alright, now I am
going to come into the Mayan and size
some of this curvature around the eye and it gives my full cheek. Mine is dry. If yours is dry as well, I'm going to turn my paper. I'm going to pull out my
number one liner brush. Go back to the Mayan blue. I'm going to define
some of the spin. These little guys
on the sea horses just seemed to
come straight out. Alright, And while
we have this angle, let's work on the
tummy a little bit. Let's let that dry. Alright, now let's work on
the midsection of the body. I've switched to a
number four round. I'm picking up a little bit of indigo blue and watering
it down quite a bit. Adding a bit of shadow, a little bit of contouring. Let's let that dry for a moment. Alright, let's do
some detail work. Now. I'm going to use my
eight round because it has a really fine tip
and I like working with it holds a lot
of water and paint. I'm going to do a mixture
of the Mayan blue. But I am going to pick up
just to touch up the indigo. So, but it's a
little bit darker. Now beings have a little, it's almost like a
little triangle tip. Just on the green portion. That's my number. And I'm going to just
add a little shade. Little things could shade on the bottom side of what
we did on his tummy. Same thing. It's going to have a little edge to it out there. All right, Let's let that dry.
8. Sea Horse Part 2: Okay, so this upper
portion where we're going into the Winsor, violet has more like
some frizzy horns. I don't know what to call them. I'll show you the
picture of the seahorse that we're using for reference. But I'm just going
to pull some out. And then there were pew
across the top of his nose. Back to our mixture will
just define mouthful, but let's pick up some indigo in a little star shaped
eyes so to speak. Let's let that dry and
we'll come back to it. Okay, now I really want to add just a little
bit of shading. Hey, little bit of
that Mayan blue just to add that
touch of shading. Now I'm using water to just lighten up where I
didn't want it to go on that. Good. All right, same with the green. Let's add a little bit
of this Mayan blue. And just shade this a touch. I'm going to lift a couple
of highlights off the back. This was some water on my brush. See how that gives it more
of a curved texture look. Alright, Let's let that dry. And I think we are ready to
go ahead and add some dots. So we're going to be diving. I'm going to be using a stylus. You can use a small fine
tip brush if you want. I want pretty small dots. They're going to
run down his back. Alright, let's let those
dry completely and then we'll come in with
some white and finish off our seahorse. Okay, I've put some white
gouache on my palette, not straight from
the tube this time, I have picked up
a small flat and just a little bit of water because gouache is quite thick, so I just wanted to thin
it down a little bit. The first thing I
want to do is just watch a little bit of highlight around the
outer edge of his cheek. And I want to add, add some emphasis on his tummy. Just that outer edge.
You don't want to live. We don't want to lose. The shadow that we did was to touch up emphasis on the back where
we lifted off some. I like the texture
that it gives him and gives him that curve. Look. Seahorses are quite
lumpy, bumpy. You look at them closely. I'll put the picture up
again so you can see it. Now for his little back fin, I'm going to take my number one. Actually this is my double odds. Smaller than a number one. And then down the paint, rolling it between my
thumb and my finger. And I'm just going to pull out some really fine
lines on the fin. And let's not forget
to put an I in there. We have the I, so let's, let's give it a little shine. Alright, now it's time for dots. I'm going to speed up the tape. Now. Last thing I'm gonna do is
I'm back to my double lot. Brush and thin down wash. And I'm just going to add a little highlight on his tummy. Just on that ridge line. We put the shadow
edge on the bottom. Now we're putting a
highlight edge on the top. I think we are finished
with our seahorse. Let's let that dry and
we'll come in and put our plants and coral in and we'll be finished with
our beautiful piece.
9. Seaweed and Coral: So this is a number six round and sap green,
straight sap green. And I'm just maybe 50, 50 ratio, maybe 60, 40. And I'm starting up on a tip. And as I come down, I'm going to press and come up, then press and
come up and press. You get the picture. And that is sap green. Here is terre verte. I'm just lifting,
impressing if you run out and just load up and
start where you left off. I also want to do this
with straight Mayan Wu, because you can mix these
or use them separately. But I want you to see
the different colors. And don't worry about
the shading and whatnot. We'll, we'll work into
that in a moment. So play with those. Decide which greens
you want to use. I'm going to use a
variety of them, but I want you to be happy with your piece and do
what you wanna do. For this piece, the most
important thing is to figure out what your seahorse is going to be holding
onto with its tail. And so for that reason, I don't know if you
guys can see it. I've gone ahead and just lightly sketched in
the little pea pods, or maybe they're seaweed pods. And that will tell me where
that piece is going to go. And I'm actually going to
start by painting that in because I can
fill in around it. And this is the piece
that I'm going to do this waving quite
mustard yellow. Now, I'm going to go
ahead and take care. Some sap green, a little
darker edge to it. Bombed at odds. Are still wet. So I'm doing a little wet
on wet technique. Okay. Let's let that dry and we'll
go on to the next one. Alright, I've decided
to use my number eight. And I'm going to add
the seaweed over here, going to pick up
some of the Mayan blue mixed with a
little terre verte. You notice that I did my
seahorse flowing with the current and so everything I do has to flow with the current. Otherwise, it's
going to look funny. Now, I could bring some up here, but I'm afraid it's going
to distract from my fish. I don't want it to be too overbearing and
too overpowering. But I do want to connect the fish colors down here with some coral in
this bottom corner. So that will be next.
Let's let that dry. Sure, that some of the orange and the yellow both
still show through. Alright, I think I'm
happy with that. Let's learn all of that
dry and then we're gonna come back and
do our shading. I'm using a medium-size round. I'm gonna go ahead and pick up just a mixture of
some greens here and just add a little bit of interests coming
out of our coral. Lets do a little bit of
Utah on our seaweed. We're going to start to make these look like they're twisting and turning and shading. So we're going to just work it to a fine tip on your brush and see that we'll come back in and we'll
add some shading to it. Let's finish that out. I'm going to put
this in fast motion. We'll finish that out. Picking up a little bit of
this indigo and mixing it with some Mayans so that it's a
little bit darker value. The dark spots, little
bit of shading. You can see where
I've laid this end, but we're going to leave
this highlight here. So I'm just going to blend
with water on my brush. I'm going to leave
that soft highlight. Okay, I'm going to
speed up the camera and finish those out. Wow, this is dry and
we've got our greens. I'm just going to add a
little deeper shading. Let's let that dry for a minute. Okay, now that this is dry, if you want some stronger
highlights here and there, just pick up some clean
water on your brush and lightly touch it and then
touch it with your tissue. And that lifts off and gives you a stronger highlight
that's nicely blended. And I like to do that, especially in this
type of a situation. When you're going
for that contour, it really gives us some punch. And I may even be that a little bit on the top of
these little pods. Other, we added this green, it didn't down some of the coral and I want to just
lighten it up a little bit. Alright, let's step back
about 6 ft and take a look at our piece and see
if anything is missing. When I stepped back 6
ft and took a look, I realized I hadn't
defined the coral. Bees are actually tubes if you've looked at some
different types of coral. And I'm certainly no expert. But I did look at a number
of reference photos. I just want to take some of this darker vermilion
and I'm going to add just a touch of contouring
to a few of these tubes. I don't want to
distract from our fish. That's the main focal point. But I am going to just do a little bit of
definition on these. I'll speed up the camera. You can choose to do it or not. You can skip this phase
if you don't want to. But I'll throw it in here
in case you're interested. Okay, I have finished
with the coral. I like this look. I think the definition of little tubes makes it
look a little bit better, at least for me, you can again, you can choose to do
whatever you want to do. I'm picking up a little
more gouache and I'm using a very small flat, and I'm going to just add
a touch of a highlight on these pods just to give
them a little more curvature. So I think I'm finished here. I'm going to step back one
more time and look at it. But I'm feeling pretty
good about this. How did you guys do
feeling good about it? I think I'm finished, guys, how about you? The last thing I'm
going to do is take off the tape and sign my name. So I will speed up
the camera and we will sign our piece
together and wrap up. Alright, let's find a
spot to sign our name. And you'll hear me say
this in every video, but please take the
time to sign your name. You should always be very proud of your work
and what you've done. I'm going to sign down here in the right-hand corner and
she's more comfortable for me. And I'm very proud of you and I'm so pleased that you
took this class with me. Thank you so much for giving me the honor and the privilege of sharing this project with you. And I will see you in the next video where
we will wrap up.
10. Congratulations and Bloopers: Well congratulations
guys, you have finished your project
and I hope you had fun. I hope you're proud of it. I'm so proud of you
for finishing it out. And I'm really grateful that you took the time to
take this class with me. If you feel like you learned something and it was
a benefit for you, you know, someone else you would like to share this width. They make it easy for
you here on Skillshare, or you need to do is look for that button and click on it. And it shares with a
friend and both you and your friend benefit
financially from Skillshare, which is a pretty cool thing. If you would like
to reach out more to me than all you need to do is find me here on Instagram or on the website that
I am showing you. Also, you can reach me
through our gallery below. So if you could take just
a moment and snap a pic of your finished piece
and upload that then you and I can communicate
well together there. Plus it's just so fun to see
what each other has done. So I appreciate you taking a moment to share
your piece there. Also, if you wouldn't mind
leaving me a teacher review, it helps me understand
how I can do better, and it helps build up rapport with others who might
want to take this class. So thank you. Lastly, if you've take a moment to look at
my other classes, I would love to have
you do that most especially with this three-part
series that I'm doing. First part is the
ocean wave up there. Of course you just
took the second part and watch for this one
coming soon is going to be an urban sketch of a lighthouse that I found in California
when I was there recently. So we will have a lot of fun doing an urban
sketch together. All right, everyone, take care. Oh, I guess it means that
it's time for bye for now. And putting on that
snorkel mask and wallah, there's a whole lot. Well, hello, will take 20. Okay. Here we go. Okay. And both you and
your friend would benefit from benefit
financially? I am not saying I have
so many bloopers.
 Kerrie Sanders, Artist, Teacher, Creator.