Transcripts
1. Welcome: Well hi everyone. My name is Carey Sanders and I'm
an artist, a teacher, and a creative here in
Beautiful St. ⁇ George, Utah, just outside of
Zines National Park. And it's so pretty
here year round, you can't help but want to
paint everything you see. I have been painting
since I can remember. I started teaching
when I was 19, It might have been just
a minute or two ago, and I have had many patterns
published over the years. I had pattern packets and I
published a pattern book. Both were picked up
by a big box store and sent across the nation. I just truly have a love of art and for instilling
that in others. And my goal as a
teacher is to help others learn new techniques and skills and develop
their love of art. And I've tried to do
it in a way through my videos that you have
a close up of the shot. The audio is clear, you can hear every
word I'm saying. You can see exactly
what I'm doing. And we laugh together. I show you if I have a little
looper, I'm a real person. I want to say that this
class is for beginner on up. I am going to say that if you've never picked
up a paint brush, it's going to be challenging. I won't say you can't do it. You can follow me step by
step and I'll show you how. If you are a beginner
who has painted before, you're going to learn
some great skills. We're going to do a lot
of wet on wet technique. We'll do glazing, we're
going to do shading, we'll do highlighting, both
putting on and lifting out. So this is going to be a great
piece to learn and grow, And who doesn't love a mushroom? Last summer I went to Connecticut and spent three
weeks there and taught a class able to walk through these incredible,
beautiful forests. And the rangers there had kicked a whole bunch of different types of mushrooms and put
them on display. And I'll show you some pictures. But I was so inspired I just
couldn't wait to come home. I did a holiday piece that's
some mushroom and now I've got this vinnette for you that several different
kinds of mushrooms, and they were just so
beautiful and earthy and natural and it
just feels good. I do hope that you
will join me today. All you need to do is grab your supplies and let's
get started together.
2. Project: Your class project
is to complete one mushroom vignette utilizing the videos that I have
provided for you. Just follow them step
by step and I'll walk you through all the way
from beginning to end. And it doesn't matter
which colors you choose, do something that's fun
and exciting for you. My goal is to have you
enjoy the experience, enjoy every step along the way. So that you will end
up with something that's beautiful and that
you can be really proud of. And you will have learned
something along the way. Once you have finished
your project, If you would please just
take a moment and snap a picture and look for
this button on this page. And you can just quickly upload that into our
class gallery below. Then we can all share the
joy in your beautiful piece. And it'll be so fun to see what colors people chose and
how they all turned out. That is also a great place for us to communicate
well together. Please take a moment
to upload your piece, and I look forward to
seeing what you've done.
3. Supplies: Well hi everyone. Welcome on in. We are going to get started painting these beautiful
little mushrooms. But first, we need to discover
our supplies real quickly. I'm going to cover
the supplies for all of the colors that
we have for you today. And probably that's
the first thing you need to decide is what color mushroom caps you
would like to paint today. And you can mix and match
them and do whatever you feel is the most exciting and interesting
for you to paint. I have the colors
for all of them. I demonstrate them all for you. Sit back and relax and I will take you through
every step of the way. Here you are going to
need a little sheet of graphite paper and
some tracing paper to apply your pattern. And all you need to do is on
this page of skill share, download the PDF of the
pattern and then trace that. You can see it's quite
a simple pattern here. We're going to need to apply
every detail of the pattern. We're going to be doing
some free handing with this. Yes, you can. I'm going to help
you through that. Every step of the
way you will apply your pattern with the graphite or you can use a light box. If that's what you would prefer, then as far as paper goes
today I'm going to be using 100% cotton,
140 pound paper. This is a watercolor
paper from Blick. I love using Blick.
They're easy to get to online and their
prices are reasonable. Now, as far as the paint goes, let's go over our palette. It's a limited palette, so it won't be too much to bear. We are going to be using
buff yellow ochre gamboge, burnt, umber raw,
umber brown matter, indigo blue, Cerilian
blue, Hookers green, and some white wash. And that's all you're going
to need and that will cover all three
mushroom caps. No matter what color
you decide to do today. You're also going to need a stylist to apply your
pattern if you would like. Of course, you can
always use a pencil. I just prefer a stylist so
it doesn't ruin my pattern. This is my favorite pencil, always is a black wing palomino. I love the lead
in these pencils, the graphite, fabulous
to work with. As far as brushes go, again, I'm not going to be
using very many brushes, quite limited today. I'm using two different
size flat brushes, a larger one and a smaller one. These are in 8.10 but use what you have
something similar. The rounds I'm using,
these are both. Number 41 is a blunter tip and the other is a
pretty sharp tip. Again, use what you have but number four round always
is my favorite brush. If you've taken some
of my other classes, then we will be
using a variety of thin liner brushes to be doing those intricate pieces of
grass and some fine dots. I'm using a 1.3 out
and a five out. It doesn't matter
which one you use, but I would recommend the longer brushes if you have them. Then, of course, always my favorite tool
handy, Andy Tissue. We'll be using a
lot of that with our splattering and
our wet on wet. And you'll need a container for some clean water and some shop towels or something
to be absorbent with, and you'll be good to go. Go ahead and gather your supplies and in the next
video, let's get started.
4. Apply Pattern & Splatter: We're going to go ahead
and apply our pattern now. And for those of you who
haven't applied a pattern, I'm going to do a quick
show on how to do that. But first, I wanted to
let you know that I'm not going to apply a
pattern for any of this. The grass and the flowers
really should be free handed. And yes, you can do it. I believe in you, and I'm
going to show you how to do it because they look much
more natural and slow, and beautiful and graceful. If you just do it free handed, rather than trying
to find and follow an exact line and in the pattern
that I provided for you, it's a PDF on this main page
of skill share that you can download and then just copy it with a piece
of tracing paper. Just go over the lines. This
is all I provided for you. But don't panic, it's okay. I did provide for you a sample of each type of flower and leaf that
we're going to do, so that you can have a
close up sample of that, but please don't add
that to your pattern. We're going to do it step by step together and
you'll be just great, Go ahead and trace that
onto your tracing paper. And then I just place it how I want it on
my piece of paper. I'm using a nine by 12 and slide your graphite
paper underneath that. And then I like to use a
stylist to apply my pattern. You can certainly use a pencil. I just don't like having
pencil lines on my pattern. It preserves my pattern in case I want to do multiple paintings. So I'm going to go ahead
and speed up the camera and I'll just be
adding the mushrooms. All three mushrooms. Well, I guess all
six mushrooms and then just this dotted line that indicates where the
grass will end. So it keeps me in check. All right. I'm just using a
fine spray bottle and I'm going to regenerate my
paints, giving them a spray. And while those are
getting nice and wet, make sure that you have a scrap. I just use old watercolored
paper and cut it into strips. Have that handy so you can test your color values
and your brushes. Make sure it's what
you want before you apply it to your paper. I thought I'd share
with you guys, this is my new favorite thing and it's a silly
thing, honestly. It's bendable. It's made out of plastic. I've found
it on Amazon. It's actually for a bar of soap and it's actually just like the perfect size for brushes so that you know
how you lay them down after when
you're using them. And I found that it's just so handy. I just bring that out. Not that I get
anything out of it, I'm not going to say
a brand or anything, but just because it's
handy and I use it a lot and I know I'll get questions and e mails and
so that's what that is. You'll see me use that a lot. Okay, so we are going to
actually start by splattering. And my favorite
splattering brush is my number four round. We're going to use raw umber, which is our darkest brown. And for that we're going to
need quite a bit of water. We want that to be an ink like consistency,
so nice and thin. We'll just go ahead and I like to use the method where
you tap your finger. Feel like I have a little
more control if you want to, you can certainly
just tap it this way. But I like to be a little
more directional also. I don't want it to
go on super strong. I'm going to stop and just lightly touch and
lift off some of these. They leave a nice stain of
pigment which is perfect. We'll be doing a lot of
painting on top of this too. I'm not super concerned. Mostly, I just don't
want it too dark on the cap of my mushrooms. These three mushrooms, I
don't care how much goes on the smaller ones because we'll be adding more
there, actually. Great. And I want quite a
bit down here on the grass. Splattering is one of
my favorite things if you guys have taken
some of my other classes, I'm like a kid in a
candy store right now. Oh, I just love to splatter just because you
can't make a mistake really. It's like a just
have fun with it. Just go with it. All right. That feels pretty good. Let's let that dry completely.
5. Blue & Yellow Flowers with Leaves: I'm now going to use, it's a three out, it's a long
haired liner type brush. Sproller rigger,
whatever you have. I'm using the Hookers Green. I'm just going to
thin it down quite a bit because I want
it to flow easily. We're going to do some of
the stems of our flowers. We're going to start in the
background up above here. Also, I want it
to come on light. Let's just test it
out on a scrap of paper that's a little,
adds more water. If I can lighten it
up, that's better. We want these flowers to just be a complement to our mushrooms. Now, because we are
free handing these, go ahead and look at
the color example. I have it on screen for you. I just figure out where I
want the flower head to be just naturally
lightly curved. Stroke down, make
your marks there. Let's say I want another one
here. It's nice and pretty. Then I'm going to curve one
that just comes across both. Make it look a little
more natural there. Beautiful. All right, let's
throw some over here. Now, I'm kind of
leaving this area. Whoops. I had some
water on my fingerst. Okay. I'm going to leave this
area here, kind of empty. Just we want the
sun shining down. Remember we're always,
as we paint this, we have the sun coming this way. We're going to put some
nice deep shadows in, but I just didn't
want the flowers kind of complicating a lot
of things over there. So I'm going to go ahead
and add one over here. Another one, maybe. I'll go right over that
smear I just made. I'm going to loop one down that just droops a little
bit. Love it. Then we want a couple that
are coming down here, probably from the grassy area, so maybe tucked behind these
little cute mushrooms. The other one there, these are, we're just sticking
to the bigger flowers, the yellow and blue
bigger flowers. Let's just come over and add
three or so over here there. That stems a little
bit dark for me. I'm just going to lighten
it by touching it. See how that just lightens
it up. And that's okay. We're going to have graph and
other things coming along. Let's let those
dry and let's pull out our Cerilian blue
and yellow ochre. Now I'm using a
number four round. I want to show you the
difference though. This is also a
number four round. And you can see this has
a very sharp tip on it. This is a little more blunt tip. Again, use what you have, but I just show you what I'm
using so that you're aware. It's always good to show you different tools
that are available. As you grow and
develop your skills, you'll start to want to
buy more and more brushes. You'll want to know what
they do and how they do it. Okay. Again, we're going to
use really thin down paint. We want it to be super light. I'm going to even touch my tissue here to pull
some of that water off. The technique for this flower is so easy, you're
going to love it. Let's pretend like this
is the top of our stem. And I'm using the
tip of the brush, and we're just using this as
if you're scribbling almost. We're just going to scribble,
scribble, scribble. A little higher here,
a little lower there. Then as I get on the outside, I'm a little more aware of
making that curve a little bit as petals come out from
the center, Just like that. Try a few on your spare paper before you try it onto
your regular paper, and there's no rhyme
or reason as far as placement of color. It's just what you want.
How many blue do you want? How many yellow? I love blue. I'm doing more blue than yellow. Plus we're doing a lot
of yellow on the cap. And so I didn't feel like I needed a lot of yellow flowers. So I'm just going to go ahead
and start placing this in. How did you do with
your first one there? This one feels a little dark. I'm going to just lightly
touch it with my tissue. That softens it back. Remember that water
color is going to dry. One value lighter, but
I don't mind having it dark Down here towards the base where it
connects to the stem. I want those petals
really light. I'm going to leave
that one for yellow. Now that's a little blobby, so I'm gonna just touch
it. There you go. Blobby is a technical term and a couple more will be done with these blues, gorgeous. All right, let's switch
to our yellow ochre. Okay, Switching to
our yellow ochre, I want this very, very light, very thin down. Let's see how this
would look too dark. Add more water, better. Can
you see the difference? Okay. It's why it's good to
have your test paper handy. Also, I step back six feet. You're going to hear me suggest this throughout the today. Step back six feet
frequently and look at your piece and see if
something needs to be adjusted. It's easier to
adjust it as we go along than to look at
it at the end and go, oh, I wish I had done
that differently. As I looked at the size of my blue flowers in relation
to the large mushroom, which is what it's surrounding.
They were too small. I made them just a little bit bigger. All right. Very good. Let's let those dry and then we're
going to add the other. Okay, for the other flowers
that we're adding in, we're going to take some
of this. Hookers Green. I'm back to my three oh, the long liner rush. We're going to be doing
these vines but we need to add burnt to our. Now, could we have just
used a different green? Yeah, we could have
like olive green or under the sea green. But I wanted to keep
the palette simple. Just a few colors And it's easy to mix because
we've got them here. So let's just do that. I just
want you see just a nice darker green that's different
than the other flowers. We're just adding a touch to that brown touch
to that Hookers, that's a better color there. Okay, let's test that out. Okay, You can see the
color differences. And that's what we're
going for a actually, I'm, I'm going to switch to
a little thick line of rush. This is a number one. You can see it's still long, it's still going to
give us a nice vine, but it's going to
be a thicker line because this is a
heavier flower. It's going to have
leaves and a flower pod, and I just wanted something
a bit thicker. Okay. And you'll notice also that I am in my fingers,
I'm rolling this. That gives us a fine
tip on our brush. That's a good thing to remember. Always let that roll
between your fingers. Now this is where
you're going to want to get really creative and curvy. If I want my, let's say I want my flower to be about here, I'm going to really
loop it around. You may want to practice
that before you try it. Let's say this is where
my flower is and this is where my toad stool
it or my mushroom is. You're just going to practice doing a little curvy with it. I would say once you
start, don't stop. That's really one of the secrets is just kind of keep going. Then you'll have a
nice smooth look, that's going to be
just a little leaf. Same with this one. Do
another one here, okay? And let's do another one. I'm going to have this one
come maybe here and see I'm going to have a curve
and come all the way down. You could have it stop and come behind the mushroom if you want. Do whatever feels good to you or however it flows
naturally for you. That's the joy, a free handing. And I'm going to have
another flower come out here, just curving. I'll probably, let's see, I've got a flower there, so I'm going to have a leaf here. That's not in the way. A. I kind of want a
leaf here, yeah. All right, and let's put
something over here. Probably that will be my flower And let's do a leaf out
here and a leaf there. Now, you can certainly
use my pattern as a guide or just do
what feels good. All right, so let's go ahead and pull out our yellow ocher. We already have it out and I'm just going to
use the same brush. I'm just going to
use the same brush, but I am going to
thicken up the paint. I'd say this is more
of a 60, 40 ratio. And you'll hear me say this
throughout the rest of the video because
that will help you understand how much paint and
how much water I'm using. Probably a 60% 40%
water, 60 40 ratio. We're just going
to make the bud. It's really, this is the end
of our flower or our vein. We're just going to
fill it in like that. I don't want to use a
bigger brush because one, we're already using this one. But just to maintain a little
bit of control with that, we're just going to do this bud in there the same shape
as a leaf really, but we're just doing
it a little bit bigger that now while
it's still wet, we're going to do a little wet
on wet technique and we're going to pick up some
of this brown matter just on the tip of the brush and touch that bud
where it's touching the vine or touch the brown matter where
it's touching the vine, it just flows up. I'm not getting enough on there. I want it to be darker. I'm going slow at first. There I like that darker. Okay, now we got
the technique down. Let's do another one. Let's
go back to our yellow ocher. I believe this was going
to be another bud. Here go a little big A. Okay, and then let's pick
up some brown matter. Yep. Oh, I love that so much. Okay, let's pick up
some more yellow ocher. All right. Using that
same brush and I've added a little more Hookers Green to our green and brown mixture. And we're going to come in and we're going to start
with our leaves. It's the same shape as buds. Oh, isn't that looking pretty? All right, let's let those
strive for just a moment. Continuing on, same brush, same green brown mixture, but it's the more
greener mixture that we were using
for the leaves. Because now we're going to add the little leaves
that cup the bud. We are actually going to come up over the bottom edge of the bud. All right. How'd you do with that guys? The last thing we're
going to do on these is just pick up some
of this mixture. And we're just going
to have poke out. Oh, you're going to love
my technical terms. I don't know what they are,
but just little indicators. It just helps our vines
look a little more natural, little pokey out things, especially right underneath
the bud and then a few going under the leaves. All right? I'm switching
back to my three out long. I'm coming back to
the Hooker's Green. It's just plain
Hooker's green and very watered down that we did
our other flowers with. Now that they are
completely dry, we can come back in
and we need to just add the attachment to the stem. Just it out a little bit. I'd like to add just a couple that come up onto the flower. And then again, just
a few little things that prickle out on the stem. A little dark. It's
dark of an You want just touch it real quick
with your tissue there. Hey, a couple more. All right. Let's let
those completely dry.
6. Button Mushrooms and Stems: I'm bringing out a small flat. This is number ten. I'm
going to pick up some buff. And we're just going to go ahead and start
with this back one. Go ahead and just
wash that in A wash means you're going
to do all one value. I've added water to my paint
now while this is still wet. Let's go ahead and splatter
on a little bit of our burnt umber water this down. And I'm just going to kind of
protect these flowers here, but I just want add a few spots right on
that little cute, we just did, we do it while it's still wet
because we want it to spread. It's going to do
the work for us, throw a few of those in there, and then we're going to pick up a little bit of this raw Umber, this is going to be more
of a 9010, 90% water. I'm touching my paper to
get some of that off. Now towards the bottom here where it's going
to be more shadowed. I'm using an up and down motion. I'm just here and there again, I'm going to let that
water, the buff, let that soak in and you
can see how it fills in. It starts to look like spots on a mushroom naturally do here. Now I'm going to encourage, I just have water on my brush. This is down deep in the shadow between the two mushrooms
in front of it. I'm just going to let that fill in a little bit
down there for us. Right around the edge of
that mushroom in front. We're just going to
let that keep going. Ready for the next one?
How that one feel? Pretty good. It goes
fast, doesn't it? Back to our flat, picking up some buff filling
in the mushroom. Now here's the trick guys, do not touch the mushroom behind it because it's still wet. And then they will just blend together and we don't
really want that. Keep a little space. Same thing. We're going to use
our number four. Pick up this burnt umber
that's watered down. I'm going to protect
that mushroom we just did by not touching it. I'm just holding the
tissue while I drop on a little splatter
And then I'm going to pick up some of the raw umber just on the tip of
the brush and add a little more concentrated
down towards this bottom edge
where the shadow is. And let the water do
its thing, Don't worry. We'll come in and neutle it. We'll make it look nice. But right now what
it's supposed to do, let's do our big one. Coming back to my flat
brush and some buff. Now, mushrooms don't have to
be perfectly round, right? Don't worry if it's
flat on one side. We're going to put some
grass over it too. Please, don't be worried
about perfection. We're not perfect people and
isn't meant to be perfect. Right now, I'm more
concerned about not touching my other two mushrooms than
being perfectly round. Okay, now I'm going to pick
up some of the number. I'm going to cover
the other two, you notice by coming almost straight up and
putting my arm over here, the direction of it came just
where I needed it to be. Down here where the shadow is. Let's pick up a little bit of this raw umber down here towards the bottom
where I'm going to touch. I'm leaving a space
between where I touch, if you're watching closely
down here where it's shadow because it's going to go in. Let's let those
mushrooms just dry and then we'll come back
and we'll work them. But while we have our buff out, let's go ahead and them up. And just go ahead and pick in. I'm just using my number
four that I just had out. I'm making an uneven bottom. We're on a mound, so it's going to be
longer on the right side. Pick up a little bit of
the burnt number to touch. This is again, this is the
wet on wet that's going to touch on this darker
side along the bottom. Let that blend in. Let's do the same thing with
the other one. I know we're moving quickly, but that's what you
do with wet on wet. Let's go ahead and
just fill in down lower then we're going to
pick up some of this number. I'm watching to see where
it goes for a minute. I'm just noodling
it. So I'm just stroking it a little bit
with the tip of my brush, not covering all the buff, letting the buff remain on. This is our highlighted side. Our sun's coming down here. Okay, very good. Let's see how we're
doing. I'm in Utah. It's a desert state and
we dry pretty quick. This is dry to the touch. It's not a 100% dry, but it's dry enough. If you're in a more humid state, you might need to
wait just a moment. Do not use a hair
dryer at this point. Because when you're
using wet on wet, you still want that blend. You need to let the paint work with the paper and
the water in the paper. That's why I'm using
100% cotton paper today because we're
doing a lot of blending. Don't rush it with a hair dryer or it can't do what
it's supposed to do. I'm just coming in with some raw umber to
deepen the shadow here, touching it, still using
that up and down motion because we wanted to have a little bit of a
spotty textured look. That's how mushrooms are and they're getting thinner
and thinner as you can see. As I get towards the top, I'll actually kind of stop. I love the raw umber on
top of the burnt umber. You can see burnt umber
has a little bit of red. It just gives it a nice texture when you're looking
at the mushroom. It just gives it more
values to look at. It makes it more interesting. Now this one I'm going to
kind of stroke a little bit and I'm going
to blend that out. Just water on my brush. Just going to go
over that lightly. All that's looking good.
7. Fine Tuning Button Mushrooms: Many is my larger
flat of the day. It's number eight, and
pick up some water. And I'm actually going to just
go over this larger stem. Yes, my splattering dots are going to smear.
I don't care. We're just going to
paint over them and it adds the character. Nice. Okay, mostly I just concerned
about our wet on wet. So I wanted to get some water down and now I'm
going into the buff. I'm not touching the cap. Now you'll notice I'm bump
out on chiseled edge. Now I'm not pushing. And I'm just going
to lay that into the grassy area to chop because that's how the
grass is going to do it. Right like that. All right, very good. Now let's come in and pick up a little bit of our burnt umber. Start by just touching a
little bit at the top and just let that start
to blend with the buff and then pick
up a little bit more. I'm not going to come down
in full, stroke it this way. I'm turning my brush a little bit sideways just because I have a big brush and bring it all the way down now I've got just plain
water on my brush. I'm just going to
soften that edge. It's already wet, right? Nice and easy. We're going
to let that work for us. That's all I'm going to do.
I'm going to let that sit. You can see that
it's still blending. It's coming down nicely and we have a nice
soft edge here. We're going to do some raw umber and things to it on top of it. But that's what we needed for
our base, which is great. This is coming along, we're going to let these
continue to dry. Good, everything's coming along. Take a deep breath and
let that out, relax. This is called the
messy middle guys. It's going to look
better, I promise. Making sure that your mushroom, the button mushrooms
are completely dry. Now, I'm going to use
my number four round. This is the more blunt tip
and we're just going to start to noodle
these a little bit. Let's go ahead and
finish these guys up. I'm just using water
on my brush because we've already laid
in our raw umber. I'm just going to reactivate it by touching it with
water on my brush. And you see how that just softly blends some of those dots. I want to keep some
of those dots, but I want to use some of
them to just add some shadow. This is the Tim. If you need to change the shape or if you
like your shape, leave it. But if you want to
change your shape in any way, this is a good time. Also, we want to be
aware of our shadow now. This is straight up
and it's got to change because we have a round sphere. The sunlight is
hitting the top of it. And I can't have a straight up and down shadow right there. It's got to fall in line with being round there. That feels better. Okay. I think I'm going to
leave this pretty bright, so I'm just touching
it with water, leaving that nice
and bright touch if you reactivate it with
water like I just did, and touch it with your tissue, as you can see, it
lifts the paint off. That's a great way to bring in a highlight that you
didn't have before. I wanted to have a
great contrast between this deep shadow and this nice highlight where
the sun's hitting it. I think I'm done with
this back mushroom. Let's go ahead and
move to the next one. Again, I'm using the number four and just picking up
water on my brush. Just going to gently
do the same thing, basically guys to push some of that raw umber
to the outside edge. Same thing. I'm going
to add a little bit of a highlight there. Probably wouldn't really be
much of one because it's right next to the big
one, big mushroom. But I still want that strong contrast
between top and bottom. This is water on my brush, touching it with a tissue. And you can see how
that lifted off. We've got a nice contrast there. Now I like that you
can leave a white gap. You see that frequently
in water color. I'm going to soften this
down just such there. I like that better. All right, let's
do the front one. I already added a
nice shadow there. I was waiting to see how
these played out here. I may need to add some
spots on this one. I want the texture. So you notice I'm bouncing
my brush around. I'm not doing a lot of
smooth strokes here. It's just water on my brush here pushing the buff
out a little bit. I just had a real flat
spot which which is okay. But it bothered me
so it wasn't Okay. You know, I'd like
to highlight here. All right, I'm done
with those mushrooms. How did you guys
do? Feels pretty good. Let's let those try.
8. Stem Details and Shadows: All right, great job on our little button mushrooms.
They're all finished. I'm just going to leave
those to the side. Now, I've come back
to my number four, but this is the one that
has a really fine tip. If you don't have a really
fine tip number four, then go ahead and use one
of your liner brushes. And we're picking up some raw, it's probably an 80, 20 mix. And we're just going to add, we're basically just adding,
let me show you over here. I'm coming in and I'm just
adding some texture to it, just some little
lines, literally. That's why we need
a nice fine tip. But I wanted it to
hold a lot of water. That's why I went
with a number four, particularly up
underneath the cap where there's going
to be some shadow, then the shaded side of the stem where the
grass meets it. Then ever so gently,
don't get carried away. Go go pretty dark right
up underneath that cap. Super light. And remember it's going to dry, one value lighter. All right. I'm switching
to my other number four that has a little
more blunt tip on it, still working with the raw umber and it's about an 80, 20. Again, it's kind of
the same motions. Notice I keep using
short strokes, not much paint, so very, very light, very
tip of my brush. Bring them into the light areas darker down at the bottom, it's behind the button mushrooms going going down into the grass. Now I'm following the
curve of my stem, so make sure that you are aware always of the contour lines. Hey, let's let that dry. The last thing we're
going to do on our mushroom stems
is the shadow. Let me just point it out. You've got the picture
in front of you as well. This is that cast shadow from the cap that needs to be curved so that we are
showing the contour. This is a round stem, right,
that we're doing that. We're going to use our
number four round. I'm using the blunt end. You could also use a
flat if you wanted to. I just like using my
favorite brush number four. We're using watered
down raw Umber. This is a 9010 mixture and
also tested out on your paper. Make sure it's the
consistency that you want. We don't want to cover up
what we have just painted, we're casting a shadow over it. That's why we want to make
sure that we are using a 9010 mixture and going gently. This one in the back is
going to be pretty shadowed. Want to lightly go over that? You can see have a pretty hard line for it
to look like a shadow. That's what we're
going for. We're going to go from the tip of this cap down to the base
of the stem. There we go. That's basically what you need. All right, here we
go with the top one. This one, it's bent and I'm not going to go
all the way to the bottom. I'll probably go about
here. From here to here. Same thing like that. And then just I'm using the side of my brush because I'm
going really light. I don't want to cover up all that beautiful texture
we just gave our mushroom. But that's a nice cast
shadow, guys. Good job. All right, when we
get into our grass, we will also add
our shadows here, which will enhance and add to the dimension of
what we've just done. So let's go ahead and get
started with our mushroom caps. And the last thing
that we will do is add in the grass and
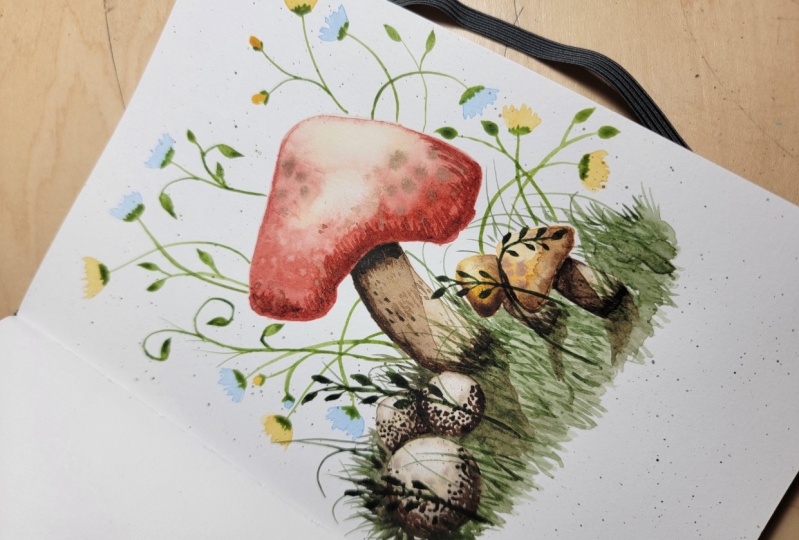
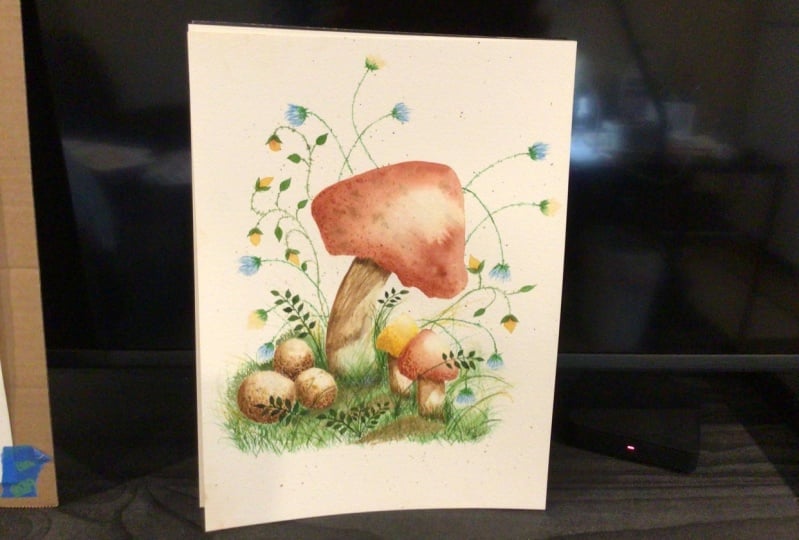
a few more leaves. Decide what color mushroom
cap you're going to do. I have given you the color
guide that you need. You can be doing the yellow one or I've given you also the
red one and the blue one. The technique is
going to be the same. No matter which mushroom
cap you decide to do, you'll just be using
the other colors. I'm excited to see what you do. Please make sure you post your finished project so that we can take joy in seeing what, what colors you decided to do. But for demonstration purposes, we're going to be doing
the yellow ochre piece.
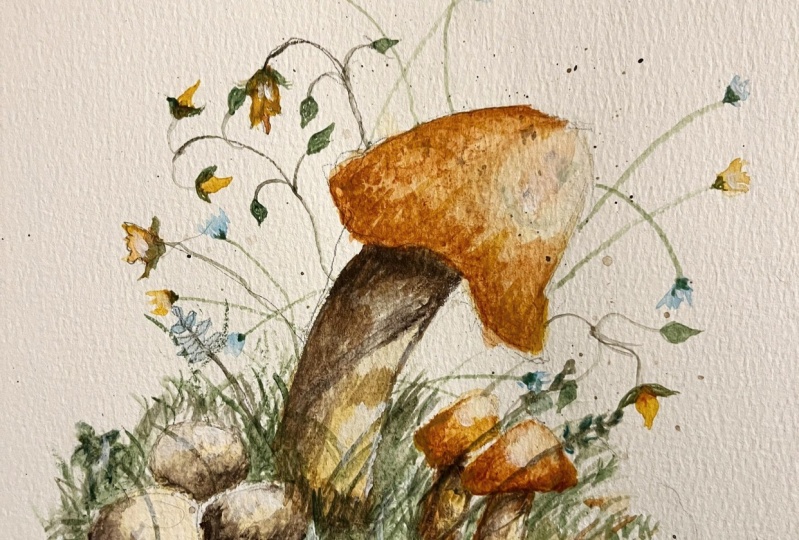
9. 3 Mushroom Caps: I'm going to be using
my larger flat. This is a number eight flat. I also changed my water. This is a great
time to switch out to clean fresh water because you don't want anything to tint the beautiful highlights that we're going to be
putting in here. We're going to start by just adding water
to our entire cap. Now be careful with this, because remember
with wet on wet, the paint will go
wherever your water is. That's the beauty of it.
That's what you want it to do. It's not going to go outside
of your water lines. Um, and that's why
we want to be really careful of where you
paint your water. Let's make sure that
we have a nice, beautiful shape to our cap. Great. All right, so let's go ahead and pick
up some yellow ochre. We're going to go
very light at first. This is a 9010, and that's because we want
to preserve our highlights, but I want to get
some pigment going. Great. That's a
wash. That should be all one value and it should be quite wet because we
put water down first, we are going to do a
wet on wet technique. I just wanted to make sure that we're pretty all one value. Go ahead and use a
water on your brush. And lift out a little high
light there at the top. And then I'm going to
use a slightly curved, you'll see a curved stroke
in the middle here. Before it gets too dry, let's go ahead with our
wet on wet technique using our gamboge here. All right, now I'm going to stay on the chiseled
edge up here. You can see that's going to
bleed across beautifully. And let's go ahead
and bring that down across the bottom again. We're watching the shape bring it up just a
little bit on this side, this is our shadow side, right up on a chiseled edge curving just ever so slightly. I don't want to come up too far, just work with it,
preserving our highlights. Our sun is hitting
quite strongly there while it's still wet. I'm going to use my number
four and I'm going to pick up some raw Umber 9010 mixture
and splatter a tiny bit. Don't get carried away. All right, and I'm
even going to just splatter first on here
to get rid of some, to offload some of the paint. Now I'm protecting my flowers. I don't want to tone
more on my flowers. Yes. Can you see how that
just lands right away? Nice. All right, and if you
want to, let's do it. Just have water on your
brush a little off. Just a little bit of water on there that's going to lift
the pigment off and give it, you can see here it
goes right here. It's going to give it
even more texture. So we'll have spots
from the raw number and then we'll have light highlighted
spots from the water. Great texture. All right. It's mostly dry, not 100% dry. And I'm going to pick up a
little bit of this gamboge, I'm just going to lightly
touch here and there, towards the bottom edge. Give it a little
more texture with a different color now
if it's not spreading. So if yours is quite dry, go ahead and touch that
with water on your brush, curving a little bit,
so have fun with yours, play with a little bit. Get
it the way you want it. We'll use an up and down motion. I'm not touching the
highlight at all. I want it to be really light. Let's come in and put in
our little baby right here. Back to our yellow ocher, and we're going to leave that high light on the side there. Go ahead and just
come in with water. I'm just going to stick
with my number four here. Some water here. I'm going
to be careful to not touch the mushroom in
front of it because we're going to come right
in and do that one as well. And I'm going to lift off
some of that highlight. Now I'm going to add a
little more yellow ochre, just touching it on the bottom. Now I'm with the gamboge. All right? I've got to
watch this for a minute. It's pretty wet and I want
to want to go up too far. All right, let's do
our last one together. All right. We're
going to start with water again and again. We don't want to touch the mushroom next to
it because they're both wet, Yellow ocher. Now let's pick up some
of this brown matter. I use this color a lot
when I'm doing portraits. Actually, it's great to
help with skin tone colors. Same thing. We're going to let it do, it's wet on wet thing, but
we're going to control it. I'm going to bring
it up a little bit. Hey, and I'm going to
less watered down. This is probably 50, 50. It's going to touch
that bottom edge. Beautiful. Notice how we keep the light light, high light, and then we do keep the
yellow ocher showing through and that's why we
just keep our eye on it. Beautiful. Let's
let it dry, guys.
10. Grass Layout: All right, while this is drying, let's go ahead and
start laying in some of our grassy area by
our Hookers Green. And we're just going to use, this is probably an 80, 20, 80% water, 20% I'm using my number four and I'm using
my blunt tip number four. I can barely see my guidelines, but now you can see why I like to put just a little guideline. It helps me stay
where I need to be. Now when I'm painting loosely. We've done a lot
of tight painting. Let me say it that way. I've
been almost like a pencil. I've been using my fingers up close to the tip so that
I can have tight control. Now we want to have nice loose
grass that looks natural. My hand is going to be
at the back of my brush and I'm going to be
doing a lot of this. It's going to be in all
different directions, criss crossing over each other. You need to hold your
brush back at the end so that you can have that looseness and it looks more natural. But first, I do
want to start with just right here on my guideline. That was a guideline. Here's my other corner
that says to me, hey carry, Don't go past that. It's about equal on
either side to the paper. Here's my other guideline. I have one here,
you get the idea. Right is my
guideline. All right. Here's my mound, then
here's my bottom. Now, I don't want it
really dark on the bottom, so I'm going to add a little
water, This very lightly. That's too. That's okay. Now I can see it through this
process of adding grass. If something goes into dark, then just touch it
with your tissue. It leaves the pigment and
it won't be dark again. All right. Now I have
all my guidelines. Here's where I want to stay. I like to start by
just putting in a little bit of
grass here and there and leaving lots of white space. I'd like to keep it
short when I start, before I get carried away, this grass is just going
to be lots of layers. Now in the front,
I'm going to come down on my brush a
little bit further, so I have a little more control. Okay, now I have a much better visual of where I
want to go with this. I'm going to come in
with a little stronger. And let's go ahead and just add some nice dark grasses around
the base of our mushrooms. Step back, switching
brushes on you. I'm moving to my three at
which is the long finer one, sticking with the same
paint, Hookers green. It's about 85, 15, but I want to do some longer. Notice I'm using the
very back of the brush. I'm starting at the base. I just want to throw
out a couple very, very been hardly noticeable. Yeah, very important. Notice that some go in front on
top of mushrooms. Most are behind and
I'm not going up high. I don't want to mess with our flowers because there's
a lot going on there. And I don't want to
complicate the composition. And I'm going to come to my number four
with the fine tip. I'm going to take some
off with my tissue. I'm just going to start
to fill in the front, still leaving plenty of white because we're going
to come in with some other colors sticking with my number four that
has the pointed tip. I'm going to pick up a little
more of the fur, the brown. Adding that to the
Hooker's green. We already have
this mixture here, but I went really green with it. Now I want a little more brown. Let me show you the color. There we go. That's about it. Gently wash in some
of this background, just the shaded
area in the back. Then it has to have
some silhouette of some grass coming up. You see how that adds depth. It makes it go shoo
right into the back. Let's do it again over here. Let's bring some of that
here between these two. I want a little of
that behind this one. Okay, now I have added
a little more green, so it's not quite so
brown as I come forward. That's a good dark spot right there between those mushrooms. I'm going to my number four
that has the blank tip. This is a 9010 mix. I'm going to add the shadow that falls from our mushrooms, these little babies here. We want it to be pretty subtle. We don't need it
to be distracting. But while we're doing the grass, let's go ahead and
just add that in. You want to bring it right
from your stem out And it can be rough and jumbled because we're going
to add grass to it. I'm going to go ahead and
rough that up a little bit. Go ahead and add this one there. We can add a little bit here. Let that drift out.
Good. Now let's come back to our green. And it's okay if it flends in a little bit with that shadow that we just put in while it's wet because grass is growing
up through it. Right? We're going to stop here and let it dry and we'll step back six feet and
take a look at it. I have a really hard edge right here that I don't
like because again, this is the ground is textured. We'll soften that for
sure and that's better. Let's let that dry
and take a look at it from six feet. All right. When I step back, I think I diminished that cast
shadow a little too much. So now I'm going to add it
back in a little bit stronger. I think I just need to make it a little more not straight, just a little more crockety. Get. Okay, I like that better.
11. Mushroom Cap Texture and Green Vine: Now that this is dry, we were waiting for these
to dry totally. And they are, so we
can go back and add just a tiny bit more texture. I'm just touching
there, good like that. I'm going to do the
same thing here. I'm just going to pick
up a little bit of this. Okay, then for the big one, I'm pick up just
a little bit bog. I'm almost using the
side of my fresh, it's on the tip, but
it's not like this. Just to get a bigger
surface area, not just a pointy over here, I'm going to do that
little contour. I want a few little brown dots. I almost want to splatter it, but I don't want to splatter it. I think what I'll do
is bring my tiniest. We haven't used this one yet. This is a five out, just thin line of brush and I'm going to just bring
in a few raw umber. This is a 9010 mix. Just a few little dots going around, some of these bigger shapes that developed from my gamboge. Now using the same number and the same tiny
brush we've got here. I just want to add a few
more defined lines here. Really dark up here under
the cap again here. Okay, I've switched to a three out and picking up
some yellow ochre. We're looking at an 80, 20 mix. And we're just going to
add a few pieces of grass. Done. Okay. The last thing
we're going to do now, we're going to have some green. And we're just going
to add a few of these leafy vines in the front. Then I think before
we finish guys, I've switched to
mine number one, I'm using the same mixture, it has very little
brown in it by now. I've added some more
bookers green to it. And this is probably
an 80, 20 mix. So it's show you pretty strong because it's in the foreground,
It's close to us. Let's go ahead and just
start with our placement. I'm going to start
with one that's just fairly low to
the ground here. Maybe a lighter spot, one there. These can go right over your little baby
mushrooms. All right. I'm going to do
those three first. You can do three or four down each side or five,
whatever you want to do. It's such a stronger green
than we have been using that. To me it looks funny
if it's just all a sudden this one step
popping out of the ground. I'm just going to add a
little more grass around it. Okay. And then the final one side. All right. Now let's go
ahead and add our others. Hey, how d you do with that? I think we are almost done. We're going to go ahead and
put our white highlights in, so let's get our white gush out.
12. White Highlights and Sign Name: The first thing we are
going to do is add highlights to the
mushroom caps by dry brushing using a small f. This is the
one we used earlier. It's a number ten, I
guess it's a medium flat. When I'm dry brushing with wash, I like to just go pretty
much straight from the. I'm just going to pick
some up with dry brushing. If you've never done
it before, you pick up the paint and then
basically you wipe it off and until your
brush is pretty dry, I didn't pick up any water. If you look at it here,
that's the look you want. Almost like a whitewashed barn. I don't know how
else to describe it, but I use my scrap paper and I just add some extra
highlight there. It's going to take a
bit to show up because my highlight is so strong on the mushroom, which is great. I'd rather take my time
and add more and more. Wash is going to dry. One value lighter like watercolor paper. Water color a little bit more
on the contour goes around. You don't really have
to do this step. If you're happy with the
highlight that you had before, maybe you don't want
it extra strong. I, I love white highlights. It just to me, it makes it
sparkle, makes it really pop. And who doesn't love a sparkle? Okay, I'm going to
leave that for now and let it dry and
see how I like it. Picking up some more,
we're going to go into this cute little
guy down here. Cute. And I don't need to do the one in the back because
I put a big vine over it and I might add a titch on that mushroom right there. Nice. Okay, let's switch out brushes. All right, I'm back
to my number one line of rush and I'm still
using the gash, but I have added just
a touch of water. I put it on my
paper just because I keep it close to
where I'm going, I have to dip in
quite frequently. I just wanted to strengthen this by adding a little bit of dots. Again, we've got this
textured surface so I can't have a
smooth line that wouldn't make sense there. I can see how that makes it pop. Now you can add a little
bit on your flowers. I like that little
extra highlight. It just makes things
shine and sparkle. And catches your eyes where the sun would
catch something and make it glint in the sun. Great. Okay, guess what. We're going to put in a little bit of grass. So I'm thinning
this down further. I'm now down to probably 9010
and rolling to a nice tip. Just going to add a little bit of white grass here and there. Again, this is
where the sun might grab a blade of grass
and reflect off of that. I might even put a little bit on the stem hair in the light spot. Okay, let's step back six
feet and see what we think. I hope you took a moment
to step back six feet and take a close look and
see if there were any adjustments that
you wanted to make. I wanted to point out a
few things that I changed just in case you're
looking at it and saying something's
different. But I'm not sure what. I deepened the shadow here and
here, and around the base. And I brought it up a
little bit higher here. It really made the mushrooms. You want something light to pop, then put something
dark behind it, and that really helped
bring those values forward. That's basically what I did. I might have added just a touch around these mushrooms here. I think we're finished
with this piece, guys. I hope you had fun with this. I hope you enjoyed the process. It's something that I try to
teach all of my students. It's not just the
finished piece, but it's the process as we go along that should be
enjoyable and pleasant. And I hope that you learn some things about wet
on wet technique. And layering and glazing and highlighting the dry brushing. We had a lot of
things going on with this piece and I hope that
it was benefit for you. Now guys, it's time
to sign our name. Please always sign your name
and claim your artwork. It's so important and feel really good
about what you did. I'm so proud of you
for finishing this, and I hope that you are
proud of your piece as well. And I do appreciate
you taking time out of your busy schedule to spend your time with
me in this class. Thank you so much. I'm
very grateful for that. And I will see you
in the next video.
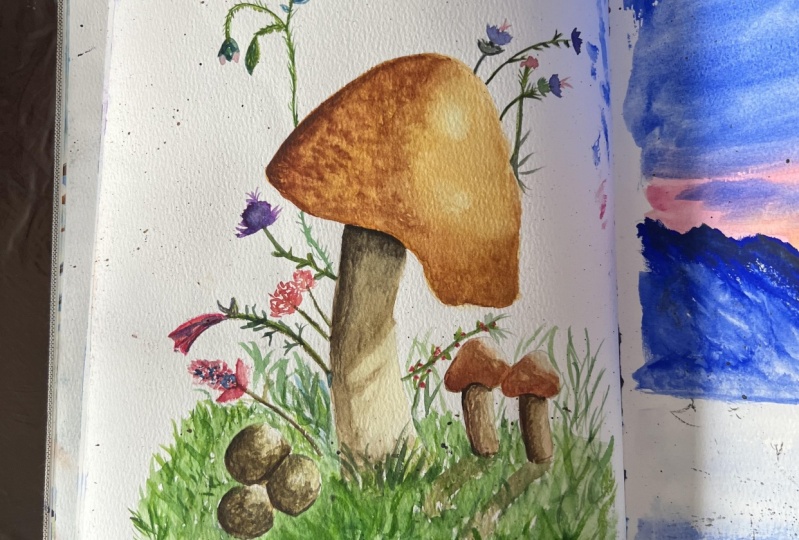
13. Red Mushroom Cap Demo: For those of you who
would like to have your main mushroom in
this reddish color, we're going to
demonstrate that for you. Now, the rest of the piece, you will do this with the brown matter that
I'm going to show you. Then the rest of the piece
would be exactly the same. Or you could switch
these out to, you have options which is great. You can do whatever
you would like to do this demonstration, this chapter of the
lesson is going to be the reddish cap. This one here, we're going
to use yellow ocher, brown matter and burnt ember
as well as route umber. We'll go ahead and start
now, get some clean water. I'm going to be using my
larger flat, my number eight, and we're just going to go
ahead and base that in water. And we'll be using a
wet on wet technique. We'll be careful of your
lines to remember that paint travels wherever
the water is. Paint flows where water goes. We're going to start
with yellow ocher, thin down quite a
bit, a 9010 ratio. Just go ahead and place
that in nice and light. This is going to be
our highlighted area, but we want it to mix
with the brown matter. So go ahead and let
it go everywhere. Great, now I'm going to just gab my paper and pull off the high light,
going to lift that off. All right. Now let's pick
up some brown matter. This is a brownish red. It's such a beautiful
adaptable color. It's great for barns
and outdoor landscapes. Honestly, I use it
mostly for portraits. It's great to mix
for skin colors, but I love it on top of yellow ocher, It
mixes beautifully. We're going to let that settle. Notice that I was using a
chiseled edge up on top. I wasn't using the
flat of my brush because I didn't want it to
come all the way across. That will be the same as I just bring it
across the bottom here, gently bringing it
up a little bit. I'm just touching it in now, just letting it darken a
little bit at the bottom. Slip that sip for just
a moment. All right? Now I'm going to encourage mine to come
up just a little bit. This is going to be
different for all of us because it depends on
how much water you had. And I'm going to have this
come over just a tad. No paint on my
brush, only water. Just working with
what's on my paper. I'm now I did pick up
a little paint there, but I'm just touching it and
I'm going to let that sit. Honestly, I'm not going to do a full stem here because you can just refer to the main chapter where we do this entire stem. It's going to be
exactly like this, but I just feel silly having no stem and just a cap that
looks a little silly to me. So let's go ahead
and put in our buff. It's better than
sitting here and literally watching paint dry. And that does bring a note, guys, when you are
doing wet on wet, you should not do a hair dryer to encourage
things to dry faster. Because the whole
point of wet on wet is to let those colors blend. You need it to work with the paint and the
water, and the paper. And that takes
time and patience. And it's hard to wait. I know
see how it's coming down. We want that to come down, but it has to do it by itself. And if I were to go blow it dry now it would stop that process. And we want that process
to continue on naturally. It's the same with
the mushroom cap. We're just going to bring this over a little bit
here and there, and across the bottom isn't that beautiful the way
it just creeps across? And that's exactly
what we want it to do. We need to wait
until this is dry. We'll see you in just a moment. All right. There
should be no shine. It should be completely dry now. And we're going to go
ahead and still using our flat and picking up
some more brown matter. Still a 9010 ratio here. We're just going to enhance
the shading on this side. You don't want to
overwork this or it will lift off what
we've already added. We're just going to gently add another layer on
the bottom edge. You got to work a little bit
quickly so you don't lift off blending that a little bit. I'm going to enhance this now. I'm going to work it with
just water on my brush. No paint, just blend that
to soften that edge. I'm going to bring
this up a little bit, curve it up a little bit, and again, I'm going
to soften that edge. I don't want to
lose my high light. Touch that with my tissue to
bring my high light back. Now, while this is
still a little bit wet, we're going to splatter a
little bit of this raw umber, get a 9010 mixture. Use our number four round, then now we're going to
take straight water on our number four tap
over here first half, once to the side, so you
don't overwhelm it with water that's going to lift off. You have two combinations there. You'll have the dark going on
and the water lifting off. It's going to give it
a beautiful texture, working its magic there, and we can't help it along, it has to do its own thing. Let's pick up some
of this raw umber, a 9010 mixture on
our number four. Just add some ice shading
up under the cap. Again, the full instructions for this will be in the
previous chapters. Just water on my
brush to soften here and there and ladder. All right, Now this is still a tad wet for me and
that's just right. If yours isn't wet
at all, that's okay. What we're going to do is
pick up some brown matter. This is thicker now. This is
going to be an 80, 20 mix. Now if you're not
getting any movement, then you can just pick
up a little bit of water and touch it and that will give it the
movement that you need. Then this is the shadow side. You've got your light coming
here from our highlight. That's going to be
darker there and maybe a little bit darker here. You can decide how far up
you want to bring this. If you bring it up,
make sure you're contouring to the
shape of the cap. All right. We're going to let
that dry. That's beautiful.
14. Blue Mushroom Cap Demo: For those of you that want
to do a blue mushroom cap, I don't blame you, it's so cute. Okay. The first thing we're
going to do is use our large number eight flat and we're going to fill
it in with water. Be careful of your lines. Remember that paint flows
where the water goes. So we want to be careful
that we have a good shape. All right, for the blue one, it's going to be different
than our other two in that we are not going
to do an underpainting, we're not going to do
yellow ochre for our base. We're just going to let the
white paper show through. Be very careful in your
application, you'll be just fine. Let's pick up some of this
beautiful Cerilian blue and do a 9010 mixture. Let's just get that going in. I'm starting over here
on the dark side. Our highlight is going
to be over here. I may not even add paint
over there for now. I'm just going to
let that flow up. Add a little more on
the dark side now. I'm gently going to
bring that over but I'm going to keep that
highlight. All right. I have a stubborn spot, so I'll go ahead and
just touch it with tissue and see how that
lifts it right off. All right, so a little
more serilian. Great. All right, so let's come
in with some indigo. It's not going to take much. Indigo has a lot
of pigment in it. I love to use indigo
for night, skies, for oceans, and this
will be a great color. It complements our silian
blue, nice leaves. I'm just going to touch, it's going to be up to you how dark you want your mushroom cap. If you wanted a nice light blue, maybe you don't even
want to add indigo. But if you want a little
bit of depth and shading, the indigo is a good
one to do it with. See how that goes. Isn't that
a beautiful combination? I love it. Steering it
away from our highlight. This is a process. You
can't rush with wet on wet. You cannot force it
to go any faster and you don't want to
dry it fast either. Patience is the word of the day here. Looking really great. While that's trying,
let's go ahead and add our stem just so we have something to look
at and add in our buff, and add in a little
bit of burnt umber For full instructions
on how to do the stem, as I said with the red one, please refer back to the instructions and the chapter when we did this
yellow ocher piece. Because it'll have all
the, everything you're going to do for the
blue, you will do here. You're just switching
out the cat colors. All right, let's wait for this
to dry a little bit more. Okay, it's still slightly wet, which is just right
for our splattering. I'm going to go ahead and
splatter with the indigo. You could splatter
with the raw umber, but I think indigo is
probably the best choice. Go ahead and test it out on your paper and see
what you like best. It's just wet enough
that it's going to open up and blend and bloom. I am going to splatter
with water as well as we've done
in the other pieces. I'm going to lift
off with water. We've added the
darkness of the indigo. We're lifting off
with the water. You can see it's
already happening. We have some beautiful
texture going on with this blue mushroom cap. Now one thing that I
would do differently with both these pieces than we did with this one is I would probably add just
a touch of the cap color. Into the stem with
the brown matter. I would just lightly wash in just to just
glaze in a tiny bit. Let me see how that
just pulls it together. It would have that reflection of color. I would do
the same thing. Let's add a little bit of raw umber to our
stem over here, so that we can add
some of that blue. And you'll see what I mean, But it's going to
reflect in the sun. It's going to reflect back. I'm not being very careful because we're just
trying to make a point. I'm not really trying
to be beautiful here. Okay. You get the idea here. Let's let this totally dry, and then I'll show you
how to put in that blue. Okay? Everything should
be completely dry. No shine to it, Nothing wet. I'm using my number
eight flat again, picking up a 9010
mixture of indigo blue. And we're just add a little more shading
to the bottom of this. I'm going to, again,
have to be super careful so you're not lifting
off what's underneath. I'm just padding
in a little bit. Color, just up and down motion and you can
see how that adds a nice added shadow on
the dark side of our cap. Like now, I'm going to just
pick up some water and ever so gently soften that edge, barely touching the paper. I'm going to add
a little cereal. I'm just going to give
you a little pop of color and makes it look like a reflection from the cap and pulls it together. Great. All right, It's time
for a highlight. All right. I'm going to use some white gas. It's time to make
it sparkle guys, this is my favorite part. Okay, so I notice I did not
dip my brush into water. I have a dry brush, literally. This is a number ten
flat and I'm picking up the gouache and then I'm going to basically wipe it
off, it's very dry. And we're going to just brush
on some highlighting here. I start easy, looks
like I need more paint. I'd rather start light and go darker than trying
to lift it off. It looks like an old barn door. That's how dry you want it to
look like it's wearing off. That's going to show the
texture of your mom. Now this one can be
harder to see because we are actually using the
whites of our paper. Remember we just with the tiniest amount of watered
down paint over here. Then because it's very textured, I think it's a good
idea to come in. I'm using my number four. This is probably 90%
paint, 10% water. It's very thick and
enhancing this highlight. I'm dabbing it up and down. If I made a smooth stroke, it would cartoonize it and make it look smooth when we actually have a very
textured surface. Same thing here, making
some white highlight. Thoughts. Okay guys, have fun with this. Please post your
finished project in the gallery
below so that I can see what color you ended up doing your beautiful mushrooms. I'll see you in
the next chapter.
15. Congratulations and Bloopers: Well, congratulations
guys. You did it. You've finished your project. And I hope that it was
a benefit to you and that you learned something
in the process of painting, but also that you
enjoyed the process, that the journey was
worthwhile for you, and that you ended
up with something that you can be really proud of. If you felt like my
class was a benefit to you and you know someone else
that would be a benefit to, then all you need to do is look for this button on this page. And you click that and
share this link with them. And both you and your
friend will benefit financially from Sharp,
which is pretty cool. Also, if you could take
just a moment to upload a pick of your project into
our class gallery below. It's very simple. You
just need to click on this button and they make just follow the steps
to upload your picture. But that would be such
a great place for us to see what each other
has accomplished, like and share comments
and discussions. And it'll be really
fun to see if you ended up with blue
or red or yellow, or what combinations you did. I truly would love
to see what you did. Please take a moment to do that. Also, if you would like to
communicate freely with me, this is a great
forum to do that. We have the discussion
tab that is on our main page here
of this class. Also, you can find me on
Instagram at Carrie Sanders Art, and you can visit my website, Carrie Sanders Art.com
to see more of my portfolio and what's happening here in
St. George, Utah. I would love to
hear from you and appreciate you taking the
time to take a class from me. I'm really honored about
that. I genuinely am. If you would like
to take more of my classes here on skill share, then all you need to do in the search bar is type in
my name, Carrie Sanders. And all of my classes
will populate there. I've got about 25
of them so far, and I would really enjoy
having you in my class again. Thanks again,
everybody. Take care. Bye for now. We're able to take this time
to take this class. But I have been
teaching for many, many years and just
take all that out. I don't like it. Oh my gosh. Learn something along the way. And if you feel like this was a benefit to you and you know, someone else that
would be enjoy, I can't talk today.
 Kerrie Sanders, Artist, Teacher, Creator.