Transcripts
1. Introduction: Greetings, everyone.
Welcome, and thank you for being here today. In this lesson, we're
going to learn how to create smooth blends
with acrylics, and then also we're
going to create detailed clouds step by step. I want to let you
know that it doesn't have to look exactly like mine. Everyone will have
a unique style. My name is Felix Kaparchk, also known as Color By Felix
on social media platforms. I've been teaching and creating art for a little over 18 years. Through experimenting
with acrylics, I was able to create my
own blending technique using specific
brushes and paints. I love the creative process and to see how each
painting will turn out, I never know how
it's going to go, so I like the fact that
it's always new every time I create a each painting
as a learning opportunity. And it's through this that
I'm excited to give back to you and to share some of the things I've
learned over the years. So in this video, we're going to learn how to blend and how to mix our colors
for our clouds, and then we're going to layer. So the first layer
is going to be a sketch of our clouds,
and then the second layer, we're going to start
to add details and add three D effects to
make our clouds pop. These techniques will help
you in your future artworks. And remember, with each
painting that you do, you will get better and better. So it's all about practice as
we go down to our palette. I'm going to show you
each colors how I mix and what I do so that you guys
can get the full step by step version of this
video and improve in your because it's important when you lay out your
colors the correct way, it makes it easier
to go to the canvas and create those blends
and smooth transitions. Also, once you're done
with your painting, please take a photo of it and share it in the project gallery. I'd love to see it. Or, I
guess, let's get to work.
2. Materials Overview: This video, we're going
to go over the materials needed for this project. I'll be using a 12 by
16 inch studio canvas. It already has gesso coat
on it, so it's ready to go. All I did to prepare the canvas was add a glaze of
water everywhere. And what that does is
once the water dries, it stretches out the loose
ends, so it's nice and firm. Of course, you could use any size canvas you
have available, but just keep in mind if
the canvas is bigger, you add a little bit more
paint when we go into mixing. If it's smaller, then
you add a little less. Next for brushes,
we're going to use my two and one blending brushes. These were great to get that
smooth transition, right? And so one brush,
I like to dab in the water and pick up paint and quickly lay all
the colors out. And then my second
blending brush, I work dry to blend
everything in. We're going to use my four
piece brush set right here, and I'll show you what's inside. We're going to need the
number eight and number four. These brushes are the same,
just the size smaller. It's like a Filbert
style synthetic hair. These I use a lot for
most of my projects, and we're going to be working on the clouds
with these brushes. And next, we have a half
an inch flat brush, but we're not going to
use it for this project, but it just comes in a pack. And the other brush is
number zero detail brush for all the little details. For paint, I'm going to
use my 24 set of acrylics, and I'll show you which colors I'm going to use from this set. We're going to need
medium yellow, orange, crimson red, sirtlane blue, palo blue, and carbon black. And from my five
set of acrylics, we're going to use
titanium white. For palette I'm going to
use my paper palette here. You could use any palette
you have available, but what's nice about this one, it comes in 40 sheets. And once you're done
mixing all your colors, you can just tear
up the sheet and throw it away and not have to wash the paints over the
sink. Saves a lot of time. And we're going to need a
pot knife to mix your paint. And the one I like to use, it bends easy, right? So when I come to mix the paint, it mixes nicely evenly. Some pot knives can be stiff, so I recommend getting a pot
knife that bends easily. We're going to need
a jar of water, and I like to have my
water next to my canvas. So I have a little table
right here where I have all my brushes and water jar next to it where
it's going to be easy access. We're going to need
some paper towels to clean your pot knife and also dab some of our brushes
to take away paint or water out of them,
and I'll be showing you. And last, we're going
to use a hair dryer. To dry out our first coats. So when we get the blend down and I like to dry it out before I continue
to the next step, you do want to make
sure the background is dry before applying
your next colors. Because if you don't, and the
paint is still kind of wet, you're going to peel off and kind of scratch off the paint, and we don't want
that to happen. So actually, I
prefer that acrylics dry faster because
when it dries, you can add more and more layers and start to really
create the blend. Or you can naturally let it dry, which takes about
20 to 30 minutes. You can use any materials
you have available. If your brushes are a little
different or canvases, paints, the colors are a
little loft, that's okay. Use what you got
available, and then you'll improve over time and
get used to the brushes. And also, you can improve on the brushes and
test and experiment different kinds of brushes
that will give you an idea and it'll guide you
to your specific style. You don't have to have
exactly what I have, but if you are interested
in using what I'm using, they are available
at colorbfx.com, or there will be
links to them here. Okay. In the next video, we're going to lay out the
first base of our colors, which is the sky. And I like to work from
the furthest distance up to whatever's closest
to me, that is the sky. So we're going to create
colors of the background. And here's a quick review of the materials
needed for today. Blending brushes, pallete paper, the number eight, number
four and zero brushes, the acrylic paints, we're going to need and palette knife, paper towels, water jar, and 12 by 16 studio Canvas.
3. How to Blend: This video, we're going
to create our sky colors, and we're going to create almost like an evening setting sky. So we're going to cover
the whole canvas, and I'm going to start
with titanium white. I like to start
with white and then add my other colors
on top of it. And the goal is to create colors from lightest to darkest. I usually do this pretty
much all the time. When I'm mixing with
anything I'm working on, I like to always create three to four shades of color
from lightest to darkest. And so with white, we're going to add
about a thumb amount, maybe a little more
in the corner here, Let's just say two
thumbs amount of white right here in the corner, and we're going to create
about four colors. And then each time, I'm
going to go a little less. So this is a thumb
amount of white, and then a little
less here. Okay? And then a little
less right and here. Okay. And remember to always close your lid once
you're done squeezing paint so that the
paint won't dry out. Next, we're going to add Serlin
blue onto our first one, and we're going to add a
little bit about this much, very small amount, maybe a
little more on this one, okay? Less than a thumb amount, maybe half a thumb amount of serlin blue on
this one, okay? I'm going to also
add crimson red, a small touch right here, not a lot because
red is strong color. So very small amount
here and maybe in here. And that's it. Next, we're
going to need thalo blue, and I'm going to add a little
bit like a thumb amount of thalo blue here and a little
bit more on this one. Okay? Like almost two thumbs
amount of thalo blue here. And last, lampblack,
we're going to add a touch right on this one. Okay? At this much. And we're going to mix colors and see if we
need to add more. But the reason why I added
crimson red to these two is because we're going to create from lightest to darkest, and I want to create my sky because of
the sun going down. I wanted to have a little
bit of warm colors in, you know, going from
lightest to darkest. And red helps give that warm
color look a little bit, just a small touch. But we want it to mainly
look blue still, our sky. So let's start mixing
with a put knife from lightest to darkest. And the way I like
to mix my colors is, like, chopping
vegetables like this. Okay. And then make sure
everything is mixed. And remember when
I told you about the palt knife bending.
So this is what I mean. When I'm, like, squeezing
it and mixing the colors, it just bends nicely like this. Some palt knives are so stiff. It's hard to get the
perfect, you know, harder to get a smoother, you know, mix of color
here on the palate. But this is important.
Like a lot of the time, I would encourage
you guys to practice creating gradients of
color because that's how you will also remember if there's a reference photo or something you're going
off of and you see a color, after many practices
of mixing your shades, you're going to know how to get to that color that
you're looking for, or at least similar to it. So once you're done, you
just pile it like this. I like to pile it like this
and then mix my next color. And so I'm going to quickly mix everything and show
you what I get. So when I was mixing, I
decided to actually add a little more crimson red
to this one, as well, because I wanted to
look a little warmer going into the more
of the darker blues. And here you go. Also, I
like to dab my pot knife in the water jar all the way and just clean it
quickly like this, and it'll be ready
for the next use. Basically you want it to
look something similar like this from lightest
to darkest with blues. And remember, it doesn't have
to look exactly like mine, but something like this will do. All right, so this
is a quick process. We're going to quickly
lay out our colors onto our canvas and quickly pick up our dry blending brush
to blend everything in. And I'd encourage
you guys to practice the blending process so that when you catch
the technique, it becomes easy and quick. So the next step is picking up our water jar and our one of
our one blending brushes, we're going to dab
it all the way in the water jar all the way and then we're going to
squeeze part of it out, okay? Not everything. There's
still some water, but it's not a lot, okay? And so water helps keep
acrylic stay wet longer, which allows you to when
you lay out the colors, you can go with a dry land of brush to blend
everything in quickly. And I've tried using
mediums and stuff, but the problem is with those
mediums, I didn't like it, is that it becomes kind of sticky and
bumpy certain areas, and it doesn't blend in
well, certain parts. So I didn't really like using these mediums that keep
acrylic stay wet longer. The best solution I
found is with water. And once you actually
catch the technique, it becomes super easy and fast. So we're going to have our water a little bit in
our M one blending brush, and we're going to start
with the lightest color. And the reason why I
like to start with the lightest color
is because I can get the lightest colors
into the darks instead of bringing the
darks into the lights. It's going to, you know, you're going to
carry too much of the darker into the lights, and you're not going to get that nice brighter blend, right? So again, and also by the way, when I have my water
jar next to my canvas, and whenever I'm saying I'm dabbing my brush in the water, I'm basically just a tip
of my blending brush. I'm just going like
this in the water, just a little bit,
not all the way, but just a little bit
to pick up some water, and then I'll be
picking up more paint. And I'll explain
every time I do this. So now that I have a
little bit of water, I'm gonna just pick up my paint all the way like this, okay? We're just going to
lay it quickly, swirl. And you see bubbles,
that's a good sign. But if you start
seeing water dripping, that means you have
too much water, and I'd encourage
you guys to pick up more paint and kind of equalize it by swirling and kind of
spreading the paint around. So I'm going to pick
up all the color here, the slightest color, kind of
add it randomly like this. All the color here.
All that nice. And I'm not pressing too hard, but it feels like
butter on the canvas. That's what you want. You
want to evenly spread. And the reason why I swirl is because the paint kind of
falls into all the cracks in the canvas texture and fills in the paint
everywhere evenly. So quickly lay out
your first color. Next, my brush has some water
still in it pretty good, so I'm not going to dab my
brush in the water yet. But once I start feeling that it's kind of
getting a little, you know, pulling the
paint a little too dry, then I'll dab my brush slightly
in the water like this. And then pick up more paint
and try to swirl, make sure. And you can go
down a little bit, but don't go down too far. Okay? A little bit like this and don't focus
on blending too much. I'm dabbing my
brush in the water, picking up more of this color. And then here, I'm going to dab my brush in water and
pick up the next color. And sometimes you don't use all the colors, but that's okay. It happens. But basically, try to evenly spread it, dab my brush slightly
in the water, pick up more of this color, and swirl and try
to kind of blend, but don't focus too much on it. We're going to work on
with a dry brush. Okay. And the last color
dab my brush in the water is this darkest blue, and we're just going to lay
it quickly all over the top. Okay. Just like
this. Real quick. Dan my brush slightly
in the water, pick up more paint, and
quickly lay it down. Spread evenly. Okay. Next step, I'm going to put my
brush in the water jar, and I'm going to pick up my
dry N one blending brush, and this is the
part where you're going to create
the smooth blend. The paint is still wet, so this is the perfect
time to do this. Quickly pick it up and
then slightly press and swirl and try to swirl up, pulling your paint a
little bit upwards, and start to blend the colors. This is where you're going
to see a smooth blend come start to happen. Just like this and take
away all the brush strokes. Just like this. And now
we're done with blending. So I'm going to let this dry out and you can use a hair
dryer to dry it out. I'm gonna clean my brushes so they won't sit in the
water jar too long. And if you take care of
your blending brushes, they'll last you very long time. For the next part,
we're going to create the sketch of our clouds. Okay, so here's the dry version, and something to keep in mind is every color you
mix with acrylics, it tends to go a shade darker
once the paint is dry. That's normal for all acrylics. Just keep in mind. And the way I clean my brushes, by the way, I use a little bit of
dish soap on my palm, and then I run it
over warm water and I swirl until all
the paint is gone. And then I use paper
towel to kind of well, first I squeeze the water out, and then gently clean
it and swirl it onto the paper towel to fluff it back up, and
you're ready to go. So now, I've got
a new water jar, and we can continue
to the next part.
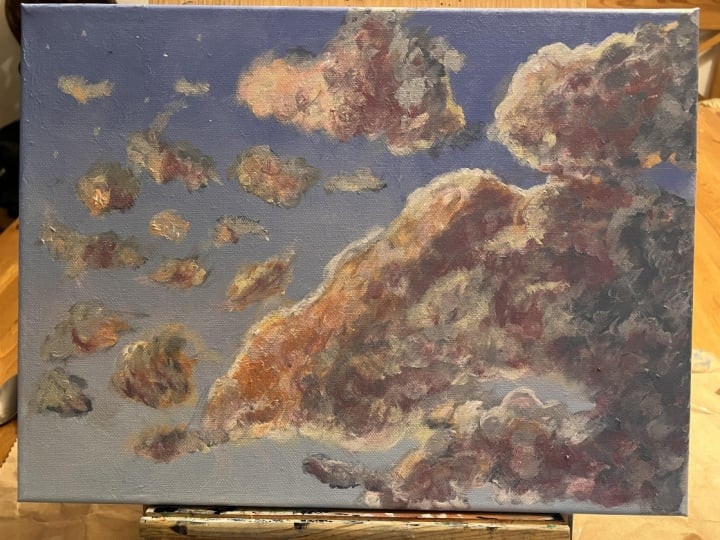
4. Sketching & Shaping Clouds: This video, we're going to
create shades from lightest to darkest for the
base of our clouds, as always, we're going to
start with titanium white, and we're going to create
the lighter colors first. So in the corner,
I'm going to use about less than a thumb
amount of white here, and then each time. And we're going to create
about four to five, maybe six colors. I'm
going to start with four. So this is less than maybe half a thumb
amount of white here, and then each time
go a little less. Next, we're going to
use medium yellow. And we're going to squeeze about the same amount of medium
yellow to this one. And then maybe we can
add a little bit here. Small touch. And then
we're going to use orange. And we're going to
add a little bit of orange right on this one, and then a little
more to this one. And I'm going to close my
lid. Always close your lids. And then crimson red. I'm
going to pick up crimson red, and then add a
little bit in here, maybe less than orange and then add a little bit
more on this one. And then we're going
to add serlein blue to this one
about this much, and then a little bit here. And now I'm going to use carbon black or
lampblack lamp black, and we're going to
add a small touch to this one and a little
more to this one. And quickly, we're going to mix these colors and
see what we get. And then we might mix more after we see what
we get here. Okay? So starting from
the lightest color, this is the base of our cloud. So it does not have
to look perfect. We just want kind of the layout. So as I'm mixing,
I'm looking at this, and I actually want it to
be a little bit lighter. So I'm going to add
a little more white, a little more white, okay? Close the lid, and I'm going
to take part of the red, a small touch of red from this one like this,
mix it in with this. I want it to kind of
look a little bit like orangy pinkish,
maybe peachy color. Okay. Something like this. It's a good base color. Okay, that's good
enough and take a little part of this
and mix it with this. And remember, it does not have
to look exactly like mine. As long as you get something similar, you're
good to go, okay? So I'm looking at this, and
it is a little too dark, so I'm going to go ahead
and add a little bit of white, more
white to this one. Just a little touch of white and make it
a little lighter. I don't want it to be too dark. Okay. That's good enough. Next, you can take
part this color, bring it into this
one, and randomly mix everything here. And
let's see what we get. Okay. I'm looking at this, and I think what
I'm going to add is a little more crimson red, a little more crimson red. And let's add thalo blue. Let's add Tala blue, a small amount to this one. And we're going to mix it. We want to lean towards
more of the red, warmer color, but we still want a little bit
of blue in there. Almost like a violet color,
darker violet color. But it's leaning towards the Like why I added the black
it dolls the color a bit. We don't want it
to be too bright. But this is good
enough right there. Next, I'm going to take part
of this, mix it with this. And I do that because for fun, I really just take
part of it just sometimes, you
know, to get that. When you go into
blending your clouds, you're going to have each of these colors
blending together. So it's all going to be blended anyway when you go into
adding to the canvas. And this one, as you can see, we added more blue. I'm going to actually
add thalo blue, a little more thalo blue to this one because this one's
leaning more towards red, but I want this one to
lean more towards blue. So I added a little more
halo blue to this one. Okay. And last color, I'm going to
add next to this one, white. And I'm going to
use take part of this color mixed in with white. We're going to have a
lighter gray color. I'm going to actually
add a little bit more. Let's add a little
bit serene blue. I want it to lean towards a
little bit of grayish blue. We can take part
of this one again. I want to make it
a little darker. Okay? That's good right there. It has it's like grayish,
light grayish blue. Okay. Quickly mix that like this. And finally, we're going
to add white on the side, squeeze part of white
on the side just in case if we need to mix any of
these with the white, okay? So here we are. We have our
water jar next to our canvas, and we have the number eight
and number four brushes, and we're going to put these in the water, let them soak in. And in a few minutes, they'll be nice and damp
and soft the brush. Right. So once you
have that ready, we want our brush to always have a little bit of water
in it, not too much, but just a little bit
because it makes it nice and soft when you add color, and it works like blending. You know, you create
a smoother transition with a little bit of
water in it, okay? So my brush is nice and damp, and we don't want
too much water. So if you have too much
water, you just dab it on the paper towel to
take some water out. And these are the colors, again, if you get
something similar, that you'll be good to go. It does not have to look
exactly like mine, okay? This is the base and
sketch of our clouds. So first of all, we're
going to start with the lightest color and kind of shape out our
clouds first, okay? So let's just use this yellow, maybe mix it with
white randomly. So my brush has a little
bit of water and white, and we're going to
start to sketch out. Remember, we're going to have clouds that are further away, and then we're going to have
some bigger clouds that are up close up here on top, okay? That's the goal. And
let's see what happens. So with my number eight brush, I'm going to start to
sketch out where I want my highlight of the light. And remember, the light
is coming from the bottom on the left side of my
canvas going this way. So everything all the light is hitting the corner of my clouds. So it's going to be
the highlight and the brightest colors are going to be more
on the left side, and then the darker
colors are going to be more on the right side, okay? So that's the gold. Okay. So with this color, we're going to quickly dab my brush in the water now, and we're going to start
to lay out the next color, this orange orange color, and we're just going to start
to randomly fill it in. It's gonna look rough, but we want it to be
covered in color. Like this, and then you mix
those randomly together, and let's just add
it in here randomly. And then we also maybe want to add it in the
corner because I want to these clouds are going
to be bigger up here. I want to cover this
corner right in here. They're coming
towards us, right? Okay, and then a
little bit in here. Alright. Dab my brush lightly
in the water. This grayish color. And I don't need
to clean my brush. I just dab it in the water and
tap it on the paper towel. This is just a quick sketch. And we're going to kind of
start to add a little bit of grayish blue
on some of these. I'm going to dab my brush
lightly in the water, use a little bit of
white, mix it with this. I want to make it some
areas a little bit lighter. And I'm using a
corner of my brush, and we're just sketching out. Demo brush in the water, and we're going to use a
little bit of white and this reddish color,
mix those together. And then we're
going to continue, but with a little bit
of the red colour, reddish pinkish,
gray color here. A little more that cherry color. With white, we just going to try to connect
these a little bit together and then use
just a darker color, no more white, and we're just going to add it
right in here randomly. We're going to
continue to go back to this grayish color with white, and we're going to
try to add in here. Et's go to the darkest. Color here, dip it in water. Maybe mix it with the
lighter blue randomly, and we're going to add
a little bit of clouds that are further away, and
they're going to go down. And the reason why I'm adding
it on a darker shadow is because you want to create depth and remember the light
is hitting from the left. Okay. Next, we're going to
use a little bit of this color and orange. And we're going
to continue here. Okay, and I'm going
to go back to my white and maybe
orange and white. Randomly mix those,
and we're going to try to lighten some of these. And then maybe randomly mix those in the
darker areas here. Use a little bit
of a darker color. Darker bluish gray color. And I'm just looking at
this and kind of going with the flow and trying to
make it look interesting. And now I'm going to use
a little bit of white and this yellow and kind of swirl and add a little bit more
brighter colors to my clouds on the edges here. Because my brush has a
little bit of water, it blends in with the
background nicely. And the base is done. And so now I'm
gonna let this dry, and we're gonna continue and start to finalize
this painting.
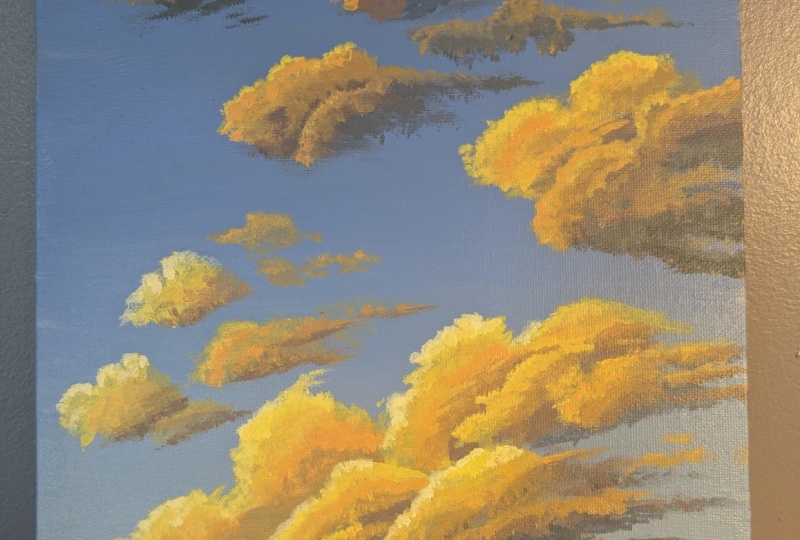
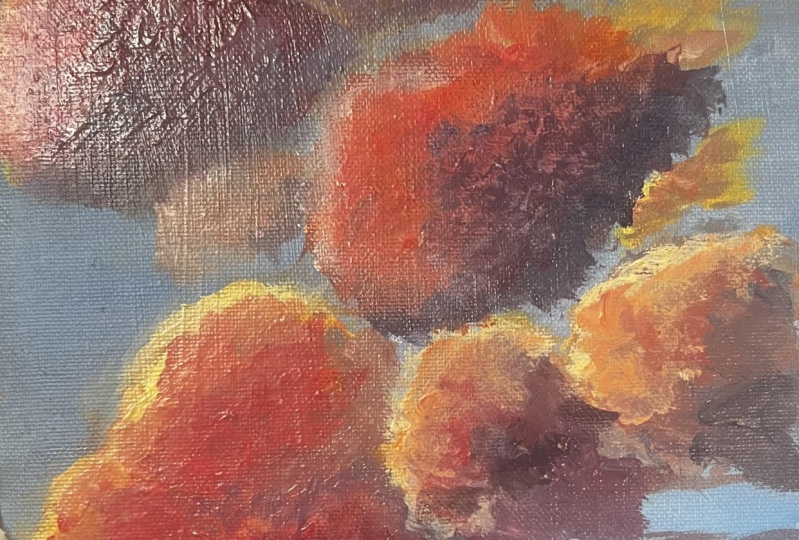
5. Detailing & Finalizing: This video, we're
going to continue and finalize the painting by
adding another layer, the final layer and try to create our clouds looking
more cleaner and more like three D. So we're
going to add little details and just shape up our clouds and make them look fluffier, okay? And so my background is dry, and I got a new water
jar right here, and I'm going to use the number eight and
number four brushes, I'm going to leave them
in a water jar for a few minutes so that my
brush can become damp. That's important, remember, because when you have a little bit of
water in your brush, it just makes it run
smoothly on the canvas, and that's how you
create the smooth effect with acrylics, okay? So now I'm going to
mix some colors. And by the way, I
had fun with this. I added a few little
ones up here. And like I said, it does not have to look
exactly like mine. You can change it
up. You can add clouds where you want it to be. The techniques are the same, the placement of your clouds, there is no right way
of doing it, okay? So I'm starting
with a new palette, and I'm going to
have a little bit of titanium white
right here on its own. And then about a thumb
amount of white, maybe less right here. And each time add a
little less white, okay? Each time go a little less. You could see this one has
the least amount of white. And then I added here a very
small touch of crimson red, a little bit of orange
and medium yellow. And then here, I added a
little more crimson red, and then more
orange to this one. And then here I added
more crimson red. You can see almost a thumb
amount and thalo blue. Then here I added a little bit
of Tala blue and lemblack. I'm going to mix these colors
and show you what I get. Okay, as I was mixing, I wanted to have one more
color, like a pinkish color. So I added a little bit
of white and crimson red. And if I have a
little bit of orange on my neck, that's okay. So I'm gonna mix this one and continue mixing and
show you what I get. And then this one, I wanted
to make it a little more Data color and make it
more, like, darker. So I added lemblack just a
little bit here like this one. Alright. Then finally, added half a thumb amount of white, and I'm going to take part of this grayish blue color and
create a lighter color, kind of like what we
did with the pink here. We want it to look like
a grayish blue, lighter, grayish blue color,
something like this, okay? Not too much. I took a little bit of this, and it's going to be
something like this. And then once I'm
done mixing here, I'm going to take
part of this orange like this and mix
it with this color. I want it to it's looking to, um to, like, cherry color. But I want to make it look a
little more like brownish. And orange, when you add orange a little
bit to this color, it really makes it look more leans towards a
warmer brownish color. And that's what we want
in the sky a little bit. Not too much, as you saw,
I just took a little bit. We just want to make it
look a little warmer. There you go. Okay?
So with these colors, we're going to start to
detail everything here. As you can see, there's some
brush strokes in my clouds, and that's why it's
important to add layers because when you add more layers on top
of each other, it'll really soften
and make it look solid and cover all the
brush strokes, right? So, the more layers you add, the more, you know,
it'll look cleaner. So we're going to start with this bottom part first
and then work our way up. And I'm going to pick up
my number four brush. Dab it in the water, remember, and tap it on the paper towel. So it has a little bit of water, and it's nice and soft, okay? So with a brush. And if you don't
have, like I said, the materials I have
similar to mine, then use what you
have available. Maybe something similar
like this, okay? And we're going to start with
detailing in here, okay? So I'm going to use
remember these colors. I'm going to use a little
bit of this blue color and the light grayish
color, grayish blue, and with a little bit of water
and my number four brush, I'm going to try to start to create a little bit
of faraway clouds. A little softer like this. And I'm going to dab my brush in the water and tap it
on the paper towel, clean it out again so
that it can run smoothly. Use more of this
lighter gray color. And right here you see
the brush strokes. We're going to just
use the corner of our brush and kind of let it fade away into the background
blue that we have mixed. Okay. So kind of going
over your clouds slightly. So I'm going to use
a little more of this lighter grayish blue color. I'm gonna go down here
and add some little ones. I'm going to use the bigger
brush for the bigger parts, number eight, dab it
on the paper towel. And with this brush,
we're going to use some of the colors we have mixed here and go over with
this orangy white color here, we're going to go over and
create a little more details. So I'm using the corner
of my brush and just randomly going over
and adding color. Okay, I'm going to go back
to my number four, actually, just for the smaller parts and use a little
bit of this pink, maybe mix it with orange. Okay, and go over some
of these parts again. I don't want this
one too bright. I want it to look a
little more pinkish. And when I'm adding
another layer, it makes it look a
little more solid. I'm gonna use a little
bit of this color. It may be light blue. Light blue gray, and this color. We're just going to fill in some of these areas in
here, darker shadows. Make them look a little
bit more cleaner. Dip my brush lightly
in the water, tap it on the paper towel. Use a little bit more gray
color here and swirl, use the corner of your
brush kind of swirl. And then as you go
up, you could see it's mixing with the
pink a little bit. So then go back to the
pink and blend those in. Try to create a
smooth transition and go back to this darker one again and you just do this until you're happy
with a smooth transition. So I'm going to add a little bit of
pink and this red right in here and maybe on here. Small little touch to make these clouds pop and maybe
even these ones as well. Use a little bit of white
and a little bit of the yellow or orange, I mean, I'm gonna
go over and add a little bit of
lighter highlight. With a little bit of
more white than orange. And I'm going to
just really start to make my clouds
have more detail. And now you can use
your detail brush too for some of these parts, but I decided this
is not this is easier sometimes to
go over lightly dab. It creates interesting
effects, you know, natural. And then what I mean
with a detail brush, you can go over and
create, for example, I'm going to da detail
brush in water and use a little bit of this with
yellow, more white, though. And then with a
little bit of water in your detail brush, you
can go over the edges, right, and make them look
sharp on some areas, right? That's what I mean, like this. Right? I'm gonna go back to my
number clean my detail brush and put it flat on
my paper towel, and I'm going to go
back to my number four. So you can switch
whatever you like best, whatever's easier for you,
either with a detail brush, I'm just so used to working
quickly and kind of getting my sketch
down first and then all the little details
with my detail brush, I kind of do that like last and then the final few details for this section with
the detail brush, like I said, you can go back and use a little bit of
pink and this color. Mix those two real quick
to get in between shade, maybe use a little bit of
this orange color, actually. Mix those, and then here, remember this separation
of this cloud, I'm gonna lightly go over it to make it pop even
more lightly, okay? And so I'm going to dum
my brush in water and use pink and kind of blend those in to
create some separation. Alright, we're going
to continue doing the same techniques
like we did here, but we're going to
cover this area here. So with our number eight, we're going to start off
with adding the highlights, the lighter parts, and we're going to use this
orange and white, mix those a little bit with
our So I have too much water, so I'm gonna tap it on
the paper towel and then use a little bit
of orange and white, and we're going to go
over some of these. We'll continue with the pink, and a little bit and go over
and here back to the orange. And have fun with this. There's no, you
know, correct way. And a little bit of white. Make this a little
brighter and here maybe. Alright, so I'm going
to spend a little bit of time just making it clean, going back and forth, doing the same thing
like I showed you. It's basically the same
technique going back and forth and finalize this piece, and I'll show you what I get. But remember, totally up to you how much you want
to spend time on this. So have fun and
enjoy the process.
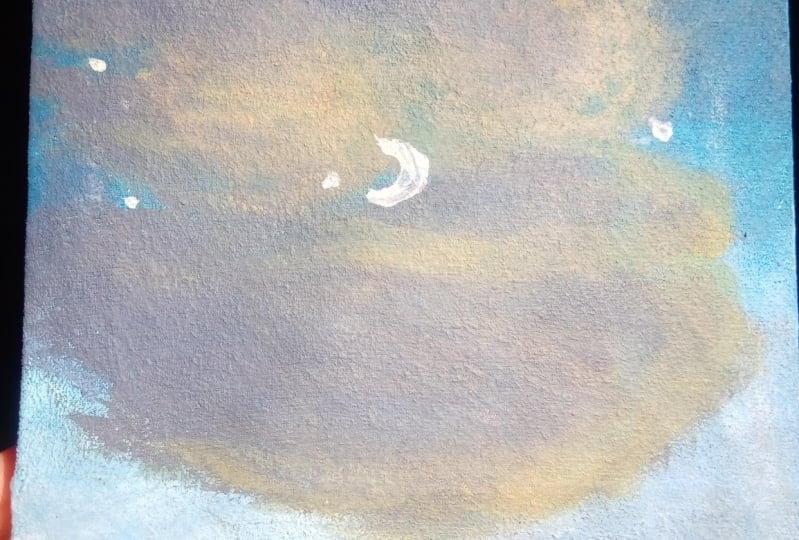
6. Final Thoughts: Alright, I'll be done for today. You can see I added a
little more details like little stars and a little moon here just to make the painting
look interesting. Also, if you want to make
it even more detailed, it's basically the same
idea, mix the colors, similar colors
like I showed you, and go back and, like,
define and make it smoother. So total up to you. Have fun. Thank you, everyone
for joining me. The class is now finished. I'd like to congratulate you. In this class, we'll learn
how to blend with acrylics, and we also learn how to detail our clouds by adding layers
of different colors. Also, I'd like to remind
you guys to please share your painting
in a project gallery. I'd love to see
it. Alright, guys take care and happy painting.
 Feliks Kaparchuk, Acrylic Painter & Art Influencer