Transcripts
1. Introduction: Hello. My name is Minashi. I'm an artist and
an illustrator. I love to draw and paint. I welcome you all to my class. Today's class is about painting
birds using watercolors. Painting birds can be
a little bit scary, but I have designed this
class for beginners. I will teach you right from the basics like you'll
learn how to draw a bird. I will be teaching you my four
step bird painting method with which you'll be painting
birds at different angles. Then we will paint together two cute birds using
wet on wet technique. The objective of this
class is to make one confident on painting loose
birds using watercolors. By the end of this class, you'll have a page full of cute little loose
watercolor birds. If you think this
class is for you, let's meet in the next lesson.
2. Requirements: Let's now take a look on the
requirements for the class. You'll need two
glasses of water, one to clean your brush, and one for painting. We'll be using number four, six and eight round
brushes for this class. Any brand is okay. Just make sure they
are watercolor brushes and they can hold
a lot of water. I'll be using the
ceramic palette, which has ten wells, but this is quite on
the expensive side. If you are a beginner, I
would suggest to you to use a ceramic plate instead of a palette because they
are budget friendly. You'll also need some
tissues to clean your brush and to remove
some excess water. You'll need a pencil and an eraser to draw the
outline of the bird. For this class, I'll be using
menura watercolor paper. They are cold crust, and it
is 100% cotton, 300 GSM. The papers are thick enough
to hold a lot of washes. Any brand would be fine. Just make sure the watercolor
papers are 100% cotton, and it is about 300 GSM. I'm using MisinGld
watercolor paints. I love them. They are highly pigmented and they are
super easy to use. Again, any brand of watercolor
paints would be fine. So what are we waiting for? Grab your supplies, and
let's get started to paint.
3. How to draw a bird: Even though we'll
be concentrating much on painting a
bird on this class, I also want you to know the basics on drawing
a simple bird. Let's try drawing some
birds, grab your pencil. I start by drawing an oval shape for the crown of the bird, followed by an oval shape
for the body of the bird. I make the neck by joining
the circle and the oval. I make the eye and
also the beak. Then I make the wings. These two are the side feathers. Then I draw the tail feathers. Just by using simple lines, I draw the tail feathers. Then I finally draw
the legs of the bird. So this is as if the bird
is looking sideways, and the photograph is
taken from the back. Now let's draw another bird. I start by drawing an oval shape for the crown of the bird. Then I draw an oval shape
for the body of the bird. You can always use an eraser to get rid of unwanted curves. Then I make the
neck of the bird. Then the side
feathers, side wings, which goes right up to the eye, a small circle for the eye. And I draw the beak of the bird. Then I make the
legs of the bird, the claws, then the stem on which the bird is
standing and the tail feathers. So this is a basic outline
on how to draw a bird. You can do some Adjustments after you draw the basic sketch. You can get treat off
the unwanted curves and lines from the drawing, and that's how
you'll draw a bird.
4. The four Step Method: Let's take a look on
the four step method on which we'll be concentrating
in the coming lessons. We are going to paint a bird
in just four simple steps. The first step is to paint the head and the
beak of the bird. I'm using a number
ten round brush. I start with a beak, I draw straight line, and then I slowly move on
to the head of the bird. The next step is to paint
the wings of the bird. I'm not using too much
water or too less water. I'm just using the right amount. I'm making a simple
stroke for the wings. The next step is to paint
the body of the bird. The body is quite diluted when compared to the
head and the wings. I'm using a lot of water. I use a different
color for contrast. I'm just making a simple
s shaped brush stroke. Finally, I do the tail
wing of the bird, and the color is
somewhat mid tone. I just make a couple
of simple lines. Finally, I draw ten on
which the bird is standing. Let's try once again. You can try using
a different color. I start with the beak, and then I go to the
head part of the bird. I make the wings of the bird. I'm making the
wings a little bit more saturated for contrast. I'm using a different
color for the body. The color really does not
matter because, you know, whatever color you use, it still looks good on birds. Finally, I make a couple
of lines for the tail. This is just an overview of what we are going to do
in the next lessons.
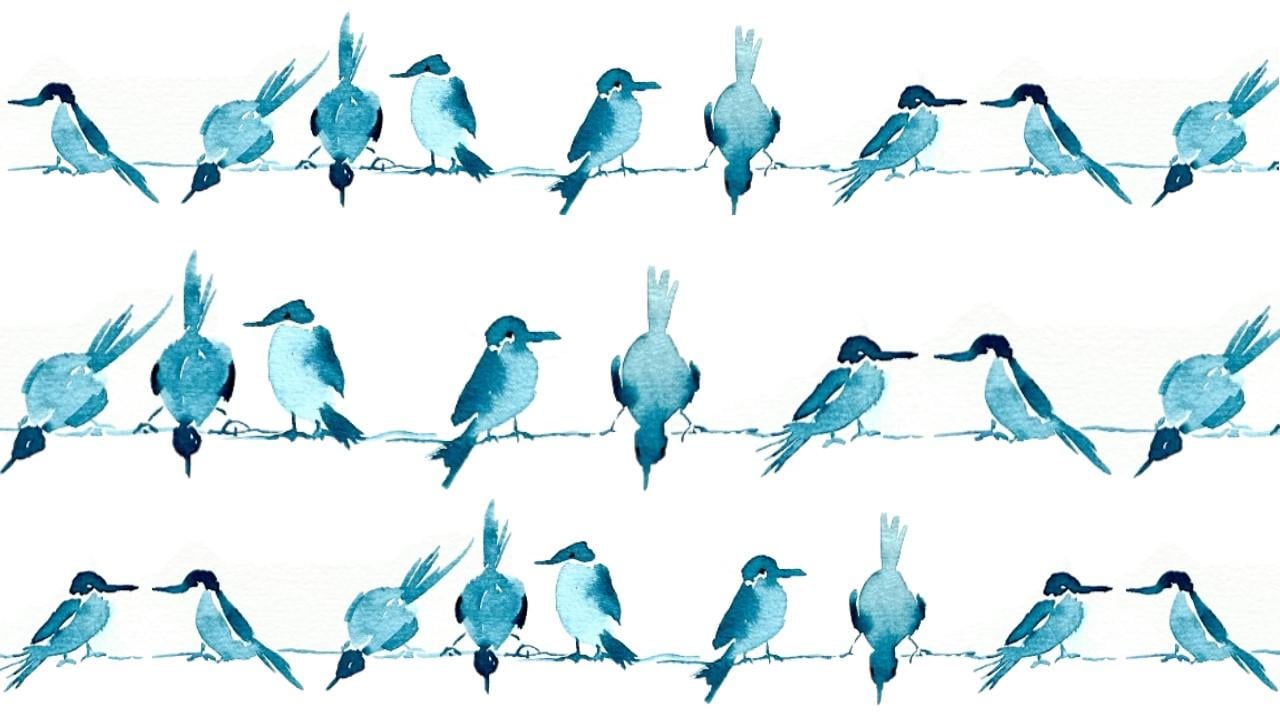
5. Loose Bird Painting - View 1: I'm using my brush size number six to paint some loose birds. At this point of time, the
brush size is not much important because if
you use a small brush, then it's gonna be a small bird. And if you use a big brush, it's going to be a big bird. We are just practicing, so
any brush would be fine. I wash my brush and I load my brush with
cerulean blue colour. I'm drawing a sharp line
for the beak and I'm slowly moving forward to make the crown or the head
part of the bird. Next, I'm going to paint
the body of the bird. And for that, I'm diluting
it with a lot of water. I'm making a small
semicircular shaped pattern for the body of the bird. After you complete the body of the bird, let's do the wings. And for the wings,
I'm going to make it a little bit
darker for contrast. So I'm adding some more
color to my brush. Just a simple line is suffice. Using some simple lines, I'm making the foot of
the bird and the claws. I'm making the ground, and I'm making the
tail feathers. Let's now try painting a
bird with different colors. I first wash my brush thoroughly and add some
permanent yellow to my brush. This is going to be
quite saturated. I'm making the beak first with a straight line and slowly move towards
the crown of the bird. For the feathers, I'm
mixing yellow with blue color so I get a
mild greenish shade. It's just a simple
line like stroke, adding some more blue by washing my brush and I'm
making the body. The body is going to be soft, so I'm diluting it
with a lot of water. I'm making a simple
semicircular shaped pattern below the wings for the body. For the tail, I'm going to use a bit saturated
color for contrast, maybe the same yellow
with blue color, so we get a mild greenish shade. And then I make the legs. I'm making the
claws of the bird, and finally the ground or the branch on which
the bird is standing. We're not going to concentrate much on the details of the bird. We are just painting
simple loose birds. I'm trying the same bird
with different color. I'm using the same brush. Everything is same. I'm
just using different color, and I'm just checking how the
bird is going to turn out. Similarly, you can also
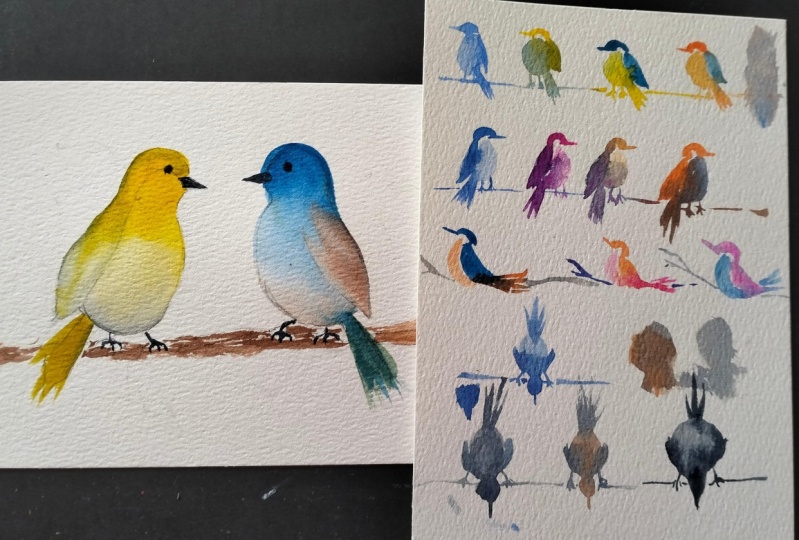
try playing with colors. It's not like you have to use the same colors that
I'm using in the class. You can use your own colors and check how the
bird is turning out. We will also paint the birds at different angles and
different views, and we will discuss about all those techniques
in the coming lessons.
6. Loose Bird Painting - View 2: Using the same technique, let's paint a bird as if it is looking towards
its left side. I'm loading my brush
with erulean blue color. I start with the beak
on the right side. We are painting the same bird, but just on the
opposite direction. The beak goes to the crown. This requires a
little bit practice because you might be
comfortable at one direction. And when you paint on
the other direction, you might feel it a
little bit challenging, but practice makes
it much better. I do the feathers. I wash
my brush and I dilute it. And I make the body of the bird. With a concentrated shade, I'm painting the tail feathers. I'm making the wings also a little bit more
dark for contrast. You can always go back and do some changes whenever needed. Using the pointed
tip of the brush, I'm painting the foot or
the claws of the bird. Now, let's try the
same with some colors. I'm using permanent yellow deep for the beak and the
crown of the bird. I start with a beak, which goes to the crown. I mix blue with
some yellow to make a mild green shade for
the feathers of the bird. Always clean your brush when
you want to use a new color because the old color mixes with the new color and gives
an undesired one. In this case, I'm mixing
yellow with blue to get a mild green shade for the body of the bird
and also for the fence. I've diluted it with water, so it is very light. And I'm using a darker shade
for the tail feathers. As you can see, the
blue colour which I added to the tail feathers, it is mixing with
the body color, and slowly we get
a beautiful shade. This is why I love
watercolors because we never know what happens and it's quite
interesting for me. You can try the same
using a different shade. I believe you now got
the idea of how you'll paint a bird in
two simple angles, which is towards the right
and towards the left. In the next lesson, we will
take a look on how to paint a bird at another different
interesting angle.
7. Loose Bird Painting - View 3: In this lesson,
I'm going to teach you how to paint a bird at an interesting angle as if the bird is looking towards
something on the top. I'm using my same brush, and I'm loading the brush
with cerulean blue. Instead of making a
sleeping line for the beak as we did in
the previous lessons, I'm going to make a
slanting line for the beak. I'm making the crown towards
the direction of the beak. I'm making a small s
shaped brush stroke for the wings of the bird. It moves forward to
the tail feathers. After I complete this, I use a diluted color for
the body of the bird. It's going to be a nice s
shaped structure for the body. It is as if the bird is sitting and watching
something on the top. Since the bird is
sitting on the branch, the claws or the foot of
the bird is not visible. Isn't the bird very
cute? I love this. Now let's try the same
with some colors. I'm using some red for the beak. A slanting line for the beak, since the bird is
facing towards the top, then follows the
crown of the bird. And then the wings, everything goes in
the same direction as if it is looking
towards the top. And I'm mixing some yellow
with red for the feathers, some cute little feathers. I'm using a diluted
shade of yellow with a mild red for the
body of the bird. Whenever you get some
paint to undesired areas, you can use a clean
tissue paper to wipe it, but you have to be really quick. I'm painting the branches
using the tip of my brush. You can also make some
small branches to it. Now you can try the same
using a different color. Isn't all these little
birds really cute? In the next lesson, we'll
be learning to paint a bird at another
interesting angle.
8. Loose Bird Painting - View 4: In this lesson,
let's try to paint the same bird at another
interesting angle. We are going to paint
as if the bird is sitting on a branch and
looking something down. I start with a straight
line for the beak and a small circle for
the crown of the bird. Following this will be
the body of the bird. The body is more diluted. It's going to be a big
oval shape for the body, and I make simple brush strokes for the tail feathers
of the bird. Now, I'm adding some more
pigment to my brush. I'm using a
concentrated color to paint the side
wings for the bird. So I'm making C shaped structure on either
side of the body. I'm making the side wings
really concentrated for contrast and also the top
crown part of the bird. I'm making it even more
darker for contrast. The bird is sitting on a branch and looking something down, so the legs are
going to be wider. So I'm making the foot wider. Finally, I make a branch on
which the bird is standing. Let's do the same
with some colors. I use permanent red for the beak and the
crown of the bird. I'm making a really cute
small circle for the crown. I'm washing my brush, and I'm loading my brush with yellow color to make
the body of the bird. This yellow is quite diluted. The body is somewhat
in oval shape. I clean my brush, and I mix red with a little
bit of brown colour, burnt Siana and I'm painting the tail
feathers of the bird. Some simple brush
strokes for the tail. I'm using a really
concentrated shade of red with burnt siana to paint the
side wings of the bird. Finally, I draw the foot of
the bird, which are white. Then I make the branches on which the bird is standing
and looking downwards. You can also make
some small branches on the side to add more drama. Using the same method, you can try painting the
bird with different colours. Painting these cute
birds are interesting, relaxing, and also meditating. Now we have a page full of cute little birds at
different angles. In the coming lesson, we are going to do a beautiful painting which combines all the view we learned in the
previous lessons, and I'm telling you
you will enjoy that. So we'll be doing that
in the coming lesson.
9. Let's Combine: Now that we have practiced
different angles, let's try to combine all the angles into
a single painting. What I'm going to do
is I'm just going to paint different birds
at different angles, different viewpoints
on a single branch. I'm planning to paint two birds which are
facing each other. So this is a bird which
faces towards the left side. I'm using the exact
same technique we used in the previous lessons. I'm just combining
all the birds. Now that we have drawn one bird, I'm going to paint
another bird which is facing towards this
first drawn bird. I'm drawing a beak. Then the crown then the wings, single simple stroke
for the wings, diluting the color to paint
the body of the bird, a simple tree shaped body. Then I'm using a saturated color for the tail feathers
of the bird. Finally, I make the claws
or the foot of the bird. I'm drawing a branch on which
the birds are standing. I'm going to paint another bird, which is facing downwards. Instead of painting the bird
facing exact downwards, I thought of giving a
change and painting as if the bird is looking something
downwards on the side. It is almost the
same like what we did in the previous lesson
with a small change. Likewise, you can
also try painting the birds at different angles
and different viewpoints. This will stimulate your
imagination and creativity. It might be
challenging at first, but once you start practicing
it again and again, you'll get the perfect
right painting. You can also try the same with different colors instead
of making it monotonous, like what I do now. The sky is the limit. Don't be scared to explore. Even if the result is not as pleasing as you
wanted it to be, I suggest you practice
it again and again. Practice makes a man perfect.
10. Wet on Wet Bird Painting - Drawing the Outline: Using wet on wet technique, we are going to paint two birds. Let's do the sketch
for the painting. I'm making a circle for
the crown of the bird. Below that, I'm
drawing an oval shape, joining the oval and the circle which forms
the neck of the bird. I'm drawing the feathers. I'm making the eye. I'm
adjusting the neck, and then I make the beak. I'm joining the
feathers right up to the eye and which comes
down towards the beak. I'm drawing two
claws for the bird. I'm going to draw one
more bird so that it'll be like two birds
facing each other. I start by drawing a circle
and an oval towards the side. The circle and the oval,
they intersect each other. Then I make the
eye and the beak. I'm doing the neck of the
bird, then the feathers. I'm doing some adjustment
on the body of the bird. I make the legs of the bird. At this point, you can erase off the unwanted curves and
the lines in your sketch. After drawing my sketch, I was wondering why my sketch looks like penguins
instead of birds. Only then I realized that I forgot to draw
the tail feathers. So here I draw the tail
feathers and finish my sketch. In the next lesson,
we will use wet on wet technique to paint
these cute birds.
11. Wet on Wet Bird Painting - Part 1: Let's paint our cute birds. I start by applying
a wash to my bird. I'm using my number ten
round to do the wash. I'm applying the wash to the entire bird except
for the feathers. You don't have to
apply a lot of fodder. When you apply a lot of fodder, the paint will bleed
when you paint on them. I'm loading my brush with
permanent yellow color. I'm using my same brush, and I start by painting
the crown of the bird. And slowly I come down. As of now, my brush is
too much pigmented. But when I go down, I want the color to diffuse. So I'm adding water, and I'm removing the excess
pigment from my brush, and I'm slowly diffusing
the color as it moves down. Clean your brush and
remove the excess pigment. In the same manner, I'm completely filling
the entire bird. As it moves down, the color is going to be
very much lighter. I'm changing my brush
to a number six round, and I'm loading my
brush with indigo. And slowly start to paint from the bottom
part of the bird. As we move up, we
have to diffuse the cracky edges that the
indigo paint has created. So how do we do that?
We clean up brush and diffuse the indigo
color again and again until we get
an even finish. So what to do if you spill the paint on any undeside areas. Use a tissue paper to tap that area and suck
the paint so that, you know, the mistake
doesn't really show. I'm mixing yellow with indigo to paint on the
wings of the bird. I'm just doing a small glaze. Once it is dry, I'm adding samo indigo to the
wings of the bird. Add indigo towards the edge, which goes right up to the top part, the
crown of the bird. I'm painting samo indigo
to the crown of the bird. At last, I paint
the tail feathers. I'm just making some simple
strokes to the tail. O. And then I'm using the same indigo color to
paint the claws of the bird. Then paint the peak of the bird. I'm using my same number
six round to do this. Then I make the eye. In the next lesson, we will do the other bird and
complete the painting.
12. Wet on Wet Bird Painting - Part 2: Let's paint another bird using the same wet
on wet technique. Using the number
ten round brush, I'm just giving a wash
to the entire bird. I'm loading my brush with
cerulean blue color. I'm not satisfied
with the saturation, so I'm going back to my palette, and I'm adding more
pigment to my brush. The top of the bird
is more pigmented, and as we move down, we are going to
diffuse it gradually. So right now my brush
has a lot of pigment. So if I use the same brush, it's going to be more pigmented, so I'm washing my brush and coming back again
to diffuse the color. Whenever you feel that your
brush is in short of pigment, you can always go
back to your palette and take some if it is needed. I want the bottom of the bird to have a very dilute color. I go back to my palette
and take some burnt siana. I also apply some burnt siana
to the wings of the bird. For contrast, it's
going to be very light. So I want to diffuse it, so I'm cleaning my
brush and coming back again to diffuse the color. Always clean your brush
before you diffuse the colors because you don't want to add unwanted colors on
unwanted areas. I'm adding some more blue
color below the wings. I add some blue colour
to the body of the bird as well so that the
gradient is more gradual. I use a smaller brush to
paint the tail feathers. For the tail, I'm mixing blue with a little
bit of yellow color, so we get a mild green color. And also, I'm adding
some blue on top of it. I use the tip of my round brush to paint the claws of the bird. Then by using burnt Siana, I'm drawing a branch on which
the birds are standing. I'm using a medium
sized round brush. You can also add
some small branches to the sides to give
a more natural look. You can also add some
leaves if you want, but I'm just going to
leave this as it is. By using burnt Siana, I'm going to add one more layer
to the wings of the bird. After I paint a layer, I clean my brush and I take some paint off from
one portion of the wings. Then using black color, I paint the beak and
the eyes of the bird. I'm adding some highlights
to the legs, as well. With this, we have
completed our painting. In the next lesson, let's discuss about our class project.
13. Class Project: We have now come to
the end of the class. I hope this class
was useful for you. If you are painting along
with me from the start, then I encourage you to share your projects in the class
project section below. If you want a specific
project to work with, then I would suggest you to try painting other angles
and viewpoints of birds. You can use Internet to get some sample or reference
photos for this. You might be a beginner and your painting might be
very simple, but still, I encourage you to share your projects because
no one is born artist. As I always say practice
makes a man perfect. Don't be scared to
take your brush, start with simple
angles and then try some tricky angles
because it will motivate you. If you are interested
in floral illustration, you can also try
my other classes. Thank you so much
for taking my class. Also, I encourage you to share
your feedback on my class. It will help me create better
classes in the future. Also, if you have any doubts
in any part of the class, feel free to contact me. I will get back to you
as soon as possible. Again, I thank you so
much for taking my class. It really means a lot to me. Happy painting,
share your projects, and have a great day. Bye bye.
 Meenakshi Muthuraman, Artist and Illustrator