Transcripts
1. Introduction: Hello, guys. Welcome to
my new sculpture class. My name is Menakshi. I'm an artist and
an illustrator. I love to draw and paint. I work on acrylics, watercolor and paint drawings. You might be familiar
with watercolor, but do you want to start
your journey with acrylics? Then this class is for you? I have designed this
class for beginners and you need no prior
experience with acrylics. This will be a
step by step class where we will explore
the medium together. I will be teaching you to paint a beautiful galaxy
background with a simple, easy to follow method
with amazing texture. Then I will teach you to use a masking tape to paint
two beautiful planets. I will also teach you to
add stars and highlights. After that, I will
teach you to paint an amazing glowing moon
painting as your class project. The objective of this class
is to make one confident enough to start his or her
own acrylic painting journey. This class is packed with so many tips and tricks
on acrylic painting. If you think this
class is for you, let's meet in the next lesson.
2. Requirements: Let's now take a look on the
requirements for the class. If you are a beginner,
I would suggest you to use a canvas
drawing book. It comes with ten to
12 canvas sheets. It is great for practicing. If you want to frame your work, you can use a stretched
canvas or a canvas board. I've seen many acrylic
papers on the market, but I would suggest you to use a canvas because of
its wonderful texture. You will also need
a masking tape. Then, of course, you need
some acrylic paints. You can use any brand
of your choice, but just make sure
your paints stay wet for quite some time
to work on it. We'll be using hog
brizzle brushes, which gives really amazing
textures to our painting. If you don't have
hog Brizzle brushes, you can also use a
normal kitchen sponge. But my suggestion would be
to use hog brizzle brushes because of its amazing texture
it gives on the painting. You'll also need some synthetic
brushes for highlights. I'll be using a flat brush
and a pointer brush. You'll also need a waist
cloth in the jar of water. So these are the
supplies you'll need. So grab your supplies
and let's get started.
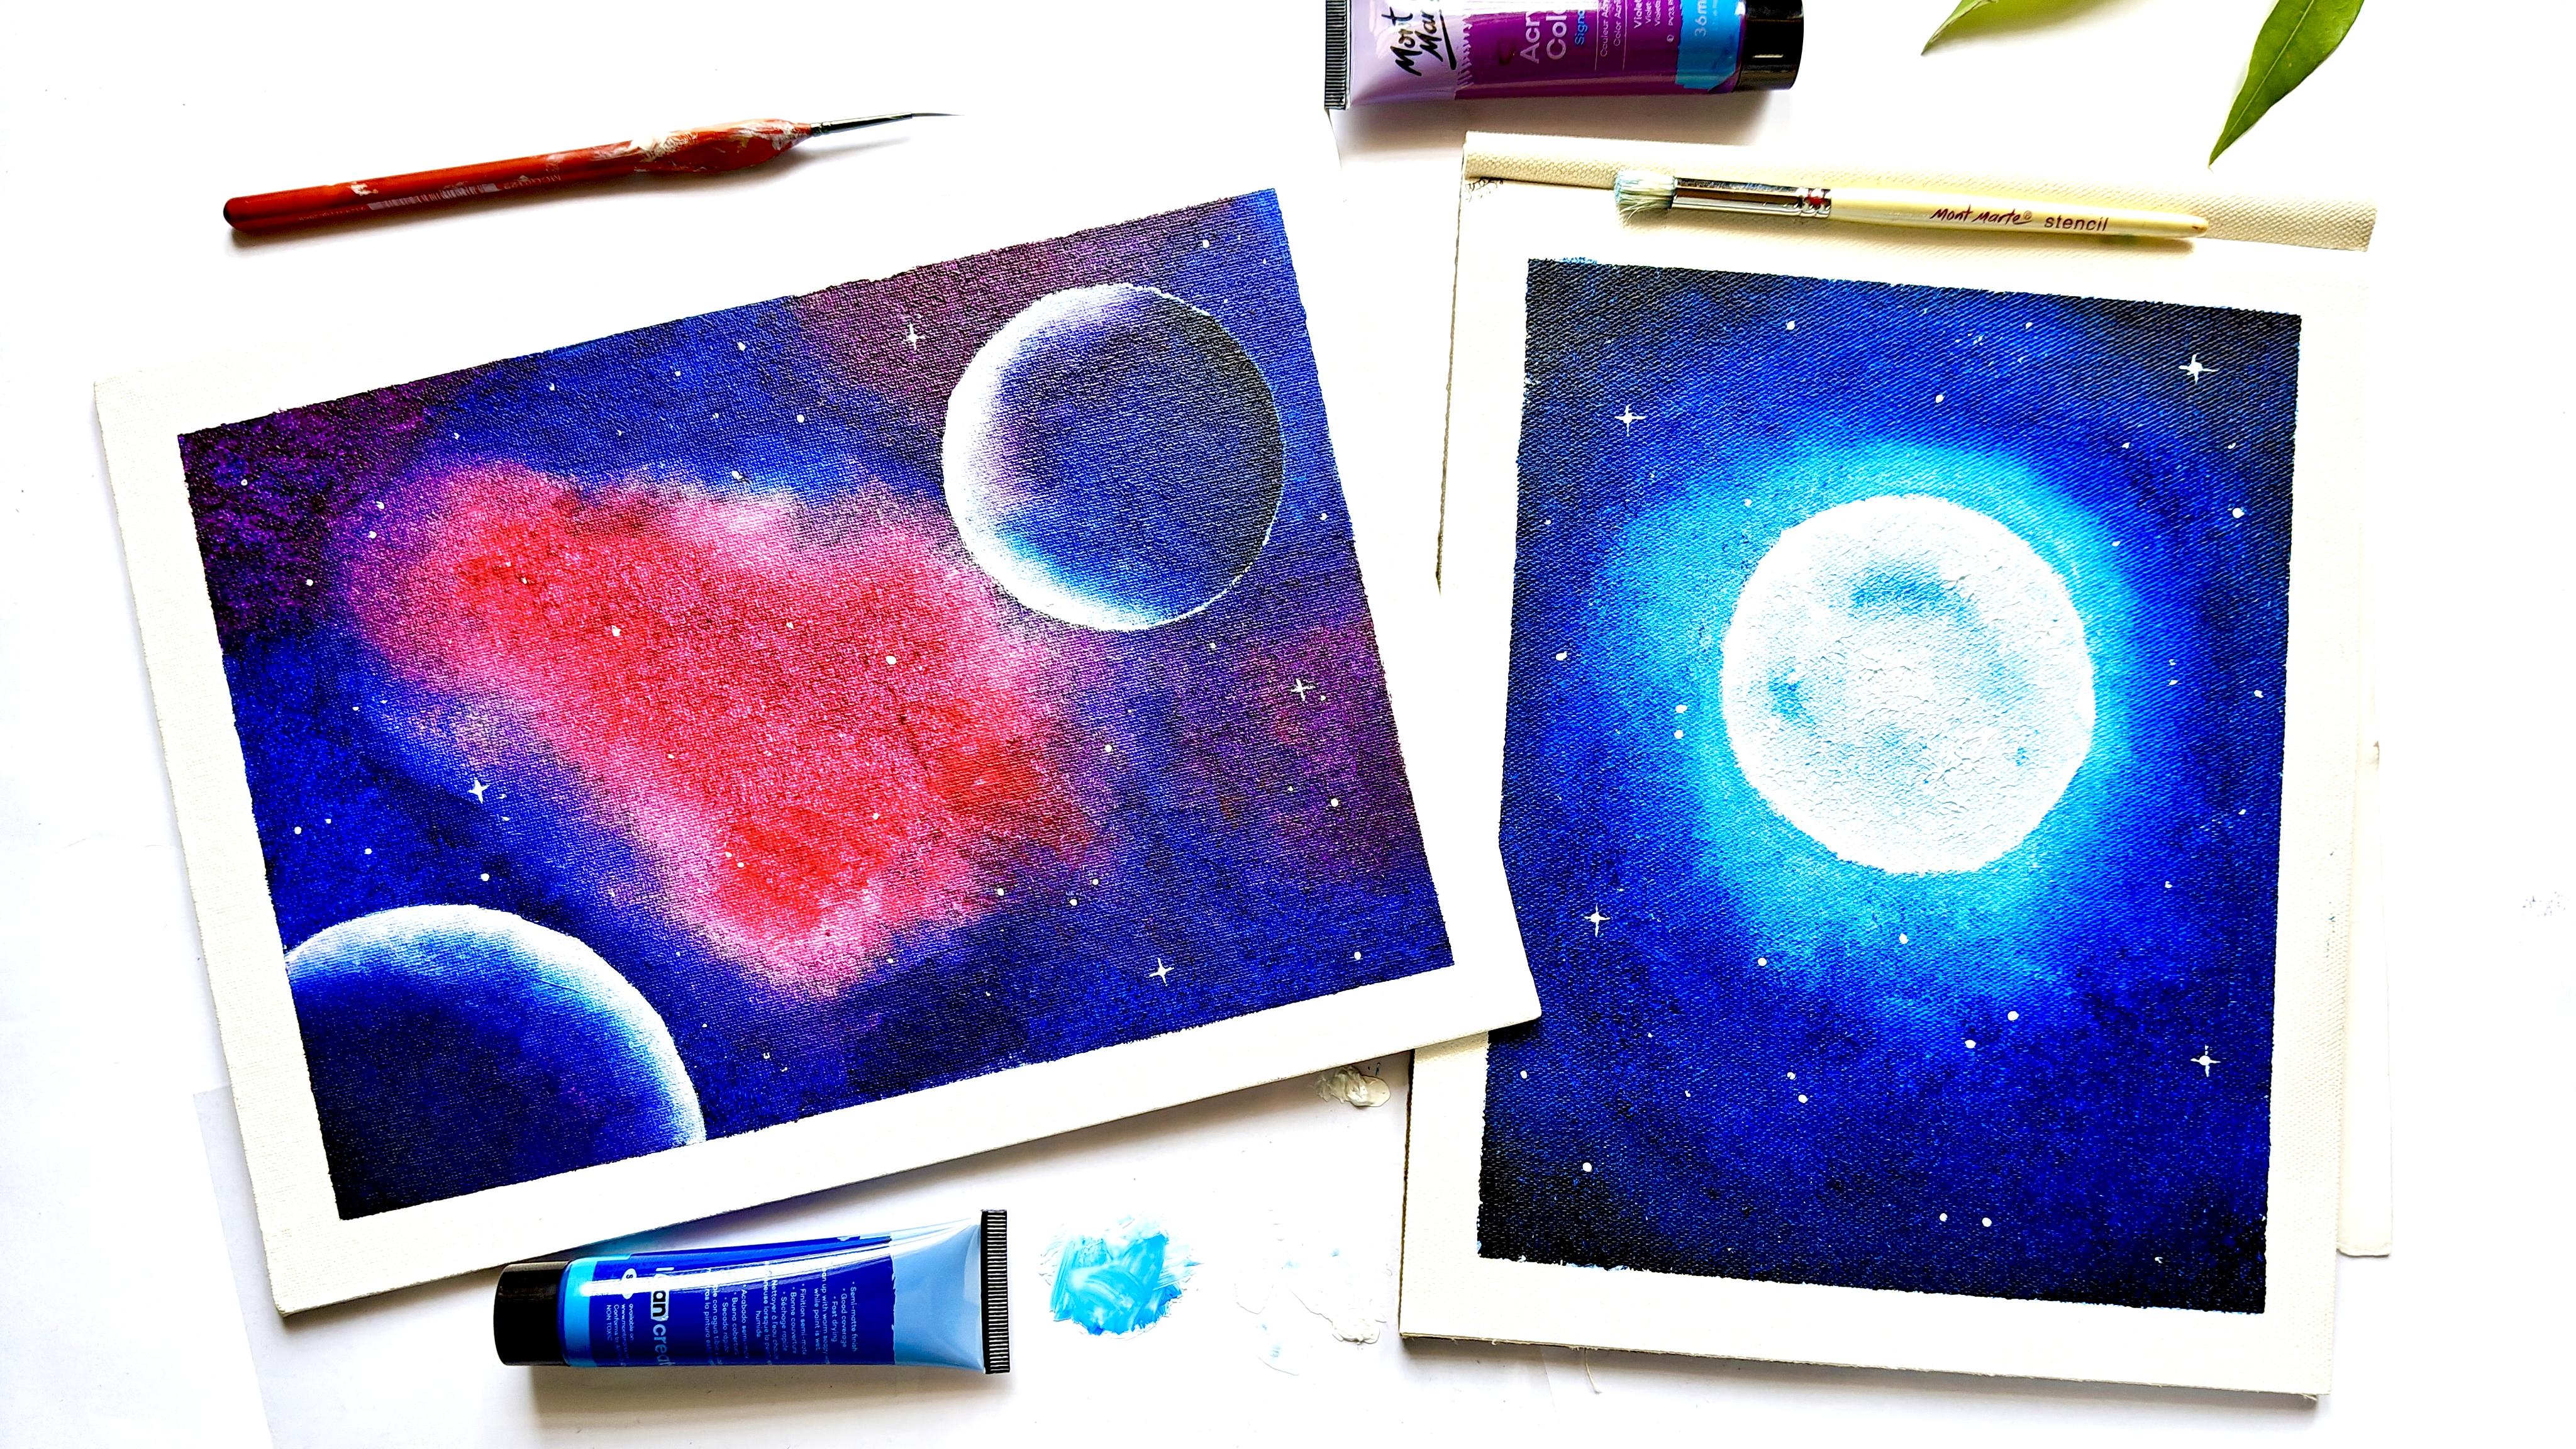
3. Painting the Galaxy Background Part 1: This galaxy painting
has two parts. One is to paint the background and then to paint the planets. For the background, we are
going to be using four colors, deep cyan and violet for
the darker sections, and magenta and pink for
the lighter sections. In this lesson, we will be painting the darker background, so keep your violet
and deep cyan handy. I'm going to use a hot
Brazil flat brush, which is a slightly bigger
size to paint the background. Make sure your hog
bizzle brush is dry. Do not use water. Even
a single drop of water will ruin the technique we are going to use in this lesson. Having said all that,
let's start to paint. I'm going to leave some space on the center for the light colors. I'm using a pencil to mark the areas where the light
colors has to be placed. Without using a palette, I'm directly adding
paint to my canvas. I start with deep can. I'm just randomly placing
deep can on the outer area. I'm also adding violet
in between deep can. You can also use a
palette if you want to, but this method is more fun. So right now on my canvas, I have deep cyan and violet. Once you're done
placing the colors, you can use any large brush to spread the colors
on the canvas. So I'm just spreading
this violet. Start with one color, and once you're done
with that color, then you can move
on to the next. I've started with violet. I'm just spreading
all the violets that I've placed on my canvas. I'm not painting evenly. I'm just spreading the
paint on the canvas, and I'll do the blending
part sometime later. After you're done spreading the violet paint on the canvas, you can move on to
spread the blue colour, deep cyan on the canvas. I'm not blending it. I'm just spreading the
colours. That's it. As you can see, I'm not
blending the two colors. I'm just spreading the
two colors separately. Whenever you feel you're
in short of paint, you can always add some
more paint if you want to. I'm not moving inside
the center part. I'm just painting
on the outer areas. The center part is reserved
for the lighter colors. So once you're done
spreading the two colors, use a dry hot grizzle brush and start to blend the colors. I'm just tapping my brush to create this beautiful effect. One important point to note here is that as you
change the colors, in my case, I'm gradually tapping from violet
to deep cyan. And once I do this, I should not go back to
violet again without cleaning my brush because the violet will become deep
cyan if I do that. So always clean your brush whenever you change the colors. If you don't clean your brush, then the final output will
not be as you have desired. What do I mean to
clean your brush? Is that clean it using a cloth, do not clean it using water. Deep cyan is a strong color
when compared to violet. So nothing will
happen when you move from violet to deep cyan, since violet is not
a strong color. But if you have to go back to violet again from deep Cyan, then you have to clean
your brush using a cloth. If you don't do that, then your entire violet area
will become like deep cyan, a darker deep cyan. So keep this one rule in mind
to paint the background. One more way to do
this is that you can soften the deep sin separately
and the violet separately, and then you can do, you
know, the blending part. It is completely up to you. You can use any one of the ways. You can take one
section at a time and clean your brush
whenever it is required, or you can soften
one color at a time and then do the blending
process sometime later. As you can see, our painting is getting some amazing texture. You have to do this a bit quicker because if the
paint gets dried up, you cannot do the
softening part. I'm adding some
more violet paint because my violet
paint has dried up, so I thought I would
add some more violet. I'm directly adding the violet
on my brush to the canvas. I first soften the
violet portion, and then I move on to
blend the two colors. In the next lesson, we will use the same technique to add the light colors on
the center part.
4. Painting the Galaxy Background Part 2: I'm adding some
magenta to the center. And on the sides, I'm
adding pink colour. This is going to be somewhat
lighter shade for contrast. I'm going to use the same brush we used in the previous lesson. I cleaned my brush thoroughly
using a waste cloth. My brush is completely dry, and I'm going to start
tapping the magenta portion. As of now, I'm not
touching the pink colour. I'm just spreading
the magenta color. Once you're done spreading
the magenta paint, I'm slowly moving on to
paint the pink portion. I'm trying to make
a smooth gradient. You can always add some
more pink paint if you want to if you think you're
in short of pink colour. As of now, I'm
just concentrating to blend the magenta
and the pink colour. I'm not touching the cyan
or the violet as of now. Just concentrate blending
magenta and pink. So after I blend
these two colors, I'm going to clean my
brush using a waist cloth, and now I'm going to blend the blue or the violet
with the pink colour. Blending the cyan with
pink is more tricky when compared to blending
the machina and the pink. This is because, again, the cyan is a very strong
color when compared to pink. So you have to do
this very slowly. You have to clean
your brush then and there and take your time. Whenever you feel cyan
is more dominating, you can always add some more pink colour to neutralize it. Take one section at a time, clean your brush then and there, and enjoy the process because
this is a fun painting. It has no rules. Whenever you feel the
son has dried up, you can always add some more can to the painting
because, you know, it has been quite a while since we painted the sign
and the violet. You can always do some
mags mints by adding more paint when the
andlaya has dried up. Just make sure to clean
your brush then and there because you don't want a dark
colour on the center part. I'm going to add some magenta
directly on the brush. Now that you have
known the technique, you can just play
with the colors. There is no mushrooms
needed for this painting. This is how my final
background looks like. In the next lesson, let's
start to paint the planets.
5. Using a Masking Tape: I'm going to draw two planets, one on the corner and
one on the other side. The corner planet is going to be slightly bigger
than the other one. I'm using a white pencil. Masking these circles makes the painting process
much easier. So I'm using a masking
tape to do this. I'm using a masking tape, and I'm trying to make a
circle over the outline. You can fold the tape to
make it in a circular form. You can do this
with your hands or you can also make use of
some tubes to do this. You will not get a perfect
curve, but that's fine. We can always do some
adjustments in the final stage. So just don't worry if you
don't get a perfect curve. Using the same technique, I'm going to mask the
other planet also. But since this is a smaller
circle than the previous one, I will suggest you to use
a smaller masking tape. When you use a smaller tape, it gives you more control. So making a circle would be much easier using smaller tapes. I would have used
maybe four pieces of smaller tapes for
this one circle. A Press all the folds on the tape and get
rid of the extras. Our planets are
ready to be painted, and we will do that
in the next lesson.
6. Painting First Planet: To paint the planets, I'm going to use a circular
hog grizzle brush. If this is not available, you can use a smaller
rectangular brush. I'm going to start with
the corner planet. I'm directly applying Titanium white over the side
of the planet. I also apply some purple and deep cyan finally, I add some dark
gray to the corner. Applying the paint directly to the canvas makes the
painting process much fun. As we discussed in
the previous lesson, I'm not using a wet brush. My brush is completely dry. I'm just spreading
the white paint. You can also add some more
white paint if needed. Using the same brush, I'm moving on to spread
the purple paint. Then I gradually move to
spread the deep cyan. I just spread the
paint and I clean my brush to diffuse it to
make a smooth gradient. Clean your brush completely. After cleaning the brush, move on to blend the white
color with the deep cyan. What I would suggest is
paint this in sections. So after you blend a
particular section, move on to clean your
brush completely and then come again blend
the next section. If you don't clean your
brush then and there, then the deep can will
dominate the white color, which will not give a
nice final outlook. So it's important to clean
your brush using a towel Once you're satisfied
with the lighter colors, then move on with
the darker color. So I first spread the
dark gray on the corner. Then I clean my brush and slowly blend it
with the deep Cyan. So that's all. We're done
with our first plant. D
7. Painting Second Planet: Following the same steps, let's try to paint
the second planet. As always, I directly place
the paint on my canvas. I have already added
dark gray to the side, and I've also added
this violet and deep cyan with titanium
white to the other side. My brush has some
dried deep cyan to it, but it doesn't matter. I've cleaned it
completely with a towel. Like we did in the
previous lesson, I'm just threading
the paint first. I start with titanium white. You can always add some more
white color if you want to. Since white is not a
dominating colour, I'm using the St. Brush to paint the next color,
that is the violet. I'm gradually coming
to deep Sian also. I'm not trying to
blend the colors. I'm just treading the
paint on the canvas. I really love the texture that the hog brrizle
brushes give. I'm adding some more
let colour on the top. Now that we have
spreaded the colors, let's clean the brush
completely using a towel and then come
back to blend the colors. You can always go back and
clean the brush whenever you think the paint is
falling on undesired places. Once you're done blending
the lighter colors, then move on to shade
the darker gray. Do not overpaint. I'm just blending the
colors. That's it. In the next lesson, we
will paint the stars and we will give some highlights and finish this painting off.
8. Painting the Stars: I have some titanium white on my palette to
do the highlights. I'm using a flat brush. I've cleaned my
brush with water, and I remove the excess
water off my brush, and I'm just loading my
brush with titanium white. I'm making some
adjustments on the planet. We were not able to mask
properly on the curved area, so I'm just doing some
adjustments so that, you know, the planet
is looking good. I'm also giving
some highlights on the other side of the planet
for a realistic look. You can always turn your canvas and make yourself comfortable. You can also use a fine line of brush to do the highlights. To paint the stars, I'm
going to use a darting tool. If this is not
available with you, then you can use the other side of your brush to do the stars. I'm just grabbing some paint on the darting tool and
making the stars. I'm using a fine line up
brush to do the highlights. On some stars, I'm
making a plus sign. That's all. We're
done with a painting, and I can't wait to
remove the tape. You can protect the
painting by varnishing it. You can varnish once the
painting is completely dry.
9. Class Project - Glowing Moon: Using the same technique we
used to paint the galaxy, we're going to paint the moon, and this will be
a class project. The colors I'll be
using are deep cyan, titanium white and dark gray. You can mask the
moon if you want to, but I'm not going to mask it. I'm just going to
paint directly. We're not going
into the details. I'm just going to
give you a gist on how to paint
this glowing moon. I'm placing dark
gray in the carnos. Again, I'm using a flat brush
which is of a bigger size. This is a hop grizzle brush. I start with a light color. Slowly moving on
to the deep Cyan. I'm spreading the colors first, and I'll be doing the
blending part sometime later. You should have to
clean your brush many times while
you're blending. A so this will be the background. For the moon, I've
used a masking tape. So the color will
be titanium white. I'm just spreading titanium
white on the center part. And I'm using very
little deep cyan to the center for a realistic
look on the moon. You have to be careful
while doing this because deep cyan is a
very saturated color. I'm doing some adjustments
using a flat brush. Then I make the stars
using a dotting tool. If dotting tool is not
available with you, then you can use the
other side of the brush. So this will be
your class project. You can also try
something on your own instead of moon painting. There are so many
reference photos available on the Internet. You can make use of
the reference photos, and you can use the same
technique we used in the class to make your
own galaxy painting. You can also experiment
with different colours. If you are new to this medium, then galaxy painting
would be a great start. This is because there is
so much rules you need to follow while you do
the galaxy painting. You can just go with
the flow Here we go. We're done with our painting. You can varnish it once
it is completely dry.
10. Final Thoughts: Guys, we have now come
to the end of the class. I thank you so much
for taking my class. It really means a lot. If you have any doubts in
any part of the class, feel free to ask me. I will get back to you
as soon as possible. If you are painting with
me right from the start, I request you to share your projects in the class
project section below. This might be your
first acrylic painting, and your painting
may not look great, but perfection comes
with practice, so don't be disappointed. Please do share your works. I would love to
see your projects. I also request you to share
your feedback on my class. It helps me create better
classes in the future. Thanks again for
taking my class. Thank you so much. Have
a nice day. Bye bye.
 Meenakshi Muthuraman, Artist and Illustrator