Transcripts
1. Paint More Loosely & With More Freedom Preview Pamela Roberson Strong Artist Life: So if you want to grab
somebody's attention to say, hey, come over here, I've got some really
interesting visual story to tell you over here
with this painting. Congratulations, you've
finished the course and hopefully like me, you've ended up with a little inspirational flip book that will remind you to hold
things a little more loosely. Paint with a little
bit more freedom and be a lot kinder and
gentler to yourself. Well, hello there. My name
is Pamela Robertson and welcome to how to paint more loosely and
with more freedom. And we will come back and make some decisions
about what we're gonna do. We're gonna add another
layer still are. We're going to start
removing paint. Who knows, We'll find
out, stay tuned. So now we're gonna
do the big reveal.
2. Welcome to Paint More Loosely & with More Freedom: Well, hello there, My name
is Pamela Robertson and welcome to how to paint more loosely and
with more freedom. I am a lifelong
painter and I coach other abstract artists on
how to be a better artist. Certainly I am not
an art teacher, although I know a lot about art. And I certainly will give you some advice around
that sort of thing. But this course is less about
me teaching you step one, step two, step three. Hey, we have art because I don t think making art
really works that way. I think everyone is
such an individual, which is why I love art so much, because everyone has
their own process and their own methods
of getting there. So this course is really
just introducing you to some ideas and general tools. Let's say that you can adopt and change in use so
that it makes the most sense for where you are with
your art right now and to expand and get you closer to your own personal goals
with your art, right? I think a big problem that
a lot of artists talk about having is that they're just
too tight and they're very, they're afraid to make a mistake the whole time they're making art or making a piece of art. And so this exercise is really about kind of
loosening that up and starting to practice the idea of being unconscious or
being comfortable with those times when you feel
uncomfortable and really allowing yourself that space
to truly be an artist. And sometimes you need that
space to be uncertain, to be not focused, to be I'm making mistakes
and to be messy. So often I think that we demand each mark that we make in a painting to be more
beautiful than the last. And I don't believe that is
how truly great art is made. I think paintings,
any art really, it goes through a phase that
because it's not finished, it's not very beautiful
and that's perfectly okay. So I encourage you
to think about these ideas as you move
through the course and to really pay attention
to how you are speaking to yourself
while you're painting. How does it feel when you're doing something
you really haven't done before or using a color
that you don't like or a tool that you've
never used before or don't use very
much. What is it? What are you feeling
into practice? Being okay with that feeling? If that feeling is discomfort, The feeling might be joy. The feeling might
be, oh my gosh, I can't believe I
haven't done this. I need to do this all the
time, which is great too. Don't, you know, I'm
not saying you have to feel negative
about these things. But often when we're
doing something new, that discomfort comes in. So I just want you to
pay attention to that. And in practice, being a really good friend to
yourself in these areas, it doesn't even just have
to be in your studio. It can be anywhere in
your life where you're trying something
new to practice, being that gentle
but firm friends, someone who really supports
you and who really has a lot of love and compassion for
you and what you're doing. But can also speak to you clearly and kinda
straightforward saying, Hey, I like all this, but this part really
does need to, you need to rethink it or change it or
something like that. Rather than saying, Oh, wow, This sucks and that
painting sucks, and this painting also sucks. And why am I even doing this? I must suck. That's not helpful. And you wouldn't speak to
your own friend that way. So I want to encourage you to speak to yourself as you would a really
good friend and B, that really good
friend to yourself. And I think once you are doing that on
a more regular basis, you're gonna see a lot more
freedom in your own work. And I think you'll start to
see growth in your work too, because you won't be
constantly beating yourself back from
trying new things and taking risks and being perfectly okay with the fact
that you might make a bad painting or a lot of bad paintings and just being okay with that and being
able to move on from that. Certainly I've made a
lot of bad paintings. And certainly even making this
course has been, you know, I could go down a
very negative path with that here I am
making these paintings. I don't know if they're
going to turn out. I've got a camera
and I'm providing a whole bunch of strangers
to come look at it. And so there's, you know, there's a lot of things that
could be very insecure and that situation because what if you don't like what I make? What if you think that,
you know that I'm not a good artist? And what if you don't
even just like me, like from what you see on these videos, you're
just like, wow, I don't like that person, like it's a little intimidating, but then I remind myself that that's not
really why I'm here. Because I'm going to
make art no matter what I have come to
that realization. I'm making art no matter what, as long as I've got
paint and something to put the paint on,
I'm making art. So that's never going to stop. Of course I hope that, you know, people like my art, of course I do, but that's
not really why I make it. And it's not why I
showed up here to create this course for you
is not so that you'd like me and that
you'd like my art. But really just about offering a helping hand to the people that are serious
about their art. And they understand that
somewhere in their process, they're getting stuck and
they're not having fun. And they know that they
should be having fun with this is this should be more enjoyable than how
it is right now. And I think for many
people the key is how you speak to yourself and how you support yourself
through these challenging, very challenging
times of improving what you're doing and
doing new things, and trying new things, and exploring and playing and all of that can be
extremely intimidating. It's not just as easy as a
lot of people will tell you. I certainly struggled
with it for a long time. So that's why I
built this course. I hope it helps you. I am offering a special bonus to anybody who wants to take me up on it at the end of this course. And we can talk
about face-to-face, about what you made and
how you feel about it. And any sort of questions or struggles that
you might have had. Certainly during the course, I will be responding to any
questions that you asked me. And I'm really excited to
see what you're doing. And I look forward
to meeting you and let's get on with the course.
3. Materials List: All right, Hi everybody. We're going to talk
about the materials that we want to use
for this project. We're going to talk about the
ones that are required and then we'll talk about
optional ones just to give you some ideas of different
things that you probably already have on
hand that you would may want to bring
into this project. Alright, so the first one
is some artist's tape. I'm going to post a link to the artist's tape
that I like the best. This one that I have here
is definitely not one. It's a little bit
difficult to work with. If all you have right now is the blue painters tape
that totally works. And you may just have a
little bit of a problem with it lifting up paper because the artists blue tape
does tend to do that, but it's not the
end of the world. I did it with blue
tape for awhile, but then I discovered
the white tape, which are the artist's tape
that I like a lot better. This is, I think a half-inch. Get this. I always forget. Now
this is an inch. So this is an inch. And that works just great. So if you have a wide one, you literally could just cut
it in half and use those. This is not, this
is an exercise. I want to stress that
and I'm going to stress it a lot throughout
our time together, but this is simply an exercise, so don't worry about
getting it perfect or waiting a week or more to
get all your material. The perfect materials is same exact stuff that I have.
Don't worry about that. Alright, the next thing that
you must have is some paper, and I really loved the
Canson mixed media. I'm using the 11 by 14. This paper is so great
because it doesn't react a whole lot to moisture. Which means it doesn't
do lots and lots of crazy buckling because
it is heavy weight, so I recommend a
heavyweight paper. Watercolor paper will
work heavy-duty, one, heavy-duty Bristol
paper will work. But if you get into these a lot, I really do recommend just
getting a spiral bound mixed media thing about
this size is pretty perfect and they're not
terribly expensive, or at least the
last time I looked, they weren't terribly expensive. And because you
don't want to do, is use really expensive paper like Arches watercolor paper
or something for this, because It's going
to naturally stress you out and start
thinking this is very precious and be
very tight again, which is what we're trying
to move away from here. Okay? So that's the other thing
that you will want to have. Obviously you'll
want some paints we're using acrylic paints. Oils would work, but you're
gonna have a lot more time of drawing and different
issues with that material. So this is acrylics. And then you'll want tools
to move, paint around. Definitely a palette
knife for mixing. I and I use palette
knives for painting. I have a big variety of different palette knives
and a few brushes. Then the next thing, there are some
mark making tools. So this is this
embossing stylus. I have a lot of these. I have a fat, this one has a really fat end and are really
small and I'll use these to make marks in wet
paint. Let's kinda fun. You could use a broken pencil, a broken pen and stick that
you get in your backyard. Now have to go get the stylus. China markers. I have black and
white and these, these are great because
they're not water-soluble. So when you put a mark down and you put even a white
paint over it, it won't pick up any of that color and change
the color of your paint. Then I have a lot of
water-soluble tools. This is a compressed
charcoal pencil. I have a set of Darwin's IQ
tense watercolor pencils, which I really like. Another great one. If you like drawing at all, and if you like drawing
in your painting, I think this is such a
great brand Art graph. It's water-soluble graphite. And they do set
with earth tones. They offer black, white, gray. And then they do one set that
is blue, yellow, and red. And you can actually buy
these individually too. So you can just
pick one up there, not too expensive, and then try it out and
see if you like it. They're really fun, especially when you add water to them. And the colors are really nice. Also, this is a
silicone bowl scraper that I got in the kitchen
department at Amazon. And this is a great
tool for moving big blobs of paint around. So something like this. This could be an
old credit card, a trowel, anything
really with a flat edge. It doesn't need to be
specifically this. On the brushes. I would recommend that you
have some bigger brushes. Like in one of the exercises
I'm gonna be using, excuse me, this great
big brush here, which is big for this size. So you do want some variety. You don't want to
just show up with little teeny tiny
brushes for all of this, you want some big variety
in your brush sizes. And let's see, we'll be using
scissors at the very end. Common household tool. Don't really need
to mention that. Oh, yes. And this is optional as well, but if you do have it on hand, this really does
elevate the whole, the whole process of this. It'll just give us really
crisp edges around the tape. Whereas if you don't use it, then the paint has a
tendency to kind of get under little tiny
spaces between the paint, between excuse me, between
the tape and the paper, leaving you with
that scattered edge rather than a straight,
straight line. So if you have some
matte medium or medium, it doesn't matter if
it's Matt or glossy, just some acrylic gel medium. And we'll, I'll show
you how I use that to keep your paint edges really, really nice and clean. Hey, other drawing materials to strictly just be a pencil, okay, so don't get
too hung up about having a million
different things. It could be a block of charcoal. I just, I just wanted to show you all the different kinds of things that you like I said, you probably already
have on hand. Don't get too hung
up on exactly, exactly the same thing. A nice low tack tape, a nice heavy-duty paper. Some acrylic paint
will get you started. So let's get painting.
4. Setup: Okay. So what we're doing. We're going to do
the same thing with every one of these exercises. We're going to do
the same setup, and we're just going to mask off the edges and have all this pretrn we're just going to mask off the edges and I'm
just going to eyeball it. I'm not going crazy. With getting everything
perfect because, you know, these are what we're working on
are just exercises. I'm going to repeat that
a lot because I think we can tend to
psych ourselves out and think just because
we've picked up a brush, and we've got some
paint, and this is going to be something
now that people can see. I think that's when we can
already start getting tight, even if it's just an
exercise on paper. My tape getting stuck to
everything over here. And so I'm going to be reminding you that this is
just an exercise. And therefore, the
stakes are rather low. And then I'm going
to divide this in half because what I'm doing is I'm going to be making
four quadrants basically, and they do not
have to be perfect. I feel like this one
is quite a bit wider. Oh, that's some sticky tape. Yeah. If your tape is stickier, I would advise that if you leave the tape on
there for several days, it is going to pick up
paper when you take it off. So you probably don't want to leave this tape on here
for longer than two days. If you're very concerned
about picking up the paper, and if you're not
terribly concerned about it, just take it off, very slowly, and as long as you're not
just ripping it off, which you wouldn't
do in any case. But as long as you're
not just tearing it off. You're not going to pick
up the whole painting. Just go slow and just know
that the longer you wait, the more tendency it
has to lift the paper, especially if your tape is on the stickier
side such as this. And then for the optional step, if you have a medium, and it doesn't matter if it's a gloss medium or a mat medium. It dries clear either way. And because this
is not a top coat and it's not even
going to be seen. It doesn't matter if it's a mat or a gel or I'm
sorry, or a gloss. And what we're going
to do is we're just going to put
a very thin coat, And you'll see I mean, I can only just see the
shine on this stuff. And what this does is
this is going to seal that tape edge and fill up any little gaps between
the tape and the paper. And give you a really nice
crisp edge when you're done. Even if you were
to use white paint because you didn't have the gel, I don't bother doing it because the white of your paint is very different than the
white of the paper, and when you take the tape off, you'll see a
feathered white edge and it'll really bother you. If you're anything like me, it'll bug you a lot.
I've tried that. So if you don't have a gel
medium, don't worry about it. But if you do, then you
can take a little bit, and this will just really ensure that you get nice crisp edges. But like I said, totally
optional and not a big deal. Okay, so that's it. We're
going to let this dry, and then we will get on with the painting.
See you next video.
5. Limited Palette = More Freedom: Okay, so now we're going to
actually start painting. And I want you to keep a couple of things in
mind as you watch this. And when you start
your own exercises. Part of the exercise is to
just get rid of the white. And to understand that this
is not a final painting, this is just a first layer. I'm not super concerned with making the most beautiful marks. I'm not super concerned
with bringing in some real finesse and
detail at this point. This is really just
a first layer. So this is where you play, where you experiment and
this time of the painting, right now, you have
nothing but auctions. What we're doing here is because we have
nothing but options. We're going to start by picking one option being a
limited palette. I'm using an orange, a phthalo blue, and yellow, turquoise, sorry,
and a yellow over. These are the three
colors that I'm using. So every other color
you see on here are just made with these plus white. And then I think I'm
going to be introducing just a little bit of
black to kinda get some darks in here because contrast is very important
in any painting. So let's just get started
with these colors here. And I'm just painting. I'm not creating anything. This is very spontaneous is
the word I'm looking for. I just am looking to play around and lay some colors down. You get some white
hair on my palette. Pharaoh on his brushes
are really loose. Let's see how that's better. Okay? So the only reason I'm not going over at this
point and painting over any of these shapes
that I've just put down is because
the paint is wet. I don't want to be mixing
my colors in my painting. I want my colors to
be mixed over here. So in this exercise, I have just a couple of rules
which is a limited palette. And trying to do
most of my painting. I'm sorry, most of the mixing of my painting on my palette. I am being a little bit careful around these
areas because I know that they are very, very wet. Still. See how it just
picks it right up, which isn't the worst thing. But I do want to be
deliberate about my mixing. And what I'm also
doing is I'm changing the tone even though I'm still working in this yellow ocher, I'm making a point
to pick up some more white to change the tone. Yes, I am mixing my colors a little bit here in the painting. But I'm doing it deliberately. And it's like I want to do
like this at this point, I don't want to pick up the orange and make a
new color right now. While I'm being loose and
free and Devil May care, I'm also this is controlled. I'm not just slopping
stuff down at this point. And then just hoping
for the best, there is some method
to the madness or this part of the painting. I really do like this ocher and I think I'm
going to continue with that. I'm going to mix up a bit more. You see what I'm not doing
is I'm not just adding white straight to
the straight ocher. I'm adding these other colors. And what happens is it makes it more harmonized with the rest of the painting because
there's a little bit of each color in each color. That makes sense.
The other thing I'm not doing is I'm not
painting with a lot of water. I'm painting with
a lot of paint. And I'm ignoring the tape. Which takes a lot more practice when you're using the blue tape, but it's totally possible
I did it for a long time. So just get up, get that blue tape covered up. And we want to really
try to imagine this as one piece as much as
possible or one image, I should say one
square, one rectangle. Then what happens? When I change it again? Hopefully this is
still an frame, just a little bit of this
blue that I made earlier. That's a lot drier now. So you can see, I'm
not making a ton of decisions about composition
and blah, blah, blah. I haven't really introduced
any blue at all yet. I'm accidentally picking up colors here that
I don't want to, but my goodness, look at that as almost a red and it's beautiful. Might have to figure out
how to make that color. Oh, my palette. There we go. Very
close to it there. Dabbing here and there. To get rid of the
white of the paper. You see none of this is very
serious, are very precious. And as it continues to dry, it will become less
precious to me. And I'll be more
free to work on it. I haven't put any blue in, so I'm going to pick
up a pallet knife and introduce some blue. Now that sketch this out, I have not given this
a lot of thought. I'm literally seeing it for the first time,
just like you. Alright, so I think I've kind
of done as much as I can do with this for the moment because I've
got some very thick, I'm going to actually thin that down just a bit because it's going to take
a long time to dry, but I'm going to
let all of this dry and then come back
and then kinda, just kinda see where I am with it as a whole and it makes some decisions
going on from there. Here's what I'm not doing. I'm not judging this and saying, this is garbage and
I'm a terrible artist, or this is ugly and no
one should ever better hope no one sees
this because this is terrible and everything
I do is terrible. Okay. I've just made some marks. There's not a lot of meaning
in this for me right now. This is just experimentation. This is an exercise. So as I'm not going to get really worked up about
it one way or the other. I might find some super cool
things in this experiment. I might not. But I'm, right now, I'm just enjoying it. I'm in, I'm enjoying trying
out some new things, some different
color combinations. And I'm not judging
things beyond that. I just wanted to remind you, when you do this, this is not the place
where you're judging your artistic ability is going to be a bit of
a mess right now. And that's okay, that's
what we want because we're trying to paint a
little bit looser. And what that means is
we are more free within ourselves to put down marks and put down color and
make different shapes. And without all of
the negativity and the relentless criticism that's going on within our minds. Okay, so just relax. Have fun to explore,
experiment, play, whatever word makes you most comfortable with
this, just do that. And I will meet you on the
other side once this is dry.
6. Variety & Your Intuition: We're back for part two of
our limited palette exercise. This is a few days later and most of my
paint is still wet. Some of the very, very
thin spots have dried, but all of the puddles
of paint are still wet. So I just covered up the pallet actually
with this sketchbook, I just unfolded it. It has two very stiff
front and back and so I just spread it out
over the palate and left. Actually, I was really busy
these last couple of days. So it's been a little bit of
time since I've been here. And you'll see that the
colors here are darker. They're not quite as vibrant as they were in the beginning. And that's what happens with acrylics as they
dry, they do dry. They tend to drive it darker
and they lose some of that yummy immediacy
of a wet paint. Now, as you work with acrylics and with the
proper acrylic painting, there are methods
that you can use to bring back that brilliance of
that fresh wet paint look. And that's that we're not
going to discuss that here. I just want to let you know
that that is out there for you to bring
your paints back, bring your paintings
back to life. Anyway. So as I'm looking here, I'm going to assess where I am. What I've got going is
I've got a lot of little of these turquoise easy
shapes, which is okay. Then I have these, I'm going to call it three
sort of orange shapes. And they're all
about the same size. And then I've got the ocher
that has turned into a neutral really for this piece and that kind of covers
the rest of the area. What I wanna do is I want to bring some more contrast
to a couple of things. One to the shapes, I want to have
some larger shapes to play against these
very small shapes. I also want to bring
in some more dark. I think I'm going to
focus maybe on dark blue and to bring in some darks and maybe even a dark neutral
and see if I can't bring some interests to this
through those areas. Another thing I'm going to
focus on is probably to make, to paint a little
bit more on some of these orange bits
because to my eye, the paper is still coming
through and that's a personal thing for
me with acrylics. I don't want a watercolor look, I want an acrylic block. So that's gonna be
something that, that I'm going to
address as well. But now everything is dry. So for a moment here, I can really, what
I'm looking for, I can be very non
precious about what I've got going on
here. The other way. The other reason
I can be very non precious about any of
this stuff is that I'm not really in love with
very much of this stuff. There's some things that I like, but I'm not in love
with any of it, which is a great place
to be because that means you can really make changes and try new things and
just be more open. So I just, I know I want
to make a larger shape. Somehow I've picked up blue. Oh, I see. Okay. I want to make a larger shapes, so that's what I'm gonna do. I'm gonna make a larger shape. Okay, very simple. I'm not making it
too complicated as far as where do I put it?
How am I going to put it? What is it going to look like? All of our color
we're going to use. I'm just making the decision
to make this a bigger shape. So my theory and what I have found that and that's
been successful for me is when I keep
things simple and don't try to over-complicate
it and overthink it. I'm going to have
a better outcome for where I want
to go with my art. With each piece. I do tend to get a
little bit quiet when I'm painting because I am accessing a different
part of my brain and my language skills tend to
suffer during those times. So I apologize for
the moments where I sort of stopped
sometimes mid-sentence. Okay, so now I've
got a bigger shape. But is it big enough? Let's try making it even larger. Make it come off of the page. Altogether. Normally, if I
weren't filming this, I wouldn't have the easel. I mean, the palette right here where I'm knocking
into it all the time, just, it'd be a little
more spread out. But I just want to
get everything into the camera shots so you
can see what's going on. So if you have more
room spread out a little bit so you're not
bringing into the tray. That's my tip to you. Okay. I feel now I just have this little voice in
my gut that says, Let's put in some lines
now, I'm going to, so this is just a concept
or charcoal pencil. I'm just going to
put in some marks. I'm not really
thinking about it. Just I call it noodling around. And I'm keeping it
very organic and i'm I'm making sure not to
find a mark I like, and then repeat it,
repeat it, repeat it, repeat it very evenly
all over the surface. That tends to get a little dull for our brains to look
at when we're kind of always doing the same thing
all the time in a painting. So I'm being careful about
that to not do the same. Like I'm not just
putting in a pattern, I'm putting in some lines. Will any of these lines be here? Any of these lines be visible by the end of this painting? We don't know and that's not
really the important part. Okay, So now I am going to try
to make a great dark here. Let's see. This is going to
push us a bit to the greener side of things. With the orange and
the yellow ocher. It's quite nice. It's still a bit on
the medium side. So I'm going to try a
little bit of black. I don't usually I don't always use black to
darken things up. A lot of times I
use a lot of times I'll use a dark amber rod, dark umber because
it's very, very dark. And I do like the kinda
darks I get with that. But because I'm experimenting
and trying some new things, I'm going to
experiment with black. That's a lot darker. Okay, So that's a lot darker and I'm going to pick up a brush. Okay. Let's see. Everything I'm not
doing is I'm not painting around the lines. I'm not using the lines as a new way to like
fill in a space. Now I'm not saying that
you can't do that. So certainly some
places it might be interesting to do that. So here I will pick out a
shape that's defined by this line to make a new
shape with this dark color. Okay? So, but I'm not gonna do that
throughout the whole thing. That's not where I
want my art to go. I don't want it to be a paint by numbers or coloring
book activity. Do like those two
next to each other. And I know this is all
paints or tape rather, so that's not going to
be in the final piece, so I do like that very much. So adding it in here. Here we go. Okay. So what I'm doing now is
I'm just listening to that quiet little
voice in my head that sometimes comes
up with ideas. And the ideas sound like, well, what if you did this
or how about that? And it's just a very simple
activity of an idea, very, very simple idea. So like when I
picked up the pencil that that was the message in my gut that just said how
about some line, right? That's all. It's it's not a, I talk a lot about listening to your inner voice
and your intuition. And what I find is
that it's not speaking in huge paragraphs and it
doesn't have a whole plan. It doesn't tell you the
beginning to end in the middle and the
end of this piece. It's just a little just idea. I find the more
that I honor that the happier I am with the
results in most cases. So I've got this really
little tiny palette knife I think I want to use to get a very light
pale color going. Kind of balance or
counterbalanced rather these darks
that I just put in. This time, if I do
pick up some paint, I feel like I have enough
of a balance or a base here that if I do
pick up some paint inside that that shape, I'm not particularly
too bothered by it. I just feel like it's
different paintings at different times will benefit
from different things. So that's the great thing
about being an artist. You're the boss and you
get to make the rules, and you get to make the rule that the
rules always change. So that's part of painting with more looseness
and more freedom to, is to allow yourself
to change things up. Just because you had
this little tiny idea that didn't really make sense and you're not sure if
it's going to work, but you did it anyway. And that's how we learn things. So if you're paying attention, I think it's very obvious
now because now I have almost the whole thing covered with a second
layer of paint. But how much more
interesting this is now, because there's,
there's more layers. There's, there's, there's
more things to look at. I think what I see so often with artists and certainly
I was guilty of my, guilty about myself
for a very long time. It was a 11 layer wonder, like things got done that
first layer and then I was finished and the painting
was done and I'm done. I've finished paintings very, very quickly, like 34
days, sometimes less. But the thing was, is I was never really
satisfied with them. I knew I could do better. So I would make another painting. I very much was of the mindframe that if I paint a whole lot, I'll eventually get
to the good stuff. And in part, that is true, yes, you do have to paint. The more you paint, the
better you're gonna get, your skills are
gonna get better, your eye is going to get better. Things will definitely improve. But excuse me If you're just doing the same thing over
and over and over again. And just doing it maybe
faster every time. That is not a recipe for actually improving what
it is that you're doing. A whole lot of the
painting more loosely, is the mindset of giving
yourself the freedom to really create an
opportunity to fail. I know that sounds a
little bit negative, but truly that's what it is. I don't know if any of this is going to be something that
I like when I'm done. I've done it enough to know
that there probably will be some things in this one I'm finished that are that
are grid that I like. But there's no guarantee. What I practice is
being okay with that, being okay with just
learning through doing. And that if I fail, if I totally screw this up and it just turns
into something really that just makes me sad to look at then that's okay. It doesn't, it doesn't reflect
back on me as an artist. I think I wanna go
into here some, but it's so thick there. Let's see if I can just lay
some in just a little bit. Just pop a little bit on top. And I'll probably touch that up again for the third round. And we haven't been
working on this very long and just a small space, so we don't need to
work on it very long. What I'm not doing is I'm not overworking this
and going over and and making sure every little
thing is exactly right. Because I don't think
that leads to if I'm moving in here with a five
hair brush to fix an edge. That is the antithesis
of painting loosely. That's painting
very, very tightly. So I'm not going to get super wrapped up a browned the
details still at this point. And I'm going to just play around with just
making some marks. This time with a
white China marker. These marks may
not go everywhere. They may just kind of
appear here and there. And then maybe just do
something like that. Just to continue to add layers. I'm very interested in, in layers and what happens
when you make layers. I'm just looking at it now, just seeing if there's anything that's very obvious to me, that's where my intuition says, Oh, we should do something here. And I feel like we're pretty good in a group because I do
have a lot of paint on here. I think I am going
to stop for now. We're going to wait
for this to dry. And then I think that we will take off the tape
and then work on each quadrant and bring in some more details if needed
or some adjustments. So I just want you
to pay attention. I didn't work on this
for three hours. This still is very quick, but I am just, I'm not in love
with any of these colors. Let's be really clear. These are not my three
favorite colors in the world. These are just three
colors that I picked. I do like what's happening. And there's so many
different ways to go with a limited palette. I think one of the things
I said when I started this that I was gonna do
like a darker neutral. This could maybe almost
be counted as a neutral, but it is, it reads
still is quite, quite on the blue side. I don't know if
I've gotten that. Yeah, maybe I'll do that even as a third layer before
I take off the paint. But I don't know
yet. So right now, I'm just going to stop and
let it be this big mess. I mean, it is it's wild. I can't really see it because
there's so much happening. But I'm going to let
this dry and call this a break time for now. And we will come back and make some decisions
about what we're gonna do. We're going to add
another layer still. Are we going to start
removing paint? Who knows? We'll find out, Stay tuned.
7. Reveal + Detachment: So now my paint has dried and
I have a decision to make. I can either lift the tape
up now which I'm dying to do because it always just
makes such a big change? Or do I want to make a few more adjustments to what
I have going on right now. And I think I want to make just a couple more adjustments. So very quickly, I'm
going to cover some of this here with a little bit of a different tone
of that same color. Just a bit more
orange and a throne, a little bit of ocher. And of course I get
blue in it right away. So should always try to
work with clean tools. I'm just getting a
little and paint. I'm rather impatient person, so we will just accept that
as a happy little mistake. I actually kinda
like the way that looks in that one instance. So I will leave it there. And then I just
want to add just a, it more depth and tonal variety in
these orangey colors. Just keep the interest
up just a bit. Just a bit more. Okay, I think that's better. And then I wanted
to talk a little. I've been talking a
lot about neutrals, but I don't know that I really just shown neutrals and kinda
what I mean by neutrals. So I'm going to try to
make a neutral from the existing colors
on my palette by using all three of them
together to create. What? If you weren't
trying to create it would be maybe called mud. But we're going to on purpose, create this color and
we're going to adjust it and see if we can't
use it as a neutral. You can see whenever you add
a different color to it, it changes it just a bit. So now we've gone
a bit red here. So let's see if I can make
something happen out of this. This is an experiment
for me too. So we're finding out together. The interesting thing is, is that if you were to
use these same colors, you would come up with some of the same colors I'm making, but you would also come up with a lot of different colors. We, even within this palette, I've only touched just, I mean, I've touched three colors
now for, you know, very few colors have
I really created? There are so many
more colors to create from this palette is
what I'm trying to say. And I really just
scratched the surface. So now I've thrown in some white and some black
and kinda got this sort of a chocolatey gray color thrown a little bit more black. Let's see if there are some places that
this color might work. So the more you
do these sorts of exercises and really focus on what's going on in your head and how you are
approaching the painting. And I really feel like this is, this is a great
time to practice. This sort of disconnect. With what's happening. What I mean by disconnect
is that I'm not going straight into judgment
mode and going, wow, this is really embarrassing
and can't believe all these people online
are going to see this and judge me and just know I'm a fraud and I'm a
terrible artist and all the rest of it, right? Because I, I am not putting
that much energy into this. This is an exercise that will remind you of that
over and over again. As I remind myself, this is merely an exercise. And my goal is to enjoy the process and to find some new things and to play with completely
different colors, this neutral color I would, I would never
typically work with. But as I start to work with it, I am finding a kind of, uh, kinda like it, kinda like
this warm brown gray color. So that's what that's what
I'm really focusing on. I'm not worrying about
making a great piece of art. That will happen. If you just keep
working and you learn some basic fundamentals about composition and how to make
your composition stronger. And so in that way
with this painting, I've done that by
making sure that I'm not repeating the same
shape over and over again. I'm not repeating the same size of shapes over and over again. I'm not just using a orange, a blue, and a yellow
in calling it done. There's a variety in
all of these things. I have a variety of lines. I'm not I'm not painting
the same way all over. I'm not painting the same marks over and over again
across this piece. I'm mixing it up. I'm using different
tools and I'm trying to keep it variety. Trying to just keep it varied. That's that's the
word I want you to think of when you're doing
this is just variety. I think I'm going to stop here. I feel like this is,
this is as far as I really want to go at this
point with this piece. And if it's yours and
you're feeling like, Wow, this is really cool. And I like this concept
of doing layers. I wonder how many
layers I could do. I would encourage you
to do that. Then. Do a bunch of layers, explore that, and keep going. And how many layers can you
put on a piece of paper? When is too much, too much? Is there even a too much? So if you're comfortable
with just continuing to lay on layers and you're really enjoying that I encourage
you to do that. We are going to move on now because we have other things to talk about our course. But I just want to remind you this is something you can do over and over again. I do these a lot. So now I'm going to
take off the tape, and this is really the
most exciting part of the entire event. Then you see it's lifting the
paper up just a bit there. I'm not really sure why. Except maybe, Oops, maybe
the paint was a bit wet. But it is just
grabbing it that tape, I mean, at that paper,
that is annoying. Like I said, this is
better than the blue tape, but it's not perfect either. And probably waiting until the
paint is completely dry is probably a good rule of thumb. But let's see if we don't get lucky with the rest of this. We're not pulling any
paper up with a tape. You got to love these corners. So cool. Oh, there we go. Lifting paper again. Orange. I think it's the wetness
of the paper because I've really put on
a lot of paint. So do as I say, not as I do. And pull that tape off. Once, you know
that paint is very dry very carefully
lifting that off. There we go. Void is just lifting like crazy. Oh my goodness. I don't know. Maybe it's the humidity
in the air or maybe it's this specific brand of tape. This isn't I will admit this is a this is a new tape
border I got in. I don't know if it's the exact same tape
that I have been using. It might just be
the brand of tape because I don't usually
get a lift like this. So my apologies if this
is happening to you too. I hope it isn't trying to be a bit more
careful and lifting, so I'm not taking paper with me. Let's see. I know that if you pick
up the tape from the edge and pull
away from the edge, the chances of picking up
paper or are so very high. So you always want to pull away, away from the edge and not with the edge that the
tape is tearing. I think this must be the
brand of tape I bought. I don t think I liked this tape. I'm not sure really what it is. Let's focus on what's
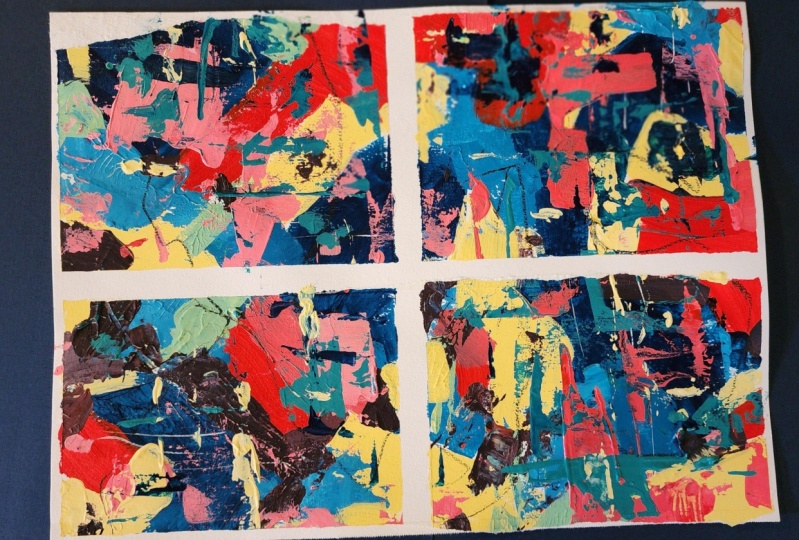
important right now. Look at these four little
paintings that have evolved from a pretty chaotic mess. That's really for me, this is why, this is the main reason why
I do the exercise. Because out of that craziness, you've got some pieces here and the parts that maybe in the original you didn't
care about at all, suddenly leap out
as being much more interesting than
the other pieces. Oh, when I still have
to remove the top here. Something about these
cleaned up edges. Really focus your eye and pull these kinda focus what's going on in each
quadrant of that page? Now you can go back in and
start to make adjustments. So I'm going to continue. I've still got some
really thick paint here. I'm going to continue to dry. We'll come back with
the adjustment phase. Happy painting. Speak to you soon.
8. Refine: Okay, this is mostly dry. It's dry enough anyway. And I want to start
adjusting this guy here because as I
look at this one, I'm seeing that I've got some very similar shapes and
very similar size of shapes. And most notably it's this one, this one and this one here. They all kinda have that
angled end and they're all about the same. I
mean, there were the same. They are mirror
images of each other. So I'm going to break that up. Just make some changes here. I'm just watching that edge. I think that's better. I think that's even better. And I think I want to change
just the end of that guy. So it's not quite
so match the match. Okay. I think that's pretty good. This one I feel
we're just not there yet and I'm not
exactly sure why. I'm just going off hunches here. This is there's no like guide. I'm not going to say
switch to page 333. This is where you'll find
the adjustment solutions. If only it were so simple, but it isn't. We know that. So I'm just going to
try some things here that I think just feel like they just need
a little something. This is where I get quiet
because I am just exploring. Kinda going to that
other part of my brain that it's not very good
at talking in painting. So I think that might be a little bit better. Just want to do this. Yeah. Okay. And I'm gonna flip this over. I do like, what's going on here? I think I do want
just a bit more dark. Yeah. I think I like
that a bit better. I don't know about that shape. If I love, I love it.
I love that shape. I don't know. I'm going to put just a
teeny bit of orange here. Just a little bit more. Okay. That's better. Then. I think this is a
little OneNote. I think that's my problem here. So I want to get in some of the a little bit lighter of that and maybe a little bit
more of the pale blue too. But let's start here. Yeah, I think that's better. Chance to watch my edges there. Palette knife comes
in handy for this. Here I'm thinking about a
variety of shapes again, and also a variety of edges. So it's not always the
same hard painted edge that sometimes it's just a
different edge altogether. And it's very organic and like this just
sort of scrubbed in, pick up just a bit of white. So I could play a long time
here with just adjusting. I'm getting some lighter lights and some darker darks and
all that kind of stuff. Okay. Now I'm thinking I'm
maybe you want to bring some of that back? Yeah. I think that's alright. I'm going to go
back to this one. He's the one I'm not really that enthused about compared
to the other ones. And now I'm wondering if
maybe I overdid this a bit, so we'll see I May adjust
that again. I don't know. We'll see we'll see. It may not need it in the end, but I think I'm going
to I still gosh, I wish I could tell you what it is about it that's bothering me. I'm just going to hope
that whatever it is, you see it too. Okay. I'm feeling better about that. Now. That feels better to me. See if I can just touch that. Okay. It may still be a bit too much, but I'm okay with that. This one is definitely too much. So I'm gonna just kinda scrape away a lot of this excess that I know and don't really want
to hang on to now. Now we'll just go back in and kind of comment back down. Just a bit. Picked up that
light brown again. It's just getting a bit busy. Let's see if this
doesn't do the trick. I think that's better. I think that is better. Now you could also go in
with your drawing tools. And draw again, you
could wait until it's completely dry and Dragan. Or you can say, this is enough, this is a big enough
adventure for me. I've wasted so much paint. Just kidding, you're
never wasting paint as long as you're putting
it into a painting, you're not wasting that paint. And I feel like I want to do
a cheeky little thing here. I said I was gonna do some
blue and I think I lied. I just wanted to get
this really mixed in. Yeah. Yeah. I think that's good. Okay. So we're going to
call this one done and move on to our next
lesson. See you then.
9. Same Palette, New Approach: Okay, So we're here back
with our next exercise. Only an exercise, don't panic, you can screw this one up. We're starting the same way with the tape and the four quadrants. And if you have it a
little thin layer of the gel medium
around the edges to try to keep those edges crisp. If you hear a lot of tip tap
tapping in the background, that's my dog wandering
around this morning. We're going to start
with lines today and I'm going to start
with this art graph, Taylor's chalk that
I talked about. I'm using the yellow ocher, and I'm using the same
limited palette colors that I used in the
last exercise. When I had mentioned
that I didn't really feel like I made a lot of different
kinds of colors with this limited palette. I thought that, you
know, that's, that's a good exercise for me to
keep using the same colors and start exploring more ranges of those colors and more
color combinations. So we using the same palette. I'm picking this
particular yellow because it's an ochre and
it'll go well with everything. I won't have to worry
about fighting it. You can choose
whatever you want. It's not that big of a deal. Most of this is going
to get covered up. So I'm just going to start
with just making some lines. What this also does for my brain is to help
kind of see this as one plane rather than for CEP
work or separate quadrants. What I have found, the
more I do this exercise, the more I tend to focus
here and here and here. So always try to
bring it back to just looking at it as one piece. And I just liked the
way the results tend to be better for me on these exercises that way and
it helps me to loosen up. Okay, so now I'll show you why this water-soluble king
with water-soluble. So it's pretty fun. I'm just going to
pick up the white. I'm not going to
worry about mixing anything with it because this is gonna do
that mixing for me. I'm just going to start with a thin layer because I'm
going to go all over with us. And I do want to keep painting, so I don't want to put down a big fat thick
layer right out of the gate because then I'm
gonna be stuck waiting again. I'm not feeling like
waiting this morning. There's a little bit of
they're kind of graphite, little drop the
gut left on there. So I am kind of making sure
to make some parts wider, whiter because there's
less of that art graph, graphite in the paint. And then I get some
really subtle variations which I like a lot. And it's kinda
being done for me. I'm not having to mix
up palette of colors over here when it
does it for me. So I'm not going to
call it cheating, but I am going to call
it a little less, a little more efficient, as far as just Getting
the surface covered with paint and adding a
little bit of color to it. In this exercise to, I'm not going to turn this
now into a coloring book. And follow the lines. I might follow a
line or two here, if it looks interesting to me and it feels right to do it, but that's not the point of
this painting or exercise. Okay. I think I'm pretty well covered. One of the things and say I'm gonna move this
out of the way quickly. One of the things I've
learned kinda keep your paint water from
getting filthy quite so quickly is to wipe off your
paint onto a paper towel, get the excess off, and then throw it in
the water and that extends the life of your water. And I don't use very
much water at all. I think there's maybe an inch and a half
of water in this. Maybe an inch and a half. And I will use that for for quite awhile and
that's brand new. I just filled it up
this morning because my other one was a few weeks
old and it was pretty gross. But I use it till it gets pretty gross and I don't
use a lot of it. And then what I do
is I dump it into a big like ten
gallon bucket out on our patio and I just let it sit there and
slowly evaporate. There are other filtration
systems that you can use to actually
turn this water or turn the dirty paint water to
separate all the paint out of it and filter it and then
actually end up with water. You can pour down your
drain and it's safe for. Municipal waters. You
can check that out, I think through Golden and
I forget the name of it. It's like called boom
or something like that. Anyway, it's about last time
I looked and that was been a little bit it was like
$50 to get the kit. Okay. So back to our exercise. Like to give this a
chance to dry just a bit. And it is. So now I want to mix some colors and get
some new, fresh colors. And I'm going to start
now with some blue because kinda feel I've
talked about yellow here. So you see when I mix just the
white with just one color, It's pretty, but it's a
little bit one-dimensional. It's not very rich and
it's not very interesting. And it's what they
call in the biz. Sweet means it's like candy. It's a, it's a bit too much. So I'm going to add just
a bit of the ocher, just enriching it up a bit. And it's a subtle shift. But it changes it just a bit. Just a bit more. So you can really
see the difference. There. Have really
dirty it up a lot. I'm going to add
some blue back in. But you see how it's still, well now it's
shifting to a green, but it's still gonna
say it's still a blue, but it's not really changed it to a green by adding
that much ochre. But here now we're moving
it backup to blue. And you can see it's
still very pale. It's still very pastel English. But it has a little more to it. It has a little bit
more depth because it's not quite so candy colored. So let me show the candy color. And not to say it
isn't a pretty color. But I would say it's prettier when alongside its
cousin over here, because this has more
qualities to it. And so this is a nice highlight. And you can use that, but I don't know That
would be my main color that I would use because it's a little bit simplistic. That's the word I'm looking
for. It's just a little bit simplistic compared to this
as a bit more complicated. Now these are subtle things, but it's something to note
when you have colors that are, I'm a little more complex. Your palate and your
paintings will become, will look a lot
more sophisticated. And if that's something
that you're interested in, then you may want to look into making more of
your own colors. In general. Doing the thing where I'm starting to see
it as a as for areas. So I'm going to try to
get back into thinking this is for seeing
this as one piece, so it's hard to do sometimes. So one of the most
important exercises I've done for myself this past year was creating
color charts with limited, with a limited palette
just like this, with just three colors and white and that's all
know, darker color. In doing this is
very precise mixing. I'm going to say
it's really precise, but it's very ordered. Mixing and coming up
with different colors. And it takes a
little while to do. The ones I was doing was probably around two-hour
mark and they were really great for days when
I didn't really feel like painting like art. But I felt like painting
like mixing color. I love mixing colors. And the days when I wasn't
really into it As far as. Working on a piece or
starting something new. I found the color charts were a really great way
to spend time in the studio and learn a lot. I'm a lot better
at mixing paints, which I know sounds funny, like how hard is it is not hard, but I think what we do a lot
of the times we don't spend enough time actually mixing them in doing these
color charts, it shows you pretty
quickly that you didn't really mix your
paints very well. When you didn't mix
your paints very well, it's kind of no room to hide. But what it also
did is it made me understand that I
don't need to own hundreds of colors
of paints that I can make so many colors
with just a limited palette. And it was quite exciting. If that's something that
you think you might like to have a little
Skillshare course on. Let me know in the comments. I guess if there's enough people that are interested in that, I will put that together. I love them. And it's not something
that you have to do in a two-hour session. It's really great too, because you can just
spend a couple, ten minutes or something
and then just walk away. And it will, it
will keep will say, I tend to be following the
lines a little bit on this. And I say a big part
of it is probably because I'm talking
while I'm painting, which I know really interrupts
and disrupts how I create. I'm going to try to
stop doing that. Dr. to stop doing that. So when you use a palette knife, you can see where I'm pushing hard because you can see
the paper underneath. You could see where I'm
just sort of layering it on like icing on a cake and the
paper isn't coming through. You're not seeing these
scrapes and scratches. So it's a good
thing to understand about a palette knife
and the angle of the blade to the surface
is very important as well. You are either on the
edge or your flat. And so you get different
looks that way. So this is the result of not really mixing paint very well. That's okay. I mean, you can mix here. Just a little more awkward. Sometimes we get some
really lovely results. So depending on the
look that you want, the weight of that
knife is going to, is going to really
determine what happens. So neither one is good or bad. It's just sort of like,
you know, what is the, what is the look
you're going for? What I don't recommend
is trying to, is painting really hard with the palette knife
all the time so that you're always with
this idea of saving paint. I mean, certainly
use your paint. But when you start
getting stingy, like if I were to just to
paint this like this, right? Because I really want to make this this paint last, right? This may not be the look
that I'm, that I'm wanting. Same things, same
thing with brushing. Although I will say it
kinda looks cool here, but it may only look okay here because I've got
thick paint here. And the contrast of those differences is
interesting to our eyes. So this is kind of a pattern where the
other places aren't. So pattern like but I wouldn't recommend painting your whole painting like that unless you were to go back
over that and then add like thick luscious shapes that are very clearly lots of paint. Alright, let's introduce
a little bit of orange. Add some of the umber. And already we've got
some blue in here. Get some funky no-name color. Throwing a little bit of a
little more ocher, kill. The other color was
looking a little bit pink and I have
hardly made any, so let's make a
little more Pamela. Sometimes I have to remind myself to use a bit more paint. Actually make a
pile of paint here. Definitely need more yellow, probably some more blue. Let's start with the yellow. Certainly on the videos here, I'm not spending a bunch
of time mixing my colors. I know that's not
what you're here for. By certainly am trying
to mix it as well as I can as quickly as I can
kind of get on with things. Well, that is a
seriously funky color. Let's see how it plays. Maybe a little bit more white. Surprisingly. That's what these exercises are for. This. Let's remind ourselves
why while we're here, we're trying to paint more
loose and more freely. And that means you've got to experiment and or
play for years. I heard from other art teachers in the beginning of
a painting you need to play, play, play. And it always annoyed me to a great extent
because it's like I'm, I'm a grown adult. Painting isn't a game for
me. I'm not a hobbyist. This is serious play. I just don't see the
point in it, right? Because kids are playing games
and no one's keeping score and it doesn't matter
if you win or lose even if you are keeping a
score because it's all a game. But I'm like this is
serious business, so I really resisted that idea. And then when I did try to play, I was so tense and concerned about results
and really wanting each thing I put down to be more beautiful than
the last and being really frustrated and freaked
out when it was ugly. Like this is ugly. I can see that it's ugly, but no longer is this attached my worth as an artist
or a person or creator. This is just me noodling around. And so I, I started to think of this idea because I
really started to push myself to just experiment. And I sort of calling
it exploring. Just explore. Because when I
think of explorers, so if we think about
explorers and history, these are people that
did great things. We take explorers seriously. Yeah, they're doing stuff
that nobody else has done before and most
people would never do. But they're finding
out new things. We know about them.
They're there in history. It's important. Just that one shift of thinking about this
as exploration. And not to say that I think
I'm important are gonna go down in history or
anything like that. But understanding that what
I'm doing is important. And changing that
definition from play to explore
allowed me to play. So now I can call
it play because I'm not threatened by
that idea anymore. I'm going to use this
embossing tool is one of the bigger ball and there just to kind of do what I'm doing right
now, kinda make a mess. So if the word play bothers you, like it did me try on the word explore or experiment
or exercise. If you start to feel tense with these exercises, there's
a few things to do. One, remind yourself
as an exercise and then do something
nutty, right? Do if you feel like
you're like, oh, I'm going back into that, into that thing that I do. And I'm going to end up with a thing that I
always end up with that. So I'm trying not to do
anymore than do something wacky and break it up. You see what I'm not
doing is I'm not brushing this paints into
the other paint. I'm just laying it on. I'm letting it be what it is and if it picks up
another color fine. But I'm not scrubbing it
in because I want to keep this separate colors
going on here. Okay. Now I've totally
just did that, whatever that is, I don't
even know yet what that is. But I can change it and
shifted even still. I'm gonna go back to the blue. If you're working
with more paint, like this is kind
of a small pile. But if you're working with
a little bit more paint than you can separate this, I'm going to try to do it here. This is almost too small, but I think we can make it work. So now I've got one pile of this sort of medium
color, right? So I'm going to
push part of this over here and make
a new pile here. And I'm going to add
some white to this one and make it much paler, but it's the same color. This is especially
helpful when you found that color that you love. And now you want to make
different colors with it in different shades of it. Rather, you do not need to
use a palette knife for this, you can certainly use a brush if that's what you're
more comfortable with. And this last year I've just, I've just picked up
a palette knife, which I never used before, and now I use it all the time in brushes seem really
foreign to me. So use what excites you. And if it doesn't, then
try something new. So if you know you're getting
the same marks all the time because you
always use this brush. Then maybe don't use the brush. Maybe come in and use a finger or an old credit card or a stick or two big brush. And I'm like I just
used the two big brush. I don't really want
to put straight color and that was not a good idea because I ran
out of colors to use. I don't have a pile
of a mixed up. And that's something
else you could do. You could mix up a bunch
of colors here as well. So let's go with a little
bit of the orange. I've already got some, a little
bit of blue on my knife. Makes us salmon,
salmon, pink color. Add some blue to this. May come right back to the
color I was making before. I'm not careful. A little bit of dark. I think I am going to
use a little bit of black because there's
a certain quality of color that I'm looking for. I feel like between the raw, umber dark and a
little bit of black, I will get to that particular unnameable color that I'm thinking of here. I think that's
pretty close to it. Sort of a gray brown brown
asphalt, something like that. Still not really
as dark as I want. I mean, these are all
pretty medium tones. And I'm getting really
close to being done here. I am having fun with this one because it is a
puzzle and I know that there's a lot
to accomplish. Coming back to it. Certainly do see it
as one whole sheet of paper now instead of
four little quadrants, just being careful how
you put this down. Like that idea of just a stripe. Okay. One last thing
before I sign off. I'm not showing you
how to paint like me. That's not what this
exercises are about. I'm just showing
you some options in a fresh way to look
at what you do. Your marks are completely
individual to you. Just as you can't
replicate mine, I could never replicate yours. And yours are just as
interesting and beautiful as you see others are making when
you treat them right? And when you're in
that right headspace of being kind to
yourself and allowing that inner artistic genius to come out and
play a little bit. Got a huge mess here. That's kind of
exciting actually. So we're going to let it
dry and we're going to come back for round two and see if we can start pulling
this into something. I need some time to look at it. Okay.
10. Taking Risks: We're back part two
for the exercise too. And I'm feeling like we want to get some of this
brighter orange in here. And that might be, it may be very close to
being done with this one. So let's mix up an orange. And I do want to
pick up a little bit of the colors that
we've been using. So I don't want a straight
orange in there because that would be not
harmonic at all. So maybe just a tone down
orange would be great. We shall see. So I hope that you're
starting to see as you work with this
limited palette, that what's happening
is that you're also, you are finding more
freedom because, because you have to come up
with creative solutions to make three colors work and
be interesting to you. So you are, you are being your four-year setting
up a situation where you have to work a little bit harder maybe than you
would if you were using all of your of
your available paints. But it also, I think helps keep you focused
because you don't have 50 or a 100 or 30 paint
bottles calling out your name. And I think that can get
overwhelming and confusing. A lot of the times, especially when
you're just doing what we're doing right here with just experimenting
and exploring. I think as you limit
some of the parameters, kind of liking that texture
that's coming through those thick brush marks. As you limit those parameters, you're kind of forced to be
a little more inventive. I hope too, that you're allowing
yourself to make messy, ugly images and things that you, that you may not
personally like very much. I think that also is
some real freedom in that to be able to practice painting and really
controlling that judgmental, overly critical part
of of your mind. And to just allow
yourself to paint something that you're
never going to show. You're never going
to frame you're never going to put for sale. You're never going
to put on your wall. You're never going to
show anybody else outside this group because they won't understand what
they're looking at. Because what you're
painting here is not really so much
about the painting, but it's more about the process. It's how the paint got on
there and what that felt like when you did it in a different way than
maybe you normally do. And that's the real
growth that will really begin to change your art and the way
you approach your art. And that all comes
from the inside. And the way you
access that is by doing little experimentation
or things like this. We are practicing art concepts
to make our art stronger. In this, I've got
thinner paints, I've got thicker paints. I've got some textured paints. I have flat paints. I've got a little bit of line in here probably will want
to do a little bit more. I'm really trying to vary my
shapes and my shapes sizes. And also I'm trying to pay
attention to contrast as well, which I could do a
whole another class on. Contrast is really
important if you do feel like even in these exercises where you're
just kinda like, I don't even know
what's going on and I think I hate it and
it's just looking really blah or even muddy
than I would encourage you to take a look at the contrast and not
so much the colors. So a really good exercise is
to go ahead and put this in, take a picture of this, of what you're working on
and then flip it over to black and white and
you'll instantly see. Where y, maybe your composition or your little quadrats aren't that exciting because once you flip it to black and
white, it's very gray. And what that means is that all your colors are
in the same range. Usually in the middle
is where we kinda naturally gravitate,
gravitate towards. And so it's a very, very gray and our brains see contrast and perceive
contrast before. And more and more. We're more aware of it even
then color and every color. Even a bright color, can be very dark on the, on the white to black spectrum. So we will be painting
and thinking, Oh yeah, I'm hitting these really
high bright notes because I'm using
yellow or orange. But in reality, oranges really a dark color and
yellows can also be a very, a very dark color. So that's when you need, if you're seeing that you're
getting a lot of that, a lot of medium tones than
work in some, some lights. And then work in knowing that acrylics are going
to dry darker. Work in some lights
that are way too light when you put them in because they will
definitely darken up. They even this little
bit of light that I'm putting in is not
really light enough. I already know that
just from really concentrating in my
recent work on on lights, it's been for me, it's been a pretty difficult
thing to get right. And I'll be working on a painting for
awhile and think, wow, there's so much light
and brightness and this, and really be proud of that. And then I'll look at it a month or so later
when I, you know, continuing to add
brights and lights to my painting and see how
dark my paintings still were. The ones I thought
that were super bright, quite dark still. I'm always learning. I think I'm just going to
put a few of these in. Actually standing on
my tiptoes trying to get a better vantage points, get a little more space. I want to make sure I'm not just repeating the same size
and the same shape. It's very common tendency
for most people, you just kinda go on automatic and you're sort of
feeling things out. And often we'll just sort of unconsciously
repeat ourselves. And so I want to
try to make sure I'm not falling into that. Now. I'm checking my oranges to make sure I
haven't done that, which I feel like
I might I might have done a little
bit over here. So let's see if I can
adjust something. I don't really want to
adjust it with this color. Go back to the orange. Just adjust that a bit more. And yeah, I think that's better. Now I think. Okay. I think I wanted to
do some linework and this time I'm going to use, I don't know, we'll try
this orange ink tents. And I'm just holding the end of the pencil and twisting
it in my fingers as I draw to kinda give it some real unintentional
marks and movement. I like the idea of looking at a painting and not really knowing
exactly how a mark was made. And then I think I'm gonna
go in with a charcoal gray. You see when the paint
is still really wet, you're really moving it. Moving it around. Once again, you see I'm not making
this mark everywhere, although I am
repeating this mark, I'm not repeating it everywhere. Keeping it loose and just You don't think like this
is like pepper here. I don't want to cover
my dish and pepper. I just want a little bit. Just to add to the
overall painting itself. I think I've reached
pretty much done here. I think. Because I keep
touching the pain. Another thing I like to do is
I like to paint over lines that I've put in and not
completely painted over, but just a little bit so that the lines are kind
of going in and out. This is another aspect
of using layers to add interest and
detail to your work. Okay? I feel, I'm feeling pretty good about this and I'm going to be wild and I'm going to take the tape off right
away rather than wait. So now we're gonna
do the big reveal and let's see how it turns out. Let's see if I have any better
luck with this tape today. I made a point with this tape. Whoops, that was not the
last piece of tape I put on with this tape to
stick it to my shorts and my apron first
before I put it down trying to
reduce the amount of TAC because I think although this is not
blue painters tape, it has the same level of TAC, which is kind of strong, but definitely having a
better result so far. I wonder too, if it's
because this paint is much the tape is much fresher. The other tape,
the tape I removed last time it had been
there for a few days, remember, because
I got interrupted. My painting schedule
with regular life stuff. That might have had
something to do with it too. So I'm going to have to remember to I think try to
get rid of some of the TAC first before
putting it down on the paper. But so far I got clean edges. We're not doing any pickup. These are very busy little guys. Which is easy. That's an easy thing
to happen too. But we can go back in
and make things quieter. Yeah, I really love the paints over the texture
from that big fat brush. I like that a lot. Because that's instant that isn't variety right there with thicker pink paint
and the thinner pink paint coming where they're orange paint is coming through. And then it has the pattern
underneath it which breaks up the shape itself.
It's really cool. So that's something to think
about when I go back to my regular paintings about maybe coming in
with some really, really thick paint and a big brush and just sort of lay that in and then work over that, get that same sort of
effect is quite nice. Lifting up some paper,
but only at the very end. I'm so glad I got
really feel luckier. This extra sticky tape. Okay, cool. Yeah, I'm going to
take a look at these. I really want this one to dry, or these to dry now that they're multiples and then come back in and I think makes some
changes maybe to this one. But yeah, it is so fascinating
to me, I must say, when it was all the one-piece, if you rewind and watch it
when it was the one-piece, wasn't that was okay. I wasn't really that inspired
are interested in it, but now that all
the tape is gone, I'm seeing these
little vignettes. And all of a sudden I
really like these colors. They're quite fascinating. So anyway, I hope you're getting
some good results to definitely let me know
how things are going in the comments and if there's anything I can
help clarify for you, please do let me know, but I will see you in
part three when we do some adjustments and maybe
not too many on this one. All right.
11. Review & Adjust: We're back and have had
some time to look at these. And while they are pretty busy, I don't know that I'm going to change a whole lot about them. So this is going to
be really quick. I think. I think I'm going to just make an even
paler color if I can. Definitely going to
need more white. Getting a little clogged up. A little bit of a pale, super, super pale non-color is what I'm calling a little bit of blue. It has a little
bit of this pinky, orangey color, which means it
has all three colors in it. And where do I want to put this? Yeah. No. Try a brush off of the brush I was looking for
are hiding in the water. Okay. Just going to use the knife just to
touch it up a bit. So I'm just doing things that I probably wouldn't do
in irregular painting. I'm literally just covering some stuff up and stuff
that I even liked. But I think it's really
good practice to learn how to paint over things. Even the things that you like. Especially in the case when this thing that you
really like that you've been protecting for the life
of the painting really doesn't best support
the actual painting. And my heart goes out to, if you've ever been
in that situation, because it is a little
bit difficult when you have that area that is been so special from
the very beginning. And as the painting
continues to grow, you keep protecting that
little, whatever special thing. And it doesn't grow
with the painting. And it just becomes
a bigger barrier to the completion of
successful completion of that painting all along. If you can see it, that is a huge moment of growth. So pat yourself on the
back if you can see it, then the next big
step is to change it. So these, I think this is why these exercises two can be so helpful
because they can, this is part of teaching that you're not so that everything you
do isn't so special that it can all just
be undone or changed, that you are
disconnected from it, not in an unhealthy way. You're detached. That's what that's the word I
was searching for. Your detached from the outcome. And that's what that's
where you're sick. That's where your freedom and more looseness is going
to come from when you're more detached
from the outcome. So whenever you put a super, super light over dark, you can try putting in some lines and see if you like that and
maybe you love it. And maybe it's not so great. Maybe like me, you've decided that a more quiet shape is really what we were
trying to do anyway, because these have a lot
of activity in them. I don't think I'm going to really fast with
these too much more. There's some really
lovely things going on and I hope that you
take some time to look at yours to see the lovely moments that happened while you
weren't controlling it. I wanted to say why
you weren't looking, but you're probably looking, but you weren't really
in control of all of it. And especially as we
build more layers, things tend to happen that
we didn't quite expect. And I think that makes for a more exciting
painting experience. And as you keep painting
and keep creating art, it will make your
heart stronger. Yeah, I'm feeling pretty
good about these just being done as exercises. So yeah, we're gonna move on and we're gonna
do more of these. I think I might use
some different colors that you've got some new
things to look at too, okay.
12. Light & Dark - New Palette: All right, We're back. This is our third and final
exercise for this series. And what I want you
to think about when you're doing these
exercises on your own. And you're not using
this one-page as a warm-up to move on to
your regular painting. What I encourage you to do
then is to tape up four or six of these pages and tear him out of the book
and then work on one, get it to where it's pretty much covered and all the paint is wet and then move to the next one. Instead of stopping and
starting like we're doing through these lessons
to show you how I do. You'd be working through them, all, all of them. Layer one and then take a break because that
will probably be about 30 to 45 minutes and
your brain will need a break. So go take a walk or
play with the dog, go get something to eat
and then come back. And when you do come
back 20 minutes later, everything will be dry. And then you can do another
pass or you can say, Hey, I painted a lot today and I don't need
to paint all day. And so I'm going to come
back to this tomorrow, cover up my palette, and get
on with the rest of my life. These are really good
practices and it's really the consistency
that is going to improve your art
faster than you. Really spending hours
and hours and hours working and slaving
over a painting. So just want to think about
bringing more ease into your practice so that you're spending a few minutes
a day painting. This past year,
I've been very busy with a lot of things
outside of my studio. And yet I have some of the
best work that I've ever done. And when I do paint, sometimes I only am painting for ten minutes and that's all
that happens that day. Because that's all that
needed to happen that day. And of course, there are
other times when I hit a flow and I'm working
for a few hours. But they're enjoyable hours. Their hours that like I said, I'm in a flow and they
work really well. So just think about
bringing mindfulness into your practice and be a
kinder manager to yourself, which is kind of what
we've been talking about really throughout all of these exercises is to just
be kinder to yourself, to be more open and accepting
of what is happening here, what is happening in your head. And to balance those things out. Being hard on yourself and being a mean manager type
person to yourself is not going to elicit
great art from you. So, but if you back off
a little bit and let your true inner artist come out, you will start to see
some real magic happens. So I encourage you to, if you're the type
that is going to spend 16 hours in the studio, working away and beating yourself up the whole
time and reworking, and reworking and reworking to maybe find a different
way to approach your art. Alright, let's get
to it. So I've got a new limited palette with
chromium green oxide, a Prussian blue, Indian yellow, a little bit of raw umber dark, and of course a lot of white. And I want to, in this one, I do want to have a little bit
of focus for me. What I've noticed in, in the other
exercises is the end. In my work in real life, it tends to get a
bit busy and there's a whole lot of little
tiny things going on. This exercise. I want to, I want to
think more about bringing openness and larger shapes and just making these
a bit more airy. And I have more space. So we'll see if I can do it. It's really a challenge. I tend to end up
with a whole lot of stuff in my paintings. And then I have to
spend quite a bit of time editing stuff out. So let's try and see, or let's observe and see what happens when I attempt
to kinda bring in some space and also keep that space
once I brought it in. So I'm just mixing up some
random color choices here, keeping them both
pretty pale for now. And that will help me to bring
in some contrast once I've got colors laid in and I want
to use this both scraper, this silicone bowl scraper
to really just put in some large shapes right away. And not really spend
a lot of time, you know, kinda
overthinking things. Got a little dry
bit of paint there. Let's try that here. They're here. I mean, there's some
freedom, right? I'm just throwing the
painting because I know I needed to get it in
that general area. That's pretty nice. And look, I can get this
done really quickly now with this enormous tool for
the size of real estate, I've got going on here. Silicone bowl
scraper is massive. Little bit of a warp there. Okay? I'm liking these edges so I don't want to mess
around with those too much. I'm not looking to pull
this all into one color. I want these to remain
as distinct as possible. Just scrape up the last bits. And I think I'll grab
some more whites. And the idea of having a second one to work
on sounds really good. So I think I'm going
to tear this one out and start a new one real quick. Just want to maybe
make these just a little bit less tiny and fussy. I think I'm gonna go
over this a little bit more with my scraper. Just see what happens when I move it in a
different direction. Paints drawing a little bit. Get some interesting textures. It's subtle, but yeah, okay, So now rip this guy
out, put him aside. Start a new one real quick. Okay, so I'm just going to
move forward with this one. I think I started out
light on that first one, so let's go a bit darker
now for this one, let's go with the
blue and the green. A little bit of white in there. And I think these colors
are pretty strong, so there'll be able
to handle that. Now. It's lovely, isn't it? Really gorgeous? Okay, then let's see. I'll go with some of this. Wow. That is a Wow green. I like that green a lot. Am going to use
more burnt umber. I am going to make
it a bit darker. Okay? Now, going to use, I'm going to try this spatula. This is for frosting a cake. So let's see if this works. As a giant palette knife. The longer your tool gets, the less control you have. So there is some,
what's the word? I'm looking for?
Some surprise and that really loved these two colors against each other and sort of blending
into each other. So I'm going to make another version of
that same color because I really love it. I am working quickly. I think playing even
just with the speed of how you work can
be very interesting, interesting effects
from that too. Because if you work quickly, you don't have a lot of
time to overthink stuff. You kinda gotta make
these decisions and move on with things that line
of green through there. Wow, that's gorgeous. I might need to start using that giant spatula more
often even though it's a bit frustrating to use because it's not doing exactly
what I wanted to do, but it looks like it can do some pretty incredible
things that I wouldn't be able to do by myself or
with by my own hand. That line through
the blue is who? Really nice. Okay, now, thinking about
my original intent, which is to make bigger shapes kind of an
area are more open feel. I don't want to go in with little tiny touches
here and there. I do want to work quickly. I think that maybe all I can do right now just because
things are quite wet and then I'm gonna have
to be always making a larger shape because I touched everything
that was there. And I really just want to see that line
for a little bit longer. I'm not going to
protect it, but I do want to just keep it
there for a second. So maybe I can remember
to do that again. Alright, chair this guy off. And then go back to this one that I think suddenly
is going to be a lot less interesting
and I'm so right. But that's okay. It's
the first layer. Now I can really add some
depth to this because this is quite the
yon of a start here. But now I know what's making me excited as mixing up some
of these colors here. Getting some much more bold,
vibrant colors, going, bring in a bit more blue. Okay, I think I'm gonna
go with this icing tool. Even though I don't
really love it, but I do like what happens?
Does that make sense? It feels I feel so far
away from the pain. You get used to working in much more close
contact with the, with the palette knives. But see, this is what
I'm talking about. Now. I'm experimenting. I'm doing something that isn't makes me a little uncomfortable. And I have to move
differently after move my whole body differently
to make this do things. And I'm combating the paper
that's warping just a bit. That's nice little
shape I got in there. Okay. So I think
I want more blue. Don't know that I'm
reaching a stage of like big shapes and quiet spots
here at all. But that's okay. Because it's something
that I can work towards as I continue to
work on this piece. Yeah, there's so
much more control with the regular palette knife. It's quite funny. Not that it's funny that the big
icing knife, I lose control. It's just funny
how I react to it. Like I've noticed
that now I've got frustrated with it
and I don't enjoy it. But I like to toy
with the idea of, does that mean I
shouldn't work with it? Or does it mean that I'm
just doing something new? And, you know, whenever we do something new it
makes us uncomfortable. That's normal response. So this one I am
slowing down or an I. It's quite nice to have to be careful that
green is very, very wet. I think we're going
to call this done on this first pass and get it
needs some time to dry. And I need a little bit
of time to look at it and think about what it
needs to get me there. And it may need a
lot of covering up. We may have too many things going on already. Okay. So I'm going to
trust the process. This looks terrible, right? But I'm going to trust
the process that this is all going to work out in the end and worst-case scenario. It doesn't it's paint on paper. If I if I really don't like it, I can crumble it up and throw
it away when we're done, I never have to
look at it again. So this is not that
big of a deal. So don't psych yourself up. This is paint on paper. Kids do this in kindergarten. This is no big deal. Alright, Happy painting. I'll come back for part two.
13. Back & Forth - Practicing Detachment: Welcome back. I'm going to start on
this darker 1 first. Not really sure what
I wanna do with it. So I'm just doodling here
with some paint on a stick. It's really all this is. See if I can get an idea of
kind of where I want to go. I know I want to bring
in some lighters. Some lighters. Now I want to bring in
some light colors again. This one, we got pretty dark, which is great because now I can build up some of that contrast. And I think I'm
going to experiment more with the yellow and, and try to stay away from
the greens on this one. And I don't want to,
I don't want it so sweet as we talked about before. So I'm going to throw
in a little bit of this dark amber just to
dirty it up a little bit. And I'm going to add
even more white. I'm going to remove
some of that over here. Let's split this up. I'm going to add even
more white to this pile. And I want to even
paler than that. I probably could
have separated this into two piles again, but since we're just working
on this small exercise, I'm not going to get too precise with these things
for the demo anyway. And just going to
flip it around. Sometimes I think that
helps to kinda get a fresh perspective
on what we're doing. And certainly on an
exercise like this where There's not too
much on the line. I mean that you can change
directions and it's not going to screw up your
series or anything like that or your
intentions for that piece. Suddenly get shifted. Because you've found a
new trail to follow. Just not necessarily
a bad thing, but sometimes you don't
want it to happen on a larger painting that
you're working on that you started out that had a a point to it that
you did want to follow. So you don't want to chase every shiny thing that comes up. And that's why
another reason why Think exercises like these are really good because you can
chase the shiny objects. I'm just, again, I'm really
just noodling around. And then remind myself to that often when I work on these, the things that I do that or my least favorite end up being some of my
favorite things. When we peel back the edges. And you know, that this
kind of cleaned up and it dries and I have some
time to look at it. And so I think I want to go in with some shapes. I am going to use
some blue for this. That's really pretty compression is a little bit wet. You can always tell when I'm thinking because
they get very quiet. I just want to put in
some different shapes, different marks. I mean, they're all
the similar shape, that's a circle, but I mean, different sizes
and not everywhere but generally
generously applied. I mean to say
generously applied. Okay. I think
that's pretty good. And so for now, I'm
going to set that aside some time to dry and come back to
it with a fresh eye. Okay. Then we've got this one. And I think it could use
some yellow as well. And let's start with a brush
this time, just for fun. Just for fun. Let's
just see what kind of marks I feel
like making today. This Naples yellow is a
very transparent color. So one of the reasons why I
like using the palette knife, because I can just put
that color down as thick as I need
it without having the brushstrokes are
the streaks rather from the brushstrokes kind of
reveal the color beneath that. It's also good to have differences as I've
talked about as well. So also doing what I
told you not to do, which is mixed color on
your palate with the brush. So lovely color. And again, I don't have
a whole huge plan here. I'm just noticing there's a
lot of white paper coming through that was there
from the first go round. So I do want that
to get covered up. Does tend to pop
out, be very strong. And want to try a little
bit of a different color. I really load up my
brush as much as I can. Now I'm getting that
really thick paint here. Just laying it down. A little bit more bluer and a little brighter,
a little paler. We're gonna go through
and draw on this. And this time I'm going to
draw on it with a color. I'm gonna go in here
with this pale blue. You see it's a much
different quality of line and scraping through. So you have options
when you do lines, you can, and you can
make different lines. You can do something
that's really swooping or you can
do something that's sort of jerky or you can
just do little lines, you know, here in there. Or you can come in and do
something quite grand. And lines are really interesting when you
start noticing them. And people's works
because you start seeing how different
lines can actually be. I mean, you think if I
take this and I do this, the line will look like that. But honestly, the lines people make or is
like handwriting. It is so different from person to person to person two artist to artist
is really fascinating. So consider that you also have different
kinds of handwriting. Therefore, you can also have
different kinds of lines, so don't get stuck
making one kind of line. I think that's about where we're going to stop for this round. And I will see you
for round three.
14. Bold Moves Reward: To part three of exercise three. And these are the two
pieces that I've got. I've got this one that is, wow, it is loud. And then we've got this one, which right now is my favorite. I am in love with these colors, but I do think I'm
missing some contrast. So I do want to spend a
little time with this, but since this one,
I like better. Let's start with the first one. Let's start with this first one and get loosened
up a little bit. And then typically what
happens is you will get a little bit tighter in the first one and then you get a little bit looser
in the second one, then you get a
little bit tired on say the third or the fourth one. You got to notice these when
you have that sweet spot. So I don't have a
lot to lose here. This one. So I am going to
go ahead and work on it. And I'm trying to
determine like, what is it that is. So in my face, I feel like I'm on this one. I feel like almost like
taking the paint off, the paint the tape off. And so I can kinda
see them in sections. But I think I'm going to resist the urge at least
for a little bit. And I think I want to
get kind of that medium, sort of blue in here. I think that's what
I'm going to try. And I just made a
really pretty green. I don't really want a green. Gets some more blue in here. I don't think I've
touched the green on this exercise, have I? Or maybe once touched it. But anyway, I think
this will work, although I would like it
to be a bit more blue. I've got a blob in there. Okay. I think that's better. I'm going to come
in, I think what the little palette knife. And let's see what happens. So what do we learn
in these exercises? We learned that we are more often rewarded
with bold moves, then we are punished
for bold moves. We've also learned that
punishment with an exercise like this is pretty light
because this is not a very high value painting. We didn't spend a lot
on the materials. It wouldn't be worth as
much as say, oil on canvas. And the marketplace
typically works on paper are gonna be less
expensive for sale. But this is merely an exercise in what we're
doing is we're learning to loosen up or learning to trust that little
voice that says, I don't know what if we
just tried this and then actually tried it rather than jumping in and go
no, no, no, no, no. We couldn't possibly do that
because I've loved I loved this mark more than any
other market ever made. And I can't touch it and
I can't cover it up. We forget sometimes I think that we are the ones who
actually created the mark. Yeah, we may not always know
exactly how it came to be, but we do know the process
that got us there. And I think once you trust
that you can do it again, that this is something
that is repeatable. It didn't happen by magic. Then you can start
taking more risks and making more incredible marks and experiences on
your in your art. Which is really what
we're trying to do here. And this is one method that
you can try to get you. There. And it does take some practice
to kinda talk yourself off the ledge of despair and harsh words and not really
valuing what you're doing. And also being able to not to hold it a little
loosely, right? So that you have room to make
something that's just crap. That it doesn't that doesn't affect your day
and it doesn't make you a drag of a person
to be hanging out with because it was just
some paint on paper. And it didn't define you
as an artist or a creator, or a person or anything, because it was just
an exploration. It was merely a play session. It was just an experiment. I feel like I made
this even busier. This is what happens when I
get to talking and painting. So, okay, I'm going
to stay focus now. And I'm going to try to bring some of these
shapes together if I can. I know I've got a tape
line right there, so I'm not going to worry
too much about that, but let's connect here. I think that might be good idea. Make some bigger,
lighter shapes. Yeah, I think that is acceptable for an
exercise on paper. Okay. So we're
gonna set this one aside just for a minute or two as we work on the other one. And then I think we'll reveal
these on this session. I don't know that I want to
do a whole lot to this one, but I think I do want to make sure I've got a
little bit of this yellow up in these up in that
upper part because it is, they're just right here in
the middle and they kinda, There's a little bit there, but there's almost nowhere else. So we need to rectify that. I think that will
bring this piece a little more balanced. Just a smidge. More whites. Got a very bright
yellow going on here. That's okay because
it's the same yellows. I don't have to worry about
it really fighting a push, a little bit of
that to the side. So I have a little pile of that. Maybe a little bit more. There we go. Then I'm going to add
more white to this pile. And more whites still. Okay? I'm going to use a brush again. Use this guy. What I'm not doing is I'm not
trying to balance it as far as make the same
sizes and shapes and the same amount
of yellow up top. I just want to just bring a
little bit of it up here. And I might make some
bigger shapes and lines. I think the, the yellow sorta. That's a bit to this. In a like it's getting
some really nice fat paint in here of one stray little cut that you
need a haircut rush. I feel like I wanna go back
in again with some more line. Now this is mostly dry, does have some few wet spots. I'm going to bring in. A white, fairly subtle. Just a little touch like that. Then that's a grey. Do I wanna do grey? Grey might be a bit harsh. I have an indigo, blue, a deep indigo. And I think I want an
almost white in here. Most of that yellow off pickup, just the TNC is smudge of
the burnt umber on here. Were some yellow
underneath that. White, I like that. Okay. Answer like painting
with the tool. Treating it more like a brush. Liking the edges that
I'm getting from that. I want to try to go crazy. I am very aware of the
time on these demos and I'm trying to keep it
under like 15 minutes. So typically I would spend more time on these and I
would would slow down, I think can really make
bigger shapes and a little bit more of a concerted effort. So I encourage you
to do that once you have a lot of pain down on
your third layer to slow down, be a little more considered. If you feel like you
have something now, if you don't feel like
you have something, then do another layer and
just keep going and get to that point where you
feel like you might have something and then
once you have something, then that's when you maybe
want to slow down and be just a little more focused
and a little more. What's the word I'm looking for? Intentional about the shapes that you're making and
how you're making them. Like I said, I want to I
don't want to bore you with a 30 or 30 or
an hour minute. Hour. 30 minutes or an hour long video of me just making
minor adjustments. But that is typically how it would go for me
if I weren't narrating. And we're going to call
this one done too. I feel like we're good here. I don't want to
keep working on it. Ilo, all it will. Hold on. I do want to also
add in some darks. I feel like this
is my darkest dark and that is a
pretty medium dark. I think. I may have to I may crack open the black to
really get it there. Let's see what I can
come up with here. I'm going to do a
little more blue and a little dot of black if
I can get it to come out. That was a lot more
than I wanted. But that's okay because I can definitely use
these colors elsewhere. I'm going to take
out a whole lot of that black because
I wasn't thinking. You can always add more. It's a little harder to take it out and you
can end up with giant pile of paint that
you never really wanted. Oh yes, that's nice. So I wanted to remind you again when you're
painting and you feel a little stuck and you kinda don't know where
things are going. Check your contrast first. Really look at it as are
your dark, sexually dark? Or are they just dark mediums? And a really great
way to do that is to, to see it very quickly,
is to put it in, take a shot of it on
your camera and switch it to black and white
mode on that photo. And you'll see very clearly that the colors
you thought were very bright and super clear. Maybe around, around all the other colors
that you've got on there, they kind of disappear
as far as contrast goes. No, they may show up
just because they're very highly pigmented
and that's okay. But that doesn't really
solve the contrast issue. And as I said, our brains
perceive contrast before, that, it perceives colors. If you want to grab
somebody's attention to say, hey, come over here. I've got some really
interesting visual story to tell you over here
with this painting. And then you really want to
have that contrast so that there is something for that, for the viewer's brain to
be interested in seeing. Then when they get closer, that's when you can hit
them with a subtlety. Fine marks and
details and all that. I wonder if this is good. And you know what, I'm not
going to worry about it because at this point, really, once I take off the tape,
I can do some some, you know, some adjustments
here and there. So let's go back
to the other one. Let's move this paint
dry least a little bit. Pencil here. Okay. Let's do the reveal or so difference, isn't it? It's so different. I wouldn't say it's
my favorite at all. But I don't hate it. I don't love it. I'll be very honest.
I didn't love it. I don't think it's
the most amazing the most amazing piece
that I've ever done. A little bit of tape
remnants there. This could probably
benefit from some darks. I'm not sure if that's the right palette
knife for these, but you see I'm not, I'm not
really attached to it. So I can easily just
paint over things that at that moment don't
really please me. And it can be just
as simple as that, that there's just something in there that just isn't
making you happy that there's a shape that
you don't like or a color that just gives
you bad memories. Or just is not
interesting to you. So don't be shy just because
it's there and you can see it doesn't mean
that all of a sudden is quite special and you have
to protect it at all costs. Especially if it's
something that isn't working or isn't working for you or it isn't working
for the painting. Don't hang on to that, especially in these exercises. This is a really good
time to practice. Being very brutal. And painting with ice in your veins to make those
decisions and just follow through paints a little bit wet so I can
leave that for now. Alright. So that one is, I think done, probably has
done is it will ever be. And if these were actual
paintings that I was working on, I don't know that I'd be
terribly excited about them. And I would definitely work on pushing contrast even more. I think, I think
I'll now bring in some even lighter lights and probably paint
over a lot of this. But that's not what this
exercise is completely about. I'm more excited about this one. This just feels better to me. Okay? Yes. I like these so much better. And I believe it's because
they have more sense of space and there's some
quietness to them. These are really
loud right there. Very chaotic and there's
just a lot going on. And I didn't really do, I think enough in that second round to really
quiet these things down. And I totally can go
back in and do that. But with this, like I said, because this is an exercise, I'm not really that
concerned about it. I'm just going to
move on and note the differences and why
I like this one better. And I do like this
one a lot better. And, um, yeah, and it's
because for me this, I find this a much
more enjoyable thing to look at are
things to look at. Because there is space. And it's not just everything in a big, chaotic visual jumble. I think these are much better.
15. Creating Our Final Project: Welcome back. I have cut out all of my
little quadrants into little rectangles and there are some different
sizes and stuff because remember
in the beginning I wasn't measuring stuff out and just don't know that
that's too important to me. And I stuck them under
some heavy books for it's been a couple
of days since I've been here for a couple of days just to straighten
them out a little bit. Which is something you can do or you can wait until after you're done with this part
because now we're going to put this all together. So first, what you may want to do is just kinda go through, because we're going
to make a little, a little accordion Philip style book of sorts to
keep these altogether. So they're not just
loose, laying around and getting in the way
and getting destroyed. So what you may wanna do
is kinda go through here and check them out and pull out any of the
ones that you know, are just they just don't
work or you just don't like. So I'm okay with all of
those and keep those. I do like this with the brush strokes as I in my regular work, I never do that without much
paint on a big fat brush. And this is a great
reminder for me to, hey, maybe do that again
because you like it. Yeah, I'm happy
with all of these. Some of these I love a
little bit more than others. Really like this
one quite a lot. Actually. I like that
one quite a lot. Yeah, not my favorite. But I liked the colors and
the color combination, so I'm going to keep that happy. Fine, fine. Fine. Okay. So none of them are
really just like that was just a big mistake and it just depresses
me to look at it. So I'm gonna go
ahead and keep them. So now what we're gonna
do is we're going to take some tape here, and we're going to just
take these guys together. So this is super simple
stuff. What we do. So now we can start. You want to leave a little
bit of room there so you can fold this over because ultimately
that's what we wanna do. You wanna leave a little
bit of a gap there. So that now you can easily fold this over and it will work. And it will work
both ways, right? Okay. That is, you can do it this way to give them a little bit of space and to see even my edges here aren't really
straight and it's fine. It's going to work. Because this in the end
is really more of it. This is not a
showpiece for public. This is a reference
tool for you. And it's a reference
tool for you in any way that makes sense. And that reference May
change as time goes on. You might look to these in the beginning as reminders of how you really do know
how to paint loose. And you could
probably even try to push it and go even looser. It may be a reference point that of different
color combinations, colors that you
don't typically use. But they remind
you that these are available and you
actually liked them. And maybe you want
to try that in an actual painting piece. It could be as you learn
more about creating art and learn more about composition and color and all
that kind of stuff. Variety than these might be really great reference
points to go back and kind of self critique. Maybe even, you know, rework some that don't really hit that mark now
that you can see it. Because as you learn art,
kind of an awkward phrase, but as you learn more about making art and
about making strong art, making art that is
a piece that is successful in multiple
ways, not just personal. Then you start to see more of where you
kinda miss the mark. And it's an, it's a
constant ongoing process. Which is really the secret
to making art, is that. Always a student. At some level. The more you can keep that part, that student mind
active and engaged, the more you will learn. The more you learn
and the more you do, the more you practice, the more gentle you are with yourself instead of being
a very hard task master, but actually being a compassionate and
understanding firm. Taskmaster, then
your work will be, we'll have room to grow. I think this is just
a great way to remind yourself of the different
possibilities, varieties, all the different things
that you do that you were able to do in these
pieces that you don't normally do and how you
ask yourself the question, well, how can I bring that, bring that into
my everyday work? How does this, how do I transition some of
these ideas and these things that I did here
into my actual painting. And that could be this, this book could serve
that purpose as well. I think we often
need reminders that we are capable of more. And I would also suggest that you do these
paper projects, these paper paintings on
a really regular basis. Maybe it's just one a month, maybe it's a one a week or more. Maybe it's every day you do. You work on one page
before you start your real painting just to get loose and just as a warm-up. And what and how cool
would it be if then you would take each month or each year or whatever and just
collect them and put them into these
books, right? And then you could just
write on the back the date. So you can kind of
like a visual diary. You will be impressed. I think if you're
painting consistently at how much your work
changes over a year. And the other thing that I would do too is to
write on the backs. I wouldn't worry about
doing it all of them, but on the back of this one, it would be helpful
to write what exact paints that
you used, right? So that if you walk away from this for a long time and you come
back and you're like, I don't know, I
have so many blues. Which Blue was it, right? You may have forgotten
that there was a chromium green
in there because you never use chromium green. And this way it's just documented and so
you can go, Oh yeah, I love that color
combination and now I don't have to worry
about recreating it. I already know what it is. I would also advise
that as well, but definitely I would
date it indefinitely. Put in the different
paints that you use to make those colors. Then each time you do this, you use a different
color combination. You put in a different parameter that hems UN to have to make different choices
than you normally would. Maybe it's this this page. I'm only going to work
with my non-dominant hand. I'm not gonna do anything
with my dominant hand. Or I'm only going to use
paint colors that I hate. Which is a little
negative on the outset, but it could actually make
you fall in love with colors that you just didn't
understand very well before because he
didn't really like them. And so you never
really use them. And so you never really
discovered their genius. The possibilities
are really endless, really have all the different
things you could do. Okay, so now we
have a little book, so I can write here the
date of when I did this. And now I've got this
whole accordion book. And what you could also
do is you could just take another row and just attach the whole thing so
that there would be an image like this. So you'd have that sort of a flip book back in
front would have. So it's really
just your choices. Like I said, this
is for reference. And if you didn't
press your pages or these little cards
before this now you can just put under
super heavyweight for few days and pull it out
and it'll be nice and flat. But you can just flip
through it just like this and look for inspiration. Different ideas. Remind yourself that yeah, there are some
moments of genius. How did you do that? And let's try that again. And all of the different
things that come up. So if you flip through
yours and you go, wow, I do the same thing over and over and over and over again. Then that's a great
opportunity to do this exercise again and
mix it up a bit, right? Break up what you're
doing over and over and over again that you're
doing something new. All right, we're done
with our project. I just want to wrap
up with you in our final video when I get
to see my face again array. And we could do our
final sign-off. I really hope you've
enjoyed this. I look forward to
speaking with you. Bye bye.
16. Conclusion & Bonus: So you've finished the course
and now you should have a super cool little
flip book like I do, full of inspiration. And hopefully it's a new
color combinations that you actually hadn't considered
working with before. Now I also did
promised a bonus at the end of this course,
I'm an art coach. Obviously, I love working with abstract artists and really
helping them through their processes so they can really start to
make the art that they love and enjoy the
process of making that art, even though it is hard. So what I'm offering is a free 45-minute
complimentary call with me, this is not a sales call. We're only going to be talking about the work that
you did in this course and addressing any questions
that you had around that. And then working
together to come up with some maybe next steps for you that would work well to continue to move
your art forward. Hopefully you'll join my
mailing list so you can hear about what I do and
what I'm offering. But this call is not for that. Anyway. It's really been
a pleasure. I have. I'm really looking forward to seeing the work that you create. And I'm even more looking
forward to actually getting to meet you and speak with
you and discuss your work. I hope you have a
great day. Bye bye.
 Pamela Roberson, Create Art You Love & Love to Create