Transcripts
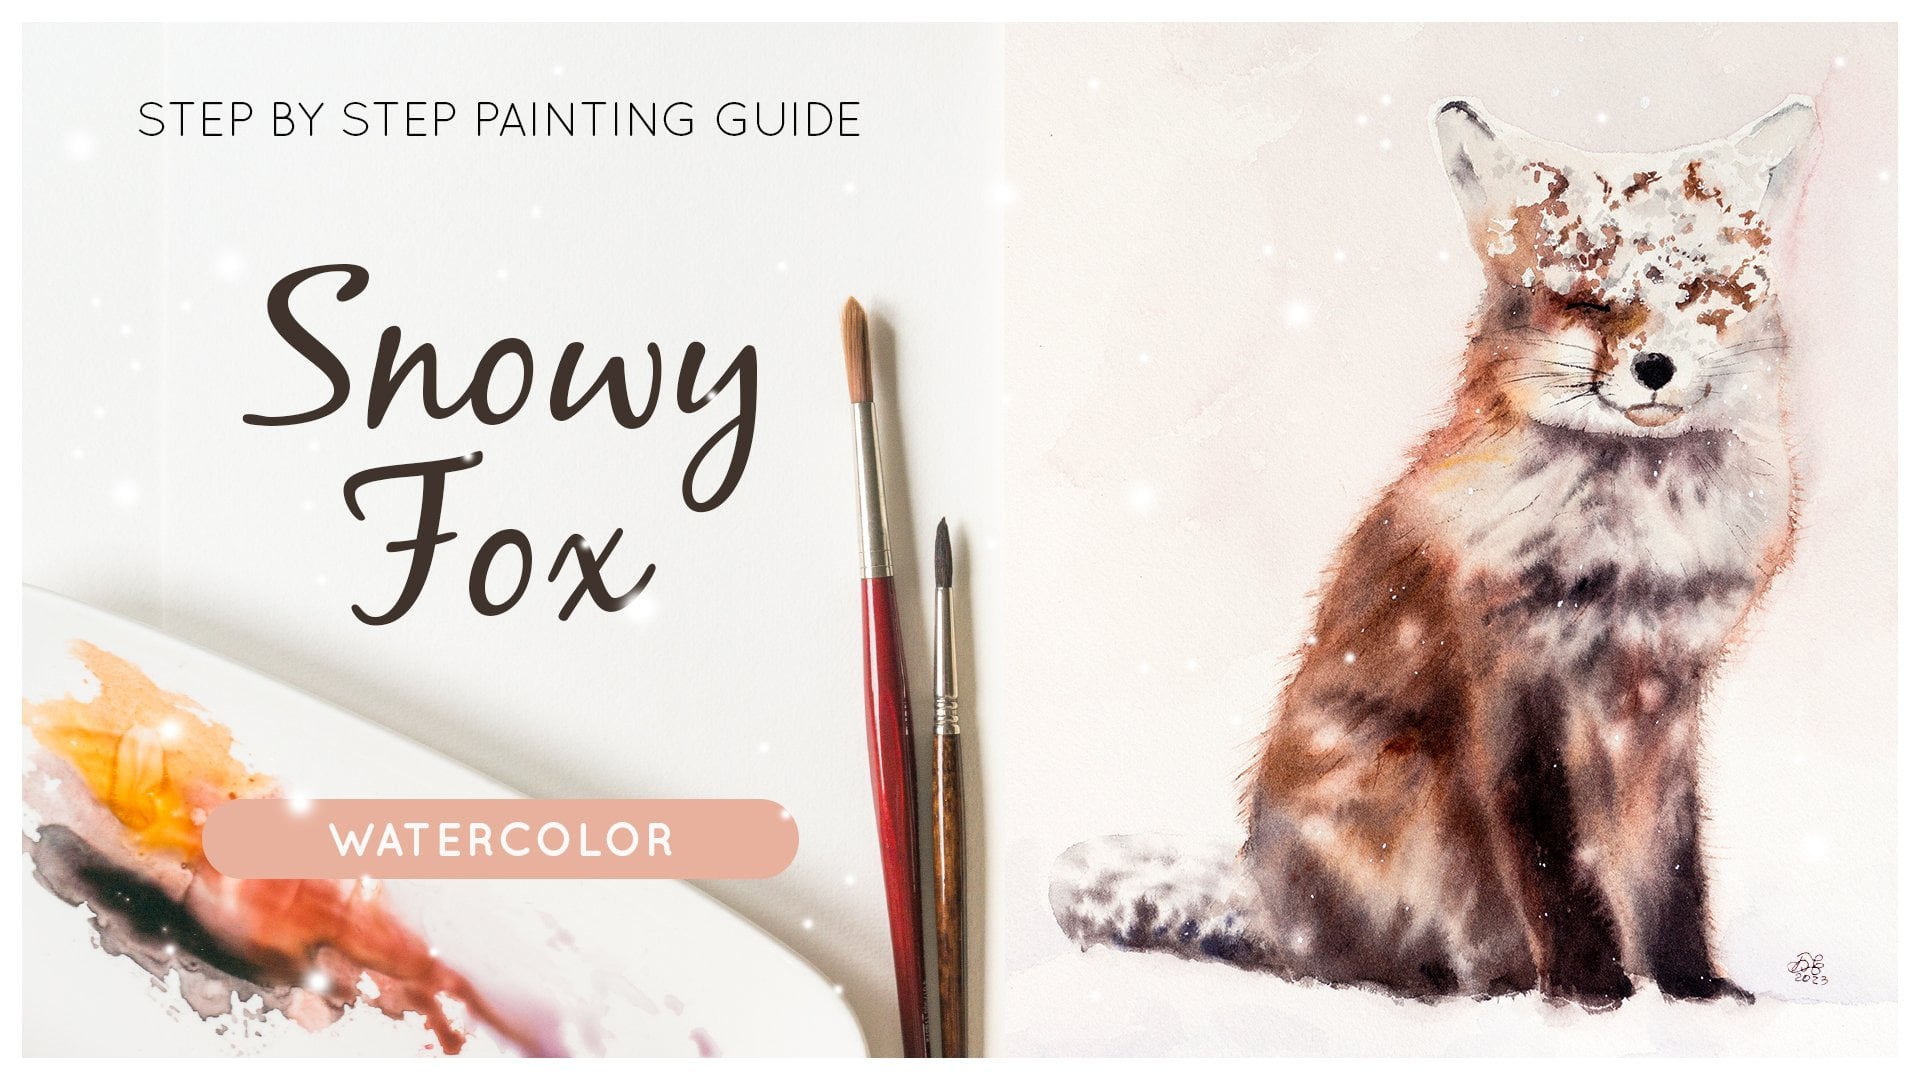
1. Introduction: Hello and welcome to my first special class on painting. Dramatic storm clouds. On what color are you fascinated by this guy and all the dramatic this place off clouds and colors. You can see there And do you wish you could capture them in the painting in a simple and easy white. If your answer to these questions is yes, then this is the right cost for you. My name is Cristina time. I'm a watercolor artist based in Argentina, and you can find me a bonfire art on Instagram and Facebook. In this class, I will take you through my process off painting dramatic storm clouds, and I will show you how you can achieve great results was just a few easy steps. Sky scapes, especially dramatic skies with lots of color and clouds, like during sunrise or sunset or before or after a storm, are some of my favorite subjects to paint. I take my inspiration on this topic, either from watching the sky. I'm taking tons of pictures myself whenever there's anything interesting to see and also from the Internet. For example, on Instagram, there's a lot of people posting amazing inspirational pictures on their feet or in their stories Justice. A little reminder. If you use pictures from other people, it's always a good idea to ask them for permission if you can use their pictures, and they also make sure to take the photographer whenever I post the painting based on their images. Royalty free images like, for example, announce pleasure also a great source, so there's no shortage of inspiration to look up. Whenever I'm in the mood for another dramatic sky painting, this class will be painting a sky full of approaching gray storm clouds to get into the basic process, and we will be using only to color. I will break down the process of just a few easy steps. So this class was absolutely beginner friendly and no previous experience is needed. You can directly paint along with me on by the end of this class, you will have your own dramatic sky painting. You will also have learned some of the key techniques for painting with watercolors, and you can apply them in your next projects as well. So let's have a quick look at the supplies you'll be needing for this class and then get right to paint it
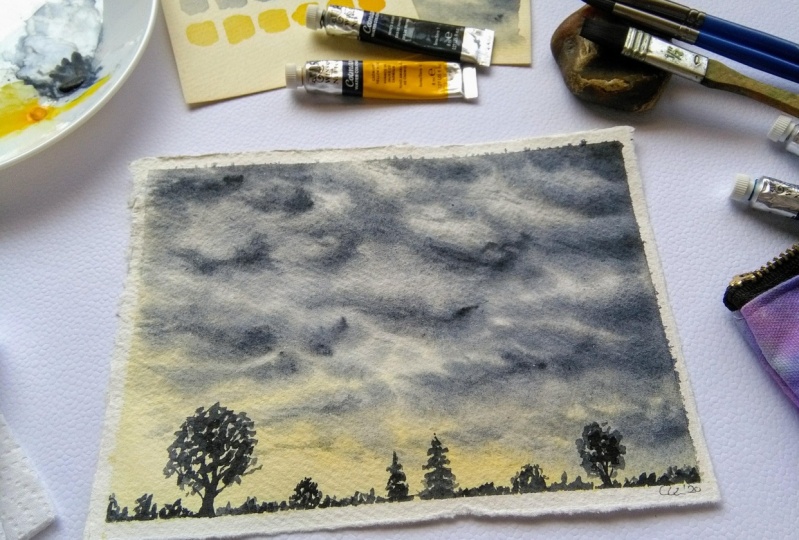
2. Supplies : Let's take a look at the supplies needed for this class. First, you need some watercolor paper. The painting requires the use of quite an amount of water and various layers off watercolor . So a cold pressed 300 G s, M, £140.100 percent cotton paper will work best. I will be using some off my car D papers for my painting I will use to brush is a flat brush number six and a round brush number seven. These are synthetic pressures from the Kraft. I'm a water addition, but you can use any medium size flat and round brush you have. And like for your painting, I also have another flat brush that's a bit bigger. This one. I will be using only toe what? My paper in the beginning. Next, you need some pains. I will be using only two colors in this class. A cadmium yellow you and the pain is gray. Both are Winsor and Newton Cartman water color, but you can off course use any similar colors off any brand you have. You also need a mixing training or some proposal in plate will do. Then two jars off water, one for cleaning the brush, and another one was clean water toe. Wet the paper and don't contaminate the colors when you switch from a darker through a lighter one, for example. Then I have some paper scraps left over from other paintings, which I will be using for my swatches, some masking tape. And lastly, it's always good to have some paper towels at hand to clean the brush and take away excess water. That's everything you need to paint some dramatic storm clouds, so let's get started.
3. Getting to Know the Colors: before start to paint a larger piece. I always like to try out the colors to see how the look on the paper, how they mix and blend, and the different shades I can create with them. So before we start on the class project and the stone felt itself, we will be doing some switches and some radiance to understand how our calls work before the swatches, I will pick up some ray and paint a long rectangle on my paper. You can see it starts very intense, and I should go on painting. It gets lighter. Then I clean my brush, and I do the same thing with the yellow that I picked for the painting here. You can also see that it's a very intense color at first. Unless I go on painting, it gets lighter. Next, I will do some radiance watches. These are especially useful for painting the storm council later because it gives a good understanding off the amount of time and the amount of water that is needed to create the different lighter and darker shades for the different layers Or some cats. Just like before I pick up some gray and paint a little square with very dark one. It's almost black. Then I pick up some water, mix it in and painting on the square, become some more water and then another square and so on until I get one, where it's almost all water and almost no payment like this. That might clean my brush again, and I do the same with a young, very intense first. And as I keep on mixing water in, it gets lighter. So what I want to achieve in my final piece is this. You re feeling over an approaching storm where you have one part of the sky delighted with sunlight, and the storm clouds come in from the other side. Dark, heavy, the yellow basically serves as a contrast to the gray. Because of that, I will be using definitely one of thes lighter shades off my yellow in the final piece. There's another thing I want to show you in the next video. That is a little overview on my process. When painting stop clouds
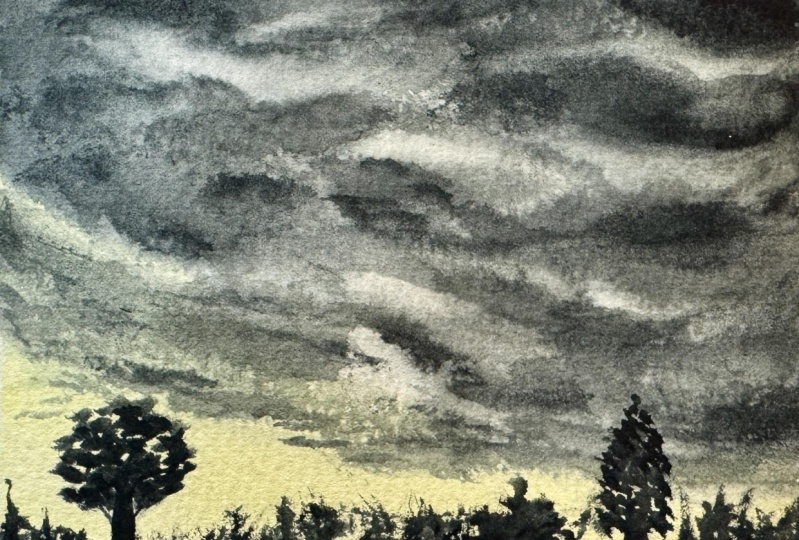
4. Painting a Practice Piece: in this with you. I will give you an over You off my painting process for strong cowards. I will switch to my flat brush for that because I discovered that I can achieve the fluffy Carlo. Better with fled Blur. Brush them with the world. Think of a new paper and the first thing I will be doing is what my paper on the technique we will be using for the storm clouds. It's called wet on wet technique, which means we bring what color to a wood surface. So the first layer off painting is just clear water that we bring on our paper fine and even sheen of water on a paper that allows the colors to blend on their own and to mix on the paper and flowed a bit, not too much. Float a bit and blend together. Efficacy like this just clear. Water is the first layer. No, I will pick up some yellow, very light, Asai said, Just to create a core interest toe the clouds and I will be covering the lower part of my paper if you go into dark just with the color out on the paper. So no, I'm starting with the gray and I bring on my paper. The first layer off lied gray picked a big much here in the upper part, so I just bring it down until it touches almost touch of the young apart. So that's our second layer after the water office layer of color. And now slowly I start to pick up darker shades of gray and I start to tap them a little bit. Dia dia Go Diarra, Mali On my paper, I make some darker, some lighter. It's too dark. I just spread it out. I will make the corner of the darker to go out from there. Also leave some lighter parts and between the darker ones so that it looks like there are various layers off where the various take players off storm clouds coming in and covering up the sky and then slowly building layer by. They opened things up. Some areas would be dark, huh? Some layers. Some areas leaf white or almost white. This is too dark in some water. This is definitely too dark. So it just spread it out a bit. Also going into the yellow, the yellow part and you can see the Connor spreads, flows a bit on the paper and creates fluffy cloud look almost on its own don't have to do much. So That's basically the technique that I use for painting. Storm counts. Now we have a little practice peace and I was watching us and you can move on to our final piece. I'm very excited, so let's jump right in.
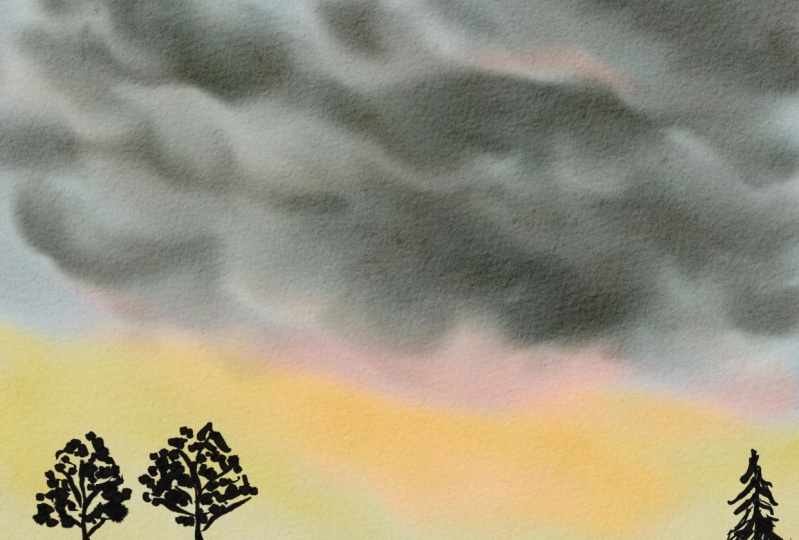
5. Painting the Storm Clouds: Okay, so let's start with a final class project. What I already did to prepare. Yes, I taped the paper I will be using to a simple cardboard with my masking tape. This is useful because we are using a lot of water in the tape and the cardboard will prevent the paper from buckling. And it also gives a nice clear edge in our painting once we have finished. So as we did in our practice peace. The first thing I will be doing this with the foot. The paper with clear water. Well, this I'm taking up my biggest brush and with clear water, I'm wedding white paper. If you can see this brush, maybe it's not the best choice for this task. It could easily be bigger than so. Wedding the paper would be would not take so long. So if you have a bigger marash, pick it up and he was it. Toe with your paper. Take care, but you with your paper evenly with a fine quote. Water. Take care to not get puddles. If you have too much water on your paper, the pain would just float around on the surface. And we're not get onto the paper properly, but you can also do if let your paper sit for a bit So the cotton fibers are able to absorb the liquid, and that would make that you would have better, better control or if you want to come. So if you have a few have puddles in some places, you can take the excess wood off with Brooklyn paper toll. So I think that's OK. We are ready to start painting, and for that I will be taking my flat brush. My middle sized flat brush. Yes, in the practice peace, beginning with a bit of yellow, just taking up some, you know, mixing it with water. As we said, I won't be using the pure color like this one, but and where they loaded you from this and off hours, which is, and I'm applying the first layer off color to my paper idea that I have in mind for this piece is to have one part of this guy stupid up with sunshine. This corner here and the storm will be coming in from this side, so we'll have dark clouds over here and a bit off sky and some light on the other side. In watercolor. It's always a good idea to start from the lightest color and then it until the darker ones because it's a transparent medium and you won't be able to cover up or lighten dark and pitches later. So always start with your lightest color and then begin to apply. The doctor wants. So I think this is said enough. You know I would, switching to my pains grail, also beginning with the light of shade, a lot of off water and very little pigment business the bit dark. So we're take up more water and make it lighter. In this first layer, I will cover up my entire paper with light. Use off my two colors to start getting in the pigment. - Don't think too much at this point. Just apply the color. Then we will see where this piece takes us. This is the magic of watercolor. You don't have 100% control over the colors and the magic of for this to let them do what they want to let loose and observe the magic that happens when your paper. So we have our first layer. The paper is still wet and I will be. I will begin true. Apply darker colors in some areas. If you observe storm clouds He was over the sky and the storm is coming. You will observe that the clothes are come sort of layers. So you have dark purchase. You have some lighter areas. You have again dark clouds and lighter ones and sore. And we will be trying to recreate this. No paper. As you can see, I'm working my way from this corner overthrew that want toe this one or to the side Applying Dr pitches off clouds get this effect off. Storm clouds that various layers and dark in the sky from the site where the sun is still shining From here second layer, let's say and we were good dark, take more more paint and darken the areas Go storm clouds can observe that I made this this corner very dark. So it has it nice contrast to this one, which is still very light when the stunning the sun is still shining over the landscape. You can also see how the color blends beautifully on this paper. It creates a fluffy cloud, look almost on its own. And I'm just applying my color sort off currently motion with my flood brush, and it's almost creating storm troops. Planets. This is the beauty off cotton paper. It drives very slowly so you can apply multiple layers off color on your still with paper if you work on and student great paper. Oh, let's say that is made of cellulose fibers, the papers trying much faster and you want, so you will either have to work much quicker than I do all. You will have to re wet the paper during the process to not get hard. It just and these clubs. Another thing I really like about this color combination. Well, this color Payne's gray, especially, is that it's when it dries. It can't this dark blue and I said it separates kind of separates in black and dark blue bluish pigment. So it's almost so. You're painting with too different colors at the same time, and it creates a beautiful effect for these storm clouds. So I think this is quite nice. This is looking quite nice. I really love how this is turning out. The paper is slowly drying and you can no lift a bit of color. Your lighter patches to at more co interest. Clean your brush David on your paper toll to dry it and make this kind of sweeping motions to take a bit off pigment off paper in some places when maybe you want to be a bit lighter so you can take pigment off. No, I think this is almost I just apply a bit more concentrated color in some areas, especially this corner and some other areas that already dark. And you can see that the paper now starting to dry so the color. It's not spreading us much as it did in the beginning, so you can control it better and create the sliver details in the different layers off. Seriously, I love this process. It's almost like a meditation. It's so beautiful toe. Just look what it's happening on your paper, what you have just doing where it's going. Let lose, enjoy this process because it's really a beautiful feeling, so you'll finish. Sure, this I will go in with my almost dry brush and soft on the edges a bit. Take a pitch pigment round in this area, so created fluffy clouds coming in. This this my favorite thing about the flood brush. I find it very easy to create these fluffy little clouds over here. Coming in and darkening this guy. Or in these pitches that are lighter. I'm also able to tap in so more fluffy clouds, huh? I'm talking really slowly because I'm concentrating members or just not really concentrating. Just observing and watching the magic off water. Carlos. So I think this is OK. I really loved this. Scurry choruses turning out. We will be letting this dry and come back later to paint our foreground.
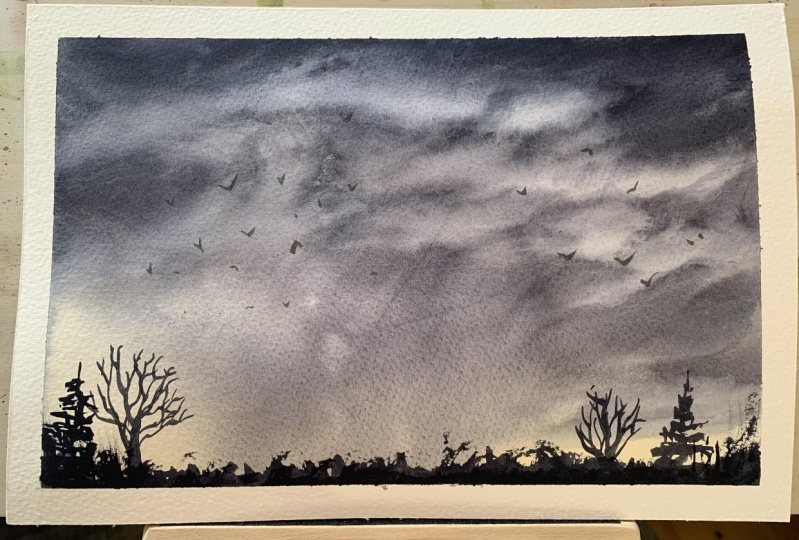
6. Painting the Foreground: So now that our cloud layer has completely dried, we are ready to paint the foreground for this piece. There are various options to do this. You could paint, for example, some mountains in this part and also city skyline. A nice option, always keeping in mind that the main focus of our peace in this case are in the store. Trump's. I will keep it really simple for this piece. I will just paying some trees and bushes or silhouettes off trees and bushes in the foreground. For this purpose. I will take round brush number seven, and I will use the same color that we used quarter clouds. Payne's gray in a very dark concentration, so it will look almost. I will, beginning with being a tree in this place, ending up a tree. It's just the the tree trunk. So, um, some branches bigger, some smaller them just some random darts for the for believes. Tired of this. That's what people also keep in mind will not to cover up the entire light area we left here. I keep you know, some random thoughts and shapes for some bushes. Another tree over here, just kind off country shape another one next to it. Get smaller. Just keep adding, so shapes some of the trawler. Some only just picking over the edge off my paper. Another tree here. Not a big one. This side. Keep it Keep some kind of balance. Can see in this case colors almost black. It's very dark and use it very concentrated for this president. You will also notice when the drives that's one. It's getting wiser. This is one of the qualities of water. Carla, this is something to keep in mind I'm working with. If you think some of your civil, it's I know Dr Enough. You can adjust it. Have a layoff. Yeah, I'm really happy with us. I hope you haven't George my lesson. Join me in the last video. And I am also looking for what? To see your creations in the project gallery. So if you paid it with me anything at all for your swatches, your practice peace, your final peace. Be sure to may Toh uploaded the project. I'm really looking forward to your creations
7. Final Thoughts: So now that our peace has completely dried what ISS left to do this peeling the tape, commonly known also as p reported. So we will do that. It should be easy to take this tape away because the paper iss cotton paper, it generally peels very easily if you have difficulties, what you can do is take a hair dryer and apply some heat to your tape so the glue well will become hot and it will be easy at appear. Another thing that I do when I have some little place where it doesn't want to pee you or some off there paper comes. Oh, what I do in this place is yes, I did my finger the tip of my finger in some water and smooth this area don't so that the paper and becomes whole again. You have to be careful with this method because if you touch a the painted area, you will leave stains there. So this is not what we want. So take care to only apply this method in the areas where the paper has no paint. So and that's it. Here's our final painting. Storm clouds over landscape and never think that It's very nice when you once you finish a painting, so sign it, you can do it with the tip off your brush. I'm not very good at this. So I generally take some Marco some pen and sign my painting like this. So that's it. I hope you like you the outcome off your painting. If you are not quite satisfied with the with the piece you made, just take another paper to try it again and just let go. Watch the magic that happens on your paper and have fun. So I hope you enjoyed my first culture class. I enjoyed teaching this class very much and I am excited to see all your creations. So if you have painted along with me if you made swatches of practice peace and you find a project, please be sure to post them in the project section. I am Well, I'm very excited to see all all these All these paintings. If you have any questions, you can always ask me in the discussion section or sent me a private message on instagram. Please don't hesitate to contact me directly. I'm always happy to help and answer your questions. Also, I would be very happy if you left a review on my class so more people can see them. And if you have any suggestions, what could be better next time or something? You would like Toa learn from me. Don't hesitate to ask either if you enjoy my class, please also make sure you follow me so you will get a notification when I post a new class or a new discussion, or when there's anything you for me. I hope you enjoyed my claws and I hope when you are gentle, shoot.
 Christina Keim, Discover Art as Self-Care Practice!!