Transcripts
1. Paint a Mimosa: Is this Class for You?: I'm Elisabetta Italian
watercolor artist and welcoming you
to my new class. In this class, we will
learn how to paint a very beginner
friendly mimosa flower. I always found flowers very daunting until I
understood that you can simplify the process using some unusual tools and breaking down the process
in small baby steps. I will take you through
the process step by step. And even if you find
flowers daunting, you will paint beautiful
mimosa flowers with no difficulty. Just follow me step by step, and you will learn plenty of interesting
watercolor techniques. This class, you will learn many useful
watercolor techniques such as wetting wet background. You will learn how to
desaturate greens so that you make them more
natural, more organic. You can add interest
with color variation. We'll see how, you will
learn how to paint glass. You will learn how to use unusual tools that are around home to easily
paint flowers, to make the process easier. I will teach you how to paint easy leaves and
you will learn it, how to choose light source
and add consistent shadows. And the most important thing is that you will
learn how to add depth to your watercolor
through layering, many layers. For this class, you will use some very simple basic supplies, and I will also take you
through piece supplies. So, what are you waiting for? Grab your supplies and
join me in the class. And
2. Your Project & Supplies Needed: Your project will be to paint a memos of flowers in
watercolor or maybe you can paint a different
flower like lilac or Hydrangs using the
same technique that I will show
you in the class. It's important to
applaud the project in the project gallery
so that I can give you a
personalized feedback. I will now show
you the supplies. Now I will show you
the supplies for your project and
they're quite basic, I always try to ask you
to use supplies that are easy to find or that probably you
already have at home. The first and most
important piece of supply is watercolor paper. It's very important that
you use watercolor paper. I must say watercolor and
the weight must be 300 GSM. This one is 100% cotton. For this project, as we are
going to use a lot of water, it's very good idea
to have cotton paper, but if you don't
have cotton paper, you can still follow the
class won't be important. But if you have access
to cotton paper, try with cotton paper
and it will be easier. But the very important
thing is that you make sure that you're
using watercolor paper. Then we need for the
sketch, pf pencil, I like to use HB because it's a feasible but soft
and easily erasable, and a needed eraser to
soften pencil lines. Then, of course, you will need the watercolor and I'm using a very basic watercolor
set that I use for most of my classes with some
very basic colors that I will explain you later. But you don't have
to have exactly the colors that I'm suggesting. Really feel free to use
the colors that you have. If you have student
grade colors, it's okay. If you have artist
grade, it's even better. But really, you can use any watercolor that
you have at home. Then of course,
you need brushes. I use this flat brush
to add water to paper. This is a brush
that I only use for water so that it
is always clean. A large flat brush, but you can use also mop brush like this
really use what you have. Then I have used but round
brushes of different sizes. Also they must adapt to
the size of the paper. Here, I'm using 18 by
24 centimeters paper, but use what you have. You can use larger paper or
smaller paper if you like. But remember that
you need to adapt the size of the brush to
the size of the paper. I'm using a medium brush, a very large brush, and a finer brush, not a liner, just a smaller brush
that I use with a light hand when I need
to draw thin lines. Then you will need tips, Q tips you will use this
tip as a stamp for petals. And a white gelpan because the white gelpan
is useful to highlights. If you don't have
a white gelpan, you can use white wash. Then you will use some kitchen
paper to dry your brush. If you have a spray bottle
where you filled with water, you can use it to revive your watercolor pants
before you use them. Then of course, you need two
jars of water like this, one for clean water and one
to rinse dirty brushes. Keep them separate, so you will always have a stock
of clean water. Cool will be using
in this class, very basic colors
that are usually found in any watercolor set. You don't have to use exactly
the colors I am using, but you can take
equivalent colors or colors that maybe
you like better. I'm using three yellows, a cool light one
like a lemon yellow, a medium yellow, like
a cadmium yellow. Or a hansa yellow
medium, and a woman, dark yellow, orange yellow like Indian yellow or Nugaboch. Then ultramarine
blue, burn sienna and the cool green like silo
green or emerald or viridian. And also optional,
but very useful, you can use a hair dryer
or a heating tool like this to speed up the drying
process between layers. Now, as you see the
supplies are very easy. Let's start with the project. I can't wait to see yours.
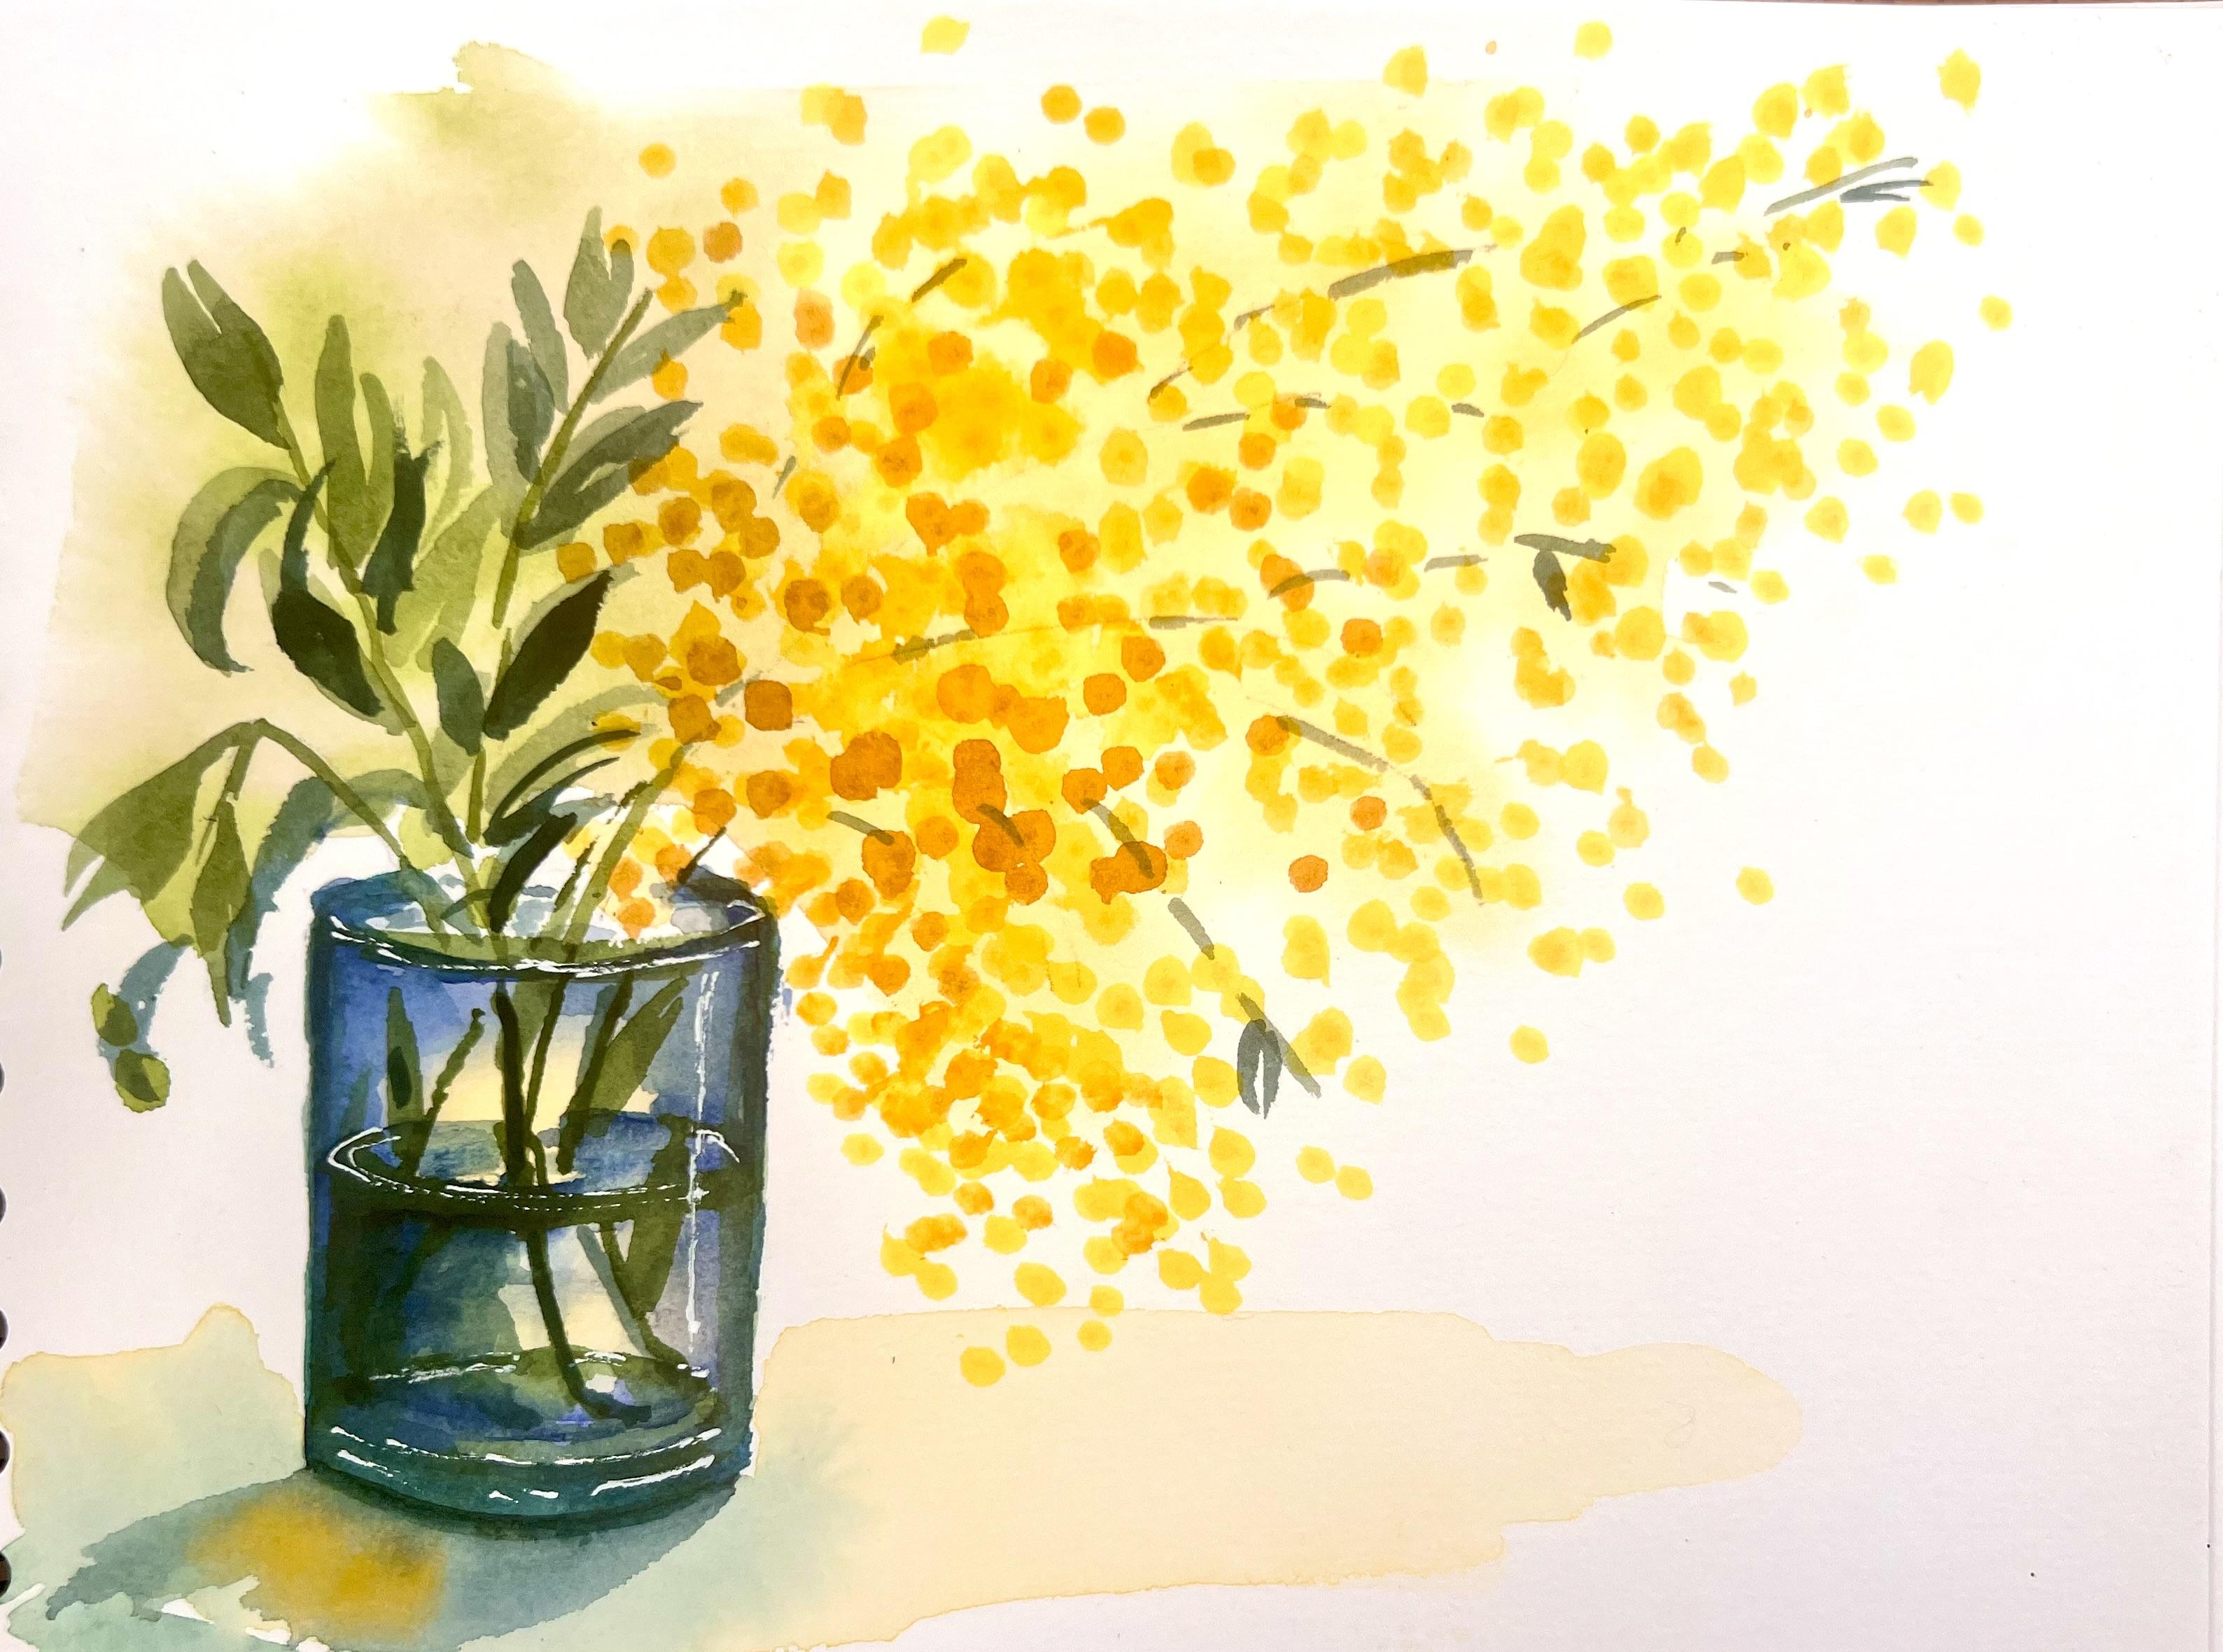
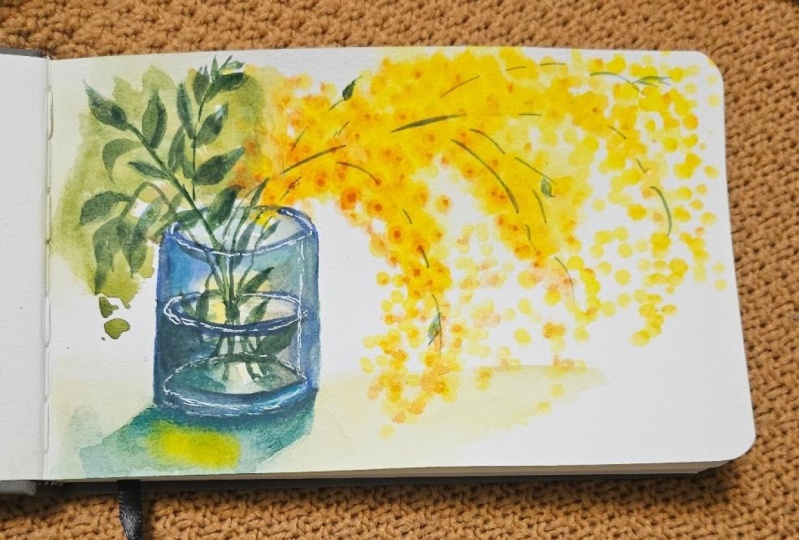
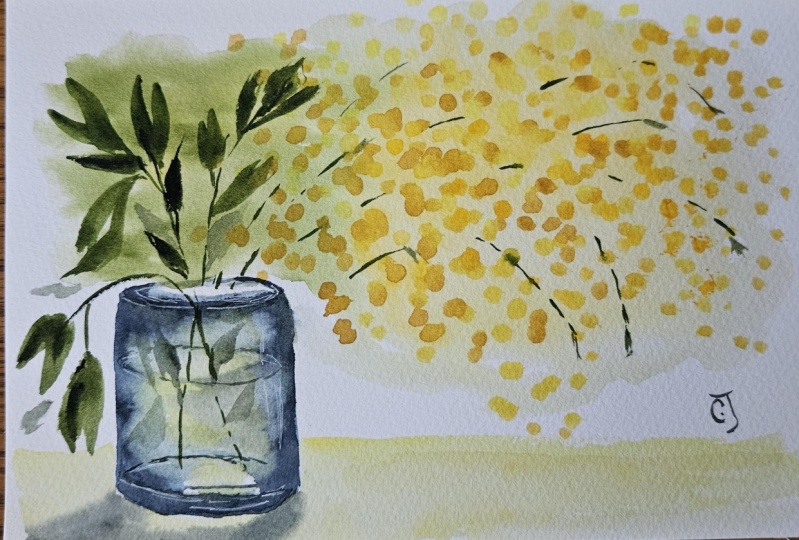
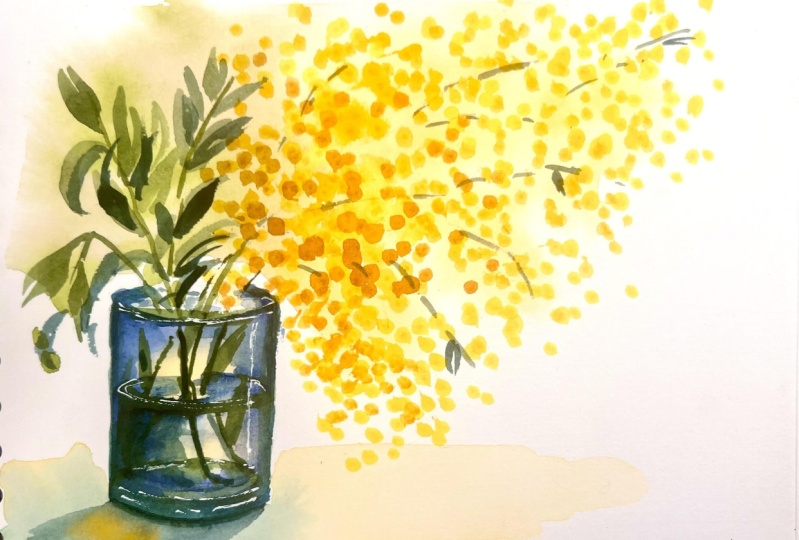
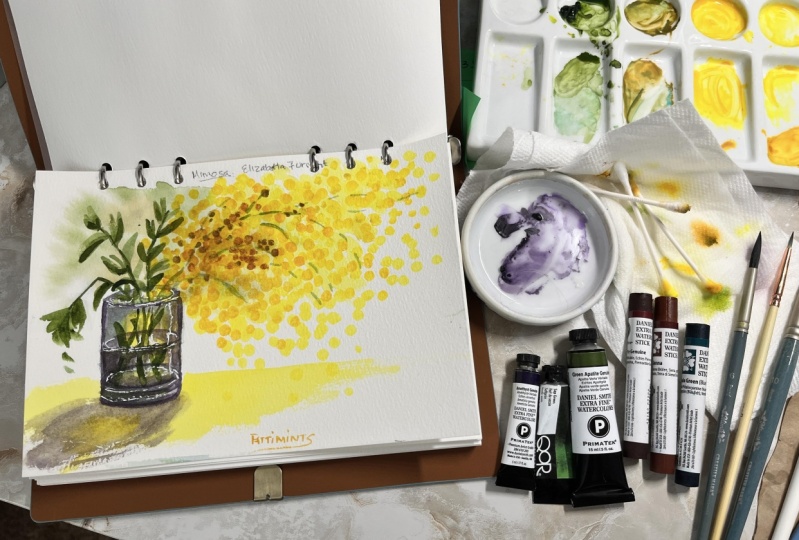
3. Pencil Sketch & Background: To Let's start with a very easy pencil sketch. I will place a vase here for a vase
basically a glass vase. I place a rectangle
with a curved bottom, same curve on top and
on bottom like this. Then I will draw some lines for leaves and some
lines for the flowers. The mimosa has these clusters
of flowers like this. That's it here Ova. Then I suggest that you
lighten up these lines, especially for the glass. We needed eraser. You can re for some lines
if you think you need them, correct one because here, I have drawn several
sketchy lines, but I need only one
here, and here. That's it. For this sketch, this
is okay and then we will start painting and the first thing
that I need to do, I take a large flat brush that I only use for water so
that it is always clean. And I will put down some water here where
you see the leaves, some water, and here around the flowers
like this, like so. Then while this
sits for a moment, I take a large round
brush like this one, and I will put some green for the background here
for the green, I take some sap green,
if you have it. So sub green, and I will tone it down with a touch of a little in crimson like so I will drop
some color here and there. It's background greenery
along these lines. You can vary the
ratio of red and green so that you can also drop some pure sap
green like so. Now you drop some
yellow background, and it takes some
cadmium yellow, any primary yellow that
you have a medium yellow, some lemonyellow, and you drop here and there
along these lines, some lemoyellow and
some cadmium yellow. Like this, like so. You can use both, alternate the two so that there
is some lovely variation. Then we'll also add some more pure sap green
here in the background. Now we can start filling the glass and we'll
let this dry. While this dry, we can
start filling the glass.
4. Glass Vase First Layer: Okay. For the glass, I take a slightly smaller brush. I will mix some
ultramarine blue. All of you have some ultramarine
blue with a touch of Bnciena so that you create a gray here also, it's a good idea to wet completely the glass without touching these
colors, of course. And I will draw
the outer margins. You can also drop some
blue here and there, and some bunsena
leave some white. Here you can go slightly down and leave some white
here like this, like so, and here too. Now you can introduce some
yellow here as a reflection. Let's play with colors. Reinforce the outer edges here a line just
suggests the back of the a glass vase and
we let everything dry. Here, it's too wet so I take a dry brush and I will collect
some of the excess water. It's called this technique is called thirsty brush
because it's dry, we dry the brush, and we collect some
of the excess water. And we let everything dry, go and grab some coffee.
5. Flowers First Layer: Now, to speed up the
process, of course, you can use a heating
tool or a hair dryer. And now we take a tip,
our secret weapon, and we mix some yellow here, cadmium yellow or any
primary yellow with our tip, we stamp dots along this line, you can go directly
into the color. Just put some distance
between them so that you can distinguish the dots. Downwards some of them, upwards is no good. Now you can take some of
the lighter lemon yellow. Just wet. Spray the
paint so that it will revive it, you revive it, and you go where
you see some space between the darker dots. Lighter dots will go towards the right top because that's
where our light source is. Oh Now we can take some Indian yellow, which is a warm, darker yellow. If you don't have it,
you can mix a touch of red or a touch of
orange in this yellow. But I have Indian yellow, so I just take it
and it's a darker, warmer, orange yellow,
and I will just dump it. This is the first layer. Okay.
6. Add Leaves and Water in the Vase: Then we take a very
thin brush and we mix some sub green with some of our ultramarine blue
so that we obtain a dark blue with a very fine brush with
the tip of a brusher, we with a very light hand
can draw the sts of the les And you can also go down. But before that,
with ultra in blue, we imagine a line
of the water here. And back. And we slightly darken this part
on the sides, especially. Darker here. And on the bottom. Define better with the
ultramarine lowly edges. You can add some salogrem Can be greens. Okay. So green. I add some cado green
to the ultramarine so that I get sort of turquoise. Soften the edges with some clear water so
they're not too harsh. Blended. So you
didn't have any hard? Okay. So green here and there. Keep layering,
refining and blending. Now lift some color
from here from here. You just go with a dry brush. Okay. Now let's try the glass and we continue
with the leaves. For the leave, you can
continue with this thin brush. You take the sap green,
you add some blue, you have a cold cooler
green, or here I forgot. For the leaves, you
just press and let go. Press and let go so that there
is a line in the middle. Same here. Press and let go. And on the other side like this, you just press and let go. Press and let go. You can do also one
brush stroke on me. I show you how like this. Two brush strokes. Maybe you can vary the
color as some blue. Overlap the now you can go between the
you see some space. You can throw some
green lines like so. Where you had your
pants and lines, but where you see
some space just look. Imagine some green stamps. Okay. We we find this. I know we let everything dry. Okay.
7. Continue Layering Flowers and Vase: Now that everything is dry, I will go back with some
very dark green sub green with ultramarine blue, and I will draw the stems
that lie in the water. Here I have rely that I have glass here, it goes here. It breaks it changes the angle
where it meets the water. You can also draw some
leaves in the glass. Now let's add color
variation here and let's start in this Okay. Now I will add more flowers, darker mimosa flowers
with our cu tips. I take my cutip,
dip it in water. I take my orange, and I will also dip it in Bncena add the darker
dots away from shadow, which is the bottom left corner. No. Now I will go back to
my very light lemon yellow. And add on top
because it's opaque. Here and there, we add these lemon yellow
dots towards light, which is top and
right hand side. Like so. Now we let this dry and we paint the
shadow of the glass, and then we add the highlights.
8. Highlights and more Darks: Now, we go back to our
larger round brush. We take the yellow, and we dilute it very, very much and we will just
paint a surface. Yeah. Were the glass is placed. I saw. Then I take some so green, bicular green mix
with the train blue, the color of the glass. Starting from this corner
and from this corner, I draw like this. Okay. That's our handle to start with and then we
reinforce it when it's dry. Now that the glass is dry, I can take my white gelpen and I can draw some highlights
on the glass here, the rim, the water. I saw also here, the sick bottom of the glass. Also the black. And I can draw a line here. Like so. Then we take some darker green because I prefer to have some more color
variation here. It's sap green with a lot
of ultramarine bloom, that will just darken some of the leaves just to
have some variation or add some dark
leaves that overlaps. Also here I have some green on this side. Because coloration is so
important in watercolor. A couple of leaves
here and there. A between the flowers. Okay. Now, we only have to darken the shadow on the left hand side of the glass, and we finish.
9. Last Touches: Now, as a very last touch, really, very last starch, I will dip my cutibs in the very light lemonello
and add some flowers, and you add some dotzer towards the bottom
in a random manner. Here and there. Okay. This is so nice. I need some dark here so I
take the Indian yellow now. Maybe you can always refine. You need to know when to
stop here in the back. See? Impression of the glass. Yeah. I really like this. We can. You know what? We can also put some highlights here in the
thickness of the glass. Okay. Now it's really
finished. Thanks a lot. I think it was easy, but you didn't think it was so easy to paint me
more the flowers, right? It can be very easy if
you use the right tools.
10. Add Shadow: M now to make sure it's dry, we touch with the back of
our fingers because if we touch it with the fingerprints,
we can leave a mark. But this is perfect. You take this very dark green with lots
of ultramarine blue and you just make a sick dark line below
the glass like this. Just pure ultramarine blue. Then with clean water, you just Just pull it in the direction
of light like this. And here, you can drop some. Perfect. And that's it. Now, when
it dries, it's finished. I wear mimosa.
11. Wrap Up: Congratulations for
completing your project. I hope you will upload it in the project gallery so that I can give you a
personalized feedback. It's very important for me
also that you leave a review so that other students
can discover this class. I hope that you found every
step easy and that you will keep these new techniques that you have learned
for a lifetime. Thanks a lot. And I
see you my next class. Cha cha.
 Elisabetta Furcht, Anyone can paint!