Transcripts
1. Introduction to the Class: Hi, I'm Elisabetta Furcht
Italian watercolor artist, and welcome to my new class. In this class, we sketch a famous portrait by his
sujant an American, a painter. But we will do it
in our own style. We take you through this process step by
step in my style. But of course, the
idea is that you at to sketch this famous portrait
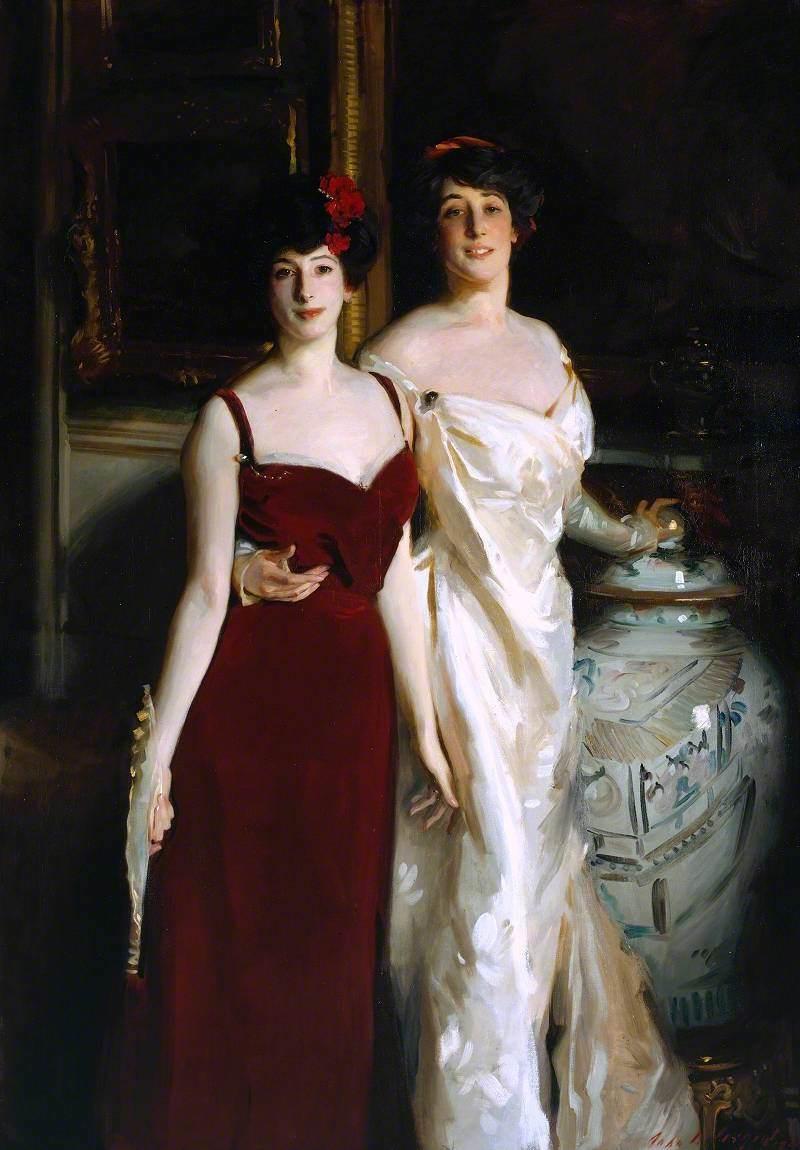
in your own style. This is the final
objective of this class. This is the portrait. As you see, I have
really changed the original because
the original is a very large painting, an oil painting, and
I have sketched it in a small notebook in a small
sketchbook in watercolor. In this class, you will
learn some important skills. You will learn how to simplify a famous painting in order to reproduce it
in your own style. It is very important that
you copy from masters because they already simplify
the reality for you. So you start from
an image that is already idea to be reproduced and you will
further simplify it. You will work on using other basic watercolor skills like wetting wet, dry on wet, drawing, freehand
drawing, you will reproduce some human figures of freehand without complicated
calculation of schemes, just using your common sense. And I will explain you how it's very important that you
develop your voice in art, and copying from
master or sketching being inspired by master
is a perfect way to do so. It's an exercise that I like
to do often because every time I sketch from a
masterpieces, I learn something. So what are you waiting for? It's a fun class. It's for advanced beginner or
intermediate students. Let's say that you need to have already some basic
knowledge of watercolor, but it's really for everyone.
What are you waiting for? Grab your supplies and
come sketch with me. You're going to be
surprised by the result.
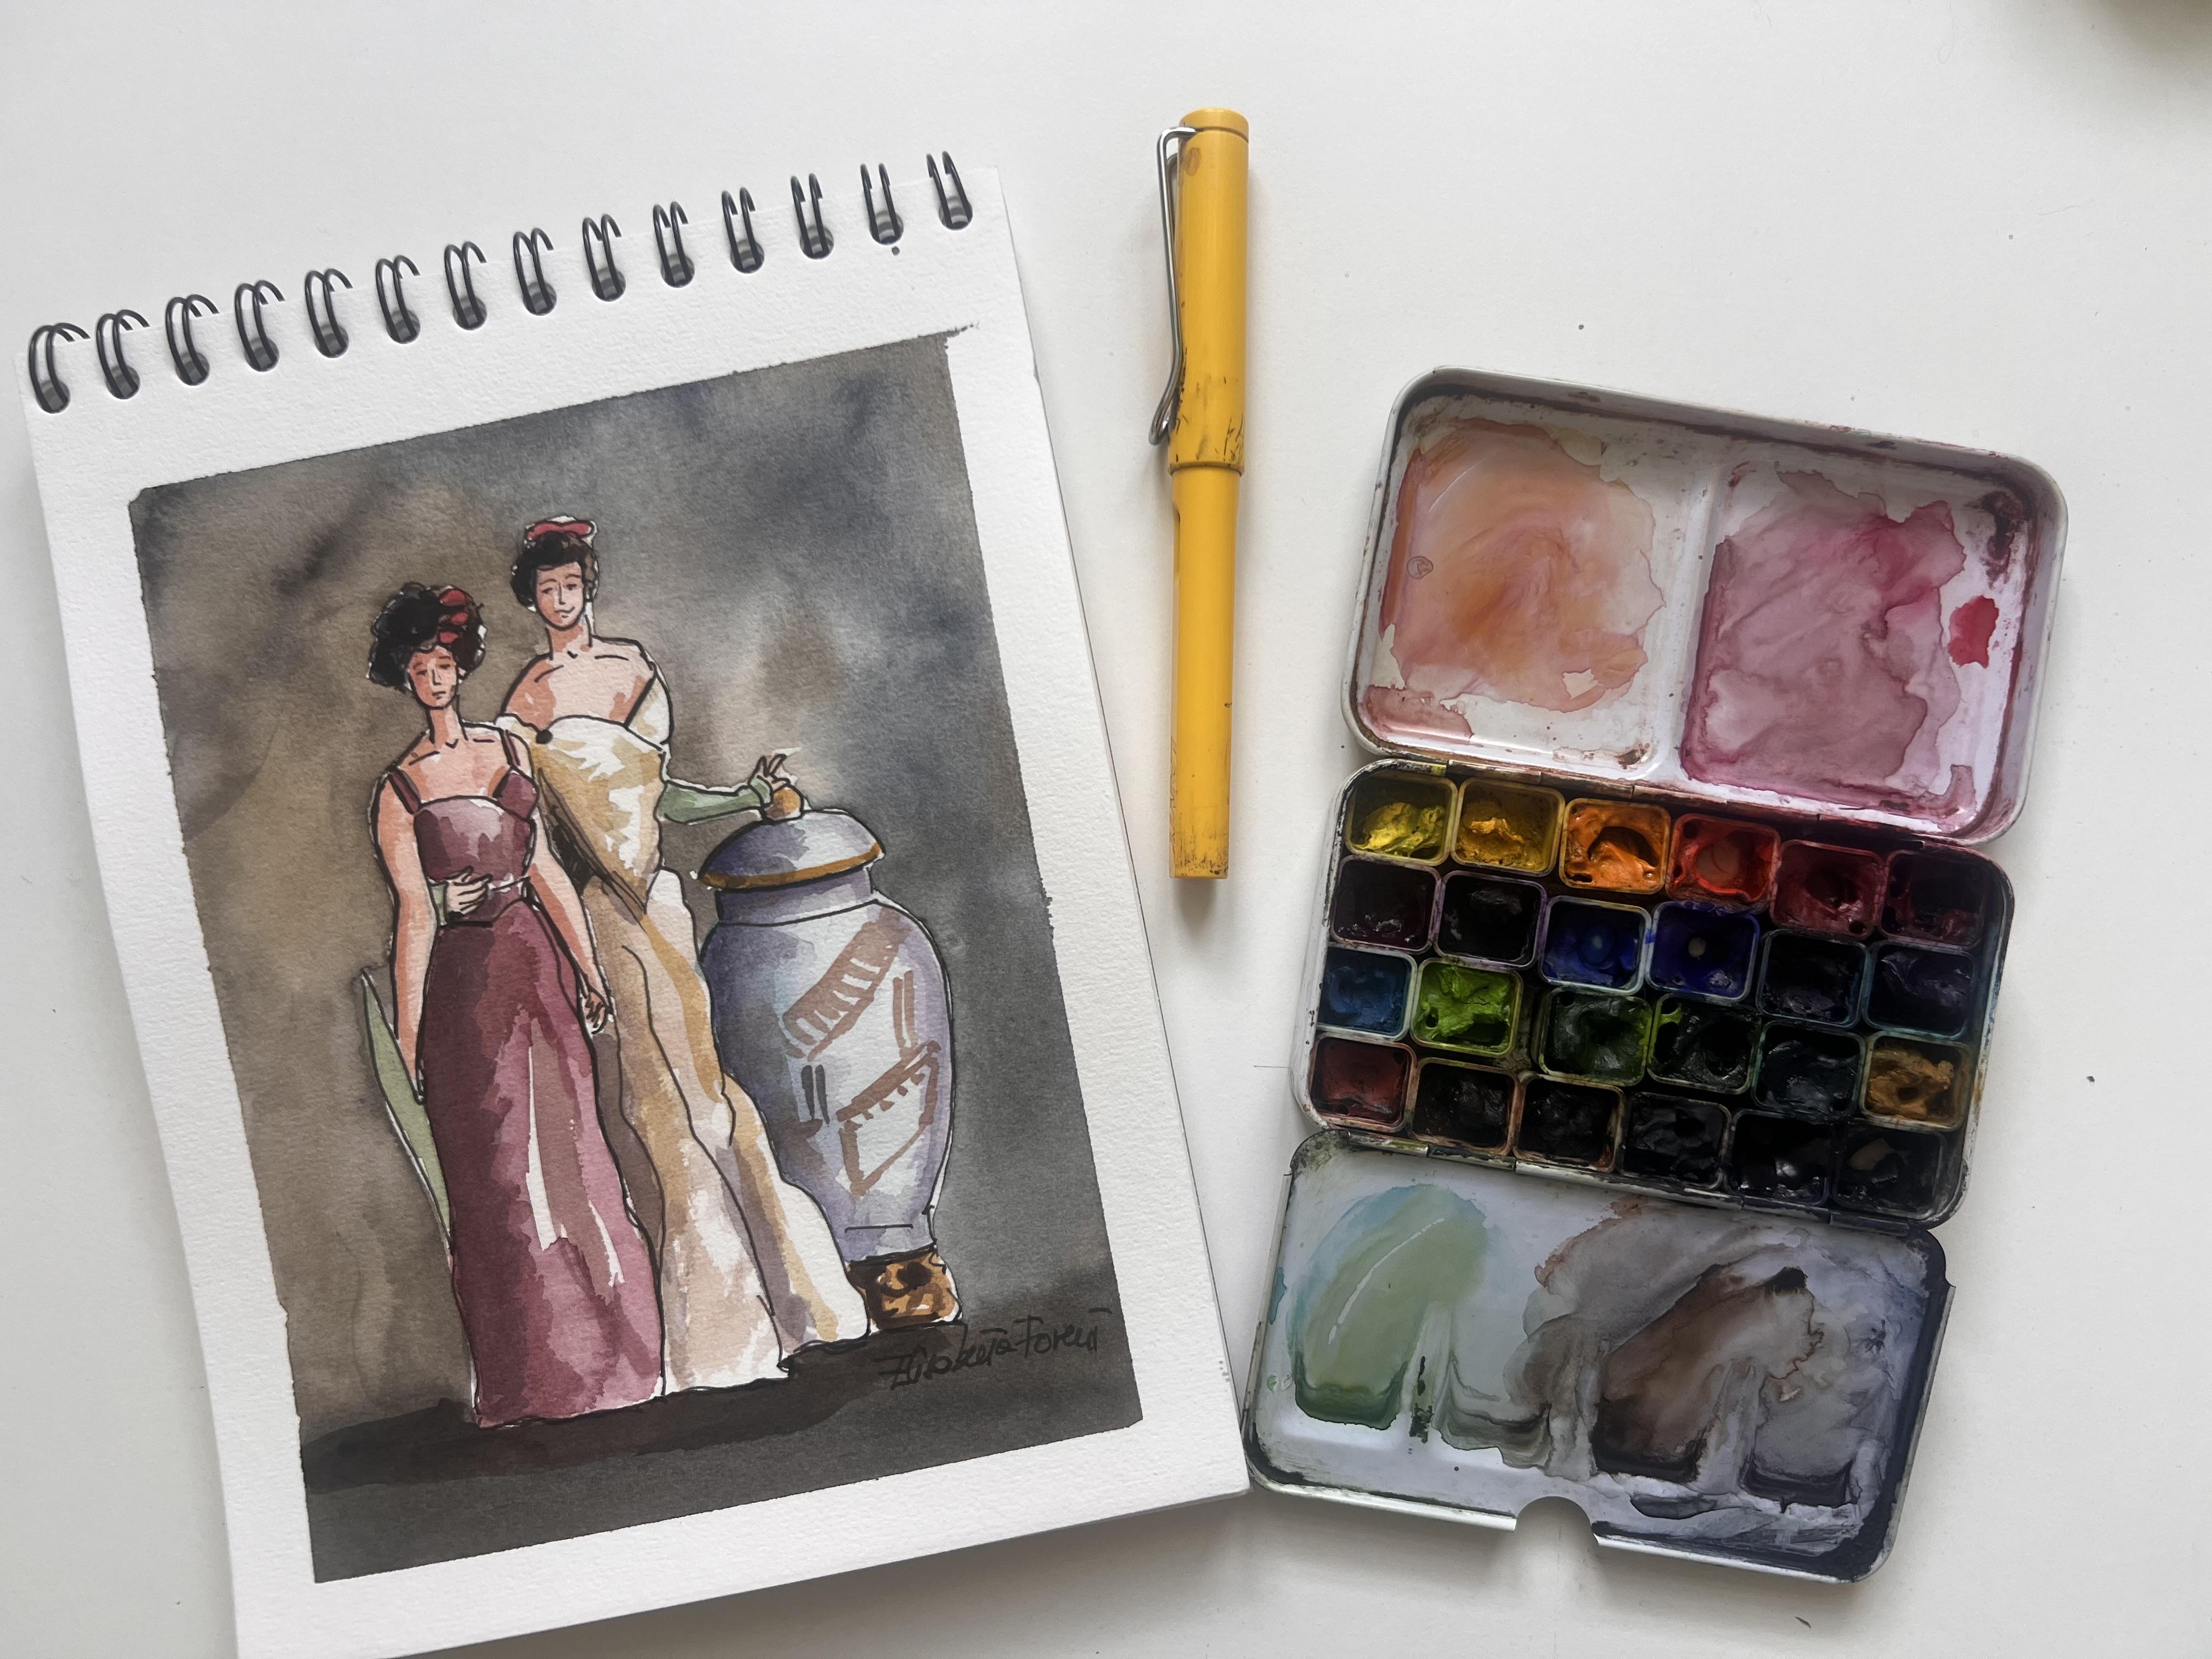
2. Your Supplies : Let's now talk about supplies. Supplies are basic
watercolor supplies. Let's start with what
I consider probably the single most important piece of supply, which is paper. Paper must be, by all
means, watercolor paper. There is no a possibility to
use non watercolor paper. Watercolor paper can be
either cellulose or cotton. I have used cotton. This is 100% cotton, but you can also use cellulose, but the weight is
very important. The best way to use is 300
GSM. Per square meter. So I have used this
smaller format. It's 18 by 24 centimeters, seven by 9.5 ". But you can use the
size that you prefer. I like to paint not too large, but it's your choice. But please use watercolor paper. Then you need a pencil. I have used a B pencil, which is very soft, but
you can use two B or HB. It's really your preference. There is no rule about this. You really use what you prefer. Pencil. Then you need
an eraser to erase the pencil lines after
that you apply your ink. For the ink outline, I use fountain pen
with waterproof ink. But be careful because watercolor
ink doesn't usually go. Inside the fountain pen. I use this sketch
ink by sketch ink by Roher and Klingene which is compatible
with the fountain pen. This is a brown. I prefer to sketch in brown, but you can really
sketch in black. You can either use
a fountain pen with waterproof ink
or a fine liner. For instance, I have
used this fine liner, fiber castle sepia ink, but you can use a
black, fine liner. I use a broader tip, 0.7 for the general
outline for all the lines, except for the facial features
where I use a smaller tip. This is 0.5. You can
use ner finer tip, smaller tip to draw very
fine facial features, you know, eyes, nose, mouth. Then I have different brushes. I have some finer brushes. This is a number five. This is a number four. But you see that it really
depends on the brand. This is a number four DaVinci, is a number five,
Boccani Bonazzi and this is funner than this. You just use what you prefer. I have a finer one
for details and broader ones for larger washes. Then also, I recommend you to
have a mop brush like this for the background or maybe
an almond one like this one. This one is very nice because
it has a nice tip so you can use it around finer details. Then of course, you
need watercolor and I have used this standard, the watercolor set
with 24 colors. What you will need is yellow
ochre, ultramarine blue, purple and have use
some viridian green, led and crimson,
some cadmium red. But you will do with
everything you have, you just pick a red, you just pick a
blue, don't worry. There is no rule about this. You just use what you have. No problem. This is a
professional grade. Of course, professional
grade works best. But if you have a student
grade is perfectly fine. Actually, I started myself with student grade and I was
very happy about it. Last but not least, you will
need some kitchen paper to blot your brushes if there is too much water
or to fix mistakes. And this is optional,
but use it. This is paper tape, artist tape to get a nice
crispy edge around your sketch. You will also need
two jugs for water, one for clean water, and one that will get dirty
throughout the sketch. You first use this jug
to rinse your brush, and then you pick clean water in this one or vice
versa, of course. I also have a small
well used as you see, spray so I can spray my
colors to revive them. And that's all for supplies.
3. Pencil Sketch: Before you get started
with the sketch, which is the first
step in this project, I have put some paper
tape along the edges of my with a color paper so that
I have a nice crispy edge. Now, I will start sketching the two sisters and make sure
I have a sharp and pencil, and I will do it in a
very personal manner. I don't want to reproduce exactly what Sagan did because
that would be impossible. The objective of this project is to paint this beautiful
portrait in your own style. I will start drawing
the girl that is on the left hand side
because I'm right handed, so I don't want to
smudge a pencil and I will start on the left and
move towards the right. Of course, the opposite is
true if you are left handed, but I'm right handed. The first thing to
remember is that the head is always much
smaller than you think. I will draw an ova for her
face I start to occupy space and her hair is
some flowers here. You can be very loose
and wonky in this stage. The neck, then her shoulder, I try to reproduce
exactly what I see. I don't want to draw
what I think is the neck I just draw
exactly what I see. The neck is almost as
large as her face. Okay. And here I have
the left shoulder with a strap and then it goes down and it's not exactly in the
middle because she's tilted, so it's more on the
right and then it goes. It goes up and here you have her breast like
this and like this. Then the rest of her dress. Here you have the belt. Here you have her arma. Try to reproduce
exactly what you see. It's a beautiful arma. This is right down. It has a nice muscle shape here. The height of the belt
goes like this, like this. Don't be afraid to make
arms too long because long arms are usually
nicer than short arms. Here she has a herend
with I think what is a fun here relieves fun. It's a fun. Like this. Here you have a hand coming here coming
out from her hip, it's her sister hand, and I will just very
loosely draw this hand. And maybe the head could have
been slightly larger and we place her eyes, nose, mouth. Here we have the
sister who is taller, so we'll put a taller oval here. You can start maybe. Placing her features. Neck. Once again, make the neck too small. She has bow here. Don't worry if it
is not nice now. We come out very nice. Here she has no straps. She has a strapless
strapless dress. Here you see her shoulder, baby. Here you have her dress also
tilted towards the right. I and you see that the
rest come to a line. The waistline is at
the same height of the one of her sister. Here you have another
arm of the first girl. I think it's Betty here and the hand is slightly
taller than this. I place the hand and then I go. Here we are here
you have the arm. You can be very loose here. Try to stay light with a pencil because you
will have to erase it. But if I'm too light, you will not see it. Here is her ribs and here you can see
her leg coming here. The dress is coming this way. Really, don't be afraid
to be wonky or childish. It's really the objective of this project is to enjoy
copying a masterpiece. Okay. Okay, here we have her arm coming here with a hand on a vase and
here we have the vase. Let's sketch the vase. There's a cover here. And this country must
be very, very loose. We only see this side. You can be very loose. Okay. And that's
the pencil sketch. I'll see you in the next lesson.
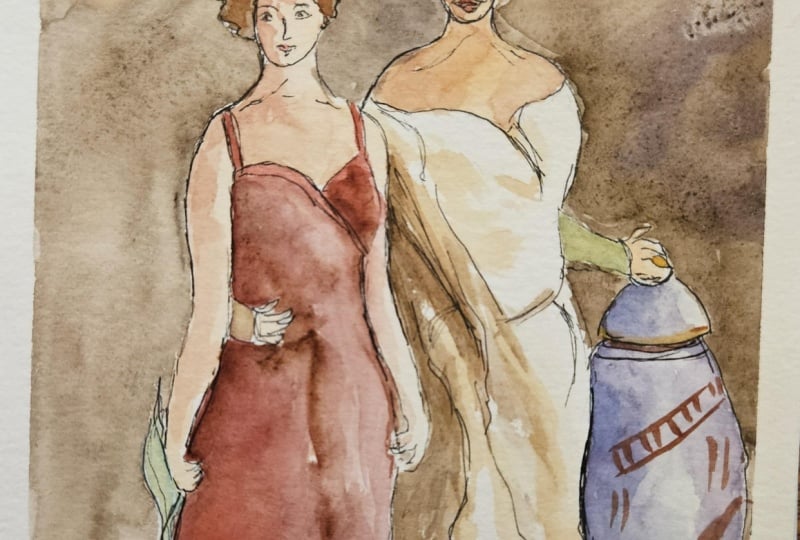
4. Ink Outline: Now that we have our
loose sketching pencil, we must refine it and
we need to be more precise in this
phase with our ink. I will use my fountain pen that as you can see is
well used and let's go. I will not use this
pen for her features because it's a broad tip. I need a final tip
for her features. I will just draw the oval. Here you have I think it's a fine tip and I will put the eyebrows line for the eyes with the dot nose line and the little dot
for the lower lip. Same here. Or
eyebrows very tall. Nose. And a smile. Okay, that's it. Just we let this dry
and then we erase, but we need some
minutes to make it dry. Okay. I'll be back
in a few minutes.
5. Watercolor First Layer: Before I start painting, I will spray I spray my colors so that
they will will revive them. Okay. I start always with colors
that are in the background, but I will leave the
actual background as last step so that I can be the contrast
with the painting. But I start with colors that
are below other colors. So first thing that we have
to paint is the skin color. I start with a small brush. To make a skin color,
it's very simple. You can take orange if you
are in a hurry, just orange, but I will mix some yellow
ochre with some red. We have this peach color. That will just go
all over C skin. It's better to be lighter so
that we can darken later. Wherever I see skin, you can also go over the strap because
it will be covered. No problem. You can go over the strap because it will
be covered by red later. Like this. Like this. And we're done. But while we wait for the
skin color to dry, we can go on to the vase
because they don't touch. Because while this is wet, we cannot paint anything
that is closed because that will blur into
the skin color. We don't want to touch with
new colors, the old colors. For the vase, we're going to do something slightly
simplified compared. I'd like to make a sort of very light water blue mixing viridiant
green and sal blue, but you can take you
can take erleum blue, very light, doesn't matter. One important thing, we need
to decide the light source. The light source we
see from the painting is from the top right. We start painting from the
left so that we can go lighter towards the right hand side. To be honest, it's not so strong this source light in
the painting itself, but we can decide
that we want to accentuate the light effect
because it's very nice. I start from the left hand side, and then I just add some
water towards the right so that we have is round effect. We can also paint her gloves. Her gloves are fun. They are light green, I think, very light green. I can add some green to this color and I
will put it here. Doesn't matter if it
is exactly the same. Now we like this dry and we come back for the first
layer of the clothes. Now, I always start from the left hand side and go towards right because
I'm right handed, so I don't smudge the colors. But these I will apply later. I will start with the
red of this girl. I can take any red, alza in crimson or
even a warmer red. I will take some
alza in crimson. And I will darken it with
some black or some brown. Really values are more important
than colors in painting, especially when you sketch. But I have this nice maroon. I hope everything is
Maybe I take it China. Brush will apply with care on the left hand side
where it is darker. Like this. Then I
will take some water. Can take now a larger brush. I will now add some yellow or some pure
Alizarin crimson B here, it should be warmer
on this side. You can also reserve go here, remember where we
corrected our mistake. You can also reserve some white because it makes the
sketch more interesting. Now I will take some brown and add it on this
side, just blot. Remember the strap
it some brown. Brown is better than black. Like this. Once
again, the edges. Now it's wet and wet because we have some very lovely
soft edges like this. Here, too. That's it. Here we have shadow
because there is for arm. You cannot touch the dress of this girl of this sister because
we would touch this red. We do the hair hair, we just take some
Brown, burn tumba. We go. Just remember
that we need to leave some space
for the roses her. The red roses here. Same here for the sista, remember the red ribbon here. Starting to look nice. I will look much nicer. Now we make everything dry. No. We can still
do something else. We can take some yellow
ochre and paint. This this fair here
and here also, I see there is some gold, but just leave some white
and go very sketchy, very loose like this. I also see some gold here
yellow ochre is okay, so we can go on top of this. We like everything dry. And
6. Add Shadows and Depth: Now we can start
painting the roses. I take a warmer red cadmium
red you can take here. I forgot fore I take some of the pitch car here there
are some details that I forgot are the fan with the same green water green, very diluted that I used for
the vase with some yellow, it becomes more green. Here. Also, I will use this for painting shadows on her
glove and here the leave. Now we can go to her dress. For her dress, I will use yellow ocher because it's white, but in white, you can add
touches of light with yellow. When I see some shadow, I can put some yellow here
and there just to give the idea of A movement. You see here is all shadow. And here, go down, down. Just give some movement. Rest rest. It's enough to give the idea. Now we add some dioxyen
violets and violets to the yellow to accentlate
some darker shadows here. Because violet makes
shadow with yellow. Here, we have darker shadows and also when we have
darker shadows here. A here. Okay. He dress is done. Now we want to have
the same effect here. So I take just some brown, bun tumble and apply
some shamow here. I need my larger brush for this. I alternate between shadow, what you see some shadow. You cannot go wrong actually because here you have
shadow on this side because remember it's from here and
you cannot really go wrong. J like this. It's better to be
loose so that it gives the tal some loose fabric. Okay. And we have
some yellow here. To give more motion. Okay. Now some shadow to the skin. For some shadow to the skin, remember we had yellow ochre
and a lid and crimson. I will mix some more and I
will just try to underline Okay to underline or if it looks too orange
will look nice at the end. Under the neck, on the left
hand side, the eyes here. Same here. I have the
shoulder, some te wedge. Eyes. The side of her
arm, the fingers here. Okay. Now we let everything dry. Wait a few minutes until
everything is well dry. Now, I see I forgot some straps. Okay. Now, let's some
shadow on the vase. We take our doxasinVolet, and we under the lid
and on the left. Now, I realized that I haven't recorded
part of the video. And what I did is I added some ultramarine
blue on the left hand side of the hair like this to darken this sign
that is in shadow. I have also darkened the vase. Applying some purple. On this side, I will now
apply some pure blue, avoiding the yellow
ochre below the lid and here to furtherly accentuate
the shadow like this. And then I will soften the edge. Same here. On this side, why do I darken this side? Even if it is towards the light? Because it gives an
idea of roundness here. I will add some blue here
also because this is cado, it's below, it's round. I have also added some curls in brown here to give
you idea of decor. Also, I take some some purple. And just here some shadow on this side of
this golden bowl. Okay. Now, we let everything de dry and we paint
the background, which is a lot of fun, and then we look at the details.
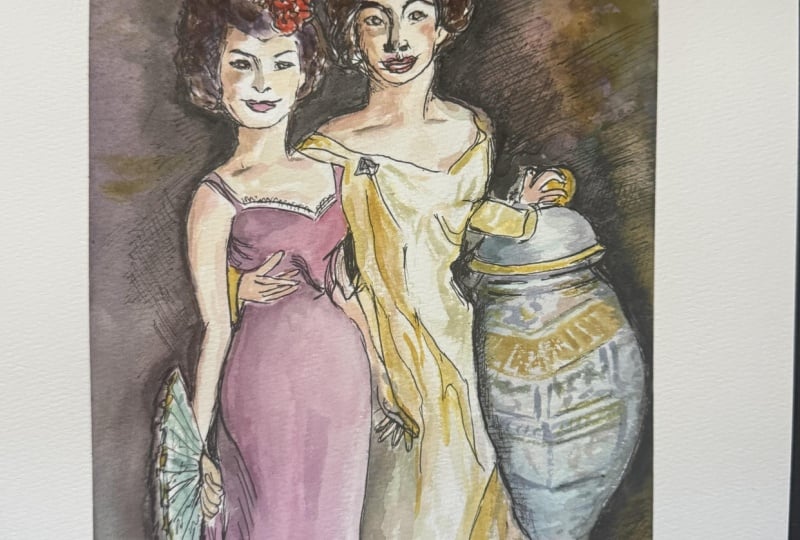
7. Background and final details: Now, as the vase
has some details. To make sure it's dry, I will just touch with
the back of my fingers, never with the fingerprints,
always like this. And we can just draw some
random lines in ban sienna. Here I have some bunsena
here there's can draw directly roof like this. And then we have some
darken lines here. It's like a house, you see. Then again, with my
bone Siena here. It's not perfectly
dry, but never mind. It can be really very loose. Okay. Now the background. For the background, I
need a larger brush. You can take a up a brush like this or an almond
brush like this. It's cat's tongue,
maybe or almond. I'm not sure how you
call it in English. Just take a larger brush,
whatever you like. And you can start to
wet the background. Be careful not to touch. Our ladies. I start
with right hand side, and then I will
turn my painting. Just apply some water. Here, there is a mistake. I can cover it with
the background and I will mix some
brown dark brown, pentambosepia, this
sepia, just go with Be careful here, round. Otherwise, you go with
loose brush strokes. You can also apply some
paint scrayT darken it. Just stay away from
the girls. Be careful. It's nice to add some texture with some
color variation here. Be very careful. It can be very loose and
it's nice to vary the color. You see that here I
am varying the color. You can also use some bunsena here and there to
give some light. Now, you know what? Here,
I must be very careful. I can use the same brush, but you can change brush if
you prefer here like this. Okay. Careful here. Okay? Now, I turn, okay? I turn my painting
because it's easier. They go like this. Very careful not to go over what I
had painted already. Can you see? Yes. I change. I can also use some Ban sienna. I can also use yellow ochre, just to vary the color. Be careful just to
work wet and wet. Also, you see, I
had wet this side, but not this side before, so there is a
variation in texture. This light is from here, it is correct that
here is darker, so I don't work wet and
wet, but only here. I love color variation. Here, very careful. Go with a smaller brush
if you're not confident. You can leave just
a small white space around the figures, the people like this. It's not a problem.
Now, I turn again. And I go here. You can drop some
color here and there. Here I don't like, so again, you can drop some
darks here and there. The floor must be dark. Okay. I had some things gray
here on the floor. Now, we let everything dry and we come back for
the final details. Wait a few minutes until
everything is well dry. Okay. Now, that is dry. We see that some shadows
are not dark enough, so we can reinforce
some shadows. If I take my darks here that I had used
for the background. I add some purple, and I will just
darken some darks. Okay. And then you soften
the edges. Same here. You lose, huh? And then you soften the
edges with some water. Here, too, here should be much darker on
the side, here, too. Here, too, just give some
motion. So movement here. And maybe we can darken
the hair of the girls. Be careful not to
touch the roses. You can give some
movement here, too. Here. Again. Now, some shadow here so that we can root
them to the ground. Some shadow here. And then the final
details in ink. Just wait a moment, and we need everything to dry, and then we will add the
last the last touches. Wait a few minutes until
everything is well dry. Now, my suggestion is
always to use your pen to darken the edges that
are away from the light. Like here by the way, here she has some bows
that I would like to show. And here you can
also add some curls. Same here. Darken
here, dark and here. Here you can darken. Here, inside the sleep, this side here where the touch. Here you can darken below
the lead, here and here, also where the dress
touches the floor, you can darken, here, here. Same here. Here, you can
just darken your pen. And then, do you know what? I don't want to touch
it anymore to pin here, and I would just sign it. And I will take the tape off. Now, if you don't want
to ruin the paper, I suggest to you that you take
a heating tool and you hit the and you hit the tape or
today if it is like today, today is very warm day. You don't need to. Hope so. Just away from the. And here it is. Well, I always see some
detail here. Her belt. On this side can be darkened. Okay. And it's done. You see that the
sketch is similar, but it's completely in your
own style. This is my style. Of course, you can use
your style and you can look for other paintings from
this painter by Sargent, then you can easily adapt. And I'd love to
see your project. But this is lovely because
it's them, but it's my style. You must try to develop your own voice in art,
your style. Okay.
8. Wrap up: Fantastic. You have created your portrait by Sargent
in your own way. That's the most important thing. Now that you have
created your project, it's very important
that you upload it in the gallery so I can see it
and give you my feedback. But also, please, I
ask you in exchange to review my class so that I can know what can be
improved or what you like. This is very important for
me. Thank you very much. Congratulations. I hope
that I can see projects with different subjects as well because this is a skill
that once you learn it, you can apply to any painting, any masterpiece that you like. Okay, thank you very much, and I'm waiting to
see your projects, your masterpieces
in the gallery. Joao.
 Elisabetta Furcht, Anyone can paint!