Transcripts
1. About the Class : Hey guys, hi, this
is Ryan artist and an art educator based
out of Bangalore, India. I have been practicing with watercolors ever
since two years now. And what can I say? I have fallen deeply in love with this medium
in case if you're joining me for the first time and you don't know
much about me. You can go check out my
Instagram profile where all my watercolor
artworks are displayed. I welcome you all
to another fund relaxing and therapeutic
class on watercolors. This class is going to be a short and relaxing class where we will let go off the control that we
have over the medium. And we're going to paint a beautiful spring landscape
in loose watercolor style. We will first start
with discussing the materials from
the paper to be used for the class project to the
paints that we are going to use for creating
elements in our class. I will be discussing about each and every colors
that we're going to use for our class projects in the material section itself, we will also be looking at the brushes and the
importance of this brushes that we can have in
loose watercolor approach, a basic watercolor
section technique has been added in case
if you are a beginner, it will help you to get
started in no time. Also in-between
this class lessons, I have shared some important
tips and tricks on how you can achieve looseness in your
watercolor paintings. So come join me in this class
and let's give it a try on how we can achieve looseness
and watercolor paintings.
2. Materials Required: In this lesson, we
are going to learn about the list of materials or supplies that we are going to need in order to create
a class project. First, we wouldn't be
needing this acrylic board, which is a
non-absorbing surface. Make sure you grab
any plastic or non-absorbing surface to deep
down or to use your people. Next would be your paper. Now it is very
important that you grab your a 100% cotton
watercolor paper, which is at least 300
GSM and thickness. And it should be
cold pressed paper. And the paper of mine is
a fine-grained paper. Now you can grab any 100%
cotton cold press paper, which is 300 GSM weight. The size of this is
approximately close to A4 size. You could tell this is 24 into 30 centimeter
size of the paper. Now let's take a
look at the colors. The colors that I'm going
to use today is from the branch in hand arts
premium watercolor range. The first color
would be my blue. So this is a paler
blue that I have. I'll be showing you the pigment information
as well so that you can pick the colors based on your pigment information. Now this is another
shade of blue. This is known as royal
blue for this brand, but the pigment information
is BB 15 is 23, and bv 66. So this is made up
of two pigments. Now you can select your blues containing either
of these pigments, or you can go ahead and use the Boolean blue
or cobalt blue, anything of your choice. Now next coming to lemon yellow, the pigment information
for this EBI 81, now coming next to the paste and shade
that is brilliant pink. Now these names may differ
from brand to brand, but the pigment information, she will be the same. Br2 09 is the
pigment information on the pigment value
for this color. Now you can make your own
pastry chefs by mixing little bit of your white gouache or white watercolor paint into your desired pigments. The next shade is lilac. So this is again
a piece to shade. It is intermediate between phase still pink and your pistol violet Are you can
directly go ahead and use some lavender faced
11 day if you have. Next is mineral valid? Now, when you mix white
into your mineral Violet, any of your purple or violet, you would get those
similar shade of lilac. Now, next will be
my rounds Alpha, show you the green. So I'll be using
these two greens, which is the leaf green, which has more of the
yellowish dominance over here. And this is the
pigment information. You can clear this
greens by mixing your lemon yellow into
your greens, such as who? It's green, sap green mode
of yellows when you add, it will tend to inclined towards more of a
yellowish shade, okay, So this is how you can create
the shades of green if you do not have this color's
already available with you. Next coming to the brown, so I'll be using
this burnt umber. Now these are the pigment
value information. So if you feel that this shade name may be
different for your brand, go pick though pigment
value information and find that correct shade
in your brand of colors. Now you might also keeping handy some of that Payne's gray, indigo or your black
or neutral tint color available with you and also grab your white gouache or your
whitewater developing. So that's all for our colors. The next material that
we will be looking into is our mixing palette. Grab any ceramic or
a plastic palette, anything which is available
with you or you can grab your very normal
dinner ceramic plates. Also anything is readily
available with you. You can use that and make
it as your mixing palette. Next, we will be talking
about our brushes. So you're mainly going to
use brushes which are of bigger sizes and holds lots
of water and paint pigment. I will be going ahead
with science number 12, answer is number eight of my silver black
velvet round brushes. And this is number two. Brush again for detailing, creating little
structures urine there. Now, one of the most
important brushes is this hake brush. You can see how broad this is. This will be very essential
to create that smooth, dreamy kind of loop. Instead of the hake brush, you can go ahead and use any flat brush
which is made up of gold hair and has a
broader fair you will, or a broader base of the Brazil's that would do
next would be some of these liner brushes are your detailing brushes
would also help you achieve some of the floral splatters that
we are going to do for, you know, our needles. Next you might be
needing a pencil and an eraser to outline
or to create the basic simple sketch or an
outline and maybe a ruler. But I will not be using
fences or cooler in Hunters landscape
because we are going to go very free and
loose for a painting. The most important thing is
your two jars of clean water. You can have them by your side. When you start to paint with. Next would be this masking tape. Now, this is totally
optional if you want to have crisp and clean edges or
borders around your painting, you may use your masking tape, but for today's painting, I'm not going to use it. Next will be some
tissue papers. Yeah. And that's all about the materials and
the supplies I have covered each and
everything that we will be needing to create
a class project. So come, let's quickly take
a look in the next section. And I almost forgot about this. You can also have this separate spare kind of
clean clocked by your side. I'll be showing you
in the next lesson what we're going to do with it.
3. Basic Watercolor Techniques: In this lesson, we are
going to go through all the basic watercolor
techniques that particularly which
we are going to use for creating
our class project. We are going to go with a very loose approach for this
particular class project. First, we will see what exactly
is wet on wet technique. Now before we start and look into what exactly is
wet-on-wet technique, I want to share with you
a few tips on how you can achieve loose watercolor
style when painting. When it comes to lose approach, it is recommended that you use a brush with
a longer handle, a bigger size brush, preferably this is a Hake
brush of size number ten. This allows you to let go off all the control when you are
moving across the paper. Hence, it focuses more on
the shapes rather than having some definite lines
are definite shapes. Now the same thing goes
for this round brush also, this is a size number
12 round brush. It has a fat belly
as you can see. When you hold it closer
towards the ferrule, you have more control
on the brush, but when you hold it
towards the edge, you, your hands are more flexible and you have
more coverage area. Now let's get started with the very first technique which
is wet on wet, wet on wet. Typically men's applying of
coat of water on your paper, wetting your paper,
and then applying your wet paint on
this wet surface. Now I will be reactivating
my paint on my palette. And using this watery paint, I will be dropping the colors on this wet background
and you will see how beautifully the paint spreads on the wet background. Once you start to lay those
colors on the wet background, you will see how beautifully
the paint starts spreading. And more you apply this
watery paint makes on this wet background
you will see that the colors are blending and
spreading across each other. There is less control in this
technique and so it is fun. The unpredictable effect that it creates makes this technique more versatile and is loved by all the watercolor
enthusiast. I have shown you the
wet-on-wet gradient blend that we are going
to use water Skype. Next coming to the
second technique that is the lifting technique
which we will be using to create
those fluffy clouds. Lifting technique is usually carried out wet-on-wet
backgrounds. Your it means you will be removing some of
the painted areas using your tissue paper or tissue towels or even
with your clean brush. I'm just repeating
the entire process which we had seen on the very first technique
that is a wet-on-wet creating the gradient
blended sky. Now I will be grabbing
my tissue paper and gently dabbing on the surface
of this wet background. I am lifting off this paint now exposing the whites
of the paper. The next technique
that we are going to look into is the
wet-on-dry technique. Now wet on dry technique
means applying your wet paint on the
dry paper surface. So this tree trunk is made with the help of this
wet on dry technique. Even the canopy of this
cherry blossom trees we will be doing with the help
of this wet-on-dry technique. Here I'll be showing you
how with the help of your liner brush or any round brush of size
number one or two, you could create this branch or the stems of this
cherry blossom tree. You can see how well-defined this lines of the
trees are looking. This is why we will
be going with this wet-on-dry technique towards
the last finishing step, when we are all done with the wet-on-wet background
work for a landscape and then going ahead and doing this wet-on-dry techniques
for the finishing touch, observe my brush
movements as I'm doing this canopy of the
cherry blossom tree, I have held my brush
very close towards the edge of the handle so
that it appears very loose. I am not trying to
exercise any control. I'm just carelessly
moving around the brush. This short subtle strokes. We will be using this similar
wet-on-dry technique to create the grassland structures for our grassy meadow areas. In this technique, we
will not let the paper dry out completely,
like completely dry. We will start working on
this Grass Lake strokes with the help of our liner brush or a small detailer brush when the background is still a
little wet so that the grass appears to be well blended in some areas and when eventually
the paper is drying out. Some of the graphs which are closer towards us will be more sharper and we will be going and creating more sharper
and distinct strokes. In order to add a sense of
depth in this grassy meadows, we can go ahead and use
lighter values as well as darker values and create this sense of depth
in the middle. Now coming to the
next technique of how we will be creating
this background Florida Blooms is with the mix of wet-on-wet and
wet-on-dry technique. Wet on wet technique
will give us a very blurred background and we will be going ahead and learning some more darker values
on top of those areas, leaving some little amount of whitespaces, urine
they're in-between, so that this tree looks beautiful and there
is a sense of depth. When you add differentiates like lighter to darker values, you create the sense of depth. The main objective is to
capture the essence of a scene and not get stuck into the details
of the painting. This is a loose watercolor
painting is all about. You can see I'm adding
in some shades, darker shades of lilac
or mineral violet. And I'm going over those
dried patches where we had led first to the
pace, still pink color. I'm just going over it. Now. It looks much
more brighter and much more radiant and much
more bushier rate. So this is what the sense
of depth is all about. The last technique that
we are going to look into is this
flattering technique. Now this is a technique
which is mostly used to create textures into your
watercolor painting. This texture here we would be creating this floral
middles are floral blooms, this technique, we will also go ahead and do it with
wet-on-wet technique. Because the main objective of this entire loose
watercolor painting is to go and work with
wet-on-wet to have smooth and dreamy like
finish to your painting. For this technique to
really work and bring out the desired effect
that you are looking for. You need to make sure that
you work fast and you work on a wet background
that is properly vet. In this method,
what I will do is I will just prepare or
reactivate my paint, make it a little
loose and watery. I will just dab my brush
with the help of my fingers. Or you could use a brush. As you dab your brush
loaded with the paint, you will see this
small little spots are blooms will appear
on the wet background. You can do the same step using
just your brush dipped in water and you can just flatter the water on this
colorful wet background. In there, you will get
those white little blues. So that would represent
your white floral meadows. So you can do it either way. Either you can go
ahead with is paint or you can go ahead and
splatter some water droplets. That was all about the
techniques that we are going to use for this class project. Now if you want to know more about the detailed
watercolor techniques, I would suggest you to go refer back to my glass
glowing auroras, a class on Northern lights or my first-class that
is watercolor sunset see escapes where
I have explained all these basic watercolor
techniques in great details. I hope you are all
very clear about the techniques that we are going to use for our class projects. Come, let's jump into
the main project.
4. Prepping the Paper & Painting Sky: Before we start on directly
painting on the paper first, I want you to show you
this little tip on how you can retain the wetness of your paper for a
longer period of time. This tip will especially
be helpful for you if you are staying in some place
which is very hard and dry, especially with the
onset of summers. It is very, very frustrating
when we start on painting on a bigger size of watercolor paper and it
starts drying out too soon. So in that case, what you can do is you can whet your reverse size of
the paper as well and use that paper side
of that paper and stick it onto this
non-absorbing board, like cure, I'm using this
acrylic board and once I am satisfied on how prevented
the reverse side of my paper, I will flip it over and I will wear to the
front side as well. This is how you
must flip the paper and adjusted accordingly on
the non-absorbing board. Now remember always to use a non-absorbing surface while
doing this trick or dip. Because if the surface is
absorbed and it will absorb the water from the
paper and hence your paper will start
drying out soon again. While doing this step
quarter generously, the amount of water that you are quoting coated generously and let the water get absorbed
into the fibers of the paper. Now one more way is to just soak the entire paper for some three to four
seconds in a tub of water and take it out and let the
water drip out from there a paper and then you can stick it back on
this non-absorbing. So first you're going to
directly start painting on it. Now if you feel there
is excess amount of water on the front
side of the paper, you can soak it up by using
a clot order tissue double, which I am going
to show you next. I gently dab off the extra water that I felt was
there on the paper. And it's time to start
with dark painting. Now I'll get the colors
on my palette ready, so I'm squeezing
out tailor blue. Now instead of the yellow blue, You can offer other blues
that you have in your palate. And then burnt umber, burnt sienna, yellow ocher, hookers, green pea is
still pinks and purples. And for the floral meters, we will also be using some of the cadmium yellow and
11 yellow as well. I have shown and discussed all these colors in
the material section. So please go refer back
to the material section about the colors
that we are going to need for this project. I would advise you to
get your color palette ready before you start
wetting your paper, because in the meantime, your paper might start
drying out too soon. It's time to layer the
paint onto our paper. So I'm using I'm trying to make this watery mix
of my in yellow, blue, but do not
make it too watery. You needed to have a little
bit of pigmented value. We are going with top
to bottom approach for a gradient blend of the sky. Meaning that I'm starting
out with my darker tone of the color from the
top and as I go down, it's going to get lighter. I'm trying to remove
the loose hair which has got stuck onto
this wet background. So this must be the head from the hake brush
because Hake brushes, natural brush made
up of goat hair. So I think those hairs are
really very soft and brittle. They're often tend to, you know, come off
from the brush. So make sure when something
like this happens, you take it off when the
background is still wet or else it might form of batch spot on your background
once it starts drying. Once you are happy with the
gradient blend for this guy, it's now time for her to make some fluffy
clouds in the sky. For that, we will be going ahead and using our lifting technique. This I had already explained
in the technique section. I just grabbed my tissue
paper and I'm just gently dabbing those surface, the wet surface of my
sky with the paper. And you can see the paper is absorbing the color and we're
getting this white patches. So to make it look fluffy, you use your sum, this dabbing motion of your hand to lift the colors
off from the surface. This must be done when
your background is still wet because as soon as the
color starts drying out, all your papers
starts drying out, you will not be able to lift out the colors from the surface. Keep doing this clouds
until you are satisfied and happy or however you want
to go with the clouds, you can make really
big fluffy clouds also at the middle
or at the center. It's totally up to you how you want your sky to look
with this fluffy clouds. I like it this way. So I'm going to do, and I'll stop it here.
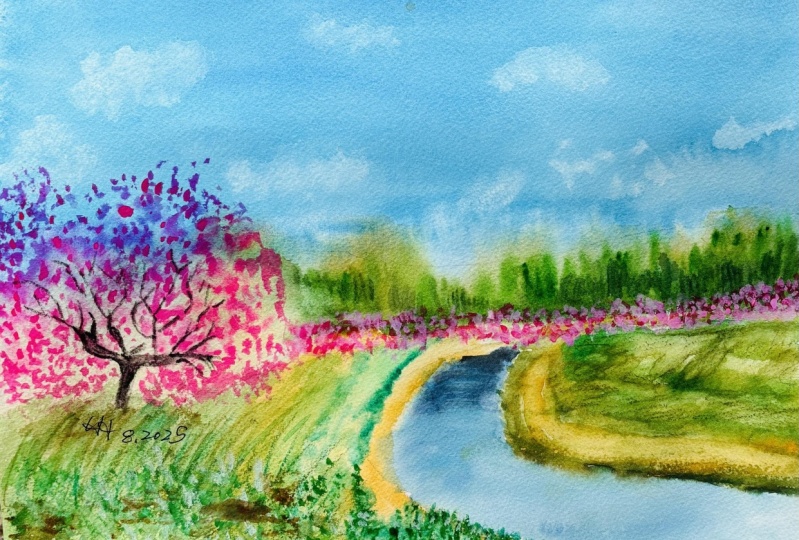
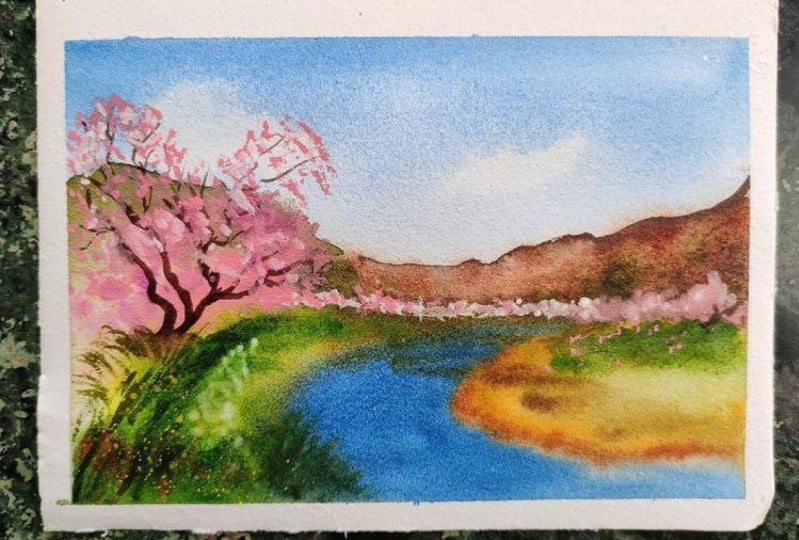
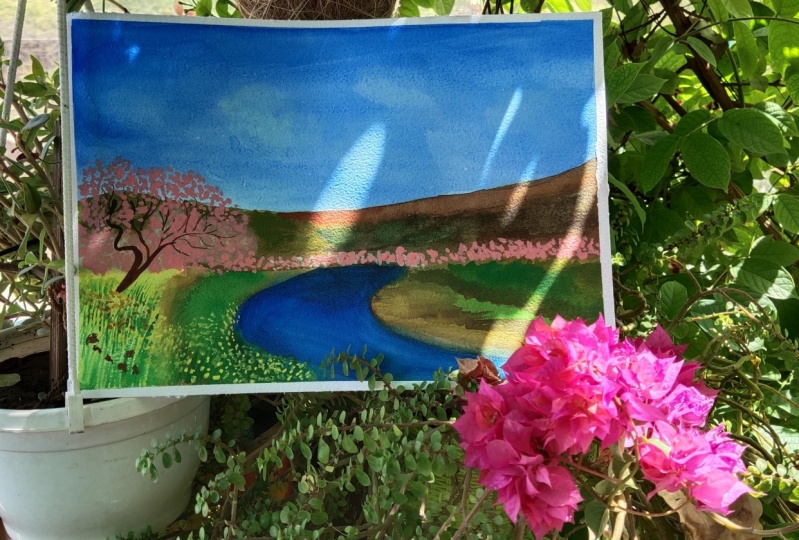
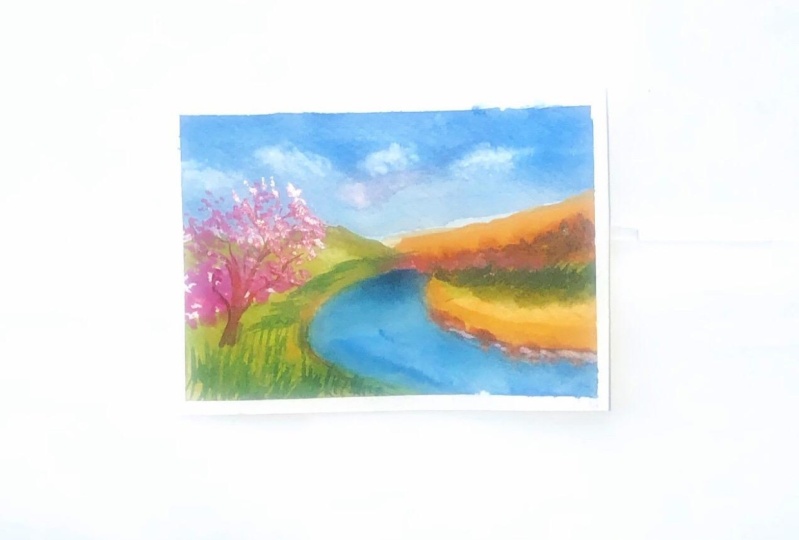
5. Painting Mountain & Stream: Let's get started
with our foreground. So I'll be painting
the mountains, which will be towards the horizon and situated
closer to the foreground. Here, we are not going to go over our pencil
outline or sketch, but directly we are starting
to pay into mountains. The idea behind this
is that you are confident with your strokes
when working on paper, especially for loose
watercolor landscapes because you're, we're not trying to
achieve realism. Photo see in grade, It's just letting the
colors flow and to have an essence
of seeing, right? There is no realism painting that we are
going to do a hair. So this is very important
for you to remember. Whenever you are trying to approach loose
watercolor landscapes, your strokes is what gives the definition kind of
shape to an object. There is no realism that
you need to achieve. Also, another thing when you are going ahead with this
loose style is start letting go of the control that you have on your
paints are your brush. Because the more
you try to control, the more you will try to have a realistic approach
for your painting, which we do not want
your VI warned, just a basic preliminary shape, more of color blocking. And just to get the idea
represented on the paper, we're trying to create your different layers by
using varying colors, lighter to darker shades. You know, that is how we
are going to roll along the entire painting and create this beautiful,
dreamy landscape. Entire point of this
loose watercolor style is to have it work on
wet-on-wet background. Make sure that
your paper is wet. If you are especially residing in heartened, very dry places, there might be chances
that even after soaking the paper in water and starting
out with your hub paint, the paper might still start drying up because
of the dry heat. Immediately know your
paper before you are starting out with
watercolor landscapes, especially when you are approaching this loose
style because you need the colors to flow and that is what it gives the freedom, the freedom of expression, the colors expressing themselves
on the wet background. Study your people
well beforehand. See how long does it take your paper to dry out
in-between the painting so that accordingly
you can plan it out and choose a
smaller paper size. Or if you want to go for a bigger people say is
like me, then, you know, in-between you can
keep a spray bottle handy and start spraying the water at different angles so that your paper is
mystified all the time, does remaining wet, I'm adding some darker tones
of my burnt umber now you can also add
in a little bit of dark bluish mix to your heart, browns and turn it into a
far more darker colors. So use and mix whatever you like you might be able to use
already started to dry her. Then hence, I'm going over
it with my wet hake brush. Now I will go and similarly tried to create this land area. On the left bank side
of this extreme. I'm mixing in some of
that cadmium yellow, green that I have now. In order to obtain this color, you can make sap green
along with your lemon yellow and you could get
a similar color tone. Now this is to
represent a kind of Highland just beneath the
mountains over there. And then this bank
will be starting. And hence that's why
I decided to go for this color gradation,
green to brown. And now with some darker strokes and long slanted
strokes of the brush, you can see very loose. I'm keeping everything very
loose in this landscape, not going to in
detail are trying to include very detailed
structures over here. Now I'll be starting
out with the stream. So for the stream, I have
chose the same color, that is the color of her sky. This is the yellow-blue
color because the sky is getting reflected
in the water or the stream. Water has no color of its own, so it's a reflection that gives the color to
the water rate. And hence, I have
decided to go with it. If you do not have those
two yellow, blue colored, you can go ahead and use
colors like ultramarine blue, cobalt blues, early NLU, anything of your choice. Now I'll be mixing in some
of my burnt umber with data of my tailor blue and
created this darker shade. This is merely to depict the shadows of the mountains
which are being tested.
6. Painting Foreground Meadows: Let's continue with
that painting. We are painting the left side of the stream bank that we
were painting earlier on. And now I'm just going and filling in some of the
areas with the green. The green that I'm
using here is green. You can use any green
of your choice. You can also, of the viridian green mix in
some of that yellow ocher in it and you can obtain this lighter shade or
a mix of sap green. Now I've switched
to my liner brush. This is a mini detailing
brush that I have. And now I'll be going ahead
and creating some horizontal, not horizontal or vertical. Lines are vertical strokes indicating the blades
of the grasses. I am now going to squeeze out my pastel shades in a
separate clean palette. Because my earlier palette
has already become very dirty and all the colors are almost
mixing with each other. I do not want this pinks to
get mixed with the greens, blues and the rounds, then it will be a
mess over there. So I decided to mix it
in a separate palette. You could also do the same. Now, I'm loading my brush
with this pastel pink shade. Remember not to
make it too watery. We wanted to have little
thick consistency and you'll go use the tip of your brush and just
dabbing the colors. Short random strokes,
and that's it. Now I'm going to squeeze out a little bit of my
white watercolor paint. If you do not have
white watercolor paint, you can squeeze out
your whitewash as well. Now this white watercolor
paint I'll be using to paint this blossoms into
that distant mountains where it is very dark. So in order to create
a contrast as well as a depth for this blossoms, I'm creating this white base. And over on top of this
I'm going to go and create this piece still pink dots that it looks you're not a sense
of depth comes into play. Okay, Now I'm quite
satisfied with how the blues are coming to
life on the right side. Now it's time to go
for the left side. Might be but has started
to dry and I want this mountain to be
blurred in the background. I'm using my hake brush and just dumping the
area all over again. So that when I tried to layer this cherry blossom pinks there, the colors spreads
instantly because this is kind of blurred
background that I want. While doing. And going ahead with
this random strokes, remember to leave
in some whitespaces in-between do not cover the
entire area with this pinks, leaving some white gaps. This will bring out
the beauty when we start letting it
with darker sheets. Before my paper starts drying
out in the background, I want to go and paint the
mountain which is there. Now, I want it to be
wet because this is the background mountain which I want to be blurred since it
is at a distance from us, that cherry blossoms at the main focus at this
part of the bank. We are trying to keep all the other elements
little blurred and distant. Only the cherry blossoms will be the main prominent
focus in this. While creating this middle, remember that you need
to work this with using the wet-on-dry technique that we had shown in the
technique section. Remember, your paper is almost
dry but it is still wet. And you are loading
that, you know, almost semi wet
paper, wet paint. And you are going to create some strokes which will
be of the grass blades, which will be blurred
into the background. So you need to make sure that your paper
is not fully wet. Because if the paper
is fully where these drugs will get blended
into the background. With the help of my
same liner brush, shorter detailer brush, you can create these
blades of grass. I'm using slanted long
strokes, vertical strokes, and keep creating these
strokes until you are satisfied and your
middle looks promising. You know, we are not trying to paint something
very realistic. I will go and see
it again and again. Just the shape. We are just trying to
create a shape of it. So to give an illusion of depth, we are using varying tones of greens if you are noticing it. We have used first as the base to the
middle, lighter tone, and then on top we are doing the grass blades with a darker tone just to
create the sense of depth. Now, we are going
ahead and creating this dots indicating the floral wildflowers
in the middle. You can either create this
darts are splatter some pins. Remember in the
technique section, I assure knew how you can create beautiful blooms
and wet background. You can also go ahead
and use that technique to create this blues
in the floral middle. Okay, so the meters are done. Fortunately, my head
right side is still wet, so I thought of creating this slope kind of structure where my
cherry blossoms are. Just to denote that it is on a high land
and it's the slope. We're just getting inclined towards the bank of the stream. Okay, So just to denote that I'm using different shades
of greens mixed with little brown to create
the illusion of depth than the sense that it
is two different lens.
7. Cherry Blossom Tree and Final Touches: Hi, welcome back. So now we will be painting
the cherry blossom tree. I'm mixing my browns. I'm using my burnt sienna
and burnt umber and I'll be using my liner brush or you could use your
detailing brush, anything which you
are comfortable with. You can paint this tree trunk of this cherry blossom tree. When you are creating this
cherry blossom trees, remember that the tree trunks
towards the base will be thicker and as you go up
it will become tapering. Thinner. I'm mixing the
brilliant pink or the pace two sheets of my pink and
lilac that I have got and I will be going ahead
and creating them blossom on this tree trunks. I'm going to repeat the exact same process
that we had done. Well, you know, creating the blossoms on the
left-hand side, right next to the mountain. So I'm going to
repeat the same step, retaining some whites
and then filling in the spaces with random
dabs of the brush. Tree is complete. Now it's time to create some
textures on the tree trunks. Now this is storytelling
optional step. You can skip it as well. Or you can use the tip
or the backside tip of your brush and create some texture lines
on the tree trunk. In order to meet the
base of the tree. Look little neat. We will hide it out using some vertical strokes are
slanting strokes creating some grassland patterns just
near the base of the tree or you could splatter some of
the yellow paint as well. Now for splattering, covered the other areas with fewer
tissue papers so that you do not splattered the yellow
paints around the sky or the stream area also splatter. Do this little carefully
and that's all about it. Now, I'm going to connect
the cherry blossom tree lines that are witches forming a canopy
from left to right. So I'm going to connect it. And as I had told earlier also, when you are going
towards the distant, use smaller strokes
of the brush and when you are coming towards you, our newer, do you use
a bigger strokes? Towards my right side, I'm using some
random brushstrokes indicating that you're
not with the wind. Some of these cherry blossom are following and strewn
across the land area. Now the next step that I'm going to do is totally optional. I feel that my mountain
has got far more blurred out and it is
not clearly visible. So I'm going to go
ahead and layer it with the damp brush
using my red paint. You will have to
be little careful because the paper has
already dried out and I'm risking the formation
of some hard edges. You can see hard edges are being formed as I'm
trying to paint it. In order to take
those things away, I'll be using my damper tip of the hake brush and I'll
smoothen these areas out. By the time when it gets dried, it will always smoothened out. And yes, that's it. We are done with
our final painting.
8. Final Thoughts: We have come to an end of
our painting here I want to share a last tip before
we end this class. Sometimes our paper starts
buckling up when drank. So in order to prevent
that to happen, what you can do is you can read the reverse of the paper once you are done
with your painting. And you can place a weight over the trans side and keep it in the same position
overnight and your paper will be flat and will
not buckle at any cost. Thank you for joining
in and painting along. This means a lot to me in
case if you have loved the class and you
have painted along, I would love to see
your class projects do upload them in the
projects gallery section.
 Nilam Roy, Art Instructor