Transcripts
1. 1. About the Class: Lakes and ponds may
look serine and lovely, but the colder Venter
just delivered them to another dimension is ended with the temperatures
dropping below subzero. The topmost layer of this
lakes and ponds freezes, creating an astonishing variety
of patterns and textures. From those cracks do jagged
lines to frozen bubbles. They look just fascinating
and mesmerizing, isn't it? Hello guys. I'm Neil. I'm an artist and an art educator based
out of Bangalore, India. You could find me on Instagram under the
handle name means artsy underscore go where all my artworks are
displayed over there. Also, you can find
me on Pinterest, YouTube and Facebook, the link to which is given on
my Skillshare profile. Welcome to my Skillshare class, which is the last class
for the year 2021. In this class, I
will be taking you through all the
unnecessary tips and tricks and techniques which are required to create beautiful
watercolor textures. We will be learning to create this beautiful background
textures using very common ingredients
which are available in our kitchen or in
everyone's household. About from the techniques
which we are going to use for creating our practice project as well as the main project. I have included an additional
lesson for this textures, where I have shown
how you can create different kinds of textures using different household items. For example, spawned, you know, a palette knife,
tissue, paper, leaves, even I have included
Rosemary so that you can absolutely have some
fun creating this textures. And it will also give you
an outlook how you can incorporate this textures
into your paintings. A warm-up lesson has been included before we
Kickstarter mean project, which would help you
to clearly understand the techniques and
the approach that we would have when we start with our frozen ice lake
for the mean project. So do not skip this practice lesson before
we start our main project. Because in main project
we will be including some other elements like
a mountain and the sky. So come join me in this class
and let's learn more about watercolor textures
and how we can incorporate them
in our landscapes. So I'll see you in
the next section.
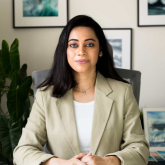
2. Materials Required: Hello, guys. Hi, welcome back. And let's quickly take you
through with all the materials that we are going to be using for creating a class projects. First, beginning
with the people. Now the people that I am
you're using is from Archies, and this is 100
percent gotten 300. GSM is the thickness of the people and it is
all fine grained. So this is how the
texture of the paper is. I'll show you the
texture up close so you can see right how grainy
or textured it is. I love using this paper because of the
texture that it has. Even though it does fine grain, but it works beautifully for
creating various textures. Now this is the size that we are going to be using for
our class projects. I have cut the paper
into a size of 26 centimetre by 18 centimeters. Now you could select
any size of the paper. You can also select the A5
size she or an A4 sheet, anything that you are
comfortable with. Now, let's take a look at the next material that we
are going to be using. So your gums are brushes. The brushes that I'm
going to be using are from Silver Black Velvet
Brush and Princeton Brush. Now you're I'm going to use three natural hair brush and
one synthetic hairbrush. The ones on my right are the natural hair brushes and
the one which is on my left. Is this the big hairbrush
that I'm going to use for creating little dry brush
strokes and little detailing? Next will be our palette. So this is a mixing palette. This is a ceramic one, but you can choose
to use any blade or anything of your choice that you have available at
your hands reach. And these are some of the
items that we are going to use for creating textures
that was solid rosemary. Different textures of salt. This is the bubble
wrap and cling wrap. Now, using your
household kitchen items, you can create
beautiful textures on your watercolor paper. Now there will be some
more of this ingredients. Do not worry if you I'm
not showing you your, there will be a
detail section in the next lesson and here
will be a palette knife. Now, if you do not
have palette night, you can substitute
it for a card and this is sanitizer now
instead of sanitizer. Your best bet would be your isopropyl alcohol
or rubbing alcohol. You would get the desired
result with that. And last but not the least, I will be needing
two jars of water, one fresh water and the other
one for washing my brushes. Oops. My snowmen fell down, so I'm just adjusting him
back to his position. OK? The next item would
be our tissue paper. Now tissue paper is a must. It will also come in handy when we are creating textures
for our watercolor paper. And there goes our masking tape. Now you can use masking
tapes if you want to do have a clean
outline or borders. And that's pretty much it. And yes, the very important
thing is our beams articles. So how can I forget that, right? So these are the colors. This is from Shinhan
Card or BWC. So do not worry, it is not mandatory at all to use the same kind of
colors that I'm using. You can go ahead and use any colors that are
available with you. You can always, you know, mix and match your colors. I'll be here mostly using those shades of
blues and yellows. So these are the swatch cards for the other brands color that I have along with me from White Nights and
Magellan Mission. So these are the Blues. So in this class, we would be mainly focusing
on a darker shade of blue and some yellows
and some Bastille pinks. OK, so grab your colors and yes, get your materials ready, and let's jump start
our next lesson.
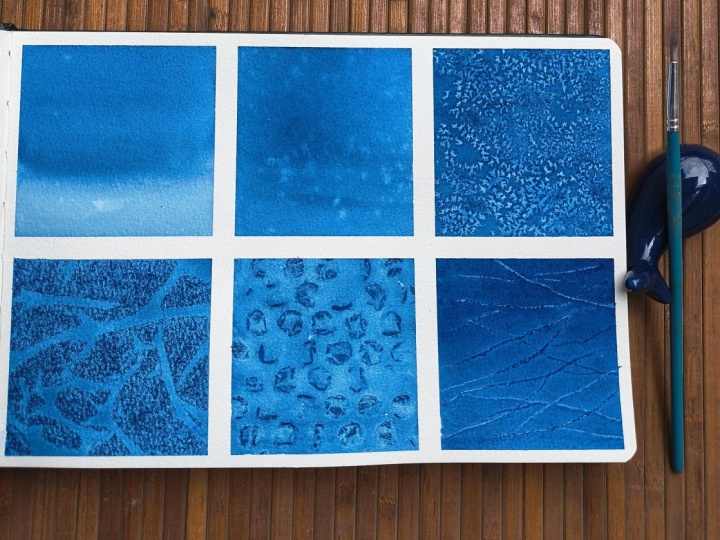
4. Texture & Techniques Part 2: Hello, welcome back and
welcome to the Part two to offer textures
and techniques section. So in this section, we are going to
experiment and have some fun with the other
ingredients as well. So this is kind of experimental section that I
have included for you guys. Now here is a list of the materials that
we will be using, but it is not necessary that you need to stick by
these materials. You know, go explore your kitchen shelves and find out some of the
ingredients which you think may add texture
to your backgrounds and grab those and do
this fun exercise. This will also increase your
knowledge about the water, the materials that
you can use for creating some very interesting
watercolor backgrounds. Starting off with
my first grade, so I'm leaving and
gradient wash of colors, so I'll be using your my bubble wrap to create
the texture that I want. So in a while that after I'm satisfied with
this gradient blend, I will grab my bubble wrap so you can collect
this bubble wrap from any of the package
that you receive at home. So I have collected
mine accordingly. I'm basically a hoarder. I never, you know, do away with all this stuff, so I hold them. And so here it comes
handy when they want to create something
fun and interesting. So press the the, you know, bubble wrap with
your other hand, so that it imprints on
the surface of the paper. Let it get dried. In the meantime, I have started out with
those second grade. Now, in the second grade, I will be using a kind of sponge wrapper that generally
comes with the package. This is another kind
of packaging material, but unfortunately that material did not work because
it was still take. But anyhow, I have included this process here so
that you have an idea of which materials may work on the wet people's surface and which materials may not work. So I have come to this
realization that, you know, thinner materials work best
on your wet papers office, but the good ones do not
work that very well. Now I'm trying to press down the paper on the
paper surface, sorry, this sponge wrap on
the people's surface, but as you can see it, just to take and hence I don't think so it
will really work out. But anyways, let's experiment and see a way out
for the end result. Now I will let
this air get dried and I will move on
to the next grid. For this next one, we will be using
our palette knife. Do not worry if you do
not have palette knife, if you have a brush which has a sharp pointy at
the back of it, you can even use your brush to create the texture that I'm going to
demonstrate you here. Or else you can always
go ahead and pick your expired debit or credit
cards or any shopping cards. Basically any cards, which is
little take and, you know, is sharp enough and
has those sharp edges, whether it be rounded or spread. OK, so you can grab those cards, but do not you not take take
out any cards which you are currently using
that to me hamper with the chip that is
there in the card. So always go ahead and
take out cards or ask your parents to provide
you with the cards which are expired or
which are not in use. Now you can see how I'm creating these long strokes with the help of the edges
of my palette knife, and I'm using my cling wrap on these strokes that I just created with the
ballad Navel Gaze. So when you, you know, scratch the surface
of your wet paper, which is loaded with
the paint pigment with this kind of palette knife
or any sharp object, it, you know, scratches the people's surface and
the pigments get stained. Okay, so into the boards
of those paper hands, you get those effects. So this technique is
very widely used by loose watercolors whenever they are going and painting any, you know, background
blurry parts and they want to create, you know, branches or stems. Moving on to our next grid, that is a fourth grade so far, this grid, I will be
using some rosemary now. You can go really,
you know, creative, but then you can use
all your dry spaces, you know, which
are little course. You can also use your ball
papers, your rice grains, shorter rice grains or
the longer rice grains, even your chilli flakes. You're not. Chilli
flakes are oregano. It's no harm to
experiment, right? So just go creative grab. You know you would
always have this small, small sachets of leftovers
that you may not be using. So grab those ingredients and
write this fun thing out, and you will be amazed to see
that different, you know, elements or ingredients
create different kinds of textures based on
their shape and size. Now, for this next grade, it was totally random
and experimental, so I just decided to I will create live patterns
on this red background. But since it is
already late at night, I couldn't, you know, go and grab any leaves
from my other plants. So the one that I have along the table this filter trained
on are the broken heart. I grab those leaves and I try to create some
texture out of it. Now, when you are drying
out this leaf patterns on your red paper so you can go
and grab any veined leaves, you know, some leaves are
more range than the others. So Jews are going to need your hunting and collect some of these leaves that you
may see falling over or you may have a
chance to pluck them. So go collect those leaves and you can try
this exercise out. The shape of this
leaves are two rounded, you know, and cold, so it is really not going or staying flat on
the people's surface. So, you know, when you
are choosing a leaves, bear this in mind, it should at least have a flat surface so
that you are able to stick those vein part on
exposing to the peoples of, or that the pattern is
etched on the people. For now, I believe I did
and let this get dried out, and we will be starting
out with the next grid. Now for the next script, I'm laying a flat wash of water, and I will go with the same technique
that we have been using for all the other grids. But Don, Robert and I will
be going with a gradient, so it is totally up to you. If you want to go and
have a blended wash, you can go and create uniform, blended wash or you can
go for a gradient wash. Now you're I'll be using
my textured tissue paper. You know, some tissue
paper rolls that comes along will have some
kind of texture on it. You know, some boards
like structures on it, like you can see your rates. So I will be using the reverse
side of the tissue paper, which has these boards
like structure, and I will be using that and
dabbing it on the surface. So it just kind of
lifting technique. But I'm not lifting Asper, you know, a certain
segment or section. I am just going
randomly trying to create the textures
that I have under. There should be a bow and, you know, lifting of the paint, dabbing it on those areas
so it will create a kind of very beautiful and
bloody kind of texture. Our paper has finally
dried out completely and we will be removing
this, you know, the bubble wraps
and the other labs that we have placed
on the people, and you can see the leave
one did not really work out. It is still wet because
the leaves when are the rest are not staying
flat on the peoples of is. Neither was this von Trapps. So I have decided to show you this sponge
technique again. So here I will just go ahead
and use my regular sponge. Now the sponge I have, you know, you're not rerated my sponge, but it is not, do you
know, filled with watery? I have squeezed out
the water and it is just damp sponge that I will be using on my this wet background
that I'm creating again. OK. So in a while, I'll be using our dabbing my wet sponge on
this wet background. And this will be also kind of
the lifting technique where the sponge the balls on the
sponge will create some, you know, structures on. The people are creating a very soft look into your background, so it will be very interesting. Once the paper is
dried out completely, I'll be showing you it. It just kind of giving a very interesting
look to your people. You know, you can see that. My waiting period is
over for this leaves. I cannot hold any more patience and I'll remove my rosemary do. I can see that my beeper
has dried out completely, so it's finally time
that, you know, we can build off our
masking tapes and remove all the tapes from all these sites
that we had pasted. And yeah, we are done
with that next year. I'm really loving
the textures that we have got
interesting, wasn't it? I hope you have had some fun when exploring and
experimenting with this ingredients or materials that can give you such
beautiful textures. You know, you can try out
different other materials, too. You can also go ahead
and use your combo, your toothbrush, you know, options are really endless. This entire texture could have been one single long glass, but I decided to stay put with this ones and thought to sure, you bring to you how
creative you can be with the different materials that you have in your household. So I hope you are excited. So now let's jump start
with our practice session. In our next lesson, we will be using few
of this textures to create this beautiful
warm up project.
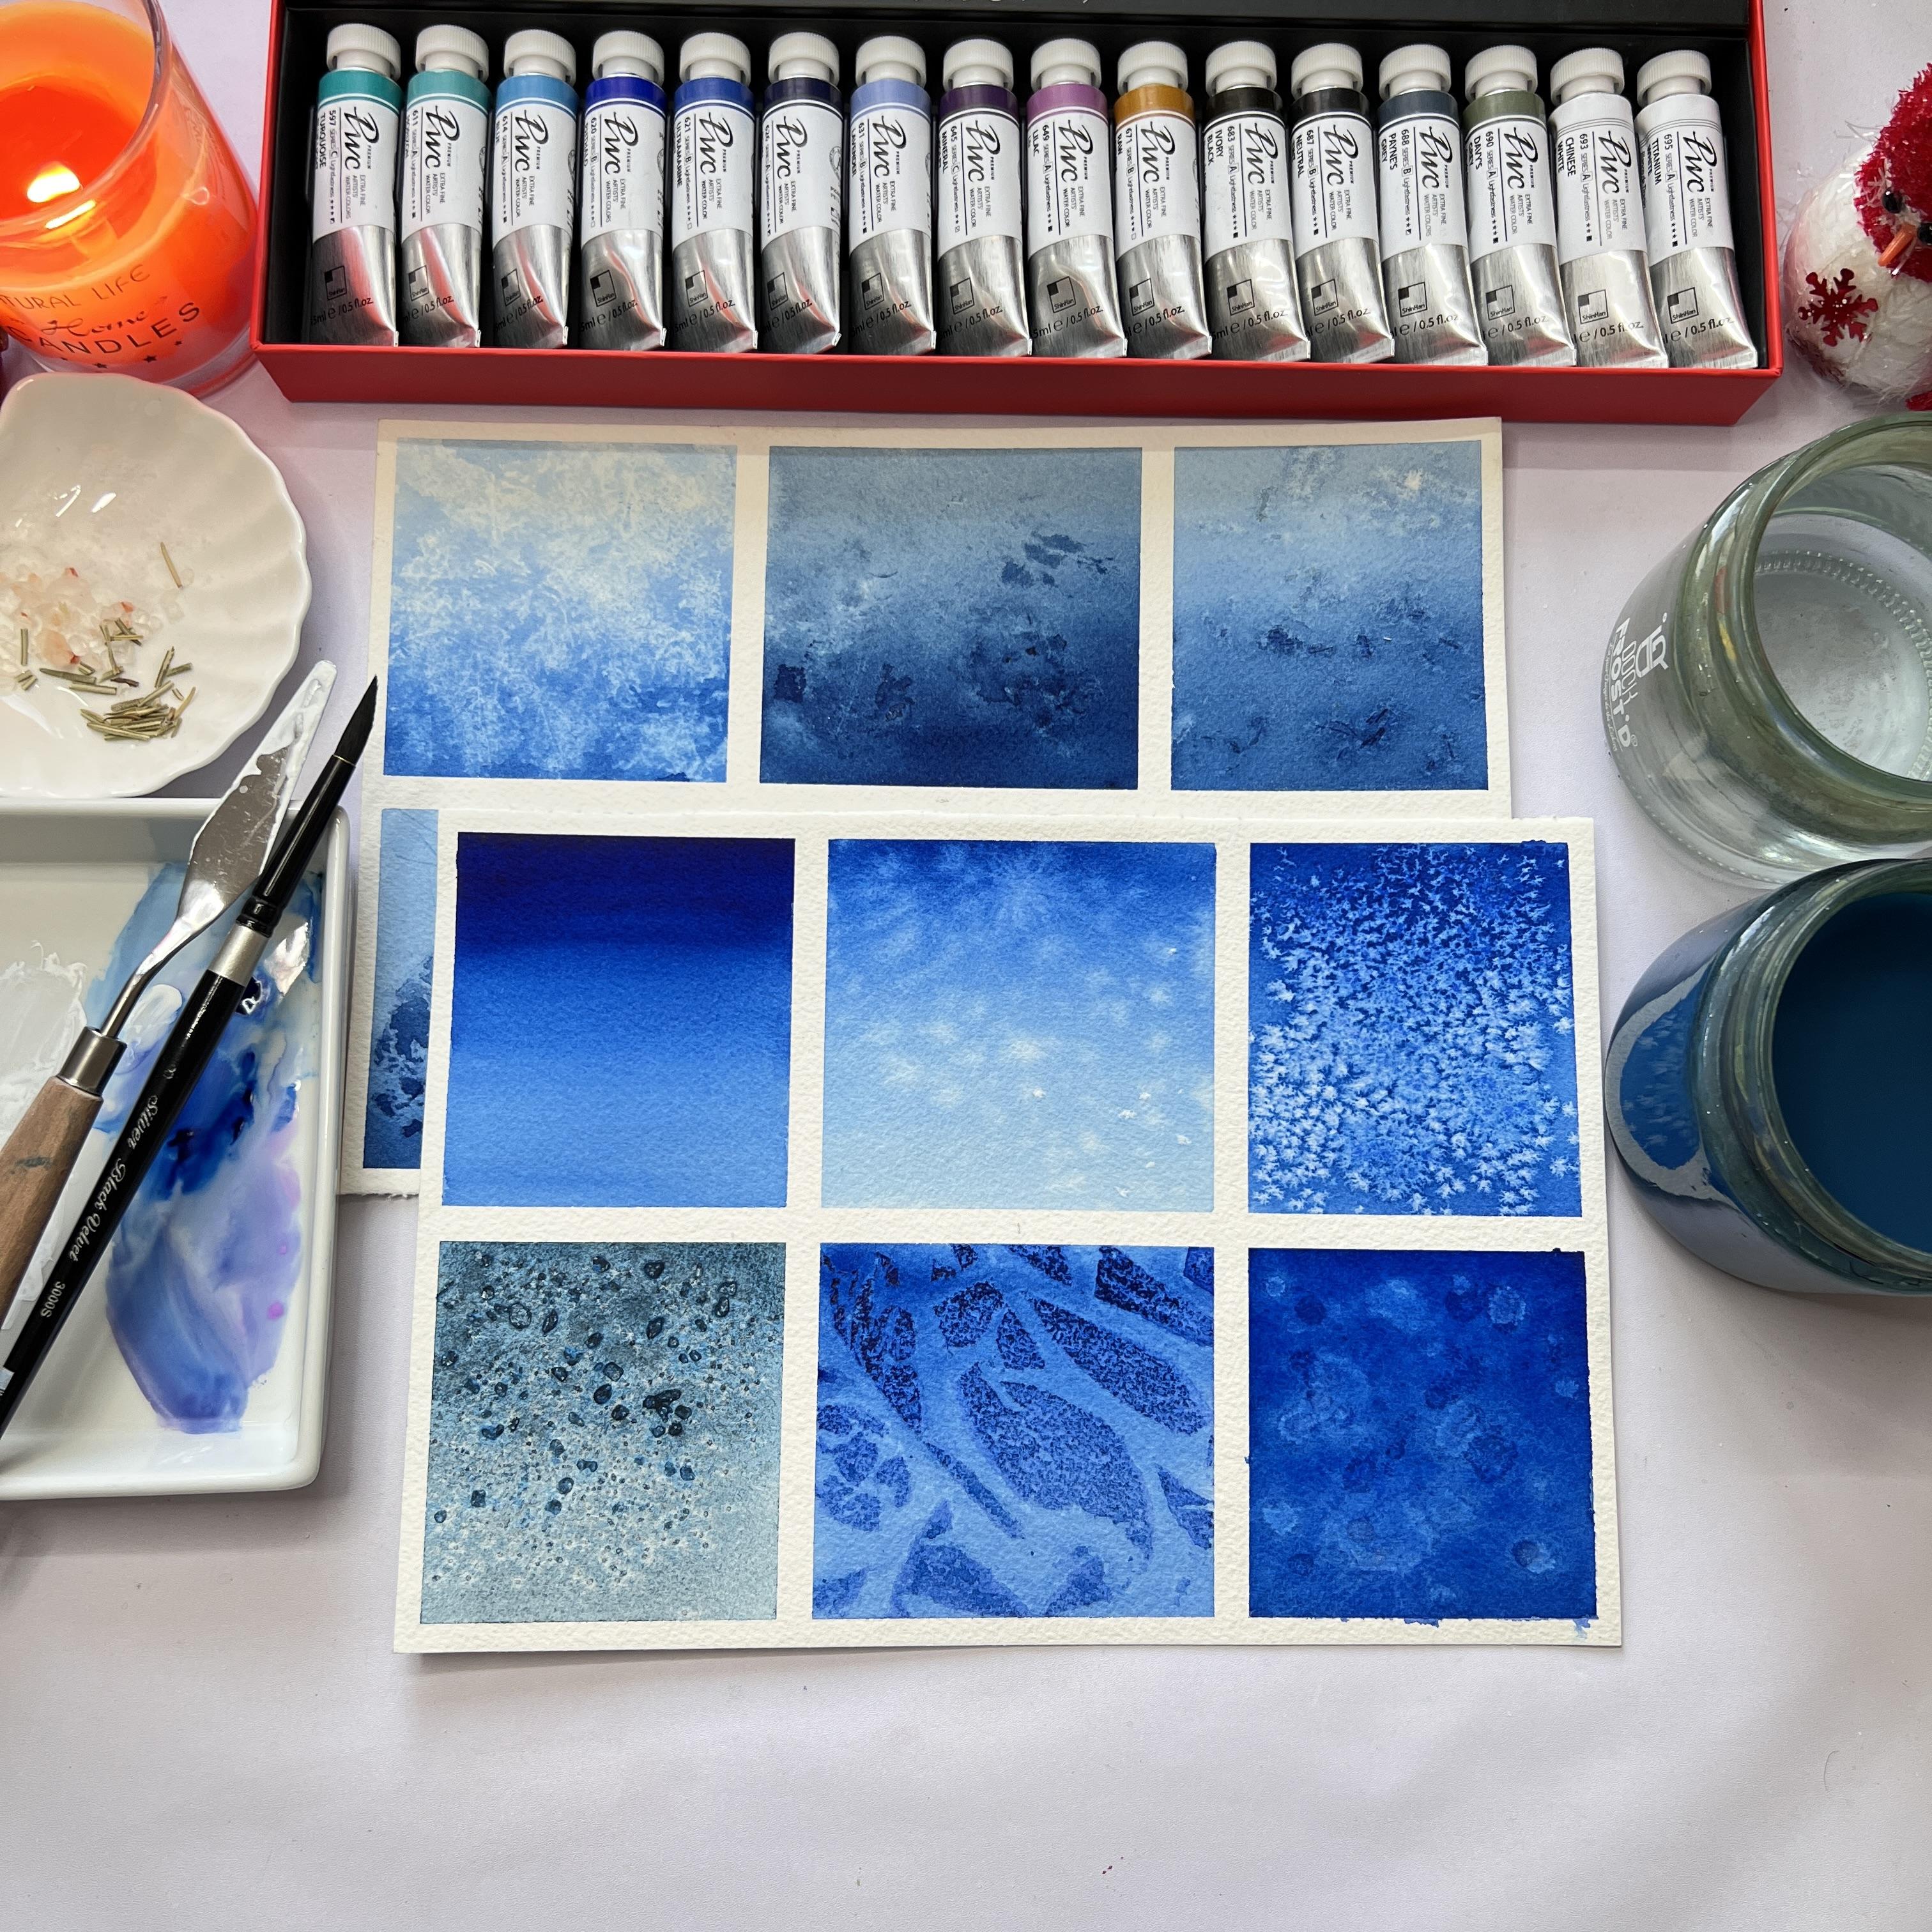
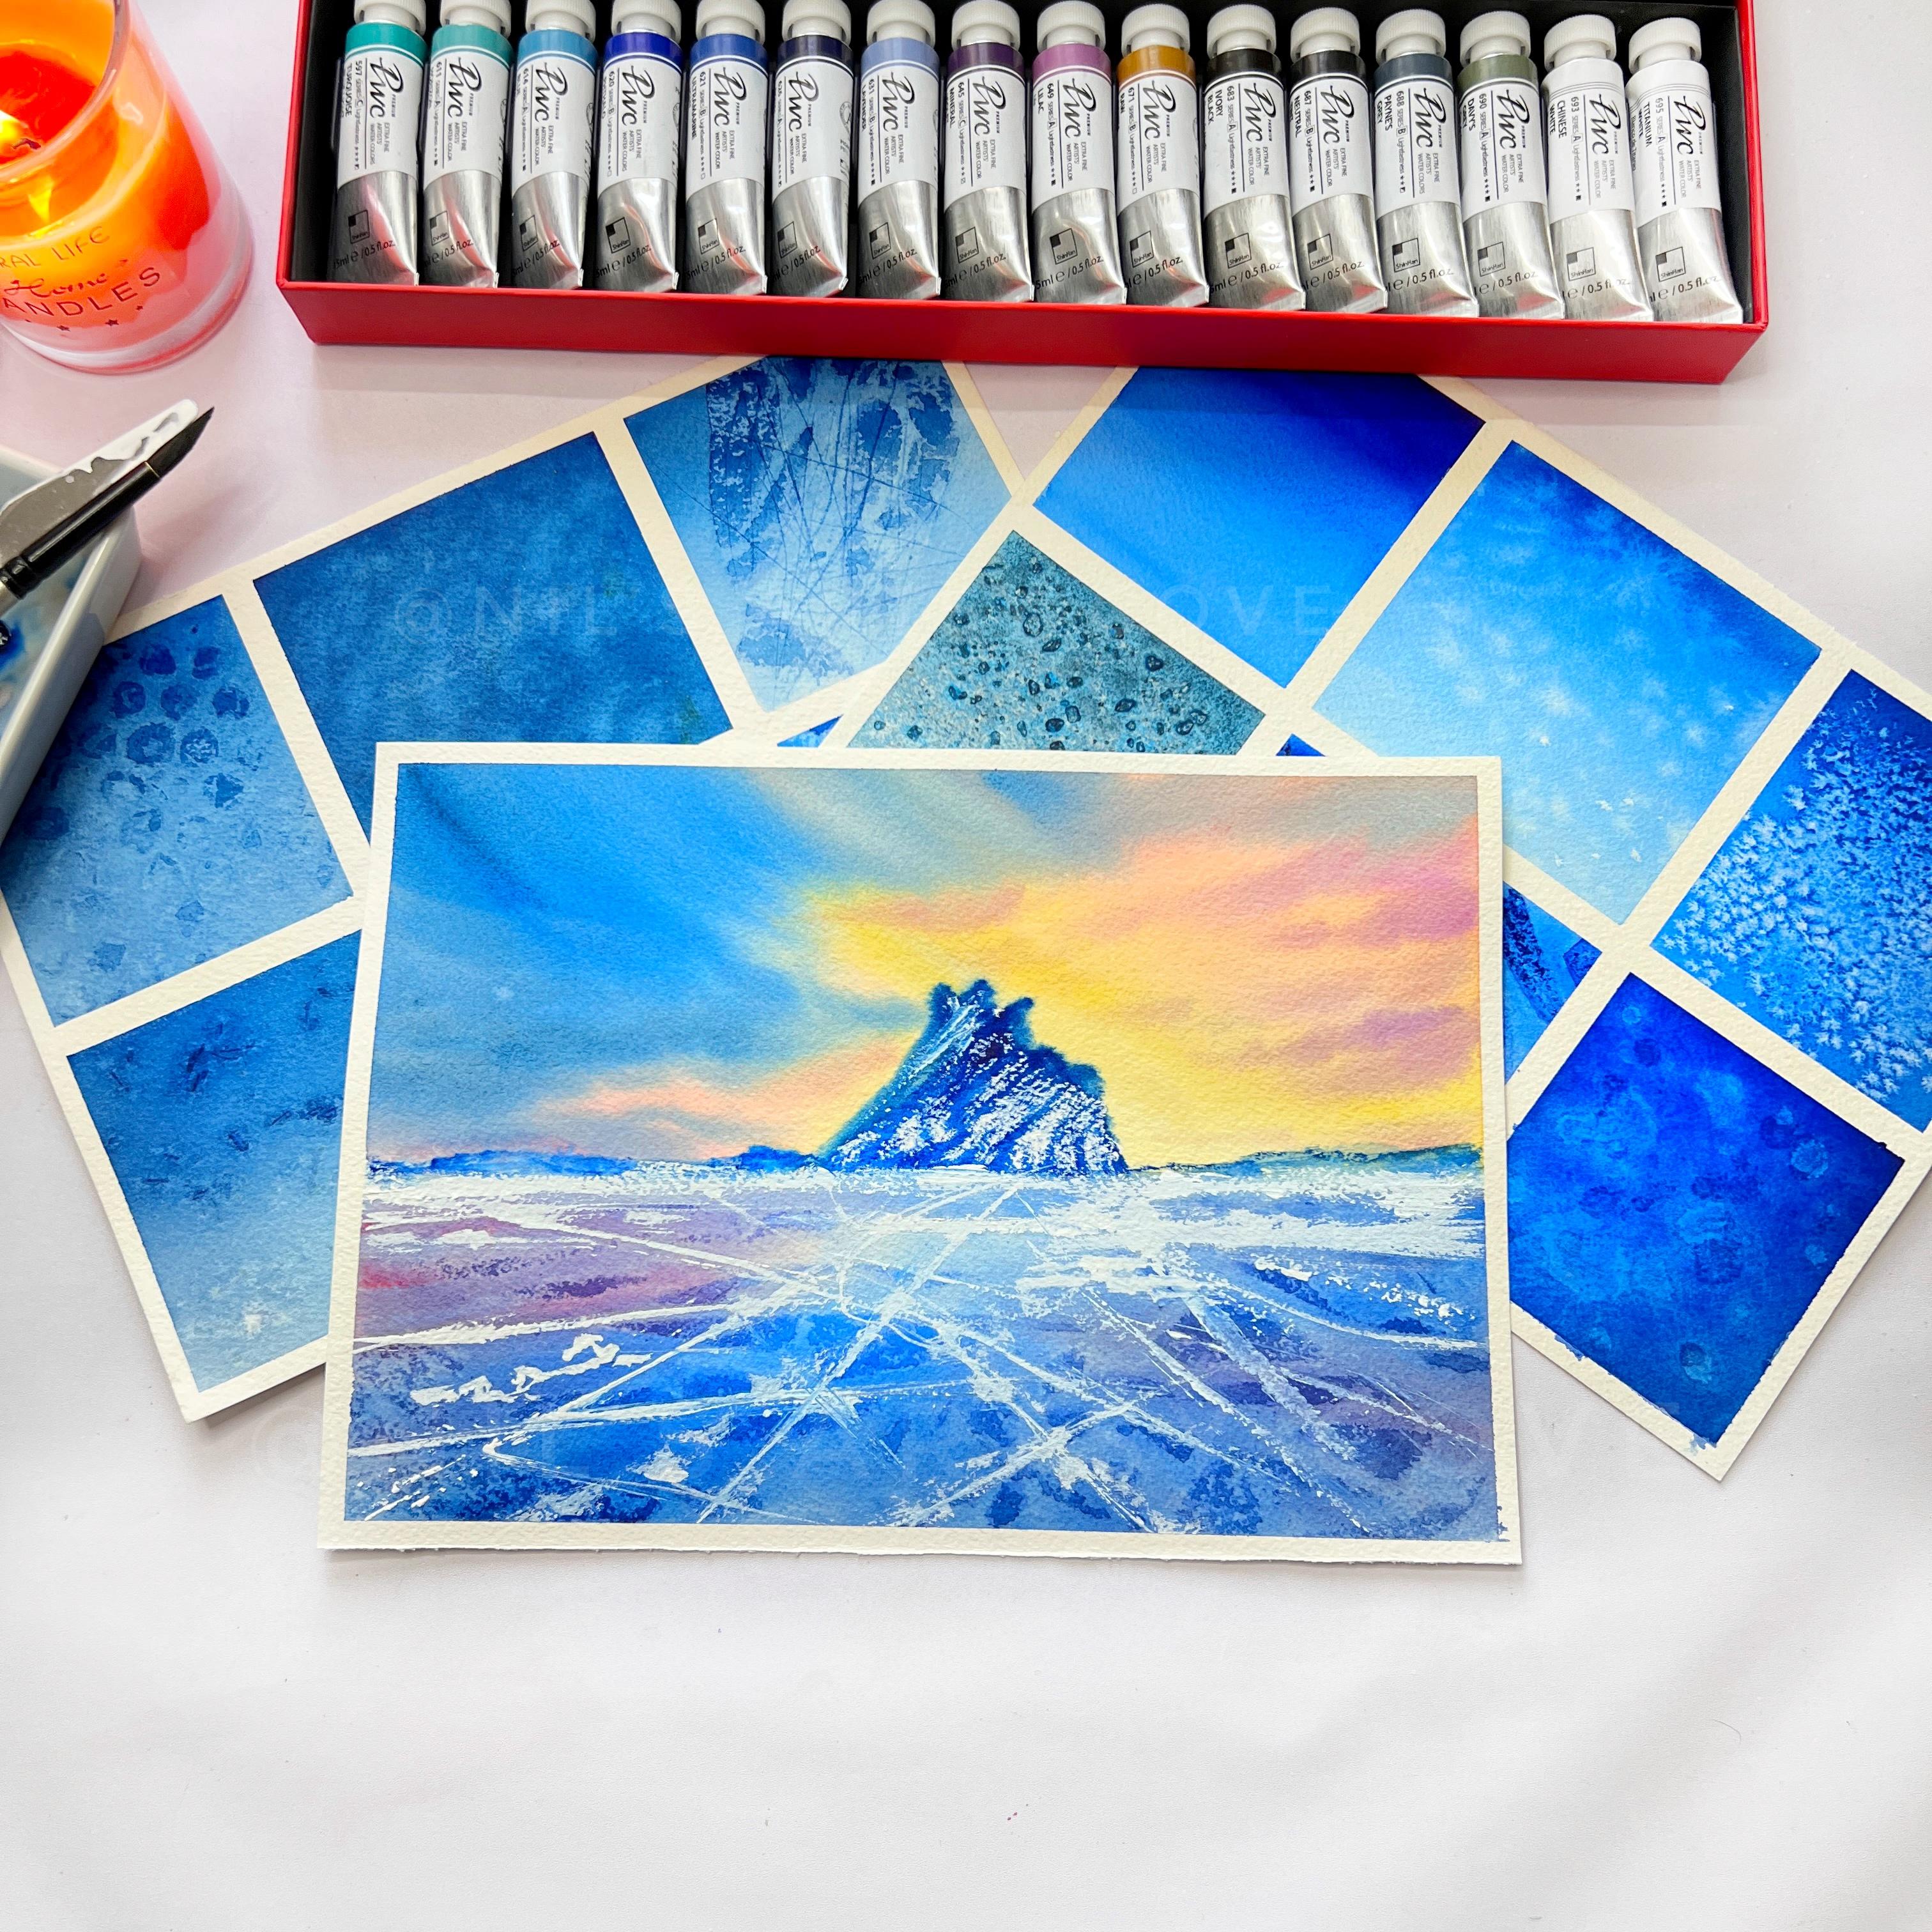
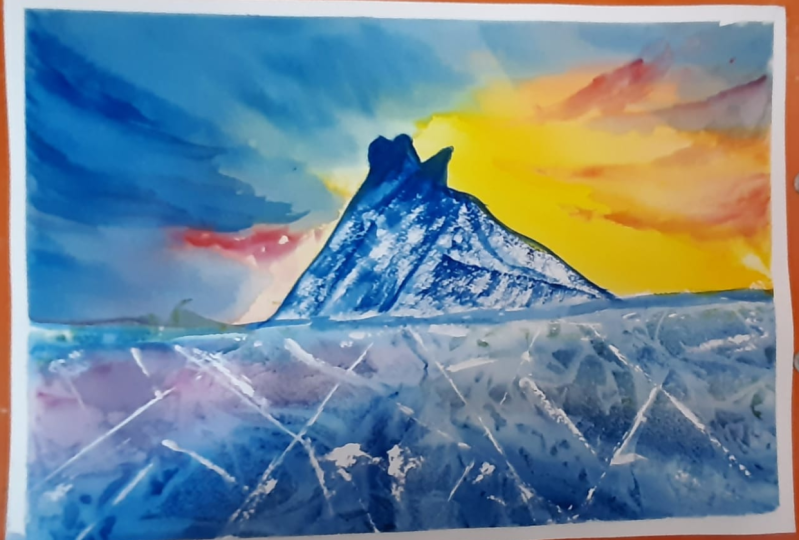
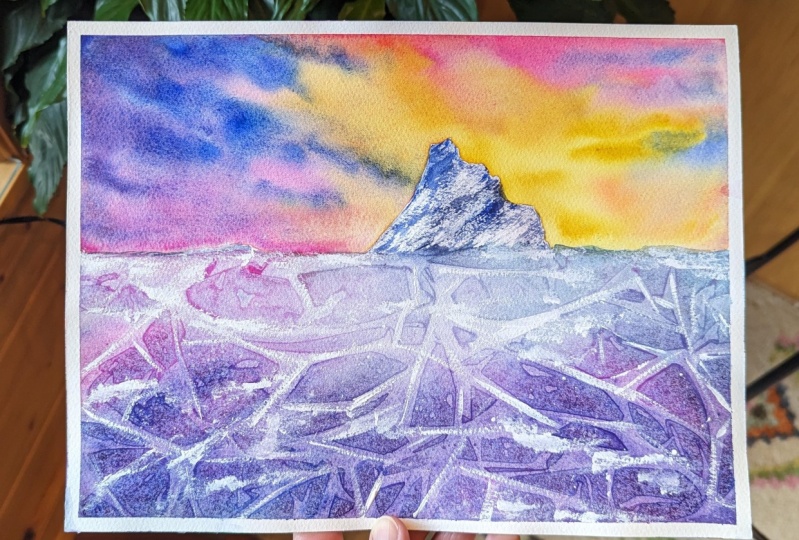
5. Warm up Project: Ice Cracks on Frozen lake: Hello, guys, welcome to
the Warm-Up session. Now, before we begin with
this practice session, I want you to take a close look at these
reference pictures and see the kind of textures
that we want to achieve for our this warm
up practice session. So those reference pictures, when you observe closely, you will see that, you know, there are a lot of bubbles
underneath and a lot of geometric patterns
also sometimes along with the jagged lines
or the cracks of the ice. So the easiest way of attaining
this kind of textures on a bigger or a
larger surface area would be are cling wrap. So this would make our life
very much easier when we want to create this
exact same textures like the reference pictures. OK, so I'm beginning with first, though wet wash off my
beeper now I will evenly and thoroughly coat my
beeper with this water. And you know, I will go with
the long and even strokes, ensuring that the water is well distributed at each and
every corner of the people. Make sure that you do this Deb very thoroughly and ensure that your paper is bad enough for
you to create beautiful, softer looking background
with some textures. This is very, very
important. Step guys. You need to have your paper wet because we are working on
a larger surface area. But if you choose to have a
smaller, low people size, then you know you won't
be having much of a problem in making or retaining the
richness of your paper. But when we are working
on a larger piece of paper like this are
larger than this, such as A4 sheet or
an A3, a Doeschate, it is very important
that you know you divide those sections
of the paper and read them thoroughly
so that you are able to create your beautiful,
softer looking background. Now, I hope you are observing the way my brush is
moving along the people. I am going ahead with long, short and even some random
strokes on the paper, but my tonal value is differing. I am going from darker
to the lighter shades, and now this darker to
lighter transitions is very, very important when
you are painting this frozen lakes or cracks in the ice because wherever
the cracks are occurring, there will be this
light lighter values because the light is passing through those cracks
and is getting illuminated. So to make those areas glowing, we need to go for the
light values where the other surrounding areas
we will have to go and, you know, layer it
with darker values. So in that way, the glowing part of the
painting will be enhanced. You need to work
a little faster, because if your paper
starts drying out, then you will not
be able to create those beautiful
transitions from darker to lighter values and
you will be having some very nasty hard
edges into your people. This is the reason why I always emphasize on the fact
that you must be at least using 100 percent cotton watercolor
papers, even if it is not. Art is great that will do, but ensure that you
were at least using a good quality of 100 percent
cotton watercolor paper. Because when your
watercolor paper is right, half of your battle
is one that you know. Paper plays a very, very major important
role in bringing out the beautiful effects or the beautiful painting
that you want to create. I am pretty satisfied
with the way my background is
already looking, the glowing light
and dark areas, so I will let it be, and now it's time
to work the magic. Yes, we will be using our cling wrap and
let the magic happen. So I have your card long grab of almost all kind of same
size as that of the people. But you can also create this bits and pieces
of cling wrap and use it to create textures on the sides
of the painting as well. Now, the center part is
the main important part. So, you know, use a bigger chunk of your
killing rev for that area. OK. Now, once you have set your cling wrap on the vet's office or
let it be, do not, you know, pick it up or again, lead back once said later, just be it will automatically create some beautiful
textures underneath. You need not worry about it. Okay, so let it dry
and then we will wait for it to dry completely
and begin the next steps. Now, our paper has
dried completely, it's time to remove
this ceiling wraps and look at those beautiful
textures that we have got, you know, we have
even got some of that bubbles and geometric
patterns as well. So it is really looking
very beautiful and pretty. Now it's time to go
with the whitewash, so I'll be here
using my whitewash. This is from Drew Straw, but you can use any white
gauze that you have, or you can even use your
white watercolor paint, but make sure that you are using it and not very
thick consistency. I'm trying to dilute
my white squash, and then I will
begin working with my palette knife now
in case if you do not have your ballot
and I do not worry, you can go ahead, grab those cards, you know, credit cards or debit cards, which are obviously
expired or even yard. Do you know any skill or
rule or like a steal rule or anything shop that you have with fine straight edges
that would do? I'm layering my palette
knife with, you know, that wide wash with the help of my fingertips because my
palette knife was not able to to reach out to the hogwash that I just
diluted in that palette. OK, so now I'll be using
the sides of the ballot and creating this long or
straight or crooked lines. OK, just along those
textures that we have obtained with the
cling wrap, I will go. Follow along those
same lines and I'll create this dry brush kind
of technique, you know? So since this gorgeous
kind of take, it will create some dry
brush, beautiful patterns. You observe closely
how I'm doing it. If you're not confident going
directly with your palette, knife or your card, practice it on a separate
piece of paper or any surface. And then when you are confident, go with the go with
it on your painting. This process is absolutely
fun and therapeutic, and you will absolutely
enjoy doing this, you know. Do not fear, do not worry, just go randomly
with this patterns. Just follow along the textures or the lines that you
have already got. And just, you know, go with the flow, basically. You need not worry or, you know, be scared. This is very, very easy. And the way I'm showing
you the techniques, you will feel it a lot easier when you are
doing it by yourself. I'm trying to
connect those lines, the straight or
the crooked lines in some way or the other, and create some broad strokes as well as some Dennard
strokes as well. So just to go along
with the flow and keep observing my movements, I would urge you to observe the entire painting and then maybe you can start on your own. After a while, I think I will be using my synthetic brush, the long down brush from
Princeton Velvet does CDs and I will be creating
the dry brush patterns. I am just going to create this very thin air and some
somewhere broader strokes, and I would just try to connect those lines that I just did
with the palette knife. Go very loose and handedly with long and steady
strokes, you know, make your wrist flexible, and that way you will be able to create this longer
strokes more easily. Now this requires some practice, but with time you will
also be able to do it now. Always go with very light
handedly and do not over. Try to overdo it. Too much of this
textures, you know, then the underneath those geometric patterns
will get hidden and I think I will stop it here now and wait for it
to dry completely. My beeper has dried completely, and I'm just loving the patterns
that I have achieved in using the Sling Wrap technique
and the palette knife. Beautiful, isn't it? So it helps the paint, you know, blotched my
people over there, I did not get clean edges. So always, always
make sure that you deep down your paper
very thoroughly. There must have been some gap or that
issue was not paper. So the paint to leak through it when I was working there
don't read anyhow. You can always chop out the sides and retain
the main frame. I'll see you in
the main project.
6. Class Project -Winter Sunset at Lake Baikal: Part 1: Hello, and welcome back
to a mean project, so before we begin, let's quickly take a look at
the colors that we are going to require for creating
our mean project. So I am going to go with a till sunset sky
for the main project. So your composition
will be the sky of middle ground mountain
and in the foreground, we will be having
our frozen lake. OK, so that's the colors that
we are going to require. Now I'm arranging
these colors on my this ceramic palette one
by one at different corners. So you can also, you know, arrange your colors
accordingly so that it is easier when we are starting out with the
painting for you. Do not again go squeeze
out the colors. You can directly begin out the colors once you
arrange your colors and your color palette or the
ballot that you are using. So here is my cadmium
yellow deep now this color we will be
using for our sky. The next color would be
our cadmium yellow light. Now both of these colors we
will be using for our sky, along with lilac and the bright shell pink
or the basal pink. Now, in case you feel the shade means that I am calling
out may be different, but these are all
based on shades. You can mix a little bit
of your white squash with your regular beams
and make them turn based on OK. Now, for example, this lilac you can obtain
by mixing a little bit of your blue along with
your pink like opera, pink or any bright pink, and mixed this color to
get a brighter purple. So with that bright purple, you can mix your white
squash and turn it and do this based on shade now that
we are done with the colors. Let's briefly look at
the sketching part. So here I am, using my pencil and outlining almost three fourths of the
people the horizon line. Now you're just
right at the center. I am going to go and create
this tilted kind of mountain. So this is the main
mountain ridges, the Baikal Mountain, which is situated in Siberia, Russia. So the inspiration is
from the photos that I was looking at of Lake
Baikal and its frozen lake. It's one of the most
most popular lakes and the winter sightseeing
places in Russia, and it is quite famous
across the world. So I will begin with my skate by layering it with some water. Now me do this, Deb, very, very cautiously. You should not be allowing your water to
seep into the mountain, so just go around
the mountains and read your paper
uniformly and evenly. Now we will be starting
out with the colors, so I will go red
from light to dark. So I'm starting out with my lighter tones of
yellow. So I am. You're going with the
mid value intensity of my yellows because
once the paper dries, it will eventually be a
little bit more faded out. OK, so go with the mid
value tones of your yellow now towards
the upper portion, go with the lightest stone. So when you keep
dragging your brush, the colors will automatically
start lightening out as your brush moves
across the paper. Now, grab some of that
pink and lay it on top of that yellow that you have just layered on the
topmost section. So this is how we are
going to work right on red and create a beautiful
soft door based on sky. Always observe the brush
strokes that I am doing. I am, you know, going
from one end of the paper to another
end with very long, gentle strokes of my brush. If you are someone who is always very
intimidated paintings, guys with watercolors, then
I have a glass for you, my glass on painting 15 days of expressive watercolor skies with watercolor paints and
inks should benefit you. This glass was
designed absolutely for beginner to an
intermediate level. Art is where we have seen over 15 days different
tips and tricks, how you can create beautiful, stunning skies and also some very dramatic skies using inks as well as your
regular watercolor beams. So you know that glass is
highly recommended for you to check it out if you are a beginner and is stretching our skies
for the first time. So your first sky, I have started out with my Blues and I'm going from, you know, the corner end to the center using the slanted
strokes of my brush. So as I'm going towards this and though my strokes
are getting lighter, so when I'm starting out, I am, you know, laying layering the paper
with the darker tones. That is how we will
obtain that beautiful, dramatic sky that I want
to create your oops. You can see that the blue paint
over there on the yellow, so I will go and
gently lift it out. You can do this. Steps up process only when
your paper is wet enough. Only when your paper is wet, you will be able to, you know, move around the colors and a softer looking sky
can be achieved. Whenever you are
clearing, your skies, always go with the, you know, softer strokes, because when you use to press
down strokes on your paper, you might be lifting out
the background color. So go over it very gently
when you are going like with one color over
the other, like you're. You can see how gently I am
moving around the brush on the paper and I'm creating this must be soft
looking clouds. So the more gentle you
will be on your paper, the more softer looking clouds you will be
able to create. Now, in order to add a
little bit more of drama, I'm going ahead and adding those lilac on the
right hand side colors, so just little strokes from
the corner to the center. A broader at the corners
and narrowing it down. So yeah, I'm done with the sky. So now it's time to
let the mountain. So I will go with the dry brush technique
for the mountain, for creating the
dry brush strokes. I will, you know, not think I will go ahead
and use my pillow glue. I'll use some intense
pigment of the glue and I'm dabbing my brush
on this piece of tissue paper so that the
excess water is absorbed. Now you're at this side because we had just
been to the sky. The idea was little bird, so the colors, you know,
started spreading. So do not worry, we will go ahead with
some darker tones in there and the rest
of the other areas. See, we are getting
this dry brush strokes. So when you have
a textured paper, it is more easier
for you to do this. Dry brush patterns and this dry brush patterns come out very
beautifully when you have a textured paper and more prominently when you go
for a rough green paper. This is how we are
going to build our mountain and build those
textures on the mountain, so this is a kind of continuous
step and process so you can do this dry brush techniques until you feel satisfied
with the mountain. So I think I'm
going to stop here. I'm pretty happy with how
the mountain is looking now. It's time to go ahead and create the dry brush strokes for the surrounding
mountain ranges also. So I'll use the same technique. I'll use the same
blue color and I'll go around and do this dry
brush strokes by just dragging around the brush
on the paper along those smaller hill of our
mountains that we have created. And that's it, I will see you at the next part of the painting, where we will be starting
out with the lake.
7. Class Project- Winter Sunset at Baikal at Lake Baikal Part 2: So let's begin with the lake, so I will be going
wait on, wait, I will completely let my lake section with an
even coat of water. So do this step very gently and thoroughly because
you need this area to be wet for a longer period
of time for in order to get those textures that we want with the help
of duckling wrap. OK, so now that we are done, I will be starting out
with layering the colors. I will be using my blue
color and I will be going. But the longer slanted
strokes these are almost like slanted horizontal
strokes that I am creating towards the
center of the paper. And this is almost, you know that along the side
lines of the prospective, you know, the center perspective
is my the Lake Mountain, which is standing
tall over there. So with help of that, we are creating this structures are the strokes of the brush. So this is the lake
which has got frozen and the ice has formed
cracks accordingly. So the strokes that I'm
creating right now, with the help of lighter and darker tones that will denote the cracks once we let
it with darkling wrap. The colors that I'm
using for the lake are basically our sunset sky colors, so you can see I'm not too much keen on you're
going ahead with the yellow because I have
already laid it with blues or one's yellow
and blue makes. It will create an
muddy green color, so I do not want that. So instead, I will go with
my lilac and my pink shell. Shell pink color because
these two colors really blend and complement
well with my blue. So with that, I am going
ahead with the leg. Now I'm adding some more of those darker tones because
as the paper is drying out, the colors are starting to
get lighter and lighter. So use very gentle, long strokes off your brush. And you know, when you are trying to create
those light strokes, use the belly of
the brush and drag the colors inward
towards your paper. And when you are
starting out and want to let it with
darker strokes, go with the tip of your brush because that is where you
have loaded the pigment. I am really satisfied with how my leg is looking right now, so it's time to
bring in our magic. Ingredients are killing them. So I will now let our, you know, first I will cut my cling
wrap and do some pieces. And based on the
strokes that I have just layer layered on the people with the
help of my brush. I will go and place the cling wrap according
to those strokes, so that I get those textures and the cracks accordingly to the strokes that I have
just layered, you know? So that would be giving the painting a much
more beautiful look. So based on the placement
of your cling wrap, also sometimes a
landscape can take form, you know the texture
that you want to achieve in your landscape. So, you know, these
are all the small, small tips and tricks that you should learn and go
ahead and try to implement it on your own
whenever you are trying to bring something new or
something interesting. Now, after placing
this cling wrap, do not displace it and do
not use any you know he'd gone or your hair dryer because that will not give
you the desired look. Let it dry out naturally. Now, my beeper has dried out, so it's time to remove
those cling wrap. Yes, see how beautiful geometric shapes we have got along
with some baubles. So these are looking like those striped bubbles
underneath the ice formation. Right now, it's time to bring in our palette knife into work, so I will go squeeze out
some of that white gorge and I'll start layering
my palette knife with this white squash and start creating the textures towards the horizon line
because that's where the are means no
components will be. So it will be like some
broken ice shards over there. So I'm trying to
create that effect. So I'm just going
with the tip of my palette knife and he this is just like using your brush and creating on
creating dry strokes, you know, but in palette, the shapes and tho textures that you get is really
very different, and it's so very
fun doing this way. So this is a most widely
used technique if you have seen for most of the
acrylic paint painters, also whenever they want to
go and create textures on big canvases or doing textures on mountains
or in part as they use, they take the help of this palette knife and
create this textures. So I am here trying to mix
and match techniques here and creating the same kind
of effect and the outcome. So I'm really glad
and satisfied with how this technique
has worked for, ah, you know, Frozen Lake. Now, just like the same way, how we had created our ice cracks in our
warm up practice project, I am going to similarly
do the same way here too. So I am layering my gosh
on the palate knife with the help of my fingertips and with the sides
of the palate knife. I'm going and creating this long, horizontal straight lines. I am following the directions
wherever you know, the textures have created those
creases along the people, so I'm just going ahead and creating filling
those cracks up. Keep doing the
steps until you are satisfied with the
crack formations, but always remember
not to overdo this crags because the
deck shows that you have guard with the help of
Clean Grab that should also be visible underneath
this crack, right? So that is the main objective. So, you know, at the point where you feel
that you are overdoing it, please do stop and do not go overboard with this
crack formations. Now I will be switching to my
synthetic long brown brush, and I'll just go
with very, you know, 10 lines connecting
those strokes that we have just done
using a palette knife. I will just go connect
them and create some dry brush patterns on these cracks along the
sides of the cracks. So that would look like, you know, the snowy deposits. And though cracks that are
inside the snow that has gone gotten the texture
on this lake now. So yes, now it's all about detailing this lake with
the help of your brush. Use a combination of two no longer strokes and some dry strokes
here and there. See, now I'm creating
those Noé deposits here, but the tip of my brush daggers that I'm using is a
very thick consistency. So make sure that
your gua sha is not too watery or else you will end up in spoiling the look of
the, you know, licked. So make sure that the washes of correct consistency are even if you are using your
white watercolor paint. Make sure that it is up to consistency and not too watery. And I think that's it. More or less. We
are almost done. I'll be going in and
filling in all this white, snowy areas here and there. So this would be
like floating shards of ice on this frozen lake. Are there bigger chunks or
the bigger shards of ice which have separated
based on the cracks? OK? So yes, it does. Your imagination
and yard inference are how you are
inferring the subjects. I think I am pretty
much satisfied and I'll create some more
textures here and there, and then I'll stop with that. My beeper has dried
up thoroughly, and it's time to be loud and masking tapes from
all the four sides. Now I'm really happy with
how this everything played well together and
how beautifully we have created our frozen legs. Now, if you like my style and though
approach of teaching, please do leave a review
for me for this class. This would help my glass
to reach a wider audience. And also I would love to see your projects and
creations and try out the other techniques and create something fun incorporating
in your landscapes. So until then, wishing you guys a very happy holidays
and a new year ahead.
 Nilam Roy, Art Instructor