Transcripts
1. One Stroke Painting: Beginner-Paint a Rosebud and Leaves in 6 Easy Strokes: How would you like to paint
like this or like this? Hi, my name is Sue elder, Eddie
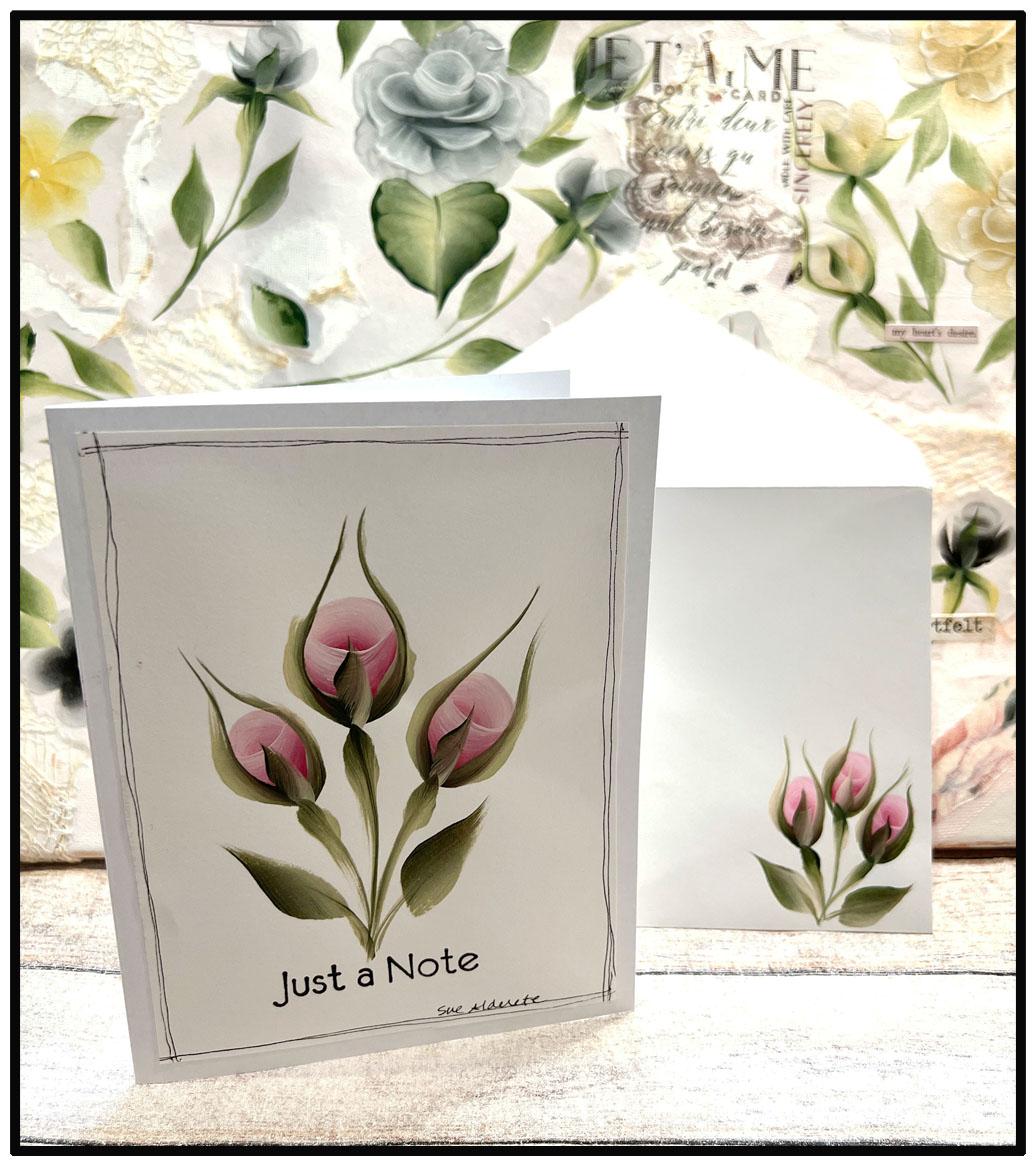
2. Project Intro: Paint Rosebuds and Leaves on a Greeting Card Front: In today's class,
you will be applying the rose bud and
leaves to a piece of card stock that will then be applied to a
greeting card front. I chose this greeting
card project as a beginner's piece because it's just a small bite and
not something large, like painting onto a canvas. This is also a way to share your art by sending
a special message to someone who doesn't love to receive a
card in the mail. And it will be
extra special being that it was made by you. I suggest buying the
recommended brushes, paints, and floating medium to set yourself up for success. When I first started
painting this style, I struggled because my paint wouldn't blend and glide
over my paper surface. Come to find out
I had overlooked the tiny detail to
use bloating medium. This is definitely
the secret sauce. I've painted many cards to
send to my family and friends. And I'm always told that
they saved my cards. Once you have the proper
supplies and get ready to start, remember to take a
deep breath and relax. Do this periodically and don't stress or strangle your brush. Relax and enjoy this experience. The first step you
should take is to download the supply list and either purchase online or take with you to
the craft store. Then download the handouts provided in the class
resources section. These handouts describe exactly how to create the strokes. And you can also place
a piece of wax paper over the top and trace
paint, the strokes. This will help you know
how hard you need to press down onto your brush
to create the strokes. I'll see you in the next lesson.
3. Supplies : Let's talk about supplies. The supply list is available as a download in the class
resources section. Some items may be available at your craft store or on Amazon. And I have provided
links for you. The folk art acrylic paint. This paint is thick and creamy and is perfect for
this style of painting. The folk art floating medium is a clear gel which helps you
glide along your surface. One stroke brushes,
there's a three brush set, or you can purchase of
ten brush value pack. There's blank cards
and envelopes. And diversifying black
ink for stamping. And then we have the stamp set with various sentiments
and an acrylic block. And I use a fine tip marker, and I prefer the micron 0.02 in blank black blues, you can use any kind of glue that's not going
to be too runny. You also need some
white card stock, white printer paper to practice. Wax paper to place
over your car. Your downloaded teaching
guides to trace paint, your strokes, a water container, paper towels, and
a Styrofoam plate. See you in the next lesson.
4. Loading and Blending Basics: Hi guys. This lesson is one of the most important lessons
in one stroke painting. If you don't load and
blend your brush properly, your strokes aren't
going to be successful. I've loaded this non absorbent
Styrofoam plate with Barry wine and white
thicket sunflower. And here I have the
floating medium. Floating medium is a clear gel that when you use it lightly, it helps your brush glide
across your paper surface or any project you're
working on. Here. I have these boundary boxes, one and a quarter inch
tall and an inch wide. And I place this here so you can understand what I mean by
staying within the boundary. I don't want you
loading your paint over here and over here
or going longer. Because when you're doing that, you're taking paint off of your brush instead
of loading it. And your goal is to
load this number 12 flat with paint
two-thirds of the way up. So I'll show you how we're
going to load our brush. First. We're going
to dip it in water. Then we're going to
remove all that water. We don't want water
on our brush. We just wanted it
so it's not stiff. So you're gonna dip one
corner into the white, one corner into the berry wine. And then you're
going to press down. You press hard. You want to see
this brush open up. See how the bristles
are opening up and pushing paint up into the brush. Let's grab some more
corner and corner. Oops. Did you see what I
was gonna do there? I would have done
this incorrectly. So stop and think before
you put your brush down. It's got to go this way. So we push that paint up
into the, into the brush. Look at how pretty that is. That's a nice gradient. So now I'm going to grab
a little bit more paint. And normally I'll do
this three times. And there it is. See how
far up I got that paint. Now, I'm going to lightly, lightly touch into
that floating medium. You put too much
floating medium. It's like pudding,
too much water into your paint and it's just
going to get messy. But just a little bit more. There it is. And that's how you
load your brush. Let's see what it looks like. Oh yeah, that's really nice. The cap pretty that is. Okay. Sometimes you might not
need to add more paint. You just need to flatten it
so you get that nice chisel. And say you, by mistake, dip your white side into your berry wine and
you're thinking, Oh, no, what am I
going to do now? I got to wash it all out. No. Stop. And just pull off the paint with your paper towel and then go back to blending. There it is. You've saved yourself
from that mistake. Nicer blend. See you
in the next lesson.
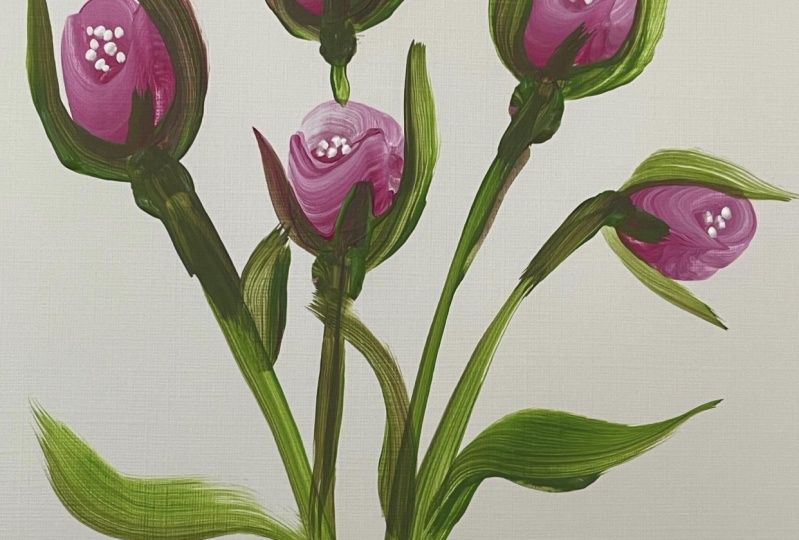
5. Lets paint the rosebud: Welcome back. In this lesson,
we're going to learn how to paint the rose bud. Download these two pages of teaching guides that I have for you in the class
resources section. With a mix of white
and Barry wine. We're going to paint
these rosebuds. So I have these posts that I've drawn here on
my piece of paper there, the, the width of my flat brush. So with my white side up, I'm going to start
on the first post. Minute press down as
I'm coming up and over. Slowing down, stop and stand up. Fresh white paint again
on that first post. Press, come up and over
like the letter N, stop and stand up. Fresh paint. First post, white
side up, up and over. Stop and stand up. First post wide
setup up and over, stop and stand up. Now I'm going to show you how to complete the bottom
of this stroke. We start at the first post
with fresh paint, white. Is it the top? Press down? And over to your friends,
your second post. You can see how it got
kind of ragged E there. I'm glad you saw
that because that means that my brush is too dry. I don't have enough paint. I might need a tiny bit of floating medium because
it's starting to drag. And let's fix that. So we come back over again
and waste breaststroke that. See how easy it is to fix that. So let's get fresh paint. First. Post, white side up, press down and up
like the letter. You do it again. First pose, press down and up. Like letter, you. Press down and up
like the letter U. And in our next, after we learn how to paint
the one stroke leave, I'll show you how we
can finish this up. We'll be adding this calyx, the stem, and the leaves. So I'll see you in
the next lesson.
6. One Stroke Leaf: Yay. Now it's time for my favorite, the one stroke leaf. Download the handouts from
the class resources section. And in this handout, you can see how I talk
about the face of a clock. And we're going to have our brush at 11 o'clock
and at five o'clock. And then we're going to press down and end up at two o'clock. So let me show you how
to create these leaves. I still have a little
bit of this red, this berry wine and
the white mix in here. Want to show you something. I'm going to pull off
some of this paint, but not all of it. And I'm going to load my brush with the
green and the white. And do you see how
it's blending here? It's pulling out some
of that Barry wind and your leaves end up having a bit of an
olive looking color. So let me, let me just show you. Of course, we can start with the fresh clean brush
and just do your green, white, and yellow mix. Here, I'm going
to add a touch of the yellow bit
more of the green, trying to adjust this. Also trying to make sure I
have enough paint in my brush. Number two-thirds of the way up there it is nice and pretty. Add a little bit of
a floating medium. Okay, now it's loaded. I'm gonna be at that
angle, like I said, the 11 o'clock and
five o'clock angle, this doesn't look like
it's blended out, right? I see a big glob of white. What you see here, you're
going to see here. So you wanna make sure that
it doesn't look too messy. So you're going to press
and you're going to turn it slightly and
come up to a point. I'm going to add a little
bit more floating medium. It looks kinda dry. Let's try that again. We're at that angle. 11 o'clock, five o'clock. Press turned slightly
and come up to a point. I feel like this
is still too dry. I'm in an air
conditioned room and I think my paints are drying out. Let's try this again. Press turns slightly
and come up to a point. Do you see how pretty that
little blend is there being that I didn't clean
out that Barry wine. Okay. We'll do one more. Turn slightly and
come up to a point. Now, we're gonna
go the other way. Because not all leaves
face the same way. Okay, so now I'm gonna be at this angle and
I'm going to turn slightly up to a
point. There it is. We're gonna do we're
gonna paint some leaves. Going up. Fresh paint. Still looks like it's
a little blobby. Let's try that. Okay, so now I'm gonna be the
bottom like this. Press and turns slightly
and come up to a point. You see how I'm just
rotating my brush? Rotate it as I'm pressing down, stop and come to a point. Let's come down now. So our leaf is going to be
coming down to a point. I'm going to do. I'm going to show you how
to do these shadow leaves. So I'm going to take
that paint off. And then I'm just going to add a little bit of
floating medium here. See how nice and
soft these look. So pretty. That's how you do shadow leaves. So next, I'm going
to show you how to create this trio of leaves. So we're going to load our
brush again with some green, white and a little
bit of yellow, little bit of floating media. And what we're gonna do here
is with our green side, we're going to
tilt back to where only the green is touching. Then I'm going to place
my brush at an angle, press down and come to a point. Just like that. And that's how you create that trio of leaves. See you in the next lesson.
7. Calyx, Stem and Leaves: Okay, So I'm going to show you how to finish
up this rose bed. We're going to be
painting the calyx, which is this area here
around the rose bud. So with fresh green, white, and yellow on your brush. I don't have enough green here. There we go. A little
bit of floating medium. So I'm gonna be at
this angle like this. And I'm going to push
down and then hug around this bud and then tilt the brush back and just lightly
paint this tip. So we'll do it on this one here. So I'm at this angle here. I'm going to press down, tilt back light and my pressure
and come up to a point. We go. So now we're at this
side. Same thing. Press tilt back,
lighten your pressure. Only the green is touching. Load some fresh green
on here, fresh white. And then here I'm
going to flip it to where the green side is up. I'll be right here and paint this tiny little
one stroke leaf. Flatten out my brush
with more paint. Now here to create this
little thing here, this little bud, you're
going to press down. The green is right
under the rose bud. You press down,
lighten your pressure, and then just the
green is touching. So let's do it on those other to grab a little bit of green, little bit of flooding medium. Press down in here, this angle you press
lighten air pressure. And then just the green is
touching the other side, press at an angle there, decrease the pressure, tilted back to where only the
green is touching. And then make a
little curve there. Fresh paint on here. Again, green side is up. Little small, one stroke leaf. Little bit more paint. Green side underneath
the butt, press, lift and jazz the green
is touching. Last one. You're at an angle, pressure, lighten your pressure. Just the green is touching. Your hugging that rose bud. Angle. Press releases the pressure. Just the green is touching. Fresh paint. Green side up, press like a one stroke leaf
and come up to a point. Fresh paint. Green is under the bud. Pressed open up
your brush a little bit, decrease your pressure. Only the green is touching. There's your rose buds. We can add a couple
of leaves to this. Fresh paint. I'm going to add a leaf here. I have my green up on top. So I'm going to press, come up to a point. Press come up to a point. And then just the green
part is any fresh paint. There's no more green
there. Just the green is touching into your,
into your leaf. Again. Press open up
that brush a little bit. Needs some fresh paint. There it is. Fresh paint. Press open up and lift. Last one, last one. You go. That's how you paint a rose bud. I'll see you in the next lesson.
8. Painting the Card Front: Okay, Let's get ready to paint these rosebuds onto our
piece of card stock. Or a piece of card stock
is cut a little bit smaller than our card front. So just to look slightly
smaller all the way around. So let's load our
brush with paint. So again, dip it in water. Pull off that water and load your brush with your very
wide mix and your white. And staying within
that boundary box that I talked about earlier. You want to just stay here
and not go any further. Because like I said,
that takes paint off. You want to load your brush. So just keep adding
about three times. Press that into your brush. And a touch of floating medium. There it is. Let's get painting this. So our rose buds are a little
bit higher than the center. So we'll do our first
one right here. Press down, and then come over to that for
that second post. First post, press down. Come over to the
second post stops, stand up. Reload your brush. One on this side, up and over. And then down and up. Reload. Over on this side. Press down and
over, down and up. And there's your rosebuds. Let's pull off some
of this paint. Load our brush with
the green and white. So on the PRB, on
the Barry wind side and your green green
and white mix. I exaggerate when I put down when I put down
into the paint. I don't try to go this
way straight in because I can get it to go all the way across and I don't
wanna do that. I want to make sure that I
just get it on the corners. And then blend, grab
a little bit of the yellow little bit
of floating medium. And let's paint our calyx. So let's bring you
back down here. And we commented
angle, press down. Curve, come up just lightly
touching with your green. Let the green side to the top. Tiny one stroke leaf. Adding more paint,
come to this side and press hug the bud,
releases the pressure. Just the green is touching. Fresh paint. Angle, press down, hug the bird, release the pressure,
tilt back on your brush to only the
green side is touching. Fresh paint. Green side is up. Small little one stroke
leaf, they're fresh paint. Angle, pressure. Hug the bird, release
the pressure, tilt back. Only the green is
touching fresh paint. Angle, pressure. Hug the bird, release
the pressure. Just the green is touching. Fresh paint. Add a little one stroke
leaf right here. Reload. Okay, now we're gonna do this. The stem. So with the green touching, press release the
pressure and come down. Press release the
pressure and come down. Press release the pressure. Flatten out my brush
with some fresh paint. Let's do one stroke. One on each side. There it is. The front of your the
front of your card. See you in the next lesson.
9. Stamping a Sentiment, Inking a Frame, Signature 1: In this lesson,
we're going to be stamping a sentiment onto the front of our
piece of card stock. And then we're going to add this little whimsical frame around it and signing our card. So let me go ahead
and get my ink. Let's move this aside. I'm using versa fine
pigment ink and it's black. And I'm gonna get
a little piece of scrap paper just to test it. I've got my sentiment here on a, on an acrylic block. And I'm going to lightly
tap that onto the ink pad. Take it to the paper, press down evenly and lift. And there it is. So now I'm gonna do it
onto my card front. Lightly tap onto the ink pad
to see that it's straight. Press down and up a little bit, but it's still looks okay. Now I'm gonna go ahead and add this frame around
here with my marker. And I'm using a
micron, a micron 0.02. So I'm going to take a
piece of scratch paper. So I don't get it on my surface. And I'm just going
to draw this line. Doesn't have to be straight. It doesn't have to be even. Crossover. Turn it over. Do the same thing. I'll use my pinky here to
kinda help me guide it. Over. To the next side. Flip it over one more time. Lips went off the
piece of paper. There it is. Now I'm going
to sign my name down here at the bottom. Valley girl. Now what we're gonna
do in the next lesson is we'll attach it to the
front of our card front. See you in the next lesson.
10. Attach Cardstock to Greeting Card Front: In this lesson, we're going
to attach our piece of card stock to the front
of our card front. I'll place it here
so that lays flat. And I like to use a glue that
not too runny, not too wet. Beacon makes the paper glue. There's also Tombow. Multi-legged glue. Scotch has a quick adhesive. And then you could also
use this tacky glue. Just don't use too much. He is too much, it might
buckle your paper. So just going to add a line, thin line of this glue
on the back side. Flip it over, center it onto
my card front. Press down. And wallah, there it is. Finished card. Now that you've finished
painting your card front, you can paint some rosebuds to the front of your envelope
to make a matching set. I hope you've enjoyed my class. If you have any
comments or questions, please leave in the
discussion section and share your project
in the project section, I would really love
to see your work. I'll see you in the next lesson.
11. Cleaning your Brushes: I talked to you
here a little bit about cleaning your brush, wipe off your paint, then you have a little bit of dishwashing soap in
the palm of your hand, and then just start to
blend that soap up into it. Swish it around in your water. And can you see how that soap is just drawing that paint out? You can see that. Look at that. You don't want to
leave any paint in this brush, you'll ruin it. And these are nice brushes. So I'm going to rinse again. Usually I do this at the sink, but this is easier for me to
show you how to clean it. Let's try this again still. It's pulling off some of the berry wine in
there. You see that? We thought that there are paint was cleaned out of
that brush and it's not pressing down
back and forth. Rinse again into the water. Does that look Queen? It looks clean. I don't know if it is. Let's see. No, we're still pulling out some
of the very wide. Keep doing this
until it's clean. What's important about
these brushes is you want to keep that nice chisel. If you have paid that dries up into the feral here,
the silver part, it's going to make your
brush fat like that. And you don't, you
can't get that nice. Chisel. Notches are so important when
you go to do those leaves. I think I've got
it. There you go. Nice clean brush. These will last you a long
time. You take care of them.
12. Conclusion: This is the conclusion of my one stroke painting class
on the rose bud and leaf. And we painted it
onto a greeting card. Remember, you can do this. Anyone can just practice, practice, practice, and
believe in yourself. Thank you, and I
appreciate you being here. Be on the lookout for my other one stroke
painting classes. Be safe and take care.
 Sue Alderete, Always Believe in Yourself!