Transcripts
1. Intro: Hi. I'm Sue. I'm an artist with over
40 years of experience in painting with
watercolors and acrylics. My other passion is
anything to do with sewing, whether it's making clothes, quilting or meditative
hand embroidery. In this beginning
friendly class, I'll combine both of my passions to show
you how to create a simple embroidered
outline and then fill it with vibrant colors using
Derwin Inc tense pencils. You can keep your
work soft or add layers of color to make
it bold and vibrant. This process reminds me of the joy of getting a new box of crayons and a coloring book and just letting your
imagination run wild. I'll show you which supplies
to buy to be successful, how to prepare your fabric
and transfer the pattern, how to create a simple
embroidered outline, and how to apply the pencils
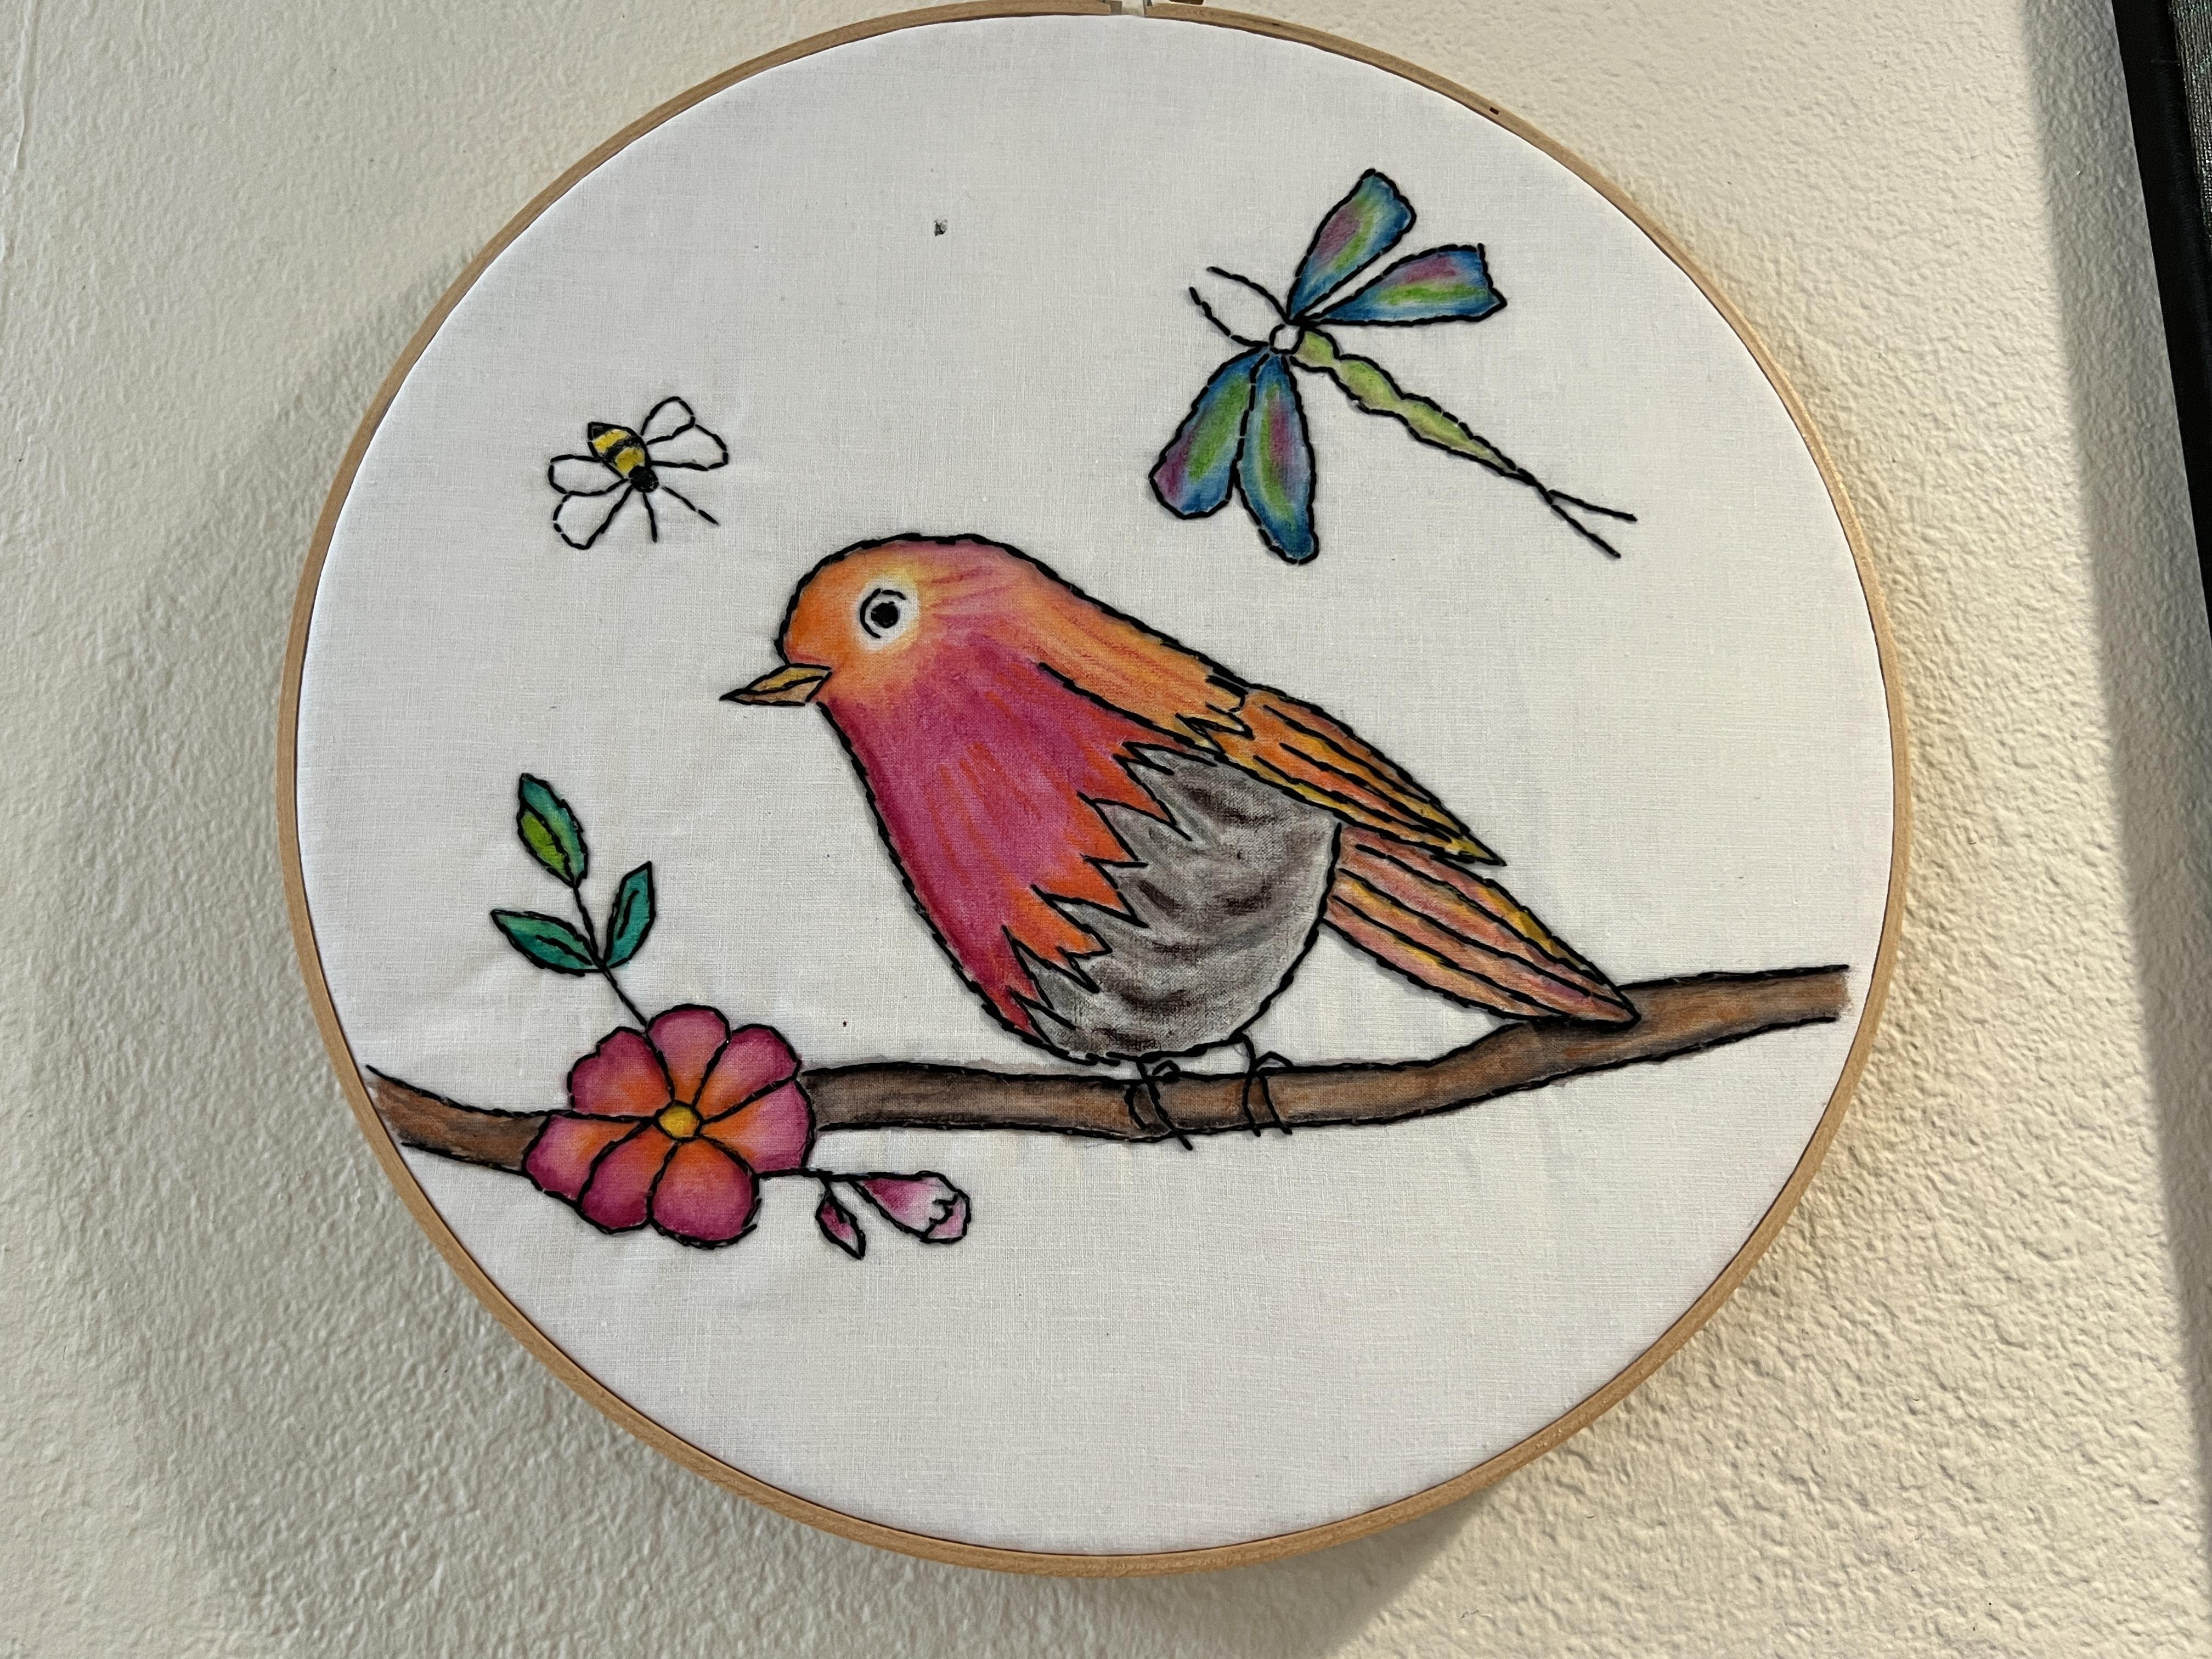
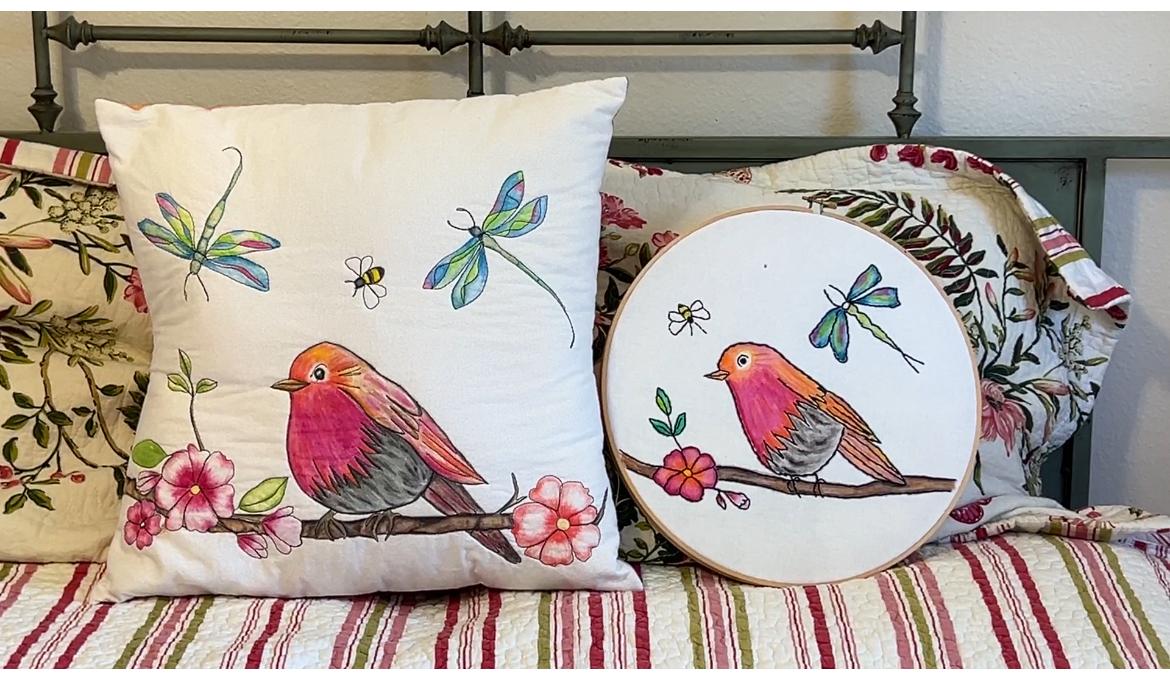
and adjust youre color. For the class project, you will be creating a cute, fluffy bird with this friends, the dragonfly, and
the honey bee. When you finish, you will
have a unique wall hanging or a piece large enough to
use as a pillow front. So please join me in this
fun and creative class.
2. Supplies: What I'm going to talk
to you about right now is which supplies to get. First off, you're
going to want to get a 12 inch hoop and this
will be for your project, a four inch hoop,
that's for practice. You want some cotton fabric, large enough to fit
over your large hoop, and then a little bit
of quilting batting, just a lightweight stuff, and that you're going to
also put into your hoop. Then to lay your pattern down, I use this pilot friction pen
and it says it's erasable, but what I like about it is once I mark my fabric with it, and I'm done and say
I still see some of the ink on there after I've outlined it with
my embroidery flaws, I can take an iron, a nice warm iron and just
iron over the top of it, and it just makes the ink
disappear like magic. Then we also are going to
need some embroidery needles. These are size one through five. I like using the bigger size, the five so that I can get the three strands of
embroidery floss through it. These here are threaders. You can use this one, but to me, this one is a little flimsier. I like these because it's
a nice little metal piece. You stick this part
through your needle, and then you put
your thread over it and you pull it through the eye. And this one is a three and one. It's got the little flimsy one. It's got this one,
and then it's got the more heavy duty one with
a bigger opening for yarn. A little pair of scissors. So embroidery floss. I use the DMC black, and it comes in this hank here. You can pull it out and it's six strands and I use three
strands for my outline. Then you can also get some
of these cardboard little spindles that you can
wind your thread around. So it doesn't get all tangled. Then for coloring, I use
Derwent intense pencils, and these guys are amazing. What you do is you have
your pattern down and then you lightly start to
rub this pencil over it. At first, it just looks so
bland and you're thinking, there's no color there. But then you get
some of this alla. Gel, you put it in a little cap, and then you dip your
paint brush into it. I have a nice little
flat brush here. This is a number six flat,
I'll dip it in there, and then I rub it onto where I put some of this pencil on, and it just blooms
and comes to life. You can keep adding and make
it really bold and vibrant, or you can keep it
on the soft side. I really love these pencils. They again, they're magic. Join me in my class. You're going to have
lots of fun doing this.
3. Prepare Fabric and Pattern Transfer: We're going to go ahead
and prepare our piece of fabric and batting for our hoop. So this is my hoop. I take it apart. The part that is just the wooden
circle goes down first. Then you get your piece of
batting and you go over that. Then you lay your piece of
fabric over the top of that. Now that you have all that down, you're going to take this
part and put it over. It's tight, so I'm going
to loosen the screw here. And still tight. There it goes. There it is. And now I will tighten it
back up up here at the top. So now that I have that down. I'm going to take
my friction pen. Remember I told you that it'll disappear when I
put the iron over it. What I'm going to do here is, I'm just going to
mark a perimeter. So I know where I have
to put my pattern down. So just making this line. Like I said, I know it'll
come out when I use an iron. So now that I have that.
I'll take that off. I can move that aside. I can lay this down. Now I can get my pattern. I'll get my pattern, and I put it down and for teaching
purposes right now, I'm just using
this smaller hoop. But when I actually
go to use this, I will have my
larger 12 inch hoop. But what I just want
to show you is how to put that pattern. So let's see. So what I would do is center
this over my pattern. If you can't see it that
well, here I can see it. I can see through this fabric. But if you're having issues, then you can pin this and then take it over to
a window and tape it, and then you'll be
able to see it. Or if you have a lightbox,
you could use that. What I would do is I would
get my friction pen, and I would just start
to outline my pattern. I can see the bird underneath. Take take this. This pen is just wonderful. I'm able to add all this. Then I can use the iron if it's after I've put the outline with
the embroidery floss. If I still see any of the pen, I can just take it
out with a hot iron. These will disappear
with the iron. And that's how you prepare your fabric for your embroidery. See you in the next lesson. I.
4. Outline Embroidery Stitch: I'm going to show you how
to do an outline stitch, and what I'm doing
is I'm getting about 18 " of this
embroidery floss. I'll get one of these needles, which I should have
had out already. There is, and I'll get three
strands of this floss. It comes in six
strands, one, two, come on, three, and then you just slowly start
to pull it apart. Sometimes you get a knot. There There goes. There you go. Set that one aside, and then this is where I use
this wonderful tool. I'll take this, put it through
the eye, slip that over. Hold onto the needle and
then pull and look at that. It's nice and threaded. Now I'm going to
create a knot here, and what I'll do is I'll
get my index finger, and then I roll it, and then pull it,
and I've got a knot. I'll show you again. I take these three strands and then roll it with my thumb, pull it with my middle finger, and it makes a knot. There you go. Now
let's get this needle, and I'm going to
start from the back. We'll start right up here. I pull it. Go down like maybe no longer than
a quarter of an inch, a little less than a
quarter of an inch. Then I like to pierce it in
the center of that stitch. Pull it. Come on down, back up, rough the
middle of that stitch. And there we go right
right in there. You do this throughout
the whole piece. Sometimes there's a curved area. And in the curved area, what I'm going to do is I'm
going to just do a, come on. There we go. I'll just do
this stitch, let me show you. I'll put it in there. And then come over and back
in where I just came through. You could use this stitch over the whole thing too if you don't like splitting the thread. Either one is going to work. What you're wanting to
do is you're wanting to create this outline where we're going to
be coloring inside of it with the intense pencils. This just gives us the
effects of a coloring book, where you have your dark
outline of your shape, and then you're going to be
able to come in and color it. This is all you do.
You just go ahead and embroider the whole piece, and then we'll come
afterwards and ink it. Okay. So I'll see
in the next lesson.
5. Painting with Derwent Inktense Pencils: I'm going to show you
how to colorize this. I'm going to take some of this. It's called fruit of the
Earth, Aa, 100% gel. I'm going to pour some
of this into the cap. I don't need a lot. Then I'm going to
get, let's see. I'll get this red. It's called poppy red. All right. I don't necessarily need to
have it in the hoop anymore. I'm going to lay it down. And like I said, you're going to just start to color this in. And you can leave
the center open. Do you see how light this is? I can barely see it.
But now watch this. I'm going to dip into
this a. Look at that. It's getting nice and vibrant. You can continue to add more
to deepen this outline here. The reason I'm using Alla as opposed to water is
because water would seep out of outline and into my fabric and that
wouldn't look so good. But you can also
dip your pencil tip lightly into the Alla
and create the outline. T and then to soften that, you can get some more on your brush and then
soften that out away. Isn't that just so pretty? Let's add some more of
this llovia out over here, where we had already
added the pencil. And do you see the difference? This is where I added
it with the pencil tip. Let's go ahead and
do that again. I'm going to add a little bit
of Alva and look at that. And then I'll get some more
of this gel and pull it away. Pull it away to soften
that. Oh, that's so pretty. Okay. Let's get some more gel. Little bit here. I just
think this is so pretty. And then you can even add. Let's add a little
bit of orange. Okay, so just lightly, do a little ring of
orange around here. Let's see what this looks like. Come on. There is. Look at that. Then I'll add a
little bit of yellow. Okay. Wow. Isn't that pretty? You can continue to feather
this out here. I think I'll add a little
bit more of the red back over here. Right in here. Soften it out. And that's how you colorize
your thread art. What I can also do, let me wipe off some of
this red and this orange, and I'm going to use some green. What I'm going to do
is, I'm going to color this first before I
do the embroidery. Then I'll go back and
put it in the hoop and add the black outline. Let's see what we got here. This color isn't as vibrant. Let's try using
this other green. This green is called teal green. Okay. I like this green better. I shows up. That's going to look really pretty
with the black outline. Let me add it to this
side. There it is. And even after I've
added my black outline, and I think it still
needs some more color, I can still go
back and add more. So that's how you add color with the Derwin in
tens pencils and Aa.
6. Project: Transfer Pattern and Begin to Paint: For our project, we're
going to get a piece of batting and a piece of
fabric that is 20 " square, and then we're going
to get our hoop. And place the bottom
of the hoop down. Then we'll put the fabric and the batting over
the top of that. And then we're just going
to mark a boundary line, and you'll see what the
boundary line is f in a second. I'm just going to place
it down inside here. Then I'm going to take
my pilot friction pen, and I'm going to around
the perimeter of the hoop. Then I'll remove. I'll remove that and
just get the piece of fabric and our pattern. I'll put my fabric
down over my pattern, and where I had
that boundary line. That's where I can see where I need to place this pattern so that it will fit
inside of there. When I see that, fits
in there nicely. Then I'll just come over with my friction pen and I'll start
to mark the pattern down. Remember, this friction pen is the one where after I'm done, especially like here in the
boundary line that I made, I can take a hot iron
and it'll disappear. You can use pencil, but you got to be careful
because that might not come up, or you can use chalk, or you can take this over to a window and tape it up and
then trace your pattern. Now that I've got
that pattern down. We'll get the batting again, and I'll lay that down and then I'll put
that back in the hoop, and then I'll do the outline
with the embroidery floss. Once I've finished the
outline, look at that. Doesn't that look
good? I can take the hot iron and remove that
now or wait till later. So I think I'm going to wait til later because I don't have my iron
set up right now, and I'm going to start
to do the color portion. What I have here is a sample of the colors of the basic 12 set. This is the 12 set here, and then you can get the 24 set, which I've got
some of them here. But this is these are
our basic colors here, those are pretty nice. What I'm going to do is I'm
going to start to color. I'll get my Alla, and that was my Alla. This one is called
fruit of the Earth, and I got this off of Amazon. This is called Alla, 100% gel. I put it inside of this
little water bottle cap, and then I'll get my
little flat brush, and this is my number six flat and then I'll
get my paper towel. I'll start with
these leaves here. I'm going to start with
the lighter color. Like I said, it
looks very faint. It looks really faint. Then I'll put in a little
bit of the darker color. Grab some of the Alla. And it starts to come alive. Remember, you can also dip
this lightly into your gel. Scrub it in. There look
at how pretty that is. You can even add a little
bit of yellow here. You can see the difference
from this one to this one. Again, the reason we're
using Alla instead of water is if I was to use water, the water would seep
past the outline. With this Alla, it wets
the color, but it doesn't. This reminds me of a
stained glass effect. It goes by pretty quick. You can see how fast I got this set of three
leaves there done. Now I'm going to
go to this flower, going to get a little bit of
that loa and wipe my brush. I don't want any of that green in this pink that
I'm going to be ing. For this, I'm going
to be ing this color. Ops. You got to be careful. I went out, I bumped
out of the line there. All I'm doing is I'm adding
color to the perimeter of these petals because then I'm going to come back
with some orange. Add some orange in here. And then we'll hit it with
the ello via to activate it. Are we ready? Here we go. Though it's magic. Magic, magic. I love the stuff. I'm going to add a little
bit to the outline. And then I'll soften
that, bring it back in. So pretty. Get some of
this orange and deepen it. Pull it out. Wow, look at that. Okay, let's do our second pedal. I mean, you could leave
it soft like that. But I like this bold look. Okay. Let's soften it out. So pretty. This is so relaxing. I swear it reminds me
of having a box of crayons and just spending
the afternoon coloring. A bit more here. Remember, while it's
wet, you can blend. If it's not wet, then you just
get some ala and blend it. Get into those corners. I don't like to see
any white. There is. I'm seeing white over
here and over here. But just be careful that you
don't go on the outside. Because once the color is
down, you can't pull it up, which is a good thing, but if you go out of the
line, it's a bad thing. Try to stay within the lines. That's why I like to use the three strand of embroidery floss to make
the outline thicker. You're just switching back
and forth between the colors, your brush, and
getting in there. Sorry if my hands in the way, but I'm trying to
get into that air. Scrub it in there. Let at that. How fast this is moving along. Just continue to add your oa. You can do this in little
small circular motion. There is so pretty. This is so relaxing. Like I said, it's meditative. You go into a zen place
when you do this. Forget about your
cares.org about your worries and just
enjoy this process. It's very soothing. Soothing. One last pedal. Slow down Sue. I just almost
went out of the line again. Go slow. Not in a race. Just take your time. Have fun. Put on a little bit of music, and just enjoy this process. So Okay. So I've got that much done. I add a little bit of the
yellow inside of here. Maybe a little touch of orange, just to do a little shady, and let's hit it
with some color. I mean some loa. And if I think I got too orgy, let me go back in with
the yellow. Look at that. See how you can adjust it. In that little
time, we've already completed the flower
and the leaves.
7. Project: Paint the Fluffy Bird: Come around. I'm going to leave a little bit of
white around his eye. Then I'm going to add the
sun yellow up over here. Let's just get that activated
and see what we have here. Remember, try to stay
kind of light here with this Alora when you're getting around the edge so that we
don't have this happen again. I just got too excited there, and it started to seep out. Okay. Want to use
some of this up here. So instead of trying to push to get into those,
I'll pull it away. I'm not going to make
that same mistake. Okay. We're just going to
add patches of color here. That was Fia. This is a
little bit of tangerine. And then I'll hit it with
a little bit of yellow. Let's see what we get. Circular motion here. Okay. Now I'm going to do this area here with
and Tangerine. This is going to be
the brightest part. I. Okay. I want to add the tenderne in here in these feathers and
tender coming down here. There we go. All right, re? Let's get
our a starting around here. So we're doing our
first layer here. After we do our first
layers when we can go back and adjust our color. Yeah, and come back in. And I'm laying the side of the pencil down. Okay. Let's see what this does. To his feathers here. Maybe you can add some
stripes of orange. Okay. Soften those stripes. Pull the color away from the outline just so we
don't get it running out. Dip this fs into the
Alla. There we go. This is looking pretty. I can add these little really lightly. Little lines here. I'm
also gonna add some here. Kind of give the appearance
of his feathers. This is looking a little light. So I think I'm going to add a little bit of this poppy
red just right in here. Let's see what that does. Oh, that's pretty. I think I'll add the
poppy red down below. Right in there. Very nice. Okay. I go to
deep in this right in here. There. I'm happy with that. So now
I'm going to do this area. That one, I'm going to do
with some brown. Where is it? It's the bark. And let me see, I think this is, that's the
ink black and the bark. So I'm just going to start to lightly pull down to
make it look fluffy. And this one is really
sharpened right now, so you can see how
nice this is looking. Let's see. Going to make it just look
like like a gray belly, like a gray feathered belly. Kind of do it like
in a curving motion. So it looks like it's got some depth there and
its little belly. And here I'm using I'm
still using the black. At some of this bark. That's the bark. I
was using Indigo. You all look the
same. You got to look at the color, the
name of the color. Okay. All right. Let's see. Arc. I even wed it. Okay. Now we're going to finish that
feather and that feather. I'll be using the tangerine, the fs and a little
bit of poppy red. Let's just do a little
bit of poppy red. Soft tangerine. Little
bit of fa. Okay. I'm going to dip
this yellow in here. And then dip a little
bit of the anderen. And now, I'll blend it all. Straight up and down strokes. My brush is straight
up and down. I'm not slanting at here. I just want it straight
up and down. Okay. And now, I'll finish this. This is a little bit of poppy red. A little
bit of fuchsia. And some of the baked earth. So it's not so bright. Okay. Let's get some loa on there
and see what this gets us. Nice. Oh. Okay. I'll blend that out. Remember, just because
this is all dried here, you can go back and
adjust your colors. Okay. Maybe I'll
get a little bit of yellow in here. Okay. We'll just finish this
little piece here. And this one, I'm
just going to add color down here at the bottom. Then this will be really light. Wipe off all that color. There it is. Soft, that is. I'm not going to add
any more to that. This is just a little bud here. Okay, you know, one thing I do see that I want
to finish off. I want to finish of the I. So you know Let me go
ahead and dip in here. There it is. You
got to be really careful with this
one. There we go. Can take that off. Work
on his little beak. Little beak. I'm going to
do it with a little bit of yellow and some bark. No, not bark. Baked
earth, baked earth, yeah. And our little bird is done. How's that? We just have to finish our dragonfly
and our little bee. Do you see how quick this goes? So I
8. Project: Paint the Honey Bee and Dragonfly: Okay. Now we're going to paint the honey bee and the dragonfly. Starting with the honeybee, I'm going to be using the
yellow and the black. I've made two stripes
here of the yellow. Now, coming in with the black, I'll do the pointed back end. Could add a little bit
of Alaa to your pencil. And then add the other stripe. Now, I'm smoothing it
out with the alla, but you've got to be very careful because it's
such a tiny area. Make sure that you
remove some of that black that's still on there when you go to the yellow. Now, with the black pencil, dip it into the loa and in
a small circular motion, you're going to color in
the black for his head. And then activate it with
a little bit of loa. Again, very carefully,
because it's a small area. Next, we'll go on
to the dragon fly. In the dragonfly,
we're going to be using several colors here. We'll be using the
Fusa the apple green, and the sea blue on the wings. Fuca, Sea blue and
the apple green. Starting with the Fuchsia, I'm just going to be adding
a little bit of color. You can see on the pattern and color guide where I've
added that fuchsia. The next color is
the apple green. Again, you can look
at the color guide, so you can see the placement
for this apple green. Then the last color for the wing is going
to be the s blue. I put it in the inner
part of the wing and then around the edge there. I'm just so amazed at
how light these colors look until you activate
them with the alla. So take notice of how
light this looks. And you'll see the
difference when you finish. For the body, I'm
going to be using the leaf green on the left side and the apple green
on the right side. Now, let's start to
activate these colors. We'll start with
the first layer. Oh, I think I still had some
black on there. There we go. So just continue to add the Alla and activate
your colors. This is a little bit
of the sea blue that I've added some lava. Now, I'm softening it out. And adjusting the color, pulling away from the edge. You don't accidentally
go out of the line. I dipped the Fuchia
pencil into the Alla, added it to the tip of the
wing, and soften it out. You're doing two things here. You're softening it out,
but you're also activating that pencil so that it sets
the color into the fabric. Do you imagine if
you forgot to do that and you spilled
a little water on it? It would probably bleed. It's really important that
you activate and you cover every piece of your
color that you add with the alla so
that it's activated. And then it'll set and
dry it's permanent. It's not coming out
even if you wash it. I've washed and filted
pieces that I've done, and they're still vibrant. They're beautiful. If they do happen to lose a little
bit of the vibrancy, you can always go back
and add color again. So we're just continuing
to add the Alla. Look at the first wing
compared to the other three. So much more vibrant and looks
like a stain glass effect. Now I'm just going
to add color where it's still wet with the Alla. You can already see It's starting to get
nice and vibrant. At the tip of the wing,
I make a V a V there, and then I color the tips
of the wing with the blue. Then after that, of course, we're going to brush the
ala onto it and activate the color. It's just magic. I hope you find this
as much fun as I do. It's relaxing, beautiful and therapeutic. Look at that. Soften that wing out, and then we'll start
to work on the body. But before that, we have to add a little bit more of
the because it was looking they were looking
pale, activate it. And there's the wings. Wipe off the color, and
now we go to the body. Two colors of green, leaf green and apple green. Add a little bit more of the
apple green to deepen it. Give it a little bit of
dimension there. So pretty. And activate it with the loa, brush it out, and that's it. That's all you do.
9. Project: Finishing the Back: Now that I've finished
embroidering this and adding the color with the
dir went intense pencils. I placed it back into the hoop and I made sure to iron out those marks that I made
with the friction pen and as soon as I touched the iron to them,
they just disappeared. This is a little mistake that I made when I had the black. I must have touched it.
That's what I'm saying. You got to be careful because
it's not going to come out, but what can you do? What I'm going to show
you here is how to finish the back if you were to use this one as
a wall hanging, and I'm not going to do it to this one because I want to
use this as a pillow front. I'm going to use this little
guy that I have here. What you do is you trim, about an inch, three quarters of an
inch, all the way around. And then you get a needle and thread and I've already
made a mess here. There it is. Read your needle
with just regular thread, and I've just doubled it
and put a nod at the end. Now what I'm going to do is
I'm just going to create a running stitch all
the way around here. All the way around
and then I'm going to pull it up and
when I pull it up, it's going to sent it and
it'll sent it to the back. Let me keep going. It doesn't take
long. I might take a little longer on a larger hoop, but still it's not long. Created another knot. There it is. You just keep
going all the way around. You can see how it's already
starting to sent it up. We go. Then at the end after you
have it tied off and cinged, you can cut a circle of felt and glue it to the back
to cover all of this up. Then it's pretty. It's almost there. We just continue
around. There it is. Okay, one more, one more. There. So when you pull it, it just lays flat. I'm just going to
tie a knot here. Let me bring it up to the top. So I can tie the knot. Okay, so I'll take
a little piece there and then pull
pull it like that. And there's my knot. Cut it off. And there it is. So now, I'll take
a piece of felt. M. Just mark around here. I could see my circle, and I cut it out, and then I'll just glue it. You could use a glue gun. You could use graph glue. It's just going to
take longer to dry. There it is. Then I would I would just
add glue around here. And hold it down, and then it's nice and covered. If you see anything,
if you see it showing, you can trim that afterwards. But it was pretty close there. That's how you finish it off. You can add a ribbon
to the top here. You can even paint your hoop
before you finish it off. That would look cute too. There it is. You could
see the difference here. On this one, the same color thread and it doesn't define
it as well as this one does. I like this better.
This just looks nicer. I hope you've enjoyed
this. Thank you so much.
10. Farewell: I hope you learned something
new and above all, that you had fun doing it. I would love to
see your project, so please take a
picture and share it in the project gallery located under the Projects
and Resources tab. If you have any
questions or would like to provide me
with some feedback, I would greatly appreciate it. If you enjoy this class, I also have three other classes on painting with acrylics, using a method
called One stroke. Finally, I want to express my gratitude for taking
the time to view my class. Be well, my friends.
 Sue Alderete, Always Believe in Yourself!