Transcripts
1. Intro: Hi, my name is Sue elder Eddie, and I'm an artist,
designer and teacher. I'm here to teach
you how to paint on glass using the
one stroke method. I learned this method
many years ago from one stroke creator
Donna du Barry, and I am one of her
certified instructors. This is a beginner friendly
class and with practice, you can learn how
to paint like this. I will take it nice and
easy and have included PDF handouts in the
resources section that you can download and print. You will then place a
piece of wax paper over the handout so you
could trace paint your strokes to match mine. Once you learn this technique, you can apply it to
so many surfaces, such as paper, would, pottery, walls, and glass. You just need to
change out the type of paint and the size of the brush. The possibilities are endless. You don't even need
to use a pattern. Just build the
flower step-by-step. I've taught at many Michaels
and Hobby Lobby craft stores in the Los Angeles
and San Diego areas. And I've been commissioned
to paint murals on walls in many homes in the
Los Angeles area. Even in movie star Judy
Garland's former home in Brent wood, California. In this class, you
will learn how to paint a hydrangea
on a wine bottle. And I'll also give you a bonus lesson on how to
paint on wine glasses. If you want to learn
this method further, I also have two previous
classes here on Skillshare, on how to paint a
rose buds and roses. So please come join
me in this fun class.
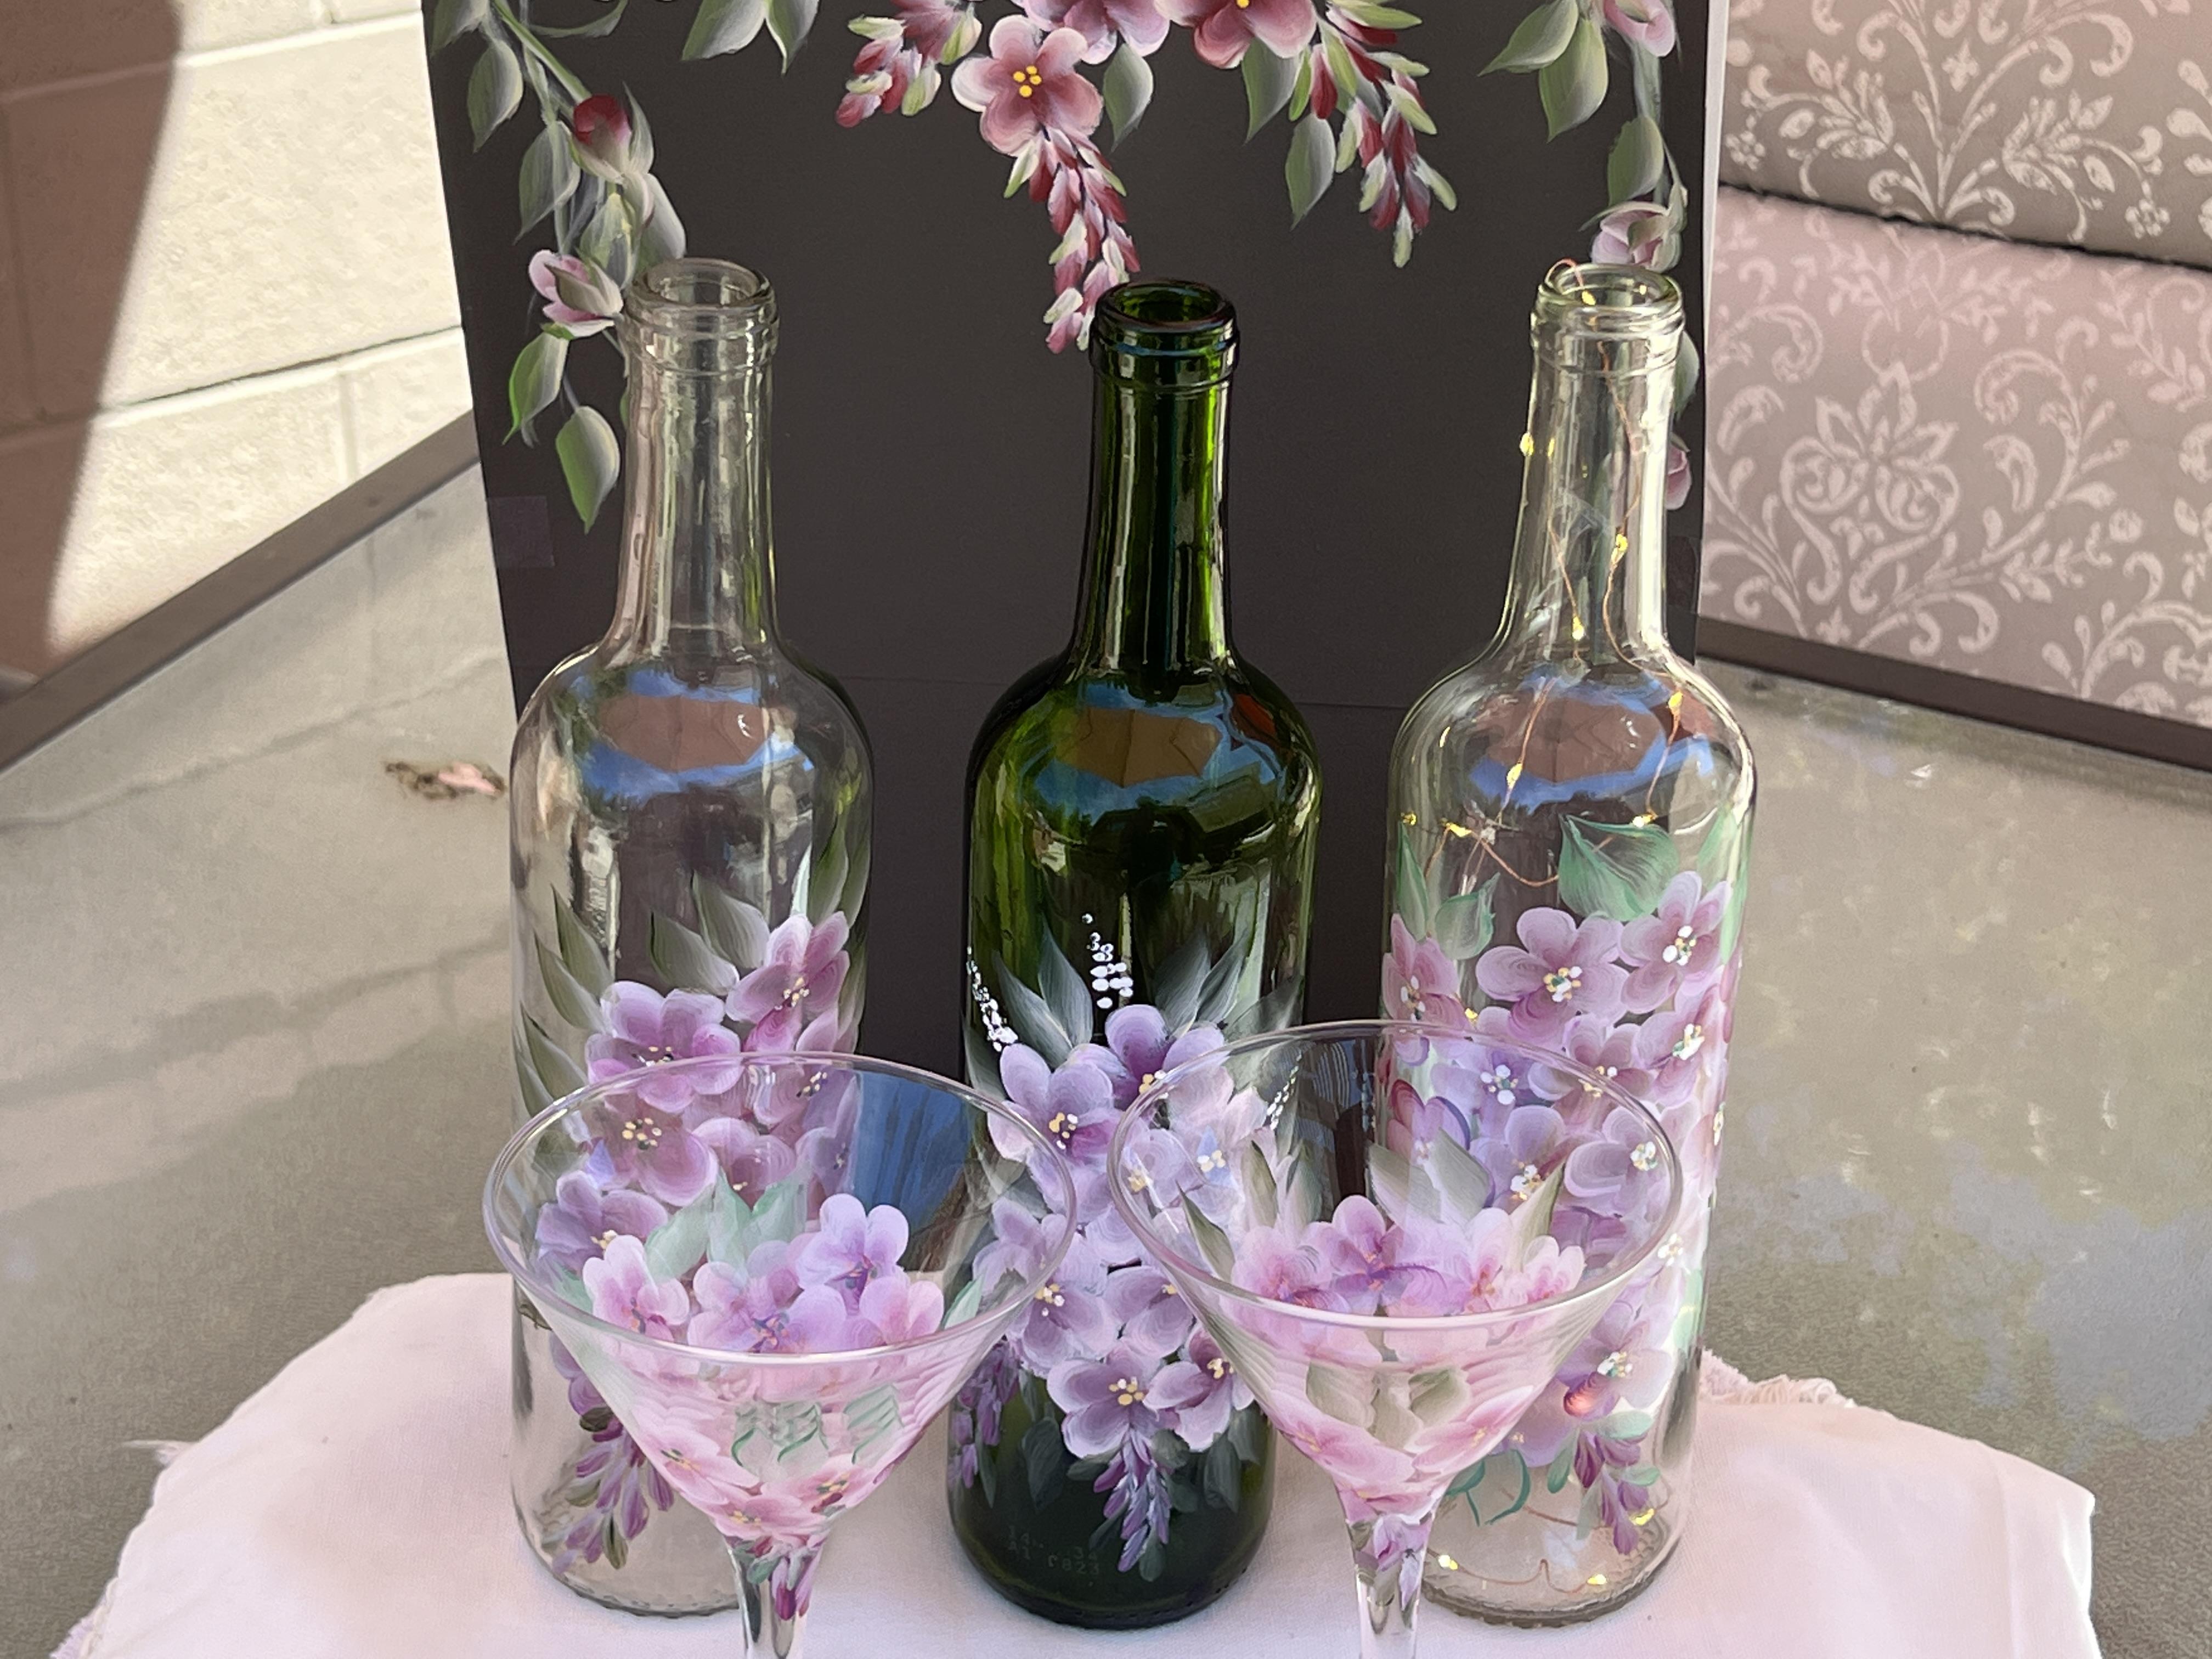
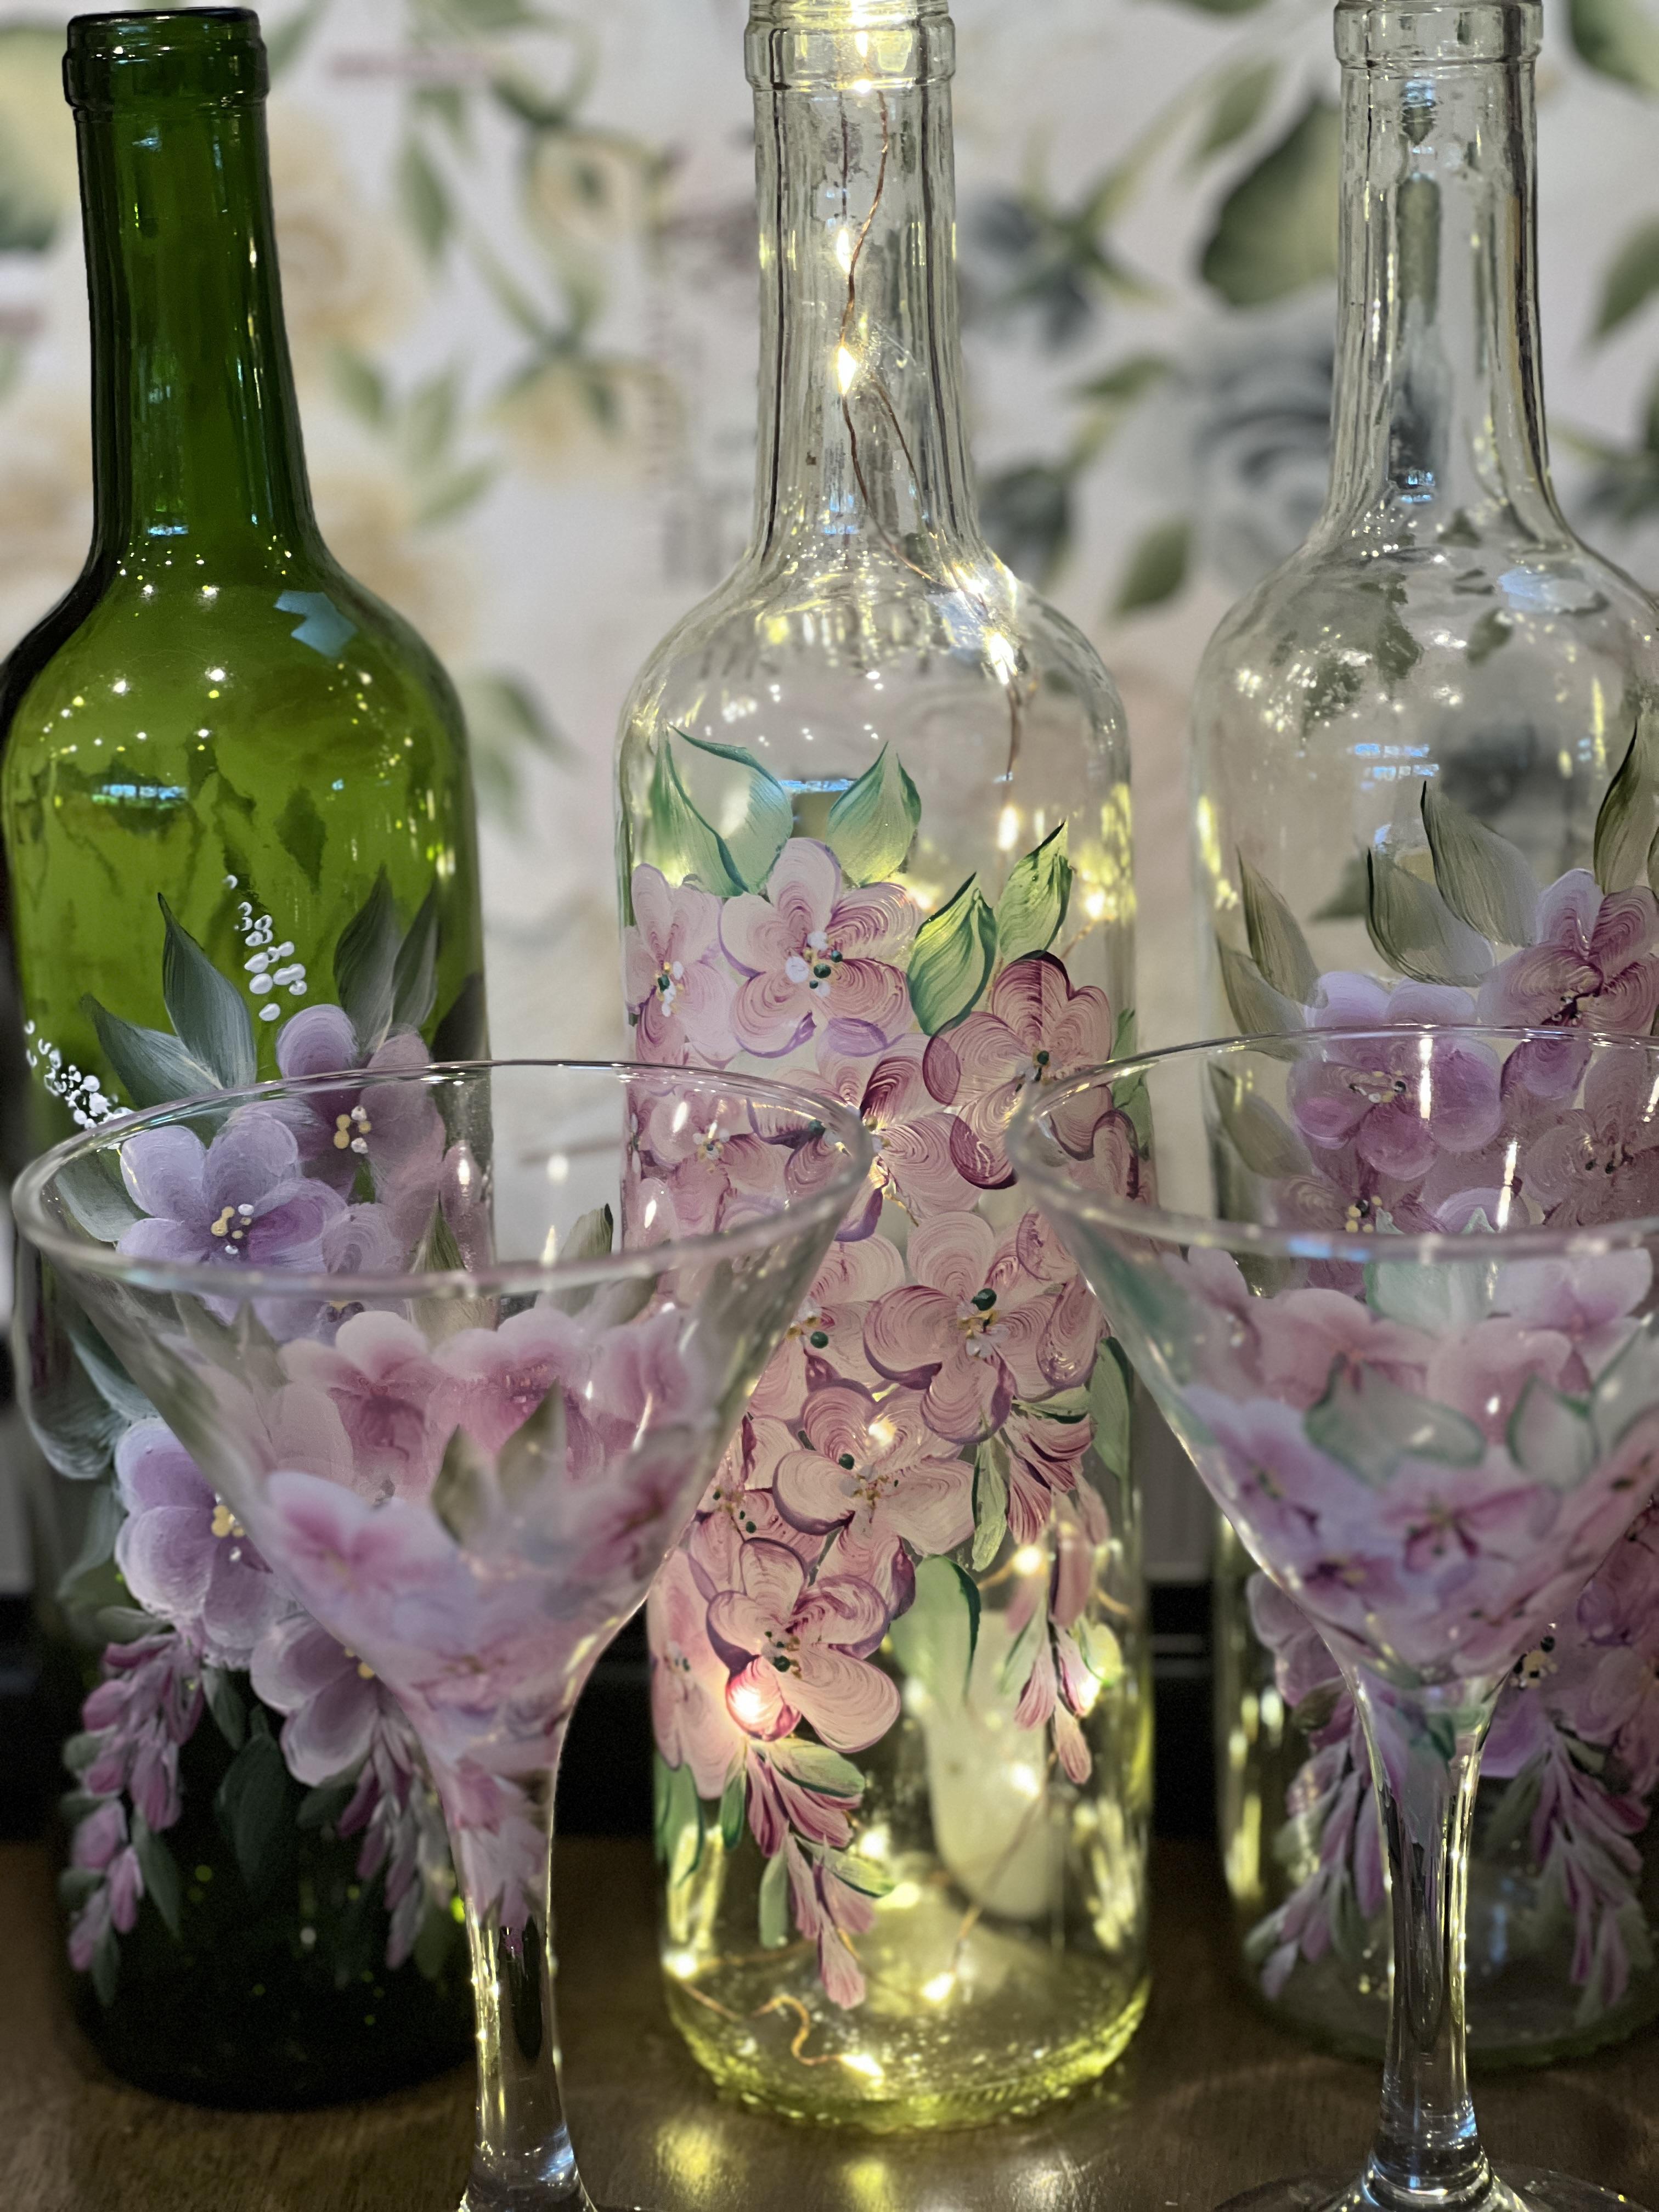
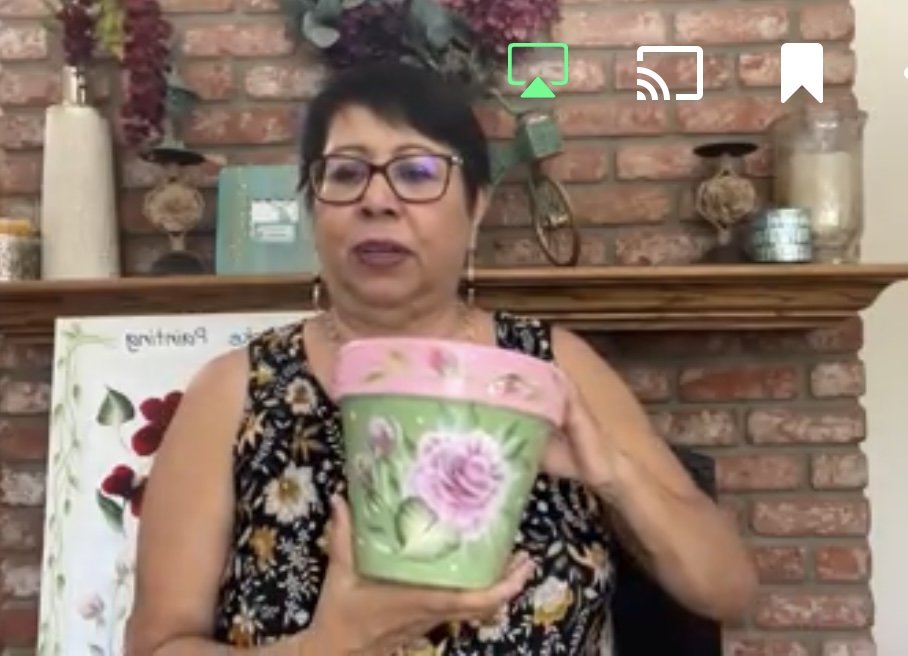
2. Project Intro: The project for this class is going to be painting
on a wine bottle. You're going to learn how
to trans, form this plain, clear wine bottle into
something beautiful, something beautiful like this. I'm going to teach
you how to paint these five petaled flowers that when you put
them all together, they resemble a hydrangea. You can even add some very light to transform this bottle
and do something magical. So come join me in this project. I'll also include a bonus lesson on how to paint on this
little glass here. At the top of it.
3. Supplies: Let's talk about supplies
for painting on glossed. First and most important are
the paints that you use. These are going to be the
folk art and animals. And got them here in thicket, plumbed vineyard, wicker,
white and sunflower. And some of these
are older bottles, so they look like this with
an E on the top for enamel. Or the newer ones are
called multi-service. And you can see the
little wine glass here, meaning this is appropriate
for painting on glass. Then your one stroke brush. This is a number ten flat
one stroke brush by plaid. And I have found these
in the number 1059 pack, and it's a set of ten. And you can make your flowers bigger or smaller using the
three-quarter flat. This is the ten flat. So once you learn the strokes, you can just use a larger brush and they're
just going to be bigger. Or they have smaller ones and
you can make them smaller. Then you're going to
need a clean wine bottle and some wine glasses. And if you want to
include fairy lights in your bottle, you can do that. And I have found those on Amazon just by Googling fairy lights. And then you need a
Styrofoam plate or a coated paper plate
to use as a pallet. You need a pencil, a piece of paper,
some wax paper. And this is going to be used with the handouts
that I provide. So this is the handout. And then you're
gonna get a piece of wax paper and you place it over the top where you
can see the pedal. And then you're going
to be practicing these strokes over the piece of paper onto your wax paper. And then you're going to
need 0 water container. Some paper towels. Let's see, toothpick. Toothpick to create those
centers on your flower. And the supply list. I've included it in the handout, in the resource
section as a handout. And you can download this
and print it and shop from this at your local
craft store or on Amazon. And that's it for the
supplies. Let's move on.
4. Trace paint with wax paper: Okay, This is a little
short lesson on using wax paper to trace
paint your strokes. I'll be using wax paper that you can easily find
at your grocery store. So you can also date, date your piece of wax
paper and then save them so you could see your
progress as you go along. So I'm going to go ahead and load my brush
with the paint. And Brad go from one corner
to the other corner, press down back and forth. And you want to get this loaded
two-thirds of the way up. You also want to see a
beautiful gradient here. And you can't see it right now. But I had a box here that was an inch and a
quarter by an inch. It looks something like this. And I just want to
stay right here when I'm loading my
paint by go-to far, what I'm doing is I'm
taking the paint off. So just stay right here. Loading your, your brush, dip lightly into your
floating medium. And let's just try this. So we're going, excuse me. We're going to place our wax paper over this
shell stroke here. And this is a handout
that I provide in the downloaded section
of the resource section. So I place the wax paper over the top of that with the
white side facing out. I'm going to start
at this corner, this corner here, and end here. And then I'm going
to think about that bottom point there. So what I'm gonna be
doing is I'm going to press down wiggle, wiggle. Always truly my brush as I go. So let me show you. So you press and you wiggle, like if you were scrubbing, crass wiggle, press wiggle, slow down, stop and stand up. And then there you
can see the stroke. So we'll try a second one. Reload your brush
with fresh paint. I really don't need
more floating medium because I can feel this is
pretty slick right now. So again, you're gonna see
this is the feral, this here. So watch the feral as I paint this stroke and see how I'm
twirling it in my fingers. Don't provide this
death grip on it because then you're not
gonna be able to twirl. So I'm gonna be right here, starting with the white on top. I push and I wiggle, Bush. Bush, wiggles, slow
down, stop, stand up. And that's how you use
these handouts here. Let me show you quickly how different it looks
using a size ten. So this was the 12th and you could see it
right here says size 12. This one is a size ten. You could see the
difference in size. So the reason I'm
showing you this, if you have a
different size brush, this isn't going to
be the same size. So I'm going to load this
brush up with paint. Two-thirds the way up. Look for that
beautiful gradient. Bit more. Cheese, usually about three times at touch, the
floating medium. Now let me place this over here. We'll do the same exact thing. It is to see how it comes
out a little bit smaller. So just be aware of that. If you were to use the
three-quarter flat, which is oh, it's
roughly this size here. That stroke is going
to be much bigger. So there you go. Use your downloaded handouts with tracing paper to help
you learn how to do this.
5. Five Petal Flower and Trailing Vines: Okay, In this lesson, I'm going to teach you how
to do the teardrop pedal. So you're going to dampen
your brush in water, and then you're going
to remove the water. You want a soft damp brush
but not sopping wet brush. So now I'm going to dip one corner into the platform and the other
corner into the white. Then I'm going to blend, come over here into my
boundary box and push down. Try to stay right in
the center so that you don't you don't
muddy up your paint. You want one side to stay white, one side to stay plump. So I'm gonna be picking
up paint about three times and blending,
Blend, Blend, Blend. And you don't want to see
your brush get messy. See how right here it
looks a little messy. You want to blend that out. Because what you're going
to see on your brush, you're going to see
on your projects. So you want it to look. You want your brush
to look neat. There you go. That's a nice neat brush. So we're gonna come over
here and we're going to think of this teardrop
petals shape. We're going to
start on one side, press down and twirl the brush and stop and
stand up on the other side. So let me see. I can show you how to do this. So we're going to be
standing straight up with the white
side to the top. And we're going to push
tour of the brush. Stop and stand up. And you're going to
pivot at this point. So I'm going to pick
up some more paint. Every time you pick up paint, you blend it out in
your boundary box. So let's do this again. From that to that. So we're going to push
down, white side up, push, twirl, stop and stand up. And you end up with a
nice teardrop shape. So you just keep
practicing these. And I've included the handout where you can place a
piece of wax paper over the top of it and practice these strokes and I'm
using a number ten flat. So here I go again. We're just going to be
pressing down, up and over, press down, up and over to create that five petaled flower. I'm going to be putting
five of them together. And the way I like to think
about is it's a head, two arms, and two legs. So let me show you how
I'm going to do that. You have here had one arm, flip it over to the
other side, another arm. It's feeling dry. So I'm going
to grab some more paint, a leg and another leg. And you just continue to
build these flowers one on top of the other until you
get the shape of a ball. In this lesson, I'm
going to teach you how to do the hydrangea. Well, it looks like a hydrangea. So I'm going to
think of a circle. You probably can't see that, that well, let me draw
it a little bit darker. That way you can see
where I'm going. Okay, so I'm going to pick
up some plum and the white, and I'm going to blend it out. I'm going to start
here, the center. And I'm just going
to start building these 55 petaled flowers
into a circle until a ball. And I'll just be overlapping them one on top of the other. And you have to
continue to pick up paint because it gets dry, especially on a on
a paper surface. When you're on glass. It'll be a different story. Now, I'm getting
kind of messy here. I need to really slow down
and blend this out there. That's much better. So you're going to be adding these into the shape
of that circle. Okay, I've finished my
five petaled flowers into the shape of
this round circle. So it looks like a hydrangea. The next step I'm going to do is these little blossom looking flowers that are coming
off of the ball. So the way I create those, as I get fresh paint. And then oh, okay, so the way that I
add this is I'm on the chisel edge standing
straight up and I push down. And I create that. I'll do like three of
them to create this, like a trailing bunch
of little flowers. So we'll go ahead and add
those to my round ball here. And I get fresh paint. Okay, so I think I'll add
some right down in here. So I press ups. I meant to do that with
the dark side towards me. So I'm leading with the
white side and I press down, press down, and get fresh paint. And I'll do it in
the center here. So I press down. As I'm pressing down, I'm also curving it. Get some more fresh paint. So sorry, you couldn't
see that one. Let's see if I can move
the camera a little bit. So here I press down. You go fresh paint. And I'll add another one
trailing off over here. Press
6. Leaf, Vines and Dots: In this lesson, I'm
going to teach you how to create these
one stroke leaves. So I've washed the
paint out of my brush. Now, I'm going to add the
green one side to the other. Come over to this boundary box, press down, grabs some more
white, some are green. Press down. Stay within that boundary box. Let's build up some
more paint in there. You want to see that gradient? Okay? A little bit more. Okay. So we're going to start, it's going to be
similar to a teardrop. But, um, it's, you'll see. So we start at an angle. We started this angle
with the green on top. And then I'm gonna push down, twirl slightly and
come up to a point. Press downturn slightly,
and come up to a point. Fresh paint, press down, come up to a point. Press down. Come up to a point. So let me grab a little
bit more fresh paint and then I'll just continue
to practice these. You can see when it
starts getting dry there, you just need to add
some more paint. I'm and you can go over it. I've included a handout that
has these one stroke leaves and then you can
just add a piece of wax paper over the top of it. And you can see the pressure
that you need to apply to create the stroke
with a number ten flat. We're just going
to add one stroke leaves around this
ball of flowers. I'll add some here, maybe some over here. Now I want to show
you something else. If we were to add just a
little bit of a little bit of sunflower yellow to this mix. You're going to see how
it softens these flowers. So on the white side, I'm going to pick up
a little bit of this yellow and I'm going
to blend it out. Just keep blending
it out and you can see how it softens it. Now. Watch, I'm going to add oh, I'm going to add one right here. Green is on top. See how that looks a little
bit softer than these that were just
the two colors. I'm just gonna go back over
these and soften them. A little bit more paint. I think adding the yellow
just makes it a little bit softer looking than just
the green and the white. That's just continue adding these little leaves
all the way around. Here on these little, these little trailing vines. I'm going to be adding similar that from the
one that we did earlier. Just looks like it's got leaves around this little flower,
these little buds. Just put them in
there in-between. That looked pretty. Let's add some
more to this side. And that's looking
pretty isn't it? So I'm going to show you how I add the little dots
in the middle. I'll just pick up a
little bit of yellow with my toothpick or you can use
the back of your brush. The only thing is the back
of the brush just makes it look too heavy, too big. Let me show you. So this is the back of my brush. I'm going to dip into my yellow and it just looks
too big, I think. So. That's why I like
to use a toothpick. And then I can just add these
little dots around here. And when you do
this, it magically, you can see each
individual flower, whereas before it was
all a jumbled mess. So just add them to
the centers of these. And then after we do the yellow, I'll add a few white
and then a few green
7. Painting Flowers on Wine Bottle: Okay, let's get started
on painting our project. So here's my clear bottle. We're going to be using
the folk art enamels. And they come in
two different ways. Folk art enamels
or multi-service. And you can see the lids. This one has an e for enamel, and this one has the different surfaces
you can use it on. And you could see there's
a wine glass there. So you know that
this is good to be used in your glass painting. So I'm gonna go ahead
and blend my brush. So I've dampen this
brush and I've taken all the water out of it. I even pinch it to
get the water off. I want it soft and pliable, but I don't want it sopping wet. So again, I'm going
to dip corner to corner on each of
these two colors. This is that plum vineyard
and this is wicker white. And then I'm going to blend back-and-forth
corner, corner. And then I'm going to
push down and blend. And I want to stay
right in the middle. I usually will draw a boundary box that an inch
to an inch and a half. And I don't want to go out of that because when
I go out of that, I'm taking paint away. I want to build up paint in here and I want
to make sure I have that gradient where you have the dark side
and the light side. So let me grab some more. Press down. You can see how
hard I'm pressing down. So I want to build that
paint up into my brush. Alright, so that
looks good to me. It looks like enough. So remember in our lesson
when I said we wanted to create that ball
in the center. So this is what we're going for. We're going for a circular shape of these five petaled flowers. And then we're going to add
some of the trailing vines. Here's, here's our sample. Can we see that? Well, let's see if I put
the black underneath it. I want to create the flowers
in this circular shape here. I press down, come up. And remember I said when
you're painting on glass, it's different from
painting on paper. It's slippery. And you just have
to take your time. So we're gonna be building this bunch of flowers
over each other. Just overlapping. And go slow because like I said, it's slippery and you're
going to make a mess. Let's see us add one here. One here. Remember, head, arm, leg, leg. There. This goes pretty quickly. See another one here. We'll just continue
around the bottle at some more over here. Okay. And remember how I said
you can let this bottle dry for 21 days or you can let it dry for
an hour and then put it into a cold oven, turn it up to 350, leave it in for 30 min. Turn off your oven and then
pull it out when it's cool. Then it's dishwasher safe, top-shelf, or you can
just hand wash it. Okay. Let's add another one down here. That looks good. I might want to add
another one on the top. It's looking better up there. Let me add another
one. Right here. You can see I'm slipping there. It's it's a little tricky, like I said, when
you're on glass. Not the same as when
you're on paper. Okay. That looks good to me.
8. Adding Leaves on Wine Bottle: Okay, now I'm going to, I'm going to pull off some of this color with my
paper towel here. Then I'm going to add the
green little bit of white. And I'm going to
blend over here. And I'm going to add
my one stroke leaves. Need some more paint
there. Let's get into S3. So pretty okay, So
let's add some more. On this side. It's just too transparent. See that? Okay. I'm
going to turn my bottle. Let me add some more down here. Oops, I think that's
where I wanted to try then vine. You know what? Let's see if I can pull
that off right now. While it's still
while it's still wet. Yep. There we go. Right now. Let me go ahead and lay that down now I think a
better standard up Mike
9. Adding Trailing Vines and Dots on Bottle: The plan and the white. Go. One more. Okay. Let's see. I'll add some coming
this way. That's right. Place that leaf
that I wiped off. So pretty. We'll get more paint. And let's see. Let's do one here and one here. With the white leading
first I'm going to push down and curr, push down and curve. And then the last one, just do a small one here. So now I'll wipe
off my brush again. I don't need to wash it out. You just take that
excess paint off. Go back to my green
and my white and blend it out in my boundary box. A little bit more of that. Yeah. Okay, so here I'm going to do that same
stroke, but in green. Look at that. That's
pretty okay. Here. Let's kidding, gloppy. Ready? And then the last one here, start to feel dry. I add more paint. Not gonna go anywhere
until you do that. Very quickly. Look at that. Like how fast that's
been created. So now I'm going to
wipe out my brush. And for now I'm going
to stick it into water. I don't want it to get I
don't want to get stuck. The pink stuck up in there. I'm going to grab a
little bit of the yellow. I'm going to add these
dots, little delicate dots. And like I said, when
you put these in, right now, you look at this, it looks like a
big jumbled mess. But once you put in these
centers of the flowers, you can see where each
individual flower is. At least I can get that pretty, pretty, pretty
painting on glass. It is. Just like anything new. It's difficult at first, you just got to take your time. You really did take your time. Practice your strokes
first on paper, and then come over to the glass. And if you don't like
the way it comes out, you can go ahead
and wipe it off. If you don't wait too long. And start over again. Let me add a little
bit, a few white ones. This whiteness just not
cooperating anymore. Now it's coming. Okay. I can even add a few that green ones. Too many, but give
it some variety. And there we go. Now, like I said, you can you can also paint it
on the other side. So you have it on both sides. But for now I'm just
going to leave it like that and I'm going to let it dry for an hour or so and then I'm going
to put it in the oven. So I'm going to show
you in the next lesson. It'll be our bonus
lesson on how to paint. Paint this beautiful glass. The same way as the wine bottle.
10. Bonus-Painting on a Wine Glass: So in this lesson, I'm going to show you
how to paint this glass. Some trailing binds here. And the five petaled flower, pretty that is inside. So let's get started. So I've dampened my brush, pull off the water. Now we're going to
load our brush with paint corner to corner and blend it out. Each time you pick up paint, you blend it out on your, on your palette here. Okay. So I'm going to cover this little boo-boo
that I can scrape off just by adding paint over it. So we're going to create our
five petaled flowers here. And I'm just going to just roughly just put
them all around. Okay, So I'll just
continue adding these flowers all
around the base here. I got to tell myself slowdown, sue, want to make a mess. I guess the part that
you really have to take caution is when
you do that twirl. Because that's when
you can kinda go out of control because
it's slippery. So if you just take, take your time to make that
shape, you'll be okay. When you go too fast, it's when it gets really slick and slippery and make a mess. I'm gonna go all the way around adding these
pretty flowers. Then we'll add some
trailing vines. Ups that one went
and six petals. Okay. I'm just going to
go ahead and add some. Well, I don't want to do
that yet because I'll touch it with my I'm
almost done here. Let's just finish this off. And if you don't push hard when you're making that that turn, you can make them smaller. When I'm pressing down
there, coming out bigger. So let's stay small, not press that hard. Let's just bury them. Bigger one here. Now at my trailing vines. See with the white
up at the top. Not so easy because
it's on a curve here. Let's do one here. So I press there you go.
11. Bonus-Completing Wine Glass: Now I'm going to add the leaves
onto our little flowers. They're on our glass. Okay? Alright. Careful when you pick it up because remember we added
the trailing bonds. So here I'm going
to add a leaf here. Okay? Make that one
a little darker. There we go. So pretty okay, then we got to touch that. Let's go ahead and add
these little green petals. She's not doing so good
here. Let's try this again. Slow down and touch it. More paint. And see, where's the other
one here we go. Green side. There, it's done. Well, now we have
to add or centers. Okay, let's just quickly
add our center's. Gotta be careful not to
touch that trailing vine. Almost done. One more. One more to go. Now it's done. Look at that. That just so pretty. Look at the inside
12. Final Thoughts: Now that we've gone
through the lessons, I hope you've found it doable. It does take practice
just like any skill. So don't feel discouraged
that you can't master it. Just keep on practicing
and it will come to you. If you have any questions please post and I
will answer them. Follow me on Skillshare to see my other classes and to be informed when I
release another class. And if you could leave me
a review on this class, I'd really appreciate it. Last of all, I want to thank you for joining me here today. Peace and be safe.
 Sue Alderete, Always Believe in Yourself!