Transcripts
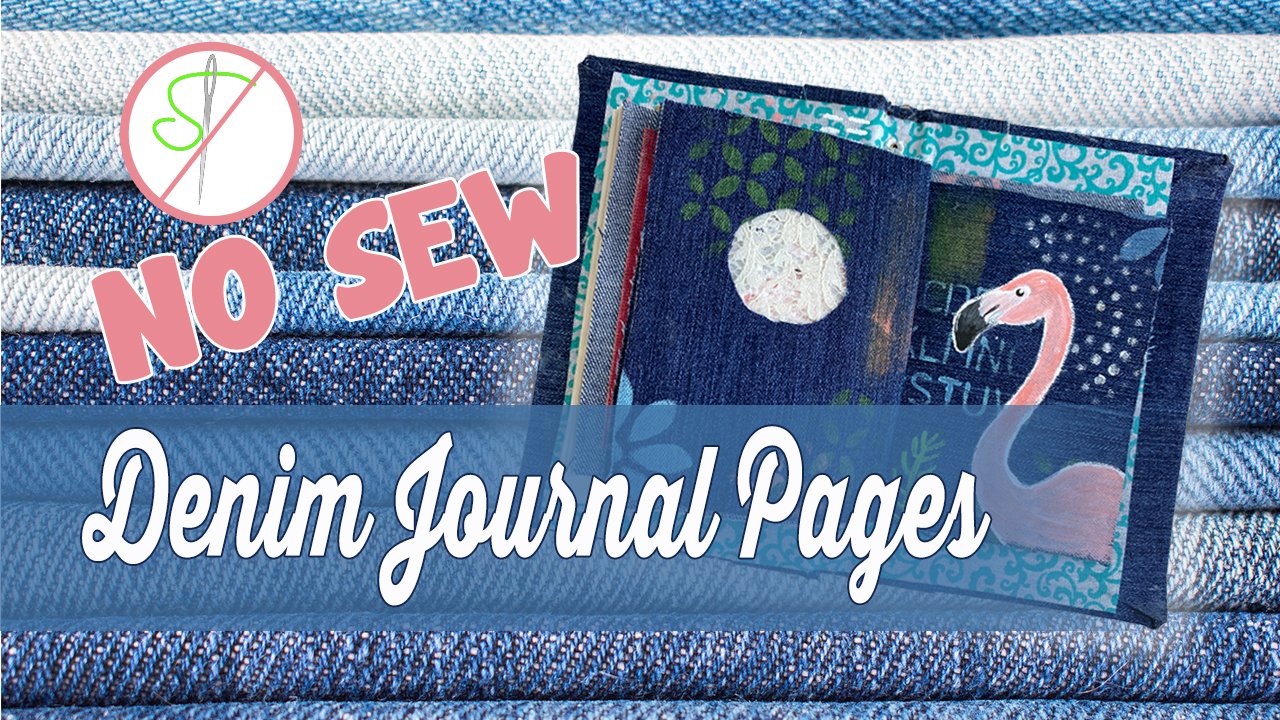
1. Class Intro: Hello, I'm Daniella melon and author and artist. Thanks for joining me for today's class. Know so denim journal to ways. In today's class, I'll show two ways of creating handmade journal using denim fabric that we repurpose from US genes. Since the journal is no. So we will use feasible adhesive and fabric glue to attach our pieces. Both materials are easy to find. In the first version, we'll use an old book is the base, the structure of our journal. It will result in a professional looking book filled with pages that can be removed and added easily. The second version is a little more eclectic. If two uses denim fabric to create the journal, but it's more free forming. This means you can choose to make the journal any size you'd like. It allows you to personalize it and make your artwork totally original. I'll show a way to take this journal one step further. And we've designed, again, using repurposed denim to create an embellishment for the cover. It's a fun way to create a handmade book and reuse materials that you may have on hand.
2. Class Supplies: Here are the supplies that we'll use to make our know. So denim journals, now I'm going to show two renditions, two versions. The first version uses a book, and a second version does not use a book. So you can decide if you want to try either method or both. Either method does require some basic tools. Since we're not sewing, we'll need another way to attach the pieces of fabric together. Fabric glue is a wonderful option. It doesn't matter which brand you use. It's quick drying, it dries flexible, and it also prevents the fabric from fraying. I have a frame check here. It's an optional step and this is if I want to put the fray check on in areas at the fabric glue won't go on. Again, it's an option. And then I had this reusable adhesive and that's crucial for our project. This one comes with a paper backing and you cut it down to size and then you iron it onto your work. But you can buy the kind that doesn't have the paper backing or if you have it, I prefer the kind of the paper backing because it's easier for me to write out and to cut. If we're making the rendition where we use a book, I choose a book from the thrift store or an old book, or book somebody's throwing out. And I choose it based on the size and the quality of the book. I don't really need the book itself to be in the greatest shape, but I do need the cover and the spine to be in good shape. So I removed the jacket to really just take a look at the book, The covers intact, no signs of mold or anything like this. But most importantly, when I pull the cover back, I can see that I can get the pages out without doing too much damage. So I'll use this in my work because we're using a book, we need to reinforce the spine. And this is just a piece of corrugated cardboard that I cut larger than the book, approximately the width of the spine, and will work with this some more later. Because I want to attach the cardboard to the spine. I just have some tacky glue. You can also use your fabric glue. You don't have to have multiple glues. I'm just very familiar with the tacky glue and I like to use it. I have some extra fabric. Some of it is the height of the book as well as the width and this will be the inner liner. And then I have a little bit extra which I might use on the exterior of the book as a trim. Again, I just make sure that's the right height. Or I can fold it to the right height. And then I have my pair of jeans. Got these genes at a thrift store. They're beautiful color that i like, they're in good shape. Some genes will have embroidery or some other aspects to it that you might be able to incorporate into your work. Crop genes. I would advise against not getting, although depending on the size and the gene, you might have enough fabric on the crop genes, but I try and get a full length gene so that I can use all the fabric from the legs. And we'll go into cutting apart our genes to use to salvage the fabric in another chapter. The other tools that I use are an ironing board. In an iron, a ruler, a hole punch that will punch through the fabric. If you don't have one, you can make a little hole with your scissors or even use an all. I have a pair of paper scissors. I haven't devoted pair of fabric scissors that I'll use to cut out the fabric. It makes it easier. They stay sharp enough for fabric. I had just a little scalpel or an exact dough blade that I'll use to gut the book. And then I have just an old gift card. It's not the strongest one, but it will help me get into the crevices when we start to line our book. This is my fold away ironing. Matt. I can put on my board or just using my table, it protects the table from the heat. And then in our second rendition, if I'm going to make a book that does not require the actual hardcover book that we're reusing. I just want to use my gene fabric, my denim fabric. I have enough fabric to make a liner to that, as well as some trim. Will go over that in a separate chapter. You'll also need some paper or some fabric to make your pages. Now, I'll show versions of the book made with either pages in some made with denim fabric, but we're not gonna go into detail on making fabric pages. That will be a different class for a fabric book, but it can be done. It's the same process as using the pages. You just need to make sure that your fabric is large enough to be a page that can be folded in half. And you can also incorporate other fabrics as well. And that is actually a whole new can of worms. And that's why I'm going to devote a whole class to a fabric book. But for now, in today's class we'll focus on just using paper. You can use any size paper as long as it's the height of your spine, the interior spine. So here I have an assortment of gel printed pages, card, stock, sketch paper, paper, paper, and colored paper. The next chapter we'll go over a couple of things, starting with gutting the book and then cutting our genes down to size.
3. Method 1: Book Surgery: Now to do the book surgery, what I do is I take the book and I'll open it completely. And then I'll just really carefully make an indent on the seams with my fingernail. It's just a light pressure and this will tell me if the pages are weak enough that they'll break under my fingernail pressure or not. And it gives me a feel for the book. They'll take my blade, my exact a knife and I'll do this in multiple pulls and I'll just go right down where those two pages meat. And I'll pull that down and pull it apart. I'm trying not to cut through all the book, but just the textblock and the hard cover of the book. So again, I'm not rushing this and I'm being careful not to cut myself. And so I have one side removed. I'll come around and do the same thing on this side. And so here I have the textblock, not going to use this for today's project. So I'll set this aside so I can decide here based on the condition of the book. If I went to remove these little fabric markers or not, I am going to cover over here with the denim. And these fabric markers are not very thick. So I think I'll just leave them. I think if I tried to remove them, even though they only go up to here, I'll be left with a little bit of a messy area right now. And they're just trim up this paper on the edge very carefully, just so it's really neat. And I can do that by folding this edge over. And this side is doesn't require so much work. And I'll just cut that off. And again, this is just to clean up the book and to make them on the fabric sits on it. To be very neat. So now I have my book. I'm salvaged the part I'm going to use. And then I'm gonna take that cardboard that I have, want to make sure it fits in the little divide here on the spine. And I want to be able to close my book without any issue. So I cut my spine cardboard approximately a half inch and that worked out really well. If it didn't, I would just come back in and cut it some more. What I will do though is trim it down and I want to just put it inside these marks here, these little fabric markers. So I'll make a little mark with my scalpel and then I'll cut that. And then the last thing that I'll do is I'll take some of my tacky glue and I'll put it down right over here on the spine. And I'll set my spine reinforcer, my cardboard right in place. What I like to do is just take a gift card here and just make sure it's there's a little gap between my cardboard and the side of my book. And this way I know it'll close nicely and I'll be able to work my fabric in there. Right now. I'm going to clamp this down and let this dry just for maybe a half hour or so. We'll come back and we'll work on gutting our genes.
4. Cutting Jeans: Methods 1 & 2: So now we have our book that's gutted and we've reinforced the spine. I just took the measurements of the book opened flat and I put it on a piece of card stock so that I have a little pattern or a template. And this template would be whatever size book you use. So the reason I do this is because I know that this is going to be the size fabric piece, the minimum that I need to cover the front of that book. So what I do is I take my genes and now I'm going to cut around them. And so the first thing that I like to do is I go right over here to the seat of the genes, the front view. And with some scissors I'm gonna clip right over here as if I was making very short cut off shorts. Can even flip it over just to really see the seat. And I'm going to just make a clip here. And then I'm gonna use just cut one layer at a time. Right to the center here, and I'll remove the legs. So my edge isn't cut very well, but I do have these legs and for this purpose, for this book, we'll do nicely and I'll only need one leg. I'm going to cut the other leg here just so that I have kind of a matched set. And then I'll just set this aside. I might use a pocket or one of these spots in my work, but for now I'll just set aside the legs because this was what I'm going to use for the project today. And then I'll take one of the legs. And I like to flip it inside out. Because of this way I can really see the scenes. Now I know that I want my piece to be larger than my template here. I could cut it like this. Or because I'm going to cut it pieces in half for my actual book. When I adhere it to my book, I can use just one side of each of these legs since we have seems on both sides. So I'll take this and I'll go right to the scene and I'll just cut the length of the pants here. I get to the bottom. I'll just cut it just like that. So now I have a big piece with the same. If I want to use the seam, I'll leave this piece intact, but I don't want to seem. So I'll just come over here and cut right along the seam on both sides of it. And then on this piece, it has now two seems cutscene and we'll fast forward through this. Then I have the seams, which I'm not going to use all dispose of these. And then I have my fabric. I'll do this to the other leg as well. And then in the next chapter we'll start making our book.
5. Method 1: Part 1 Covering the Book: So now I have my denim that I cut for my genes. I removed the seams and then I press them. Now these genes that I got have a very deep crease, a deep pressed seem I guess or not seen but pressed spot on the, down the front of each of the genes. So I just left it. I, I went over it with my iron but I couldn't really get rid of it. And that's just the way it goes. So I but I did press it to get the wrinkles out. I did the same thing. I pressed my fabric here that I have to use as my liner and my trim. So again, there are no wrinkles there as well. It's time to eat my iron hot and I have my ironing pad down. And then I took the heat and bond which have the package looks just like this. You will unwrap it like gift wrap. It has a smooth side that feels like parchment paper. And then on the opposite side is, I don't know if you can see on the camera, but it's textured. It looks glossy, it looks more like wax paper. So this is the adhesive. The reason they keep the paper on the back is because when I press this onto where I wanna put my adhesive and the fabric piece, I'll press it on the paper side, the smooth side. And this way, when it dries, which happens in seconds. I can still work with my paper and I don't have any residue on my iron. So all I do is I cut it and it comes beautifully. I use my paper scissors, cuts beautifully. And then I'm just gonna take my liner. I'm not gonna put any Heaton bond or any feasible adhesive onto my jeans, but I am going to put it on my liner. So I made sure that this liner was larger than my book because I'm going to trim it down to size. And then I have my reusable adhesive that I've cut down large enough to fit over my book, but smaller than my fabric here. Just barely going to flip it over this way. And I was sure to put down the good side of the fabric that I'll see, the textured side of the adhesive. And then I have the paper backing. To do this, you have your iron on the hottest setting that your fabric can tolerate. So in this case it's cotton. And then I just press my iron down onto the area that I want to melt that adhesive. And they say to leave it for three seconds, I think leaving it a little longer than three seconds, maybe five or so. And you just wanna make sure you press it everywhere. So wherever my ironing plate is and I leave it down long enough, it will melt the adhesive. You don't run it back and forth like you do with an iron. You just press it just like this. And I find the hardest part is to make sure you get the scenes. And the scenes or the edge of where you're putting your adhesive. It's very easy to think you've got it when you don't. So I'll continue pressing this and I'll speed this up. So everything I haven't done, I like to just double-check. So I flipped my piece over. Q's gonna let it cool for a few seconds. And I can see that it has a really nice adhesion everywhere. So another way to just double-check on the seams on the sides and I just hold my iron down there. Just a few more seconds. Just like this. So now it will cool in about ten seconds, it will be completely cool back to room temperature. So now I have the inner part of my book. I have the genes cut through the outer part of my book, and then I have my trim fabric. So now to cover our book, what we wanna do is set our book down and make just a rough cut larger than the book. And I like to leave a good inch, inch and a half if I can, around the book. So I'll take my template and set it down. And then I'll just roughly cut around it just like this. So I'm leaving a good inch and a half somewhere between an ancient and inch and a half all the way around my template. So now I have I denim that I'm going to use to cover my book, particularly the outer cover. What I like to do is I'm going to fold it in half and make one more slice. And I like to cut it right down the center. And I do this because I don't like to cover up this the outer spines with a piece of denim. I want my book to open and close freely. And so by doing that, if I don't cover it up, I can just bring my fabric right to the edge. That works out very well. So in our next step, will adhere our outer cover to our book.
6. Method 1: Part 2: So now we have our book, we have our swatches of denim. I have my scissors and my fabric glue. And it take a little the fabric glue and I'm gonna go right up to the edge here, leaving just a little bit of space between the spine and the book where I'm putting them glue and I'll put the glue all around the edge of the perimeter of the book. That'll go in there and just add some glue to the center as well. This glue is nice and thick like rubber cement. So I'll set that aside. Then I wanna take my fabric. And the only thing I really want to make sure is that I overlap all around the book and I make this side fairly straight. We are going to cover this edge, but I do like to make it fairly straight. The glue will dry very quickly, but there is a small window where we can move the fabric. I have that seam or that pressed seem in the center. So I want to just push that out. And now I'm going to just take my time and really burnish everywhere on this book here, a hole down beside and pull it apart. And this will get out any wrinkles. Go right over the edge of the book with my fingernails. Just to make that nice shape then will come back when I'm happy with the way it looks and I'll just gently pull the fabric down. Not to give it, not to remove it, but just to see where my glue of how far I went with my glue. If any of the cover is exposed, like it is right here in this corner. I'll go in and add a little glue to that. And again press it, and it will do the same thing on the side here. Again, I'm trying to make sure that there is a nice adhesion with my glue and my cover. So when I have one side, just with the front done, I'll come around to the other side. Make sure I have a somewhat straight scene. And if I don't, I'll make a nice little trim rate along the edge. And this denim is fairly thin. Here we go. And I'll do the same procedure on this side with my glue, bringing it very close to the edge and then right to the edge of the book, again leaving the spine and then those little channels by the spine without glue. Again, I'll add my piece of fabric. I have a little bit of overhang all the way around which I like burnishing the fabric to the book. And then I'll just do my check all the way around with my fingernail, precedent with my card. And then I'll just do my double check here. Add a little more glue to that corner. I seem to let all the corners not have enough glue. And then I'll press it down. I'm going to let this dry for maybe a couple of hours. I'd like to have that glue nascent dry so that when I put the book over and press it down, I'm not tugging with wet glue.
7. Method 1: Part 3: So now it's been a couple of hours and says dried. Gonna flip it over. And then we want to create my nice edge. So what are you going to do is I come to the edge here and I just clip a little bit of ways here. And I'll just click trim this one down a little as well. So I go to all four corners and I just trim so that there's about half an inch or so diagonally on the corners. And I'll trim that further. As I go along. I'll start with one side and I'd like to do opposites. So I start either the top or the bottom. And once again, I'll put my glue. I started right along the edge, make it just a bit of glue. And I'll go just a little bit on the corner. And then I'll put my glue right on the top piece over here of my fabric. Again, really close to the edge. So then from there, I'll take my pat fabric and pull it. Not so much taught as in meat. And I like to pull it straight over the edge right here. And I pushed down here. So it carries off the page as since I cut it at an angle, it's, this part is just a little lower than the top. I can take my card here and burnish it. And I'll do the same thing over here on the bottom. Again, I put my glue down, right on the edge, and then right on the edge of the fabric as well. Carry it off. And then I pull my fabric flat and then I just press down and I press down right here on the edge. Because I'm pressing down on the edge here, I'll have a nice covered corner and that's my goal. So the glue is quite sticky and I do wind up with it on my hands. But that's okay for now. We'll come over here to the top piece or the bottom side. The remaining piece. I push my edges in and then I'll take my glue. And I put my glue right on the edge of my fabric to start with. As well as a bit of glue right on the side. And a little more glue. And now I want to be careful because when I turn my fabric piece over, just going to very carefully pull it in the center. And I'm just gonna make sure that this edge is tucked under. If it's not, if it doesn't come across, I'll fold it in half. Just like this. Press it down, or maybe even add a little glue to hold it in place. Press this over. And then I can flip this nicely. While this part isn't the nicest to look at, my edges are nice and formed. There's no part of the book exposed. It's all covered with fabric. Fast forward and do the same thing over here. So I'll let this sit for a few more hours and then I'll come back and add the top layer.
8. 8 Covering the Book Part 4: Now to finish off the cover, what I like to do is take another piece of fabric and I cut it with straight lines down the side. That's my only requirement because these lines are going to show. But I make the piece of fabric a little with a little overhang. So maybe an inch or so on either side. And I'll set my fabric down. And then I just center it roughly on my book. And from here I'll make some markings. I want the inside here on the spine when I fold it over to go just right on the spine. So I'll make those markings on both top and bottom. And I'll cut them a little in from the marks that I made so that when I adhere it folded over and there'll be a piece on the spine and then pieces on either side here. So I make my mark. I'm gonna put a little line here. And then with a pair of scissors, I'm just going to go to those lines I made. And on the inside of those lines I'm going to cut straight marks, stopping right at that line that intersects them. And that's how I know how to make it nice and deep. And then I'm gonna take this fabric just to the outside of the marks and just cut a little triangle on either side of both of those marks. Just like that. So essentially I will be gluing it down a line up my book and adhere this part, and then I'll adhere these as well. I can go in there and trim those lines, those angles a little further. And I think I'll do that. But before I do that, I want to create a liner. And so for this, so you can envision it, this will be my outer spine. And then on either side of the spine, I'll have just a nice little edge here, folded edge of this liner, just peeking out. And I can decide if I want it to be very short. Burst of color or a larger burst. Gonna take my fabric folded in half. And I don't have to worry about getting straight lines, so I don't have to cut it with a straight edge. Just gonna cut the fabric down to size. Saw, cut it in half like this. And then actually I'll just cut it in 1.5 more time. I don't need that much fabric. I'm just going to have a little bit of this pattern peeking through. So I'll set my book aside and now I have my two scraps here that I'm going to fold over. I'll take a little fabric glue. Just put it down one side. Same thing on this. And I just want to fold my piece over. The only piece that will be exposed. The only part that will be exposed will be this fold here, this little crease. So I have that and I'll set that aside and then I'll do the same thing on this piece. So now I have all three of my Pieces and I'll just press this one more time. I have my book, my denim spine, and then my accent piece. I line them up. Just like this. Not putting any glue down yet. But this is the effect that I want to get. So the first thing I'm gonna do is hear the spine. I like to work in parts here just to get a nice professional look. So I'll just put a little bit of glue down the spine, right to the top and the bottom. And then I'm going to line up my denim spine as straight as can be. Flip it over. Really burnish it into place. And I'll take some more fabric and just put a little glue on the tab here. Put a little glue on my book. And I'll pull down that tab. Both on the top and the bottom. I'll press just for a moment, just to really burnish it in place. And now I'll come back here with my scissors. And I'm just going to trim this a little bit and could make that angle a little more, a little more of an angle. And I'll do that on the top and the bottom. And now it's a matter of just taking my time, adding my glue and my fabric into place. I'll start on one side of my book. Start on the right side. And I'll fold my fabric back. So now it's folded over the spine. And then I'll just roughly see where I wanna put my trim piece. I think that's a nice look. So I'll come here with my fabric glue. Put some glue on the back side of this fabric piece. And once again, just eyeball where I wanted to go. I like to hold it up against my piece here and then just gently set it down. I have just a little bit of time to play with it. I'll pull it back just a little bit. Again. I'll just view where I want it to go and then I'll burnish it. So now I have one side with my trim in place. I can come over here and add some glued to my denim, right to the edge. And then I'll put a little glue on my fabric. Put the glue right at the edge of the book and press that down. What I like to do is fold the book closed and then burnish it some more. I'll have these little trimming, these little pieces here, but I'm going to leave them for now and I'll take care of that at the end. Then over here, I'll do the same thing. I'll open the book, makes sure it opens next and flat. Turn it over. And when it's open it'll have a little bit of a ruffle up top. I'll take my card here and press down the areas that I want the fabric to go. I can do this while the glue is wet. And then I'll turn my book over and do the same thing. The press my glue and press my fabric into position. Do this on both sides. And then I'll open my book From here. I'll add some glue to the top piece of fabric and the bottom piece, and then burnish it up. We want to create a nice tight seam. If any parts remain, I could trim them off or just push them up with the glue. Can always add a little more glue as necessary. And then I'm going to let this dry.
9. Method 1: Part 5: So after the glue has dried, before I add the interior liner to my book, I want to punch a hole on the top and the bottom so that I can thread my pages through my book. I've measured a half an inch from the top and the bottom. I've marked it out. And that's where I'm going to punch my whole I've already punched a hole at the top and I made my mark and then we'll just punch my hole on the bottom. And I do this because I'm going to read punch the hole after I have my interior fabric on. But I also know that it's a little difficult to pierce through all these layers. So I do it multiple times. So there I have my hole in the top and the bottom of the book. And now it's time for me to add the liner. To do that. I took my paper, my fabric that I fused with my adhesive. And because of the paper on the back of it, I can just make my mark for where I want to cut it out. So I made my mark. Basically I just measured my book and just went a little bit in from the top and the bottom. From here, I'll take a pair of scissors and I'll just cut neatly on this mark. When I have my piece of fabric cut to size, I'll just verify that it's the size that I want from my book and it is. And now I'll just peel off this backing paper. So now I verify that it's the right the proper size. And because I put that backing that adhesive backing on it, I can iron it and press it to this page here. And I like the way that's going to look. So before I do that though, I have these little ridges deep in here that I want to also get the fabric into. So what I'm gonna do is create some glue here and create a spot of glue right on the inside here. I'm going to try and avoid the holes that we punched with the glue, but I'm not going to really worry about it too terribly much. Worst-case, it will dry and I can read punch it. But I'm putting a lot of glue now on the spine. And then I'll put it a little bit on top of the area next to the spine as well. Fold my piece in half just so that I can get roughly the half. And now I'm going to make sure it's lined up top to bottom. Or I have a little bit of an edge. And I'll press right on top of the spine. Again, I'd like to move my book around quite a bit to do this. And then I'll take my card. And I want to press that fabric deep into those grooves. Because I use the extra strength adhesive. On the feasible adhesive, the fabrics become very stiff, so it creates a little bit of a challenge, but I know I can work it in there. Just takes a little time. If I was just to use the fabric without the reusable adhesive, it would not be a problem. So I have that one side done really well. And I'll use my ruler, my straight edge here just to hold that in while I go to the other side of my spine and try and work the fabric in. Can do that with my ruler. Really pushing it in. This part takes a while. It can be a little feisty, particularly because I used that stiff adhesive. Again, keep working it in. This might take a little time. And I always fold that book. I want to make sure my book is flexible. So once again, press with my straight edge, hold it down. And then I'll come over here and press with my straight edge. Then I'll take this one side here, or my straight edge is nicely buried into the spine. And then I'll take my iron and I'll just press hot iron right onto the feasible fabric that we need. Hold it down. And it'll adhere to not only the fabric of the book that we put on the denim, but the cardboard behind it as well. Again, it takes some time to really get that nice infused. You want to melt all that feasible backing. I pay careful attention to the edges. And they'll go around. Fold my book the closest nicely. And then I'll work on the other side. And once I'm happy that I have nice adhesion. Now again, close and open my book a few times to make sure that works. And then I'll let this dry and cool.
10. Method 1: Part 6: When our adhesive is dry, now I want to come back in and set the grommets. So to do that, I want to read punch the hole, holes that we made on the top and the bottom. And I've already done one and set the Gromit, but I want to show you how I do that. And then I'll come in here, find the hole and read punch it. So I punched my hole and then I just set my Gromit right inside there. And then I take my tool and I set the Gromit, presses it into place, and it flattens, opened the edge here. And from here I'll string my beads and my elastic through this, but we'll go over that in another chapter. Right now. I just want to trim up these threads here. And what I'll do is I'll take a little bit of this Frame Check. So I'll just take a little bit of this frame check, can just run it along the edge here of my fabric and I'll let this completely dry. And after it's dry, I can go through and trim any of those threads. And it'll have a very neat look. So well to set this aside, to come back for the final assembly.
11. Method 1: Part 7: Okay, now that our pieces dried, we can go in here and just trim away any of these little scraps here along the side. And I'll go in and do that a little more detail in a moment. I want to show you how I make the binding for the book here where I'm actually gonna put my pages. So I take a piece of very thin elastic and I started with three times the length of my buckets. Pretty generous, but it works out well. I flip it over and from the inside, I'm going to feed it through that first Gromit hole. And I leave a little bit here, good portions or won't come out. Then I take one of my large hold beads and I threat it on my elastic that's on the outside of my book. And I bring it right to my Gromit. And then I'm going to feed the elastic in back through the Gromit hole, but not through the bead. The bead will catch the elastic and give me a little tension here. And then I take that long piece again. I come back in a thread it through the bottom. Gromit. Do the same thing with my large hole bead. And then I feed that elastic back in through my Gromit, leaving that bead exposed. And then when I pull my elastic, I get a little tension. I can alter how tight the elastic is and I don't want it too terribly tight. I want to add a quite a few pages. So now I have two ends of elastic here. I'm just going to take them together and make a knot. And again, determine where and the tension that I want on that elastic. And again, I don't want it too tight. I'll make a double, not really pull that double knot so that the not itself as tight. And then I like to add just a little drop of either fabric tack or even the fray edge to that, not just reinforces it. Take my ends here, my tails and cook them. And there I have a place for my pages. Next chapter we'll go over Adding the pages.
12. Method 1: Adding Pages: So my book is completely dry. I can go in and load the pages. I measured my measurement between grommets. It's a little larger than six inches. So a six inch height on the page is the highest. I really want it to be the tallest. And then across is almost nine inches, so I have a little bit of give there. It's up to me if I want all my pages to be the exact same size, if I want to use one signature or to and what texture of the pages I want. For today's class, I'm just gonna use paper and a here I have a bunch of sketch paper, some gel printed paper. I cut it down to size that I have right here. And then I'll just fold it in half. And then I had that smaller gel page right here that I'll fold it in half. And this will be the outer cover of my signature. And then I can just take those signatures and stick them inside each of these plastics. So very simple procedure and it's easy to load and unload these pages so I can add to it, change it around and whatnot. It makes for a very convenient journal. Now, there are some other options as well. I can just take some fabric here and here I have some just the denim scraps and I cut that the same size as my paper for the pages. And I can just use this as is just folded in half and I would just use a series of them. Here. I did the same thing, but I fused two sides of it together so that it's a lot more stiffer and more sturdy. And I can fold it and make my pages as well. And I have another class that I'll put out in the coming weeks where I actually embellish these pages further. So it's an all fabric book. So you can incorporate pages of paper. Just fabric or a combination of both. And it's up to you.
13. Method #2: Creating the Cover: For my second method of making a journal. And this is the cover that we're going to work on first. You just want to whatever size you want. It can be teeny, It can be large. I'm using one that's ten by 5.5. So here's my template for this is just a piece of paper that I took to the measurements that I want. And this helps me to eyeball all the different things since I'm using a lot of scraps. So I have my denim that I cut from the leg that fits on my scrap here. And this is going to be the cover. So I have my piece down. Then I took a piece of the feasible adhesive, again, the FEC thick brand, the ultra hold. And I cut that a little larger than my shape that I want my finished cover to be. And so I will fuse this to my piece of denim. So I just make sure it fits nicely. Then I take my hot iron and I press it into place. And again, I do this the same procedure that I've used. Any of the pieces. I have the rough side touching the fabric so that that becomes the adhesive. And the smooth side with the paper is where I touched my iron. Makes sure all the edges are pressed. And then it becomes quite hot and the adhesive melts and clings to the fabric. So there I have it touching the fabric. It's quite hot. I'll just give it a few seconds to cool. So it takes about ten or 20 seconds to cool. I haven't sitting down and then I'm just going to pull up the edge here. And as you can see, what you're left with is a shiny coating of that fabric, adhesive on the denim. So I remove my backing sheet and then I take my liner, which is my fabric, and I'm going to put it all over that shiny adhesive. And I'll set it down. And I can take that liner again and just put it on the edge so that I don't get adhesive on my iron. And now I'm just going to fuse my pattern fabric to my denim. The heat will go right through the backing sheet and will melt all the adhesive together so that I have one piece of lining fabric and denim fused together. I just have to be careful to melt all the adhesive on the denim at this point. And that, and then I let it cool. Now from here I set my template down and I'll cut right around this so that I have my book cover when I do that and we'll come back. So now I have my cover with my backing. Cut to size. Looks nice and neat. And now I just want to press it, finger press it really by Could it putting it in half? And then just pressing a seam with my fingers so I know where my binding is gonna go. And I'm going to use the same binding procedure. So I have my center point. I pressed it and now I'm just going to go in and go half inch from top to bottom. And I'll make a mark for a little hole right on where I pressed that seem. So I have my marks and now all I have to do is pop my holes on both sides. If it doesn't quite come out because it is going through two layers of fabric. I can just either pick it out with my fingers or snippet off with a pair of scissors. And then I went to drop in my grommets. And I'll do the same thing here and here. Again, these are optional, but they give a nice finished edge. And I'll do it on this side as well. And then I had a nice finished edge. From here. We can thread through the spine to hold our pages. But I want to show you a technique for adding a nice elegant design to the top of our fabric journal.
14. Method #2: Denim Weaving Design: So then I make my weaving my little design for the top of my journal. I just cut a square. This one's five-by-five, so it's about the size of my journal page. I am going to trim it down, but this gives me a lot to work with and I can sometimes even get to emblems out of it. So what I do is I put my piece of feasible adhesive with the backing down on my work surface and I'm already using my ironing pad because I'm I know I'm going to press it eventually. I just take a little tacky glue and I just spread it in a very thin layer all the way around my piece here. And I'll take it and then I'll just spread it very thinly with my card here. And this is really just enough to make the fabric that we're going to put on it stick lightly. So I take my strips and I've cut these into half inch strips. These are just some more of the gene scrap that I have. And I'm gonna lately set it down. I'm not even going to press it just yet. And I'm just making a simple we've so I press one, I start and I make a cross. And then I'm just going to build up that cross going over and under. So it's like making a lattice pie. And because I put down the little tacky glue, it gives you something to stick to so I can have a nice solid result. And again, I'm going over and under. I'm building off this, this horizontal line here in the center. So the first one went on top. These are Going on either side of it. Press this polis up, set this down. And again, I'd like to make it nice and tight, close to the edge. I'll continue on this one side. Again, over and under, over and under. And again, I'm just getting an interesting texture, which is what I'm going for. And I like my last piece to hang slightly over my adhesive, my feasible adhesive, and that way it'll adhere. But when I trim it off, I'll have a nice adhere adhesion to the parts that I don't trim. So now I'll just lightly press down and I'll continue to build up on this side. So this last one went on top, so I have to fold this over and that'll speed this up. So now that I have my line down the center aisle just fold over the ones every other one on one side. And as I go along, it'll become a little more easier to work with. I just wanna make sure I press my piece nice and tight, close to the other pieces. And all I have to really worry about getting close is the new one that I'm putting down. Depending on the width you make these strips, you'll have a different result. And now I will just remove the other ones. The opposite one is I can take a pin to help me keep everything situated. Just press it down like that here and here. So now we have our finished weaving here. It's kind of an interesting effect because we still using the genes. But yet it gives us a different texture. And I think that's kind of an interesting look. So from here I'm heating up my iron. I'll remove the pins carefully. And now I'll just press the front of this here. The weaving right down onto my piece of interfacing. And now it will only melt the adhesive or it can get through because dunams thick, it doesn't always get through. And the areas where there's one piece of fabric with another piece, that top piece will not be adhered. So keep that in mind. That even though I'm going to adhere it this way, it's not going to be completely stable. Trying to melt any of the adhesive that's on the back as well. And this will give us a nice solid start. And then I'll take my fabric glue and adhere any pieces that need just a little more tack. So I have this, I'll let this cool. And then we'll come back tomorrow piece and add any glue that we need to.
15. Method #2: Weaving Part 2: So now our pieces cool. As you can see. I can lift up these pieces because this top piece is not attached. So I'm just gonna take my glue and I'll go around. I'll start at the top here. And I'm just gonna put a little dab of glue just underneath these pieces that are not attached. From here, I'll flip my piece over and trim just around this adhesive here was feasible mad. So now I have my woven piece here. So I'm gonna cut a little piece here and attack shit. And I might put a little trim around the edge if I don't want the and edges exposed. So I'll measure this out right on the back on. So I'll do a 2.5 inch square, a cut this and we'll come back and adhere it to our piece. So now I have my block. I can decide if I wanted to use a larger one, but I like this little square going to take it. I'm gonna remove the adhesive from the backing. And I'm just gonna set it in place where I want it on my journal. I can either use my fabric glue, I can just take my iron and press it in place and I can decide that which way I want my weaving to go. So I like the way that looks. I'm just going to press it down in place. Then I'll let that cool. In the meantime, I'll decide on which trim I want to use. If I want to use this green trim, which I kinda like the look of or the pink, which is also very pretty thick. I'm gonna go with the green because I like the size and the pop of color. So I'm going to just eyeball, make sure I have enough of this trip. So what I'll do is I'll just take a bit of glue. And I like to start on the side here, and I start a little bit on the emblem here, as well as coming off it just barely a cut my trim on an angle and I'll go around about half of it. When I come to a corner, I'll make that. And now that I've come to the end here, I'll eyeball it, trim my piece a little longer than necessary, but which is easy to work with. And then I'll put my glue down. I'll also put it down a little bit over onto the trim that I added. Working with the glue is kind of messy. And I'm windup gluing my hands to the piece instead of the trim. Carefully pull that off at a little bit more glue and try this again. And I just try and be patient and play with it until I get the right effect. Again, trying to keep those lines nice and straight. I'll let this dry and then we'll come back and add our pages.
16. Method #2: Binding & Pages: So now to create my little elastic binding, I cut a piece of elastic, and this is the same procedure I did using the hardcover book. I just cut my piece of elastic three times the height of my book, and it's a very generous peace. So if I have a little scrap of elastic that's a little bit less, I'll probably use or at least try to. From the back. I'll go in there and I'll thread my elastic through the top Gromit, then through a bead, a large hole bead. And I like it large holes so that I can thread my elastic easily. But really you need any size hole that will fit the your elastic. And then I feed it back through my Gromit, but not through the bead. And when I pull it, the bead prevents it from coming out. I'll take my longer tail and I'll do the same procedure on the bottom hole, right? Just feed it through at the bead and then feed the elastic only back through the Gromit hole. Here I have a lot of space I can before I nodded off, pull down the elastic to tighten it up. I don't want it to be too tight though. And then I'll tie this off. Again. I like it so that the book lays flat. I'll make my knot. And now I have two elastic bands where I can either use one signature or two. I'll turn the edge. I have the tails off. Mixture might not as tight and then I add just a little dab it either fabric glue or fray check, and that just holds it in place. So now to add pages to my journal, I just open it up and on the elastic, I want to measure the distance between the grommets here, and that's a little more than four inches. And so a four inch space gives me a nice size for a page in between the grommets here. And as luck would have it, when I opened it and created my template, this is just the standard width of 8.5 by 11 piece of paper, the 8.5 inside. So all I did was cut my strips or four inches long using the 8.5 inch side. And then I have my template for my pages. I took a bunch of papers and folded them after cutting the strips to that size. And I made two signatures. So here I'll just take one signature, feed it through into one of the elastic bands. And I'll do the same thing with the other. And the beauty of making your own books is that you can dictate the size. So if you have a size in mind for your pages, you can create the journal based on that size.
17. Class Wrap Up & Variations: So here are the two books that we completed today in class are two versions of the No. So denim journal will start with the first book that we did where we took a book, repurposed it an old book. We used his pair of denim jeans and we cut up the fabric and really salvage that fabric into a nice, really effective piece. Here I incorporated some additional fabric just to add a little highlight as well as a border. I could have done the entire piece with denim from those genes, but I just really like the look of that little pop of color. And then I incorporated just some pages in here. And I can use this as a collage journal or a gratitude journal or anything of that sort. So I'm very pleased with the way this came out. I wanted to show you an alternative version using the same techniques. And so here I have just a smaller version. The book itself is smaller, so little taller in height wise. And because of that, I was able to puncture two holes on the side and make two signatures inside as well. Just like that. And so I use two holes instead of one to make the signatures. Again, I used contrasting fabric for the interior lining. I carried that over, write them aside here just like I did on our book that we used in class. And then I added a bunch of pages to my signature. Again, it gives a totally different effect. And again, I salvaged pair of jeans to do it. So I'm very pleased with the way these have come out. We also did this smaller journal where we did not use a book for our structure. We just used the actual genes that we've reinforced with some fabric. Again, we had two signatures, we incorporated papers into those for the pages. On the top of it, we have a little woven design which was optional, and then we just use a little bit trim to enhance that. And again, no, so but it has a very effective little journal. One variation that I made with that is the sternal right here. Same thing. I have one hole in the side instead of beads. I used just clear buttons and I threaded the thread in and out of them. For my embellishment on the top, I went full size and really covered the, almost the entire cover with a weaving. I also used wider strips, but it was the same technique. On the inside though. I did fill it with all fabric pages and the occasional paper. So it's kind of a mixed Meteor journal. And this is what I'll be showing in the next class. So different effects. I hope you'll try your hand at creating one of these NOW. So journals, either by reusing a book or just skipping the book altogether and just using the fabric. You don't have to limit yourself to just repurposing genes. There are plenty of other fabrics you could use to recover a book or to create your own journal because of the beauty of stabilizers and additional fabric gives it a nice support. Thanks for joining me today. Please be sure to follow me here on skill share to get notified of future classes. And please consider leaving your review.
 Daniela Mellen, Artist & Author