Transcripts
1. Class Intro: Circles are a basic shape found throughout the globe that have intrigued humans for ages. What is it about the circle that makes it so intriguing? Maybe it's the symmetry or the perfect balance, or the continuous, smooth and soothing shape. Whatever it is, the circle has captivated our attention and been used by artists for centuries. In today's class. Five ways to use circles in your slow stitching project. I'll show you ways to add interest to your needlework using the humble circle. Now all circles are simple shape. Creating them with fabric and thread can pose some challenges. I'll show different methods for cutting fabric into rounds, as well as stitching circular shapes to add a compelling element to your artwork. This class is designed for beginners and those wishing to branch out gently into the world of needlework. I'm Daniella melon and author and artist. Thanks for joining me today.
2. Class Supplies: The supplies for today's slow stitching class, focusing on five ways to use circles in your stitching. Include the class download, which is just a guide for the five techniques we're going to go over today. There will also be a downloadable class supply list that refers to all the objects you see here, plus ones that I find useful. They're not all required, but I wanted to show you different ways you could use them all. You'll start with some batting and I just haven't cut down to the size I'm going to use. Then I just have a bunch of fabrics that I want to use. Some of them are repurpose like the genes and some of this fabric is from various sweaters and in clothing, you can reuse any of that, just press it flat, make sure it's clean and press it flat. To make the circles. You have some options here. None of them are required, but they do have their uses. So the first thing is a feasible adhesive, and sometimes it's called Heaton bond, sometimes it's called Wonder under, there may be other brands. And basically it's like a piece of paper that has this adhesive on it. And one side is shiny and smooth and that's the paper side. And the other side is very rough and that's where the adhesive is. And so you want to put the adhesive side, it's not sticky, but you put the adhesive side on the wrong side of your fabric. And then you iron it with a hot iron. And we'll go over that procedure and more in depth in the next coming chapters. But this serves two purposes. Wanted helps adhere your fabric pieces together using the adhesive. And two, it offers a little stability to your fabric. If you don't want to use the reusable adhesive to get the stability, but not the adhesive property is just a piece of freezer paper that you can find in the grocery store. And again, we'll go over this a little more in depth in the next chapters. Then you have your thread. If you use any type of thread you want, you can use regular sewing thread like the kind you'd using your machine. You can use these cotton threads. You can use embroidery floss, and this is my favorite. It's just a crochet thread. It's very economical. It comes in beautiful colors and I can get lots and lots of it here for a very reasonable price. Then you're going to want to use your fabric scissors. Again, optional. I have little snips for cutting thread. I have a pair of regular scissors for cutting my paper, my feasible adhesive. I have my hand sewing supplies, which are just pins, sewing needles, needle, thread her my Wax. I have a light pencil to draw my shapes, and they have a marker here, which I've gone over in the past classes of friction marker. The reason I like it is I can write on my fabrics and when I'm done with my sewing, I can just iron on and remove any of that ink. I have a little iron. I have a wool pressing Matt. You can use any type of ironing board or pressing Matt. And I have just some round shapes and these are, I use these as templates. These I bought very inexpensively at the hardware store, their big metal washers. You can find them in any shape from very teeny to very large. It's not required. You can use a cup, you can use a template for a circle. You can use a dish, anything to get the shape that you want. In the next chapter, we'll review the different techniques we're going to use.
3. Five Circles Techniques Overview: So here are five techniques that we'll review in class today in ways and you can use circles in your slow stitching and your needlework. The first one is kind of an application. It's where you take eight fabric circle and attach it to your work with stitches. Pretty basic, but you can vary it by obviously the size of your fabric, as well as how many stitches you put in the direction of your stitches and how you attach the stitches to the fabric pieces so that you joined your base fabric along with your circle. The second one is just by using stitches in circular shapes in your work. And whether you do one circle or multiple circles, you get different effects, a different feel, and just an overall different look to your work. The next one is very similar to the first one in that we're going to attach a piece of fabric to our work, a circle. And then we're just going to create parts within that circle. So here I have a circle and here I have a half circle on top of it. I still have a completed circle, but I've added interests with my addition of stitching, as well as the different shapes. And you could add multiple pieces here. You don't have to stop at just 2.5 circles. You can make essentially a pizza pie, or you can do unusual patchwork shapes just to complete your circle. The fourth piece is layered circles. Now here I'm demonstrating them concentrically, but they don't have to be concentrically. They could be off. So they could be multiple circles within the circle, it's just a matter of layering your circles. And the last one is kind of my favorite. It's a very unusual piece. It's where you remove the piece of fabric circle instead of adding to it. So I remove this piece of denim in the circular form. And then on the back, I've added my piece of fabric. And all you see that the eye sees is that circle. So these are five circles, and we'll take a more in-depth look at each one. And different tools that help us create. These effects will also look at some variations at the very end.
4. Circle Technique #1: So the first technique that we're going to work on is cutting out a fairly perfect circle to use in our sewing to advocate to our piece. Now you could always use just the standard method where you have your fabric. You take your circle and you trace it onto your fabric. Now, with this, you can use anything as your template guide. Here I'm just using my little washer. And now you can cut it out. You don't need interfacing. However, it makes it a lot easier. So for example, this fabric is pretty thin and pretty light. And if I'm careful, I can kind of fairly good circle using the guide here. I could start my fabric as well. But I find starting it to be just useful at times, but I don't particularly care for starting my fabric. So I have a fairly decent circle here and from my work that would be fine, but it was a little tricky. The fabric was kinda limp, moved around a lot. So there were a couple of methods you can use. The first one, filters have been using for a very long time is they take a piece of freezer paper. So this kitchen supply you can find in the grocery store, in the aisles near the tin foil and the plastic wrap. And what it is is it comes in a roll and it's the paper with wax coating on one side. Similar to butcher paper. So I buy it in these big containers, big cardboard. I'm boxes here. And it lasts me a very long time. It cuts very nicely with regular scissors. Has a little bit of body to it. And then there are this two sides, the shiny side and the paper side. So you just want to remember that you don't want the heat directly on your shiny side. What I do is I'll take my fabric and this is a really good fabric to use. I love it, it's beautiful, but it phrase a lot. So if I was to cut it FOR I make my circle, I could do it, but I would get a lot of fraying and a lot of lint. And this is the freezer paper acts as a stabilizer. So I take the wrong side of my fabric. I find the shiny side of my paper and I set it down. And then I'm just going to press my hot iron onto this paper. It melts the shiny side of the wax and adheres it to the paper. Then I just let it cool for a very brief time, 20 or 30 seconds. And now I have a piece of paper and my fabric is a lot stiffer. And as you can see here, if I hold the paper, the fabric from the side, the part with the paper is much stiffer. I can just take this and I can trace my shape right on the paper. Not only does that give me a nice crisp circle because I was able to write directly on the paper. But then I can just use that as my guide to cut out my circle. Because I've used the freezer paper. It has a little more body in a little more stability. I'm obviously cutting a little faster than I did with the fabric. And I have a nice result. And now if I want to use this in my sewing, I'll just gently peel off that freezer paper and place my fabric down. Another option, and this is a two for one punch is using this feasible adhesive. This one comes on a roll of paper. You can also buy it in a role without the paper so that both sides are feasible. But I find it with the paper to be very helpful in this case. I buy it by the yard and it's 17 inches wide. And I treat it very much like I do freezer paper. With my scissors. I'll cut out a piece that I wanted to adhere to my fabric. It acts as both a stabilizer because it has the paper on it as well as an adhesive. Now, the thing to remember with the feasible adhesive, when the iron melts that adhesive, everywhere that adhesive goes becomes sticky. So I don't want extra feasible adhesive going on my mat or definitely not in my iron. It's pretty messy to clean. So I just make sure that I have more fabric exposed than I do Interfacing reusable, adhesive. So once again, I double-check the rough side is going down on that fabric. And then I just treat it like the freezer paper where I'm pushing my iron down, melting that adhesive and its adhering to my fabric. We want to make sure I go over it all well. And I'm using the setting that I would use for the particular fabric that I'm working on. So if I am using cotton, I'd go the cotton setting nylon, et cetera. According to the iron. We'll let this cool for just 20 or 30 seconds. And then I can go about creating my template and then cutting it out. So once again, that paper side, I write on my circle, and then I can cut it right out. Now, the second bonus to this feasible adhesive. It acts as a stabilizer for when you want to cut out your shapes. But then it has a layer of adhesive on it. And depending on the strength of the interfacing that you purchase, craft strength, fleece strength, or just light. It will be stiff or just a very light adhesive. So I peel off my paper. You can't really see, except if you look at by comparison, the layer of adhesive on my fabric. And then I can just put it, place it onto where I want to adhere my circle. So I'll put my circle may be right in the center of my fabric. I place it down making sure the adhesive is underneath the fabric. And then I take my iron and I just hold it in place. Flip it over. And I like to make sure that adhesive is nice and melted on the circle. So I go from both sides. And then I let that cool. In the next chapter, we'll come back and just add a little bit of stitching to our circle.
5. Stitching Circle #1: So I have the circle that we added with the iron. And now I have my other circle. I can use this as well. If I want to add here this to my piece because there's no feasible adhesive. I can just take a pin and put it in place so that when I do my slow stitching, it stays where I want it. So before I begin sewing, I like to take a piece of batting and put it underneath my work. When I do my slow stitching, I like the feel of the weight of the batting and the fabric together. And even though this is denim and pretty heavy weight compared to just like a light cotton. I do like the feel of it. I just put it underneath and I'll just add a couple of straight pins to hold it in place. And you can also use safety pins if you don't want to get poked like I do repeatedly here with this little straight pins. But that's up to you. What I'd like to do is just hold it in place. I have a needle and thread with not on the end. And then I'm going to choose a stitch and go all the way around my work here. And I'm gonna start with the first one here that we use the reusable adhesive on it. So I'm just gonna do a straight stitch all the way around and I'm gonna go right around the edge, mimicking that shape. And I'll fast forward and show you this after it's complete. So there I based it all the way around the circle to adhere it to my fabric. And now if I didn't have this piece here, my base piece would be ready to do some slow stitching and to really embellish it with different stitches. I wanted to show you sowing the piece that does not have the interfacing down. Now this fabric that I used for the circle is a little more challenging than some, some fabrics. It's knit and it comes across and it has a lot of texture. So I have my needle threaded with a NOT on the end. And I'm gonna go in here. And I have to be careful I can't go too close to the edge because it will cause a lot of fraying. And I'm just going to go around my piece to hold it down. But just with exaggerated stitches, very large stitches. And I find that this gives me a nice basis for my first layer of my slow stitching. And from here, when I'm sitting down on a couch or when I have a moment while I'm waiting in the car, I can add slow decorative elements of either smaller stitches or contrasting stitches as I like. But I like to start with my main image tacked down. I'll finish this up and show you the end result. So there I've completed attacking down my circle that did not have adhesive on it. And then I remove the pin and I it's very rewarding to remove those pins when my object is tacked down. So those are just the beginning stages of my slow stitching project. But I did want to show you how you could use that circle in a very plain, simple manner on your work. In the next chapter, we'll go over the second technique.
6. Circle Technique #2: For our second technique, we're not gonna use fabric at all. We're just going to use our stitches to make a circle. So we'll still need the template for whatever size circle we want. But there are many variations you can achieve. These are just straight stitches radiating out from the center. This is kinda of a running stitch, which is a straight stitch that continues. Here. We have the stem stitch where we go around and we create almost like a little bit of a rope. And then here we have French naughts. And while these are not stitches in the same way that they're connected, such as these, each one is kind of stand alone. I'd like the effect it makes when you add multiples of them to your work. So this is the stitch i'm going to show today. I've shown all the previous stitches in previous sewing classes. So once again, you're going to need your template and I like to use just a white colored pencil. You can also use your marker here as well. And I make, I go around and I create that circle. Once again, I like to use my batting. So I just put it down on my piece and then I take a couple of pins to hold it in place. When you do your French nots, you have some variation in the spacing and the size of the French naughts. So I take my thread, make the knot on the end, and I choose my first spot. I'm going to start at the 12 o'clock. So I go into the spot on the top of that circle. And I pull my fab, my thread through my fabric till I get to the not. And then what I'd like to do is I pull my fabric. So it's fairly taught. And I take my needle on top of my thread. And the night with my taught thread, I go around as many times as I want. Minimum of two. If I go around at three, I'll get a slightly bigger not for et cetera. And then I keep that tension on that thread. And I slide my needle and I go in very close to where I came out. And I like to take my thread still keeping it taught, poke my needle through my fabric. Still keeping that tension on my left hand. And I'm just gonna gently pull all of that thread through that needle and that fabric. When it comes to the end, I'll have a little loop. And again, I just gently pull it and I have a cute little knot. The two key elements here you want to do or go slow, Make sure your thread is not tangle and keep that tension. On the other hand, if you're, if you're right-handed using your left hand. So now I'm going to skip a good distance. Come up through my fabric circle again, right on that line. And I'm gonna do the same procedure. I gently tug my thread so there's a little tension there, but my needle on top that are wrapped around it twice. Pull my needle back and go back in the fabric just very close to where I came out. Keeping the tension with my left hand on that thread. Insert my needle and gently pull my thread. Again. I want to keep that left-hand side thread with a little bit of tension on it. That gives me a little bit of control. I get to the end of that loop and pull it snug. I'll complete the remainder of my nots and show you the end result. So there we have our completed French knots all in a circle. If I want to make it more indicative of a circle, I'll go in there and add a few more in-between. And this creates the first step of using circle from stitches in my slow stitching.
7. Circle Technique #3: So now for our third technique here, where we have a circle, but it's comprised of different pieces. So once again, I have my fabric and my batting, my base fabric and my batting waiting to go. I have my fabric form. That's going to make up my circle here. And I've already adhered some feasible interfacing with my iron to the back. I'm going to use my larger circle. And I'm going to trace a circle from each one of these. And then I'll cut that out. So now I have my circles cut out. They both have the feasible interfacing on them. And now I decide how I want this to look. So what I'm gonna do is I'm going to take my green circle here and that's going to be my back piece, my base circle. And I'm going to gently remove this feasible interfacing here by peeling away that layer. Start it. And then I can just gently peel it away. I'll set it down on my peace, my denim and my batting background. And then I'm going to adhere this with my iron. Again, I'll take the piece from the back, add some heat there as well. Just to make that a very secure set. And I'm going to let that cool. In the meantime, I want to consider how I want this to look. And I think I'm going to create kind of an X pattern. So I make 2.5 circles. And I'll cut them again this way. And I will just adhere them like this. So they're almost like butterfly wings. You can play with which one I want. And then I'll peel off the backing and attach it with my iron. Kinda like that formation. So now peel off the backing and set it with my iron. And I just set it down. From here. I'll place a couple of pins to hold my batting and my base fabric together. And then I'll start my stitch all the way around. And here's where I play around with all the trims and the borders. And I add some stitches. Gonna start right here on the edge and work my way around the piece just with simple stitches. Come back when it's complete. So here we have our completed circle with the different pieces making up the circle. And now we have a great basis for starting our slow stitching to really emphasize this piece with our stitches.
8. Circle Technique # 4: So now for our fourth piece, we're going to layer circles on top of one another. I have my base fabric, my denim, my batting, and then I have my circles. I've already cut them out. And on these two, I have the feasible adhesive on the back. But on the middle one, I don't have anything. So I'm gonna set my largest circle down. And I'll fuse that to my piece. And it's just a small little way to make it stay in place. I will take my next circle and set it down. And again, this has no feasible adhesive, so I don't have to go over that with the iron. And then I have my smallest circle. And I can decide if I want to make them concentric or I want to make them a little wonky. So it's a different effect. Going to set that down. Now because I drew my perimeter here, my shape with my Frisian Penn. I'm erasing all those lines. That remained my piece here. I had a couple of pins to hold the backing and the banding together. And then I'm just going to add one pin because my middle circle doesn't have any adhesive on it. So I want something just to keep that in place. I have my needle and my thread. And now I'm going to go around and I'm going to add stitches. And I usually start with the largest piece. But today I'm going to start with the smallest one, mainly because this middle piece doesn't have any adhesive to hold it down. And this stitch will act as that. So I'll go around and I can really just play around with whatever stitches I want to add. I have that first circle stitched down. I'll work on the next one and then the last one. And here we have our finished piece so that our fabric circles are adhered to our base. Once again, it's ready to start with our slow stitching.
9. Circle Technique #5: For our last technique here we have our reverse application effect. Again. We're gonna create our circle, put our piece of fabric behind it, and then stitch it together. So to accomplish this, I have my piece of denim fabric, my base layer, as it has been in the past. And then I have my fabric, which is going to be my fabric circle. You have to think of this slightly differently because of the layers. I traced my circle onto my fabric and that's the cutout that I'm going to make. So from there, what I like to do is roughly I just eyeball the fabric, making it a center. And then I just make a couple of snippets here and here. And that gives me an opening so that I can go in with my scissors and take my time and cut that circle. So I go around. Again, it's a little trickier than the previous techniques, but the effect is very interesting. So there we have our circle. Now, you don't want to cut a circle at the background fabric because you need it to adhere. And then you get to choose where you want your fabric and if there's a pattern on it, what you want to show. So i'm going to roughly go with that. So I'm gonna pin very loosely and very wide away from my circle. And then I'll flip this over. And I'll use those pins as a guide. And I'll cut my fabric right up against them. Now this particular fabric that I selected is kind of like upholstery fabric. There's a lot of fraying to it and it's very heavy weight. So I just keep that in mind when I do my sewing, my stitching on top of it. So that's a nice shape behind it. I'm not worried about this separating and there being a whole here. I also like to use a piece of batting behind this as well. Again, it's just for me aesthetically that when I do my slow stitching, I just like the feel of it. I have my needle and thread with a not at the end. And I'm just gonna go in here right around this fabric circle. And again, I'm just going to pin it down one more time, this time catching that background applications and the batting. And I'll start again at the 12 o'clock. And I'll just go in and create my stitching to hold it in place. I'm just going to use straight stitches all the way around. And here I have my stitches complete. Now to make it really secure, I would probably go and do some stitching right away for my slow stitching right at the top of the piece here, just to really secure that into place. But that's a very interesting look. In the next chapter, which I can't wait to show you, will look at some variations using these five techniques.
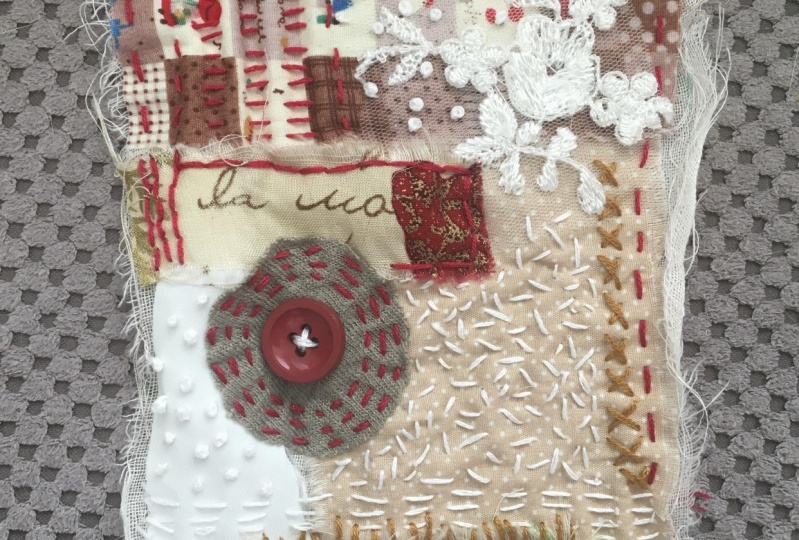
10. Class Wrap Up: For our first technique, we just adhere to fabric circle to our piece. And here's the example we did in class. And here's an example of how it's used, where I have a fabric circle and I just used a simple stitch to hold it in place. It doesn't dominate the piece, but it's certainly adds interest to your peace. In our second example, we just used stitches to create that circle. And here we used French noughts. But as you can see, you can use any stitch. Some real life examples of using just the stitch to create the circle. Again, don't have to dominate the piece, but they can be very effective in drawing the eye and creating that pleasing symmetrical shape. So here we have just a little circle layered on our slow stitch piece. Here we have nothing but circles. We have our slow stitching and we have patterns with inside the circles, again using the same stitches that we use in class today. And here we have a very interesting piece. It's very striking and very simple colors. And yet those stitches from the circles really draw your eye and make the piece stand out. They add texture and intrigue and interests to your piece. For a third technique, we took a circle and we comprised of different parts, different shapes within the circle. While the shapes don't have to be those angles, they certainly do add something. The, it's almost a collaged circle. And here we have it with a lot more slow stitching and a lot more embellishments to the pieces. Instead of two pieces of fabric, there are three separate pieces of fabric, as well as different colors for the threads and picking up on the patterns of each, as well as using our concentric circles, a slow stitched around our main focal point. And here we, I took two of our collaged circles, three different fabrics here, two different ones here. Added the stitches and then added a bunch of slow stitching behind it. These two circles really stand out. And yet when you look at it, the pieces intriguing because there's lots and lots going on. There's motion and movement and direction, all from that simple circle shape. In class, we made these layered circles, and here we have three layers of circles. And that's the basic technique. You can vary the number of circles. You can make it multiple. You can make as many as you can fit in your piece as well. Here I did the same thing with some slow stitching, although I took it easy on the stitches and the only stitching I did was in fact circles on this layered piece. And just a few and the background to really emphasize those rounded shapes. And here I have a beautiful piece of slow stitching. Once again, I have motion because all my stitches are going the same direction. It kinda reminds me of a little coy pond and this is like a lily pad. I have my layered circles on top, my stitches drawing the eye in. And yet I see that motion circling around them as well. So there's multiple ways you can use a circle by incorporating all these different techniques. And the last technique that we did in class today was the reverse applicant technique, where we cut out a circle and removed it and put in a piece behind it. Now this is very effective depending on the fabrics you choose, the contrast, the depth, and the richness of the color. Here's another version. Again, this is a more elegant fabric with the upholstery fabric and the bright red and gold. And here's a t dot, t stained fabric and just some simple stitches on denim. This would make a great patch on a pair of jeans at the knee or something. And here's my favorite slow stitching. I have just little straight stitches here, kind of a rice effect. I have my piece stuck in the background and then I used the colors from that piece of fabric to really frame the work. And I just love the way that came out. So I hope you'll really consider using circles in your slow stitching and coming up with different ways to use them and make them effective, whether they're the focal points or just little added interest and intrigue pieces. In the comment section, tell me which method you prefer and you can tell me which method you like the looks of and which one you like the process of actually completing. I find this slow stitching the circles to be just a lovely process that I really enjoy. And yet I liked the looks of all of them, particularly this reverse Apple. Okay. Thank you for joining me today. Please be sure to follow me here on skill share to get notified of future classes and please consider leaving a review. Have a great day.
 Daniela Mellen, Artist & Author