Transcripts
1. Class Intro: Slow stitching is the process of sewing comforting stitches into fabric. It can be used to join multiple pieces of fabric or just to add stitches to a single piece. The beauty in this art is the method that artists used to create their pieces. Stitches are deliberate but not precise. There are no exacting standards, no absolutes. This takes away from the stress of achieving perfection and makes the art about the creative process to this effect, today's class, slow stitching artist's palette. It's about creating little snippets that resembled a beautiful colors and shapes of a used artist's palette. There are no pace and no brushes, just fabric scraps and thread. And whatever else you might want to incorporate into the piece. I'll show three techniques in class to create three different artist's palettes using stitching, fabric and thread. And you can follow along and easily create your own pieces. Now this class is for everyone, whether you consider yourself a seamstress or someone interested in learning to. So we'll use a single stitch, the straight stitch to make all our pieces. But if you have a favorite stitch that you'd rather use, please go right ahead and create your very own version of a stitched artist's palette. Now we'll use a needle and thread to get started, but you can use leftover fabric, old clothing, or any other textile you'd like. We'll review the supplies in depth, then gets started stitching our three pieces. And I'll show variations using these techniques. Thanks for joining me today. I'm Daniela Mellen and author and artist. Now let's get started.
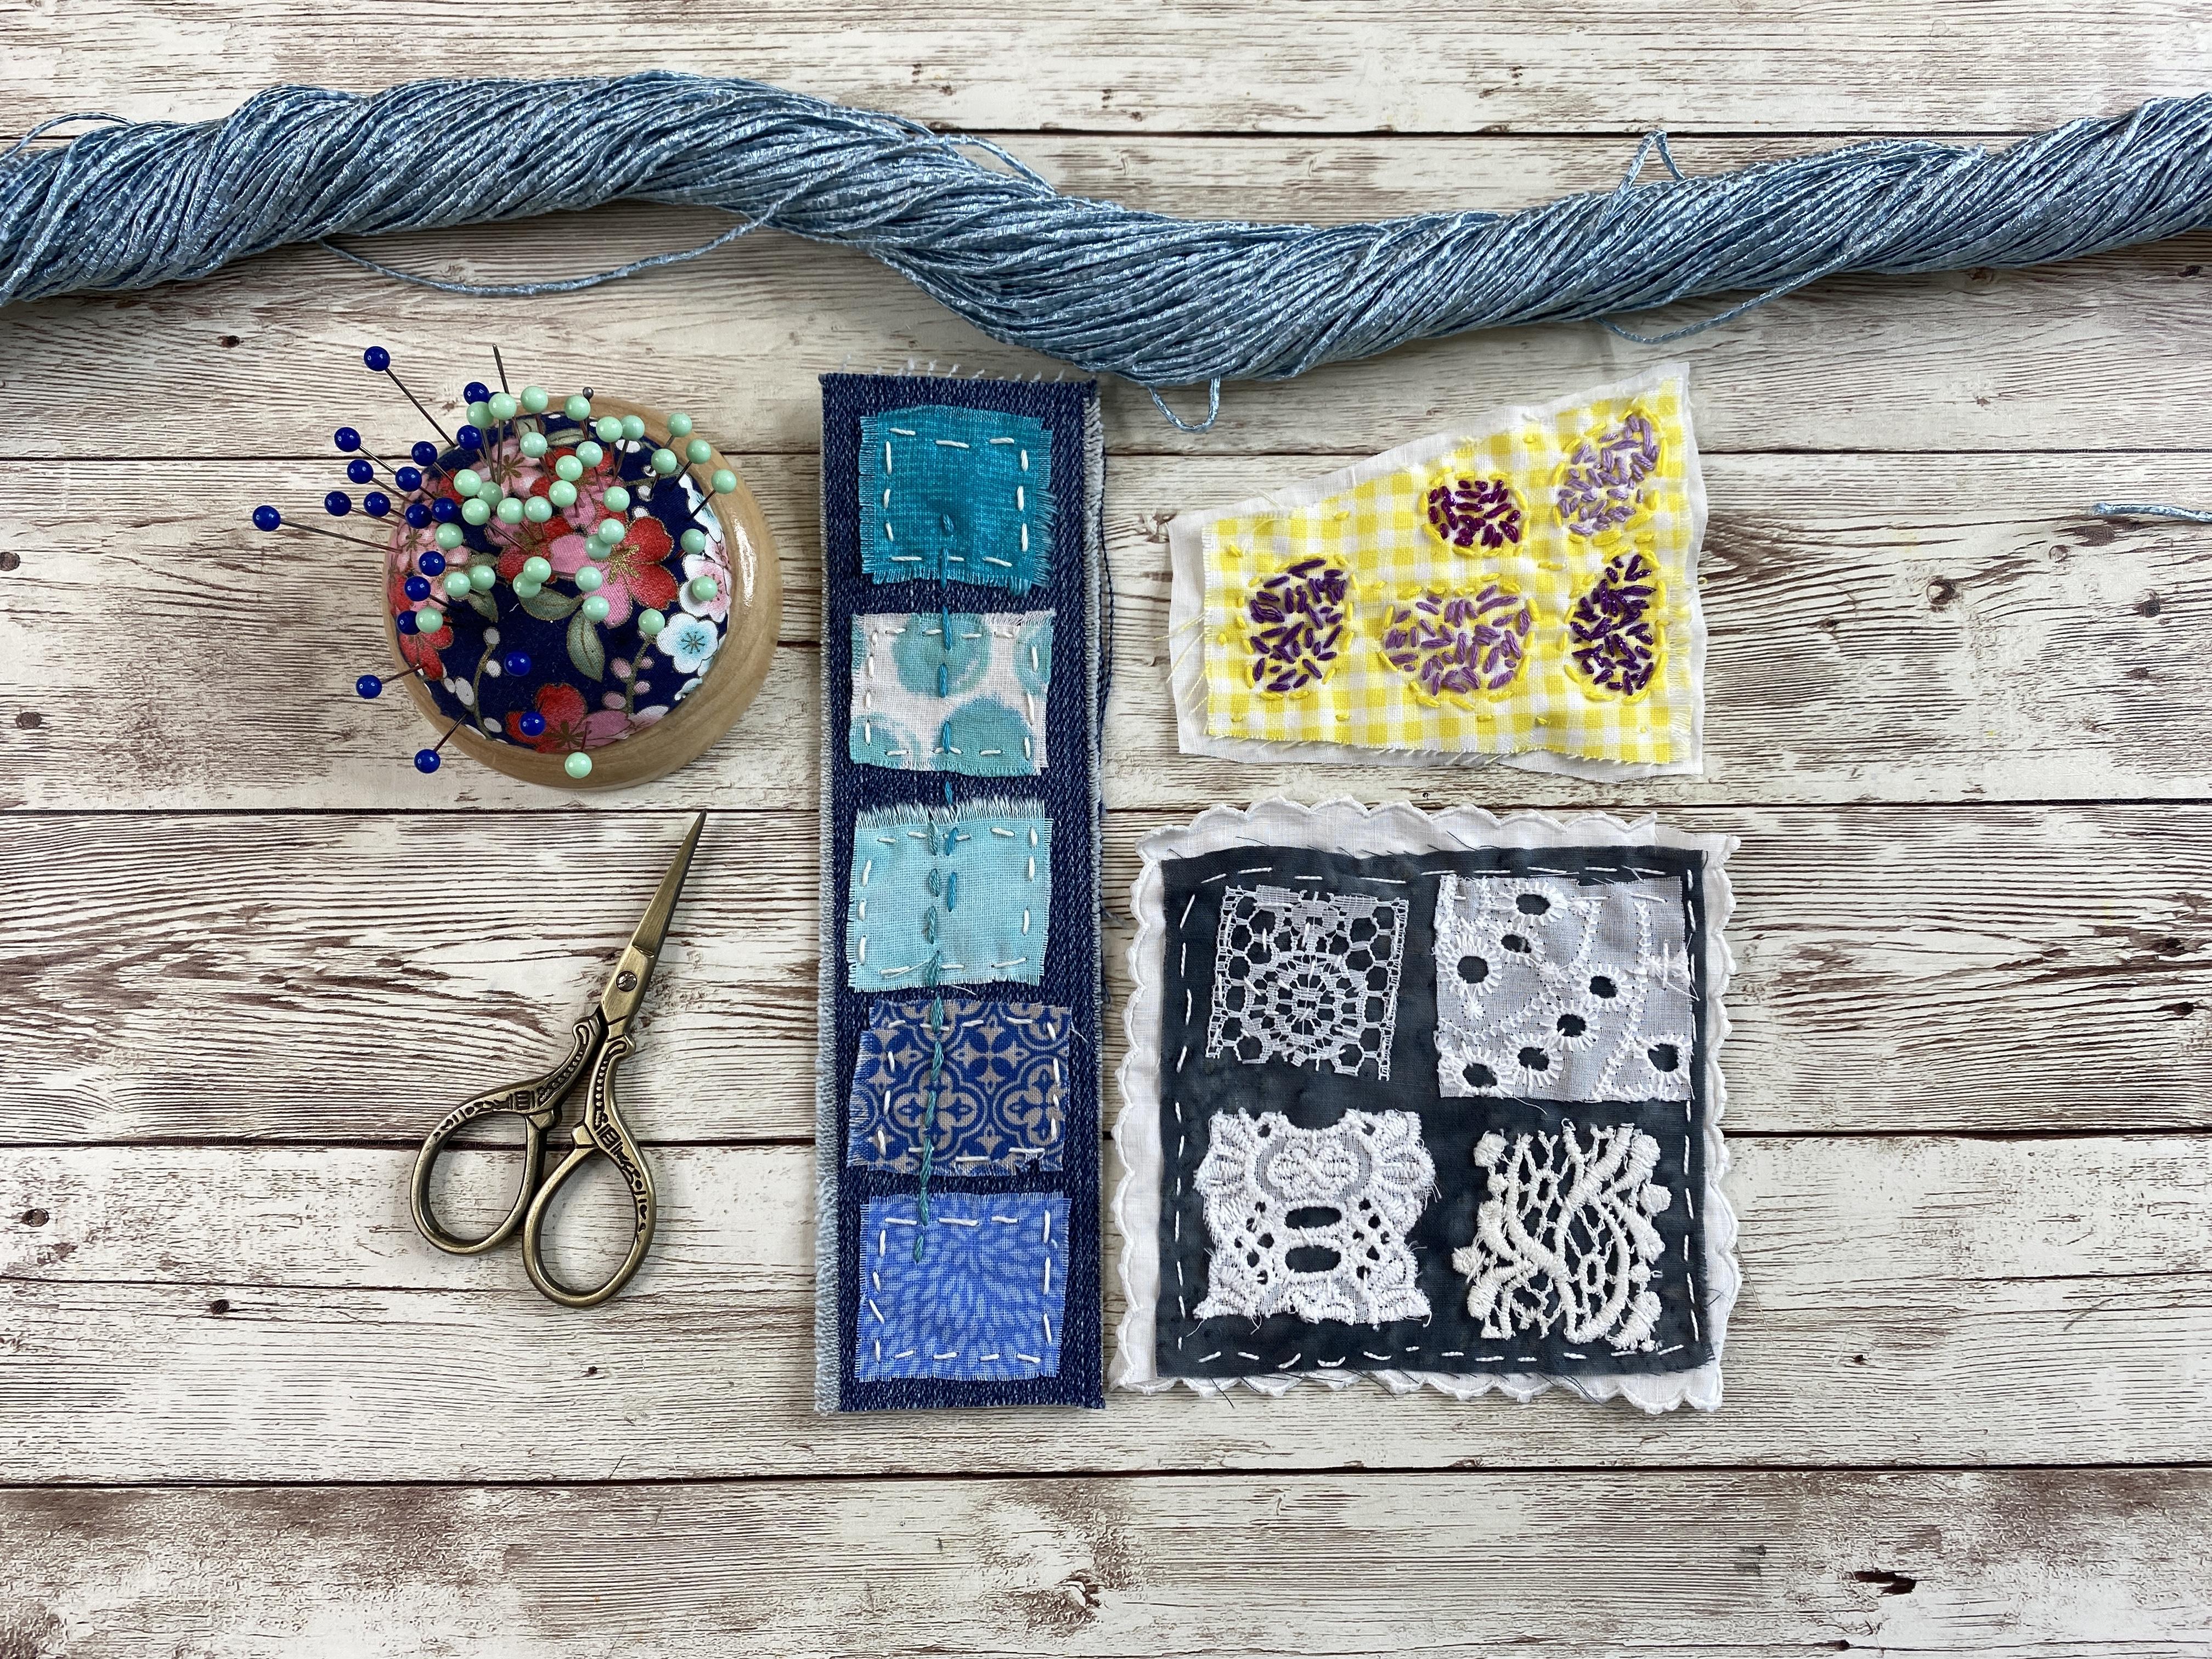
2. Class Supplies: For our slow stitching artist's palette, we'll just need some basic supplies. I'll go over the supplies very basically. And then we'll take another chapter to go into them a little more in depth. Pretty much you just need your needle and pins. Some thread, either embroidery floss, cotton thread, sewing thread, pair of scissors and your fabric. And for fabric you don't need a lot of it and a lot of it can be salvaged. Like today in class we're going to use this identity piece. I also have an, a bunch of fabric. Then I'm going to use that has different colors and that I find helpful and I always carry a neutral fabric. This is just some Muslim. But you can use anything, flannel cotton, you can even use polyester. I don't care for the field of pulling a needle through polyester. So that's why I tend to stick to cotton and cotton blends and I always carry extra neutral thread. So that just means a thread in a very unassuming color, usually black, white in some sort of beige. I also have a sheath and you can download that has a list of the class supplies, the class overview, and some project options you might find helpful. The next chapter we'll go over our supplies a little more in depth.
3. Deep Dive into Stitching Supplies: So for my fabric, I use any scrap of fabric. This project is extremely flexible as is slow stitching. So if you want to salvage some old clothing or if you see a shirt or a skirt of a thrift store that you just love the pattern or you love the embroidery or the lace overlay or something about it. And it's a great price. There's no reason not to buy it, wash it, launder it, press it, and then just store it in your stash. You can also buy little charm packs and little scraps. Now, I save the scraps that I have as long as I love them. So some fabric pieces I love and there are small as a postage stamp and I save those. And then there are others that are just larger pieces and I save them. And the only criteria that I have is that I have to really like the fabric, see potential in it. It's sparked something in me that I want to use again. Now when I'm saving my scraps, I tend to save them in groups of the size. And by size I mean more or less the size. So my smaller scraps, that's pretty easy. I just keep in little piles in a very shallow tub like this. And so when I'm done with my sewing project, I'll just stick them in my tub and keep them all together. But the larger pieces, I'll fold nicely. Now, the beauty of slow stitching is that these are not functional pieces in that they're not going to be worn, so they don't have to be laundered. So that's an option you have is if you have some fabric that requires a lot of care, like a dry cleaning or a beaded fabric. You can use it beautifully in your SLO stitching. I wanted to show you other fabrics that I use that are like lace and pieces like that. Now some other fabric like objects that I use are lace. And again, I salvage a lot of these from thrift stores or from old stashes and supplies. My friends will give me some if they think it might spark an interest in me. And really because of slow stitching, nothing goes to waste. That's the beauty of it. I have some batting here that I use when I quilt. And what it is is just like a, either a cotton or polyester fluff really that's pressed together. And you use it for warmth in making quilts. But for slow stitching, it adds a nice depth. You don't need to use batting so you don't have to go out and get it if you don't have it. But if you have it, it's a great thing to add to your stash. You can also use cotton fabric or flannel or even any fabric. Just add an additional layer. And that'll take the place of batting to add texture and bounce and body to your work. Here we have some old Doyle's. They're stained so otherwise they wouldn't be used. But I'm going to use them in my slow stitching. I may or may not use them today, but I keep them in my stash. If I see an interesting clothing label from clothing that I'm getting rid of all snippet because I think I can use it in my work. So it's a little bit of a pack rat to do this thing covered with fabric or thread. I salvage that as well. These are little parts from trim. Here's some cotton. And crochet least that I just think is beautiful. And even a small little piece that you can find in remnants or gift bags. I'll salvage that as well. These are interesting because these are old tea towels that were in terrible shape. But I saw potential, so I cut them up because I just love that texture. Sometimes they run and I have to throw out the piece. But other than that, I give it a life that it wouldn't have had. And here's the edge of a whole tea towel. And I just thought that scalloped edge was really interesting and I'm probably going to use that in my work as well. You can find lots of trim at the store and at different military shops. So you really have a lot of options. Try not to overlook anything. And when you start to see slow stitching for what it is, you start to see possibilities everywhere. I also wanted to talk about thread. Now for thread, your choices are also endless. You can use Twine even as long as you can fit it through the eye of your needle and you can pull it through the fabric without tearing the fabric. So here I just have some colored kitchen twine and I'll use that on occasion. I don't tend to use that as my standard. There's metallic thread that if you have, you can use. It's very thin. It's a little hard to use, but it does add an element of shine and interests to your finished piece. This is just standard, very inexpensive sewing thread. And so you can use this as well. It's very thin, so it doesn't require a large eye of your needle. And it gives really good results. It's very durable. Now, then you can start painting with your fabric. And by that I mean using colored threads that really show. So here's just a standard embroidery floss that you can find in pretty much any store, from big-box stores to craft stores. And they come in all sorts of colors and all sorts of finishes. You have your dull matte that looks just like cotton. One with a little bit of a set and shine and he couldn't find metallic. They're sold on these little skins. And after I opened them, I'll just wrap them around these little pieces here that I buy. Just to store them. You can use an old school as well. And then you can also find these little silicone tools that you can put on. And it just hold your thread in place just to keep it nice and neat. Now you can also find this Pearl thread here, and this comes in a variety of colors, not as many colors as the embroidery floss, but you get a larger scheme here, and it has some beautiful weight and colors, and this also comes in different widths. And lastly, there's crochet thread, which is highly inexpensive, comes in a variety of colors and can be used. It tends to be a little thicker than the thread I use, but I use it frequently. You can also use, sorry, ribbon as ARI, this beautiful fabric that's pulled into ribbon sizes and you can cut it down further. And once again, if you can fit this through the eye of your needle and your fabric, you can use this as well. In addition to the tools that we mentioned for class, there are a few that you might want to have on hand. This decorative scissors here. These are called pinging shears, and they're designed so that when they cut the fabric, the fabric will less likely unravel, but it does produce a nice jagged edge. You can also find scalloped shears and other shaped shears as well that you might find useful in your work. I have dedicated fabric scissors and then I have a seam Ripper. And it's this little device, a little tool, very inexpensive. Most soldiers have it with a little ball on one end. It's covering a point and a little fairly sharp point on the end. And I'd idea is to pull out stitches so you can slide the ball and it gives a little guidance through the fabric so that you can pick up your stitch. You can turn it around and actually break the stitch. And this way you're not clipping your fabric. This is just a fabric glue pen that I have with refills, but you can use a standard glue stick as well. I don't tend to use this very often, but sometimes it's helpful to add a little dab of glue to tack fabric down, particularly in slow stitching. I always have an abundance of needles. These are just a few, but I have some very large needles, tapestry and carpet needles that I buy. And again, the needles are not usually very expensive. I have a bunch of pincushions with pins that I use to hold my fabric together. And I find this to be a very useful tool for when I went to mark on my fabric. It's a pin friction that I purchase in the office supply section of stores. And the beauty of it is it's a felt tip pen. It comes in colors and it comes in black as well. And after you write on your fabric, it's not permanent when you want to remove the ink that you've put on your fabric, you just use some sort of heat tool, either an iron or a hairdryer, and it just totally removes that ink then you put down. So I'll use this if I want to make a guide that I want to fill in with my sewing.
4. Creating the Three Palettes: So I'm gonna make my pallets or the base of my slow stitching. I'm going to make three pallets in class. We'll do three pieces today. The first one, I'm just going to take some of this denim scrap and I just pulled the edges because I like the way that looks at little rough edge and I'll just pull that all the way along until I had the piece that I like. And so this will be one of our palate. It happens to be the right size, but I could just cut it down if it's not. So I'll set that aside as my first piece, my first palette. The second palette I'm going to make, I want it to be square. And so while I, I'm interested in these paintings shared edges, I don't think it'll fit for this palette. I think I'm going to use little lace pieces against this palette because of this color is such an nice opposition to some like white or off-white lace. However, the palate is too big for me so I'm going to cut it down. So the way I like to do that is I just, it's a very thin fabric. I just like to folded in equal parts because I want a square image more or less. I can just cut my fabric like this. No, I know it has a raw edge, but that's the beauty of this slow stitching is that's okay. So I have my fabric scraps, get rid of those. And now I have my palette now because it's such a lightweight piece, I want to have some kind of backup to it. So I'll just take another piece of cotton and cut it out just slightly smaller than the piece that I have here to make a backing. So I'll do that. Put my piece down, make my backing. And it's very forgiving. I'm cutting considerably smaller piece and it's not perfect to size, but this will be the front. So I'll set that aside. So I want my last piece to be kind of trapezoidal shape. Gonna make a cut here. Make a cut here. And just come up with a shape that I like overall. Kind of haphazard. Just like that. Looks like a little scraps of fabric. I'll pull the edges, just afraid them a bit. And then I'll cut another piece of this white here, just to be my backing fabric. Again, I cut it just slightly smaller and my piece. And now I have my three pallets. The next chapter, we'll start our first sewing piece.
5. Palette #1: Design Stage: So here I have my first piece. Then I'm going to call my artist's palette here, the base. And I can trim that down if I want to further. But then I picked out some bunch of my scraps and originally I was looking for colors of the rainbow reds and going through my little pieces until I found colors that matched what I was looking for. But then I decided I had an abundance of blue. So I think I'm going to make this a swatch, a little pallet of blues. So here's where I just take my fabric. And I'll move this around here, blues and greens maybe. And I'll just place it and see how I liked the setup here. So this is kinda like a little audition to see what I have and how it will look together. So once I have that down, and surprisingly, that worked out very nicely very quickly because I tend to gravitate towards these colors overall and I design process. So I'll set these aside and then I'll spend just a little more time fine tuning this piece. Now, I don't have to make anything perfectly size to match, although I can, but it's like an artist's palette. So some colors will have more use than others. So I'm just going to take my pieces and trim them down a bit. And I'll speed this process along. But you can see what I do. So you can see what I do to get my fabric scraps on my palette to resemble an artist's swatch. So here I have my piece designed and I'm happy with the way it looks. Now some of the pieces have these frayed edge and I really like the way that looks. So I think I'll go back in there and Fray the edges a little bit more on all the pieces. And again, I'll do that. And then we'll come back in the next chapter and start our sewing.
6. Palette #1: Stitching: So now I'm afraid the edges of my little fabric, scraps here that look like little colors on my artist's palette. I took a little length here of this cotton crochet thread, and I just double knotted it at the end and thread my needle with it. So now I'm going to go in here and I'm just gonna do a straight stitch. But this is where you can make your piece as personal as you want, using any type of stitch or any color of thread to tack it down. I'm going to actually start right here in the center. And I'm just gonna do a straight stitch. So I'm going to come up from the bottom close to the edge of my piece and I'm just going to outline that shape. But this is where you can choose to do whatever type of stitch or as many or as few as you like, you can space them as far apart as you like, or is close together. And I'm just going up from the bottom, pulling my thread snug, not too tight. And then going down and when I come to a corner, I'm just going to go up from the bottom again and turn that thread around, echoing that shape that I have here of this square that's supposed to resemble the paint on my artist's palette. And I'll do this all the way around this piece. When I get to the area with the needle, I'll remove that. But I'm keeping my thumb in place to hold this fabric exactly where I want it. So I remove the pin and now I'm just using my thumb to hold the fabric in place. And I'll just continue all the way around. And I'll speed this along and show you the results. Once I get to the end, I just flipped my piece over. Me, take my needle and I go to the nearest stitch, thread my needle through that stitch. And when I create a little loop, and then I take my needle and go through that loop to make a nod. If I was stitching something that had a little more function or a little more aware, I would go and make a second not using the same procedure, going through making my loop and knotting it, but I don't find that it's always necessary with the slow stitching. And then I'll just very gently trim my not. So I have it like that. I'll finish up sewing all the way around the remaining swatches using that same stitch. And I'll show you the result.
7. Palette #1: Additional Stitching: So now I've seen all around all these little swatches on my piece using that straight stitch. And as you can see on the back, I not in each one, I could have continued with that same thread and gone around all of them. But I chose to stop, take a break at the end of each one. And it was just very fulfilling, which is what the point of slow stitching it's supposed to be. Now I can stop right here and leave my piece just as it is and it isn't effective little artist's palette with a slow stitching bend to it. But because it's slow stitching, I have a lot of options and I love this color, so I'm going to incorporate this color in. I'm just gonna do a couple of stitches, a couple of lines, really slow stitching. And I found in my stash some thread of this turquoise color. So I'm just going to start and I'm just going to have one line come from here to about here, and the next line overlap that. And I'll speed this along so you can see and make a knot on the back. I'm going to have a little bit of an overlap here. And now I have my finished piece. I can add more stitching if I wanted. But I like the way that looks. In the next chapter, we'll start our second pallet.
8. Palette #2: Design Stage: So now for our second palette here, I have this dark gray batik fabric. I have my little swatch on the back just for added body. And now what I did was I just took a dark piece of paper so it would show up on camera. The different lace that I have that I want to audition for this piece. Now I want this to be fairly simple. I'm not looking to overstuffed the piece, but you surely can if that's the way you choose. But right now I'm just looking to see where I want to put the pieces to get the most interesting effect that I have. I have some ribbon, some lace. I really like the way these laces are so open that they show the piece beneath it, the fabric beneath it. So I think I might run with that. So I have my four pieces here. And now I just have to cut them to size. Again, I'm not looking for perfection. I just like the way they look on the soil fabric. So addition the shapes. Oh, additional shapes. I'm going to come up with one I like. We'll get started. And there we go. So I played with the shapes until I find the formation that I like opinions down. And then in the next chapter we'll go over taxing them to our backing fabric or artist's palette.
9. Palette #2: Stitching: So now my four little laced scraps are tacked down just with some pins. I have my cotton pearl, which is, I chose to go and white because it matches the lace. And I don't want to distract from that contrasts that we have between the lace and that background. Now because it's lace, I'm not going to follow a stitch like we did in the other the sewing piece where we made, we just went around the border. I'm going to use the least to my advantage. So I'll start with this piece here. Cool, I think it's one of the most complicated. I'm just going to start in the center and I'm just going to tack over some of these little spots here and there. So I'll come up from the base just on the side of the lace. And then I'll just go over. And when you do that, you don't really even see the stitches. And if you do, it's just an emphasis for what's on that lace already. So I'll come up from the side and go over. And I like to start in concentric circles and work my way around. And then I can remove that pin. I don't have to take every piece, although you certainly could. But I'm just going around the center until I am confident that that's tacked on nicely and securely. I'll just do one more over here. Remove my pin. And I'll continue concentrically working around this piece of lace until I'm secure that it's down and that it looks appropriate. Speed this along. Once I have the majority of the lace tacked down, I'll go around that border and just really secure it. So now that secure, I'm going to continue around with all the pieces and I'll come back and show you the results.
10. Palette #2: Additional Stitches: So I finished tagging down all four of these little pieces of lace on the artist's palette to look like each lace is one of those little wells of paint. And it's very intriguing. Now I could stop here, but because it's slow stitching, I wanted to take it a little bit further. I found an old little handkerchief here with a ruffled edge. So I cut off two of those ruffled edges to make a large square. So more or less all of this area now has that scalloped edge. I think I'm going to put my piece down on it and just tack a straight stitch right around the border of his dark colored piece to give me this little edge and this little finished snippet. So I'll finish that and I'll show you the end result. So I finished sewing it down onto the handkerchief, right around the edge here to give a nice little ruffled edge. And here's the contrast and you can see against a dark background. In the next chapter, we'll start our third and final little artist's palette snippet.
11. Palette #3: Design Stage & Stitches: So now for our last palette, I have the fabric piece here as well as the backing fabric. So now instead of adding additional pieces of fabric, I'm going to create all the little paint wells with my embroidery floss. So I'm just going to use a marker here, a fabric marker that will disappear with heat. And I'm just going to create little abstract shapes to indicate the little paint on smudges on my palette. Now I've chosen five colors. So I'll make five little wells here. And I kinda just doing organic shapes. You can use any shape you want. I'm going to start and I'm just going to pin my two fabrics together somewhere where I know that my fabrics are still aligned. And then I can move that pin off when I don't need it. Now I'm going to use the same stitch reviews before, except instead of going around the object, I'm going to just fill that object with the stitches. So I'll just show you on one and then show you the result with all the different colors. So again, I'm going to feed my knotted fabric on a needle. Got a fleet it up through here and I'll start on one end of the shape. And I'm just going to bring it down. And another end. Here I got caught right on that pin like an easily remove that and then gently just pull that back into position. So I have one stitch. And now because I'm not going to make a line of stitches, I'm going to do what they call the scene stitch. It's the same stitch but in a different formation. I'm going to pick up my needle through my thread and just go at a different spot, leaving a little boundary between my two stitches. And I'm trying not to align the stitches so no two stitches are pointing the same way, right next to each other. There's little angles. And I'm just going in here and it's my prerogative how close together I want to put the stitches, how large I want to make the stitches, and how many I want to make. I can try and make them all the same size. I can vary them. And it winds up looking like little scattered rice when it's all done it. So I'll just move my remaining tools aside and just fill this in and I'll speed this along so you can see it as it fills up. And it becomes reminiscent of a little filled in color, almost like I'm painting with these threads. I can remove my pin. Ever. So there I have my first little swatch of paint completed using the embroidery floss and my needle with all these little seeds stitches. Now there's still some of that marker showing, but I'm not worried about that. What I'm going to come back now is I'm going to go and fill in all of these were the different colors of the purple. And then I'll come back, show you the results and we'll remove that ink.
12. Palette #3: Additional Stitches: So now I've completed all my stitching of my purple embroidery floss on my palette here. Kind of a very haphazard locking stitch. I'm gonna take my hot iron. You can barely see some areas of marker. So I'm just going to take my hot iron and gently go over it. And as you can see, those lines just disappear. It's that easy when you're using the friction pen. So now that I have my piece complete, I want to just take a look at and see if there's anything I'd like to add. No, I like it like this, but I think I'm going to take a little bit of this yellow thread and just do a stitch framing each one of these little shapes. So I'll do that. I'll show you the results. So I have the piece completed. I stitched around each one of these little paint swatches and I just tacked it on with some small stitches onto just a white fabric piece for the backing. And as you can see where I tacked it, you can see my little trail. In the next chapter. We'll review all the pieces we created and I'll show you some variations using the same techniques.
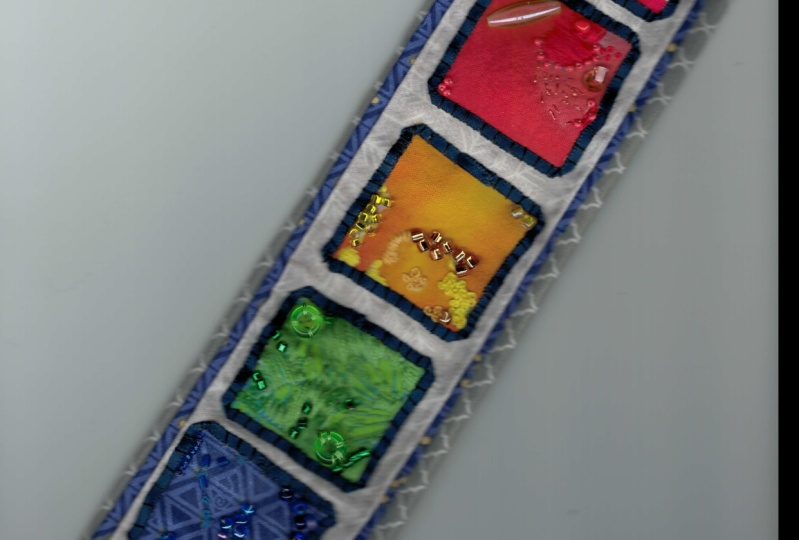
13. Class Wrap Up & Variations: So here's the first piece that we created. We use just the little streets stitch and then we added a running stitch to incorporate them all together, which was kinda just to designing flare. Here I did the same technique where I had my square or rectangular swatches. I created my stitch around each one to adhere to our artist's palette backing. And then I just added a few more things for variation. And this is something you can do yourself. I added a piece of lace on the background here for this palette. And then I added some fun stitching to hold it in place, really focusing on that pink. So I have a little pink of the background, some of the pink stitches, and then I have my lace. And this is the backing of this piece because I created all my stitches and then I attached it to this backing piece. So the only stitches you see from the back or the ones adhering it together. Now this one I did a little differently and I wanted to just make it like a little folding palette, like you'd see for a travel palette. So I add here to my swatches, to this strip of fabric on both sides using the same techniques from class. And then I attach this to a larger piece. But before I attached it, I folded the piece as I wanted it so that I wouldn't have a lot of stitches showing just the ones holding my piece together. And I can either display it open or closed as a little bit of a treat. For a second piece here, instead of using little fabric scraps, we use little lace scraps, which gave a very interesting effect because there's so much texture and intricacy to each different piece. I attached it to a little handkerchief background that has little scalloped edge just to keep that little sweetness together of the lace and a little handkerchief and the contrast. And as you can see the background, the only stitches that show or where I attached that handkerchief. Here I did the same technique using little bits of lace. I attached it to a strip, similar to a strip we used in the first one. And as you can see, I attached everything together at once. So all my stitches from my lace snippets are attached at the back there, not that noticeable because of the color thread I chose. But once again, you really emphasize the texture and the interests of each piece of lace. Now, for our final piece, where we stitched and use just embroidery floss, no additional Fabric besides the base for our artist's palette. I did some variations on that. I did a long strip because I think the strips are so effective. And I use different color embroidery floss to really emphasize and a net like a watercolor palette. And as you can see on the back, I didn't use backing fabric. So you can see all my stitches, how it looks on the back with all my knots, um, and any mistakes I will have made as well. I did take some thread that match the fabric and just create a border. And then I went around each one of these little colors to really emphasize it. Now this one here, I didn't emphasize each one of the little swatches, but I did emphasize the entire palette as one piece. And then I just went in here with some stitches, like a satin stitch over a little piece of embroidery floss to make what looks like a paintbrush. And I have a little variations that kind of blend all these techniques into one using the same stitch. So these are our originals. And here I took a piece that's very similar to the piece we did last, where I have my three colors, which was similar to my first example. And then I have seed stitched all the way around it. So I took the seed stitch from this snippet incorporated with some of the fabric from this snippet. And this is the result. And I love that. I love the color, I love the texture of the stitches, and I love this little fabric scraps as paint wells. Now here I just did one that's a collage of various fabric scraps that I had. So this is kind of reminiscent more of a makeup palette, like maybe an eye shadow then an artist's palette. But I think you can have some leeway here. And I just covered it with some running stitch, which is just that straight stitch in a straight line. I hope you'll try your hand by creating one of these little snippets or a variation using techniques that you like from each one of them. Please snap a photo of your work and post it in the project section. Be sure to follow me here on Skillshare to get notified of future classes. And please consider leaving a review. Thanks for joining me today.
14. BONUS: Stitch Instruction Review: So now to start the running stitch, I have my thread on my needle. And in this case I'm just using all eight strands of embroidery thread on an embroidery needle. And you can do this in any direction, up, down to the side diagonal. I'm going to start here on the left-hand side. And I just poke through my fabric with my needle and I pull the thread gently, not too tight. I don't want the fabric to poll, but I want it to be fairly snug. And I have a knot in the back of my fabric and I'll go back at the end and either trim that down or I might even tape it down or glue it down depending on how I'm going to use this piece. Now to make my running stitch. I just choose a length that I'm going to make my first stitch. Poke the needle through the fabric and gently pull. Now, every time you make a stitch, your thread twists a little bit. So you just hold the fabric up, let the needle unwind, and come back. And now I decide the length for the next stitch. I poke my needle in, pull up. And as I pull up I can see this pulls a little. So I just want to go back and make sure that there's not a lot of tension. And I make another and I do the same thing. I try and keep my stitches somewhat intentional. Same length, the same direction when I'm doing a line. You can also just do a stitch where you poke, come up and go down. And I can have just a random stitch or I can put two stitches together. Just like that. Now if I know I'm doing eight entire background with that same stitch for example, this where I'm going from one length to the other. I can just put my hope my needle through, pull my thread, and then I can just feed my needle through. And I'm pulling the fabric to the needle. I do it a few folds of fabric at a time. Gently pull my thread, and then I have multiple stitches at once. And depending on the width that you make of the stitches, you can do many or a few. And so you get a line a lot quicker. Now one way to end off your stitches is on your final stitch and go back down. So you're on the backside of your fabric. And then what I like to do is I go to the nearest stitch and I thread my needle through the nearest stitch, the back stitch, not picking up any fabric. And I gently pull it. So there's a little bit of a loop. I have my thread going underneath a stitch and then I just come back out here and pull around. And I might do that twice. It's really only necessary to do it once, but I like to do it twice just to make it secure. And then I just take my snips and trim off my fabric. And that's the running stitch.
 Daniela Mellen, Artist & Author