Transcripts
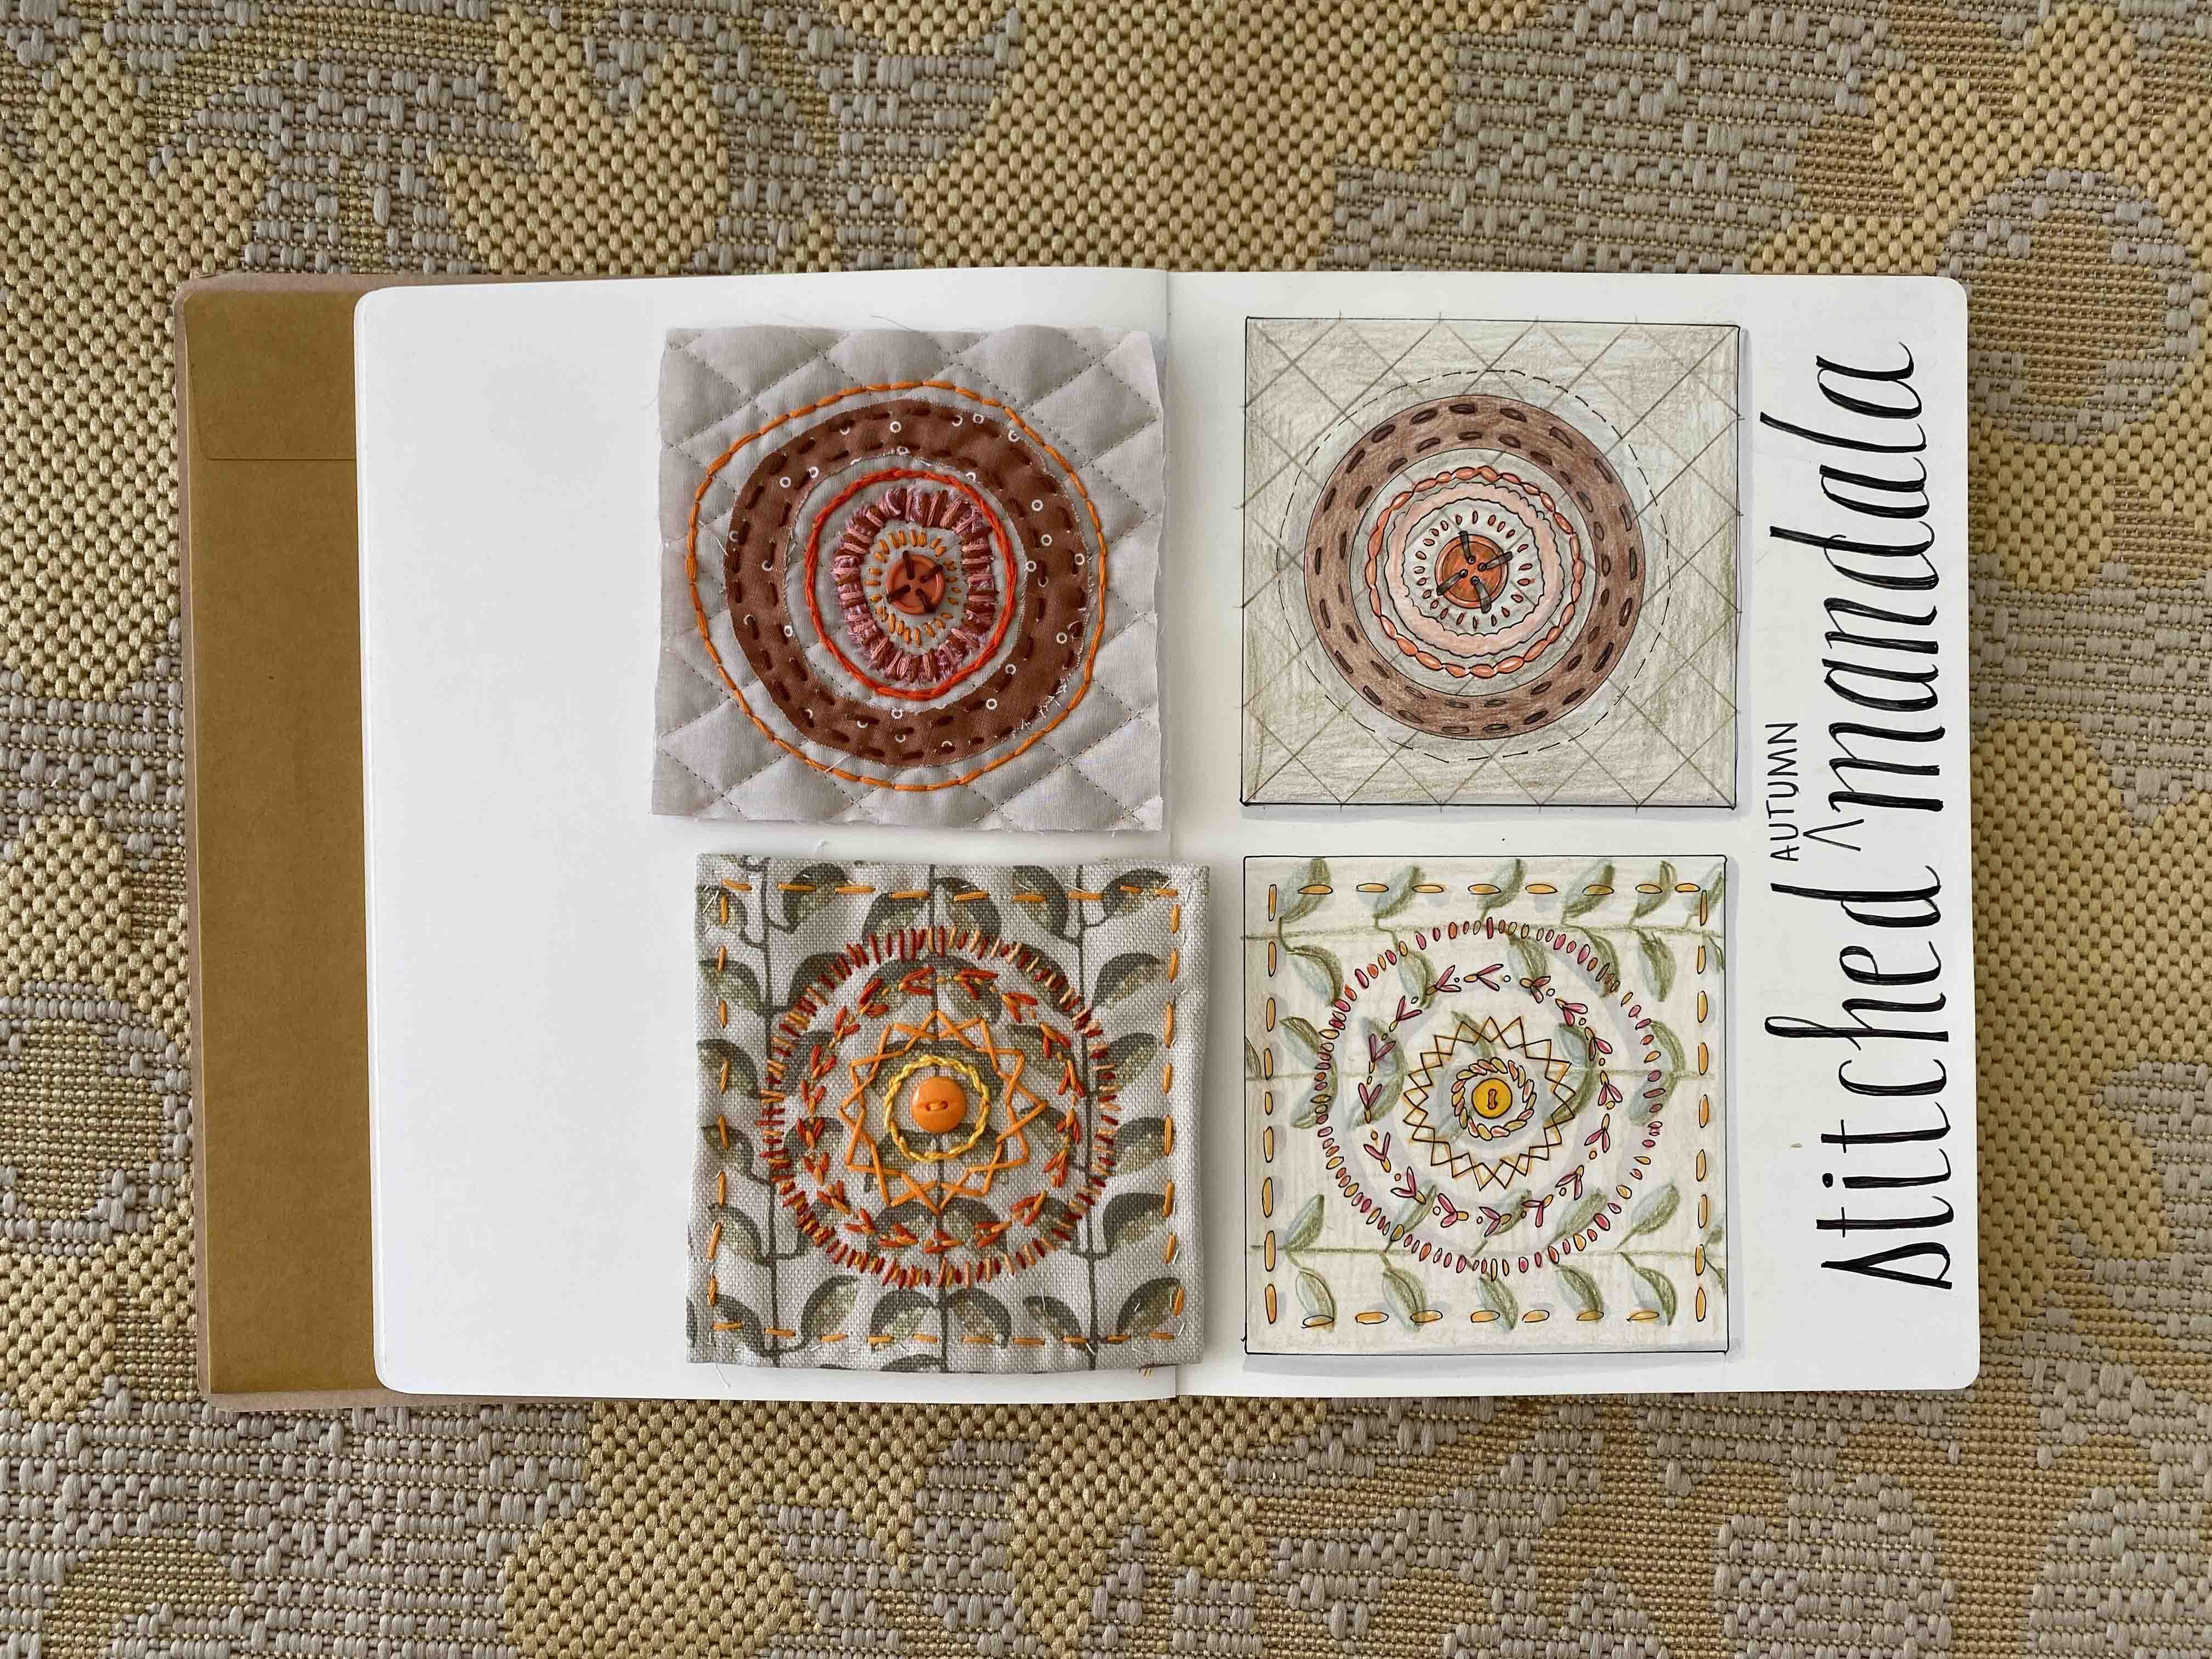
1. Class Intro: Slow stitching is the process of sewing comforting stitches into fabric. The beauty in this art is the method that artists used to create their pieces. Stitches are deliberate but not perfect, and the process is close to meditative. Now Mandela's are an art form full of geometric patterns that some call a diagram of wholeness because of its meditative effects. In today's class, slow stitching, stitched autumn Mandela's. We're going to combine the process of stitching on fabric with the beauty of the Mandela's patterns and shapes. Hello, I'm Daniela Mellen and author and artist. We'll start by gathering our fabric and threads, all inspired by the autumn colors and elements and then combine them in a Mandela will use concentric circles and the process of repeated simple stitches to practice and almost meditative art form. I'll show three-stage techniques in class that complement the Mandela design. I'll demonstrate a couching technique, backstitch, and a split stitch. And you can choose to incorporate them into your designs. Now this class is for everyone, whether you consider yourself a seasoned textile artist or someone interested in learning to stitch. We'll review the supplies and then this ditch techniques. And lastly, I'll show variations using those techniques. So thanks for joining me today. Now let's gather materials and get started.
2. Class Supplies: Here are the supplies that I'll be using in class today for the stitched Gautam Mandela. But you can use any supplies you have. The beauty of slow stitching is if you can attach it to your fabric, you can use it. So you don't have to only use thread. You can use twine or even pine needles, anything you can stitch through fabric you can use. And like I said, here are the general supplies that I'm using today in class. I had my reference guide just of some Mandela's here as inspiration for me in case I get stuck. Now, I use, for a basis, I'm going to use this quilted fabric. I buy it already quilted. You can use an old quilt as well. It's got a little bit of batting in between the layers and it has a finished back. And I use the front as well. You don't have that. You can use two sheets of any type of cotton fabric. There'll be nice to pull thread through with a piece of batting, either sandwiched in-between or just the fabric on top of the batting. I like to use an assortment of scrap fabrics that I have. And I just went through my stash and chose colors that were very autumnal here. So I'm just going to set this aside and use this in class today to create different elements on our mandalas. I have some buttons and rings. I may use these for the center of our stitching project. I have my pin cushion with needles and thread. These are various tapestry needles, embroidery needles. Then I have my assortment of thread. And to me this is very exciting because I sort of paint with the threads. So I again went through my stash and came up with a bunch of autumn colors. I also use crochet thread and just a neutral color. And this is a pearl cotton thread, very small size. I like to have this on hand, and again, I may or may not use it. I might just dedicate myself to the embroidery thread today, I have a pair of fabric scissors. This is a Frisian erasable pen. And what's neat about it is it erases with heat, so I can just put an iron on it and it'll take away all these mark that I want to make marks on my fabric. I can just use this pen and then remove them with some heat. In the next chapter, we'll go over setting up some tools and creating the basis for a Mandela.
3. Creating the Base: Now I want the base for my Mendota to be a five-by-five inch square. So to help me do that, I just cut a piece of old cardboard to five-by-five inches and I'll set it on my fabric that I'll use for the base and just sketch out the size. And this is just a rough size. It doesn't have to be perfect. I'm not looking for perfect angles because I'm using this quilted fabric. It's very nice that it's all set up. If I was using batting and fabric or two pieces of fabric, I would just cut them to size appropriate. And then I'll cut them out. Now because it's circular and I do concentric circles. What I like to do is just take a guide. You can use anything you can to trace your circles. These are just bottle caps that I keep around and I can basically eyeball it knowing that my circles are going to be somewhat concentric. I don't have to trace them exactly, although I can if I'd like to. But it gives me some tools to work with. I think what I'm gonna do is create a circle first for the background. So I'll just choose my fabric, make my design. And I think of that background circle, I'm going to have be open like a doughnut. And I think I'm going to start with this beautiful brown material here. So just so that I have a guide. I'll set it down on my fabric. And then I have my circle sketched out. From there. I can just cut it. No, doesn't have to be perfect. So kind of the beauty of slow stitching is to have some imperfections because it's, the process is what we're after. So I'm just going to cut my circle, not worrying too much about it. Set my scraps aside and I have my circle. Now because I want that to be open. I'm going to cut a circle and the center here as well. But of course I could leave it just like that if I wanted. And these are some options to consider. So for the design process, this takes a little bit of time, but this is where you make your decisions. I'm going to take a circle here. Just kind of figuring out where I want and how thick I want that circle to be, that first circle. So I'm going to take this cap here, use this as my guide and just trace around. Fold this piece in half. And it's a little thin, little thinner than I wanted. So I'll just make this interior circle, circle a little smaller. So there I have my first circle. For my Mandela. I have my exterior circle, and I want to build it going inward. So I want the next circle to be not a solid piece either. I like the openness of the different layers. So what I do, I think I'm going to do is I'm gonna take this piece of fabric and I'm going to cut a strip because it's cotton fabric. I can just cut a piece and tear it up. And I get a nice little strip here. It phrase, and I like that look. So I'm just going to take it and I'm just going to kind of place a circle now because it's cotton. It has a lot of give to it and that's okay at first. I'll just cut it down to a more manageable size. And that will be my next circle. I think I'll add stitches in between or maybe even make the circle smaller and add stitches in between. I'll set this fabric aside. I'm not sure I'm going to use this today. I think I'm just gonna do my stitches. So I have the basis of what I want to start with. In the next chapter, we'll go over the techniques to add our stitches to our Mandela.
4. Stitching the Mandala : Circle # 1: So to start the stitching on this Mandela, I like to work from the outside in. So I'll set my small piece aside. And now I have my first circle down. I'm just going to put a couple of pins to hold it in place. And again, I'm not too worried if it moves around. I like the imperfections, the looks of the folded fabric or the little mistakes. I nodded my thread and thread, my needle here, and I chose this darker fabric. And I'm just gonna do a basic stitch to hold this down. I'm going to stitch a basic straight stitch, almost a running stitch around the perimeter, both the exterior and the interior of this circle. If this was thin, the circle is thinner. I could use a single stitch or if I didn't mind it ruffling, I could use a single stitch as well, but I want this to go down flat. So it doesn't matter where I start. But I do like to start towards the edge, the exterior edge. I'm going to pull up my thread until the needle, until the knot is secure on the back. And then it's going to decide the length of my stitch and they want it to be fairly small. And I'll pull it down just like that. And I have my first stitch. Now I have the option of deciding where I want that next stitch to come out. It can go down quite a bit ways or I can go very close. And if I go too far over, I'll go right on the edge. And because I didn't secure it down, it could cause some fraying. But again, I don't mind that too much. I'm going to try and avoid doing that. But I do want the stitches to be on the edge of this circle. And I'll just continue this the entire way around. Making my stitches as I go. Now once I finish stitching all the way around the perimeter, this is what it looks like on the back. You can see all my stitches. I'm going to continue with this color thread stitching the interior circle as well. And here's where you have options. You can choose to change your thread color if you'd like, but I'm going to keep it the same. So I'm just going to take my thread, pull it across my piece, and start my stitches the same way where I'm going to go into the fabric and continuing until I finish up this thread. I don't think this is enough thread to finish the interior stitches. So when I get to that point, I'll stop and show you what I do. So now what I have just enough thread to really go right to the edge of my piece. I'll get ready to make my last stitch and nodded off. I go down into my piece, pulling my thread snug, not too tight. And then I flip it over and make sure it's still on the needle. And then I go to the nearest stitch and I can either go across or just to the side of it. And I'm going to pull my needle underneath that thread, not picking up fabric. And I make a little loop here. And then I'll just double into that loop again and pull it snug. And then I'll do the same thing again, creating a second naught my thread with that loop and pulling it snug. And then I'll slip this off fairly close to the end. I'll read thread my needle and continue all the way around here. So now I'm on my last stitch around the interior of the circle. I'll just pull that stitch up. Go down. And I've completed my exterior circle. Turn this over, go to the nearest stitch and not off my thread. I just do that loop through. And then I just like to secure it with a second one. And I'll snip that thread.
5. Couching Technique: So now normally I'd like to work on the next layer, my next circle here, or my next circular shape, I could do different pieces. But because I know I want to do this couching technique with this piece of fabric. I'm going to jump right to that. The reason I'm gonna jump to that is because I'm going to put this circular piece of fabric and creating a circle inside here, a concentric circle. And I want to make sure I have room to go around it. So the first thing I like to do is take this little piece of fabric and just finger press it by folding it in half. This creates the width that I'm looking for. And it also gives me a little bit of an easier piece of fabric to work with. So I just fold it in half and they just continue to press it. And again, it's not perfect. But I like that. Look. So then I'm going to take my fabric and just start by forming it into my circle. I'll take some pins here just to hold it in place. And it's not going to look perfect at first. This fabric is a little bit difficult to work with to start with. But I know that when it's done it will look the way I want it. So I'm kinda just pressing it as I go. And again, it's not going to lay perfectly flat. But that's because I chose a larger piece of fabric. And I'm only going to start it and put a couple of pins in and leaving this tale. But I know that eventually it will be the rounded shape that I want. So to do this couching technique, I'm going to thread my needle again with my choice of thread color. But I'm not going to actually, so through this little piece of fabric, I'm just going to secure it with my thread. I'll select my thread and then thread my needle. Think I'll go. Yeah, I think I'll go with this color. So to start the couching, I'll go to the 6 o'clock area on this circle to be. And I'm going to bring my thread underneath my fabric. Not going through this orange fabric. I have a knot in the end of the thread and I pull it till it's secure and snug but not tight. And then I'm gonna come down on the other side of it. Again, not going through that fabric. And what I've created is just a little loop to hold the fabric in place. Now the more loops I do, the more secure the fabric will be. But until I secure it, I can adjust it and play with it. I'm going to work around this pin and I'm going to start at the six o'clock and go to work my way up five o'clock, four o'clock. And right now it's a very straight line. I want it to be a little more rounded. So I'm just going to play with that fabric by holding it in place with my finger. Again, coming up on the side of that circle and going down. Now my options are quite a few here. I can decide not only the color of the thread, but the width of the stitch and the spacing of the stitch. I can even just tack it down lightly my first few stitches and then go back and really make the shapes and the distance between stitches much closer together. At first is a little clumsy as you're trying to just tacked down your piece. But then as you take more and more down, it becomes easier to work with. I can remove the pin now. Again, just play with where I want this circle, circular piece to go and add my stitches. Again, not going through that orange fabric, but just securing it with these loops. Once I have my thread in, I can move my fabric little bit more. And you can do this with thread, twine ribbon. You can even roll your fabric to get a nice smooth appearance as well. But I like this look. It's very rustic. And I'll continue all the way around creating this circular shape. I'll speed this along so that you can see the process. But know that I'm in no rush to get it done. And once I get to the end of one of my tails of fabric, I'm just going to secure it down the same way I secured it all the way along. And then because it's a little bit unwieldy to work with, I'm going to knot it off on the back here. I'm going to come back in though before I do that and just make an additional stitch here. Because I see this fabric kind of has a mind of its own. I'll just turn it over, create that NADH. And then I'll restart this process down by the 6 o'clock part of the fabric, making it join up with the first piece. And then just start tacking it down. It's a little fuzzy at this point, but it does create a very interesting textured results that I just happen to love. Once I get to the end, I like to really secure the final tale with a stitch. Once I know that that's secure, I can go back in and add stitches where I think that there's too much of a space in-between. And this is where you really personalize it. Once I run out of thread, knotted on the back, and then add some more stitches by wreath reading my needle and adding a few more. And I'll show you the results. So I took a different color embroidery thread and alternated the stitching around the circle. So it's a little wonky, but I really like the way it looks. In the next chapter. We'll stitch a circle in between these two circles here.
6. Split Stitch Circle: So now for my stitch in between these two circles, I'm gonna do a split stitch. I've threaded my needle with some embroidery floss in this beautiful fiery orange color. I'm going to start here. I'm at the 12 o'clock this time. I just pierce my needle through my fabric and pull it snug, and then I choose my stitch length. Just going to go a little ways, maybe a quarter of an inch. And I'm going to pull it down snug, not tight, just flat against my fabric. And because it's a split stitch, I'm actually going to split the stitch I just created. So with my needle I'm going to come up through the fabric as well as my stitch that I created. And I'm going to try and stick to about halfway through that stitch. I'm going to pull it up gently and snugly. And then I'm going to bring my stitch the same length as the first stitch from where I pulled it up from the fabric down. Then I'm going to come in here again. Underneath it, pierce my stitch by splitting it, pulling it up and coming down. And it gives the impression that it's kinda like a little bit of a chain. Take my time doing this. Holding my stitch down, making sure I come up on my fabric about halfway through my overall stitch length. And I create a little arc of that circle. I'll just continue this all the way around. Splitting my stitch gently coming up and taking it nice and slow. And the results are quite beautiful. So then I finished stitching all the way around and I have a beautiful pho chain stitch here using that split stitch. The next chapter we'll come back and design the center of our Mandela.
7. Attaching the Center Button: So I think I want to put another layer of stitching around, but I also wanted to do the center. So I'm gonna put that center in first and I think I'm going to use a hard object for the center. Now I have a bunch of supplies here that I can choose from. I have this pretty bead and I really liked the color. It's very nice, but the bead for my taste is just too thick for this piece. So I'll set the beat aside. I have these little open rings that I could use. This is just from a jewelry piece and this ring, I don't know where I got it from, but I thought I could cover it with stitches, so that's an option as well. And then I also have some buttons here. That button, I love that color. So I think I might use that, but I could always use these rings and then add a smaller button. And this is where the choices are really endless. I'm going to use that larger button here just because I happen to love that color. And I'm going to attach that first and then I'll do a ring of stitches around it. So I'll choose my thread color that I want to use. And I think I'm gonna go back to that brown and deep brown. I'll thread my needle and stitch that button on. Now, traditionally, the button hole stitch connects these four interior buttons and you can either do crosses, you can go from one to the next, but you can play with it. You don't have to be limited by that. So I'm going to put my button down, bring my thread through, decide where I want that. On the center here of my circle. That looks pretty good. I'm going to hold it down, pull my thread through, and I'm going to go to the exterior of that button. Turn my piece. Gonna go through the exterior here as well, diagonally across and into the button. And they'll do that in the side. The remaining two button holes. It's a different effect. And it just adds a little interest. But that's the beauty of slow stitching is you can do as much that is traditional as you'd like. Or you can kinda go your own way. I like the way that looks. I'll not it off on the back here. And then we'll come back and do our final row of stitching.
8. Straight Stitch Circle: A thread, my needle with some of this orange thread. Again, very autumnal colors. But a startup at 12 o'clock. And instead of going around with my stitches, either clockwise or counterclockwise, I'm going to do vertical stitches. So I pull my thread through my fabric and they make a little stitch line and pull it snug. And then I'm going to space it a little ways. So now I'm at the two o'clock, maybe 130. And again, I'm going to direct my stitches to the interior of my Mandela. And I'll continue with this all the way around. Now. I've gone all the way around once with fairly loose spacing. So I want to tighten that up, will continue to go around and just deciding what I like. And there I have my completed stitches or not this off on the back and snippet. And then I can decide if I want to add any final touches to this piece.
9. Back-Stitch Circle: So I think I'm just going to add a back stitch all the way around the exterior of my circle here, the widest circle. I've threaded, my orange thread, the same thread I used here for this interesting circle. I'll start with the 12 o'clock. And I think I'll go maybe it just a little bit of distance between that large circle and where I'm doing my current circle. Now to do the back stitch, I'm going to start at 12 o'clock and I'm going to head counterclockwise, just going to make a small stitch, maybe a quarter of an inch. And I'll go down. And then my next stitch, I'm going to come up about a quarter of an inch away. And I'm gonna pull up my thread. And then I'm going to come down right where I completed my first stitch. And it's just side-by-side. You'll take my thread and go down continuing to go counterclockwise, the same distance approximately away. And I'm going to come down and then go back in on my thread. And I'll continue this all the way around. Making a concentric circle around the length of my Mandela. And it makes it very pretty mark here. And on the back, It's solid as well. I'll finish this and show you the results. So I completed the backstitch for the exterior circle. I'm going to stop here my project. I'm not going to worry about the edge here. I could always either add a binding or a stitch, maybe another day. I'm quite pleased with the way it looks. It's very autumnal. I can always go in and add more stitching layers and more circles and more stitches if I'd like. I wanted to show you the back of the piece as well. And so it's obviously not as pretty as the front of the piece. And you see all the knots, you see any and tangles that happened. But that's part of the process. And I think it's kind of interesting in itself. I don't cover my pieces. Some people will cover them with a piece of felt or fabric just to hide that work. But I think I like that. I like seeing my process and my progress from when I started stitching until now. In the next chapter, we'll take a look at this and some variations on this piece using the same techniques.
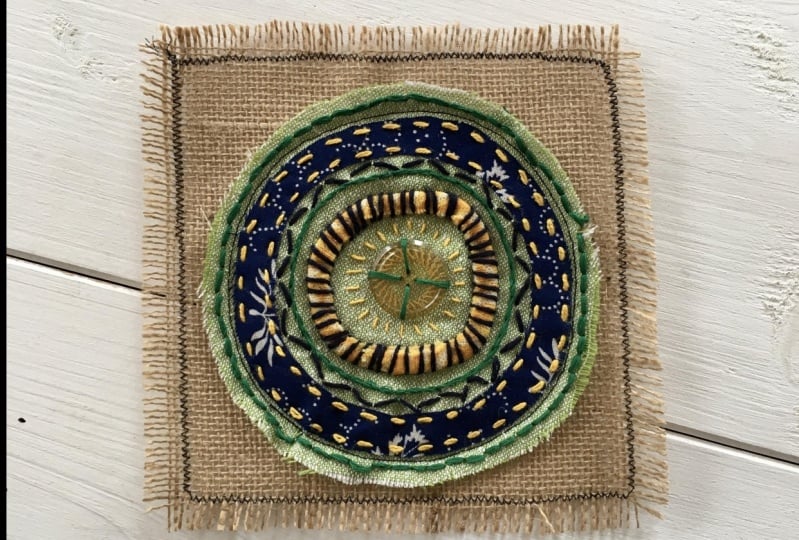
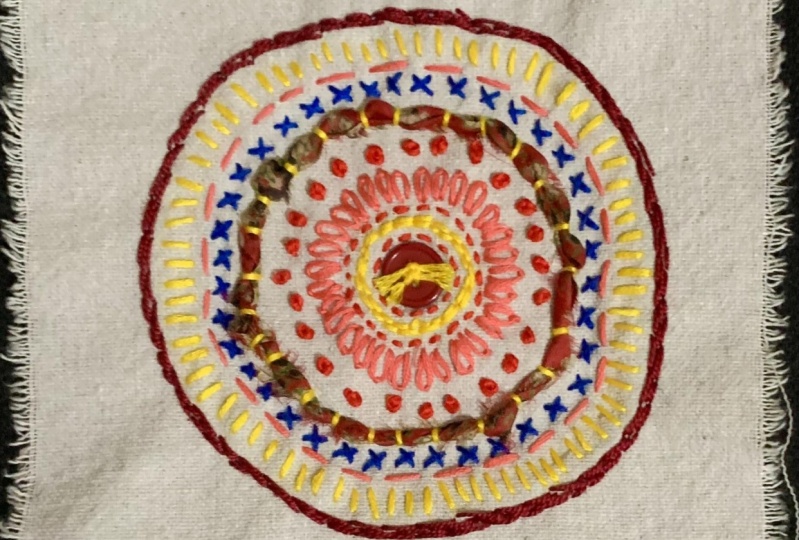
10. Class Wrap Up: So here we have our finished piece that we created in class. We use a bunch of techniques, including the backstitch, the split stitch, straight stitch. We did a couching technique here to secure this piece. And then we just use little stitches here, almost like a running stitch to secure this apple. Okay. The colors are very autumnal and I love the way this looks with the browns and oranges and a fiery colors. I wanted to show you some variations using some of the techniques from class and just some other things that you might want to throw in. Here we have a similar piece using the same fabric to do the couching. I did a little rustic scene binding. And then I did all my stitches around and round. And instead of a button for the centerpiece, I just embroidered a little heart. And again, I tried to make it autumnal with my colors, with this rust color. And then I just throw in a blue from this background. And this piece, I did nothing but stitching round and round on a piece of quilted background. There's a little bead here for the center, and I just use greens to browns, again, autumnal, using an traditional colors. For this piece, I did a patchwork for the background. Various fabrics that I really liked, including this one with some text. These are all fabric scraps. And then I just employed at all these different stitches to make way for this Mandela. As well as adding this little center, little gizmo here. A little sprocket or something to look little steampunk ish. And for our last Mandela, I took a piece of fabric, added a backing up, just batting, folded over the edges just so that the edges weren't wrong. But this is optional and stitched along. First I stitch with a lighter thread, and then they stitched with this beautiful embroidery color. I alternated my thread color here as well as here. And I used a variegated thread there. And I just played around with the stitches and it was a very relaxing process. I hope you'll try your hand at a stitched autumn and Allah. If you do, snap a photo of your work and post it in the project section, please be sure to follow me here on Skillshare to get notified of future classes and please consider leaving a review. Thanks for joining me today.
 Daniela Mellen, Artist & Author