Transcripts
1. Introduction to the Adventure: Now we're going to go on a
nature journaling adventure in the cloud for us
together. Let's go. I guarantee you that this
class is going to be unlike any other class
that you've taken online. Because it's going
to feel like you're on the actual
adventure with you. Not only will you learn a
lot of great watercolor, nature journaling and
nature sketching skills, but it's going to
feel like you're on an actual adventure with me and not just stuck
at home in the studio. It's going to be hard, it's
going to be challenging parts to this class,
but I believe in you. I've got resources
and a bunch of support to help you make
it through this class. And at the end,
you're going to have a beautiful nature journal page. New skills to brag about. In addition to art skills such as water color
and sketching, you're also going to learn about this amazing ecosystem and the biodiversity of the
cloud forest in Ecuador. This is the Choco Andino, one of the most biodiverse and endangered ecosystems
on the entire planet. You also learn some
cool tricks such as how to go underneath a
rusty barbed wire fits. But don't worry, it's
not all barbed wire. High humidity and
mosquitoes all the time. We're also going to
chill in a cafe, drink a cappuccino
from the cloud forest while doing some bird
studying from books. So if you like birds, if you like bromeliads, ferns, orchids, moss, and super biodiverse
places for nature journaling. And if you like watercolor
and you want to do something a little
bit different online, check this class out. It's going to be awesome. I almost forgot to mention the awesome project that we're going to do
for this class. Whoa, what the op, sorry, I got distracted. The project for this class is to create a
nature journal page combining a variety of elements
including a bird drawing, plant drawings and a little
scene plus lots of notes. For this class,
you're going to need some basic art supplies such as sketchbook
drawing tools, watercolor, and
also don't forget, a waterproof jacket and rubber boots for hiking
in the rain forest. Binoculars are going
to help you see some of those exotic birds also. And for more details
about the resources, check out the resource PDF where you can find
tons of information. But don't go on a huge
shopping spree yet because we've got some exploring to do in the cloud forest. So right now you
might be asking, why would I take a
class with this guy? He seems kind of crazy. I might be crazy and passionate, but I also have over ten years of experience teaching
nature journaling and creating over 500 videos about nature journaling
on my Youtube channel. I specialize in
nature journaling in extreme situations and helping people overcome their
creative blocks. Don't worry kids,
I'm a professional.
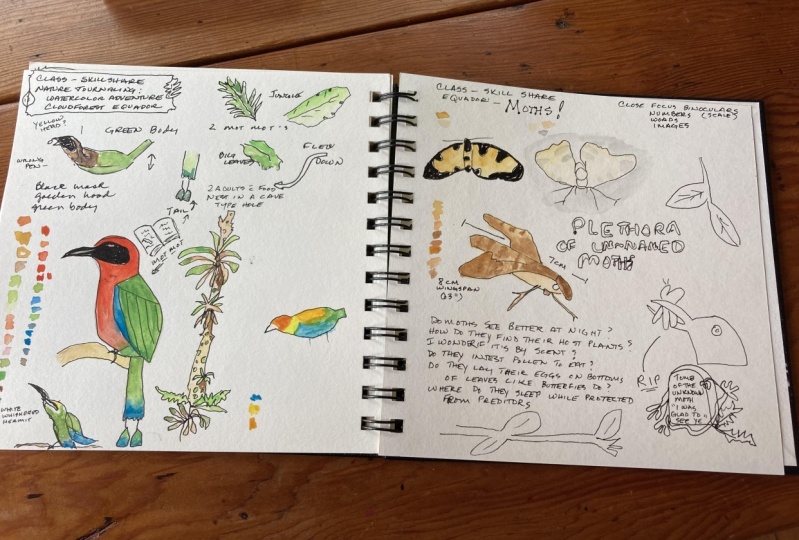
2. Watercolor Sketching Birds and Plants!: So remember, you
can't always find the perfect spot or
the perfect subject. Sometimes you just need to
stop in nature journal, anything that's in front of you. So we've been walking around for more than 20 minutes
and we haven't even pulled out our
nature journals yet. So this is something that
can happen when you're in one of these extremely
biodiverse places. There's so many cool things, there's so many things
happening all around, it's really easy just to walk around and take
pictures of everything. But what we're going
to have to do right now, and I'm going to
help you with this, is we're just going to
sit down and start nature journaling anything like these plants right
here, for example. So let's get our chairs out. Let's sit down and
let's just start nature journaling
what's in front of us. Or it would be really easy
just to keep walking, keep looking, and not even do any nature journaling at all. So let's just set up our handy dandy portable folding chairs. This is my absolute
favorite one, you can find out more about
it in the resource section. So let's just get set
up here underneath these bananas and
see what we notice. Sometimes just sitting in one
place for a little bit is the best way to find some cool
stuff happening in nature. I already see a super cool bird. So at this point in the
adventure where you're already seeing cool stuff,
what do you notice? You can write down
your observations as notes on your nature
journal page. What did you notice about the bird's behavior?
What did it do? Can you get a quick
sketch of it? What are the colors?
I noticed that it has this black mask around it. It also, if you
look at it closely, looks like it has
something in its mouth, flew down to the ground. All of these are the types
of things that we put in our nature journal because we're not just wait,
what's it doing now? It turned around now. You can really see some of
the other colors on it. You can write that down or get ready with your water
colors to paint it. All of these are things we do in our nature journals
because we're not just doing portraits of
animals or portraits of birds. Whoa, did you see how
it moved its tail? All of these are things
that should go on the page. This is the story of nature. This is what we try to
capture in a nature journal. Oh, there it goes. Look, does it still have
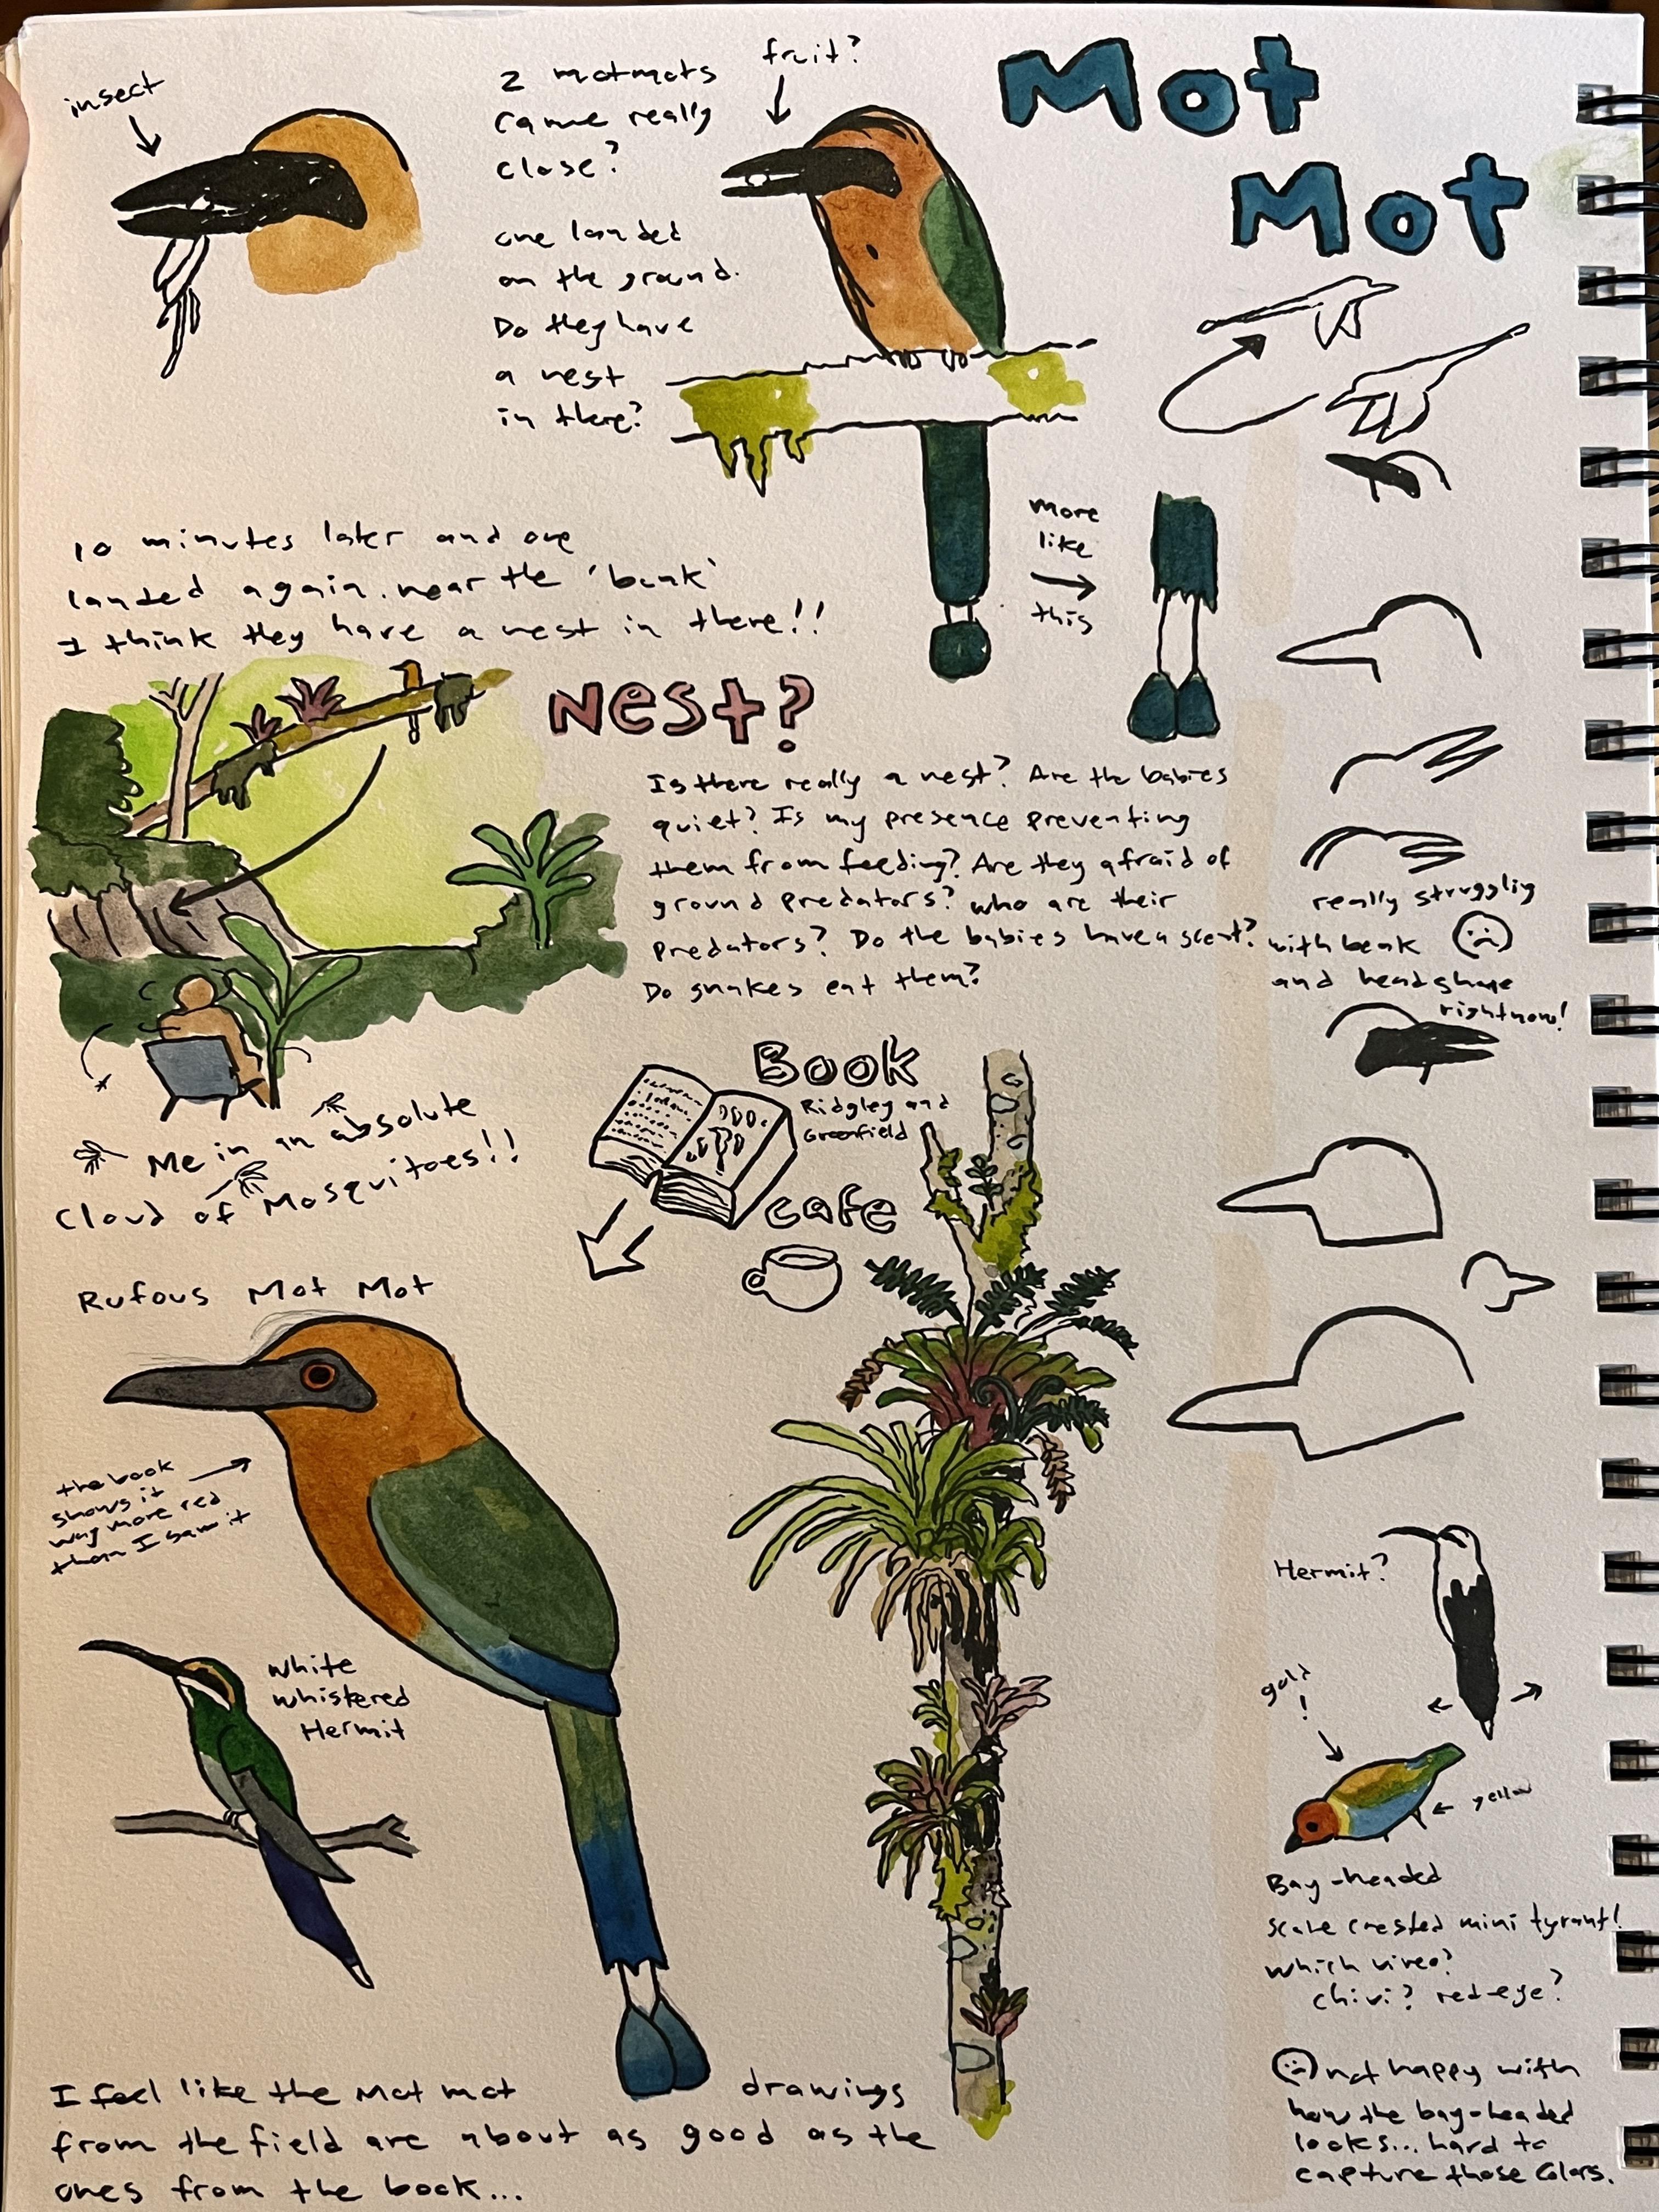
something in its mouth? These are the sketches
that I started to do while that amazing Rufus Mot, Mott was in front of us. Don't worry about the
technical names yet, we'll study this bird later. But what are the basic shapes? What was the behavior? What questions do
we have about it? Notice how I tried drawing the tail two different
times a second. Mat Mott came with a different
type of food in its mouth. Now I'm pretty sure that they have a nest and
that's why they're flying down there because
they're trying to feed baby. There's two different
mat mates and each one was bringing
food down to the ground. So what I'm going to do
now is something that we often forget in
nature journaling, but we're not going
to forget Today, I'm going to show a
little bit of the scene including myself
showing the context. This arrow is coming
down pointing to the flight path
that the mat matte took and where the nest is, this just shows
the bigger context and is a really important
part of nature journaling. Are the mosquitoes getting you? Hopefully, they're all
coming to me because I have the blood type or whatever that is
attractive to mosquitoes, but that's why I'm wearing these gloves and using my hood. But pesky mosquitoes won't stop us from capturing the
water color in the field. So let's start with
the Rufus color that is the namesake of
this species of Matt. Matt. I'm using
Quinacridone Siena with a little bit of
Quinacrodone gold, but there's a variety of dull, sort of golden, golden brown
colors that will work. And doing it in the field, we can appreciate all
the subtle transitions, and I think it's
much better than waiting until we get home. Your color can also be in a
note taking form as well. I started doing the water color for the bird, but
then it flew away. And I've only got
some of the colors, so why have my
watercolor palette out? I might as well do some
of the other colors. I could color my lettering, I could color plants
or anything like that. That's what happens when
you're nature drilling animals is they might leave and then
you can focus on nature, drilling plants or landscapes. So let's add color to this
little scene that we created. Starting with the palest colors. I'm also because of the
high humidity working in a way so that my colors
don't bleed into each other. So a lot of times I
have to skip around, I have to wait a long time
before things will dry. It's high humidity here, so water color dries
slowly as we jump around. We can also just keep making observations and when
the birds come back, let's capture that color
that we missed before. So I'm getting this
color on the back also. We are going to study these
birds later from a book. And you'll have more time
to color them if you didn't get all the color in during
the time in the field. That's the Matt nest
right there. Super cool. We got to nature journal
them a little bit, but we're going to
leave them alone now. And Nature journal some of
the cool cloud forest plants. Okay. Be careful walking
over these logs right here, because there are Tercio pelos, both rops Asper in
this area and that is the most dangerous pit viper
in all of the Americas. In fact, it might be safe
to consider it one of the most dangerous vipers
in the entire world, based on how many
people are bitten by. But we'll just be really careful and pay attention to
where you're stepping, especially when you're walking
around, logs like this. So I'll go first. It feels like this log is going
to break though. Who? The whole log is breaking? Okay, let's go Who? All right, wow. Look
at these bromeliads. This tree right here
with bromeliads on, it will be super fun to draw. So let's get in a position
where the light is good. And because it is such
a vertical subject, let's figure out
how to put it on the page in a way
that looks good. Are you ready? Okay, there
is our subject matter. Look how vertical it is and here is what my page looks like. So far, I see that you have some space left over on yours, or you could start a new page. But I want to contrast this maybe with a colorful
piece like that and do a tall thing here that is nice and skinny with these
bromeliads right there. Perfect subject matter
for the cloud forest. So it's a little bit hard to focus on it with all
that background green. But let's just pretend like
we don't see anything behind this and try to focus
on outline there. You can use the photos in
the reference section, but this is the kind of thing
you have to do when nature journaling in any information dense environment is simplify. And that's exactly what
we're going to do right now. Just follow along with me and look at the reference
photos if you need to. As usual I'm going
straight to ink. It's a lot faster that way, you can use pencil. It'll help you organize the shapes and sort of
plan where everything is going to fit a little
bit better because the overlapping
brameliad leaves and the little ferns and mosses are sometimes hard to figure
out where everything goes. But I'm going straight to ink
to just get the basics in here and some of the dark places before I go to watercolor. Okay. Now that we got the
basic ink drawing in, we did a lot of simplification and didn't worry too much about all the foreshortening
on those bromeliads because you could drive yourself
crazy trying to do that. And that's fine and fun
for a certain occasion. But for right now
we're just keeping it simple and we are going
to add color to this now. Are you ready If you are completely new to
water color or need a refresher or don't know
what this water brush is, watch the video at the end with watercolor basics as usual, starting with the palest stuff. Getting those pale
colors in first, working it up, building it in, putting in some of these pinks and going to do a little wet on wet between the
pinks and the greens, because there's a really
cool combination of pinks and greens on some
of these bromeliads, Trying to find the
balance between making lots of different
colors and greens for everything and keeping
a simple color palette is one of the challenges
in the cloud forest. We woke up early,
we walked around for hours trying to find the right location
in nature journal. We got chewed by mosquitoes, we found some awesome stuff, saw some cool birds. And look at this, we have a nature journal page right here with just a
little empty spot. I think it's about time to go, reward ourselves with a
little cappuccino and maybe do some work
from photos and from a book to add a little bit of final touches to our
nature journal page from the cloud forest.
Are you ready?
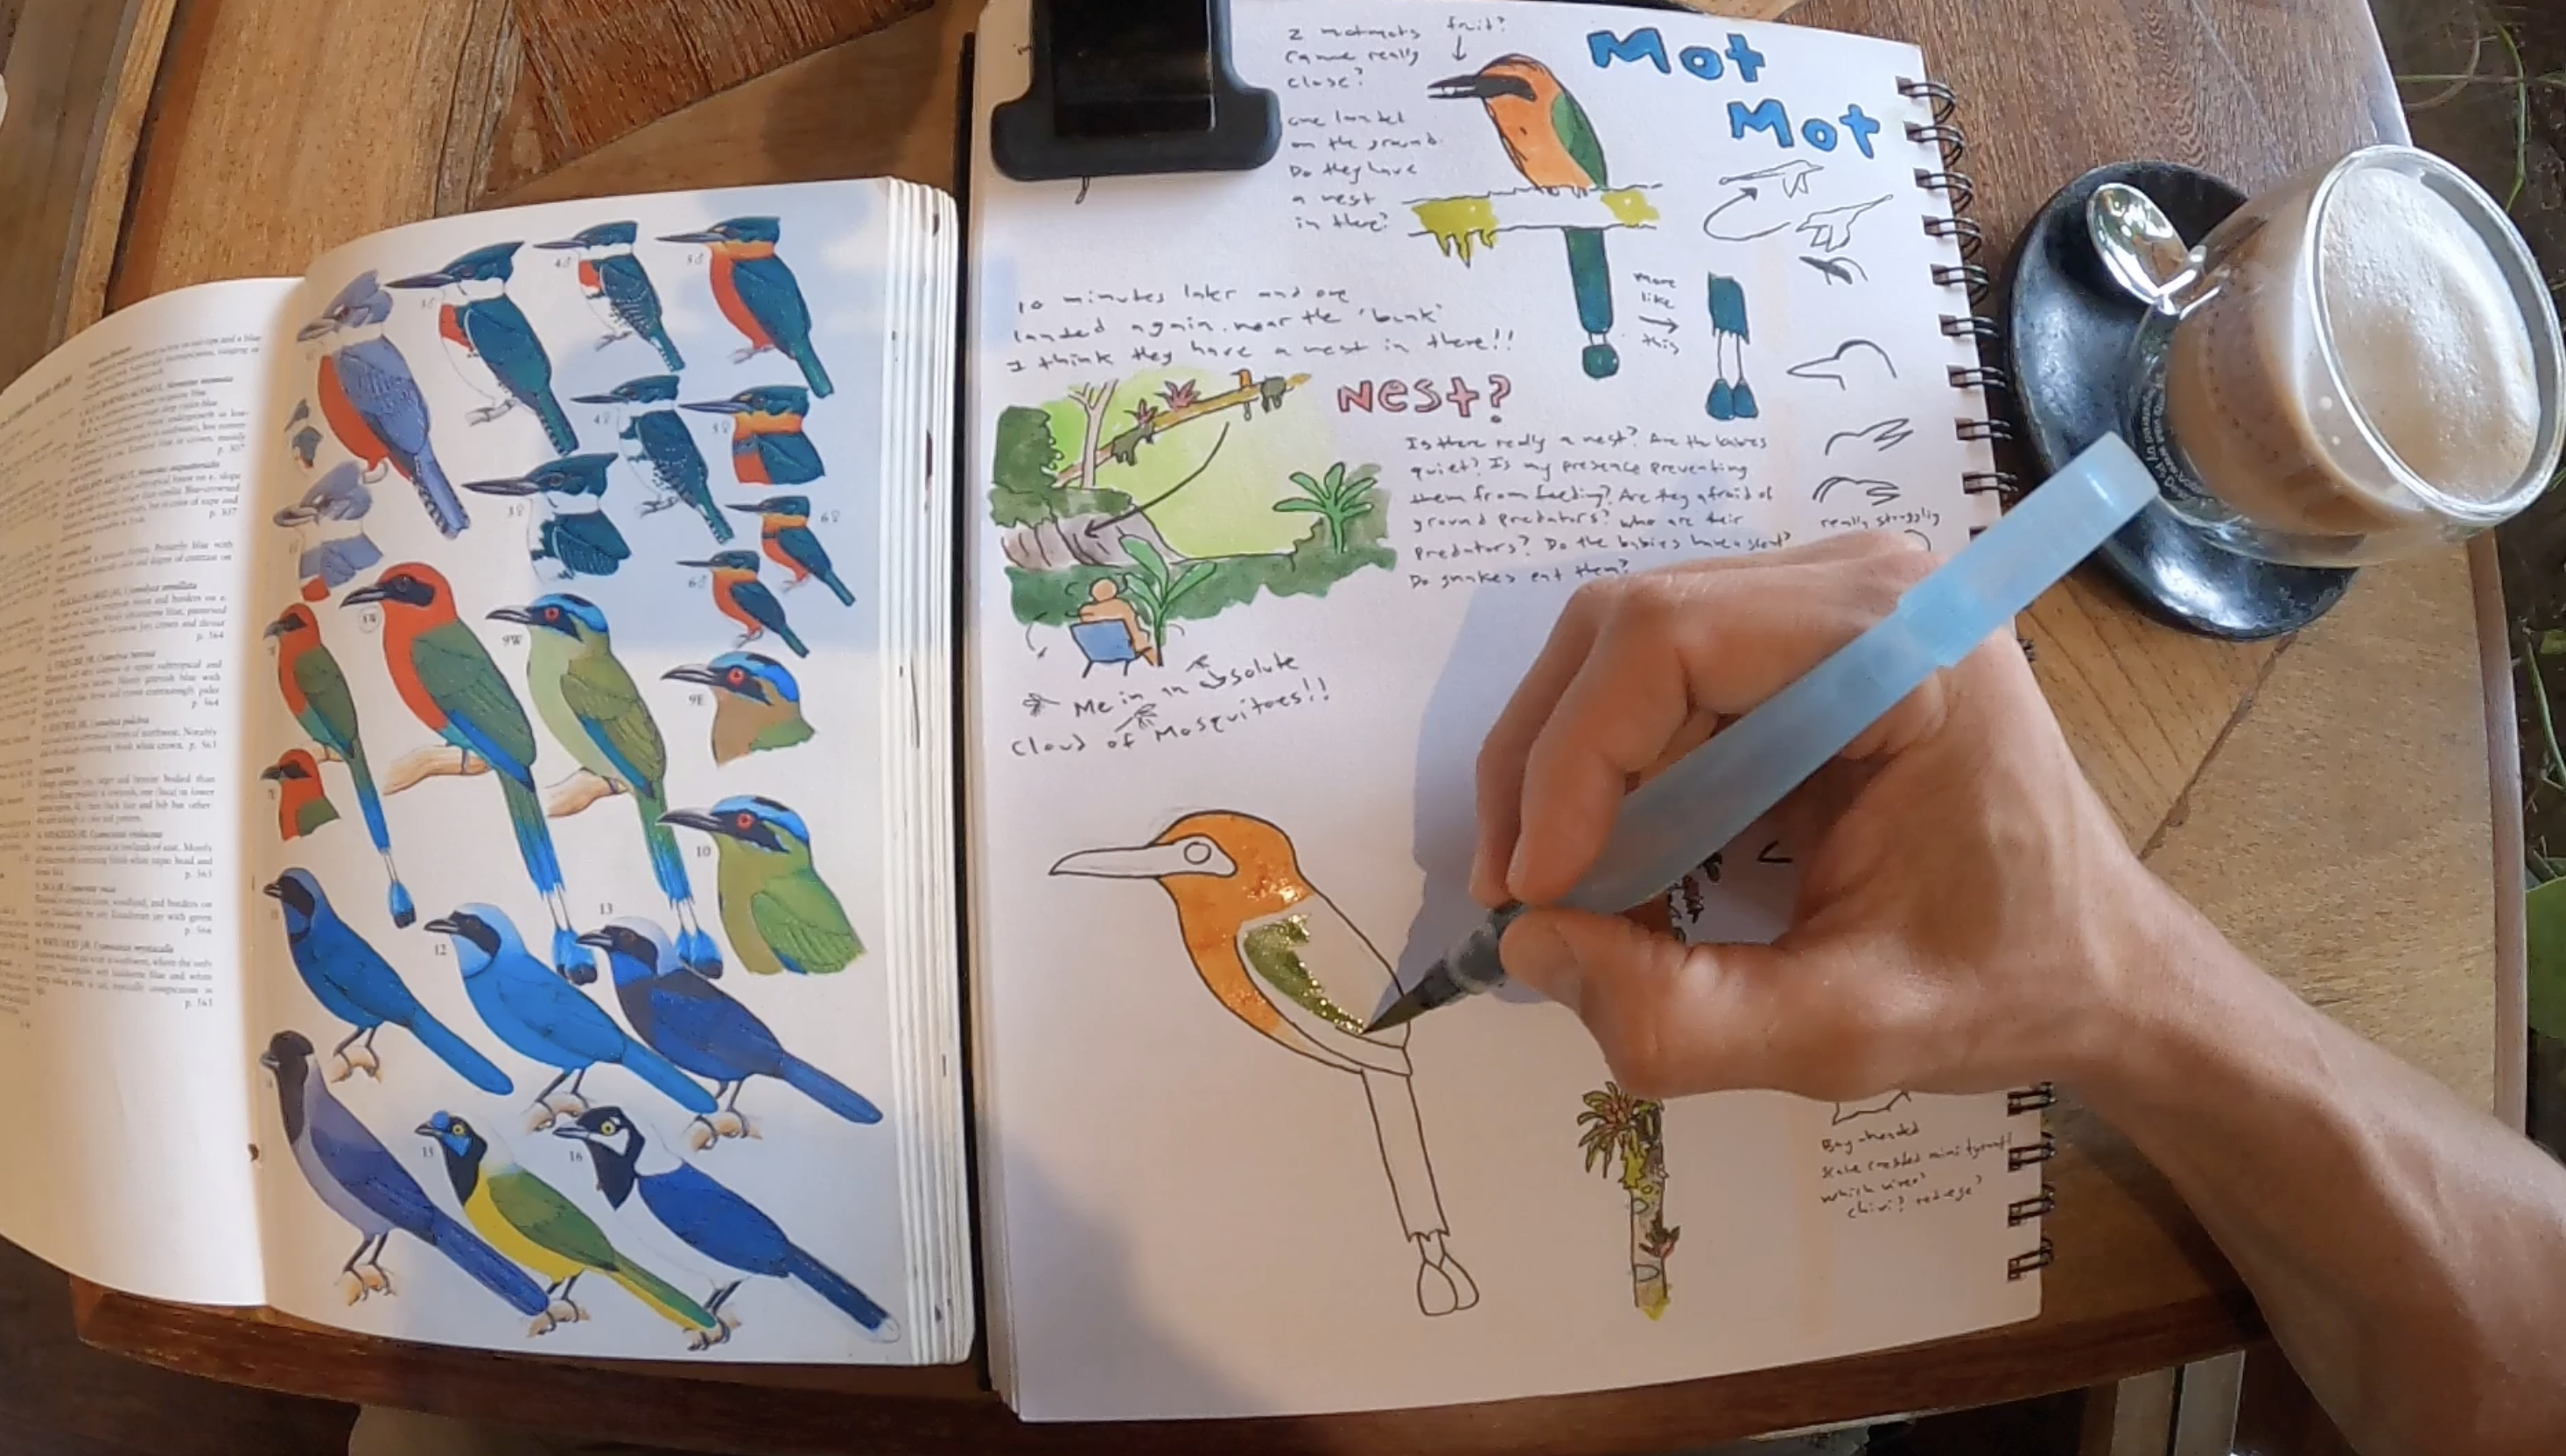
3. Cappuccinos and Bird Drawing :) : In case you didn't get
a good enough look at the Matt Matt in the field. We're going to go to a nearby
cafe, have a cappuccino, and study the birds from
a book. Are you ready? Nature journaling is
about what is done in the field or with direct
observation. It can be at home. However, there can be
supplements to nature journaling and homework
that you do based on books, on photos and online resources. This shouldn't be
a substitute for nature journaling.
So here's our bird. And for those of
you that didn't get a good enough look
at it in the field, we're going to see what
the book has to say. And we're going to
do a little bit more of a Polish drawing if you have a camera with a good
zoom lens or if you're drawing subjects that are
easy to photograph close up. You could also use
this approach. With any photos that
you take in the field, photos that you took
yourself would be ideal. I usually don't
start with pencil, but for a more polished
drawing such as this, we're going to build up the shapes and try to
get the proportions right because that's what I was struggling
with in the field. You can see all of the little sketches I
did in ink of the mat, Matt's head, in
the right margin. And I wasn't really
happy with those. I wanted to practice
getting that shape right. So starting with
pencil is always a good plan when you're
trying to get shapes right. Obviously, it takes
a lot longer. So now we're going to go
over the pencil with ink. Once we've done that sort
of planning in pencil, we can go over it all with ink. Books can be distracting When
you're nature journaling, just look at the violceous
and green jays on this page. This is why working from
online resources is not my favorite because once you're looking at images online, it's really easy
to get distracted. So now we're going to
do the color part. I'm adjusting my color slightly. Remember we're trying to
make a more polished version of this than we're able
to do in the field. So I'm going to
try to get some of these color gradients going from this less saturated green into this more
saturated blue green. I'm going to use
thalo blue here. Thalo blue is always a
tricky color to work with, but it'll get that
saturated color. This Matt. Matt has some
areas where there is a sharp transition between
two different colors. It's best to let the colors
dry in those situations. It also has some areas where there are soft
transitions or gradients. Sometimes you can use wet on wet techniques for
these soft transitions. The next thing I'm going to
do is make a little symbol and write some notes about where this drawing
is coming from. I always do this. If working from videos,
photos, or books, you can write that this
was a skillshare class, for example, while
we were doing that, the water color dried. And now we can do some layering. Layering is helpful
for adjusting colors, making things darker, or even doing some of
those transitions. This is different
from wet on wet, and is called
glazing or layering. I don't know if you noticed it, but there was also a really
cool humming bird that came close to us while we
were out there in the field. It looks like this
white whiskered hermit. So I have a little sketch
of it in the right margin, But let's do a little bit more
in depth of a drawing now. This time I'm going
to go straight to ink and I recommend
you give it a try. Because when nature
journaling in the field, being able to go straight to ink is going to help you a lot. Remember, the best
way to use white with water color is to
reserve the paper. This hummingbird, as it's
called, white whiskered. It has some white on it. Not only on the whiskers
underneath the eye, but also on the tail. So what we're going to
do is we're going to do some pre planning and we're
going to paint around that, especially being careful with this really dark blue color, but also this intense green. So we're going to
start with those spots first and just make
sure we're careful. Reserve the white on the face and the white
on the tip of the tail. Now that we're done
with the humming bird, I'm going to add a couple
more details to the Mott. Mott. Then there is one other bird that we saw
on our way to the cafe, and it is an awesome bird. So I think we're going to
need to work on it from the book a little bit now
because it's so beautiful. Do you see it? Isn't
that an awesome bird? Let's try to just get a quick
sketch of the body shape, and this is where a really simplified bird body
shape will be helpful. And then because the
colors are so amazing, we'll add the colors
from the book. This is a challenging one, but I'm going to start
with a little bit, this inacrodone gold, then mud that a little
bit with a green. Try to get a more
saturated green, transitioning into
the olive green. This is where I'm trying
to use wet and wet, and then now I know
there's a little bit of pure yellow on the neck. Let's get the head a
little bit more dark. It's called the bay
headed tanager after all. Then putting in that
really saturated blue and a little bit of
yellow on the lakes. I'm not totally happy
with how it came out, but this is a really
challenging one. You could draw
multiple versions of that small outline and try coloring them a couple different
times, But there you go. There you have it. And
I think that we've got a page that's looking
pretty good so far.
4. Cute Moths and More!: Last night it was really hard
to nature journal because the lighting was
weird and there were so many bugs flying around. Our bug set up. But luckily some of the cool moths are still
here during the days. So let's see if we can
nature journal then. Right now, this is the kind of thing that is really
easy to avoid. Nature journaling, we often will just include plants in
our nature journals. And maybe we won't include moving animals or we won't include bugs because we
think we don't like them. But if you do this section
with me right now, you'll see how rewarding and fun is to nature journal,
these cool creatures. So let's just set this down
with some other mas right here. There you go. It's okay. Go on
there. There you go. Don't tell me you forgot your close focused binoculars because they are super
useful for things like this. You'll be able to
see so many details on these really cool
mas and butterflies. Don't worry, you
can borrow mine. There you go. Now remember this is nature journaling and
not science illustration. So let's see if we can capture
the biodiversity without too much pressure and
perfectionism in our journal. I'm going to start with
the easiest one first, going straight to ink
and just trying to get the basic shapes of it. This will sort of warm me
up for the other ones. Did you bring your
watercolor palette? If not, you can
use a sum of mine. One of the moths
that I was really excited about drawing
just flew away. But that's what happens when
you're nature journaling. In real life, one
of our moths is a very pale color and this is a problem especially
for watercolor. If you're working with
toned paper, dark paper, and pastels or opaque media, that is one solution. Another solution that
I'm going to recommend you try this time is to paint around it with a cold
and darker color. You were distracted by
some other cool bugs when I did the first
layer on this one, but it was basically just
one layer of a paler color. Now that it's dry, I'm going back and adding
these darker areas. That's the best technique
for patterned moss. Now go ahead and
add a funny title. I chose this one and I'm
going to use bubble letters. Bubble letters are
a good approach. Do you see that there's
a little house were in back there eating
one of the Bs. That's the kind of
thing that would be great to capture in the little mini comic in your Nature journal.
So let's go. Don't be intimidated by comics. Don't be intimidated by drawing
people or moving animals. These are probably things that you did as a five year old, so let's bring them back. Start little by little.
It's the best way to tell stories and moving
things in nature, look how easy that was. We captured a couple
basic sketches here, a little mini comic and a title. But we're not done
yet because remember, nature journaling is more than
just drawing fun pictures. Let's write down some
questions that we have and some observations about
these really cool insects. Take a moment now to write down some things that
you're curious about. The questions will get
better as you ask more. One question will lead to another question will
lead to another question. Create a little block of text. Things that you couldn't
capture with the drawings, all of those with words. So far I have a pretty cool looking at nature
journal page going. But remember, looks
aren't everything. Nature journaling is about
learning and observing. And one thing that's
really missing is scale. You can't even tell how
big these organisms are. So what I'm going
to do right now is I'm going to take
some measurements and write down some numbers
in my Nature journal. Because numbers are one of the three languages
that we use in nature, journaling, words,
images, and numbers. We have words and images, but let's get some numbers. I like to use this
little goniometer that John, Mr. Laws gave me. It has inches and it
has metric on one side. I'm going to use the
metric right now. It looks like this one is
about 7 centimeters long. There's a couple ways
that you can do this. One of the ways that
I like to do is to draw an actual ruler on here. And that's what I'm
going to do right now. I'm going to use
the gray side of my pin to create a
visual hierarchy. And I'm going to make two marks here showing the overall length. See how I made
those marks there? They're lined up.
Now, I'm just going to free hand a
line through here. See how I created that line. And then I'm going to
write 7 centimeters is that right? Yep. 7 centimeters. I could also measure
the wingspan. And what I'm going to do
for the wingspan is to use another technique for
showing the measurement. Let's see what the, oh,
and I just remembered there's these white dots
that I need to draw. Wow, the wingspan is even
longer at 8 centimeters. This, however, my drawing,
it's in perspective. See, it's tilted at an angle. I can't as easily do the method that I just
used. It would look weird. All I'm going to do
instead is I'm just going to write eight
centimeter wingspan, exclamation mark that in inches. That would be, um, that would be about a
little more than 3. " see right there, I just wrote
eight cinnamon wingspan. Oh, did you hear that? It's the Ns. Again,
there are a bunch of ins that are coming in here. Oh, there it
is, right there. It was in the gutter
coming to eat the bugs. There are also some Motts, which is a really cool bird
coming to eat the bugs. There's definitely
some other animals that are taking advantage
of this situation. Now that we got that, I feel
pretty good about this page. But look, we've got
an empty space. I don't know about
you. Do you have an empty space at
the bottom of yours? What are some techniques for
filling that empty space? Because right now it
looks kind of weird. We could just make a
big watercolor wash and fill it, that's
one thing to do. We could find some type of
composition that's long, like for example, a plant
maybe, and fill it in there. We could also just fill the
rest of it with writing. That would be a good strategy. But what we're going to
do right now to help us capture some of
the information about all these cool insects, is we're just going to
do sort of a collection. And I'm going to
use the gray side of my pin and do a bunch of small drawings because they're small and
because they're gray, that's going to offset them a little bit in terms
of visual hierarchy. Because if we did
something really bold here at the
bottom of the page, it would make the layout
look a little bit weird. And even though aesthetics of the page isn't the
most important thing, I think you're
going to appreciate having a page that looks
good aesthetically. So there's a cool one that I'm going to make
a quick sketch of. Both of these are really cute, so I'll draw those. Oh my goodness, that
one is amazing. And I feel like that deserves more than just a quick sketch. But I'll do a quick sketch
just to get it on the page. Also include
something that's not a moth here, it looks
like it's dead. But this looks like some type of brackenid or ichnuminid wasp, so I'll get that one also. Last but not least, here's
another Hymenoptera. This looks like it could
have been a male ant, a reproductive
ant, that they fly out of the nest and go
somewhere to reproduce. So I'll try to capture
that one also. All right, so you can see how simple these sketches
are at the bottom. And little descriptions
with words can really help because I'm not going to
put color on these, so I can just use
words like lime green, dead edge to describe the color. This one I'm not sure if
it's a beetle or moth, so I wrote that question. This one I wrote cute ears
because that's funny. This one I'm not sure if it's a bracketed wasp and
same with that ant. And then last of all, of course, this one could be a
portrait of itself, would be really fun to do, but I tried to just
capture it quickly. I wrote big,
beautiful and green. And look at that,
we filled a page.
5. Watercolor Landscape by the Creek: That was super fun,
nature journaling those moths with you,
but check it out. There's a really cool
creek down the hill, and I think we could
capture a little bit of a landscape down there.
Let's go check it out. This area looks very different, more like a disturbed ecosystem, probably from the
creek when it floods. Oh, look at these
that looks edible. Looks like it's in
the roses family. A lot more disturbance
plants down here, probably from when it floods and the boulders wash
everything away. One more bit of barbed
wire to crossover. Look how rounded
these rocks are. They look like
igneous rocks too. Like granite coming
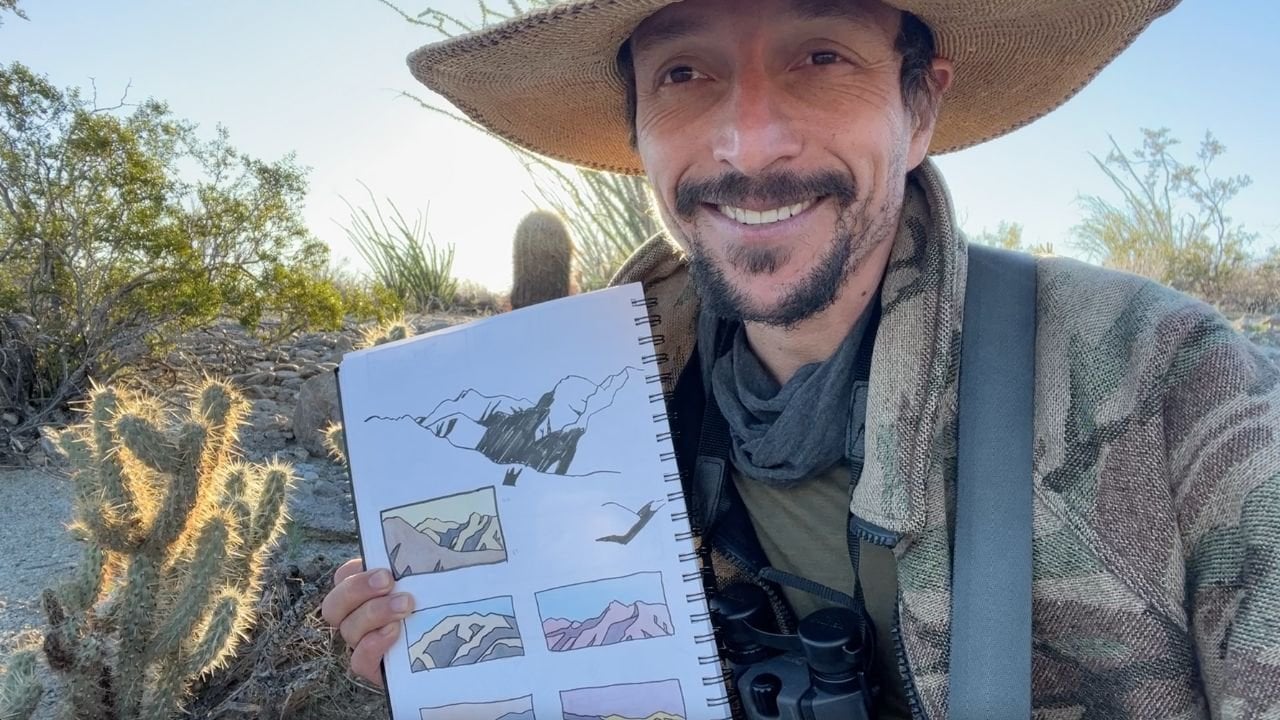
out of the Andes. Lots of cool boulders. If you've taken my
landscape painting class, then you probably already
know what I'm going to say. But down here by this creek, there's a lot of good
extreme foreground elements to put into a landscape to, or landscape painting
in our nature journal. But other than that, there's a lot of problems
and it's not really an ideal place for
doing a landscape. So we're going to
see what we can do. I think sitting up here
on these rocks next to this cool purple flower
is probably our best bet. We can see that cool
foreground plant right there, that Heliconia, which
would be really fun. And we can see a little bit
of a curve in the river. We could also potentially fake a little bit of the
background mountains weight. Speaking of the
background mountain, those clouds are looking
kind of dark up there. Create a small rectangular
box for your landscape. Use the margin for bird plant and other
distracting nature notes. As you can see,
I'm starting with gray pin and getting in
some of these basic shapes. I'm also simplifying
certain things and exaggerating other things. Overlapping shapes
are really important. Now that I got the basics, I'm going in with the black ink, starting with the
elements that I want to emphasize the most. This Heliconia plant, with the inflorescence hanging
down over the creek, is central to the painting. So I'm trying to get that
in place right away. We're supposed to be
doing a landscape, but there's a two can
over there right now. It just went into the
trees a little bit. Definitely. Take a note of it. See it through your binose. They like to eat the eggs
and babies of other birds. So I have a feeling right now it's looking for bird nests. Now that you have a note about the two can in your margin, we can get back to the
landscape drawing. And remember, you
can always look at the reference photo sheet
for any of the references. Or you can pause the video
at different places and take screenshots to get the
references to draw from. Did you feel that drop of water? We might not have that
much time to finish this since we're in a hurry. Let's see if we can do this
without too much layering. As usual, we're starting
with our lightest colors. A little bit of wet
on wet in the water, a little teeny bit more
wet on wet in the water. And darkening the furthest distance mountains
in the background. Now while those are drying, let's add some of
this saturated green for the foreground vegetation. A little bit of high
light colors for that really cool
inflorescence dangling over. And then the mid distance green for the forest in
the background. Okay, let's finish this off. I'm adding a little bit
of darkness to the water. Really easy to make it
too light everywhere. Also some darkness
in the forest. And putting in the
brown on this. Heliconia has lots
of dead leaves. Now I'm going to
get the gray for the rocks and I want
them to be dark too, especially close to the water. And I think that's about it. One of the key reasons to get your water and those
rocks dark enough is because we're going
to come in with this white gel pin
to add white water. This is a tricky tool to use, but it can work very well, especially if it's on
dark enough background. If your water and rocks
aren't dark enough, it won't work at all. Boom. Done. We did it. Yeah. Time for chocolate. We finished. And just in time because it's not
starting to rain, but it's getting really hot. So let's go jump in the river. It's crystal clear water coming out of the
Andy's mountains. I hope you brought
your bathing suit.
6. Refresh your Basic Watercolor Techniques : Watercolor is the
best color for on the go because with a minimal
kit and some basic skills, you can make every
color possible. Not only that, but
it is less messy, dries faster, and is less expensive than any
of the alternatives. Right now, I'm going
to briefly go over some watercolor
techniques and how to use a water brush If you need to refresh your watercolor basics or you have never seen
one of these before now, please do this lesson before. Continuing on, now is the time
to get your supplies out. Remember that if you go
underneath the video, there's a section called
Projects and Resources, where you can find a
downloadable shopping list with all the art supplies
and a lot of information that you
need about them. This is the large size of the
pintel quash water brush. This is what I'm
recommending for the class. Or the medium size
would be fine. For more information
about these, check the accompanying
resource document, because right now we're going to focus on is how to use them. Always have a towel on hand, something you can
clean them with. That's one of the first steps
that you need to learn, is how to make water
come out of these. By squeezing it, you can
make water come through. And if you squeeze and
wipe on a towel at the same time or on paper,
you can clean the brush. Or check to make sure the brush is clean. This brush is clean. The first thing we're going
to do is show how to load, load it with water color
and put it on to the page. Once you know that it's
wet and it's clean, you can choose the color
that you want to work with. We're going to work
with a pure color here. A pure pigment from
my mixing paints. And in that case, I'm just
going to choose this one here. Serpentine genuine. Serpentine genuine is
a really nice color. I'm not going to mix it
with any other color. I'm just going to move my brush around here to pick up color
on the tip of my brush. Then I'm going to use
my mixing area here to check and make the
right consistency. I might squeeze
more water through. If I want more of a wash, you can squeeze water
through or you can just puddle it up here and
check your consistency. Then you can go to your page. What we did just
there is loading the brush with this nice
serpentine genuine. And I'm just going to make
a strip here if I want to. I can squeeze more as I go. Now I'm going to clean my brush. When I do that, I'm going to squeeze and I'm
going to wipe it on my paper towel that is loading
and cleaning the brush. Loading and cleaning
the brush is the most basic thing
you're going to be doing over and over again. Make sure you know how to do it. Next we are going to mix paint. Say that I decided that
Serpentine genuine is not saturated enough and I want to make it look more bright green. Then I will mix in
a little bit of this thalo yellow green here. It doesn't matter
if you don't have the exact same colors as me. The idea is that
we're going to do a mix between two
closely related colors. What I'm going to do
is going to make sure I have a clear mixing area here. I might squeeze some
water out already in advance. Put it in here. I'm going to pick up some of the serpentine
genuine that we're just using. Spread it out. Maybe squeeze the brush
to get more of it out. Then once I have some
in my mixing area, I'm going to go
to my paper towel here and I'm going
to clean my brush. You have to clean your brush before you stick it
in other colors. And there might be
times where you're feeling really lazy
or in a hurry and you want to stick it straight into one of your other colors
while it's still dirty. That is going to
happen no matter what. But just know that it's going to make your colors less saturated. And especially with the
yellow, it can mess it up. Just be aware of that.
Knowing the rules lets you break them
in creative ways. Now I'm going to add some
of the thalo yellow green into my serpentine genuine. Make it evenly mixed by
moving my brush around. Now I'm going to go here
with that mixed color. I'm going to put down a line. I could also do swatches
of that new mixed color. The other thing I'm going
to do is I'm going to write notes next to the mixed color. I'm going to put SG, all. The next thing we're going
to do is an even wash. Even wash is really simple. It's when you just do an
even even block of a color. But this is one of the
places where water color is way better than any
of the color markets. Color markers that
are out there. And I've played
with prisma color and I've played with Cop. But I feel like one of the main downsides with them is it can be really hard to create a large
block of color quickly. Doesn't show. Your brush
strokes with watercolor, you can do that really easily. Just keep squeezing as you go. If you keep squeezing as you go, not only can you
create a solid wash, but you can create
a graded wash. Look at that gradient
and tell me you can do that with any markers as fast as I just did it
then without leaving a bunch of lines that
is superior for sure. That is how easy it is to do a graded wash or a solid wash. Next technique we're going
to do is called wet on Wet, because instead of waiting
for something to dry, we can add other things
to it while it's still wet and create some
crazy effects. You can see right here, I'm squeezing a little
bit and adding some water to the
serpentine genuine, creating basically a
continuous or solid wash. This will be easier on
some paper than others. Now I clean my brush, I'm going to take some
pure yellow here. What I'm going to do is
while this is still wet, I'm going to add spots of
yellow that is wet on wet. Be warned that wet on wet
is really fun at first, really addictive and
can have some of the negative health consequences of other addictive substances. You can see here
that my paper is buckling a little bit
under those washes. That's because this
paper is only 150 GSM. This is the main paper I use. For watercolor, you can use a heavier paper that won't
have that buckling effect, But for this class, I recommend something a little bit lighter. 150 GSM is perfect. If you don't know what GSM is or you want to learn
more about the supplies, then check out that
supplies resource list. I have a whole shopping
list on there and you can get a lot more
information about supplies. The next basic watercolor
technique that you need to know is how to put down a glaze. A glaze is when you build
up color in layers. What I'm going to do is
say that this wash here, I felt like I needed
a darker shape in front or I wanted to add some color that's
not there already. I can go in here,
mix something up, potentially even the same
color I used before. I can go through and I can
paint things onto here. Say I want to build up trees and I want to build
them up using the same color. If I wanted to do this whole
painting with one color, maybe it's a mystical scene
or something like that. But you can build
up layer by layer and this is very different
than if you do wet on wet. In this case, you can get
sharp edges with wet on wet, you get this crazy texture. Wet on wet is good
for happy accidents. Glazing is good for precision. When we build up one wash atop another dry wash,
that's called glazing. You might be noticing that
so far we can only do dark things on top
of lighter things. That is the main challenge
with water color. But one thing you can do, that we're about to practice
right now, is lifting. Lifting is a way to take
paint off of the page. For example, if you're
painting a sky here, it's really easy to make
your blue too dark. Then maybe you realize
there are clouds there. That blue is too dark
for those clouds. First of all, you
need to know which of your colors are staining
and which are non staining. Because lifting will work best with the least
staining colors, some colors are going
to be staining. Say I put down a bunch
of blue here for a sky. And then I decide I want to
try to put some clouds in. I can come in here, There's
a baby bird I think, or a begging bird in
the tree above me. Nature is so distracting. I can come in here
with a clean bit of paper, towel or rag. You can even do this
with your finger. Sometimes you can
just lift like that. This has to be done
while it is still wet. Once it's dry, it
is possible to re, wet with the tip of your
brush and then come in and erase with your
rag or paper towel. That is called lifting.
7. Conclusion of the Adventure : As you can see, we're not in
the cloud forest anymore. That's because we
have already dipped into the next nature
journaling adventure, and the cloud forest
is far, far behind. But look, I have these pages to richly remember
my experience. How is your experience? I would love to
hear from you and see your practice pages. So go ahead and post review on the class and share
your pages in the project section
so I can give them feedback You can also
share on Instagram, so more people can get inspired. Tag me at Marley Pifer, Hashtag skillshare, and I will share them with the
rest of my followers. I'm not going to say
it wasn't challenging. There were mosquitoes, the
birds kept moving and drops of water fell from the trees and messed up our watercolor
a couple times, but we did make it
through together. If you have lots of scratchy
sketches, that is good. Do you have lots of mistakes or discoveries that is good too. If there are some smudges, sweat, or tropical
dirt on your pages, that is even better because
today we learned first, how to not step on
venomous snakes. Second, how to watercolor
birds and plants in the field. Third, what a Mott,
Mott nest like. Fourth, how to paint a
small landscape by a creek. Fifth, how to do nature journaling, homework,
and cappuccinos. And last but not least, I taught you the
secret technique for scooching through
a barbed wire fence. What, what do you mean?
I forgot that part.
 Marley Peifer, Journal for Life