Transcripts
1. Welcome to the Course!: Hey, I'm seeking,
and I'm gonna be your instructor in this
really fun class in which we learn how to take any
sound that you find and turn it into a playable instrument
using just your iPhone. But who am I? I'm CK Barlow. I'm a composer for film and TV. And I have more than a
thousand pieces music signed and represented by
publishers all over the world, and music placements on more than 300 different
television series. By far, my favorite aspect of it is when I create my own
sounds from scratch. And that's exactly what
we're going to be doing. So who is this class for? Really? Anybody? If you're
already a musician, but you've never
tinkered with samplers. I think you're gonna be amazed at the creative possibilities. And if you're just someone
who has an iPhone and you've heard that it can do
cool stuff for music. You are so right. Another reason I get
so excited about sampling and sound
design is that anyone with a
credit card can buy all the same sound
packs as everyone else. So a way that you can
really set yourself apart if you create at least some of your own sounds from scratch. And I want to tell you about
your project for the class. As you might expect,
you're going to be making at least one custom
instrument of your very own. Now, I'm confident that you're not only going to
succeed in doing that, but you're going to have
a great time doing so. And here's why every single
skill that you need to do it. We're going to be
walking through to make sure everyone
understands. And you can always reach
out with questions. Let's get started.
2. What's Our Project?: Alright, let's talk about
the project for the class. Trust me, when I say it's
gonna be straightforward, I'm going to walk you
through every piece of it. You're just going
to have fun, okay? The main idea is
you're going to make a custom sampler
instrument using GarageBand for iPhone or iPad. And you're going to
make this based on a sound that you
find in your home, around your home on
vacation or ever. There are a few more little
pieces that will go with it. Simple stuff like
taking a picture of the object that you choose so
that everybody can see it. Let's take a look at the list of the things you'll
be turning in. In lesson four, you're
going to choose the object that you want to turn into a sampler instrument. At that time, I'll remind you to take a picture of
the object that you choose next once you record your object into
GarageBand sampler, I'll remind you to take
a screenshot of it. I've included a link to the
Apple support page that shows how to take a screenshot on all the different iPhone models. In lesson nine, I'll
show you how to record some notes playing
your own instrument. In less than ten, I'll show you how
to export that to an industry standard audio file that you can share with
the rest of the class. And finally, I
encourage you to add any notes you'd like to
apply your creative process, such as why you chose
the object you did. And maybe it sounded differently than you
expected it first. Things like that, anything
you'd like to include. Alright, so key takeaway, super fun, super easy. I'll be helping you
every step of the way.
3. Pick Up Some Must-Knows in GarageBand: Our first steps
are going to be to get you up and running
in GarageBand. If you don't already have GarageBand installed on
your phone or your iPad, press pause right now, get data on over to the
app store and get that stuff downloaded and
installed, and meet us. Alright, back here, we'll wait. Just like I promised. Okay, so our focus
in this video, we'll be two things. We want to make
sure you know how to start up a new project and then how to add a track with the sampler
instrument on it. And then as a bonus, we want to make sure you know
how to add an audio track just as an alternative approach that we'll talk about later. When you first
launch GarageBand, if you've used it before, by default, it
will probably open your last edited project.
That's cool though. Look in the upper left corner, you'll see a
disclosure triangle. Simply tap that and
choose my songs. This puts you back in a
browser where you can see either your recent projects or your file browser
if you're in recent. So you don't see a Create
New over in brows. It's big and noticeable
over on the left. Go ahead and tap that. If yours comes up and shows
live loops, just tap tracks. And notice that there are lots and lots of
different options. You want to swipe
through here and look for keyboard and
then tap sampler. That's all there is to
adding a sampler track. And you can even tap a key. It's got a little arc
dog bark sound in it, which is kinda cute. We'll get into how
to record into it in the next couple of videos. For now, over on the top-left, look again to the right of
the disclosure triangle. There's the browser button, and that takes you
right back to where we were browsing through the
different instruments types. If you swipe around there, look for audio recorder. That's the other one I want you to know about because
that just creates an audio track in GarageBand
that you can record sounds into without dealing with
the sampler if you want to. It also gives you
the option to do some processing on
your recordings before putting them
into the sampler, which you might find helpful as you do
this more and more. Notice that with audio recorder, we have choices like
voice and instrument, as well as more sounds. These choices just load up some pre-chosen
effects combinations. For example, if I choose voice, It's going to put some nice
sounding vocal reverb on it. Vocal hall, you notice right
here would actually make it sound like it is in a performance hall by adding
some reverberation to it. If you look in the upper
left corner once again, you'll see that in addition to our disclosure triangle
and our browser button, we now have a Tracks button. By pressing that, we go to this tracks view along
the left-hand side, followed down halfway
and you'll see there's a small handle that
lets you pulled out the track header view. This right here is
the track header. Notice that if you tap the icon, you get choices for
things like delete, duplicate, rename, and so forth. If you want to
rename your track, just tap rename
and be sure to tap the X and that'll blink out
whatever is already there. And you can type in
my great and return. And you're all set. Okay, let's go ahead and add another track and we'll make
this one a sampler again. Down at the bottom left
you see a plus sign. Just tap that, swipe over as we've already learned
until you see keyboard. And then tap sampler. There's our sampler. And then type the
Tracks button in the upper left to return
to this tracks view. And then just a
couple more things quickly notice the icons at the left edges of
the track headers. At the far left is the speaker with a
line through it that mutes the track
where you've pressed that button and the
headphones solo the track. So this one is going
to be soloing. It's going to be the only
one that you can hear. Those might come in handy to you as you're working
in GarageBand. So I wanted to make sure
you knew about them. Alright, so the main steps
to add a sampler track, tap the browser button, swipe to the keyboard, tap the sampler button.
4. Choose an Interesting Sound to Sample: In this video, we'll
talk about finding a sound to use for your
sampler instrument. There are lots of different
directions that you can go and even some
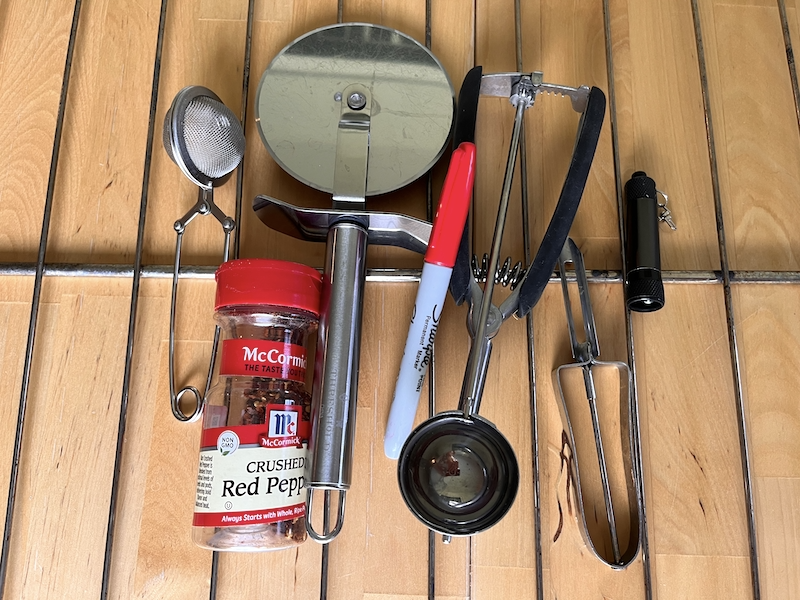
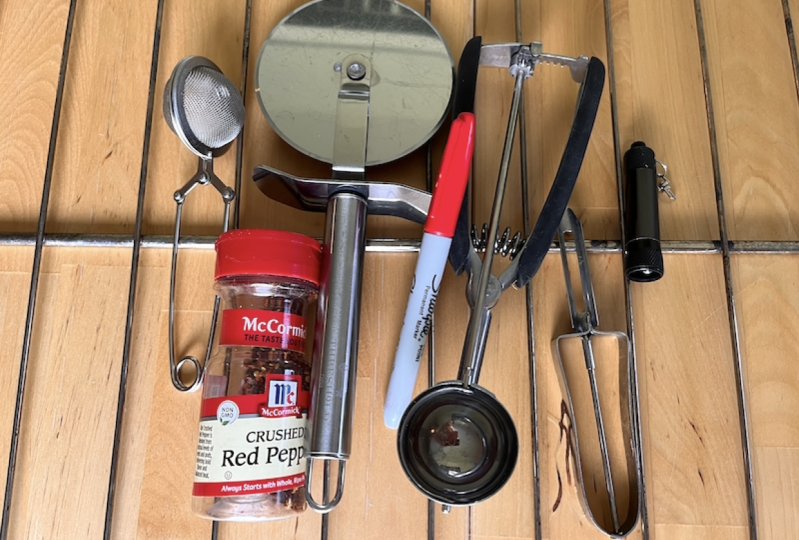
surprises along the way. It's gonna be fun. One of my favorite places to look for interesting sounds
is my own kitchen. There are a variety of
materials, shapes, sizes. You've got gadgets like the melon baller and
the pizza cutter, which I used in the song
heard in the intro video. So they're just all kinds
of things to choose from. If you want a melodic sound or something that
you can use for chords like almost an Oregon
or piano like instrument, you want to find objects
that give you the clearest, purest tone possible. So while this bowl does
kinda give me a tone, I can get something
much more pure here. But you do need to pay attention to the way that you hold it. If you're a physics nerd, you're already
going to know this. If I hold this by the
rim, I get a moment. But if I use the least number of
contacts possible and leave the rim free to vibrate.
Big difference. Try it yourself and
see what you're fine. Now, I just chose this guy over this one for a
clear, pure tone. But this one has some value to, there really is a tone there, depending how I hold it. So again, be sure to experiment with
everything that you find. Another really useful
category of sounds will be noises like metallic noises
that we could turn into, say, a clap or a snare type
sound in a percussion part. This one is kinda ready-made. Just experiments. And see what you find. Another category that I really want you to
pay attention to, the stuff that you might not think would be all
that interesting. But if you just tinker
with it a little bit, you might surprise yourself. So check out these
measuring cups, plastic that is starting to have a pitch
that you can hear, especially if you compare
it to another one. In that same
category, chopsticks. I think most people's
instinct would be to just hit with them
like their drumsticks. But you can get all kinds of funny sounds, sound effects type things
out of the simplest objects. So be sure to get
creative. Try everything. Okay, So when it comes
to choosing a sound, couple of main takeaways. If a sound has a
pretty clear pitch, obviously it's going to be
easier to turn that into a pitched instrument for
playing melodies or chords. Whereas if it's more of a noise like that is more easily going to translate
to percussive sound. But what we might not have realized until we've
played with this for awhile is that sounds you
didn't really expect to have a pitched component
start to reveal themselves once you
start playing with them. So our possibilities are
practically endless.
5. Record Directly Into the Sampler: In this video, we'll look at recording directly
into the sampler. Will talk about how to make sure your sound is loud enough
to be recorded well, but not so loud
that it distorts. And about headphones as a really important
recording tool. Finally, we'll look at an
alternative approach that involves recording your
sound directly into an audio track and GarageBand
so that you can do some preprocessing before
putting it into the sampler. Alright, we're going to
start with our bowl. I feel kinda like Martha
Stewart or something, but we're going to
start with this ball. This is the one I got that
really nice pure tone from. And I know that the sound
is coming from the rim. So that's what I want to
put close to the microphone of the iPhone that is down here. Now what we wanna do is
kinda check our levels. Not kinda, we really
want to check our levels because
it's super-important. You'll notice there's
a little jumping LED meter right next to
this big red record button. And that's telling
us how loud we are. So what we can do is make our noise and just make sure it's not getting
too high on that meter. That is probably plenty loud. So now all we need to do is
tap this red record button. And then when we're done, it's happened again.
And there we have it. So here we are and
we've got our sound. Now, you'll notice that up
in the upper left corner, I don't have a Tracks button. I can't get back
to the tracks view to add another track to
record onto another sampler. It's because we haven't done anything with this instrument. Garageband is helping us by assuming that we
just want to change to a different instrument if we haven't recorded something. So you're gonna get
a sneak preview of how to record notes
on your sampler. Up at the top center there's
a red record button. Tap that and wait for
the metronome to finish. And just play one note,
and that's enough. And now magically we've
got a Tracks button. We can tap that. And then use the plus
button along the bottom to add a second sampler
for our next sample. Alright, now we're gonna
move on to our silverware. It's in his drawer. Again, not rocket science. We just need to get
the microphone over. I mike close to
our sound source, that being our silverware. I'm going to tap Edit button. And now we've got our
simpler revealed again. And let's see what
our levels are like. I like that one the best. So I'm going to tap
my sampler button, make my sound, and then tap
it again when I'm done. Easy. Let's talk for a moment about the quickest way to improve the quality of your
iPhone recordings. What is it? Headphones? By using headphones
while you're recording, you hear exactly what the
microphone is hearing. And it might be a lot different
than you're expecting. You're going to pick up
things like wind noise or the fact that the sound source really is too loud
and it's distorting. The one little gotcha with
using headphones while iPhone recording is if you use headphones that
include a microphone, your iPhone is going to
automatically assume that you want to use the
microphone on the headphones. And that becomes
really awkward really quickly if it's an inline
microphone set up here. So what you really
want to do is use headphones that do not
have a microphone. For example, these are
my studio headphones. And I've attached
this little adapter that lets me plug
them into my iPhone. Using these, the iPhone
will still default to using its own built-in
microphone that allows you to hear what
the mic is picking up and easily position
your iPhone near your source versus
having to pull one of your ear buds out and put it next to the source to
pick up the sound. Back. In lesson three, I showed you how to add a
sampler track to your projects. I also showed you how
to add an audio track. And audio track is what you use to record
anything that makes some outwardly like when you're singing the vocal
tool whole song. But you can also
use it to record any sounds that you hear
when you're out and about. And you'd like to capture. The advantage to this method
is that you could apply preprocessing to your sound to clean it up before putting
it in the sampler. It's a little more involved than I'd like to get into with this class because our focus is on the quick and
fun way to do this. But the short version is this. You'd record your sound
into your audio track. You would apply any processing that you'd like to that track. You'd use GarageBand
share feature to export the track
to an audio file. And then you can
bring that file right back into GarageBand and actually just drag
and drop it right onto a track that has
the sampler loaded. If you've got any
audio background, you're going to find
that really easy to do. It's little bit convoluted
of a workflow, but it works. To me. It seems like if you wanna
go to that much trouble, you might as well bring up professional field
record with you. And I certainly do that
on plenty of occasions. So again, in this
class our focus is on the quick and fun way to
capture something when you, maybe you weren't expecting
Record anything at all. Alright, so now you
know how to record into GarageBand sampler, it's
pretty easy, right? A couple of things
for you to remember. One is make sure your
sound sources and completely blasting those
iPhone microphones. The little LED meter that you see in GarageBand,
simpler, unfortunately, is not going to
turn yellow or red as you hit the levels too hard. It's not going to
warn you at all. It is, however, going to limit the sound and that's going to suddenly degrade
the sound quality. So just make sure you're
not hitting it too hard. The second thing, and this
is a really good one if you can use headphones that don't have their
own built-in mic. That way you're hearing exactly what the
microphone is hearing, but you still have
the flexibility of positioning the
iPhone's microphone is where you need them. And you're coming from a much better perspective
to do so well. And you'll be able to
hear if you're getting anything like when
sounds and so forth, that you'd rather avoid.
6. Control Which Part of Your Recording Plays: Alright, so now
you've got a chunk of sound recorded
into your simpler. But how do you
control which part of that sound actually plays
when you hit the key? We're gonna find out
right now. Okay? So if you've been
following along, you now have at
least one sound that you've recorded into
the GarageBand sampler. Let's take a moment to define exactly what assembler
is and does. It's a type of instrument that contains at
least one recording. And then when you play
a key or hit a pad, that triggers that
recording to play. However, all samplers
let you define what portion of the
recording is going to play. If I double-click
the track header, I get the sampler interface. And then if I click the controls button at the upper right, I get the more
detailed controls. And here you see again
the sampling page. And you're recording something that you might have noticed when using the sampler
for the first time, is that it waits to start
recording until you make a noise over a
certain volume level. That is a feature you'll
see in a lot of samplers. And it's awesome that this
free software has it. So that is how I actually got this seemingly
perfect Recording of the metal ball
starts right when I strike the bowl and
then I stopped it. When it rang out sufficiently, it's really nothing
I would change. One of the things we always
want to see when building a sample instrument
is responsiveness. So when I hit the key, when I play the pad, you want that sound
to start from. Imagine how frustrating
it would be if you were trying
to play a part in. And of course you've got to
hit the rhythm correctly. Or maybe you're using a sampler for a sound effect
and a podcast. And you hit a button and
you want applause to start. And there's a lag between
when you hit the key and one, the applause sound starts. That's no good. So this kind of responsiveness, having this start point really
tight is very important. Let's take a look
at a little bit more complicated example,
the silverware drawer. So I'm going to tap the tracks key to get back out
to the tracks you. And I'm going to double-click my silverware drawer header, and then again tap
the Control button. So now you see a much more complex recording and a much longer recording. I did, I don't know, four or five different attempts at getting a sound that I like. And it wasn't until down here that I actually got
something that I liked. Let's take a listen. That last part to me. That's the money because I'm interested in using
this sound to layer with a snare and
genres like hip hop, trap of future base. So that last part would
work really, really well. How do we make it so that, that's the only part that plays
these handles right here. This defines the
sample start point. In this defines the
sample endpoint. So think of this entire thing
as being the recording. And the part that
you define with these two handles as being
the sample, start and end. Now when I hit a key
on the keyboard, only that portion of the
recording is going to play. Awesome. There's another thing
that I'm hearing that I don't like and I want
to fix by default, the sampler instrument comes
with some reverb on it. I don't want that
here. I want it to be nice and pure and flat. So let's look at how
you change that. Go up to the track
settings and scroll down. And you'll see that
under master effects, it's getting put through
the master reverb and that's what's making it sound like it's in a big space. Let's take that off. Come back out of track settings. Yeah, that's what I want. That's what I want. I might
use it up higher like that. Good stuff. Okay, great. While we're here, take a
look at the fact that you can also reverse it, which is really
cool, really fun. Not the effect that I want, but definitely experiment with that one because it's great. Now finally, let's take a look at a really extreme example, which is the tea strainer. Again, that's this little guy. You can see it doesn't
make a long noise. It's a very short click
like a finger snap. And in fact, I didn't
even use all of that. So if I hold down, it will zoom in for me
so I can be precise. And what you're seeing here is that I pulled in
the sample start, the absolute peak of
the start of the sound. So that tallest
part of the sound, That's the loudest
part of the sound. And similarly, if
I click and hold, tap and hold on the
sample and handle, you can see it's not very long. I could even that's even
a short is it lets me go. So it's very short. So playing it down a few
octaves to make it lower, making it super, super short. And then also using
some EQ right here in GarageBand for iPhone,
believe it or not. I get that kick drum sound
and it's pretty great. What I think I
really want to get across to you is that the how of these handles?
That's easy. That's the easy part. We can probably train
a German shepherd to put her paw on the
handle and move it. Okay. But it's why you use it, how you use it to really dig
in and get at the part of the sound that speaks to you and does what
you need it to do. So don't think of these as simple tools that
are actually really, really powerful for
shaping your sound. I think there are two really
important takeaways here. One is that you could record this and really just need this. The thing is, once
you only record this, you can't get any of that. So it's kinda like
getting your haircut. You can always cut it shorter, but you can't cut it longer. You might as well record
more than you need to make. Absolutely sure you get that
one little nugget of gold. Then the second thing is where you choose to
play back and for how long can have a huge bearing on what kind of instrument
you end up with. Like me turning the tea
strainer into a kick drum. So keep that in mind.
7. Make Your Sample Play Forever!: Now this one's
really interesting for pitched instruments. We might want to be
able to play a key and have it hold for a
long, long, long time. But our sample is
only this long. We want to sustain
for that long. What do we do? A new instrument from scratch that we haven't
already recorded? And at the same time showing you this ability to extend this out. Okay, I'm going to
sample my own voice. So the first thing
I'm gonna do is add a new sampler instrument. I'm going to go into
track settings, cruise downward, turn
down that reverb, get back out of track settings. I'm gonna go to the
recording page. Did my very best to maintain a stable volume and a stable pitch because
that will help us out. I can't sing forever, nor can my iPhone
record forever, right? It would run on storage. But I want to be on
the news this sound in chords that I
might hold for many, many measures, for example. So here's what we do. Turn on loop. This gives us a new set of
handles that we can use to define an internal
section that will repeat as a way of extending the sound for as
long as we hold down a key. What I'm gonna do
to help myself with this process and
something I recommend you do a lot when you're designing
sounds is just record a note so that I can hear
what I'm doing as I do it. I'm going to use the
song controls to shorten the length of this part. Right now it's eight bars. I'll just make it four. And now I'm going to record a note long enough
for me to share. Now, it's just playing. Alright, so that
took a little doing. But I was kinda the
point I wanted you to see how long I'm willing to spend getting something to work as
well as it possibly can. It's imperfect. And that's actually part
of what I like about it. Now I can play a
really long note or cord and hold for as long
as I want it to with this. And it'll just
keep going for me. At this point in your sampler, you really have
three definitions. It's redefined chunks of audio. One is your entire
recording into the simpler. The next is your
sample start and end. Where it's going to
start playing within that larger recording
when you press a key and then where it
will eventually end. And then thirdly, which
we've just learned about, there's your loop
starting and then that determines where
it's going to loop. On and on and on, as
long as you hold the key down to create a
sustained sound. So just make sure you understand those three concepts as
distinguished from each other. And if you have any
questions at all, don't hesitate to get in touch.
8. Control Your Sample's Volume Over Time: In this video, we're
going to learn about amplitude envelopes
and how they help us control the volume
of our sound from the moment we play to
the moment we release. That can make the
difference between feeding in or coming right in and also fading out gradually versus cutting off abruptly.
Let's check it out. Amplitude envelopes
are really cool way to take a sound and sculpt it so that it behaves differently than the
original recording did, if that's what you
need it to do. Right now we're looking at my metal bowl sample and you can see that it is loud right at
the start and then fades, fades, fades, fades out. That is its natural
amplitude envelope. So how its volume
behaves over time. We can make changes
to that though, to turn it into something
pretty different. If I go to details, now I see some
additional controls. Just like our metal bowl
had a natural shape to it. We can impose one using the
amplitude envelope controls. Let's take a look
at these controls. The first is attack time. That controls how long it will take your
sound to fade up to full volume after you
strike the key or the pad. If you need your sound to feed in full this node to the right, if you want it to
come in immediately, keep it all the way to the left. The second node is decay time. This sets how long it takes
your sound to fade down from its full strength
to it sustaining level. Imagine a scent that comes in full and blossoms
and then backs off a little bit to sustain
in the background. You would control this using the decay time and
the sustain level, which we'll talk about next. Some sounds like a snare
drum can't sustain. So they would always have
a sustained level of 0 no matter what the
decay time was set to. Like we just learned, sustain level works hand-in-hand
with decay time. If you want your son to
sustain at its full strength, no matter how long you hold it, push this all the
way up to 100%. If you want it to back off a little bit after
reaching full strength, pull this down a little bit. 50%, 40 percent, even less. It all depends what you
need your son to do. Last we have release time. This one is the easiest to understand for a lot of people. This controls how long your
sound takes to die down to nothing after you
release the key or the pad. Where this especially
becomes fun is when you've got a
sound like me singing. Remember that fourth
one that we made? It's down here. And I'll open that up by double tapping and open
up the controls for you. As you can see, just looking
at it, it's very static, meaning it doesn't change over the course
of the recording. It just stays at
that same level. But we can use the amplitude
envelope to shape that. Let's tap details
and take a look. So right now we've got this. It's an immediate attack and just a little bit of a release. I could set the release
like this and with this perfectly 90
degree shape here. Now this sound is
going to be on, off. I play the note, it comes on at full
strength immediately. I release the note. It shuts off completely
immediately. Let's try it. Okay. Let's make the decay
really obvious now. It's going to take a
long time and it's going to fade to a lower volume. Once it reaches that
lower sustain level. It'll just stay there for as
long as I hold this note. Making sense so far. Okay, great. If I wanted this to act like a really smooth pad
where it enters, it fades in slowly,
fades out slowly. What would I do? I would
turn up the attack and the release and maybe set that about there
so it'll sustain it. What's that look like? 60%. So here we go. And I'll let go. Now. I'm going to turn it
into a pluck sound. I'm going to turn on crush
fans built-in arpeggiator, and just leave the
default settings. Now we have this,
which is really nice. And I used lashed to hold
onto those nodes for me. And I'm gonna go over to track settings and turn on some echo. Some pretty fun, right? Alright, so now you knew what
an amplitude envelope is. Remember amplitude
corresponds to loudness. Envelope is basically
behavior over time. So put that together and
you've got the behavior of our loudness over
the course of one node. Most importantly, why
do we care about this? Well, because it has a huge
impact on the character of our sound and corresponds
to what kind of parts we might use it
for. Musical production.
9. Record Yourself Playing Your Instrument!: In this video, you're
going to record yourself playing your
own custom instrument, right into GarageBand
so that you can share your wonders creation with
everyone else in the class. It's gonna be fun.
Let's get to it. It's time to record notes
using your custom instrument. Garageband makes it dead simple. First thing you wanna
do is set your tempo. If you've got a vibe in mind, you can go up here
to the gear icon, click that, and then tempo. And then you can just tap right here to set the tempo
you've got in mind. So here's taken,
something like that. Alright, I'm going to bump
that up a little bit. Alright, and then tap Done. The other thing I
wanted to do is make sure the
metronome is turned on so that I not only
get a counting 1234, so that I know when to start, but also it'll keep
ticking for me while I'm recording because I don't have anything else
in the project. I need some kind of timing
reference to play against so that I'm playing to the
beat from tracks to you. As soon as I hit record, GarageBand will automatically
display the keyboard for me because it knows I need to
play it in order to record. Okay. I hope I come up with
something interesting. I'll keep it simple. I just
tap Record and off we go. Alright, so my performance
wasn't perfect. It did have some
syncopations in there, but I want it to be perfect. Let's take a look. We go back to the tracks
view and then I click this. I can edit it. And what we see here is
called a piano roll view. It's named that because
of the old player pianos that we'd use
holes punched in paper. That was in a role. And a piano would interpret the holes punched
in the paper too. Pitches and durations to play. Here though, we've got each of these little bars representing
a note that I played. And if I pinch and
drag to zoom in, you can see that
there are grid lines representing
subdivisions of the beat and some of my notes or off. Now I could drag each one of these to the
correct position, but I'm going to make
GarageBand do the work for me. I go into track settings and then track settings
and quantisation. I see that quantisation
corrects my rhythms for me. I just need to tell it what kind of beat
I'm working with. Let's get playback going. That's it. Perfect. So I've even got a little
bit funky syncopation in there on purpose, but it's nailing it. Alright, so now
I've got back on. I'm going to stop anything. I'm going to keep
the metronome on. And I'm going to use my tea
strainer as my kick drum. And I think I'll just record
a simple kicked part. Let's see. Rewind and record. Back to track settings, track
settings, quantisation. And I'm going to do
straight eighth. Cool. I'm going to come back
out to my tracks view. I'm going to choose
my silverware drawer. And I'm gonna go ahead
and tell it that I want quantisation before
I even record. So every note that I
record now is going to be automatically routed to
the correct position. Stop and hit record. Actually want this
to be up higher. Okay, that's what I'm gonna do. Once and hit record. What do I have left now? My pool. I bet we
can do some fun with that. I like it. Okay. Your takeaways for this should be that it's just fun. You don't have to make a
full-scale production. All I'm asking you for, for this requirement in this
project is just to record a few notes that let everybody here how your
instrument turned out. But by all means, if
you want to create more of a beat or song,
something like that. Absolutely do that. Remember, you can
find that tempo controls under the gear icon. You've got all kinds of
controls in track settings. You can correct your
rhythms using quantisation, which is under track settings. And there's an undo
button that looks like a backward arrow that'll show up along the top of the
GarageBand interface. And you can tap that whenever
you need to undo something. It's your best friend. Have fun, and don't hesitate to get in touch if you've
got any questions. I'm happy to help you.
10. Share Your Creation!: In this lesson, I'm going
to walk you through the simple steps to exporting your recording to an
industry standard audio file so that all of
us can hear what you made. First, get yourself to
Garage bands file browser. If you're in a song, go to the upper-left corner, tap the triangle, and
then choose my songs. Then tap and hold on your song. In the menu that comes
up, choose Share. You'll have three choices. Choose song. For file format, choose
uncompressed AIFF. This will save your song in the industry
standard AIF format. And in fact, GarageBand
will save it at slightly better
than CD quality. Then tap share in the
upper-right corner. Next, tap open in. Your screen will show an
exporting song, progress bar. Tap, save to files, and choose a location
to save your song. Once it finishes, upload it
to your Skillshare project. I can't wait to
hear what you made. You now have all the
tools you need to complete the pieces for
your projects submission. If you have any
questions whatsoever, please don't hesitate
to get in touch. And even if your project is just stressing you a little
bit, get in touch. I will help you get back
on track and having fun.
 CK Barlow, Composer for Film/TV, Tech Instructor