Transcripts
1. Introduction and Welcome!: This is a list of setup steps for one of
my freelance tasks. And this is my Mac doing all of it for me
using keyboard Maestro. Maybe you've got complicated error prone workflows
that you have to get just right and some
just plain boring stuff that you'd rather not do at all. What if you could shove
all of that stuff off your own to do list
and onto your mac, You can without programming
using keyboard Maestro. Hey, I'm CK. And if you make a
living with your mac, you should be using
keyboard Mastro to help with everything
I just described. Maybe you've never
even heard of it. But compared to Apple's own
automation tool shortcuts, keyboard Mastro is
actually easier to learn, especially for non programmers. Imagine being able to hit
one keystro to kick off a complex multi step workflow in the software you use most. Imagine getting more done in less time and
with less stress. And the bonus, It turns out it's really fun to take
control of your mac. We'll get up and
running by building our first macro
together right away. Then we'll step back for a tour of the keyboard
Maestro interface. Then we'll build
our second macro, which can double as your
class project. Easy. Each lesson after that will add another feature to that
second macro to show you even more possibilities and we demonstrate a bunch of tips and best practices
along the way. All you need for this class is your Mac and keywork Maestro. You can get a free
trial or purchase it using the links I've provided in the
class description. For me, it's been the best $36 I've ever spent
on my business. All right, let's get started. I can't wait to show you what
you can do with your Mac.
2. Our Simple, Customizable Class Project: For your project, I'm giving you two choices and you can choose the one that you
think will be most useful to you in your
day-to-day work. Project Option 1 is
the one that we'll build as an example
together in our lessons. It's a macro that
opens two applications that you use the most in
your typical work sessions, or say your planning sessions that you use to
start each workday. For example, maybe you use Apple Calendar and Reminders together to plan your
day every morning. Or maybe you spend most of your day in Adobe
Creative Suite and Behance.net or like me maybe
in Logic Pro and ADSR. Just make a macro that launches the apps or sites that you need. The second option, you
can roll your own. If you don't feel like the first option would
be useful to you, feel free to come up with your own idea and
then run it by me, and we'll figure out if it's
going to be doable for you. To turn in your project, first, create a project: Go to our class and go to
Projects and Resources, and click the big green
"Create Project" button. Upload either an
image of your macro or a link to a shared video
of your macro running. To make an image of your macro, single-click any of the actions and then type Command
A to select all. Then just choose
Edit, Copy as Image. This puts a picture of your
whole macro on the clipboard. You can then paste right into
your project description. [MUSIC] To make a screen
capture of your macro running, use the standard Mac commands according to your Mac
model and OS version. Then just below the project description field
of your project, find the Add More
Content section, and click the "Video" button. You'll be prompted
to provide a link to your video hosted elsewhere, for example, YouTube or Vimeo. Remember, if you
want to do Option 1, we'll be doing that together as part of the lessons in
this class. [MUSIC]
3. Let's Build Your First Macro!: I want us to have
some fun right away. We're going to dive in and
make our first automation, which is called a macro
in Keyboard Maestro. But I'll be with
you every step of the way and in the
next two lessons, we'll take a closer look
at the whole interface. If you haven't downloaded
Keyboard Maestro yet, please take a moment
to do so now. I've provided links for the free trial and the purchase
in our class description. Go get it. You ready? Let's do it. We're
going to create a Macro that lets
you type a key combo like Command-Control something to open your most
used application. Let's just say that I
want to launch Pages, Apple's Word Processor,
using a key combo. In Keyboard Maestro, look
at the leftmost panel. It's labeled Groups, and come down here and make sure that Global Macro Group is selected. If it's not just
single-click it. When you select a category here, that determines which macros are going to be
displayed over here. It also means that any
new macros we create right now by default are
going to be in this group. We'll talk about why that
matters a little bit later. Next, we can create
our new macro by either typing
Command-n as in New, or we can come down here
and click this + button. I'm going to type Command-n and there's my new,
Untitled Macro. Cool. You see that
its name is already highlighted and ready for
you to type in a new name, so let's call it Launch Pages. Definitely want to name your
macros something meaningful. Always. That's what we would call a Best Practice for sure. Now, let's make our
macro do something. Here's a fundamental for you. Every macro you create is going to have at
least one trigger to kick it off and then it's going to have
at least one action, which is the thing or things that the macro
will do for you. In this case, our
trigger is going to be a key combo or a
keyboard shortcut. In Keyboard Maestro that
is called a hotkey. If we cruise up here
to New Trigger, which has the green + sign, we tap it and we see Hot Key
Trigger as the first option. It's probably the one
people use the most, but there are lots of very sophisticated
options listed here too. Let's just choose
Hot Key Trigger and then you see
that it now says this hot key will execute
the following actions. Because it's highlighted,
it's ready for us to just type the keyboard combo
that we would like to use. I'm going to choose something kind of extreme just to make sure
that it's not already in use. Command Option
Shift P for pages. Now that I've typed in
my desired hot key, this is no longer highlighted, but if you want to come back and change this
any point later, simply single-click it
and it'll highlight again and you can type any other
alternative that you'd like. Next, we need some actions. We need to tell this
macro what to do for us. Right now it says No Action because there
aren't any actions. You can just tap that, single-click it and you'll
see that a new pane comes up. It's labeled Actions and these are all the possible
actions that Keyboard Maestro
gives us, and it's really exhaustive
and really awesome. There's so much power in
this list right here. You can see we have the
All Actions category selected and if I
come over here, it just so happens because these are
sorted alphabetically, that the very first one
is the one we want, Activate a Specific Application. I can grab it and
drag and drop it. I could double-click it, or I could highlight
it and press "Return". All three ways work
and here it is. Now typing this hot key is going to execute
these actions. There's just one:
Activate Finder. That's just what it defaults to but you can see it gives
us a little menu here to choose which app we
want and in the top, it lists all the apps
that are currently open to make it easy for
you to choose one of those. Next, it lists recently used
applications and then More will actually list every
application on your system. If I choose that, I'll see that they're sorted alphabetically and
I can cruise down here and just click "Pages" and not only
does it fill it in, it renames this specific
action now so that it says Activate Pages and it updates the icon to the
standard Pages icon. That's pretty cool. It's
the moment of truth. If I type this keyboard
combo pages should launch, so what have I got here? Option-Shift-Command-P. Boom - we are in Pages
that fast. Pretty cool. Obviously this is a very simple macro but even this can be
super useful compared to, say, going like that. One keystroke versus 5, 6, 7. Great, there we are. YAY! Before we
wrap up this lesson, let's take a little
bit closer look at the other options in the Activate a Specific
Application action. First, we see the All
windows checkbox. That's pretty straightforward. If I've got multiple
windows open in Pages, they're all going
to become visible and the one that was currently focused will come to the front. If this is unchecked though, just that one that was focused
will come to the front, reopen initial windows
really ought to be called Restore minimized windows because that's what it does. If already at front, this one's pretty interesting. It defaults to leave
it at the front. In other words, I've
asked you to activate Pages if it's already at the
front, I'm cool with that. However, it gives you
three other options, each of which is a variation on "Get rid of it" instead,
a toggle possibility. This one will switch to the last application
that you had in front. This one will hide Pages and this one will
actually quit Pages. Your key command now
becomes more like a toggle, a smart or specific version of command-tabbing
between applications. There you go. We have
really quickly and easily made a macro that launches Pages for us with just a quick
keystroke, pretty cool. There's so much more
that you can do with Keyboard Maestro
though, so stay tuned. Now we're going to review what
we covered in this lesson. Now you know how to
create a new macro. Rename your macro to
something meaningful. Assign a hotkey
trigger to fire off your macro and add
actions to a macro. Those are the absolute
fundamentals that you'll use every time you
build a new macro. Along the way, you also
learned some specifics about the layout of the main Keyboard
Maestro window, hotkeys, also known as
keyboard shortcuts, as triggers, and the action called Activate a
Specific Application. Now it's your turn during a
typical workday at your Mac, just make a note of anything you find that
you do frequently, whether it's opening a
particular application or doing a particular task. Make a note of it and
share what you find out with the rest
of us. Here's how. In our class, click the
"Projects & Resources" tab, then click the green
"Create Project" button and then just
comment in your project.
4. Interface Pt. 1 - Super-Powerful Groups: Now that you've made
your first macro, let's take a step
back and look at the Keyboard Maestro interface
a little more closely. It might not be very pretty, but it is pretty
ding-dang powerful. We're going to split our
tour into two parts. In this lesson, we'll focus on the surprisingly powerful
Macro Groups column. Let's take a look. Here we are again in Keyboard Maestro's main
window called the Editor. It's organized so that you start with more general information on the left and you get more specific as you go to the right. The leftmost column
contains your macro groups. These are groups
of related macros. At their simplest,
you can think of them like folders for
organizing your macros. But they can do
something much more important and more
helpful and powerful, which is to control
when the macros in the group are actually
available to use. Let's look at the group we
used in the first lesson, the global macro group. It's right here. I'll click it and check out these settings. This says it's available
in all applications, in all windows, and
it's always activated. Global macro group is
the one to use when you need a macro to be
available anywhere, everywhere, all the time. For contrast, let's look
at my Logic Pro group. All of these macros
are only available when I'm actively
using Logic Pro. I could go further and specify that a certain
window has to be focused, or that a certain window
must not be focused. Otherwise, these macros
won't be available. I could also configure
it so that when I launch Logic, Keyboard Maestro pops open a small floating
window called a pallet, containing a clickable list
of all of these macros. Finally, I could make it
display in the menu bar, which is this guy right here. Now that I've got this
configured to show a palette and display
it in the menu bar, let's launch Logic
and see what happens. Now we're seeing a
floating palette - this is what we're
talking about when we say a floating palette - with all of these macros
available, clickable. There is now a Logic
Pro group sub-header in the Keyboard Maestro
Status menu with several of my
commands there. Then the moment I
switch out of Logic, both of those go
away. Pretty cool. By combining these features, you could create a bunch of custom shortcuts for your
favorite app and then make Keyboard Maestro display all of those shortcuts in
a floating window whenever you run that app. Really, really powerful. To show another
example, in this case, it's available in
these applications, which means both of
these, either of them. As long as I'm running either
Safari or Chrome and I have a window focused
with this phrase in the title, I'm good. By contrast, here we've got one that's okay for
all applications. But it cannot have a focused window with
either "Song Titles and Album Descriptions, or
"Descriptions" in the title bar. It gets really specific. To wrap up this lesson, let's take a look at
the toolbar buttons specific to the
macro groups column. From the left, we've got
Add a Smart Macro Group, Add a group, Delete a group, and Enable or Disable group. All of those are pretty
self-explanatory, with the exception of
Smart Macro Group. These are a lot like smart
folders in the Mac Finder, which are basically
saved searches. Instead of putting macros
in this group manually, you use search
criteria to specify the types of macros
you'd like included. This results in a
self-updating container for all macros related
in some particular way. As an example, I have a
client called Golden Rule. Every time I create a
macro for my work for him, I make sure to include space hyphen space GR in
the macro's name. That way it shows up automatically in this
Smart Macro Group. You can tell where a macro
actually lives in terms of its normal macro
group by selecting it and looking in the
upper right corner. The search criteria rules, and all the different
possibilities, are spelled out in great detail in the
Keyboard Maestro manual, so I won't go into that here. The main things for you to know are they behave just like Mac smart folders and they
don't give you the boundary features that we saw
in the normal Macro Groups. That's it. [APPLAUSE] Let's summarize what we've
covered in this lesson. Now you have a good
feel for why we care so much about Macro Groups. They go way beyond
a simple folder. They allow you to restrict
when macros are available, not just to a certain app, but even a certain window. Plus, they allow you to
display your commands in a floating window or in the Keyboard Maestro status
menu. Now it's your turn. Think back on the first
macro we created, which launched an application
using a hotkey command. Would it make sense for that macro to be restricted
to certain contexts? There's no right answer. It completely depends on your situation. Just
give it some thought.
5. Interface Pt. 2 - Low-Key Awesome Tools: Now let's look at the
rest of the interface. In particular, there are several helpful
toolbar buttons along the top and bottom of
the Editor window, that can really speed
things up for you as you're building and
editing your Macros. Let's look at the rest
of the interface. As I mentioned in
earlier lesson, things go from general
to more specific as we move from the left side to the right side
of the interface, like column view
in the Mac Finder. We've already looked at the
first column, Macro groups. Our next column to
the right is Macros. It's pretty obvious that this
lists all of your Macros. The main thing to
remember though, is if you don't see a Macro that you're expecting to
see listed here, start by checking your selection in the Macro groups list, because of course, that will affect who gets
listed over here. Secondly, be sure to check the search field up
here in the right. If you've got
anything typed here, that will filter in
your Macros list. Just be sure to ex that out, and if you like, go to all Macros and then
look for your Macro. Much like the Macro
groups column, the Macros column has buttons at the bottom
for important actions. We already know about
this one for Add Macro. This will delete
the selected Macro, and this will enable or
disable the selected Macro. You could have Macros
that you're not currently using, I
have some of those. I don't want to delete them
so I've just disabled them. Now, let's talk about
this from a higher level. At the top center, you'll see some really
powerful and useful buttons. The Share button shows the
standard Mac share sheet. It even includes an entry for
the Keyboard Maestro Forum, which is the discussion board, and that is a really
helpful group of folks. If you're working on something, you can use this service to send your Macros straight to the
forum and ask questions. Used is really helpful, it shows the most
recently used Macros. This is amazing when you've
just used a Macro and decided that you
want to add to it or tweak something
about the way it works. If you click and hold, you see a list and you can go to any of them and choose them. History is similar, but it shows the Macros you've
viewed most recently. The tool-tip says that it
shows edited most recently, but my experience is a
little bit different. The same goes here
for a long click. Modified, as you might expect, shows the Macros you've
edited most recently. Clicking it again returns
you to your previous view, and it has the same long click feature as
the other buttons. Run, will run whichever Macro you're
currently looking at. Now, let's check out
the buttons down here. Try is run in that
it runs something. However, it's super useful because it only runs
the selected actions. Say this Macro has a couple main segments and I
only need to test this one. I can hit ''Try'', and it will only run this
portion of my Macro. Then finally, record. We're going to look at this
further in a later lesson. It actually records your actions and that gives you
a starting point for building a new Macro. You can then look it
over to see how your own on-screen actions translate
into Keyboard Maestro actions. I think this is so important that I'm going to
devote a lesson to it, showing you how it works and
having you practice with it. In my experience,
these two Try and Record are the most useful
of these lower buttons. The single most important thing to remember from this lesson is that the Macros list is always
filtered by two things. The search field in the
upper right corner of the Editor window and the currently selected Macro
group over on the left. If one of your Macros seems
to go missing, don't panic. Just clear the search field, choose All Macros
and look again. A close runner-up for the
most important takeaway, don't sleep on the toolbars. Up top, you've got the Used, History, Modified,
and Run buttons. These are great navigation
and testing shortcuts. Down at the bottom, you've
got the Try button, which is super useful for running only the
selected actions. Remember that try is also
available in the gear menu of most actions and by right-clicking
a compatible action. Clearly no rocket
science involved, but these buttons
are super useful, so don't sleep on them.
6. Our 2nd Macro - Simplest Possible Class Project: Now that you've got a
feel for the interface, we're going to build
another Macro. This one is actually going to be the simplest possible version
of our class project. You'll want to be
sure to follow along. This Macro is going
to start simply, but in each lesson
after this one, we're going to add
on new features, so by the end we'll have
a pretty cool setup. As we work, we'll
look not only at the specific actions needed to make our Macro
work the way we want, but also the fundamentals, the why behind each step in each decision and also the best practices that I
recommend along the way. Let's get to it. You remember that when we're
creating a new Macro, the first thing we
want to do is choose the Macro group where
we want it to live. For our purposes,
let's stick with the global Macro group, just single click
it to select it. Next we're going to
type Command N to create a new Macro, there it is. Our new Macro is right here
with its name highlighted, so I'm going to type planning
setup and in return, this Macro is going to open the combination of apps
that I use to plan my day. As I said earlier, this is a great example
for you to work from when making your
project for the class. Now we need a trigger, I'm going to use a
hot key trigger, so I click the green
new trigger button and choose hot key trigger. With the hotkey
field highlighted, I press the key
combo that I'd like to use to trigger this Macro. I'm going to use Command,
Option Control Y. Because when I'm
planning my day, I'd like to consider
why I'm doing each task on my list
before I add it to my day. Typing the Y just creates
a little reminder for me. I'm using Command Option Control because it's extreme and so it's unlikely to already
be assigned in any application I might be using when I issue this command. I tend to use that modifier for overarching global commands like this one that's going to
start my day every day. Now it's time to
add some actions. The first thing I want to
do in this Macro is launch my planning project in the app that I use
for that thing, which is called Curio. It's made by a company
called Zengobi, and I've been using it
for years, it's awesome. I'm going to single click this no action field to
display the actions pane. Notice that the actions pane has its own search field and if the Actions pane
is currently focused, meaning it's the active
window in the interface, I can type Command F, which is the standard
Mac shortcut for Find and my cursor jumps right
up into that Find field. Something I want to
point out here is that Keyboard Maestro gives you a really useful search results. We know that we want to open a file and without
even knowing the name of the specific action that we need to do that
in Keyboard Maestro, we can just type file
and see what shows up , and it filters. I didn't need to hit Return
or anything like that. Look at all these possibilities, here, open a file
folder or application. That's the one we want. With that highlighted,
I can just hit Return and it pops right
up over in my Macro. We just need to tell it
what file we want to open. Keyboard Maestro
makes this easy by providing this little
purple Browse button. If I click that, it opens the standard Mac
OS open dialogue where we can go
and find our file. I'm going to just use
search and go to Curio. The name of the file I use is
GTD home, and there it is. I make sure that this is the main file as
opposed to the backup, and open and there it is. Now we've got our Macro setup to open my planning project. Notice that there's
a stepper menu here that currently says
default application. If you're opening a file
that isn't specific to a particular apps
such as a TXT, RTF, PDF, etc, you probably want to use this to specify your
preferred application. I pretty much always do
this just to be thorough. I'm going to do that
now. There we go. So now I've told Keyboard
Maestro I wanted to open this specific file and I want
it to use Curio to do that. Just like we saw in
our first Macro, this little menu is great because it gives
us anything that's currently open and
anything we recently used. Then if we need the list of
every application on our Mac. That's everything
we need to do here. There are a couple
of other options worth noticing though. Over on the right, check
out this gear icon. If I click on that, I see
a bunch of helper commands that I can use to configure exactly how this
is going to work, to try things out, to temporarily disable it. Notice that there's a
command called Try Action. This is just like the
try button that we learned about down here. It will run only the
selected actions rather than running
your whole Macro, which is what this button does. That's great for checking
just one or a handful of actions to make
sure they're doing exactly what you expect. You'll also see
an option here to rename the selected action. This can be really helpful
just for making your Macro as easy to review and
understand as possible. This action is a great
example because look at this, open Tilde documents Curio
GTD blah, blah, blah. Maybe I rename it to something
more plain language, like open my curio
planning projects. Boom, much easier. Then there are two
more choices that I'd like to point out right now. Failure Aborts Macro
and Notify on Failure. This first one, it
sounds pretty intense, Failure Aborts Macro dev con 5, but it means exactly
what it says. If this action fails, stop the whole Macro. Let's think about this though, because this is
really significant. If every action coming
after this one is dependent on this one
having worked, for example, I'm going into a Word processing document
and I've got a bunch of automated edits like copies
and pastes and deletes. The last thing I would want
is for this to not work and whatever document
happens to be sitting in the background gets all these destructive
actions performed on it. If that's our
scenario, then yes, we probably do want the Macro to stop if this specific
action fails. But in this case, we're simply opening one file
and then another. I think I'd like the Macro to continue rather than to stop. But I would like Keyboard
Maestro to let me know what happened and
that's what this one does. It does exactly what it says, Notify on Failure, so let me know if
this guy fails. Cool. For this Macro, to me, it makes sense to turn this one off and leave this
one turned on. So I selected it to uncheck it. If I wanted to check it again, I would just select it
again, and there we go. Onward. Now, to plan my work for the day I need to also
reference my calendar. We already know about activate application because
that's what we used in our very first
macro to launch pages. If I happen to use Apple
Calendar then that's an app that I can open using
exactly that same action. I would add, activate a
specific application, and then I would set it
to activate calendar. But I use Google Calendar, and that gives us a
chance to check out a new action to open
a specific webpage. I'm even going to
show you a new way to find and add an action. There's a great
keyboard shortcut that I would like you to get used to using when you're ready to add an action to your macro, it's Command Control A. What this is is insert
action by name. But the way it looks, it's a whole lot like Spotlight, which is the macOS find utility. Just like I showed you in the Actions pane,
when searching, we don't need to know the specific name of the
action that we need, which makes Keyboard
Maestro really great for learning
and for beginners. I just know that I want
to open a webpage, so I'm just going to type web and see what we get.
Well, there we go. Open a URL, get a URL, remote trigger, and
search the web. Clearly, this is
the one we want, so I'm just going
to double-click it, and boom, it gets
added to my macro. Now, this looks really
similar to our first action, there are a few
differences though. First, instead of a file
here we need a URL. It defaults to the
Keyboard Maestro website, which is cute, but
that's not what we want. What I'll do is open Safari
and go to my calendar. I'll set it to the view that
I like when I'm planning, which is to see my
day but to see it in context of my whole week, busy. As you might know, if
you use Google Calendar, there can be the day view, the week view, the month view, the next four days view, and the agenda or schedule view. I like to be here, and so that's the one
I'm going to grab. We come over here, this is already highlighted, so I just paste and there we go. Now again, default application, I am going to go ahead and specify that I want
it to use Safari. Again, just like with this guy, we see that the
name of the action is descriptive at a high level, but it would be great if
we went ahead and said, open my Google Calendar. Let's do that. This time
I'm going to Control, click on it and choose "Rename", and say, open my Google
Calendar in Safari. One last thing about
the open URL action, before we go ahead and
test our new macro, did you notice anything about the gear icon over on the right? It's got clock
hands and it's also yellow to really stand out. These clock hands
let us know that this action includes
a timeout setting, meaning we can set how long
Keyboard Maestro will keep trying to load this URL
before it just gives up. Further, we have two more timeout-related
options here in this menu. Similar to what we
saw for failure, if the page doesn't load, do we abort the macro or no? If the page doesn't load, do I want to be notified with
a little onscreen message? Based on the new timeout
options that you see here, plus the failure options that you're already
familiar with, how would you set these
options for our example macro? We're back. Your
decision might be different from mine, but for me, it makes a lot of sense
that failure aborts macro doesn't really do
much because right now, anyway, this is the last
action in our macro, so it doesn't really matter. But if it weren't, I would only turn this on if
the actions after this one would make a mess if the calendar
URL didn't open. What about notify on failure? Yes, I'd want to know about it. Then timeout aborts macro, it's the same as this one. I don't really see
the need for that, so I'm going to turn it off and then notify on timeout, yes. I would like to know if
my calendar didn't open. We now have a macro
that will open my curio planning
project and will open my Google
Calendar in Safari. To run it instead of
hitting the hotkey, I'm going to use our Run button. Pop. There we go. Here's my calendar,
and here's curio. Let's take a look
at what we learned. Well, that was a big one. Now you know how to
open a specific file, indicate which application
Keyboard Maestro should use for any action
that requires one, open a specific web address, easily identify
whether an action includes a timeout setting, and set action
failure and timeout options in ways that makes
sense for your needs. Along the way, you also learned some great tips and
best practices. One of my favorites is
that even if you're new to Keyboard Maestro
and you don't know what any of the
actions are called, you can use Insert
Action by name or Command Control A to bring up a search bar and just type something related to
what you want to do. I know that the
failure and timeout options probably seemed a little funky when we
first looked at them, but they are really
powerful and helpful, so don't sleep on those. If you insert an action
in your macro and the name it ends up with
doesn't really say much to you, take a moment to rename it to something that will
mean something to you, and six months or a year, you will thank yourself later. Finally, when you're assigning a hotkey combo to a macro, stop and think about the
context in which you'll use it. That will help you narrow down the available key
commands that you can use for it and try to
make it something memorable. Now it's your turn. Just like we did in this lesson, pick a couple of apps
that you often used together and create
a simple macro that launches the two
of them together. You can do exactly what
we did in this lesson, and then just substitute in the names of the
apps that you need. Then click one of the
actions to select it, and then type Command A
to select all of them, and use the copy as
image command to put a picture of your macro
on your Mac clipboard. Then simply head
over to our class, open your project, and paste
in the image, all set. Always feel free to
contact me with questions. It's my job to help you succeed, and I'm happy to do it.
7. Using WiFi as a Trigger: To me, one of the coolest things about Keyboard Maestro is this huge variety of triggers
that you have available, so just events that can make your macro run
for you automatically. One of those is
Wi-Fi connection. This means, for example, we can make our planning setup run as soon as we connect
to our office Wi-Fi, or maybe the Wi-Fi at our
favorite coffee shop. That's pretty cool. Let's
check it out. Here we are. I'm going to use the
history dropdown to return to our planning setup. Great. In our macro, we've already got our
hot key triggers setup. But, we can add another trigger without
effecting this one. We're going to click
the green plus button. You can take a
look through here, and see all the
different ways that you could trigger
a macro to run. Like you change your audio from headphones to your MacBook
speakers, for example. But if we come all
the way down here, wireless network trigger,
we'll choose that. Great. Now, we've
got some options for setting this up to trigger
exactly the way we'd like it. First off, it looks
as if we need to tell Keyboard Maestro the
name of the network. But, I've got a
great tip for you. If you connect a network while the name field of
this action is highlighted, Keyboard Maestro will fill the name of the
network in for you. So that my macro doesn't launch while I'm trying to
demonstrate this, I'm going to disable my
macro by clicking here. Now the macro is disabled, but this field is
still highlighted. I'm going to go up
and just change to some other random network. Great. You see that
it fills it in for me just by virtue
of me selecting it. Let's see what happens here. I turned off Wi-Fi, and it changed this
to disconnected. Because I've got this selected, Keyboard Maestro is watching
my actions relative to Wi-Fi connection and setting these to match what I'm doing, I'll go connect it to
my normal home network. There we go. Great.
That's really about all there is to it. You can read about these other options in the
Keyboard Maestro help, but you've got the
main idea now, whenever I connect
to this network, this macro will run. Pretty cool. Now, you know how to make
a macro run for you automatically
whenever you connect to a certain Wi-Fi network. Along the way, we also
looked at a helpful tip, which is that if you have
the name field selected and either connect or disconnect to a particular network, Keyboard Maestro
will actually fill in the name of the
network for you. Easy-peasy. Alright, now it's
your turn to try it out. Go back to the macro you made
for the previous lesson, and add a Wi-Fi trigger to it. Get it setup, and then
take a screenshot of the Wi-Fi trigger
portion of your macro, and paste it into
your project so we can all see it. Cool.
8. Giving Our Macro Options With If, Then, Else: To get ready for
this next lesson, let's imagine something. You're planning your weekend
and you say to yourself, well, on Saturday, if it's super nice out, I'm going to go for a
run and then maybe I'll grab a smoothie and go sit
at the park to drink it. But if it's gross out, to make the best of it, I'll go to the gym and then maybe I'll go to
the Matinee movie. So you just evaluated a
condition, the weather, and decided on one set
of actions for if it's sunny and a different set
of actions for if it's not. That's what we call an if, then, else or a conditional operation. Keyboard Maestro can do
that same thing for you and it's one of the
most powerful actions you can learn how to use. We're going to use
it in this lesson. Also in this lesson, we'll learn how to choose
a menu command and how to evaluate the status of a menu command.
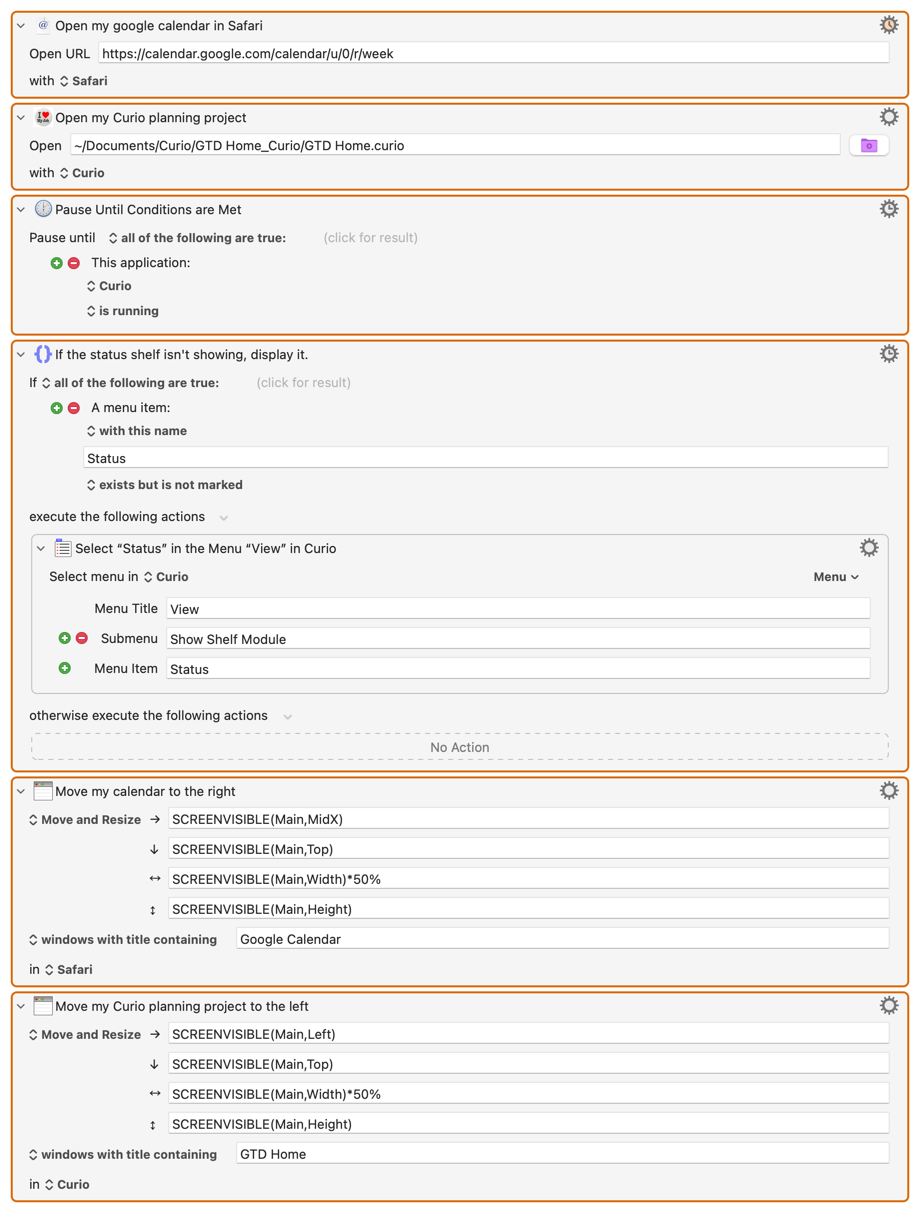
Let's check it out. Here we are in Curio, this is the software
I use for planning. And you'll notice this
panel over on the right, this is a really powerful
panel that shows all of my upcoming tasks across all
of my different projects. It's called the Status
shelf and I'd like the Status shelf to always display whenever I launch
my planning setup, then it's pretty obvious why because it shows me
everything I have to do. So you probably already know
that in the typical Mac app, the View menu is
going to give us access to the app's various
panes and panels and windows. So let's see if
that's the case here. View, it's called
the Status shelf, so I see shelf and show shelf module and sure
enough, there it is. In fact because it's the
one currently displayed, it's got this
checkmark next to it, so it's marked with a checkmark. Great. So over in
Keyboard Maestro, let's use this information. First off, let's click our last action so that anything we add comes
after that guy. Now, we'd know that we want
to do something with a menu. I don't know what that action is called off the top of my head, but let's just use our friend Command Control A and we'll
just type the word menu. Select or show a
menu item and pop, hit Return to add it to
the end of my macro. You'll see that this defaults
to the front application, but it's always a good idea to specify which app you
want it to work in. So if I click on this, you'll see this similar
structure where all of the currently
open apps are here, and then recent ones and then everything
you've got installed. So because I'm running Curio, I can just choose it here. I also need to specify the exact menu title and item name if I want
this to work correctly. But here's a great tip for you. Over to the right, there is a menu
Menu and it lists the entire menuing structure of everything you
currently have running, and so there is your tip. If you're going
to use show Menu, go ahead and launch the app that you want to use
it in and that way, Keyboard Maestro will lay out the menus for you
and in our case, we can simply choose Curio, View, Show Shelf
Module, and Status. Curio fills it in for us
exactly the way we need it. Awesome. So I'm going to pull this down out of
the way so that we can see what happens
or better yet, maybe I'll hit Command K to
open the Actions and return. I've just added the
Activate application and I'm going to
switch to Curio, but I want that to happen first. Just for demonstration purposes, we're going to activate
Curio so that we can see what happens when
we try this action. But I need it to come
before that menu commands, so I just drag it and drop it. Boom. Great. So now I'm going
to Shift click on that so both of these guys are now selected and
right-click and choose, Try 2 Actions and
see what happens. So did you see that
over on the right? The Status shelf was
already displayed and by choosing the menu command with it already displayed, we actually toggled it off and
closed the shelf entirely. Definitely not what we want. Well, you've probably
caught on by now that Keyboard Maestro is pretty
smart and sure enough, it gives us a very smart way
to deal with this thing. We can actually check on, peek at the status
of a menu item and then only issue the command if that's actually
what we need to do. So we're going to use a
very versatile action to do this called
if, then, else. You've maybe heard that phrase before if you're familiar with any programming concepts or you have any programmers
in your life, but it's actually
pretty straightforward. It lets you check on the current situation of something and then
act accordingly. So for me, that goes
something like this. If there's pizza in the fridge, then I'm going to
eat that pizza. Otherwise, I guess I'll
eat something else. In our case here, the setup is that if the Status shelf isn't
already displayed, which would mean that
there's no checkmark next to it in the menu, then we want to choose the
command to display it. But if it's already checkmarked, then we don't want
to do anything. It's just that simple. So let's add it to our macro. We'll bring up that search bar again with Command Control A, and just type the word
if, and there it is. Boom. So the way we're going
to set this up is if the Status shelf menu item
doesn't have a checkmark, we want to choose the command. Otherwise, we don't
want to do anything. So let's see what
conditions we have available that would work
for checking on that menu. Buttons, calculations,
what's on the clipboard? Can you find an
image on the screen? So many different options, but here's our guy right
here, menu condition. Now, it defaults to
saying a menu item with this name, copy is enabled. We know that we want the
menu item called status. Exactly. So I'm just
actually going to copy and paste it to make sure I
get it exactly right. Always a good idea, especially
if it's a complex name. Great. So we've got our
menu name in there, but is enabled actually
what we want to check on? Enabled means more is it available to choose
versus being grayed out? And that's not what we want. Let's see if there's something
that fits our situation better is marked, is not marked. Wait, exists, but is not marked. I think that's our
winner because yes, it exists, but it doesn't
have a checkmark by it. That's exactly what we want. So now all that's
left is to say, here's what we want you to do. If that item is showing up the menu but doesn't have a
checkmark next to it, what do we want you to do? And that's this guy. And because we saw
earlier in this lesson how to reposition
something in our macro, I'm just going to grab it and drop it right where
it says no action, you see it's
highlighted, and pow. So now, in effect, this says if there's a
menu item called status, but it doesn't have a check
mark by it, select it. If it does, don't do
anything, and that's it. Two whole actions, one that's nested inside the other and suddenly
our macro is smart enough to determine
whether this panel is already displayed and
if not, display it. Now, here's the thing, if, then, else is incredibly
powerful and versatile. Anytime you run into a fork in the road where you need to
go one way or the other, depending on some condition, this is your jam. Let me tell you if there is one technical or logical concept that it will pay off to
grasp, it is this one. You will find 1,000
ways to use if, then, else, no lie. So I strongly recommend
taking a few minutes to look through the
different conditions. All of these different
guys and then of course, consult the help by clicking the gear icon
and choosing Help and it'll take you directly to the Help page for this action. Makes sense? Awesome.
Now you know how to choose any menu item from any application
automatically, and how to check the status of a menu item
before choosing it. Use the if, then, else action whenever your macro comes to a fork in
the road and needs different options depending on the situation and rearrange
the order of actions. Along the way, you'll learn some great tips and
best practices. In particular, when
you're going to use a selector show
menu item action, be sure to launch the application in which you want to choose
the menu item. That way, Keyboard
Maestro will set up the entire menu structure
for you in the Options menu, making it super simple for you to choose exactly
the right phrase. It's time for you to try
this out in your own macro. If there's any window or pain or panel that you'd really like to show up in your macro setup, use what we've just learned in this lesson to set that
up in Keyboard Maestro.
9. Windows Where You Want Them: Now we've got our planning setup macro running like a champ, but let's take it
one step further. We can have Keyboard
Maestro arrange the windows for us
on screen so that we can view our
calendar on one side while working in our planning
software on the other side. Keyboard Maestro has built-in
window positioning actions, and we're going to
take advantage of those plus learn how they work. Window management is one of those seemingly small things
that can actually make a big difference in just the flow and
ease of your workday, especially if you switch
between projects a lot. It also makes it a great example
of having our Mac handle small stuff for us
so that we don't have to think about it.
Let's check it out. Great. Here we are again
in Keyboard Maestro. Once again, I'm going to
go to the modified menu and hold down and
choose Planning Setup. That's an easy way to find it. I'm actually going to
option-click one of these little disclosure
triangles to close all these up and get us a little
more visible space. I'm going to select
our last action so that the actions that
we add come afterward. Now I'm just going to hit our
friend Command Control A. We know that we want to do something with
a couple of windows. We need to resize them
and reposition them. I don't know what that
action is called. I know you've heard me say
this a dozen times by now, but I really want to
get it across that. This itself is a learning tool. I'm going to type window. There we go. Here's one
called Manipulate a Window. When you get this
little preview, it says "Minimize Front Window." Clearly, this is letting us do stuff to the size of the window. I'm going to hit
"Return." It gets added. We noticed that even
though this action was listed as Manipulate a Window, it came into our macro called
Minimize Front Window. What you'll find in Keyboard Maestro is that
a lot of actions have multiple specific abilities
bundled into a single action. You just configure them differently to get to
those different functions. This particular action
is a great example. Everything it does is related to moving or resizing windows. If we take a look here, there's not just minimize, there's scale size, resize by an amount, resize to a specific size, moved by and move
to, move and resize. In fact, you see presets for exactly what
we're going to want, left column and right column. Before we choose that though, let's get just a little bit technical to see how
window resizing works. This is probably the
closest we'll tiptoe up to the edge of proper
programming in this class, but don't worry, I'm going
to explain everything. Knowledge is power. It's way better
to understand how something works than
just accept it. I'm going to choose full screen to give us something
to work with here. Now, I'm going to shrink our window a little bit
so that we can try this and see the difference because this is just
acting on whatever happens to be the front window and whatever happens to
be the front application. That of course, is this
window in Keyboard Maestro. If I try this, it's going to affect the Keyboard
Maestro window. Pow. It resized it to fill
the whole visible screen. These settings, they
look a little funky, they look a little complicated, but I'm going to talk you
through what they mean. I'm actually going to use a little utility window from
Keyboard Maestro itself. This is the mouse
display window. This graphic
represents the screen and the front window
in the screen. You can pick which corner
these numbers are relative to. When you're repositioning
and or re-sizing a window, the top left corner
is your ticket. Watch what happens to these numbers when I move
to the top-left corner. That is our Ground 0. As I move to the right, the x value, the
horizontal value, goes higher and higher. As I move downward, the y value or vertical value
gets higher and higher. Once you understand, that these number of pairs represent horizontal
and vertical values related to the
position on screen and then also the width and height of the window
you're working with, everything makes
a lot more sense. Take a look at these
first two fields. This one points to the right, and this one points down. Use these arrows to
remind you this is how far we are to the right from the left
edge of the screen, and this is how far down. As an example, I'll put some
specific values in here. We'll give it an x value, a horizontal value of 200. That means it's going
to go 200 to the right. I'll put a 400 here, so it's going to go 400 down. Now if I try this,
watch what happens. Pow. It moved 200 to the
right and it moved 400 down. Notice that the size
didn't change at all. We didn't make any changes
to these two fields. We only change the position. Now, if I replace
these both with a zero and then try it, right back to where we started. We don't move any to the right and we don't
move any downward. I hope that's exactly
what you were expecting. Now that we have this part down, it's pretty easy to see what the next two
fields are going to do. This one doesn't just
point to the right, it points both directions
and that's width. This one doesn't
just point down, that points up and down. That's expressing the height. Something that I
haven't mentioned yet as it relates to the position on the screen is that when our window jumps to the
position we've indicated, it's actually its
top-left corner that ends up at that
x-y coordinate. When we used 200
and 400, roughly, it's the top-left to the
window that's actually sitting at the
coordinate 200, and 400. Makes sense? To the
right and down, really is the theme of the day. Now let's talk about these
two weird-looking guys here. These settings were
filled in for me because I chose the preset
of full-screen originally. But of course I
can edit them if I want to just like I
did the first two. Screenvisible is an example
of what we call a function. It's like a helper
that can go get information for us based on
guidelines that we specify. The techie way that
you say this is that we call the
screenvisible function and we give it
arguments like main and width to tell the
function what we want. Then the function returns information about
the visible screen. We use the info that
the function gives us back to position
and size our window. In fact, full screen,
if you think about it, really just means please make my window the same
size as the screen, whatever that happens to be. In this width field, we're saying, in effect, hey screenvisible take a look at the main screen and
tell me its width. Then this height
field, we're saying, hey screenvisible, go look at the main screen and
tell me its height. By doing that, we're getting the full width
value plunked into this field for us
and we're getting the full height value popped
into this field for us. These guys are in effect
acting as placeholders for the specific number that we need without us having to know
what that number is. This is a really smart
and flexible way to work compared to filling
in specific values. Now to see all of this
in action literally, let's finally configure
this action to put the calendar window on the
right half of the screen. I'm going to choose move
and resize and I'm just going to take the easy
way and say right column. Then I'm going to
do something else that's really important
and I want to put this to you as a
best practice to always do when you're
using Keyboard Maestro. I'm going to use these
two options to make sure Keyboard Maestro knows what window I'm talking about. This is going to be Safari. If I switch over to Safari, I can see that this window's name is always going to have this
phrase Google Calendar in it. I can count on that. I'm going to go back here and say not just the front window, but the window with the title containing and then I'm going
to type Google Calendar. Now at this point,
you can probably lead a walk-through of
what these settings mean. In all four, you see
that we're calling the screenvisible
function and it's returning the value
that we asked for using the different arguments
shown in the parentheses. That is the most
interesting because of course we want it to be on the right half of the screen. We get the value of the
midpoint of the screen and we use that as how far over to the right
our window should be. Pretty cool. Here, similar but we're dealing
with the width of the window. We ask screenvisible to
tell us the width of the whole screen and
then we multiply that by 50% to get
half of that width. Now that we've got this setup, we can just duplicate it. I'm going to hit "Command D"
and now we have another one. This one though, this is
going to be for Curio. I'm going to choose Curio here. Let's go see what the
title of it is, GTD Home. Using the same option, I can type in GTD Home and now I am guaranteed that this is the only window that it's
going to try to do this to. That's great. Now I
just need to set it. We want it to be on the
left and so I'll choose left column and you can
see how this change. This one didn't change at all because it's dealing with
the width of the window. One is on the right half, one's on the left half, but they're both half
as wide as the screen. That makes total sense. Then this one, it doesn't need to scoot it
over to the right at all. It just gets the left
value of the whole screen, which is going to be
zero and puts it there. I could blank this out and put zero if I wanted and
that would work. Make sense? Groovy. Now that we've got those both configured, I'm going to select
both of them. I'm actually going to just scoot this whole window down so that we can see it
happen ourselves. I'll go to the Actions window
and choose Try 2 Actions, pow, and there it is. Curio is over on the left and my calendar's
over on the right. Awesome. Simple as that. I realize it could have
been a lot more simple if I had just chosen the presets
and left it at that. But if I had done that, you wouldn't be armed now with the information
of how this actually works so that you could
take control of it even more if you'd
care to in the future. Awesome. Let's wrap it up. Now you know how to reposition
and resize a window. You know how to configure
the move and resize options. You learned about functions and how to use the
screenvisible function. You know how to duplicate
an action in your macro and you know how to reorder
actions within your macro. Along the way, you also learned some great tips
and fundamentals. One of those is that several Keyboard Maestro actions actually are multiple actions contained in one and
it's just a matter of configuring it to do the
thing that you have in mind. Another thing you learned
is that functions are like helpers that can go get
information for us. Finally, a really
important best practice, be as specific as you can when you're configuring
each of your actions. This will make your
macros much more reliable and stable
and consistent. Now it's your turn
to try it out. Go to your project macro and use move and resize to resize
a couple of the windows. It doesn't even matter if it turns out exactly the
way you want it to, I just want you to try it. When you've got it set up, copy as image to put a
picture of your macro on your clipboard and then paste it into your
project in our class. As always, feel free to
contact me with any questions. I'm always happy to help you.
10. Rocking That Record Button as a Learning Tool: As I was building this class, naturally, I thought
about my goals. I'd have to say one
of the biggest ones was to help you feel as empowered as I do by
do-it-yourself automation. Keyboard Maestro really makes
me feel like I'm in charge rather than just
a spectator with my own Mac, and that's huge. So I wanted to share
that with you. But if you get mad
about that idea, it means that I
should empower you to learn on your own without me. That's why we're going
to devote this lesson to one of the most
important learning tools, in my opinion, that's built into Keyboard
Maestro, the record button. We mentioned the
record button while touring the interface,
and in this lesson, we're going to demonstrate
it and also look at some effective and not-so-effective
ways to go about it. As part of demonstrating
the record button, we're also going to learn
about the comment action is just a simple action
that lets you type in some comments or
paste in an image, whether that's to outline, a new macro, and the way
you'd like it to work, or to document a completed
macro so that you understand how to use it and
maintain it years from now. Very, very useful. Let's take a look. Here we
are back in Keyboard Maestro. In the intro to this lesson, I talked about
comments as an action, they're just a utility action. They don't do anything, there's simply a
space for you to leave a comment to
explain maybe how your macro is
working or any other contexts that you might need
to edit it in the future, to use it in the future after
some time away from it. As a best practice that
might be of interest to you, when I started using
Keyboard Maestro, I would use just comment
actions one after another to create an outline of how I thought my macro
might end up working. It needs to do this, it needs to do that,
it needs to do that. Then as I've figured it out, I would just fill in the actions
in between the comments. Then I discovered the group
action whose sole purpose in life is to actually act as a container for a set
of related actions. This is another
great tool to use, the group action, as an outlining tool for setting up a new macro
and sketching out how you think it might work
because you can actually create your macro
right into your group actions. Enough about that degree, although I would call
it a best practice. What we're here to do
right now is to try out the record button as
both a utility for generating Keyboard
Maestro actions to do what you want them to
do but also as a great way to learn more about
actions that are available to you and things that Keyboard
Maestro can do for you. We want to start with a
brand new empty macro, I'm going to click
Global Macro Group and brand new Untitled Macro, I'm going to call it Add a comment because that's
what we're doing. Now, we mentioned the
record button briefly when we did the interface tour back in our first
couple of lessons. You might remember, it records whatever you do on the screen, your mouse clicks, your
menu actions, and so forth, and it generates, as best it can, the corresponding Keyboard
Maestro actions to replicate, to re-enact what you did. It's a great way to build
at least a framework of a new macro by just letting Keyboard Maestro watch you
and record what you do. But there are good approaches and not-so-good approaches, and we're going to
demonstrate that right now so that you can see
exactly what I mean. What we're going to
do, we're going to build a macro that adds a comment using a
hotkey trigger. I'm going to click record
and then we're going to use a very mouse-focused way
of setting up this macro. It's counted off for me
and now it's recording, I'm going to hit the Plus
button to add a new action, I'm going to go to the
All Actions category, I'm going to go to Comment, and I'm going to
double-click Comment, and then I'm going
to stop recording. Let's see what we got here. Oh, boy. Move and click the
mouse at this x, y location. Aren't you glad you know
that?Move and click the mouse, scroll, scroll, move
and click the mouse. There's our comment that
got added when we actually double-clicked this guy so
that it could be recorded. So that doesn't really count, I'll delete it, and
then move and click. Predominantly, move
and click actions. It's all correct, but is it good? No, not really. It's just moving
the mouse around on the screen with no particular
meaning behind it. There are a few reasons
that that is a problem. One, there's nothing here
that says which application to do it in or which window other than front
window here and there. It could be anything,
if I ran this with the wrong application focused
like Adobe Creative Suite, we'll have the mouse running around clicking
and making messes. In short, this macro would be super unreliable because
it's so general. Secondly, we don't like
that we can't really look at it and tell very
well what it's doing for us, and that makes this
macro harder to maintain and edit and
so forth in the future. We could figure it out, we could try each of these, and then I could rename it, and then I could try
this one and rename it, and try this one. So you get the idea, who wants to do that? I don't. We can do a ton better just by taking a little
bit different approach. We're going to try that.
This second time around, we're going to use the main menu instead of mousing around. First, before we do that, I'm going to just make
sure I'm focused here by clicking and then hit
Command+A to select all, right-click and
disable these guys so that they're still
there for reference, but they're not going to fire, they're not going
to do anything, and then I'll click
that one so that the recording gets
added after it. Cool. Now we're going
to hit Record again, and this time we're going
to use the main menu. If we look around, we see Insert Action. I don't even know
which of these it would be in front of,
maybe Keyboard Maestro. Yeah, comment. That's
what we're going to do. We're going to go
to the edit menu and we're going to
wrap down to that. Let's give it a shot and see if it gives us a better result. Count down. Here we go. Edit, Insert Action, Keyboard
Maestro, Comment. Bam, and we're done. We just got this
one move and click, which is getting us
up to the edit menu. We've got the comment
that resulted from actually choosing
the menu command, so that doesn't
even really count. Look at this guy, this beautiful, specific, clean instruction to choose specifically Keyboard Maestro, edit menu, sub, sub, and finally comment, and that's the only
thing we need. So we can get rid of
this, and that's it. This is a lot better
in several ways. It's much shorter, it's super obvious, we can tell exactly
what it's doing and where, and it's specific. It's only doing one thing and
it can only do that thing in Keyboard Maestro as opposed to any other
random front window. It's choosing a specific
menu command in a specific application
rather than clicking around in space. But both approaches were
beneficial because both showed you actions that you
didn't know about before, and that's likely to keep
happening when you use the record button for the first several months that
you use Keyboard Maestro, you might keep
finding new things. That's it. Let's review
what we covered. Now you know how to add
a comment to your macro, to describe how you want it to work or how it already works. How to use the record button to capture your onscreen
actions and convert them into Keyboard Maestro actions as a starting point for a new
macro or section of a macro. You learned how to try
different approaches when using the record button
and pick the best results. Along the way, we reinforced my very favorite best
practice: be specific. Be as specific as you can when choosing and configuring
the actions in your macro. This will make your macro way more stable and reliable
in the long run.
11. Thank you - and What's Next: [APPLAUSE] [MUSIC] Thank
you so much for being here. Your time is really valuable
that's why you're taking the class and I do
sincerely appreciate it. Here we are at the
last official lesson. I hope this class has
shown you how easy and fun it can be to make
your Mac work for you. I'll be continuing
these lessons with deeper dives into specific
actions and tools, including with Keyboard Maestro and that applied to
automation in general. Be sure to follow me to receive notifications about
those new classes. I want to reiterate some
super important things. First, feel free to contact
me with your questions. It's my job to help you succeed and it makes
me really happy to do. Secondly, your project can be as simple or as complex
as you'd like, but I really want to
see a project from you. Contact me with any questions. Again, I'm happy to
help. Have fun [MUSIC]
 CK Barlow, Composer for Film/TV, Tech Instructor