Transcripts
1. Welcome to the Class!: A great way to learn
any new tool or technique is to apply it to something that you
can actually use, especially if that
something is fun. That's definitely
my approach with this introduction
to Apple shortcuts. It's for anyone interested
in Apple shortcuts, especially if you've ever wondered what you
would use it for. You don't need any coding
experience at all. All you need is one of the
supported Apple devices, and you're ready to roll. Hey, I'm CK, and I'm what you might call an
automation fanatic. I've built more than 400
MC based automations to support my work in
the music industry, and I teach classes about
that here on Skillshare. I'm also an award winning
university instructor. So not only am I
passionate about this topic because I
find it so much fun, but I'm an experienced
instructor, and I'm here to
help you succeed. In this class, we'll
learn the basics of Apple shortcuts by building
a custom Tobatta workout. Now, Tabata is best known as a type of high
intensity workout, but it's actually completely
customizable for anybody. It's fantastic for heart
health, metabolism, and fat burning, and it only
takes a few minutes to do. It also happens to be a great learning example
because of how it's structured. Speaking of structure, here's how the class is
going to be laid out. First, we'll build the simplest possible version of the workout, which is really just a couple of seria announcements
separated by timed pauses. Then we'll make our
automation much smarter and easier to customize using the list action and the
repeat with each action. Finally, we'll put on
some finishing touches, like lowering the
screen brightness at the start of the workout and bringing it back up at the end. For your project, you can
build your own shortcut. This can be the exact
same Tabata routine that we build over the
course of the class, or it can be some
other shortcut, as long as it
demonstrates what you've learned and is useful
to you. It's perfect. Alright, let's get to it.
2. Our Project - Easy-Peasy!: In my opinion,
projects are what set skill share apart from
other learning platforms. Projects give you
direct access to specific personal feedback
from every instructor here. That's a lot of expertise
at your fingertips, but it's up to you to
take advantage of that. Completing your project is the best way to check
your own understanding. So be sure to do it to get the most from your skill share
learning experience. For this class, you can build your own version of the Tobato workout or
anything you'd like, as long as it uses at least some of the
actions that we cover. And if it's useful to you. Now, because we build
the Dbatto workout as we progress
through the class, you'll already have it
done if you follow along. Plus, it's really
thoroughly customizable. So I would say that
just recreating that Tobatto workout shortcut is the best option for most people. To up load your project, take one or more screenshots of your shortcut as needed
to include all of it. Then go to the
Projects and Resources tab and click the
Submit Project button. Use the controls and fields
on that page to include your screenshots and anything else you would like
to share with me, and, of course, with
your classmates. I'm looking forward
to seeing your work, your questions, and
your accomplishments.
3. What's a Tabata, Exactly?: What is a Tbotto workout? The core element of any
Tbotto workout is a burst of high effort activity for 20 seconds followed by
10 seconds of rest. You would do this effort
effort rest pattern six to eight times to
constitute one set. For example, you
might do 20 seconds of high knee runs and
10 seconds of rest, 20 of tuck jumps, and ten of rest, 20 of
burpees, and so on. When you finished all six
of those, that's one set. You could stop there, but
ideally you want to work up to three sets with a four to five minute
recovery time between sets. To illustrate how
long this would take, let's say you choose to do
six of the 2010 efforts, which totals 3 minutes. Then you have 4
minutes of recovery. So that puts you at
7 minutes per set. For three sets of that, even including the final
four minute rest after you're all
done working out, you're still at just 21 minutes
for a fantastic workout. You would only want to do a debata two or at most
three times per week. All right, let's
build this thing.
4. Building the Simplest Possible Version: This first lesson,
we're going to build the simplest possible
version of our workout. Here on my home screen, you'll see my work
focus mode apps, and shortcuts as one of those. I'll just tap it to open it. You can see here lots
of shortcuts that come with the App plus shortcuts
that you've created yourself. To create a new shortcut, you just tap the plus button
at the top of the window. You'll see the empty work
area over on the left, and the help comment
there to add actions which are shown
over on the right. Actions in shortcuts are
the main building blocks. Each action does
one isolated task, and it's by stringing
those together in a specific order that allows you to create a
sophisticated automation. To start out, again, we want to build the
simplest possible version of our Tabata workout. And really, that boils
down to a sequence of tell me what to do as
the person working out, and then wait for the specified time for
me to do that thing. And then tell me the
next thing to do, and then wait for
that amount of time. So it's just this
repeating cycle of announcing an
instruction and waiting. So the first thing we want
to figure out how to do is how to make our phone
or iPad talk to us. I appreciate any app that lets me use Plain English to
search for the thing I need instead of expecting me to already know what the app
calls that thing, right? So I want to be able to search just using a normal
English word. Let's see if shortcuts
will support that. I want Si to say something, so I'm just going to go
to the search field up here and type S. Sure enough, we get two options. Notice that neither of them
is actually called to say, but they both relate to saying something or speaking.
So that's great. That's how we can learn. We can just try things using natural language and
see what we get back. Now, of the two actions
that it gives us, it's pretty clear
that speak text is going to be the
ticket for us. Notice there's a
little info icon here. Let's see what that tells
us. Just tap on it. Okay, so it speaks the inputted text
loud. That's perfect. I can either tap the add to shortcut button that's
shown here or I can close out of this and single tap the action itself
to add it to my shortcut. Okay, there it is, and
you can see we're able to tap in this field and enter
the text we'd like it to say. The first step in any
Tbotto workout is go as hard as you
can for 20 seconds. The other thing we can do in an action is tap this
disclosure button and check out whether there are
any options available to refine how it's
going to work exactly. We have some here,
and the first one is called wait until finished. That means that the overall
shortcut is going to hold up, is going to pause until Sie
is done saying the text. In this case, we do want
everything to proceed even while Series still speaking because we're on the
clock with our workout, and the idea is to keep going with the specific time
intervals of 20 seconds, 10 seconds, 20
seconds, 10 seconds. We've also got rate
or the speed of speaking and pitch to make
the voice higher or lower. And we've got the full range of Apple supported
languages available as well, which is great. We can even choose here
which voice to use. I use Serie voice three as my main serie voice on
my phone and my iPad. So I'm going to
choose that here. Now, with those options set, we can close this Now, by tapping on the small icon for the action and
the upper left, I can get some editing options. I'll choose duplicate to give us another for our
second instruction. And then I'll double tap
directly on the text to edit it and put in my
rest time announcement. Okay, so that was easy, right? Now, we need to make the
shortcut actually wait for those same durations
in between instructions. So I'll go back to
the search field and I'll search
on the word wait. I get two options. Wait to return and wait. Let's see what the info says
for the simple wait action. Waits for the specified
number of seconds before continuing
with the next action. That's perfect. We'll
add it to our shortcut, and then drag it to where
we need it to happen. Then we double tap to open these up down controls
and set it to 20 seconds. You can also just type
a number in there. Then we can duplicate
it and drag it below the wait instruction and set the correct time to wait.
Now, check this out. Go and then rest and
then go and then rest. That's really the meat
of a topotto workout. Do we really want to make six or eight copies of this
little alternating sequence? Do you imagine there's probably a more efficient
way to do that? There absolutely is, ae. We're dealing with
computers here, right? So we want this part
to repeat at least six times as many as eight times
for a legit topotto workout? So let's see what options
we have for repeat? And the info says, Yeah, This is our
jam right here. Notice that it says
the contained action. So this action acts like a
container for other actions. It repeats the stuff inside. Let's add it to our shortcut. Check it out. So it's actually
a pairing of two actions, which makes sense
for a container. Any actions that come between
these two will be repeated. All right, cool. So let's move
this up to the top because we want all four of our existing actions
to repeat in order. And see what happens. The end repeat
actually comes along. So shortcuts doesn't
want to assume anything. It wants us to be
very deliberate about where the repeat
starts and ends. It's also being clear that these two guys are
tied together, so that's helpful to
us as we're learning. Let's put our end repeat
down at the bottom, so we're enclosing
all of these actions. Okay, so notice how all the guys that
are inside indented, that gives us a nice, clear visual indication
of what's inside the repeat pair.
Oh, check this out. I forgot earlier to edit this one down to 10 seconds.
So let's do that now. We want this sequence of go, and then wait to repeat
six or eight times. Let's go with six. I'm going to give myself a
break with this workout. Alright, great. So to
wrap up this lesson, we can name our
shortcut and give it an icon and a color to make
it easy to run and find. I'll tap right here, and
then I can type the name. You'll be able to run your
shortcut by saying, Hey, S guy or S Lady, and then the name
of the shortcut. L et's tap here and then
choose the color and icon. I'm going to choose red so
that it pops easy to see, and then I'm going to do the John Travolta
dancing Man. All right. So as simple as
this shortcut is, we've learned a bunch how
to create a new shortcut, how to add actions to it, and reorder them, how to
make Siri talk to us, how to wait a certain
amount of time, how to repeat a set of actions. Finally, how to name and customize the appearance
of our shortcut.
5. A Wee Security Interlude...: I'm coming to live from
the IT security office. Okay. It's really
just my backyard. But I'm going to tell you
something really important. So I change the backdrop and
the look and the sound of this video segment to make absolutely sure that
you noticed it. If you run your shortcut, the way we have it built now, even the way we have it built
by the end of the course, it's probably going to fail
for a really simple reason. Your iPhone or iPad
might fall asleep. Now, shortcuts doesn't include an action to keep
your device awake. To do so would be a security
vulnerability, right? And there are workarounds
that you can find online, but same thing, they make your
phone or iPad vulnerable. So what I would recommend
is a manual approach. Before starting your workout, just go to your settings, display and
brightness, Auto lock, and set your auto lock to Never. Do your workout,
and then come back and reset it to your preferred
setting once you're done. If you want to do that, there is a way you can make your
shortcut help you remember. Add speak actions reminding you to go change the
auto lock setting. Easy. If you have any
questions at all, please do post them in
the discussions area, and I'll be happy to respond.
6. Making It Easy to Customize: In this lesson,
we're going to add a couple of features
that make our automation a lot smarter and more
customizable. Let's check it out. Let's start by duplicating
our first version, and then we'll modify that. I can long press on the dots here and then choose duplicate. And then I can rename it using the command
in the same menu. For what this is, it's
pretty efficient. But once I'd used
it a few times, I wanted to make it a little bit smarter and more
interesting to do. If we have to do this
six times per cycle, I want to do six
different exercises and just have Siri tell
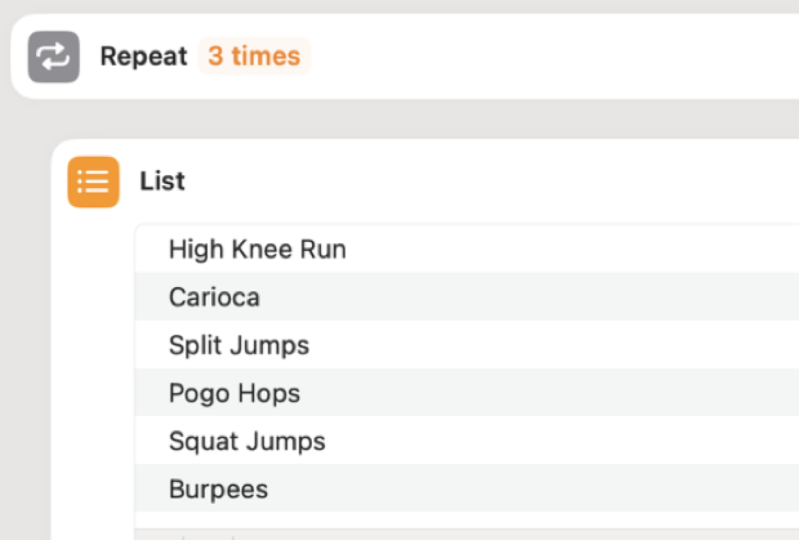
me what to do next. And when we structure
the shortcut this way, we end up with a
list of exercises. And then for each of these
different exercises, we need to say the exercise, and then wait for
me to do it, right? So for each exercise, repeat, say it and wait. So let me see if we have a
more sophisticated version of the repeat action that will let us repeat based on how many
things we have in the list. There's our normal
repeat action, but there's also this
repeat with each. It's going to repeat
the contained actions once for each item in a list. So it turns out that
the phrase for each is actually a really powerful concept in computer science. It lets you give some meaning
to a repeating sequence and make it depend on something useful like a list of
six different exercises. And if I add two more
items to the list, it will repeat eight
times without me needing to change
a six to an eight. I just change the
meaningful thing, the list. If I change my mind
and delete a few, it'll just repeat
however many times it needs to to get
through that list. So this makes it really
smart and really flexible. So all of that said, Apple being Apple, they didn't call it for each
here in shortcuts. It's called repeat with each, but it's the same idea. So let's add this
action to our shortcut, and it's going to replace
the normal repeat container. When we add it, it drops
down to the bottom, so we need to drag it
back up to the top. Notice again that the end
repeat comes with it, so we'll need to
move that as well. First, though, let's get rid of our boring old, simple repeat. And I'll bring the end repeat right up to after the repeat, and then I'll tap the
little x at the top right, and they both get deleted. So let's move our new end
repeat down to the bottom of the sequence and watch
for everything to indent. So we know that shortcut sees this pair as a container. Okay. Now we have our repeat
with each item set up. But how do we make this work? We do exactly what it says here. We need a list of items. So let's see if there's
an action called List. Bingo. That's our
jam right there. Let's tap it to add it. Okay. So it looks
pretty clear we can replace each of these
placeholder items with our own items. Let's do that.
Okay. Is that six, one, two, three,
four, five, six. Okay. We're set. Now comes the fun part. We need to tell our
repeat to use the list. We drag it up above the
repeat with each action, and we see that there's an entry field for us to
specify what items to use. So I'm going to
click there. Okay. We see that there
are several options to use as items for input, but down at the bottom,
there's our list. So I'll choose
that. Okay, great. Notice that now there's a little connector
line connecting our list to the repeat with
each action. That's cool. So now our little loop is going to run once for each exercise, but there's still
something missing. We need Serie to announce
what exercise to do. Now we have six different ones. So we're going to modify our existing speak action to accommodate those list items. We're going to replace the word go with the name of
the current exercise. Is there a smart
way to get that? Yes. So notice something here. Whenever you have a
chance to use a variable, which is just fancy computer speak for a placeholder word, Shortcuts is going to list
it down along the bottom. List would make Serie read
the whole list repeat index. That's going to be one
for the first item, two for the second item. That's not what we want, either. But the third item that's money. It's called repeat item, which is short for the item that's currently being
handled by the repeat. And that's what we want. We just tap it and it pops right into our
speak action sentence. So each time Series
speaks that sentence, it's going to say the
current list item, not this phrase repeat item. That's just a placeholder. It's a dynamic placeholder. So let's try running our
shortcut and see what happens. Hine runs as hard as
you can for 20 seconds. Cool. So he plops
that first list item right into the sentence where the placeholder
is. That's cool. Okay, so now we have a much
more interesting workout, and one that's easy to switch up by just changing the list items, the number of list items, the order of list
items, and so on. You get the idea.
In this lesson, we learned how to use the
repeat with each action, use the list action, and combine the two to make any shortcut much more flexible, powerful, and easy to customize.
7. Naming Our List - Best Practice!: Now, before we take
things any further, let's take care of a quick
administrative detail. We're going to name our list. Naming resources like this is a best practice in really
any kind of programming, even when you're doing just this dragon drop kind of thing. Why should we bother to do this? Well, by giving our list
a unique identifier, we make it easy for
other actions in our shortcut to refer to that
list specifically by name, instead of just saying, Yo, list and hoping that it
hits the right resources. I have to admit the
way we go about this in shortcuts is a little
bit counter intuitive. If we tap the list icon, we see some options, but none of them actually lets us assign a
name to our list. Show info, maybe. But no, that's the same
thing we would see if we tapped the show info
button over on the right. But if we go to the repeat with each action and tap on the
list placeholder in there, we do see a way
to name the list. There's a field
called variable name. So let's call our
list exercises. That's meaningful
and helpful to us. Now once I do that, you see that the repeat with each action
gets updated to say, exercises instead of just list. So right away, we get a signal that we're
doing things right. So with that in place, let's run a little bit
of our shortcut to make sure the list is
being used correctly. I need to run as
hard as you can for 20 seconds. Boom. Okay. Now we're set to add a
few finishing touches. And we know that if we need
to refer to this list again, there's going to be no question that we've got the right one. Perfect. See in the next lesson. In this lesson, we learn to name a list and confirm that other actions refer
to the correct list. We name the list to
ensure that we can refer to that list specifically, which becomes more important as our shortcuts become
more sophisticated.
8. Expanding to 3 Cycles: This lesson, we're going
to extend our shortcut to encompass three full
cycles of the workout. To make those a proper
to bottle workout, we actually need this entire
thing to repeat three times with four to 5 minutes
of rest in between sets. To accomplish that here in shortcuts, we just
need to repeat, and then we need a wait, a pause in the action for that
four minute recovery time. We know how to do both of
those things already, so easy. Let's search on repeat, and then we can single tap
to add that to our shortcut. We'll set the repeat
to three times. And now we need to drag
this up to the top, and we'll drag the end
down to where we need it. Now, while we're here, I'm going to mention something that I would have to call
a bug in shortcuts. Sometimes when you're trying
to place an end repeat, and it won't stick
where you drop it, just try exiting the
shortcut and coming back in, and that will probably fix it. All right, so now we've
got our repeat in place, and we need to add our
four minute recovery time inside the three repeats. So we'll do that with a weight
action just like before, I'll copy this one
and then pace below. Now, a four minute wait
would be 240 seconds. But after I had used this
shortcut a couple of times, I found that I would
naturally start doing other stuff
during the 4 minutes, like starting to prep my breakfast smoothie
or something like that, and I needed some sort
of warning that I was coming close to the
end of my rest time. So here's what I'm thinking. Let's make this wait 210 seconds and then put a second wait for
that other 30 seconds. Then we need an announcement. You have 30 seconds
of rest remaining. And then we definitely need
another announcement here. I forgot this one. We have to actually announce the
four minute rest. Otherwise, we'll hit the ten
second rest announcement, and then things will
just go silent for ever. And that wouldn't be good. So pat below and say,
Okay, great job. Rest up for 4 minutes. All right. Now, let's test it. And to make testing go
a little more quickly, let's crank down
our long wait times for just a few seconds. All right, let's
give it a whirl. As hard as you can for 22nd. Okay, so that didn't work right. He didn't say the list item, the actual exercise name. He just said go. So
why might that be? Shortcuts, I think, is confused because now we've added
a second repeat pair. And even if I delete this
reference and put it back in, the text is red, and it says that it's not a valid reference
or it's not available. So I think our best
option here is to recreate the repeat with each
structure. Is this a bug? Maybe. I'm kind of a fan girl. It's hard for me to admit, but I think it might be. Well, this gives me
an opportunity to show you something really
important about repeats. When I tap here to delete, check out the warning
that comes up. We can delete the repeat
container and all the stuff ins, everything that's
inside the container, or just the repeat actions and not the stuff
that's in between them. We just want to delete
the repeat actions. And now we can add our
new repeat with each. Notice that it automatically
takes on the name, exercises and automatically
connects to the list. So that's a really good sign. And then as always, we move our end
repeat action down. Okay. Now, the only truly
tricky part is probably this. We need to put that
list item reference back into the speak action. And again, this time, it's
called repeat item two, but it's showing up in blue. So I think everything's good. Let's run it and find out. How do you run as hard as
you can for 20 seconds. Rest for 10 seconds. Creer as hard as he
can for 20 seconds. So he doesn't know how
to pronounce karaoka, but I will take it. In this lesson, we
learned how to work around buggy end
repeat behavior, make long silences work
better in real life, test more quickly by
reducing long wait times in our shortcuts and work
with nested repeats.
9. Adding Some Finishing Touches!: In this lesson, we're
going to wrap up by adding a couple nice little
refinements to our shortcut. First, we want to have an
announcement that says, Hey, we're about to
start this workout, get pumped, get ready to rock, you know, all that stuff, right? So let's copy one of our speak items and paste
it above the first action. Okay. Starting your
Tboto workout. Get oops. Okay. Get ready to crush it. Another thing I'd
like to do is dim the brightness of my iPad screen or my iPhone during the workout. I'll enter brightness in the search field, and
there's our ticket. Okay. We'll add it. Of course, it gets added down at the end, and actually, that's fine because if I turn it
down at the beginning, I'm going to want to turn
it back up at the end. So let's copy that
and paste it up top. And we'll try it. How do you learn as hard
as you can for 20 seconds. Rest for 10 seconds. Okay. So the screen dimmed, that doesn't show up in
your screen capture. But more importantly, he skipped our awesome new get
pumped statement. Why? We need to figure that out. So let's look at
the options here. Oh Hold up. Okay, so wait until finished. We talked about this a
little in the first lesson. Now, for the announcements
during the workout, we wanted the shortcut to keep moving because we
don't want to add the time that the announcement takes to the time that
we're working out. But in this case,
you notice we've got a two sentence
long speak action. And the next thing that
really takes any time at all, is another speak action. So, in effect, I think
he's interrupting himself. So it's just moving so quickly that we're just not even hearing
that first announcement. So let's turn this option
on so that it waits till he's done speaking
those two sentences before it moves on
to the next step. Okay. Let's try it
again, see what happens. Sorry to get the bottom workout. Get ready to crush it. How do you run as hard as
you can for 20 seconds. Rest for 10 seconds. Creer as hard as you can. Sweet, we're good. Now you know exactly how this
is put together. You see how you can the
exercises that are in it. You can the durations. Anything like that about it
is easy for you to dig into. You've just learned how
to use apple shortcuts. In this lesson, we learned
how to set the brightness of our device screen
and how to use and troubleshoot the wait until finished option
of the speak action to accommodate different
circumstances. M.
10. Conclusion: I'm so glad you stuck with it. You've learned how to
create a shortcut from scratch and how to use
fundamental actions like speak, repeat with each,
list, and more. You also learned some
important best practices and also how to work around
some odd shortcut behaviors. Again, I strongly encourage you to complete and
upload a project. I will definitely check it
out and get back to you. Finally, I hope you can take some time to leave a
review of the class. I take all student
reviews really seriously, and I find them to
be such a vital tool for making my classes
as good as they can be. Thank you again for your time, and I hope to see
you again soon.
 CK Barlow, Composer for Film/TV, Tech Instructor