Transcripts
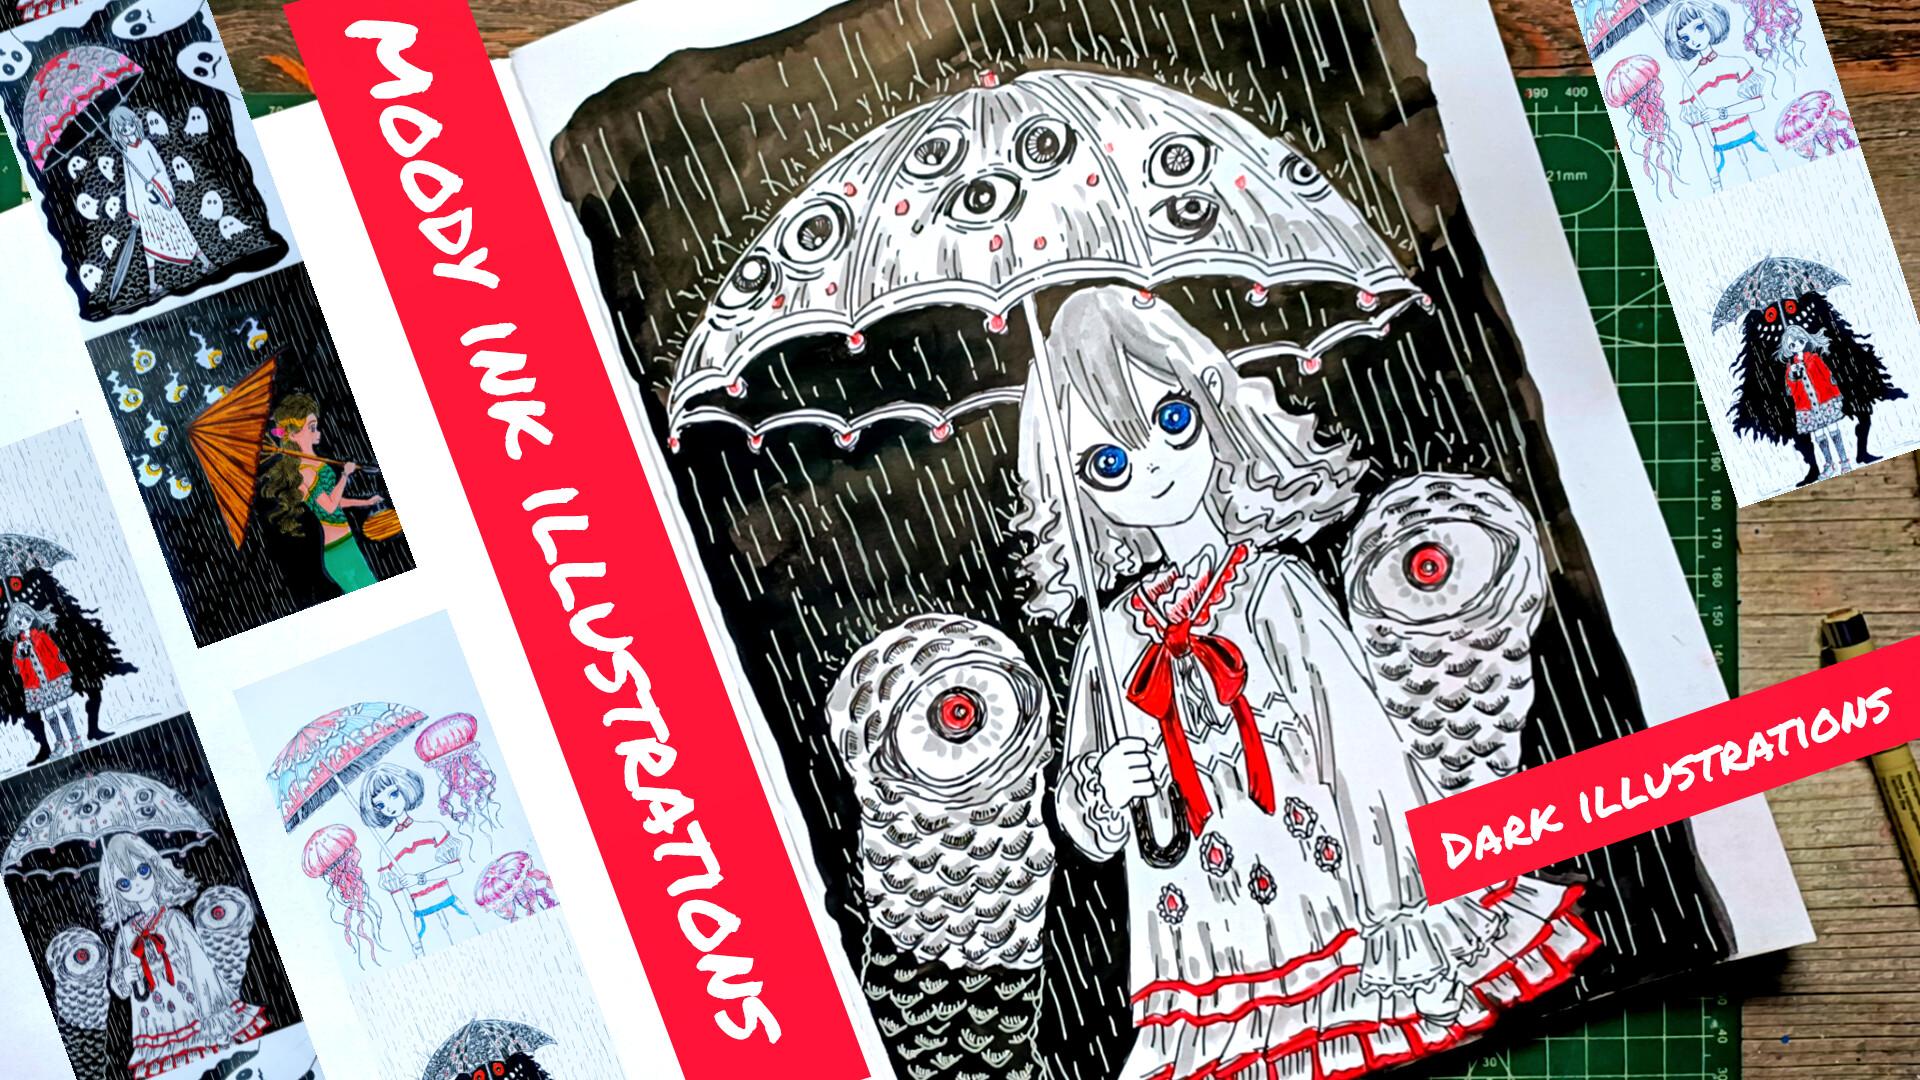
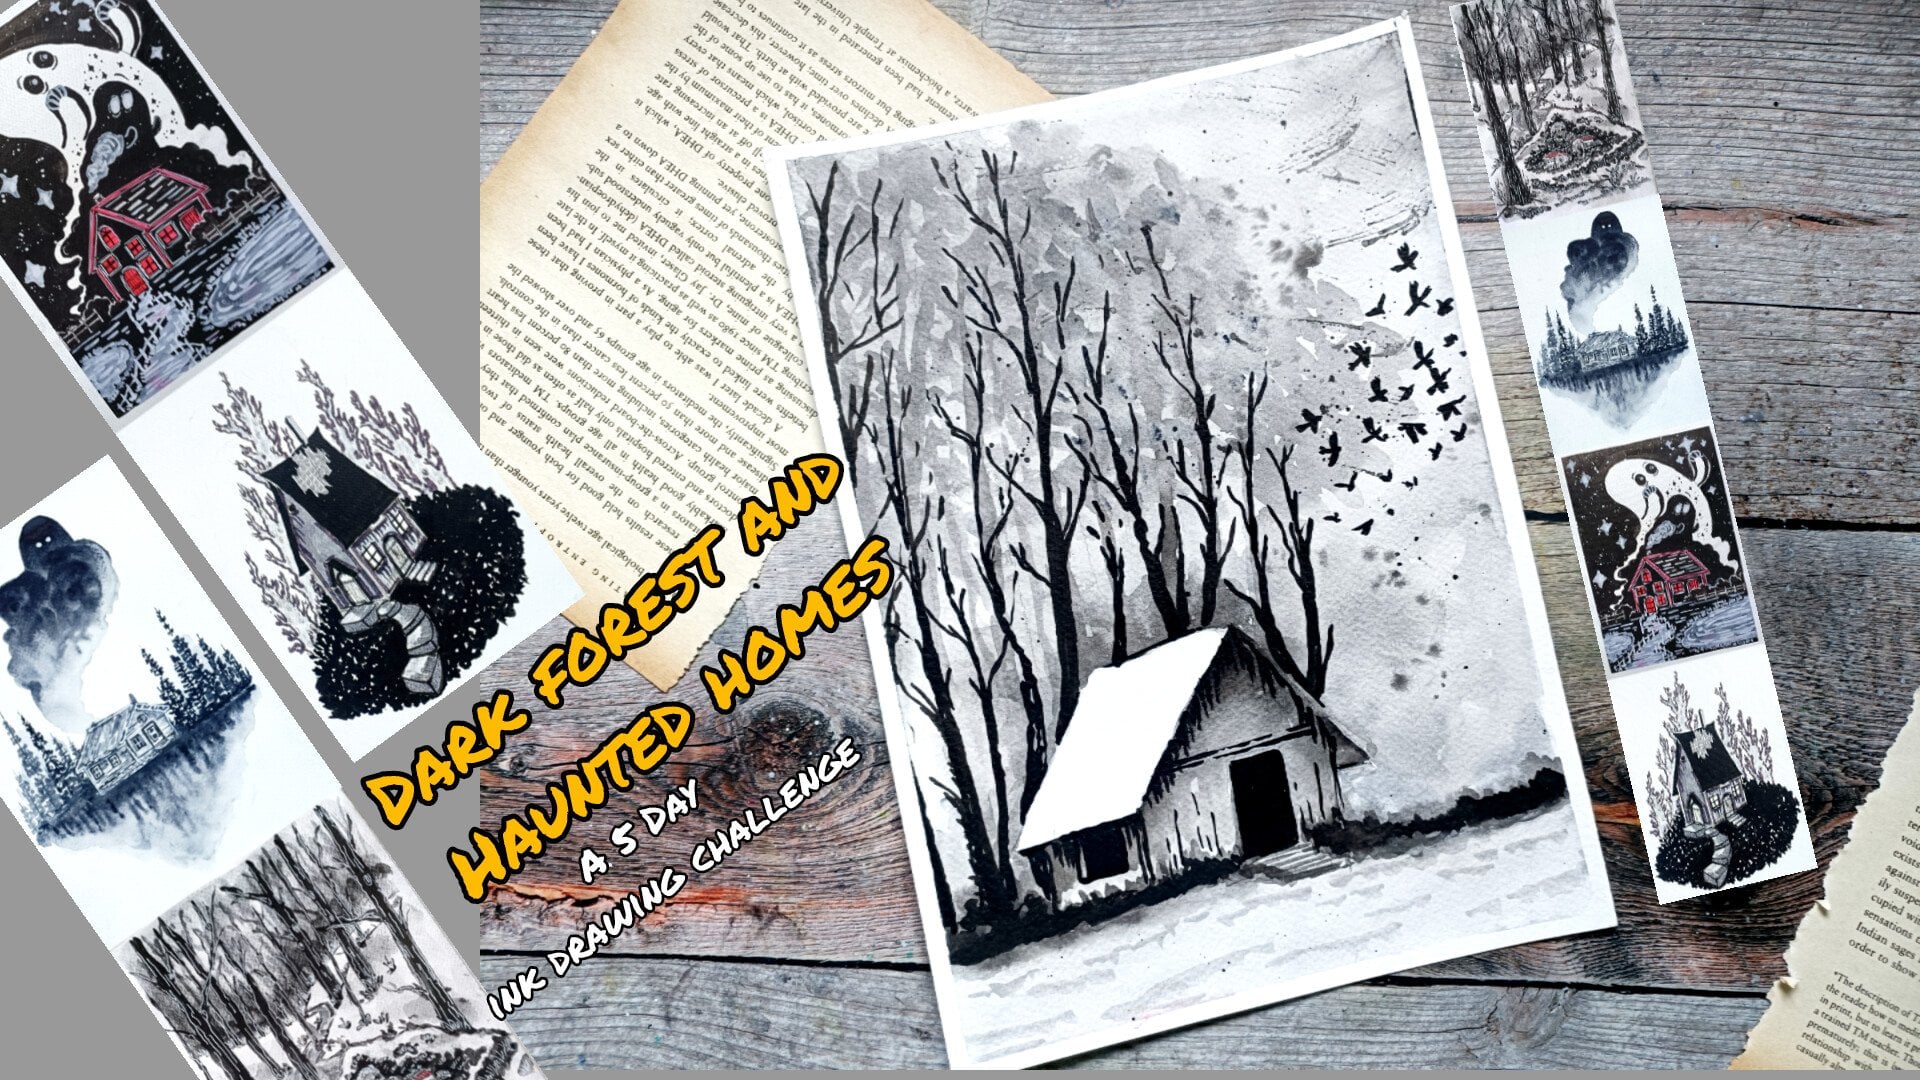
1. Welcome and Introduction : Hi, everyone, and welcome to my new class Moody
Ink Illustration, a five day umbrella dark
Illustration challenge. In this class, we will create five hauntingly beautiful
ink illustration featuring umbrella girls set against dark
atmospheric background. Each project explores a
different mood and story from night that watches back to guardians of the silent storms. We will begin with a
fundamental including hatching, crosshatching, and
essential ink technique. I'll also guide you through
character construction, including simple body form, expressive eye, and
composition before moving into final
illustrations step by step. Projects include the
night that watches Back, ruin of Jelly dreams, a walk through quiet spirits, center of the Sado ring, and guardian of
the silent Iston. Hi, I am Mihal an
artist from India. This is my Skillshare profile. On a Skillshare, I teach beginner friendly
classes in ink, watercolor and oil pistol. You can find more of my work on my Instagram
and my YouTube. This class is ideal for
intermediate artists, and most lessons
are in real time, so you can easily
follow along with me. We'll complete one
project each day, building both your technique and confidence as you progress. Before diving into
the main project, we'll begin with
the fundamentals. I'll also guide you through
how you can easily create these mysterious creatures and subtle narrative element
moving into each thing. So join me in this class, and let's create
something moody, expressive and full
of storytelling.
2. Class Project : This class we'll be creating five moody ink illustrations. We have Gargan of
the silent Storm, then we have Salter
of the sadoin followed by a wa
through quiet spirits, reign of Jaily dreams, and lastly, the night
that watches Back. Along with the main project, you will also practice essential skills through guided seeds, including hatching,
crosshatching, body construction, and fecal features like eyes. For your class project,
you can complete all five illustrations or
choose your favorite ones. Apart from this, you can also
see your practice seeds. Once you are done,
don't forget to upload your work in
the project gallery. I'd love to see your creations. And you don't have to do the coloring for all the project. Instead of it, you can keep it monochrome only using
the black and white, or if you want to make it
a little bit or redis, you can use a little bit of red. So these are all
the five projects, and I'll be seeing you
in the next video.
3. Supplies : For this class, you
will need pencil and eraser to do the basic
pencil sketching. Then you will need fine liner. In here, I'll be using black, blue, red and pink
colored fine liner. Apart from that, I'll also be
using Tombos breast paint, two breast pains, one is
thinner and one is thicker one. I'll be using it to do
the mean outlining and I'll be using the fine liner
for the small details. Apart from that, I'll
also be using the ink, black ink to do the coloring
for the larger section, white jelly pen to add
highlights or smaller details. I'll be using two brushes, one large and small brush. An brush will do the masking
tape to secure the paper. Then we have got tissue paper. These are the supplies that
I'll be using in this class. You don't need all the supplies. You can create all the
project in this class, only using normal
wallpoint paint. Apart from this, for one
of the last project, I'll also be using
colored bras paints.
4. Basics : However, in this selection, we are going to explore some very important ink
drawing basics that will help you add depth, texture, and form to
your illustration. We'll be focusing on
hatching, curved lines, cross hatching, along with how lines piecing and
preserafect your drawing. In here, we are starting
with the hatching. Hatching is one of the most basic and useful
sending technique. It simply means drawing parallel lines to
create tone and values, simple and plain normal
lines like this. We can add a little bit
of variations to it. But basically, these are
the simple hatching lines that will mostly be using. And when the lines you
draw are closer together, the area looks quite
darker, like in here. When the lines are
farther apart, it looks lighter earlier
example that we created. We can also change
the thickness or the preser of your line
to control the sading. You can also vary the
length of the lines in here for you can start
with the larger lines, and then as you move along, you can create the smaller one and you can do the opposite to. You can also play with
the weight of the line. By weight of the line, I mean,
the thickness of the line. You can use thicker pin
or you can just overlay one layer on top of the other to make it a little
bit more thicker. And as you mentioned, you can
just change the direction to get different effect
depending upon the situations. These are the
simple hyging lines that we'll mostly be using. I'll also be using hatching line to do a little bit of seating. In here, I'll be
showing you two ways in which I'll be
doing the seating. The first way like this, you can use rows and rows of hatching in this manner
to do the seating. In here, too, you can
play with the spacing, you can increase the spacing,
you can decrease it. So depending upon
the requirement, we'll be using this
kind of seating. Next one is like this. The kind of seating that we
generally do with a pencil. With this kind of seating,
using the hatching lines, I'm also wearing the
preserF the starting, I'm applying a bit more
present and as I move forward, I'm decreasing the presser Mm. Apart from this kind
of general hatching and shading using this
kind of simple and plain, straight lines,
I'll also be using this kind of broken lines
to do the hatching. These are all the basics for the hatching that
we'll be using. Apart from this,
you don't have to only create the hatching
using the straight line. You can also do the hatching
using broken lines and combine all this element that
spacing the line weight, the different kind of strokes
and wearing the prison. I'll be showing you
how I'll be using the curved lines
curved hatching line. Here, I'll be creating a
very simple example using concentric circle and do
the curved hatching lines. Apart from that, I'll
also be making it a broken curved hatching lines. So here's the example
using this kind of curved hatching lines in this manner with broken lines. Here's another example. Basically, I'll be
using this kind of hatching to give a little bit of more form and definition to some of the object or to
some of the seeps. I'll also be using it to create designs or pattern if required. You can call it hatching lines, or you can also call
it curved lines. This curved lines help
to sew form and volume. Instead of straight lines, you can follow the sieve and
the object easily with it. We can also create patterns like circular arc lines or to
sew the flow of movement. Next, we have got
cross hatching. Cross hatching is an
extension of hatching. Here you layer lines on top of each other in
different direction. Start with one set of lines and then add another layer
crossing it like this. By adding more layers, we'll be making it a little
bit more darker. So here are some
of the example of different kind of cross
hatching that you can do. In here, I use vertical
and horizontal lines. For this, I decided to use angled line and straight
lines straight lines, or you can say vertical lines. Here's another
variation. In here, I change the direction and using line straight
horizontal lines. So you have got the idea
what cross hatching is. And as I was mentioning, by adding more layers, we
can make it more darker. So this is the second layer. This is an example
of only two layer, and in here, I'll be adding a few more layers to
make it more darker. Third layer. As you can see, just by adding one
additional layer, it looks comparatively darker compared to the one that
we created earlier. And as for the hatching, you can also use this kind of broken lines to do
the cross hatching. You can do the same
thing with it. The species, the line weight, and the presser
matter in here, too. These are the general
cross hatching that I use. Now I'll be doing
a little bit of seeding using the
cross hatching. For this one, I'm using
the combination of vertical and angled
line like this. So third layer, fourth layer. In here, I'm making the bottom section a little bit darker, bottom left corner like this. The regions where you want to
make it a bit more darker, you'll have to add more lines. You can also create other
variations of sps using it directly using the cross hatching to create
ses in this manner. Here I was trying to
create a conical sap, but then I only created
this kind of simple save. Here's another variation. I did the cross etching on
this side, the right side, and one more example using broken cross etching
lines to do the siding. We'll be making the upper
side a little bit darker. Simple broken lines
in this manner. Let's make it darker, the upper region a little bit. With the cross hatching,
the more layer you add, the deeper and the richer
the seeding becomes. This is very useful for creating strong sado and
detailed texture. In our final drawings, we'll be using hatching for basic sading, using curved lines
to sew the form, and use cross hatching
for darker areas. I'll also be combining
them as it helps to create more dynamic and
interesting situations. So these are the core techniques we'll be using
throughout the class. Don't worry about
the perfection. Focus on practice and control. Try experimenting with
different line styles and see what works best for you. In the next lesson, we'll be exploring more techniques
related to it.
5. More Pen and Ink Techniques : Hi, everyone. In this nation, we are going to step
further and exploring more expressive line techniques that help us create texture, movement, and depth
in our drawings. In here, I'll be
covering uneven lines, scribbling, stippling,
flowing lines, and scallops. Let's start with uneven
lines or broken marks. In here, I've
already started with uneven lines or you
can say broken marks. These are sought
in regular strokes placed in different directions. In here, the lines
are not uniform, Spiething is inconsistent and direction varies
randomly or slightly. For the first one,
I just use random, small strokes to create
this kind of one. In here, I'm using the
same kind of strokes, but in here, they
reach a little bit of spreading out of the
strokes from the center. You can also use it to create
this kind of wave like form using this kind of uneven, small and large lines. And in here instead of adding
it in random direction, in here, I'm following a little bit of direction like this. To make it a little
bit more darker, you can use more
lines like this. Here's another
example. Once again, this are spreading out and we'll be making it quite darker. So we'll be adding
more layers to it like this one more
line in here like this. This kind of uneven lines creates very natural
organic texture. For some of the sections,
I'll be using it. Generally use this
for rough surfaces, cream bars or for feather
or uneven shadows. Instead of the perfect lines, think of it as
control randomness. Here's another example. This is somewhat
similar to a third one. And instead of a
single line in here, we are using two lines here, two, spacing and
line weight matters. So you have got the rough idea how you can create this
kind of uneven lines. You can create other
variations of it. I only sowed you a few examples. Next in here, we
have got scribbling. Scribbling is one of the most free and expressive technique. This is comparatively faster as compared to the
other techniques, the cross hatching
and the hatching. Here we use continuous
looping or circular motions to build sading like this. With the loose scribbles, we get lighter tones,
with the dense scribble, we get darker areas and
with the layered scribbles, we can get rich texture as well as do a little bit
of sading using it. Another variation
of the scribbling, and in here, I'm doing a little bit of
seeding in the middle. So let's do a little bit
of more sding in the top. You can see the seed
how the scribbles becomes more compact and darker. You can use it to
create soft shadows, textured surface
or quick sading. Key in here is to keep your hand relaxed and pwd, not stiff. For some of the sections to do the coloring or do the seeding, I'll be using it since this is quite easy and it's
more free flowing. In here, we have
got a stippling. With the stippling,
you can create very beautiful illustration, but it's more of the most
time consuming processes. So I won't be using
it that much. Stippling basically means sading using dots instead of the lines. You don't have to
do the sding on. You can also use it to
create seeps in the forms. Using this kind of stippling, you can also use it to do the outlining squeezing thickness matter. With more dots, we can create darker values with fewer dots, we can create lighter value. The first one, as you can see, is of lighter value and in here, we are making it a
little bit darker using more dots and adding it
closer to each other. The sizes of the
dots matter too. In here, I'm just using the tip of the pen
to create this. Instead of it, if I want, I can create a bit larger saves, larger circular seeps and use those larger circular
saves to do the stippling. It provides a little
bit more control over the density of the dots. With it, we can get a
little bit more control over how we are
going to illustrate. With it, we can control
the density of the dots, the sizes of the dot. Since the sizes in here for the stippling dots
are quite small, we can control the
density of the dots, the sizes of the dots and
squeezing between them more accurately and more
correctly as compared to the hatching and the cross
hatching and other methods. Main disadvantage is that
it's too much time consuming. So I won't be using
it that much. I'll only be using it for
some of the smaller sections. And as I was mentioning, you can use it to create
forms in the seeps. In here, I only use the
stippling dot to create the circular seed and we
are doing a little bit of sailing using stippling
dot by making it more darker towards
the bottom section. And I'll also be using
this kind of stippling dot to create lines
and create seeps. This simple stippling
dots and using it in this manner to create lines
or you can say outlining. Simple dots like this
to create outlines. You can notice in the
seed that dots go from sparse to very dense,
creating smooth transitions. The second and the
third example. Here's a variation
of larger dots. Generally, you can use
this for detailed texture, smooth gradient and clean
and control sading. It takes patience, but it gives a very refined and
professional look. So that's all for the stippling. In here, we have
got flowing lines. These lines are curve
directional lines that follow the
form of an object. These are somewhat similar
to the curve lines, but in here, we have got a little bit more
flow to the lines. And yeah, these are
the kind of lines. As you can see, instead
of the random lines, these lines move in a consistent direction.
It follows the set. Mostly, I'll be
creating this kind of line following the
seep of an object. It also helps in
creating a sense of movement You can use to create patterns for the leaf or pattern
for the clothes and the designing and
giving the project over a little bit of
more flowing appearance. I'll also be using
it in this kind of lines to create and add more texture and
detail for the hair. These are some of
the few examples. Apart from this, you can create other variations and other
example on your own. This kind of lines helps your drawing feel more
alive and more dynamic. Lastly, we have got scallops or you can
say repeated patterns. Scallops are generally
repetit curved see like semicircle
or wave pattern. Mostly, I'll be using it to stack one non layer
on top of the other. You can also do a little
bit of overlapping. And we can also vary the
saves in the signs in here. These are some of the
examples of the scallops. I'll only using curved ones, two or three of them for
some of the projects. This kind of scallops
helps in creating pattern that looks like scales either
or decorative textures. Apart from this, you can also use it to create pattern work or stylized structure or
create decorative details. These are simple but very effective in adding
visual interest. And you don't have to only
create this kind of curves. You can create this kind
of pointed edges stub. In our projects, Almond be
using just one technique. I'll be using mostly, I'll be using flowing
lines for the structure. I'll be using scribblings or
uneven lines for texture, strippling if required for the shadows and scallops
for the patterns. Layering the techniques create much more rich and more
detailed drawings. So we'll be using various combinations of
these techniques. So these are the
advanced line techniques we'll be using in this class. Take your time to
practice each one separately and then
try combining them. And that's all for this section. I'll be seeing you in
the next sllation.
6. Guidelines for Face and Body: In this lesson, we
are going to cover the basic construction of
human figure and face, which will help us
draw characters more confidently and accurately. All the characters that
I'll be creating for this project will
be simpler ones. Let's start with the body. Instead of drawing a complex
human figure directly, I'm going to simplify
it into basic seams. In here, I'm using a
vertical center line to maintain the balance, and the horizontal lines will help us understand
the proportion. I have divided into
eight equal sections, four for the upper section, and four for the lower sections. Oh for the int, I'll be creating a
simple circular seat. The simple circular see will consist of two
thirds of the part, and for the lower
half, this kind of somewhat conical see. For the neck, we have
got a cylindrical seat for one third of the
section like this. The torso is a rectangular or slightly tapered box like this. We are in the middle section. The hips and the legs
can be simplified into straight lines or basic
seams in this manner. This is a basic simple
guideline that I'll be using to create all
the projects in here. Simple lines like
this for the hand. As you can see, I use vertical central line to
maintain the balance. I have horizontal lines that divided into eight equal section as well as it also help and
understand the proportions. This step is very
important because it helps you keep
your drawing align, maintain correct proportions,
and avoid distortions. Here the second one. In here, I only created the
upper half of the body. So I divided into
four equal section. With the two third, we have
a circular C for the face. Mm. Now for the
remaining section, somewhat of this
kind of conical C for the remaining
section of the face, cylindrical see like
this for the neck. This kind of you
can see teapod or somewhat of rectangular
C for the torso. A little bit just above in here. Just below it or in here, I'll be considering it to be its navel simple straight
line like this for the hand. Accordingly we'll be sifting the hand to add
more gestic to it. But this is a very
simplified version. Now moving on to the head,
starting with the circle, simple circular C. This will cover the two
thirds of the pace. Or you can start with
a simple straight line and divide into
three equal section. The upper two section
will be consisting of circular C and the remaining
section like this. Or you can consider it to be somewhat similar to egg like CP or con like C. Dividing the circle into
four equal section. We have got the ears just
below the horizontal lines. Eyes are placed along a
horizontal line like this. I'll be creating some
white of animated eyes, this kind of bit large eyes. The nose sits halfway between
the eyes and the chin. The mouth is placed
slightly below the nose, and here's the head, here's the hair line a little
bit above the head. Simple cylindrical shape
like this for the neck. In this way, I'll be creating very simplified
version of the face that is looking forward.
Here's another one. This is facing towards the left and looking a
little bit downwards. Once again, using
the same concept, starting with the
circular C for the head. And since this is
a bit angled face, create this kind
of bit angled line following the proportion, give it a little bit of sphere
like save to the circular. Adding the ear just like this and accordingly
adjusting the eyes. Here, too, as you can
see, the eyes are large, stylized new style. The face is slightly
rounded and simplified. Simple neck like this.
For this kind of faces, a little bit towards
left or the right, focus on spacing between the eyes and alignment
with the center line. Accordingly, we'll be shifting the center line a little bit, making it a little
bit tilted or angle. This will keep the face look
somewhat normal and natural. Let's create one more example. The face looking upward. Once again, starting with
simple circular seam. Give it a little bit of volume considered to be somewhat
of spherical seam, and accordingly
creating this kind of curved line,
extending it in here. Only a small section of
her chin will be visible. So very small triangular
sap like this. Little bit of angled
horizontal line like this. Eyes will look like this, only a small projections
like this for the eyes. Here. Simple neck like this, the same kind of small nose
and the mouth just below the nose will be accordingly
shifting as required. One of the key idea that
you can keep in mind the center line curves
depending upon the angle. For example, straight
line leads to front view. The curved line leads
to head turn and the tilted lines lead to
head tilted like this one. This helps you understand three D form instead
of flat drawing. Now, moving on to the
fourth and the final one. Nagar will be looking
towards the right. Only one eye will be visible. Once again, starting
with the circular same. Now for the lower
section in here, I'm starting with
a simple phase, straight phase, and then
I'll be shifting it a little bit to make it
face towards the right. To make it face
towards the right, I'm just adding more curves like this on the right
side for the nose, a small projection, and for
the mouth and the chin, a little bit of
projection like this. The hair line just
beside the eyeline. Rough outlining for the hair, simple eyes, large eyes
like this and small neck. This is just a rough example
for our main project, we'll be making it a
little bit more detailed. And that's all for this section. I'll be seeing you
in the next section where we'll be practicing
a little bit more.
7. Shelter of the Shadow Rain: Welcome to the Salter of the sadoinUsing the
simple guidelines to create the body of the girl, starting with a straight line a little bit in the
middle of the page. At the lower section like this, we are going to divide into
eight different sections, and then for the first one, we'll be creating her heads for the remaining three or four, we'll be creating
her middle body, her chest stomach,
and the thighs, and for the remaining section, we'll be creating her foot. Simple circular seep like this for the guideline for her head, a small cylindrical seep
in here for her neck. For the remaining four
sections in here, create this kind of
bit triangular seam. For this project, I
decided to go with the frinlo so I won't
be adding that much of details while doing the
pencil sketching when we'll be doing the coloring or doing the outlining with
the fine liners, then we'll be making
changes and adjustment. This will be the outline for the ghost that lies behind her. This two is somewhat
of triangular see. The ghost is also somewhat
of triangular sea. Create this kind of
semicircular see. This will be the
umbrella she'll be holding the top of the umbrella. And now let's Saba closer look. We have created her face, simple circular sap like this. Now, giving it a little
bit more definition, making it a little
bit curved like this in here for
the middle section. Her ears. I'll be creating
flowing hair for her. So just rough guidelines
for the hair right now. This is a free flow drawing. Later on, we'll be making
changes in adjustment. She'll be wearing a jacket
on top of her clothes. This will be the middle
portion of her stomach. A bit of rough outlining
for both of her hands. Since she's going to
be holding umbrella, arms will be bent in here
for the second hand, outlining for her second hand. That's lying just
beside her like this. A small projection
for the umbrella. To large pocket on the sides. I'll be creating collar, just simple rectangular saves
like this for the collar. The clothes were wearing
will be buttoned up and the button will be a
little bit more detailed one. Enough for her leg. She
will be wearing socks. Beside her knees, we'll
be creating her socks. This will be her
calf. The other leg. Right now, I've
just only created a simple cylindrical sea a little bit curve
cylindrical seam. When we'll be doing outlining, we'll be giving it a
little bit more volume, Stending the line
for the umbrella. Oh you being a little bit
of curve seep like this. These are just the
basic guidelines that we have created for now, when we'll be doing
the outlining, we'll be giving it a little bit more definition a bit more saves two large eyes in here on both sides
of the umbrella stick. We'll be creating large teeth using this kind of simple
saves for the teeth. As for the eyes, just a
little bit beside her ear, you can just add it for the
same height as her ear. Now, going in with the Toms breast pain to
do the outlining. In here, I'm starting
with the umbrella. You don't have to stick with the guidelines that
you have created, feel free to make
changes and adjustment. I'll be making a lot of
changes and adjustment. This is a free flow project, so you can change as many things as you want
on the things you are not satisfied with a bit of more detailing ends of
the umbrella like this. I'll be dividing the
umbrella into five sections. Using a bit of broken lines for most of the
sections in here, where I'm not that
much confirmed. I'll be using this kind of bit broken lines to
do the outlining. And later on, if required, I'll be using the
simple and normal lines to make the outlines
a bit bolder. But otherwise, I'll be using it. This scripts a little bit of different kind of
characteristics to the painting. So I enjoy creating
this kind of lines. Now we are going to do the
outlining for her face. For some of the section in here, I'll be following
the pencil sketch, but for others, I'll
be making changes and adjustment her hair. So we are going to
create flowing hair. I'll be doing it in two part. For now, we'll only be creating the hair
surrounding her skull, and later on, we'll be
extending hair on both sides. Creating the outlines
for the eyes. Making it a bit more curvy. We are going for cute
little eyes for this girl. I'll be creating big
eyeballs for the insides, comparatively big
eyeballs like this, and I'll be leaving
a little bit of whites piece for the highlights, a very small nose like
this at small mouth. Now, for her neck, doing the outlying
ping for the collar. So the simple saves like this. We'll have to do a little
bit of adjustments in the fees that I created
is comparatively smaller. So some of the
things I'll have to adjust a little
bit up like this. Her hand, the hand that
is holding the umbrella. A little bit of mint sip
like this for umbrella. Some of the sections
of the umbrella is covered by her hair, so it won't be visible. A little bit more
detailing for her hair. Just add more curve
lines to give it a little bit more volume and definition, her flowing hair. Right now, just create
this kind of flowing hair. When we'll be doing the
coloring for the monster, we'll be covering some of
the sections and using the black to recreate the hairs. Simple sep like this for the
bent portion of her hand. These wearing a hoodie, so the upper portion of
the hoodie like this, a little bit of trumbled appearance for the
hoodie like this. The second n will be
quite simple, easier. The pockets on both the sides. In here, we'll be
trying to create a little bit of patterns, but for now, just do
the rough outlining for the triangular see. Only a small resemblance
like this for her hand, two patches on the
sides at her elbow. In here, we'll be creating
buttons, beautiful buttons. And this will be the
middle section of our clothe using this kind of bit broken lines to
give it a little bit of texture for the
crumbled up urines. Creating large circular seeps with the black for the buttons. Instead of the buttons, you are free to create other kind of patterns and designs or
other kinds of buttons, dividing into two section, the upper section in which
we'll be creating her jacket. Let's start by creating
large pockets, two large pocket
on both the sides. Simple pockets like this. And to sew stitches
on the sides, use this kind of
bit broken lines. Another button in here. Now, the remaining
section of her pockets. In here, I'll be creating small flowers using red later on. Just random designs like this. A little bit of crumble
appearance for some kind of feels that is present
in here for her cloe. You don't have to
create the same kind of pattern or design I am doing. Feel free to make changes and adjustments or add your
own personal touches, create your own kind of designs. Doing the same thing
for the other side. Just random lines like this, giving it a little bit
of geometrical seeps like this for the patches
on both her elbows, making it a little bit darker. In here, too, giving it a little bit more
detailing like this, just on top of her
hand like this. And let's give the cloth a little bit of
crumbled appearance. Just create this kind of
bitter random lines like this. Just don't over saturate
it with this kind of line. Three or four lines
will do their work so that the clothes she's
wearing is a bit crumbled. Now continuing on with
her hair on the side, her flowing hair, a little
bit of unruly hair like this. A bit more detailing by
adding more curves for some of the section so
the flow of her hair. This region, the
region is beside her ears on both the sides
will be a bit darker. We'll be adding black later on. Go down just random
detailing like this in here. For her hair and her clothes, I'll be using s. Now, we are going to do the
outlining for her leg. A little bit more detailing at the end just below the buttons. A Put the button surrounding
it with stippling dots. Now, we are going to do the
outlining for her legs. Let's add the finger
for this hand. Now, starting with the
upper section of her leg, a little bit of curve seep on both the sides for the
knees and the calf. This will be her socks, quite larger socks, the same
thing for the other leg. Now, we'll be doing the
sketching for the zoos. These are not that much defined. So let's create a little bit of more detailed guidelines
for the zoos. Dividing the zus into
different sections. One of the zoos is
towards the left. The other one is
facing towards us. Small details like
this for the zoos. So. Let's do the outlining. Once again, you don't have to create the same kind of zoous. Instead of the zoouss, you can
create other footpersO you can just follow
along with me and do the outlining in
the same manner. I'm keeping the zoouse for
this project quite simpler. But if you want to
make it a little bit more detailed,
you can do that, too. No, for the Soze
on her right hand. So with this, we are
done with the sus. A patchwork like designed for the front section of
the sus like this. And yeah, with this, we are mostly done with
outline for the girl. Now creating the stick
for the umbrella. A bit of ovals for
the monster's eyes. Now, we'll be creating
two sets of the teeth. For the pencil sketch,
I only created one, but in here, I'll be creating
top and bottom section. Instead of creating
this kind of teeth, if you want to make it a
little bit more scare, you can create
canine like teeth, bit triangular seeps or
whole set of the teeth. I'm keeping it quite simple. So only this kind of simple
version for the teeth, open mouth for our monster. Adding the inside for the eyes, simple circular sep like this. Now doing the outlining
in the form of triangular seem to give it a little bit of appearance to
the mouster body, the shadow body of the monster, we are creating this
kind of outlining. Foot now just do this
kind of outlining and we'll be extending
some of the sections. But later on pelm' be
doing the coloring. I'll be covering some of it
and creating another kind of appearance for it,
creating the foot. So one of the leg is straight, the other will be
a little bit bent. Now this leg, this leg
will be a little bit went. We have got muscular carpor
or monster like this. The upper section of its thigh and the remaining
section for its leg. Not that much of defined, but this simple
seeps like this for the leg giving the seep of the monster a little
bit of etherial look, creating this kind of lines that is coming out from
its body like this. These are optional. If you don't want to create this
kind of appearance, you can just do the coloring for the outlines that
you have created. Since I'll be using the
ink to do the coloring, the small details in here,
I have that a created. I'll have to cover some
of the smaller ones. Instead of these,
I'll have to create a bit more thicker butsons for this kind of flowing lines. Extending the side a little bit in here. And yeah, with this,
we are done with a simple outlining for
our monster's body. Now for her socks, I decided
to create simple pattern. So I'll be creating simple
cross-hatching pattern. Instead of creating this
kind of simple pattern, you are free to
create other kind of variations or other kind
of pattern for the socks, or you can just
keep it plain and simple without any
patterns or designing. In here we are doing
the cross-hatching. For the first set of the line, I'll be making it bit thicker. For the second set, I'll be
keeping it quite simple. This project is also
divided into two sections. This is the first sections. In here, we'll be only doing the main outlining as well as
a little bit of detailing. In the second section, we'll be adding the finer details as well as doing the inking and
completing this project. For the upper section
of her socks, a little bit more detail using
the broken hatching lines. Now, as I was mentioning, the region is beside her ears, adding the blacks in here to completely cover
this in this manner. This is optional, too. If you don't want to cover it, you can use the gray
later on to fill this region now we are going to extend
her hair on this side. A little bit of more flow appearance for her
hair like this. More strengths of her hair flowing like this on this side. Now I'm going to create some random patterns and
designs for the umbrella. This will be somewhat similar to the lower section of her clone. Random geometric pattern
or shapes like this. You don't have to
create the same kind of pattern or design that
I'm doing in here. Feel free to add your
own personal touches, create your own patterns and
designing for the umbrella. I'll be alternating the designs, we'll have this kind of geometric pattern or you can say geometric designs
for the first one, the middle one and the last one. For the middle two ones, I'll be creating a
different kind of design. For the insights, I'll be adding a little bit more detail later on for now continuing
on to the second one. Once again, the same kind of
simple geometric pattern. Feel the remaining
section with it. I would recommend
you to experiment on your own and create other
patterns and designing. The umbrella that
I created in here did not turn down
the way I wanted. Experiment on your own, add your own personal touches
and create other kind of variations and designs
for the umbrella stub. And with this, we are done with all the three sections
for our umbrella. In here, let's divide
this into more sections, and then we'll be
creating simple arrow like design, arrow like pattern. Dividing the lines in here
once again on this side. Now, just simple
shape like this. I'll be alternating
the saps a little bit and using the black hatching
lines to do the coloring. I'll also be using a little
bit of red later on. For this section I'll only
be covering up to here and I'll be seeing you
in the next section where we'll be
continuing on from here.
8. Using Red Fineliners : Now continuing on
where we left off, I created the same kind of pattern for the
other side too. And now we are going
to likely erase the pencil marks and see the
ink has properly dried up. And here, since I'm using a bit of more smoother
surface for the people, I'll have to be a
bit extra causes. For that, I'll have
to be extra causes. And that's why I use a lot
of tissue paper underneath my palm to avoid smudging of the ink as well as
the pencil sketches. Removing the inased dust. Since I have got a brass, I generally prefer using
it to avoid the smudging of the color by my
palm or by my hand. Now we are going to continue
with this grey colour preen. This green a little
bit tandomly in here for the pattern
that we have created. So for all three
sections in here, randomly adding it
for the insides of the pattern using this green. This is once again
optional if you don't want to use it or you want
to use the other color. Moving on to her hair,
we are going to cover the entire section of her hair with this lighter
sad of the green. If you want to do
a little bit of shading with the
grease or include a little bit of black or do the coloring with the red,
you can do that, too. But now, just fill the entire
section with the green. You don't have to be
that much coarser since we'll be using black, and when we'll be
using the black ink, we'll be redefining
the seeds of her hair a little bit for the upper
section of her socks. Also adding it for her sous
entire section for now. Later on, we'll be adding
a little bit of grain, but for now covering the
entire section with the green. Also be adding it for the cloth, but for now, I'm not adding it. Right now, I only added for the patches of her elbow
and for the upper side. I forgot to create the fingers. Small lines like
this for the finger. Now we are going
to do the inking, but before doing it for some
of the smaller section, I'm adding the blacks
in between like this, since it will be
quite harder for me to do the inking using
the breast pain, using the watercolor bras. That's why I decided to use the Tombos breast paint to do the outlining for
the smaller section. Now, we are going
to do the inking. In here, I've got
the Kuratacase ink and using normal small Wauclor
brush, to do the coloring. This process is going to
take a little bit of time, so I'll be increasing up
the speed a little bit. Now, in here, I'm starting
with doing the outlining. H Right now, it's in the normal speed, but now I have increased the
speed a little bit, 2.5 X. In here, we'll be
making a little bit of changes since we won't be able to do the inking for the modern lines
that I have created. So I'll be transforming them into a little bit
more thicker lines. You'll have to bit extra courses
while doing the coloring beside the girl to do the outlining for the
sap of her wording. And you'll have to
wit causes once again for the monster fecal feature
its eyes in the teeth. Using small strokes with the bras to do the
outlining in here, and then feeling the remaining
section with the black, spreading the color
in this manner. I would have mixed a
little bit of water with the ink to make it a
little bit more fluid. But anyhow, let's continue doing the outlining for
the remaining section, carefully doing the outlining
just beside the umbrella, its teeth, and the
eyes like this. Carefully adding it in this
manner, encircling its eyes, encircling the smaller
teeth that we have created, and now feeling the
remaining section. And with these we are
done with this side, we are going to do
the same thing. I forgot to do the
coloring for its sling. Completely filling it with
the black in this manner, we are going to do the
same thing in here, fully surrounding the
umbrella at the top, eyes and the teeth. Nia just added a little bit of black and between
the separate teeth, and then using
smaller brush strokes to feel the remaining section, coloring it in this manner. If you're using
bit saturated in, you left to bit causes to avoid the smudging of
the colon by your palm. So I started doing the inking
from the left to right so that I won't be making any mistakes by overlaying
my palm on that region. So for inking or coloring, start with the left to right, so you won't be placing your palm by mistake
on those regions. In here, we have created
a bit more flow lines. So we'll be just converting them into a little bit of
different kinds of line, the same thing we did
for the left side. Writting a bit of
straight lines like this for the triangular
shape of its body. And now we are going
to create this kind of flowing lines using
the watercolor brush. Just random bits of
flowing lines like this, covering some of the
black outlines that we created with
the tombosbuspan. Coloring the remaining
section of its leg, making a little bit more changes for some
of the sections. And with these, we are done with the inking for our monster. I waited for it to
dry a little bit. I'm using a red to
create a little bit of rosy checks for the girl, small flour on both her pockets. For some of the
sections of the susse, I'm adding a little bit of red. This is optimal.
Instead of using the d, you can use the blue
black or other colors. You can also do the
coloring for her socks using I'll only be covering her jacket and the eyes of the monster with the red. For the remaining section, I won't be using the red. Using hatching lines and
doing the coloring in this man for the entire
section of her jacket. This is going to take
a little bit of time. You can also use the breast
pain to do the coloring. But in here, I decided to continue doing the colouring
using the breast pain. Continuing on doing the coloring using the breastban
in this manner. For this section, I'm using the angle hatching
lines like this. For her hand, I'll be
changing the direction of the hatching line to
create a little bit of quite distinct
separation in between the middle portion and the outer sections of her clothes using
the hatching lines. I'm not keeping
my palm on top of the peeps to avoid the smudging
of the ink by my palm. Covering the entire section
with the red in this manner. Now moving onto the
other side and doing the same thing using the
hatching lines do the coloring. Instead of using the
red for the other side, you can make it a
little bit different. You can use the blue or a
combination of red and blue and create some kind of pattern or designing using those colors. Small saxon in here with the hatching lines
using the red. The upper part of her clothes, the hoodie and the
remaining sections. Add it carefully. Don't add the color for her hand or
the parts of her umbrella. Second hand in here,
the right hand, as I was mentioning, changing the direction of
the hatching lines. We are going to cover
the entire section with the hatching
lines on this arm. Oh And with these, we are done with the red for
the coloring of our jacket. If you want to make it a
little bit more darker, you can add another row of the hatching lines or you can also use a little
bit of Umra spin, coloring the eyes
for our moisture. We are going to completely
fill the insides with the red, and then for the eyeballs, we'll be using a
little bit of black, not a little bit of black, but we'll be completely
filling it with the black, doing the same
thing for this eye, filling with the red for now. So if you want, you can also do a little bit
of coloring for the teeth. Once again, using
the Tombosprspin to do the coloring for the
handle of the umbrella, the upper section too. For the stick at
the upper section, I'm not adding any coloring, but if you want,
you can do that. Adding the black for the
eyes of our monster. Now going with the
gray and doing the coloring in
here for her clone. In here, the red was
not properly dried up, so it got a little bit
smirged like this. Wait for the colours to dry
and then do the coloring. I made a little bit of mistake. Later on, I'll be covering it with another
layer of the red. For this section of
the umbrellas, too, I decided to completely
fill it with the prey. So doing the same thing in here, the other section, completely
filling it with the gray. We are almost done with the
coloring for our monster, and that goes, these are all
extra additional details. For the alternative
sections in here, I'm just using the hatching
lines in this manner. As I was mentioning,
the designs that I created did not turn
out the way I wanted. Feel free to use or
create other kind of patterns and designing
for your umbrella, or you can completely cover
it the black or the gray or using combinations of red and the blue to
do the coloring. Random hatching lines using
the hatching lines in this alternative manner.
We are done with this. And here I'm using the in here, I'm using the saccharomcron file a little to create the rains. We're going to
create lots of rain. I'll be using a little bit of sicky and broken lines to create the resemblance for the
falling rain drops. And on top of the umbrella, I'll be creating this kind of splatter effect using more
broken lines in this manner. This is also another
time consuming process, and we'll be creating
lots of photo droplets, rain droplets
following like this. On top of the ghosts body, I'll be using white colored
chilly pen to create it. But for now for the remaining
section in the background, using this kind of
broken hatching lines and creating multiple lines. This is optional. If you don't
want to create the rain, you can just keep it as it
is simple project like this. Instead of creating
rain in the background, you can create other kind of pattern designs or monster
in the background. Once again, in here,
I've increased the speed a little bit, 2.5 wax. If you want to follow
along with me, you can pause the video or you can reduce the speed
to the normal. You can use the tissue paper to avoid smudging
with the color. Some of the section
of the ink was not right. But some
of them are not. Instead of taking the risk, I'm placing the tissue paper to avoid the smudging of
the color by my palm. Multiple lines like this to create the resemblance
for the rain falling. Now, using the white
color to create some of the rains splattered
on top of our ghosts body, same kind of line, doing the
same thing on this side. And yeah, with this,
we are done with the detailing for the ghost. Ater on, I decided to come back and do a
little bit of more detailing for some
of the patterns that I created for the umbrella. This did not turn out well, so I'm trying to rectify it by using a little
bit of hatching lines for top and the
bottom sections of the geometric patterns
in this manner. And for the insides,
I'll be creating simple circular saps with
a tiny.in the inside. If you have followed
along with me, you are stuck with
the same kind of this ridiculous pattern for
the top of the umbrella. So just create this kind of pattern or design
or other kind of pattern or designs to rectify it to make it
a little bit better. Rows and rows of hatching
lines in this manner for the upper and bottom sections
of the geometric patterns. And now for the sides, a little bit more hatching
lines for some of them. A little bit of more detailing
with more hatching lines, making the upper
section a little bit darker using hatching lines. Moving onto the middle
section. The same thing. Lots and lots of
hatching lines for the upper and bottom
section like this. Apart from this, you can
also increase the volume of the rain a little bit by
adding multiple lines, more lines, converting this
rain into a heavy savo The more lines I'm adding it, the more muddier it's getting. And here, continuing on with more hatching lines for the
top and the bottom sections. And with this, we are mostly done with the middle section. And with these, we are done
with the middle section. Apart from this, as
I was mentioning, simple dot and circle
encircling it like this. Creating a little bit of
resemblance for the I like C. This is optional. If you don't want to create,
just leave it as it is. Once again, in here, I
increase the speed to 2.5 X. If you want to follow
along with me, you can pause the video
or you can just reduce the playback speed
to 0.25 X or 0.5 X. We are doing the same thing for the final section
of the umbrella. Bit more detail in
the same manner using the hatching lines and simple circular sieves for the insides. We are done with the black now. In here, I'm going
with the red to create more pattern for the inside
of the two remaining section, a little bit of hatching
lines in this manner. This is a normal spin. Instead of this kind
of pattern or design, you can create other
variations of it. I'll also be making
a little bit of changes to the flowers that
we created for our pocket. Since the color was
smrsed a little bit, a little bit of
changes to the flour, adding a little bit more detail for the buttons with the red. And with these, we are
done with this project.
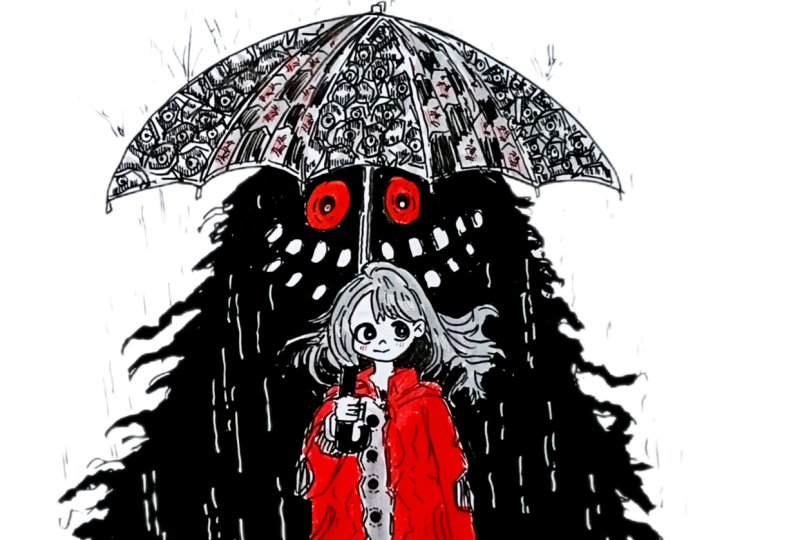
9. Guardian of the Silent Storm : Welcome to this project,
Guardian of the Silent Storm. Let's start with a
simple pencil sketch. We'll be following
the same kind of guidelines that I showed you
in the demonstration video. Starting with the straight line, I'll be following
the same guideline. Since in here, we'll be creating only the upper part of our body, I'll be dividing into
four equal sections. Divided into four equal section. For the upper part,
we'll be creating her head and for the
remaining section, we'll be creating her neck and the rest of upper
part of our body. Start with creating a bit of simple circular
see for her head, then extend it a
little bit like this, cylindrical seep like
this for her neck. I'll be creating somewhat of conical see for
this of her body. And in here at the top, I'll be creating umbrella. Circular seep like this for
the two third of the section. Extending it a little bit like this for the remaining
portion of her face. This is just a simple
guideline that we are using to create her face when we'll
be doing the outlining, I'll be making a
little bit of changes. I'll be making her head
a little bit tilted. For the neck, just use half
of the section like this, consider the head as a unit
and on both the sides, using half of it like this. So on this section in here, we'll be creating the
rest of her body. So this kind bit conical see. Using head as the reference. We'll be adding ears in here and eyes just
beside it like this. I'll be creating a
bit larger eyes. And this will be her hair. Here, I'll be
creating a little bit simpler version for her hair. If you want to create
other variations of the hair, feel
free to do that. Extending the light
a little bit more. So I will be using it
to create umbrella. In here I'm just creating
a simple umbrella. I'll be changing the
angle of the umbrella since if I'm going to create
this kind of umbrella, then I'll have to
create the stick just in front of a face. I'll be shifting the umbrella towards the left a little bit, and by doing it, I'll have to shift the angle of
the umbrella too. In here, I'm just
showing you how I'll be creating the umbrella. I'll be giving it a little
bit of three dimensional sea. So the insides of the
umbrella will be visible too. Also, I'll be shifting
a little bit upward, the umbrella for now, continuing with the remaining
section of her body. In here, I'll be creating a bow. Simple shape like
this for the bow. Now, the ribbons on the sides. Creating simple
outlines like this, ribbons on the sides. For this, I'll be using
red to do the coloring. Apart from this, I'll also be creating lots of riils
surrounding her neck. So in here, two or three
layers of the frills. Here I'll be using
a little bit of black and red to do
the coloring later on. In here, in this manner, I'll be creating the
frills, extending it. In here, we'll be creating a
hand, holding the umbrella. The left hand will be
holding the umbrella. In between the ribbons, I'll be creating simple
patterns and design. And in here, I'm just roughly sketching out the
guidelines for her arm. The skeet that I'm creating in here, if you are
going to use it, you can create the
umbrella just in front of her head or a little
bit towards the left. But since we won't
be creating it, I'll be shifting her hand a little bit more
towards the left. So if you want to proceed
with it, you can do that. You'll have to just tinge the angle of the
stick a little bit, or you can just follow
along with me and shift the hand a little
bit more towards the left. I'll be gritting her
elbow somewhere in here in between the third and
the fourth row like this. This will be her palm
holding the umbrella. Only a small section of her
fore end will be visible. A little bit beside
her face like this. Depending upon this,
we'll have to set the umbrella a little
bit towards the left hanging the angle, create a perpendicular
line like this. A straight line like this, a little bit tilted
towards the right. This will be her hand
holding the umbrella. The umbrellas handle, only a small section of her hand like this
will be visible. The remaining portion
of her hand like this. She is wearing a flowing cloth, and this will be her right arm. For her arm, as well as for
the bottom of her clothes, we'll be creating lots of frills and a little bit of
designing and patterns. In here, making it a
little bit more broader. Here we'll be creating lots of reels and extending it in
here for the other side, I decrease the width
a little bit in here. On the other side,
the right side, sending it in the same manner. In here for the two lads, I'll be creating simple
patterns and design. In here for the two sexon, I'll be creating simple
patterns and designs of reels shifting the ribbons a little bit. In here too, we'll be creating simple patterns and designs. You can create any kind of patterns and designs
as you see fit, or you can just
follow along with me and create very
simple versions. Since we are going to shift
the umbrella a little bit, so erasing the first
sees that we created. You can stick with the
umbrella in the center, or you can follow
along with me and save this umbrella a
little bit like this, extending it to determine
the height of the umbrella. You'll be creating this
kind of simple somewhat of semicircular R in here for the remaining section
of this umbrella. And we are going to give it a little bit of three dimes LC. So a little bit
of other section, the inside will be visible, making it a little bit curved in this manner so that the
insides will be visible. And since in here, we have created a little
bit of more space, we'll be extending her head a little bit and
creating her hair line a little bit of swirly pattern like this
for the bias of her hair. So this is the
simple fancy sketch using simple guidelines
to create the project. We'll be dividing the umbrellas into three or four sections. As for the top of the umbrella, I'll be creating multiple
eyes and beside her, I'll be creating few monster or some tentle screature making the edges a little bit
curve for the umbrella. I have divided this project
into three sections. This is the first
section, and in here, I'll only be covering up to
here for the pencil sketch, and I'll be seeing in the
next section where we'll be doing the outlining as well
as create the monster.
10. Outlining with Brush Pens : Welcome to the second part,
continuing on a left top. In here, I'm using Tombos bras
ping to do the outlining. The pencil skis that we have
created is not the final. If required, I'll be making
changes and adjustment to it. In here, I'll be doing the
outlining for the umbrella, starting with doing
the outlining for the bottom sections. In here, we'll be using lots of broken hatching lines to
create simple patterns. In here, I'll be using lots of broken hatching
lines to create a little bit to create a little bit of taxon
on top of the umbrella. Apart from that, I'll also be creating few eyes on top of it, continuing on with
doing the outlining. We have divided the umbrella
into four different section, the upper part. Now. For this sections in here, create this kind of
simple semicircular sap on the other side too,
I'll be doing it. But for now only
creating for the sign. Increasing the line
weight a little bit while leaving a little
bit of a space like this. Later on, we'll be
adding red for this. Now, in here, making the outlines a little
bit more bolder. So another row of
lines like this. I'll be using both
simple and broken lines like this in this manner. This is optimal.
Instead of this, if you want to use plain
and normal lines like this, you can do that. I find that when I use
this kind of broken lines, it adds another layer of
texture or you can see add more characteristics to it and give it a little
bit more organic lure. Once again, in here, I'm using a bit of broken lines like this, adding it in here too. And to give it a little
bit of crumbled look, we'll be creating more broken hatching lines
for the inside. Simple and random hatching
lines in this manner, following the curve
sip of the umbrella. You can vary the
seeds in the sizes. Apart from that, if you want to make it a little
bit more darker, you can also include a little
bit of cross-hatching. Now, let's create
eyes first and then we'll be continuing on
with this hatching lines since it will become a little
bit difficult if you did the hatching first and
then the ice later. So I decided to create
simple eyes like this, a little bit more curvy and bulgy seeps for
the eyes like this, somewhat of thicker optical
seeps like this in here. For the middle one, three eyes, for the third one, two eyes, and for the last
one, a single eye. For the insides of the eyes, I'll be creating a little bit different variations
for the pupil. You can create any
other variations or designs for the eye. Or instead of the e, you want to create other thing,
you can do that, too. On top and the
bottom of the eyes, I'll be using more broken
hatching lines to give it a little bit of tired
and exhausted look. Making the outlines of the
eyes a little bit more darker, particularly near
the curved sections. Adding a little bit more
light weight in this manner. And now encircling it in this manner using
broken hatching lines. Adding the eyeballs
for nine sides, making the sides a
little bit more darker, using this kind of spread out
hatching lines like this, making the sides a
little bit more darker, increasing the line weight. Now we'll be encircling it
using broken hatching lines. You can consider this
kind of lines to be either broken
hatching lines or we are just simply using curved
lines in this manner. I'll be doing the same thing
for the remaining six eyes. You are free to create
other variations, other designs or patterns
for the insides of the eyes. I won't be doing any
coloring for the eyes. This will be plain and
normal monochrome eyes. But if you want to
do a little bit of coloring using the red, blues or greens,
you can do that. As for the eyes of the
girls, I'll be using blue. But in here, as I mentioned, I'll be keeping in plain
and normal monochrome eyes. Adding the eyeballs
for the insides. We have got two
more eyes in here. This eye is looking towards
the upper right corner. Adding the eyeballs
for the last one. We are going to increase
the line width as well as encircle the eyes using
curved lines in this manner. Broken curved lines. As for the insides, as I menton, you are free to create
other variations or other designs or
other kind of pupils. You can also create texture
for the veins using the micron pin apart from that, if you want, you can create multiple eyeballs
for the inside. Encircling it with this
kind of hatching lines. Spread out hatching lines
like this in this manner, increasing the line weight
on both sides like this. Curved lines for the upper
and the lower sections. We have got three more eyes, doing the same thing
for the remaining ones. Spreading out the
lines in this manner instead of covering
it with the black, making the outlines a
little bit more darker, increasing the line weight and encircling it
with curved lines. Filling in sides with the black, and a set of two hatching lines in this manner on both sides. And moving on to the last one, only a small section of the
eye is visible in here, making it a little bit more curved like this,
a small section. A small section is bulging
out from the umbrella. Now, we are going to continue with creating
broken hatching lines. I won't be over saturating it for only some
of the sections, I'll be creating this kind
of small hatching lines to give the umbrella a little
bit of crumbled appearance. Also creating this kind of
bit curved saves to sew the watered droplets to sew some of the watered
droplets present in here. Very few small saves like this. And later on in here, I'll be using either red or
black to do the coloring. Creating the lines in here for the third section and
panning for the fourth one. And with these, we are done with the front section
for our umbrella. Now, let's continue with the
remaining section in here, doing the outlining for
the umbrellas stick. So if you're not
that comfortable, you can use the scale to make
the lines more straight. I'll be keeping it
plain and simple. I won't be adding any
colouring for it. We are moving to doing the
outlining for the girl. Changing a seep of her
fees a little bit. Simple outlining like this
in this manner for her hair. The sides of her hair, I'll be creating large animal
like eyes for her, same kind of eyes that I showed you in the
demonstration video. Large curved shapes
like this for the eyes. We'll be creating large
eyeballs for the insights. As for the sides,
we'll be giving it a little bit of more volume. Increasing the thickness
of the lines like this, creating small eye lass. Set of three eyelass
for both the eyes. Large circular seed like
this for the eyeballs. For the eyeballs in here, I'll be using blue colon. Adding the pupil
inside the eyeball. Encircling it like this. Making the outlines
a little bit more darker for the lower
sections like this, feeling the insides
with the black. I'm not feeling the
entire section. I left a little bit of
space, as you can see, doing the same thing
for her right eye, a small projection for the nose, and a smiling mouth. Continuing on with her hair. I'll be creating a very
simple outline for her here. Instead of this kind of hair, if you want to create
other variations, feel free to do that. Now for the bow in here, I'll be creating clothe
frills in here for her, M. All of the simple outlines
that you have created, and we are making it
quite simple and easy. If you want to create
variations and other pattern on designs or other kind of
clothing, you can do that. More frills in here
beside her collarbone. The frills in here at the side. Let's increase its
weight a little bit. So another row of lines
using curve lines. This section of the bow, follow the outlines if you
want to make genius an adjustment or if you don't
want to include this. If you don't want to include this, you don't have to do this. In here for this section, the frills, I'll be using
a little bit of red. But for this one, I'll be completely
covering it with the red. And in this section,
I'll only be doing the outline for the
girl and the umbrella. In the next section,
we'll be creating the outlines as well as adding the detailings
for our monster, as well as do the
coloring using the ink, extending the side
of the umbrella for the umbrellas handle. This section is in regular time, so you can always
follow along with me. Now, the side of her
hair, the left side, creating this kind of bit
swirly pattern for her hair, we'll be doing the same
thing on the other side. Her soldier and arm. One of her arm is
holding the umbrella. Another one is on her side. Feels in here this
beside her hand. A small section of her
hand is visible in here, and the entire soldier
will be visible like this. Simple lines like this
to create the soldier. We are not adding any
pattern or designs in here. Now for her right hand. In here, we'll be giving it a
little bit of crumble lobe. Just do the outlining. Just go over the pencil
sketch, and then later on, we'll be adding multiple
lines for the inside to give the clothe a little
bit of crumbled appearance. In here, for her elbow, a little bit of
crumbled aparian. I'll be using these kind of simple lines to give
it a little bit of crumbled aparians using
a bit of broken lines. If you want to
create some patterns and designs, you can do that. And in here at the bottom, I'll be creating
multiple small frills. For now, let's continue with our remaining
section in here. In here, I'll be creating
simple design for the middle section using this
kind of simple scallops. For the upper section to creating the same
kind of scallops. In here, this region, the middle one simple pattern and designs using
bit curved lines. This kind of bit somewhat
semicircular saves. And with these, we are done with the middle portion of her body. Now, let's do the
remaining portion, extending it, giving a
little bit of conical save. For the bottom, we'll be
creating two layers of the free, as well as I'll be creating
simple designs in here, continuing on creating
the frills in here. A very simple way to create
the fill just like this. Giving it a bit
crumbled appearance, just add lines
following the same. Using curved lines like this in this manner to create
frills like this. Using this kind of
line to give it a little bit of
stitching appearan Now for her hand, I'll be
creating folded hand like this, very simple, very
simple shape like this. And with these we are
done with both her hands, extending the cloth on
the other side like this. And in here, we'll be
creating two layers of the frills for the section and the section just below
it, I'll be using red. Here too, I'll be
giving a little bit of crumbled appearan after
doing the outlining. This simple lines like this to give it a bit
crumbled appearance. You can also use a little bit of cross-hatching to make some of the section bit more darker. This is going to be our
first layer of the frills. Use a little bit of curvy line for the bottom section in here. And for the insides, we'll be
using a little bit of red, or you can also use a
little bit of black or gray to make it a
little bit darker. These are not that
defined scenes. If you want to
create a little bit more defined or other kind of pattern and design,
you can do that. Two or three lines
for the inside to give it more
grumbled appearance. Continuing on with adding more
lines in the same manner. This will be the final layer of the frills in here
at the bottom. Another border
like this in here. For the insides too, once again, we'll be using more
lines to give it a little bit more
crumbled appearance. And with this, we are
done with another border. Now, adding three or
four lines in here like this for all the sections
that we have created. Mostly, we have
created somewhat of rectangular saves in here with a little bit of
curving outlines. This section, we are going
to give it a little bit of crumbled appearance
using the same kind of lines, but broken lines. Apart from this, also creating few patterns and
designs for the inside. Creating few lines for
the upper section too. And this is optional pattern or designs that I'm
going to create. If you're satisfied with it, you don't have to do it using this kind of
hexagonal shapes and inserting it with
the curved lines. In here, I'll be creating gems. So gems are embedded
on her clothes. Red gems. I'll be adding
the red later on. I'll be creating another
row of shapes like this. Total of three more in here. Encircling into the
small curved lines. One more in here for the
middle portion, encircling it. Creating a few more
lines beside to give it a little bit more to give it a little bit of more
crumbled appearance. We are done with our clothes. Let's continue with the
remaining section of our hair. Doing the outlining for
the remaining section of her hair in this manner. Creating this kind of
swirly pattern for the remaining section in here at the bottom part of her hair. Instead of creating this
kind of swirly pattern, if you want to keep it plain and simple, you
don't have to add this. In here, I'll be using
gray color to do the coloring for some of
the sections of her hair. Using more hatching
lines in this manner, following the sep of her hair and adding the hatching lines. And with this, we are done with a girl now for the other
side of the umbrella, creating the same
kind of curved lines. The simple semicircular
saves like this. The last one, and now we are
going to create the outline. Another outline or you
can see powder like this. The same kind we it
for the front sign. In here, I have just decreased the line weight a little bit, and with these, we are
done with this section. I'll only be
covering up to here. I'll be seeing you
in the next section.
11. Background with Ink: Welcome to the third part, continuing on where we left off. In here, I'm going to create the creatures in the background, starting with the circular
see for the head, the head of this worm like
creature with the eyes, simple circular
saves like this and inside this creating another circular see
for the eye ball. I'll create a slimy body
for both the creatures. This worm like creature, giving it a little
bit more propersy for the eye, extending it, adding a little bit
more depth or you can see a little bit more curved
to the upper section, doing the same thing
for the second one. For these we are done with
a simple pencil sketching, now going with the tombs
to do the outlining, adding black for the
insides of the eyes and now encircling it while leaving a little bit of space in here. For that, I'll be
adding to it later on. In here, I'm using Icribbling to do the coloring
in this manner, doing the outlining
for the eyes and to make it look a little
bit more scary, I'll be adding lots of lines. I'll be using this kind of curve lines on the sides on the top and the
bottom like this. Apart from this,
if you want to add veins for the insides,
you can do that, too. Adding a few more curved
lines like this for the inside for its entire body to give it a little bit
of more slimy appearance, albicurting this
kind of scallops. The scallops in here
won't be interconnected, but I'll be adding scallops, lots of scallops, rows and
rows of scallops like this, and inside them, I'll be adding
hatching lines later on. So for its entire body, I'll be adding lots of
scallops in this manner. For this one, I'll be using black for the latter
half of its body, I'll be adding black, and then I'll be using white to do the coloring in
the same manner, creating scallops and using
hatching lines on top of it. For now, just create lots
of scallops like this and add a bit of line weight by using two lines
instead of one. And as you can see, I'm
leaving a little bit of empty spaces in
between the two lines. Follow along with me
and create this kind of texture for the entire body. Instead of this, if you want
to create other variations or other pattern or designs
to its body, you can do that. I'll only creating scallops up to here for the
remaining section. This below it, I'll be
using black colour, black ink, and
then on top of it, I'll be overlaying white. We are done with the first one, doing the same thing
for the second one, using the scribbing
for the inside, now encircling it using more
scribbling lines like this. For the insides in here, I'll be using red later on. Doing the outlining
for the entire eyes. As usual, like the uglier one, we'll be adding lots of
lines in this manner. Curved lines for the
sides of the eyes, making it bit more thicker and bit more darker with more lines. Doing the outlining
for the upper section. And once again in here, we are creating lots and lots of scallops like this with a
little bit of line weight. Add more scallops. I have only created two. If you want to create few
more, you can create it. We have got a
little bit of space on both the right
and the left side. You can create one or two more. You can also create few at
the top, beside the umbrella. Adding few more layers of
the scallops like this. And with this, we are done with these two creatures
in the background, the warm like creatures. If you want to add a little bit more detailing,
you can do that. You can also add
spikes on its body. In here, I'm going
to use the ink. So since this process is
going to take a lot of time, and it won't be feasible to do the inking using the breast
paints or the fine liner, so I'm using the ink in here, starting with doing
the outlining for the region in which I'll
be filling the ink. I'm using Zikuraaki ink
to do the background. This is optional, if you don't want to do the coloring
with the black, you can leave it as it is. Apart from the black,
if you want to do the coloring with other
colored ink, you can do that. You can use green, blue, and the red to do the coloring. On top of it, I'll be using white to create the
falling rain effect. In here, I've
increased the speed. If you want to follow
along with me, you can pause the video or you can reduce the playbacks spin. For the regions near the
umbrella and the gird, you have to causes and use smaller breast to
do the outlining. If this is a little
bit challenging, you can always use
the breast paint or the to add the coloring
for smaller section, extending and use the file
or the breast paint to extend the color and then mix it with a black
ink from this. Carefully and cautiously doing the inking using
the smaller breast. Adding it carefully
just beside her hair. Any of this kind
of smaller brush comes in handy
with larger brush, it would be a little
bit challenging to do the coloring using this ink. On the other side,
extending the color. As I was mentioning for the
lower half of its body, completely covering
it with a black ink. Now, adding it in
between her hand and the body of the slimy creature. Fully surrounding her clothes. For some of the
sections in the speed, I'll be increasing
the playback speed. For those section,
I'll be mentoning it whenever I'll be
increasing the speed. In those cases, if you want
to follow along with me, you can pause the VD or
you can reduce the speed, carefully encircling parts
of the umbrella like this. The second slimy
creature in here. If you want to add the black
for the entire background, the entirety of the
people, you can do that. In here, I choose not to do it. I created this kind
of rectangular s and then filled the black
inside it in this manner. The only a little bit of black
in here for her clothes. In here, I did a
little bit of mistake. The upper region is a
little bit lighter. I mixed a little
bit of water to it, and the consistency
became a bit lighter. Now for the insides
of the umbrella, too, in here, I'm using black. This is normally spin carefully encircling
the different sections of the umbrella
and feeling it and filling the entire
inside with this plaque. Once again, in here, I increase the speed, completely filling
the inside with it. Be careful around this
circular section as well as her head and the
stick of the umbrella, the handle of the umbrella. For this sento, it
was a bit lighter, adding another layer
of black in here. Carefully encircling it,
adding it beside her here. Now for the remaining
section on the right side, completely covering
it with a black ink, you'll have to it
causes while doing the inking and see that the
other layer has dried up. Otherwise, the ink will
get smrged by your palm. The layers in here
will dried up. Going in with the
white all pen and extending the remaining
portion of its body, we are going to
create the same kind of scallops that we did with the black I'm increasing the line weight like we did
earlier with the black ones. For the remaining
section, if you want, you can create few more
creatures using the white ink. And with these we are done with the scallops creation for it, making its outline a little bit more bolder with
more line weight. Now I'm going to create lots
and lots of this kind of broken hatching lines to
create the rain effect. Instead the ink has dried up properly and just
create this kind of simple broken straight lines and to create this
platter effect, just create this kind
of smaller broken lines in different angles like this. T. On top of the umbrella and on top of both the creature's head a little bit on top
of the girl's head, I'll be creating this kind of smaller hatching lines to create splateral
effect of the rain. I'm also adding the rain
droplets just below the umbrella to give it a little bit of
more dramatic look. This is optional
if you don't want, you can just leave
the region just below the umbrella empty
without any rain. Once again, in here, I've
increased the speed, since this process is repetitive and is going to take a lot of time For the entire region, in here, I'm going to
create lots of this kind of lines to create the
falling rain effect. Now moving to this side, the lower sections
of this right side, creating splattering effect on top of the creature's head. Now on the surface
of the umbrella creating splattering
effect using this kind of broken small hatching line and creating it at different
angles like this, covering the entire
section with it. Now for the remaining section
on this bottom right side, continuing on with creating more broken hatching
lines in this manner. Adding few more hatching lines for the insides of
the umbrella too. And with these, we
are done with it. A little bit of this
section was not colored, so using the black to do it. Add few more details
wherever you think it's required with
a white chilly pen, you can create more
splattering flat. Now I'm using the gray filling the insides with
the green like this. I'm overlaying this gray on top of the broken
hatching lines. If you want to cover
the entire section with the gray or other color,
you can do that, too. But in here, I'm mostly focused on the broken hatching lines. Apart from it, I'll
also be adding it on top of the
folds we created. I'm moving on to
the creature's eye and creating this kind of spreading out appearance or texture just beside
its eyeballs. Adding a little bit of
this gray for her here, I'm not going to cover
the entire section, but for the regions where
we added lots of lines and the regions that will be comparatively darker
for those section, I'm going to add gray. And for some of the sections, I'll be making it a
bit more darker by overlaying two or three layers
of the gray and others, I'll be keeping it
comparatively lighter. I'll be coming back to the
here later on for now, just adding it on top
of the lines that I created earlier to give the clothe a little
bit more ragged look. So the folds present
on that clothe adding it on top of
it with this gray. Adding it just below the fridge. You can also add it for the
handle of the umbrella, adding it for the
fridge at the bottom. For all the rows that
we created in here, I'm adding the grill for each individual section like this. Moving on to the creature for
all the scallops in here, just overlaying this
gray on top of it. For all the scallops, just cover it with
this in this manner. I'm not going to cover
the entire section only on top of the
scallops like this, adding it for the upper section. Now, we are going to do the same thing for the second one, overlaying this gray
in this manner. And with this, we are done
with both the creatures. Here I'm going with a
blue saccharomcron file and do the coloring
for our eyes. Instead of the blue, you can
use red or green colour too, or you can just leave it
as it is simple and plain white covering the entire
section with the blue. Later on, I'll also be using
a little bit of white to add the highlights or you can see a little bit of reflection. Using scribbling to completely fill the insides with this blue. And with these, we are done with the blue colored eyeballs. Now going in with the red. In here, creating
simple patterns, using red, creating simple
small circular saps like this. And for the surrounding region, I'll be completely
filling it with the scribbling lines using scribbling and
filling the remaining section in this manner. So for her clothes, I'll
only using the red. Isad of the red,
if you want to use blue or other colors,
you can do that, too. For the bow tied around in
here, I'll be adding the red. And as for the patterns, I created for the lower
section of our cloth. In there too, I'll
be using the red to fill the extracondal
seats that I created. Also for the lower section of the frills, I'll be using red. I'm going to completely
fill it with the red. Before doing it, I'm
using the fine in it to make the outlines a
little bit more darker. And adding this kind
of lines following the curve sea to give it a little bit more
crumbled appearance. Now, going back once again with the red and filling
the entire section. In here, once again,
I increased ISP. Since this process
is going to take a little bit of time
instead of it if you want, you can also continue
with the red ink or the red colored bras pain. Just rows and rows
of catching lines to do the coloring
in this manner. And here I switched on to the bras paint to
do the coloring. It's more efficient
and more faster. Now, as I was mentoning for all these sections in
here for the freeze, the upper part, completely
filling it with a red. For the bottom layer,
doing the same thing, completely filling
it with the red. Now, going in with a black pie liner to
add the detailing in form of this kind of
small hatching line for each individual scallops
that I created. I switched to file
liner instead of the tombos breastbin
since with it, I can create comparatively
smaller line, and I'll have a little
bit more control as compared to the Tambos
breastbin with thicker tip. Using this pylon and continuing
on with creating lots of hatching lines for
each individual scallops that I created. Once again, in here, I
increase the speed since this process is repetitive and it's going to take a
little bit of time. For both the creatures
in the background, I'll be doing the same thing. For the lower section
of this body, I'll be using white to create
the hatching later on. And with this we're done
with the first one. For the handle of the umbrella, completely covering it with
a black hatching line. Now, moving on to the second
one, doing the same thing, creating smaller
hatching lines and adding it on top of
all the scallops. Each individual scallops. Instead of creating this kind
of simple hatching lines, if you want to create
other variations or other pattern,
you can do that. You can also turn the scallops into numerous of smaller eyes. And with these we are
done with the black. Now going with the
white and creating small highlights or you can see a little bit of reflection
for the girls eye. Adding it for the creatures
eye to small tiny dot. Now for the hexena banal
seeds that I was mentioning, using hatching lines to feel
it completely like this. I'm keeping it
comparatively lighter. Instead of it, if you want
to make it more darker, you can do a proper coloring or you can also use
the colored bras pen. Now for the remaining
scallops in here, using white and creating
numerous small hatching lines in the same men that we
did with the black one. More tiny lines in here. And with this, we are done
with both the creatures. As I was mentioning in here
and for other sections, we are going to
make it more darker with more layers of the gray. In here, particularly
in this region, we are going to make it
comparatively darker. This is optional if
you're satisfied with your project, you
don't have to do this. With these, we are
done with the here. Now, going back once
again with the red. In here, I'm just going to
add red in this manner, creating this kind of small dropect small
droplet like effect. This is optimal.
If you don't want, you can just leave it as it is, or you can use black
hatching lines for smaller sections in here, the small circular sap that we created for the insides,
I'm adding red. Adding it in here
on top of our head. And with this, we are done
with the red for the umbrella. If you want, you can also
use red for the eyes. Like in here, I'm using the red for the eyeballs
of this creature. You can add the red
for the eyeballs at top of the umbrella, a little bit of red in here. And with these, we are
done with this project. I hope you enjoyed
painting this. M
12. A Walk Through Quiet Spirits : Welcome to a walk through
the quiet periods. This project is a
little bit simpler as compared to the earlier
two that winded, starting with a horizontal line. This will later mind the
width of the head and now creating a vertical line
for the height of the body. I'll be dividing into
eight equal parts, dividing into two equal parts
and now further dividing into four equal parts and
finally into eight equal parts. Simple circular seep
like this for the head. In here, I'll be creating a little bit of tilted
head towards the right. Cylindrical seep like
this for the neck. Since this will be a
little bit simpler one, now creating this kind of polygonal see for the
upper half of body, and another tepert seep like this for the
rest of her body. Making the souler a little
bit curved like this. On this hand, on the right hand, I will be holding the umbrella. Se wearing a large
gown gown that I am creating in here will
be comparatively easier, and I won't gritting
that much of details or designs
and patterns on it. The gown is like this at the
bottom, a little bit curved. In here, since I'll be shifting her head a little bit
towards the right, and it will be
quite simpler one. So I simply created
simple circular shape instead of using two
combinations of the saps. Her left arm in
here is beside her. On her left hand, she will
be holding another umbrella. Creating very simple
skits for her leg. She's wearing sandal and socks. Just simple seat like
this for both her legs. The umbrella lies
on her left side. If you want to set the umbrella towards the right,
you can do that, too. In here, I made a little
bit of changes to the hand. Accordingly to the
placement of the umbrella, you can set the hand collisions. Angled line like this,
straight angled line. This will be the handle
of the umbrella. The umbrella in here will
be a little bit different. Creating this kind of large
arc see for the umbrella, large arc see a part of
the circle like this. A small section of the other
side will be visible also. I'll be making a little bit of changes to the seep
of the umbrella. The right side is a
little bit more curve. So this is going to be our simple sidelines for the sketch. In here, on both her sides, I'll be creating
multiple small ghost and two or three large
ghosts floating around. But the background will be completely filling
it with the black and use white to create the spluttering
effect and the rain. I have divided this project
into three sections. This is the first
section in which I'll only be covering
the pencil sketching. In the next section, we'll
be doing the outlining, as well as doing
the coloring or you can see the inking
for the background. And in the final section, we'll be adding details for the girl as well
as do a little bit more detailing and coloring for the umbrella, creating
some patterns. A simple hair style like this. One of her ear will
be visible and the head is shifted towards
the right a little bit. I'll be creating numerous smaller ghosts beside
her like this. Instead of this kind of ghost, if you want to create other
creatures, you can do that. And that's all for this video I'll be seeing in the next one.
13. More Detailing : Welcome to the second part of the work through the
quietest Spirits. In here, we'll be continuing
on Mavill left toe. I'm using the Tombos breast
pain to do the outlining. I'll be making a little bit of changes and adjustment
to the umbrella. As I said earlier, I
extended the siege a little bit on the
right, as you can see. Now, doing the outlining
for the girls fees. In here, I decided to sring
the fees a little bit more. And in here, I'm going to create comparatively simple here
style as well as fecal, as well as facial expression for the girl, simple here like this. One of her ear will be
visible on the right side, small projection like
this for the ear, the here on the other side, on the left side, giving a little bit of curve each
to her hair like this, doing it on the other side, and now encircling it
for her head on the top, small cylindrical
neck like this. And as for her
eyes and the nose, I'll be keeping
it quite simpler. So just simple circular seep, I'll I'll be creating simple circular sea and to do
the placement for the eyes, I'm using reference line going back once again with a breast pain to create her eyes. This is going to be her eye dose and small circular see
like this for the eyes. Instead of creating
this kind of eyes, you can create other variations. You can make it a
little bit more anime like the others
we have created so far, you can extend the
side of the face too. Now, for her clothes, the gowns she's wearing,
we need set like this. For the hands in here, creating this kind
of wavy line to give a little bit of wrinkled
appearance to the clothe. Now, doing the same
thing in here, creating this kind
of bit curvy lines. In here, I'll be using a
little bit of red later on. Creating this border and inside this border,
I'll be adding the red. This hand is holding
the umbrella, adding a little bit of
wrinkled appearance with this kind of broken lines. This don't oversaturate it. Now, this is going to be
the handle of the umbrella. Filling it entirely with
the black like this. Creating the stick or you
can see the handle of the umbrella like this simple straight line in this manner. If you're not that confident, you can always use the ruler
to create a straight line. Now, outlining on this
side and the left side. Outlining for the lower section. Continuing on with
the left hand. On this ends will be holding another umbrella,
a closed umbrella. In here, I'm not
adding or creating any kind of textured
aerian if you want, you can create wrinkle effaced using the same kind of line. This will be the umbrella. In here, I just created
a simple straight line. Later on, we'll be converting it into umbrella,
closed umbrella. If you want to extend the side, you can do that instead of the umbrella if you want
to create other thing. So stick on magical stuff,
you can do that, too. Both her legs. We are going to do the outlining
for both her legs. Very simple seat like
this for the legs. Just following the
straight lines and creating her second leg. She'll be wearing
sandals on her leg. Simple we sap in here. And socks. We have got
socks on both her leg. With these, we are done with a simple outlining for the girl. If you want to
create patterns and designs, you can do that. I'll be keeping it
quite simple for now. Later on, I'll be adding
simple designs at the bottom. We are continuing on
with the umbrella. Elliptical shape like
this for the inside. Here we have got an arc
save for the upper section. For the section of the project, I'll only doing the outlining, creating ghost, and adding the coloring for the background. And in the next section, we'll be adding the final touches, adding the color, creating a few more designs and patterns. I'll be dividing
the umbrella into different sections for both
the outside and the inside. In here, sorry, it
was not visible, but I just transform the
stick into the umbrella. As you can see in here, I
have included the image, and I also created few ghosts, smaller ghost at the bottom. Continue on with
creating smaller ghost. Instead of this kind of ghost, if you want to create
other variations of it or other kind of
creatures, you can do that. And here, I'll be
creating multiple ghosts on both her sides. Simple curvy saps like
this for the ghost. I have kept the sizes of
the ghost somewhat uniform. Instead of it, if
you want to vary the sizes, you can do that, too. On the sides and for
the upper section, I'll be creating few larger
ghost. This is optional. If you want to keep
it plain and simple with only this kind
of smaller ghost, you don't have to create
this kind of larger ghost. On instead of the ghost, as I mentioned earlier, you
can create other creatures. Another large ghost inside. And one more ghost
just below it. The top of the umbrella,
simple seat like this. If you want to create more, you can do that if you have a space. Now, let's divide them realign
to different sections. Using broken lines for this, instead of the broken lines, you can always use plain
and simple lines to divide them relin to
different sections. I prefer using this
kind of broken lines. It gives a little bit of
more characteristics, and I find it more pleasing. That's why I prefer using this. I'll be doing the same
thing. I'll be dividing the insides of the umbrella
in the same manner. A little bit away like this. Carved broken lines
in this manner, one more on this side, and a little bit of
more decoration in here for the divided
sections like this. This is optional,
the same kind of design that we created
for our ear project. If you want to create or add more details to the
umbrella, you can do that. You can make it a
little bit more larger. For the ghost, creating this
kind of simple pattern, you can see I'm trying to create grass like
effect in here. Simple lines random
lines like this. I'm using this kind of uneven lines to create this
kind of rougher texture. I'll be doing this for all the ghosts that I
have created in here. Moving on to the
right side and doing the same thing using this
kind of uneven lines. And with these, we are done
with this kind of texture. If you want to create a few
more goes, you can do that. Creating this kind of curve line to determine the background. Instead of doing this, you can feel the entire section
with the black, but I decided to
create this kind of curvy lines and determine
the outline regions. This is optional. Instead of using this kind of curvi lines, you can always use
straight lines. And now we are going
to do the coloring. In here, I'm using
Zikurataki black ink and I have got large breast. I'll be using both large and small bras for the large breast. I'll be using it to
do the outlining for the larger area as well
as do the coloring. With the smaller
breast, we'll be doing the outlining and the coloring
for the smaller areas, particularly near the
ghost and the girl. This process is going
to be a little bit time consuming and you
will have to bit cautious. We don't want to overlay
the black on top of the sketches that we
have already created. Carefully encircling the
coast with the black. In here, I've increased the
speed to do the inking. If you want to follow
along with me, you can either
pause the video or you can reduce the
playback speed. I switched to the
smaller brush to do the outlining for the smaller
section and smaller areas, carefully filling the
black for the insides. Try to maintain a uniform
consistency of the color. In one or two of the product, I mixed a little
bit of water with the black and the
consistency or you can see the uniformity of the black
got varied and it did not create that kind of beautiful effect or you can
see uniform black background. So I would recommend
you to ensure that the uniformity of the
black remains the same. Adding it in here just beside
the mil on the left side. You don't have to exactly follow the uneven lines that
you have created. Later on, we'll be adding white. So just overlay black
in this manner, simply completely failing it. Just try to create this kind of rougher texture
using the black. You don't have to be extra coss. One more thing that you can
do instead of the black ink, you can use the breast
paints and encircle the goose that you have created and then mix it
with the black ink. Instead of the
black, if you want, you can use other colors too. You can use red. That
will be interesting too. You can also use blue, or you can also create
a gradient from black to gray and then
black gray to white. Continuing on with this side. Carefully adding it
just beside her hand. Be extra cautious.
Avoid smudging of the color by your palm. You have got two more ghosts
and the lower section. Encircling the other half of the umbrella in here carefully, adding it in here, this
beside the umbrella. The last ghost in here,
adding the black. I was not able to record
the last section, but I finished adding the ink
for the remaining sanction, and I waited a little bit
till the ink dried up. In here, I'm creating
very simple eyes for our large ghost. I'm leaving a little bit of white space for the highlights, or you can say
pupil for the eyes. Instead of this kind of ice, you can create other
variations of it. Simple and plain
mouth like this. I'm not going to create nose, but if you want to create
nose, you can do that. And only for the larger ghost,
I'll be creating mouth. For the smaller ghost, I'll
only be creating the eyes. For this one, I decided to make the eyes a little bit larger. I'm going to do the same thing. I'll be leaving a little bit of white space for the pupil, and beside that,
I'll be completely filling it with the
black in this manner. Do the same thing
for the second eye. You can add more
physial expression to the eyes and the mouth. A little bit of
different kind of mouth for our ghost in here. And finally moving to third
and the final large ghost, the same kind of eyes. You can add more
characteristics to the ghost face by adding
eyeglasses most as beard. And you can also experiment
on your own and add more characteristics and
more features to the ghost, completely feeling it with
the black for the second eye, carefully encircling
the white section. Now creating another
simple mouth. We have got a sad ghost in here, and this mouth resembles a
little bit like the moustache. Now moving on to the
smaller ghost in here, I'll only be creating the eyes. Simple eyes like this
for some of the eyes, I'll be leaving a little bit of white piece for the others, I'll be completely covering
it with the black. Here, if you want to experiment, you can create other variation, other kinds of eyes, and you can also add
facial expressions. You can add you can
add nose in the mouth. I won't be doing it. I'll
only be creating simple eyes. Two eyes like this for
the remaining ghost. You can also vary the seeds
in the sizes of the eyes. And here, I'm keeping the
eye somewhat uniform. And I'll only be covering up to here for this section
of the project. I'll be seeing you
in the next section.
14. Final Highlights : No. Welcome to the
third and final part of walk through
the quiet spirits. In here, I'm starting with
the white jelly pain. So we are going
to create lots of broken lines like this to
create the resemblance of falling ran On top
of the umbrella, as well as on top of some of the ghosts and some sections
of the girl's body, I'll also be creating
a little bit of splattering effect like this. And apart from it, I'll also be creating lots of callous
beside the ghost. Continue on creating this
kind of simple broken lines for the entire section to create the
resemblance of rainfall. For some of the
repetitive sections, and here I'll be
increasing the speeds. But for most of the section, we have got the painting
in the real time. Using this kind of
uneven lines to create the resemblance
of small grasses. So for all the ghost,
I'm going to do the same thing using these kind of uneven lines
and encircling it, overlaying it on
top of the black. Instead of this, if
you want to create the other kind of patterns or designs, you
can do that, too. You can use this fight to create more patterns and designs
beside the ghost. And finally, adding it for
the last ghost in here. Now, let's create
lots of scallops. I'll be using two lines
to create scallops. Small scallops. I'll
be keeping it uniform. By uniform, my mean I'll be keeping the side
somewhat same. And we are going to encircle the girl on both the sides as well as the goose with lots
of scallops like this. So continue on with encircling the ghost as well as the
gird with lots of scallops. Instead of creating
this kind of scallop, if you want to create
other kind of scallops or add more variations
to it, you can do. Apart from it, if
you want to create patterns or designs,
you can do that, too. You can also create
the resemblance of grass and large plants and trees beside her instead of the patterns and designs
or the scallops. So feel free to experiment and add your own
personal touches. In here, since this
process is going to be repetitive and
time consuming, I have increased their speed. If you want to follow
along with me, you can pause the video or
you can reduce their speed. Continuing on with adding it just beside the
umbrella in here. Lower section two,
we are going to completely fill it with
this kind of scallops. Moving on to the right side
and doing the same thing. Inside the scallops,
if you want to create patterns or designs like
the one we did earlier, you can do that using the
hatching lines in here, just below her leg,
creating this kind of simple broken lines to create the resemblance
of the ground. In the ground, if you want, you can use uneven lines and create the resemblance of grass
and shrubs presents and surrounding the girl, adding it just below her clothe. Now continuing on
to the right side, multiple scallops, somewhat
of the same uniform size. Continue on with adding more scallops for the
remaining section. If you want, you can cover the
entire background with it, but I won't be over saturating it with
this kind of scallops. After doing this,
we'll be continuing on creating more rainfall, and I'll be creating a
few more patterns and designs for the umbrella.
This is optional. For this project, I'll also
be using colored spins. I'll be using the green one, the pink one, and the red ones. With these we are done
with the scallops. If you want to add a little bit of more scallops,
you can do that. As for her clothe,
I'll be creating simple pattern and designs
for the bottom section. I'll also be using red. In here, this is a
normal spin and creating a little bit of splatter effect just beside the
umbrella like this. A little bit larger broken lines like this in this manner. Just under the umbrella, I won't be adding that
much, but a few like this. Instead of it, if
you want to keep it plain and normal, you
don't have to add. Below the umbrella.
Only a few like this. Continuing on with the remaining
section, the right side. As compared to the
R two project, the amount of rainfall that I'm creating in here is
comparatively less. And with these, we are
done with the rainfall. Now going in with the red,
creating earrings for her. This is optional. Adding the red for the border in
here for the hand. Instead of the red, if you want to use other colours,
you can do that. You can also use the
black to do the coloring. You have got red, blue, black, green, and apart from it, as I mentioned, I'll also be using gray and the pink colour, adding it for the other hand. Now, for the socks, the
upper section of the socks, I'll be doing the
outlining later on for her sandal
too, adding the red. Now going in with
the fine to create the outlining, starting
with her hand. In here for the bottom
section of her clothes, I'll be creating another outline or you could say boundary. I'll be completely
feeling it with the red. I only created it for one side. If you want to create it for the other side, too,
you can do that. Now, going with the red
to completely fill it, admit this were done
with the red for this and using the black to do
the outline for other sock. And in here, too, I
decided to create simple pattern,
simple red outline. On the right side, we
have a little bit more red extending the size a
little bit more for the red. Making it a little
bit more darker. For the umbrella, if you want to use red, you
can do that, too. Now going in with
the gray color, and I'm going to covering the entire section of this
umbrella with a gray. For her hair, too,
I'll be using gray. And apart from her hair, I'll also be adding
the green for her socks and a little bit
of gray for the umbrella, but I'll be using the grease
for the umbrella later on, completely covering the
entire hair with a gray. If you want to do a little bit of more layering with the grey, you can create a little bit more dark and lighted
tone for her hair, adding it for the other lay, completely filling
it with the green. You can also use a little bit of grey for some of the
ghost, if you want. Now, we are going to create patterns and designs
for the umbrella. Feel free to experiment and add your own personal touches my creating your own
patterns and designs, or you can follow
along with me and create the same kind of
patterns and designs. Mostly in here for
the designing, I'll be using lots and lots of scallops of different
seeps and sides. Instead of single line, I'll be using multiple
lines like this. Now for the middle section, more scallops, a little
bit more smaller. Now, just on top of it, we are going to do another
outlining using more scallops, a little bit of different
kind of scallops. But first, let's do the outlining or you can see
creating boundary like this. And now using mode
lines like this, same kind of line, try to maintain the same distance
between the lines. And on top of it, I'll be using broken lines and
create one more layer. Using the broken lines
to create another layer. This is going to
take a little bit of time since I'll be
creating lots and lots of scallops and few more
patterns and designs for the top for the insides
of some of the section, creating small
scallops like this, creating small
sections like this, small semicircle shapes,
for the insides, I'll be adding the red later on. And as I mentioned,
if you want to create your own patterns and designs,
feel free to do that, or you can keep it plain and simple with no
patterns and design, simply using the colours to do the coloring
for the umbrella. I'm going to create more
layers of the scallop, the same kind that we did
for the bottom section. Multiple large and
small scallops in here. For most of the section
for the upper part, I'll be using a combination of simple lines as well as curve and broken lines.
Another layer like this. And for the insides, using
broken lines in this manner. It. The upper layer two, once again, using more
rocken lines like this. On top of it, I'll be creating three or four more layers
of those scallops. And as I move forward, I'll be decreasing the sizes
of the scallops a little bit. More scallops. Mostly in here, I'm using plain and normal
lines like this. One more scallops in here. Now, one more layer
on top of it, using the same kind of lines, using the same kind of
plain and normal lines. Mostly in here, I'm using
three or four lines. You can vary the
seeps in the sizes or the numbers of the
lines for the scallops. Instead of creating this
kind of curved scallops, you can create other
kind of scallops. More scallops like this. And as you can clearly
see I have decreased the size of the
scallops comparatively. For the top, I won't be covering it entirely with the
scallops in here. I'll be adding the red.
But if you want to cover the entire section
with the scallops, you can do that, too. And with these wee with this
kind of simple pattern. Go in with the red and
creating this kind of simple pattern for the
scallops at the top. So for all the scallops in here for the upper section,
I'm going to do this. Instead of using the red, if you want to use
other color or create other variation
patterns or design, you can do that, too, or
you can keep it plain and simple without any
patterns or designs. Continuing on with the red, doing the same thing for all the remaining scallops in here. Adding it for this
third section. And with this, we are
done with this section. Now moving on to the fourth and final section
on the right side. Adding the red in here
for the smaller sections. For the two rows, I
did not add any red, but if you want, you
can do that, too. Now in here, I'm going to use the red breastpin
and apart from that, I'll also be using the pink one. This layer in here, completely filling it
with a red breast pain. Once again, I would
like to remind you, instead of using the same color, you can use other colors. You can use the other
colours or keep it clean and normal
without any colors. Now, adding the lead
for the upper section, the area in which we did
not it adding scallops. Apart from it, we have got two more scallops in here in
which I did not add the red, so adding the red in here, overlaying this in on top of the red hatching lines
from the earlier. I was not able to
record a small section, but as you can see, I did the
coloring using the green. I mostly feel all
the scallops with the green for the upper section, and for the lower section, I used a little bit of pink, as well as for the
broken scallops that I created using broken lines
for that section too. Now, as I was
mentioning, I'll be creating simple
patterns like this. Simple star likes in this
manner using broken lines. This is optional. If you want to keep it clean and simple, you don't have to create
any patterns or designs. Or instead of this kind
of pattern or design, you can create your own patterns and designs for the gown. For the upper section
and for her arm, I won't be doing anything. But if you want to
create more patterns and designs for the upper section,
you can do that, too. You can also create
simple patterns and designs for her socks, too. For the star shapes,
I'll be feeling the red. Instead of the red,
if you want to add other colors, you
can do that, too. A few more smaller ones
and between like this. And I think I'm satisfied with the number of the
patterns that I created, doing the outlining for
some of the section, which I forgot to do earlier. Now, once again, going back with the red to do the coloring
for the patterns that I created for all the star
like see that I created, just feeling the red inside. Completely covering all the
starts with the red in here. We have got few more,
seven or eight. Now, adding it for the last two. And with these, we are
done with the red. And yeah, with these, we
are done with this project. I hope you enjoyed
painting this, and I'll be seeing you
in the next project. And
15. Rain of the Jelly Dreams : Welcome to reign of el Dreams. In this project, we are going to create something different. Instead of monster
and different kind of scary creature in here, we'll be creating
multiple large jellyfish, starting with the horizontal
and vertical lines. In here, I'll only be creating the upper half of our body. Dividing into four equal
section further dividing it. Now, let's create her head, starting with the circular Z, two thirds of the space
for the circular. Now a little bit of
curve sap like this. In here, I decided to tilt the girl's head
towards the left, so I change the angle. Instead of the
vertical line in here, we are going to
create this kind of angle line so that the face
can be shifted easily. You can either use two
third or one third to create cylindrical
C for her neck. This is just a rough guideline. We'll be making changes as required when we'll be
doing the outlining. Continuing on with her neck. Simple cylindrical
a little bit angle, cylindrical Cp like
this for her neck. Now, for her torso in here, we are going to this
kind of tapered seat, a little bit of angled line
like this for her shoulder and this kind of sea simple
se extending it a little bit. Extending it a little bit
and creating a bit of rectangular seam
on her right arm, she will be holding
the umbrella and her left arm will be
lying just beside her. I'll be keeping it a
little bit simpler. I won't be using the
blacking for the background, and I also won't be
creating the rainfall. We now continuing
on with the sketch. So we are going to
create her right arm. In here, si holding
the umbrella. We have got two sets of
cylindrical shape for her arm. Recording shifting this line, the tapered sap of her body. This will be the hand
holding the umbrella. Instead of the right hand holding the umbrella
if you want, you can sift it
to the left hand. You will just have to reverse the sketching order and
make the left hand holding the umbrella creating
this kind of angle line. Make sure that it's perpendiclo to the handle of the umbrella. Now, creating an arc sap
like this for the umbrella. The umbrella is looking
somewhat smaller, so I'll be making
it a little bit larger later on for now, containing onto the
remaining pencil sketching. In here for her, I'll be
creating fashionable clothes. Rough outlining for her clothes. Creating detached sleeves
on both her hands. We have got this kind
of puffed cuffs, creating this kind
of simple version of the puff cuffs on
both her hands. In here, she got ribbon
around her hand. For the second hand,
if you want to do the placement just beside the first hand, you can do that. Instead of it, if
you want her to hold something else,
you can do that, too. In here, I decided
to keep it simple, just placing it beside
her body like this, simple shape like this
for the rest of her hand. The same kind of ribbon tied
around her hand like this. The lower section of her hand, the palm won't be visible in here since I don't
have that much space. If you want to add more
decoration designs or pattern to the clothing
or if you want to change the clothing,
you can do that. On her make, I'll also be
creating the same kind of ribbon that I created
for both her hands. Now, the lower part of her top. She will be wearing jeans and we have got this kind
of top for the upper part, and in here, we have
got simple jeans. Once again, if you
want to change the clothing she is
wearing, you can do that. For her here, I'll be
creating very simple one, bob cut hair style for her here. Simple, somewhat of
curved triangular seep like this for her hair. Extending the size
a little bit more, making it a little
bit more flappier. I'll be creating
her here in layers, so two or three layers. Now for the jellyfishes, I'll be creating total of three or four
jellyfishes beside her. I'll be creating jellyfishes in different perspective as
well as different kinds. For now, just create
simple seeps like this, oval seeps for the jellyfish. And as I was mentioning I'm not satisfied
with the umbrella, so I'm going to make it
a little bit larger, making a little bit of genius to her waist and moving
back to the umbrella, extending its size
a little bit more, increasing the arc of the
umbrella in this manner. Okay. You're satisfied with your umbrella, you
don't have to do this. In my case in here,
the other portion, the other side of the
umbrella won't be visible. Left side won't be
visible since I increase the site but I don't have that much space in here on this page. Here, I'll be using lots
of curved lines to create a simple pattern or designs
for the umbrella later on. I'll be using this kind
of swirly lines to create the tentacles for our elifs. To add a little bit of
texture and detailing, I'll be using curved lines as well as this kind
of simple save. And with these we
are done with a simple guidelines for
the simple sketch. Now, let's add a little bit
more detailing for her face, dividing her face into
different sections and using these guidelines to create her eyes, nose, and the mouth. A bit larger eyes like this, making it a little bit
curvier near the end. Small nose, curved sep like this for the nose and small mouth. And with this, we are done with adding detailing for her face, ribbon like necklace in here. Now, let's do the outlining. In here, once again, I'm using Tombosbeast paint to
do the outlining. For most of the larger sections, I'll be using Tombosbest
pin to do the outlining. For the smaller ones, I'll be using Sakura micron fine liner. In here, I've already
started with the bottom of the umbrella using this kind of bit broken lines to
create the outline. Generally, I use this kind of broken lines to do the
outlining for the section. Later on, I'll be
using simple lines, simple and plain lines to do the outlining for now,
discontinuing on with it. Moving on to doing the
outlining for her eyes. Giving a little bit
more pointed edges to the curvy section
that we created earlier. Creating eyeballs
for the inside. For her eyes, I'll be
using blue colour. Theise section are
quite a small, so I decided to use the
Sakura micron fine liner. Continuing on with
it. Also making the outlines of the eyes
a little bit more darker. Simple curved soap like this
for the nose, small mouth. Creating simple lips like this. Now, let's do the remaining
section of our face. Making the checks a
little bit curvier. Now, simple chin like this, a little bit curved
s. Creating her hair. The lower section of her
hair like this in here. Small section of her ear is
visible on this side just beside her eyes,
outlining her neck. As I was mentioning,
I'll be creating the here in different section. This will be the
front section of the here and just behind it, I'll be creating
the second section. Mostly, I'll be using this
kind of lines, curved lines, curved hatching lines and making the hair a
little bit darker. This front region is
comparatively lighter. The region just behind it, I'll be making it more darker. Moving on to the other side
and doing the same thing, using this kind of
line to create and give a little bit of
seep to the here. Now, let's add lots of line
curved lines like this, following the seep of a here. Instead of creating
this kind of hair, if you want to create
other variations of the hair, you can do that. Apart from this, if you
want to make it colorful, you can use red, pink, blue or green colour to
create the hair for the top, creating this kind of lines that are coming out
from the center. In here, I'll be adding
comparatively fewer lines. Now the banks present in here, front of her head, dividing into different
section and filling it with smaller hatching
lines like this. Also, to create clear separation in between different banks, I'll be making the outlines a little bit more darker
with more lines. Let's add few more lines to make it a little
bit more darker. The other section of the
here that lies behind this. For this kind of
hair, I'll be using small hatching lines in this manner and completely
filling the entire region. Just rows and rows
of hatching lines. Now, adding it for
the upper section. I decided to make this
side a little bit more larger extending the side of the here a little
bit like this in here, making it quite darker
with more lines. Now for her neck,
simple outlining like this for the
ribbon necklace. Instead of this, if you
want to create kind of necklace or if you want
to keep it plain and simple, you can do that as you wish. Simple circular saves like
this for the designs. And as I was mentioning
that I'll be creating a clear separen
between different banks, using the file in it to make some of the section
a little bit more darker, thus making the outlining
a little bit more darker. Creating her eyebrows, where
a simple eyebrow like this, only using a single
curve line like this. Handle of the umbrella. If you're not that confident directly creating
the straight line, you can always use the
ruler to create it. Sorry, this sexon
is not visible, but in here, I've
included the photo. I just created simple version
of the palm like this. Now for the ribbon tied in here. Creating this kind of
simple pattern inside it. Now let's do the outlining
for the remaining section, doing the outlining
for her souldier. Detached sleeps are optional. If you don't want to do
this, you can just leave it as it is and create
simple and plain arm. Doing the outlining in here
for the detached sleep. In here, we have got
puffer cuffs for her arm. I'm trying to maintain the
symmetry for both the arms. So that's why I'm switching
from right to left. Making it a little bit more curvier and cutting this kind
of simple curved lines for the inside to give it a
little bit more volume and so that it's a
little bit fluffier. And now, let's do the same
thing for the second arm, doing the outlining for
the bottom section, and the remaining section, the rest of her top
for the upper section, and this kind of curved lines for the bottom
section of the curve. A few simple hatching
lines in this manner. And with these, we
are done with both the detached sleeps on her arm. Doing the outlining
for the remaining section of her
hand on this side. Outlining the remaining
part of her top. In here, if you want to
create other kind of patterns or designs,
feel free to do that. Feel free to add your own
personal touches to it. Now, the remaining
section for her torso. Now, let's create her jeans. I'll be creating very
simple jeans in here. Giving it a little bit of
wrinkled effect like this. Instead of this,
if you want, you can also create the belt tied around her
waist, her other arm. The remaining section
of our forearm. Before doing that, let's create the outline
for the genes. Simple rectangular
seep like this, creating rough outlining for the pockets on both our sides. Chain in the middle. With these, we are done with the
jeans, extending the arm and creating the cuff
around her arm like this. And I'll only be covering
up to here in this section. And in the next section, we'll
be doing the outlining for our jellyfiss as well as add a little bit more
detailings to it. Do the remaining outline
for our umbrella, and I'll be seeing you
in the next video.
16. Creating Jellyfishes : Continuing on where we left off, welcome to the second part of the ruin of the jelly rings. In here, we'll be
creating our jellyfishes, making a little
bit of changes to the initial outline
of the jellyfish. I separate it a
little bit upward and create this kind of bean like see for the body
of the jellyfish. As for the tentcle, I'll be directly
using the fine line to create it for now, create this kind
of broken lines, broken curve lines to create
the base for our jellyfish. And to give it a little bit
of three dimensional shape, I'm using this kind
of curve line and following the Cantu the curve
shape of the jellyfish. By contour lines, I mean the hypothetical lines that runs throughout the
whole structure. Since this is a little bit
of curved save like this, that's why I created
curved lines so that it's three dimensional. To add a little bit of
texture for the top, I just create this
kind of simple saves. And beside it in here, we'll be creating the tentacles. To create a clear
distinction in between it, I'm making this a
little bit darker. As for the tentacles, just create this kind
of simple saves, simple lines, simple
curved lines like this. I'll be creating two
kinds of tentacles. One will be this kind of larger one and other
will be smaller one. For that, I'll only be using two or three lines to
create very thin tentacles. These are the larger ones. I'll be creating five or six of this kind of tentacles
and apart from that, I'll also be creating a
little bit of more detailing. I'll be creating
circular and oval saves on top of it for some
of the sections. Simple seeps like
this to give it a little bit more texture and a little bit more detailing. These are optimal. If you're satisfied with simple
tentacles like this, you don't have to add this. And instead of this
kind of detailing, if you want to create other kind of detailing, you
can do that, too, or you can just
follow along with me and do what I'm
doing right now, creating this kind
of simple oval seeps and encircling it with
dotted lines like this. Adding it for all the tentacles that I have created in here. This is the largest one, the
largest tentacle in here. We add few for the
middle section too, and now the other
kind of tentacles. This will be a little bit
larger, comparatively larger, and just using two
or three lines to create this kind of
simple tentacles. If you are satisfied with
only one kind of tentacles, the one we did earlier, you
don't have to add this. Otherwise, in here,
I'll be creating five or six of this
kind of tentacles. Let's create one more in here. Making this region a little bit more darker by using more lines. If you want, you can add a
little bit more detailing to create a clear separation in
between different tentacles, you can make the outlines
a little bit more darker. But I'll be leaving
it as it is for now. If required, I'll be adding a little bit more
detailing later on. Let's move on to the second one beside her head and
below the umbrella, creating this kind
of jelly save, creating this kind of bean save. The earlier one, the first one that we created, the top view, a little bit of top view and the side view was
visible in here, only the side view
will be visible. You can consider it to be other variation
of the jellyfish. In here, I'll be adding
a little bit more detailing and create a bit
different kind of tentacles. Going in with the
sakura micron file and it to do the outlining. Just going over the outlines, and for some of the sections, I'll be making it a little
bit more bolder for now, adding the cantu lines
following the curved seep of the jellyfish and adding
the lines in this manner. A little bit of
detailing in the form of this kind of simple sieves, somewhat of circular
seeps for the inside, making one side a little bit
more darker with outlining. In here, the Bs is a little bit different
from the first one. Adding more scallops
like saves in here to make it look a
little bit more denser. Instead of creating this
kind of bees, if you want, you can proceed with
the other kind, the one we did earlier. Now let's create the
tentacles for our elifs. The tentacles that
I'll be creating here will be more defined and will have lots
of comparatively more curves than the first one. And I'm also marring the
thickness a little bit more. So we have more variation
of the thickness in here. In here, I'll be creating four to six tentacles like this. And then the same
kind of tentacles, the simple ones that
I created earlier, tentacles that I created earlier
with two or three lines. M. Same kind of detailing using this kind
of oval or circular sieves. So the sides, I'll also be adding a few for
the middle section. Apart from that,
I'm also encircling it with dotted lines like this. And the additional detail
that I was talking about, this is the additional detain, dividing the tentacles into two sections by adding one line, a bit of broken
lines in the middle. If you want, you can add it for all the tentacles for
all the sections, or you can just follow
along with me and add it for some of the
sections of the tentacles. I'm not creating straight
or uniform lines in here. I'm following the seep of
the tentacles and using broken lines to divide
it into two parts. Now, another layer of tentacles, the same kind of tentacles
we created earlier. Now, let's make it a
little bit more darker. Another line on top of it. If you want to create
a bit more separation in between the other
tentacles that we created, the thicker tentacles,
you can use the black to redo the outlining
for those sections. And you can also
use a little bit of hatching to create
a clear separation. And with these, we are done
with our second elifs. Let's do the third one. For the third one, most of the upper section
will be visible and only a small amount
of tentacles will be visible since I'm creating it in here at the
bottom section. If you want to sep the jellyfish a little bit above,
you can do that, too, going in the fine liner
to do the outlining, creating this kind
of bit oval sea for the top view of our jellyfish. And this will be the side view, a little bit more defined
see for the best like this using this kind
of organic sees, curved lines to create
this kind of bit organic see for the best
of our jellyfish in here. Now, in the middle, creating
simple pattern like this and to give it a little bit of three
dimensional sap using this kind of curve line and following the
hypothetical contour of the sap of the galifs. So curved line to give it
a three dimensional form, two small hatching
lines in here to give it a little
bit of mod, volume. Making the best a
little bit more darker. Outlining in here, doing another layer of the
outlining in this manner. Now, let's create the
same kind of tentacles, similar to the first
and the second one, using the kind of curve lines. In here, you can play with the thickness of the tentacles. You can also play
with the length. Apart from creating these tentacles for the
downward section, you can also create some of
them for upward sections. In here, I'm making it somewhat similar to the second one by dividing it into two sections using this kind of curved lines. Simple oval seeps like this, immediate on top of
the tentacles and also using a bit of broken lines to encirculate for some of them. And finally, creating
the other kind of tentacles, using simple lines. These are not that
much detail since I don't have that much
recipes in here. And with these, we are done
with our three jelly fishes. If you want to add a
little bit more detail, and if you want to
create more jellyfishs at the top or beside the
girl, you can do that. We are going to do the
detailing for our umbrella. A small section of the umbrellas
inside will be visible, making it a little bit
in here like this. Using pencil to sketch out the different sections first
and then we'll be using the fine liner to
do the outlining to avoid making simple mistakes. That's why I switched to the pencil to do the
sketching first. In here, I'm dividing
the umbrella into a total of six sections. If you want to
increase or decrease the divisions, you can do that. For the inside in this
section, I'm also dividing it. Now going back once again with the fine liner and going
over the pencil sketch. Using two or three lines to create the divisions
in this manner. Also another layer of
outlining for this section, the other side of the umbrella. The divisions that I created
in here for this section is a little bit different
from the divisions that I'll be creating
for the upper section. If you want to create a
little bit of pattern or designs for the different
sections, you can do that. Moving on to the upper
section, and once again, I'll be using two
or three lines to divide this into
different section. As you can see the
divisions in here are a little bit different
from the one that wet for the insides. One more line in here, an additional line to
make it more darker. Moving on to the right side. And finally, for
the middle section, creating a little bit of
straight line like this. And with this, we are done with outlining for our umbrella. In here, you can
create any kind of pattern on designing
for the umbrella. Or you can just follow
along with me and create the kind of pattern and designing that I'm
going to create. I'll be using a combination
of organic seeps like this, as well as scallops. So layers of scallops and this kind of simple
organic seeps. I'll be creating the same kind of design that I'm creating in here for the bottom section and use it for the
upper section. So organic seeds followed by
scallops and in the middle, I'll be using simple
hatching lines. Oh. Simple seeds like this. Now for the remaining
section in here on the right side and a
little bit in here. Now in here, I'm going to create the same thing
for the upper section, the same kind of organic
seeds like this. This resembles a little
bit like plants, or you can see this resembles
a little bit like algae. Now in between, I'll be
creating multiple scallops. I'll be wearing the seeps in the sizes of the
scallops a little bit, but mostly I'll be
using this kind of semicircular seeps to
create the scallops. For each section,
I'll be creating three to five scallops
depending upon the sine. This is optional. If you don't want to create
it or if you want to create other variations or
pattern, you can do that. For the scallops in here, I'm using two or three lines. Now for the remaining two
sections in here, in here, we don't have that much space, creating fewer
scallops like this. One more smaller one. If you want to cover the
entire section with the scallops, you
can do that too. Now I'm going to do the same
thing for the upper section, creating scallops
in the same manner, using the semicircular
sieves and just changing the
direction a little bit. Adding it for this section. Let's add a few more in here. And with this, we are done
with all the scallops. One more in here
for this section. And with this, we
are done with this. With this, we are done
with the umbrella. And yeah, we are done with this outlining for
the entire section. If you want, you can do
the coloring on your own. You can you can create the
effect for the rainfall. You can use the black background or other color background. You can do the coloring
for her clothes. I hope you enjoyed
this illustration. O
17. Using Coloured Fineliners : Welcome to the bonus section of the Rain of the Jelly Dreams. In here, I'll be using the fine leaners to
do the coloring. Here I have already started with the Satura micron fine leaner using red color and creating
simple hatching lines while following the
sep of the Jelifs I'm also doing a little bit of seeding using this kind
of simple hatching lines. I'll be adding it
for this section, the lower part of the elifs, as well as for the
upper section. And I'll also be
using this to add the details or you can see the coloring for the tentacles. For that, I'll be using
simple and straight, angled line angled
hatching lines. Apart from it, I'll also be
using a little bit of pink. Inserting some of
the curved seeds like this in here
using the curve lines. Now for the upper section, doing a little bit of sading using the hatching technique. Only a small amount of hatching
in here in this manner. You are free to
use other colors. You can use green,
blues, blacks. Now for this section, some of the larger lines that I created
earlier with the black, overlaying red on top of it, as well as making those
section a little bit more darker by adding
more red there. Now going in with the pink and a little bit of this
pink beside the lines, also extending the
lines using it. We are simply overlaying a little bit of pink
on top of the red, as well as extending the
lines a little bit in this manner and making
it a little bit darker. Adding it for the last one, layers and layers of
pink in this manner. Now moving on to the
jellyfish in here. Here, mostly, I'll be using the pinks and a
little bit of red, starting with upper section
and using this kind of small hatching lines
to do a little bit of seeding for the upper
section with this pink. Instead of the pink, as
I mentioned earlier, you are free to
use other colors. And if you want to
keep it monochrome, you can do all this using
only the black fine liner. Somewhat of uniform hatching
lines in this manner, and also doing a
little bit of seeding, making the upper region
a little bit darker. The simple saves that
I have graded in here, I won't be doing any
coloring for the it. Extending the sizes of the lines a little bit near the
curb part like this. Now, we are going to do the same thing for
the lower section, following the curve sweep of the jellyfish and
adding the lines. Overlaying this on top of the earlier line that we
created with the black. A little bit of
small hatching lines for the middle section to comparatively thinner
and lighter lines with lots of spacing
in between them. Now, to make this region, the lower part a little bit
darker, I'm using the red. We are going to
do the same thing that we did for the first one, making this lower region
comparatively darker, using these hatching
lines to do the seeding. And I won't be doing
any coloring for these simple circular seeps and oval seeps that
I have created, carefully encircling
those seeps and doing the hatching and doing the seeding using
the hatching lines. In here, we are using these hatching lines to
do a little bit of seeding as well as providing forms to the seep
of the jellyfish. Me seeding in the
curve sections. Oh Now, like we did earlier for
the contour lines in here, we don't have the contour lines, but using the red to create contour lines and extending
it in this manner, we are going to
make this sections a little bit darker
comparatively darker. So using red to create canton lines and overlaying
lots of red on top of it, if you want you can
always use black in here. For the base in here, I'm using a little bit of pink, just adding it above and below the simple scallops
that we created, the curve sap scallops. And with this, we
are done with the upper section for
the second one. Now for the third one,
starting with the pink. For the upper section, we are just going
to do a little bit of seeding using
the hatching lines, following the star like
seam that we have created in here and encircling it
with this kind of simple, small sading lines, simple,
small hatching lines. In here for the top,
I'm using pink. Later on, I'll also be
using a little bit of red. For the base, I'll also be using pink and red color combination. And for the organic s structure, I'll be using only the red. Continuing on with the pink in here on top of the
base like this, creating this kind of
curved hatching lines and doing a little bit
of seeding using this. Continuing on with creating
more smaller lines. In here, I'm creating
the lines accordingly. For the regions that are
closer to the upper section, I'm making the lines
comparatively smaller. And for the regions that
will be farther apart, I'll be increasing the
size of the lines. To get a little bit of
lighter seeds of the color, you just have to
change the angle of the pain or you can also play with the preser applying high presser to get a
little bit of darker seed, and with lighter preser
and different tangle, you can get a little bit of medium tone or lighter
tone, spacing matter. With larger spacing, you'll get bit lighter seed and
with closer spicing, we'll get bit darker tone. Now, making it a little bit
more darker using the red. Adding a little bit of red for the inside in this
middle section. Making some of the
section, the sides a little bit darker
with the red, increasing the
length a little bit. Now for the bees in
here, if you want, you can use the black and green the scallops and
then add the red. But in here, I'm directly using the red and creating
this kind of curb lines, curb flowy lines like this. Now let's do the coloring
for our tentacles. In here, I'll be
using this kind of simple hatching lines,
angle hatching lines. For each separate tentacles, I'll be changing the angles, and for the adjacent tentacles, we'll have diametrically
opposite angle and line. With these, we are done
with the first tentacles in here for the second
one, as you can see, I'm using the same hatching
lines, but in here, I have seen the direction, different kind of angled
hatching lines like this. Instead of this,
if you want to use vertical and horizontal
hatching lines, you can do that, too. You can also include a little
bit of cross-hatching. You can make the upper regions a bit more darker with
cross-hatching. And as you progress
for the lower section, you can make it a little bit
lighter by converting the cross-hatching into
hatching and then increasing the spacing
in between the lines. And instead of that, you can also use
different colors. Apart from the red,
you can also use blue, black, green, in here. I'll also be using a
little bit of pink, but later on for horn, continuing on with the
hatching lines for the remaining larger
tentacles in here. For the small sections, the oversights that
we have created, I won't be doing any coloring or adding adding
retailings for it, but if you want to
do the coloring or add details pattern,
you can do that, too. Now, for this smaller section. In here, we have got
two or three section in which I did not add any red. For those section, I'll
be adding pink later on. Now moving on to this one. In here, we'll be using
both red and the pink, starting with the pink in here. Since we have divided the
tentacles into two section, I'll be using diametrically
opposite angle line angled hatching lines
in this manner. For one side, we'll have
this kind of lines and for the other side,
completely opposite lines. With these, we are
done with one side. Now for the other
side, as you can see, completely opposite
lines like this. This is a little bit
time consuming process since we have to create
lots and lots of lines, and, yeah, step and do the
coloring in this manner. Or if you want, you
can switch with the colored breast paints and do the coloring
in other manners. Following the seep
of the tentacles and adding the hatching
lines in this manner. And as I mentioned, you can always use the cross-hatching. You can also use a
little bit of stippling. If you want to
increase the speed, you can always use scribbling and flowing lines to do the
coloring in that manner. Let's add the pink for one
more of the tentacles, then I'll be switching
on with the red. Simple ang anddine like this, changing the direction and
adding it on the other side. And with these are done
with the pink for now. Now going with the
red and adding the red for the remaining
tentacles that I have in here. I have got three
or four tentacles. Not complete tentacles, but small sections in between
the pink is tentacles, adding one directional lines like this for those sections. I'm not going to add it
for all the sections. I'll be leaving some
of the section. And with this, we are done with the coloring for
our second elifs. Now let's do the coloring
for the third one. Oh, I forgot to add it in here. So using pink to add
the coloring using pink to add the hatching lines in here for this first one, we have got three
smaller sections completely filling
it with the pink. And with these, we are
done with the first and the second elifusF
the third one. We are going to do
the same thing using red and pink and doing the
hatching lines in this manner. Now, changing the direction. Since in here, we don't
have that much space and we have created
smaller tentacles. This will be
comparatively faster. After doing this, we'll be
moving on to the umbrella. For that, I'll be
using red and blue, a little bit of black
for the inside. As for the girl, I'll be using blue colored for her
eyes and a little bit of blue colour for her jinsF her top and the detached
cuff, I'll be using red. Changing the direction
and adding it like this. Now for the remaining tentacle in here, switching to the pink. In here, since I did not
have that much space, I created fewer tentacles. If you want to
increase the number of the tentacles, you
can still do it. You can add one or
two more in here. You can do the same thing
for the other jellyfics. You can create a few
more tentacles for them. And with these, we are done
with all the Jelly fishes. Now moving on to the umbrella
for the middle section, using the blue and creating simple hatching lines like this. We have somewhat of
uniform spacing in here. And as you can see, I'm making it to a little
bit lighter tone. So the spacing is a
little bit higher by higher means we have got larger spacing in
between the lines. To make it a little
bit more darker, you can just decrease
the spicing. You can also use cross-hatching. And with this, we are done with the blue for the middle section. Now for this organic
sees like this, I'm just going to use the red and do the
hatching like this. For the upper section, since all the line will be
concentrating there, that region will become
a little bit darker, and as we move away, the spacing will be increasing and will become a bit lighter. So for all the upper sections, I'm going to do the same
thing with the red. You don't have to
use the same color. You can use the other color. You can use the red,
blue, green, pink. And now adding it for
the last section. And with these, we are
done with upper section. Now we are going to do the same thing for the
lower section. Simply using these kind
of hatching lines. The spacing between the lines is comparatively closer as
compared to the blue ones. And for the scallops in here, I won't be adding any coloring, but if you want to include
the coloring for that, you can use pink,
black, blue and green. You can also use the inking or colored rose paint
to the coloring. In here, I won't be creating any background using the black, but if you want,
you can do that. Or instead of the black, you can use simple black
fine liner and create the rainfall effect using
broken hatching lines. This is going to
take a little bit of time since we have to create numerous lines closer to each other to feel the
remaining section. And with these, we are
done with this left side. Let's do the same thing
for the right side. To avoid smudging of
the ink by my palm, I placed a paper beneath it. A paper beneath my palm to
avoid the smudging of the ink. We have got two more sections. And for the origin
under the umbrella, I'll be using black
and completely filling it with same
kind of hatching lines. Instead of it, if you
want to make it darker, you can just completely
fill it with a black ink or black sketch
pen or black breast paint. And with this, we are almost
done with this section. Now, moving on to
the final section, simple hatching line of somewhat of same uniform distancing. And with this, we are done
with the upper part of the umbrella in here
for this section, just using simple fine liner, black fine liner and filling
the entire region with it. Lots and lots of
hatching lines in here to fill the
remaining section. With these we are done
with the left side, moving on to the right side. We have got two more section, continuing on with the
remaining sections. With this, we are almost
done with this section. And now moving on to
the last section. And with these, we are done with the coloring for the umbrella. If you want to do
the coloring for the handle, you
can do that, too. I was not able to
record it, but in here, I use red for this section, some part of our tops, a little bit for the
detached sleeves. And in here for the
jins I'm using blue, the light blue that
I used earlier. And with these, we are done
with this bonus project of coloring the girl
and the jellyfishs. I hope you enjoyed
painting this. This was quite fun and a lot different from
all the project we have created so far. I'll be seeing you
in the next project. It.
18. The Night That Watches Back Bonus : Welcome to the last project, The Night That Watches Back. Let's start with simple
guidelines to create the Girl. In here, this is a little bit
Japanese them illustration. In here, we'll be creating
floating goose Yoki, as well as albicurating Japanese style
umbrella and lantern. Starting with a straight
line for the girl, I'm creating the girl
towards the right. Let's divide into
four equal sections. The girl will be facing
towards the right. Only one side of her face will be visible
for this project. Instead of it, if
you want to place that on the middle,
you can do that, too. But in here for this project, I decided that she'll be
holding umbrella right in front of her and the umbrella will
be tilted towards the lab. So that it will be covering
her back and the hand in that manner using
the combination of circular seep
and curved lines, curved seep like this
to create the head. Now for the remaining
two sections in here, creating her torso. Now for the remaining section, a small part of her waist
will be visible like this. This below this line use simple clentrical seat
to create her hand. On her right hand, she'll
be holding the umbrella. And on her left hand, I'll be creating simple
Japanese lantern. Feel free to adjust the
placement of her hand. This umbrella will be
resting on her shoulder. Using simple lines
like this to create her forearm clasp hand like
this for the umbrella. Simple line to determine the length as well as the
placement of the umbrella. This looks a little bit broader, so we are going to make
it a little bit thinner. This spots in the upper part. Some of the sections
of her shoulder and the back will be covered
by her long hair. In here for her clothes, I'll be using skills
like pattern. Extending the
remaining section in here for her waist and below it. Making this secon a
little bit more thinner. It's looking
comparatively boded, so that's why I decided to
make it a little bit thinner. Now, other hand, my left
hand holding the lantern. Instead of creating lantern, if you want, you can
create any other thing. Changing the placement of
the umbrella a little bit. Now we are going to create a
perpendicular line in here. By perpendicular line, I mean, these two lines will be
at 90 degrees. Mm hmm. Triangular shape like
this for the umbrella. Instead of this, if you want, you can use the other kind of umbrellas that we have
created so far using curve. But in here for this project, I decided to use Japanese thing. So that's why I'm creating
this kind of bamboo umbrella. Now, let's create her hair line. And the same kind of guidelines
that I showed you in earlier video using
that to create her nose and the
mouth in this manner. Only one of her eyes
will be visible in here. Oh Instead of this kind of face, if you want to create
other variations of it, or the girl or if you
want to make the girl facing towards us,
you can do that, too. And we are mostly done with a simple pencil
sketching for the girl, the umbrella and the hand. I have not created the lantern so far. I'll be creating it. I'll be using simple oval
saves to create the lantern. Now let's do the
outlining here in here, I'm using the Tombos breast
paint to do the outlining. I have not created the UCI floating UCIs in the background. I'll be doing it later on. For now, just do the outlining for the umbrella like this. We have just created
simple triangular see, but we'll be giving it a
little bit more definition. For now, just use the outlining for the width of the umbrella. Now, in here, since this will be a little bit
smaller section, I decided to use the
Sakura micron fine liner. So we are going to do the
outline for the girl's face. So that depending upon this, we'll be making changes in adjustment to the
placement of the umbrellas handle as well as her here
just beside the umbrella. In here, I'm just going
over the outlines that I created earlier with
the pencil sketche. Feel free to make
changes in adjustment. If you're not satisfied
with your pencil sketch. You can always use the
reference lines or guidelines to make your
process quite simpler. Large eyes like this. The eye is also facing
towards the right, so it's a little bit thinner, comparatively thinner
the pupils eye created. In here, wearing
a flower brooch. Simple saves like this to create a rough resemblance for
the flowers in here. You can use shades of the color to do the
coloring for it. I'll be using pink and red
to do the coloring later on. Simple seats and
designing in this manner. Instead of this, if you want
to create other variations, pattern or designs,
feel free to do that, add your own personal touches. Now extending it in here, this beside her hair
line in the front. Now, using curve lines like
this in here for the hair. Making it a little bit darker. Now, let's do the
remaining section of her hair in here for her here, we'll be making it
a little taxed. And so different
sections of her hair, I'll be creating small
clusters like this, and for those sections, I'll be filling it with
the curved lines. I'll be using simple seats
and create this kind of multiple sets or
structures in here. A small amount hair in here, this front of her forehead. Now extending it and
giving it a little bit of rough shape and then
we'll be filling the insights with
different sections. You are free to create
any other variations or styles for the hair. In here, I'll be creating
large and flowy here. In here, I'll be
creating large and flowy here till harvest. You can consider it the time
basically using this kind of scallops and filling the
insights with curved lines. The hair will be lying
behind the umbrellas. So we are going to
do the outlining for the umbrella stick
and just behind it, we'll be continuing on with just behind it will be
continuing on with the hair. Since this is a Japanese
style umbrella, so we have got small sticks coming out from the
handle like this. The support mechanism
of the umbrella. Now continuing on with the
remaining section in here, creating this kind of bit curvy
see for the flowing here. You can vary the seep side as well as placement
for the here. And as I mentioned earlier, you can also change or
create other variations kind or pattern or
designs for the here. So we have created simple
outlining for her here. And in here, I'll be using more curved lines or you can say flowing lines to fill
the entire section. So I'll be dividing into different sections,
and for those section, we'll be completely filling with different kind of flowing lines. The main project is divided into two sections.
This is the first one. And in the next section,
we'll be creating the ghost and a little
bit of more detailing. And then we have got a final and bonus section in
which I'll be doing the coloring using the colored fine liners
and the breast pain. Mostly, I'll be
using the colored breast paints to
do the coloring. Continuing on with
creating more detailings using this kind of flowing
line for her hair. Add lots of line for the different sections
that you have created. You can play with the spacing to make some of the section
a bit more darker. You will just have to
decrease the spacing. And to make some of the
sections a little bit lighter, you will just have to
increase the spacing. You can also play
with the line meat. You can use the Tombs
ds pin and redo the outlining for some
of the sections or just continuing on with this
file leaner and going over the outlines twice
or thrice to make that sections a little
bit more darker. Instead of this, you can
also include a little bit of broken lines to add a little bit of different
kind of texture to the hair. You can also include
a little bit of cross-hatching to make some of the section a bit more darker. Now moving it back to the top
of her head and cut ining with adding more lines for different sections
on her forehead. The hair on her forehead. H. At creating one more section in here and feeling
with lots of lines. And with these we get
done with her hair. Now, doing the
outlining for her neck. Moving on to doing the outlining for her hand holding
the umbrella, a simple bangle like this, simple curve sap like this in
here to create the bangle. Now her hand that is clasping the umbrella stick
or umbrellas handle. The simple structure like
this, not that defined. Adding a little bit of
small curve like this. You can create any kind
of clothing for her. I'll be keeping it quite
simple and creating simple top and simple bottom. And as for the
pattern or designs, I'll be using simple scaling
so you can say scallops. I'll be creating
scaling like pattern for her entire section,
entire clothes. Here we have got another
detached sleeve. Creating this kind
of simple pattern using this kind of scallops. In Isil, my plan was
to create a mermaid. Then I gave up on
that idea since I did not have that
much space in here. But if you have more
space and if you want to create the mermaid,
you can do that, too. Now, creating simple outlining
like this for her top. Adding one more of
scallops than here. Now, for the lower section, simple outlining like this. And, yeah, that's the simple clothing that I created for her. Now, her left hand in here, she'll be holding the lantern. The thumb is visible
on this side, two of her fingers
on the other side. Instead of the lantern, you can create any other thing, you can create a
stick or you can create other thing
that she is holding. I'll be coming back to
the lantern later on. For now, moving back to the umbrella and giving it a little bit of
texturing look, dividing into
different sections. These sections are somewhat
equidistant from each other. Let's give it a little
bit of texture using three or four lines to make
it a little bit rougher. Adding more lines for the
remaining one in here. We have got one
more in the middle. Making it a little
bit more darker. And finally, for the middle one. Now, let's give it
a little bit of rougher texture for
the bottom like this. Instead of it, if you want, you can create green
and uniform, too, but to give it a little
bit of texture and wooden appearance for
this bamboo umbrella, I'm making it look like this. To give it a little bit
more texturing in here, I'm mostly using this
kind of simple lines. You can also use a little bit more broken hatching
lines inside it. Okay. Make it
comparatively more darker, you can also use a little bit of cross-hatching for
some of the sections. I'm also making the lower
section a little bit more darker by using
two or three lines, a bit of broken hatching
lines, as you can see. Now we are done with this side, adding a little bit
more detailing in here, making some of the
section a little bit more darker by increasing the
line weight a little bit. Now, let's continue the
remaining section upper part. The same kind of detailing
using two or three lines, increasing the line weight
and giving a little bit of textured appearance
in this manner. Now we have got only the two
sections, the same thing. Increasing the line weight in this manner by adding
two or three more lines. And finally, the last
one, the middle section. Now adding a little
bit more detail for some of the sections by
adding a few more lines, this kind of broken lines. And with these, we are
done with the umbrella. So I have raised the
pencil masks, and in here, we are going to create
the simple lantern. Simple sap like this, a little bit of oval or you can see elliptical C
for the lantern. The bonds tied to the
lantern that sees holding. Let's have a closer look, and we're going to
create elliptical sap, or you can always use the circular sap or oval
seeps to create the lantern. This will be the best
for the lantern, and we have got bambo
lantern that sees holding in here using broken lines to create the outlining
or S for it. Now, let's give it a pro per se. We have got different
sections in here, so that's why I use a bit of curve lines to
do the outlining. If you want, you
can also include few Japanese or Chinese
characters written on top of it to give it a little
bit of more authentic look. Put some of the sections, increasing the line
with a little bit, making some section
a bit more darker. And with these, we are
done with a lantern. For this section
of this project, I'll only be
covering up to here. In the next section,
we'll be creating the floating goose Yuki, as well as add a little
bit more detailing. We'll also be doing a little bit of inking with the black, making the outlines a little bit more detailed and darker, and I'll be seeing you
in the next video.
19. Creating Floating Eyeballs Yokai: Welcome to the second part of the Night That Watches Back. Using the pencil and in here, I'm creating simple
oval seeps for the floating ghost yokai. In here, I'll be creating
floating eyeballs yokai that will
be following her. A little bit of color
was ismsed by my palms. So B causes to avoid spilling
or smudging of the color by your palm and see the ink has properly dried
up and then continue on. On top of this oval seeps, we are creating this kind of curved seep to give
it a little bit of flowing appearance that is smoke or something is
coming out from it, giving it a little bit of ghastly appearance
in this manner. M. You can create as
many as you want. In here, I have to
create a total of one, two, three, four, five,
six, seven, eight, nine. These are the simple yokai that I have created
instead of this, and apart from this,
if you want to include other elements, you
can do that, too. Now, going in with the sakura micron fine lane to
do the outlining. You don't have to stick with the outlines that you
have created with the pencil sage P P to make
changes in adjustment. We are trying to
give it a little bit of flowing appearance
that it's floating, creating this kind of
curb saves like this. For the insides, we'll be
creating eyeballs like this. Very simple eyeballs. To give it a little
bit more texture look, I'll be using lots of small hatching lines like
this in here to create the outlining for some of the sections for the
inside of the eyeball. Instead of this,
you can also use the dotted lines or
strippling technique to give it a little
bit more texture and encircling it
in this manner, increasing the line
weight a little bit. Now, let's do the same thing for the remaining floating eyeballs. Not all the eyeballs
will be in the center. I'll also be changing the
placement of the eyeballs. I'll also be changing
the placement of the eyeballs inside. Like this one, this is a
little bit towards the right. The same kind of small
broken hatching lines. Now encircling
Outside the eyeballs, I'll also be using
small hatching lines, but I'll be doing it later on. To make this process
a little bit easier, you can use the pencil
sketch to place the eyeballs inside in different
positions and then go with the fine
liner to do the outlining. So that's what I'm doing in here with the pencil sketching. Continuing on with the fine
liner to do the outlining for the remaining ghost Uki
that is floating around. Using scrabbling to do the coloring or you
can say inking it. This process is going
to take a little bit of time since we are creating minute
details and we have got a lot of floating
eyeballs in here. Inserting it with small
hatching lines in this manner. Increasing the line
weight a little bit. With the square done
with our three eyeballs. Now let's do the remaining ones. For this project, I made a
little bit of mistake here. In here, I used two
different black color. So it created a little bit of distinction in between that. To make this process
easier a little bit. In the bonus section, I started
with black breastpin to do the outlining so that the smaller section can
be outlined easily. And then I decided to fill
the remaining section with the black but when
the ink dried up, it created a clear
separation between the mis pen and the
ink that I used. And when I tried to cover
it with a black ink, it was not that possible. The region beside the gun
was looking more darker. So I would suggest to you if you are going to
do the coloring, stick with either the breast
pins or the black ink. Continuing on with the remaining
floating eyes like this, we have created a total of 51 This UK is trying to attack on UK, it's listing on the umbrella. Eyeball in the front like this. Since this is a little
bit smaller one, I did not add that much of detailing using small lines or you can see dotted
sieves for the inside. We have got two or three more. A bit larger se for the eyeball, now encircling it with this
kind of simple flowy sieves. One more eyeball beside it. This is our final eyeball. If you want to
include or increase the number of the eyeballs,
you can do that, too. Encircling it with this
kind of hatching lines. The eyeball is
looking downwards. So only a small section of
this is visible like this. And with this, we are done with all the eyeballs, floating UCI. These are fiery eyeballs Uki
that is following this curl. I mean section, the handle of the umbrella that I
forgot to create. Using hatching line to make
it a little bit darker. I have also increased
the width a little bit. Enough for her clothing,
creating this kind of scales, I have changed the direction. It's completely opposite to
what we created for her hand. But as we move on, I'll also be changing the
direction a little bit, as you can see in here. You are free to create any
other variations pattern and designing for her clothes. Or you can just follow along
with me and create this kind of spiral pattern
using scallops. Instead of single line, we are using multiple
lines to give it a little bit more volume to make it a bit more bolder
and a bit more darker. Adding it for the remaining
section in here for her top. Okay. And inside this, you're creating
simple pattern or const design using two or
three lines like this. This is optional. You are free to create other variations, pattern and designs
for the insides too. For the smaller ones,
creating small lines or small detailing in this
manner for the larger one, as you can see, we created more larger detailing
for the top. And with these, we are
done with our top. Moving on to the bottom section in here for the bottom section, I'm keeping it plain and quiet. I'm keeping it plain and simple. If you want to create patterns or designs, you can do that. Inset that the ink has dried up and lightly erase
the pencil marks. And with these, we
are done with our paint illustration
for this project. The Night That Watches Back, I hope you enjoyed painting
this and I'll be seeing you in the bonus project where we'll be doing the coloring for it.
20. Coloring with Brush Pens: Hi, and welcome to
the bonus section. And here we'll be
doing the coloring. This is optional. I'll be using the colored bras paints to do the coloring. Instead of it. If you want to keep
it monochrome, you can only use the
blacks and the green. In here for the
hair, I have already started with a breast pain. In here, I'm using the
olive green colour to do the coloring for the here. You are free to
use other colors. If you use red, you can use
pink, you can use black. You can use other sads of the color to do the
coloring of the hair. Make some regions
a bit more darker. I'll be doing two or three
layers of the coloring. But for the remaining section, I'll be doing a bit of flat, covering the entire section with a uniform layer of this
olive green color. Now adding it in here, the
lower region of our here. I'm adding the color following
the courtship of the here to give it a little bit
more three dimensional lo. Covering the entire
pin sketch with it. As for the umbrellas, I'll be using orange and ocher
and a little bit of brown. For her skin, I'll
be using skin color. As for her clothing, I'll be using green and
a little bit of yellow. For the background, I'll be completely filling
it with black. As for the floating you guys, I'll be using a little bit of black along with
yellow and orange. Moving on to the
bamboo umbrella. In here, I'm starting
with the orange. Put some of the
sections in here, overlaying this orange on
top of the earlier sketch, creating this kind
of bit broken lines. Now, adding it on this
side, the right side. I'm not going to overlay
it on top of all the line, but for some of them like this. And we are done with this
now going with the ocher, completely covering
the entire section of this bamboo umbrella with it, overlaid on top of the
orange that we use, later on top of it, I'll be using the brown. Mostly, I'll be adding
the brown on top of the different sections that we have created for the bamboo. But for now,
continuing on with it, overlaying on top of the orange as well as feeling the
remaining section with this. To make some regions a
little bit more darker, you can do two or three
layers of the color. And with this, we are
done with the umbrella. As for the umbrellas handle, the stick, I'll be
using the same color. Adding it for the support. Now, extending it for the remaining section
in here for the handle. Now for the Is in here, going with the black to
do the outlining first, and then later on, I'll be filling the entire
background with the black. Since the outlines in here are a little bit
smaller and more curvy, it would be a bit harder to do the outlining with the
watercolor brushes later on. So instead of it, I decided to use the black to do the
outlining first and then later on we'll be filling the remaining section the
outside with the black. To preserve this curve and crisp nature of the outlines,
I'm using the black. We are going to do
the outlining for all the floating you
guys with this black. In here, still, if
you want to increase the number of the floating
guys, you can do that. Apart from the larger ones, you can create bit
smaller ones too. Continuing on doing
the outlining for the remaining section. I'll be doing the same thing for the remaining sections too. The umbrella and the girl, I'll be using this breast paint to do the outlining so that it will become a little
bit easier to do the coloring for
the outside region, the background with the black. Creating the outline
in which I'll be filling the color
black black ink. Instead of this, if
you want, you can feel the entire section
with the black. But in here, I'll be creating this kind of bit circular seed, and then I'll be filling
the inside with the black. To avoid smudging of
the color by my palm, I'm using this paper
underneath my palm. So some of the color
from the breastbin might get to stick to my palm. I'm using this paper underneath
my palm as a precaution. And with this, we are
done with outlining of our fifth floating ghost, doing the outlining
for the umbrella. We have got three more
floating ghost yokais in here, carefully doing the outlining
in the same manner. Et's do the outlining for this side of the umbrella
and then we'll be moving back to the remaining two yokais carefully doing the outlining
in here for her head, here, and for the smaller
sections in here, I'll be completely
filling it with a black like this so
that I don't have to use the watercolor
brushes to feel the ink later on as
it would become a little bit challenging to feel the smaller regions with the watercolor
brushes and the ink. Carefully filling for
this smaller region. We continue on with
doing the outlining for the remaining section
on the left side. And with this, we are
done with outlining of the umbrella now for her hair. I here too, for the
smaller section, I'll be completely filling
it with the black, and for the remaining section, we are going to continue on with doing the outlining
in the same manner. Following the curve sweep of her hair and doing
the outlining. Adding a little bit more black for the smaller regions in here. Now, moving into this
side front sign, carefully doing the outlining
in here for her face. Try to preserve the crisp edges of her nose and the mouth. Now, we'll be coming back to
her later on, but for now, doing the outlining
for the remaining floating goes to
you guys in here. And now we have got
only a shingle one, doing the outlining
for this one, the last Uki And with this, we are done with
all the ghost Yuki, continuing on with the
remaining section, doing the outlining
for the girl. For this smaller region in here, completely filling
it with the black, adding the black in
here for the bangles. Carefully doing the
outlining in here for her arm and the
umbrellas handle. Now, for the remaining
section of her body, following the s and doing the outlining simple
outlining like this. Let's do the outlining
for the lantern. Encircling the bangle like this and now doing the
outlining for this arm. Adding the black in here. Carefully filling the
insides with the black. Now for the remaining section, plain and simple
straight line like this. And with these, we are
done with the outlining. Now as I was mentioning,
creating an outline, a boundary vegan with a black
for the remaining section, the inside region, I'll
be filling the black. If you want to cover
the entire region with the black, you can do that, or you can just follow along with me and create this kind of s Rtangular seep like this. If you're not that confident, you can always use the ruler
to sketch a straight line. And with these we are
done with most of the outlining and creating
the boundary like this. Now we are going to do the
inking using the black ink, carefully filling the
entire background with the black using water color does A Zickurataks black ink to fill the entire
region with the black, carefully add it in here in between the
floating ghost u chi. This process is going to take a little bit of time
since we have got lots of floating Ghost Ukis
in here with lots of curves. So you'll have to bit causes while feeling the
colors in between them. We want to preserve
the crisp edges and the curve lines
that we have created. So add the black carefully
in between the ghost kis. Since this process was going
to take a lot of time, I feel the entire region
with a black on my own, and this is how it turned out. For some of the regions in here, the intensity of the black
is not that uniform, but we'll be covering
it with this kind of rainfall effect using white to create this kind of broken lines to
represent falling rain. And why doing this, we are also covering up the
ununiform region, the black that we use in
between the ghost yokai. So for the remaining
section in here, apart from the region
under the umbrella, I'm going to cover it entirely with this kind of
broken white lines. On top of the umbrella, I'll also be creating
a little bit of splattering effect
with the white, as well as some of
the sections of the girls here and a
little bit on top of her head and a
little bit on top of the umbrellas handle
and her hands. I'll be creating
the same kind of splattering effect
that we have created so far with some small broken
and angle hatching lines. Once again, this process is going to
take a little bit of time. In here, I've increased
the speed a little bit. If you want to follow
along with me, you can pause the video or
you can reduce the speed. In here on top of the umbrella, creating these kind
of small lines, small hatching lines to create this flattering effect on top of her head and on top
of her hand lines. Now continuing on with
the remaining section, creating the same
kind of broken lines. In here for this region, this underneath the umbrella, I won't be adding
that much of line, but if you want to
continue on with it, you can add more lines
underneath the umbrella. Mm. Now for this side, filling the remaining
section with the same kind of lines. And as I was mentioning to make it a little
bit more denser, you can always create
algae smaller lines, smaller broken lines, and that will make it a bit more
denser and bit more thicker. Adding it in here just beside
the umbrellas on top of a hand stew With these we
are done with the white. Now let's do the coloring
for the lantern, starting with the yellow.
This is in real time. He section the rain to Aisin
was a little bit faster. Now, adding a little bit
of orange like this. Just going over the
outlines for this. Adding it on the
other side, too, as you can see, I did not
cover the entire outline. I'll be using the
rounds to do it later. Now going in with
the skin color, and we are going to fill
the entire region with it. Try to avoid doing the
multiple layering as it will create an uneven
texture. We don't want it. But if you want to
sew a little bit of shadows or darker region, you can do two or three layers. Adding it for her hand, this hand that is
holding the lantern, not for her stomach in here. Making this region, just be
her hair a little bit darker, doing the same thing in here. Adding it on the
sides of her hand, for this hand, making it
comparatively darker. This willow her clone. For these sections, I added two or three layers to it
to make it bit darker. Now for her clothing, going in with a green, covering the entire section with a cream. Another layer to
get a little bit of uniform consistency
of the green in here. Try to create larger strokes to avoid this kind of
mistake that I did. Now for her top continuing
with the same green. Add it carefully just
beside her hand. We don't want the greens and the skin colour to get mixed. Adding it for this
section, upper part. Now for the detached sleeve, completely filling the green with the sweet with the green. Now for the upper sections, the outlines that we created, completely filling the yellow. Now for the floating ghostuki encircling the circular sat
with this kind of lines, so small hatching
lines in this manner. To make it a little
bit more interesting, you can also use a
little bit of orange, start with the orange
and then add yellow. Instead of this yellow, you can also use blue, blue and red to create different colours
for the eyeballs. In here, for her
hair, using yellow. Instead of it, if you want to use other colors,
you can do that too. For the flower that
I created in here, I'll using pink and purple
feeling the pink in here. Now going with another sd of the pink and feeling
the remaining section. Earlier my plan was to use
a little bit of purple, but I decided pink
will do the work. And with this we attend
with our project. If you want to add a
little bit more detailing, you can do that, and I'll be seeing you
in the next medium.
21. Thanks and Conclusion : Congratulations on completing the Moody Ink Illustrations. Over this fi project, you have explored how
to build characters, create atmosphere and
use ink technique like hatching and cross-hatching to bring your
illustrations to life. More importantly,
you have practiced consistency and storytelling
through your artwork. I hope this class helped you
feel more confident with ink and encouraged you
to experiment with mood, composition and subtle details. If you have not already, don't forget to upload your
project in the gallery. I'd love to see your work and your unique interpretations. If you enjoyed this class, feel free to leave
a review and follow me for more creative challenges. Thank you so much
for joining me, and I'll see you
in the next class.
 Vishal Munshi