Transcripts
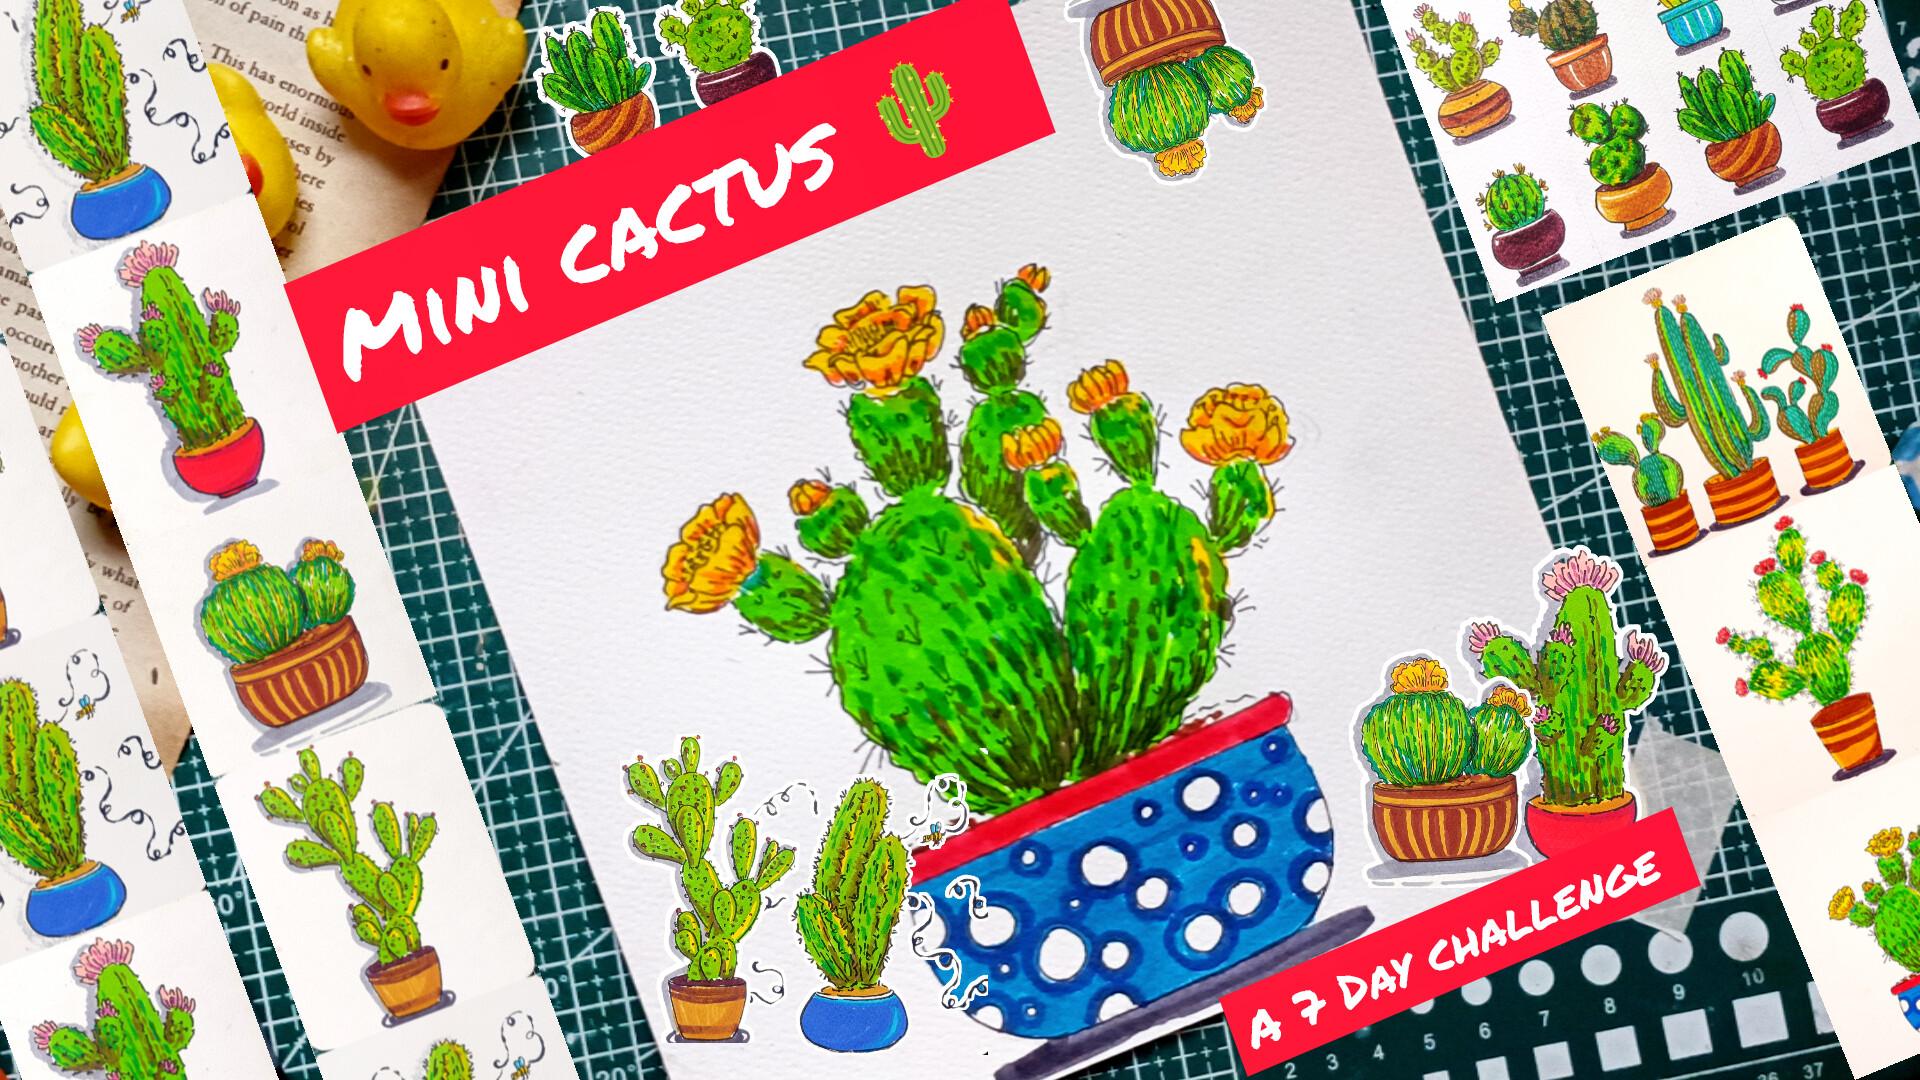
1. Welcome and Introduction : Hi, everyone. Welcome
to my new class, Mini Characters, a
seven day Challenge. In this class, you will learn to paint this seven, beautiful, vibrant and easy character illustration using bras
paints and pine liner. Across the week, we will explore around 12 different
varieties of characters, forms and styles, along
with decorative pots and charming little flowers to make each piece unique and lvy. We'll be working with just three to four
seeds of the green along with a few complimentary colors for flowers and pot. All you need for this class are dress pens and a fine liner, no complicated
supplies. Hi, everyone. My name is Jushal I'm
an artist from India. This is my skill set profile. I create simple and
approachable class in oil, pastel, gauze, water color,
pen and ink, and more. You can also find more of my work on my
Instagram and YouTube. So join me in this class. Each small paintings will take around 15 to 15 minutes and slightly larger
compositions will take around 15 to 20 minutes. All the lessons are
recorded in real time, so you can follow along step by step at a comfortable piece. This class is beginss friendly and designed as a
daily challenge. We will complete one project each day to help you
build consistency, confidence, and a
creative habit. As a bonus, I have included an extra project at
the end where you can experiment with
your own coloring style and apply everything
you have learned. By the end of the
week, you will have a beautiful collection of
vibrant cactus illustration. I hope you will join me in
this fun and colorful journey.
2. Class Project : For this class et,
you will paint seven vibrant cactus
illustration, one on each day
of the challenge. Each project focuses on
different cactus seats, pot designs, and
simple flower details. You will be using
just buzz paints and a fine liner along with
a limited color palette. You don't have to
worry about it. The buzz pins that
we'll be using are quite easy to
get along with, and we won't be using
any advanced techniques. We'll be only doing
the color and a little bit of overlaying
and blending. That's all. You can also see your practice
seats and the seat of eight cactus illustration
that we'll be painting. By the end of 70s, you will have a beautiful
mini cactus collection that shows your
progress and growth. Upload your final paintings or even your daily progress
in the project section. I'd love to see your
work and see on.
3. Supplies : For this class, you will
need very basic supplies, pencil and eraser to do the
basic pencil sketching, masking tape to
secure the paper. For this class, I am using 300 GSM watercolor paper
to do the painting. You can use any paper of
more than 200 GSM thickness. I'll be using camelin breastbin. I also got this dual te brasbins that I'll be
using to create satos, fine liners and the breastpins, I'll be using Sakura micron
and Tombos bras pin. That's all. So these are the main supplies that we'll
be needing for this class. I'll also be using
a little bit of white gel paint to add a little bit of highlight
for one of the projects.
4. Basic Shapes for Cactus and Pots : Welcome to the
tutorials in here, I'll be showing you how you
can create Cacus very easily. Here's a very simple example
of the first cactus, very simple cylindrical see like this and making it a little
bit over at the top, you can add multiple
branches on the sides. This is just a very
simple example of Peruvian apple cactus for some of the project
we'll be creating. This will be making
it a bit more detail. But this is a very
simple see that we'll be using to create our acus. Next in here, we have
got noto cactus. This is somewhat of
a sphere like sap. To give it a little bit
of three dimensional p, palm dividing into
different sections. And if you're going to
extend it a little bit, it becomes pin cushion Cacus. So you have got the rough
idea how we'll be using very simple seed to create
varieties of the actus. Let me show you a
few more examples of different varieties
of the aracus. To give it a little bit
of three dimensional p, palm dividing into
different sections. This is going to be somewhat of oval Zip and we'll be
trying to sew that. So these are just a
simple pencil outlines. Next, in here, we have got dwarf Becky peer variation
of the characters. This is going to be
somewhat of oval sip, and we'll be trying to sew that. In here, we have got
large rounded cluster of pads on both the sides, multiple pads, and let's
create one more example. So here's another variation
of prickly peer characters. So these are just the
simple pencil outlines. When we'll be doing
the outlining using file or the Busbin we'll
be adding more details. We'll be giving a little
bit more organic shape, adding multiple thorns and doing a little bit of hashing to create a little bit of shados as well as a little bit
of highlighted sections. Now let's create a little bit more detailed versions
of the Cacus. So the first one
Peruvian Apple cactus. I'll be adding this
kind of simple thorns on all the sides a little
bit for the middle too. So very simple thorns like
this. Here's another example. Here's another variation of different kind of
thorn that I'll be creating very simple
circular seep like this. If you want, you can also
add needle like thorns. But for some of
the product, I'll only using this kind of thorn. Now, for this one, the
flowering barrel cactus, to give it a little bit
of three dimensional sep, I'll be dividing into
different sections. And as for the thorns
and the needles, I'll be creating this
kind of simple variations for the thorns and the needle
using the fine liners. On top of it, I'll be
adding the flowers. Now moving on to the flowers. So in here, I'll be sewing up two or three different examples
of the flower we'll be creating I won't be making
the flowers that much detail, very simple flowers like this. Mostly, I'll be
using yellow sort orange and pinks to do the
coloring for the flowers. If you want to make it a
little bit more detail, you can do that, but I'll be using
simple lines and simple seeps like this to
create the multiple flowers. I'll also be wearing the seeps and the
sizes of the flower depending depending upon
which projects we are doing. But simple seeps like this
for most of the flower. Let's create one more example
of cluster of flower. A bit more smaller flower. Simple flower like this.
I'll be creating cluster of flowers like this
for the sides of the cactus and a few for
the middle sexon stew. Now for the flowering
marl cactus. I'll be adding the
flowers in this manner. I'll also be making a little
bit of genius if required, but you have got the rough idea. But this will be mainly
adding the flowers for our characters in
a very simple manner. Since we'll be keeping the
project quite simple and easy, I won't be using that
much advanced techniques. I'll only be using the fine
liners and the breastpin. In here, I've got this
Sakura micron fine liner and two of the
tomos breast pins. So mostly I'll be
using the Sakura micron fine liner
to do the outline. If you don't have this,
you can always use the normal ballpoint
pen or the gel pen. To add a little bit of
sading and more detailing, I'll only be using
hatching technique. Basically, hatching technique
is used to create sading at value and texture by drawing closely spaced parallel
lines like this. This is the example of very
simple hatching lines. I'll also be making a little bit of variations to the lines. Instead of creating simple
and straight lines, you can create this kind
of bit curved lines too. Then we also have got this kind of bit Broken hatching lines. Mostly, I'll be using this
the broken hatching lines to add more details
to our characters. We also have got this kind of lines following the
sep of the characters. So these are some kind of the hatching lines that I'll
be using for our project. Let me saw what I mean. So using this kind of bit curd hatching
line for this cactus, ball cluster cactus, for
this Peruvian apple cactus, a little bit of hatching
line on top on the bottom, bit of broken hatching lines. The closer the lines to get it, the darker the area will appear. For the cactus, I'll be making the lines follow the
contour of the object to make it appear three dimensional variation in the line thickness, length and preser can change the texture and
intensity of the sados. So we'll be wearing that too. But now for the pot, for all the project
in this class, I'll be adding the pots. I'll be keeping the seeds in the sizes of the
pots quite simple. First, we have got this basic
conical see for the pot. Meaning, I'll be using this pot for majority of the project. Then here we have got this
rectangular set for the pot. Apart from this, I'll
also be creating a little bit of oval seeps
for the pots like this. And here's one more
variation of it. I won't be making the
pots that much detail. If you want to add
patterns or designs or add a little bit of more texture to the pots. You can do that. Mostly, I'll be keeping
it quite simple. If required, I'll be using
three or four colors, but many I'll be
sticking with only two. So that's all for this video, and I'll be seeing the
next vino, happy painting.
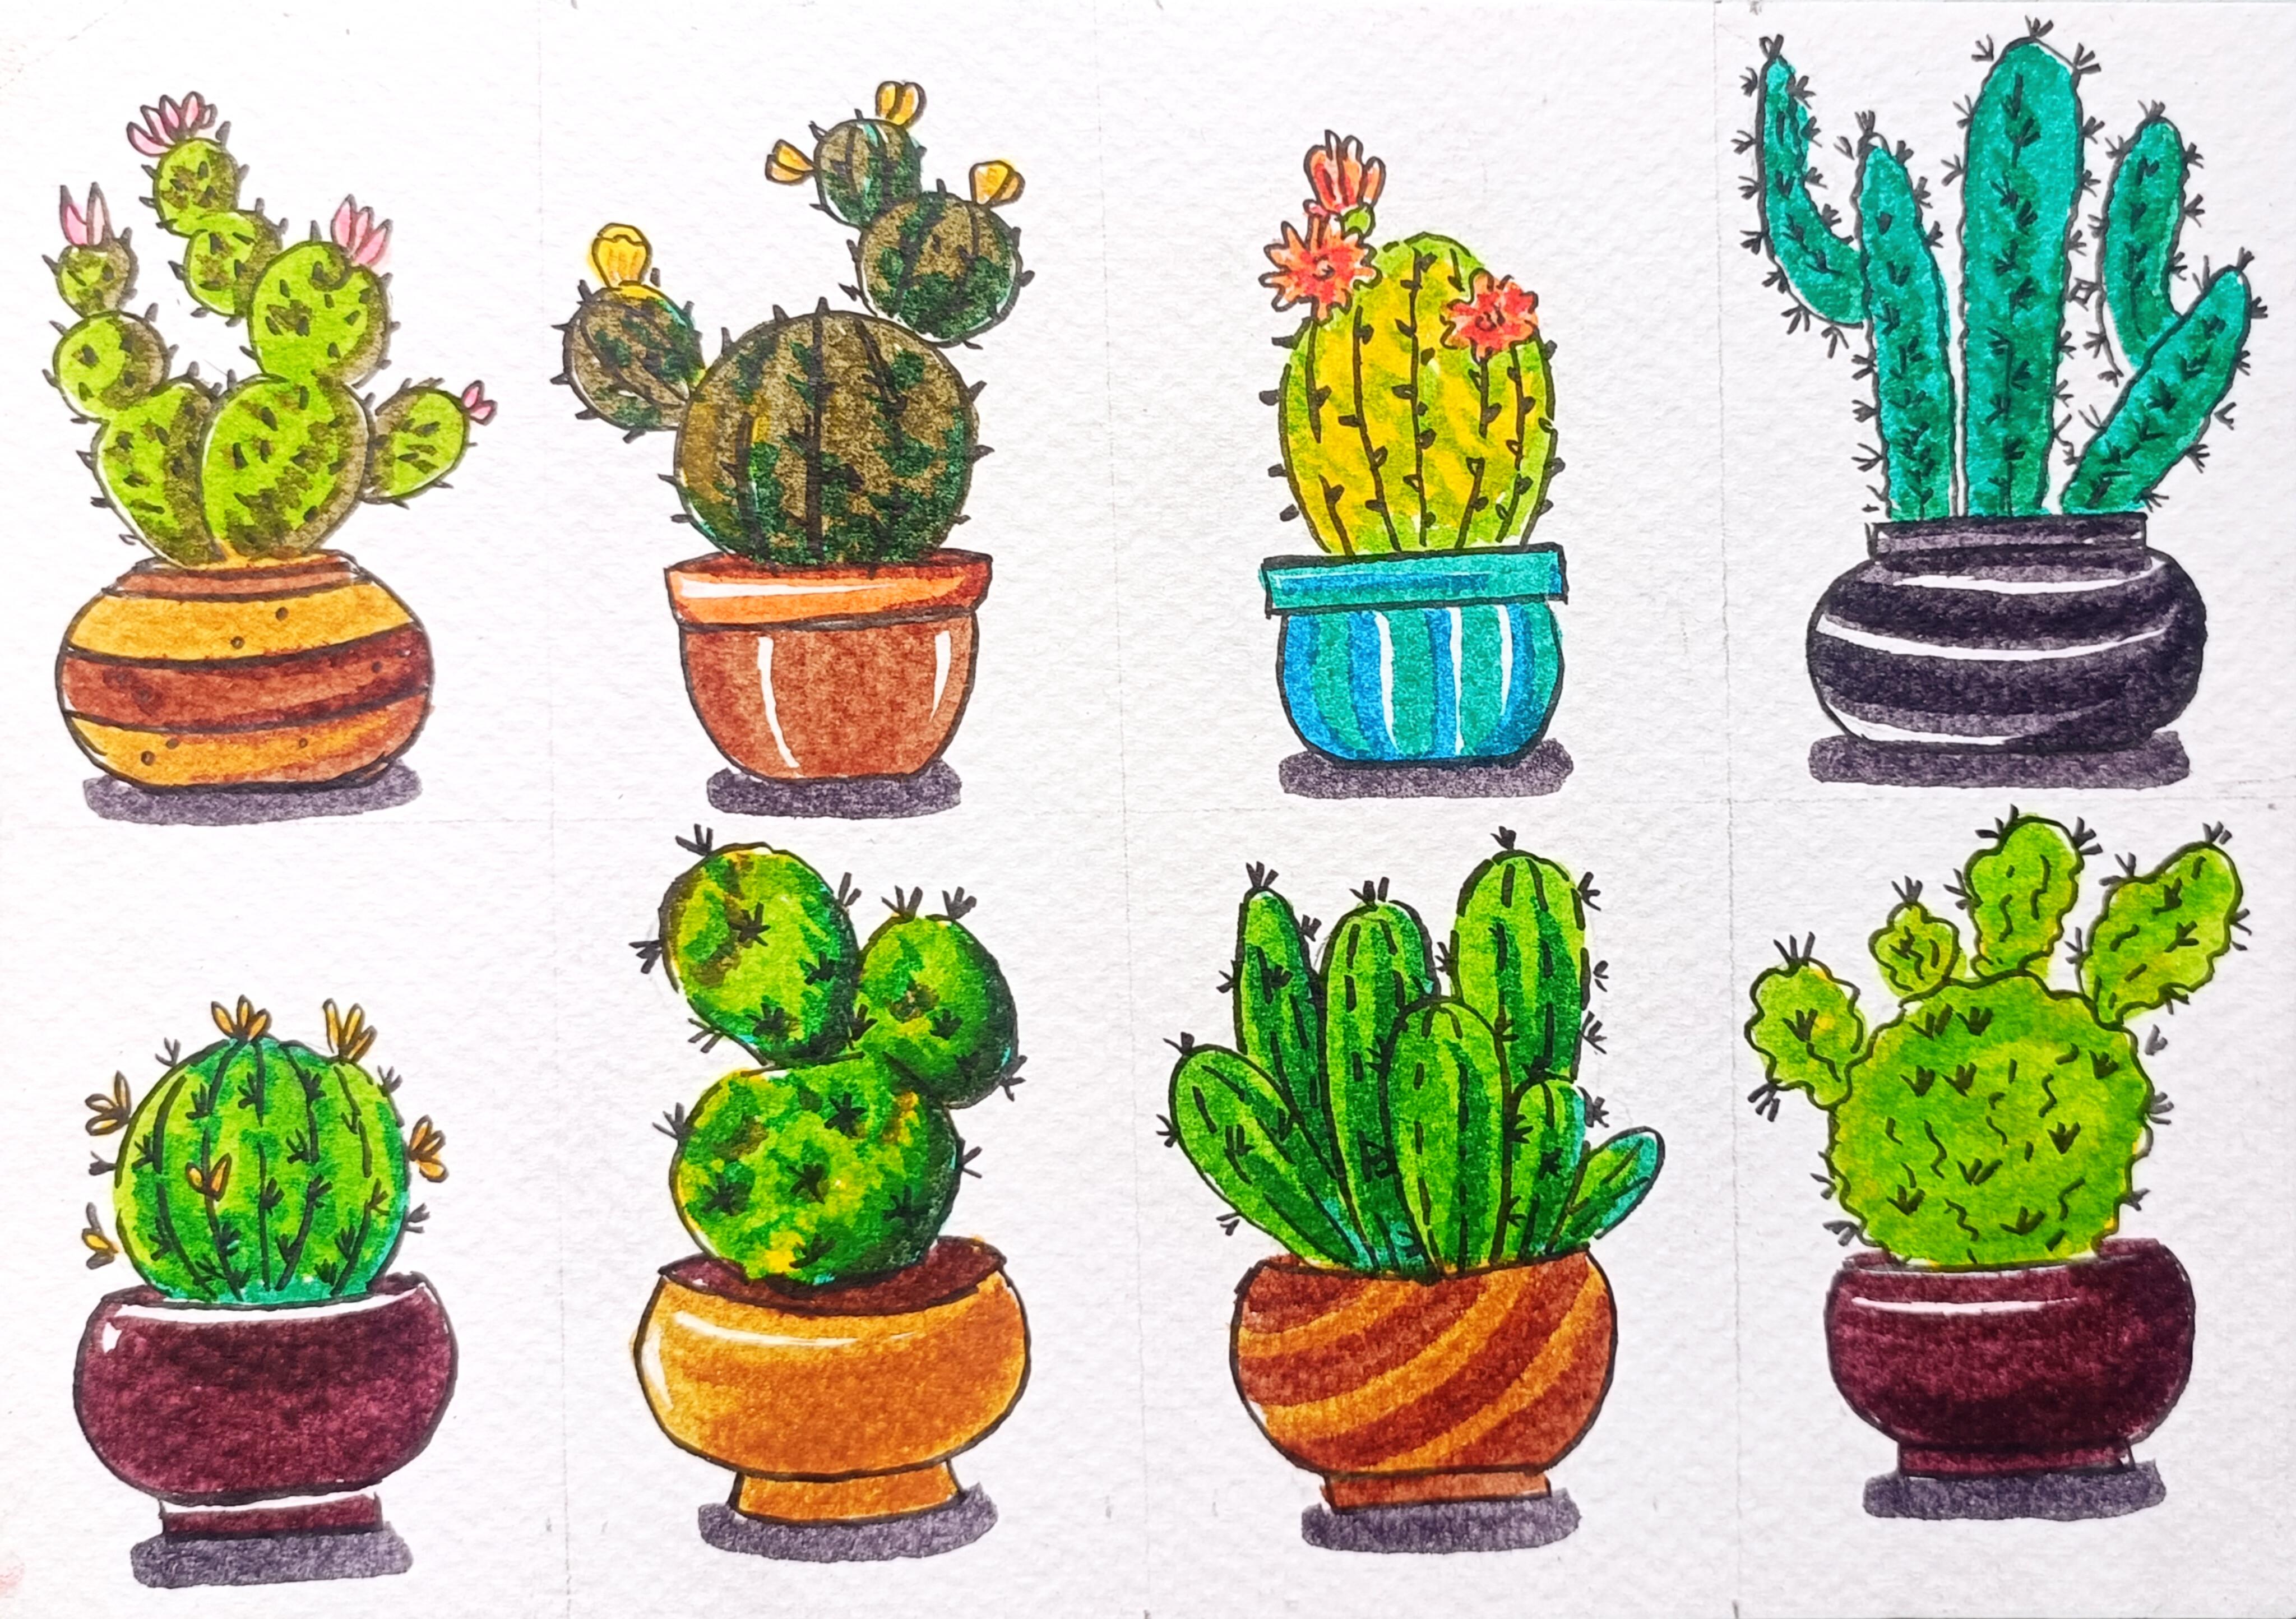
5. Sketching Eight varieties of Cactus : Welcome to the first painting. In here, I'll be showing you
eight different examples of simple cactus plants
with simple pots. For the first one in here, I'm creating this
kind of bit oval see for the part of our cactus. Here we'll be creating
prickly pear cactus. I'll also be doing
the coloring for all the cactus and we'll be
keeping it quite simple. So this is prickly pear cactus. It has got flat petal like pads, so I'll be creating
multiple pads like this and I'll also be adding
small flowers on the sides. If you want to increase
or decrease the seeps in the sides or the placements
of the pads, you can do that. But this is going
to be the simple see for our first cactus. Next, we have got noto cactus, starting with a
simple outline for the pot So very generic
see for the pot. Mostly, I'll be using
the seeds of greens and yellows to do the
coloring of our cactuses, a little bit of pink, yellow, orange or red to do the
coloring for our flowers. And as for the pots, mostly I'll using sets of the browns, a little bit of orange
or blue or black, if required to do the
coloring for our pots. I'll also be using a
little bit of gray to create the shadows
for some of the pots. So this is the very simple
seed for our noto cactus. It has got those
rounded main body, smaller baby cactus
growing around. And later on, I'll be adding the decorative wet pattern using the fine liner
or the breast pan. Now for the third one, we have
got flowering marl cactus, starting with a simple
outline for the pot. A little bit of oval
seed for the pot, a variation of the first pot. Now for the cactus, so this
is our flowering marl cactus. I'll be creating oval or
rounded marl like see for its body like this a little
bit conical at the top, bit broader at the middle. This type of cactus produces
flowers at the top. So I'll be adding two or
three flowers at the top. Instead of the flowers,
you can also create BB cactuses on the sides,
moving on to the fourth one. It's the same kind of pot that
we did for the first one. In here, it's a little bit more broader and a bit more thinner. You can create any kinds
of pot as you want, or you don't have to even create the pots for this painting. You can only practice
the cactuses. In here, we have got this
Peruvian apple cactus, very simple see like this. So tall and vertical
stems like this, a little bit of cylindrical see. And we have got multiple
upright growths like this. So this is another
simple cactus. Now for the fourth one, we
have got Pen cushion cactus. Let's start with the
outline for the pot. To keep it a little bit simpler, I'll only be creating
this kind of pot for all the four cactuses in here. Here we have got
pin cushion cactus, small rounded seem like
this, tiny clustered spines. It often forms crowns of flour. So we'll be adding
multiple flowers later on using fine liner
or the breast pane. Now, for this one, here we
have got bunny ear cactus. It's a variation of
prickly pear cactus. When we'll be doing the coloring
or doing the outlining, we'll be trying to give
it a little bit more, three dimensional seem by a
bit of hatching technique. And as for the coloring, too, we'll be following the contour of the cactus and
adding the color in that manner to give it a little bit more three dimensional look and a little bit
more volume to it, a little bit more rounded seam with rounded pads grouped
together like this. Well, the seventh
one seem kind of simple outline for our pot. As usual, if you want to
create other kinds of pot, or if you want to add patterns or designs to it,
you can do that. I'll be keeping
things quite simple. Here we have got
fairy castle cactus. So clustered vertical
stems like this. This is somewhat of variation of the Peruvian apple
cactus that we did as our fourth cactus. We have got clustered vertical
stems, multiple ones. This gives it a little bit of dense castle like appearance. Lastly, we have got Dwarf
prickly pear variation. It's a variation of
the first characters, a little bit more
rounded sheep like this, and we have got multiple
rounded cluster of pads. As compared to the first one, I made it a little bit
larger and a sheep, a little bit more rounded. So yeah, that's a simple
sketching for the last one, the dwarf prickly
pear variation. And I'll be seeing
in the next section of this video where
we'll be doing the inking using
the fine liner or the bras pane and then we'll be doing the coloring for it.
6. Inking using brush pens: Welcome to the inking. In here, we'll be doing the outline
using this Tombos breast pin. Instead of this, if you want, you can use normal
ballpoint pen. You can also use black jail pen or if you have Sakura
micron Finland, you can use that too. I'll be going over the
outlines that I have created. I won't be sticking
with the pencil sketch that we have created. If required, I'll be making
some changes and adjustment, as well as we'll be redefining
the seeps a little bit, adding a little bit more
detail links to it. For our first character, the prickly paint going over the outline, going
over the outlines. I'll also be creating
flowers like this for three or four different
tops of the cactuses. Here, if you want
to make changes to the sizes, you can do that. You can make it a bit
larger, more smaller. As I mentioned, so feel
free to do changes, making this one a
little bit larger and adding small flower at top. Instead of creating
this variation of the flower, if you want, you can create variation of the flower or you don't have
to even add the flowers. So it totally depends upon you whether you are going
to add flowers or not. Now, let's add needles. For the needles of this
prickly pear cactus, I'll only be creating this
kind of simple straight lines, tiny straight lines like this to create the resemblance
of the needles. For the insides to
adding the needles. You can add as many
needles as you want. Just don't oversaturate it. Now moving on to this
one, adding few more. Now for the larger
one, apart from this, instead of using fine line or the breast paint to
do the outlining, you can use the breast pain, the colored breast paints to
do the outlining later on, you can start with
the pencil sketch and then use the colour
directly and using a bit darker sats of
the color or just overlaying one layer on top of the other to do the outline. If you want, you
can do that, too. And with these, we
are done with our first outlining lightly raising the pencil marks and see
that the ink has dried up, otherwise, you will
get smudging all over the p Now moving on
to the second one. Starting with doing the
outlining for the pot. Instead of creating this kind of normal straight uniform line, you can make it a
little bit dynamic by wearing the thickness of the line for some
of those sections. Dividing this into a
different section. So dividing this into
different section for our second character, the not acus In here, I'll be creating this kind
of variation for the flower, total of three or four
flour for this one, too. I'll be creating
the same kind of thorns that I did
for the first one. For now, let's add a few
more baby cactuses in here. And two more flowers in here, one more on this side, dividing
into different sections. Now, creating the same kinds
of needles and the thorns. In here, instead of creating
simple straight lines, I'm making it a little
bit thicker at the bottom to give it a little bit
more thorny appearance. Adding it for the
outline section. For the larger one, and as
for the lines in the middle, I'm adding needles
on both the sides. So creating the needles in alternative
directions like this. Doing the outlining for the pot. And with these, we are done with our second one, Noocctus. Moving on to the third one, we have got flowering
barrel cactus in here. We have got somewhat of oval or rounded barrel
body for this one. Let's do the outlining
for this one. Here I'll also be
creating flour, a bit more detailed
flower like this, total of three flowers. This will be a smaller
bid present at the top. And if you want, you can convert this smaller
cactus into flour. But I decided to create
the flower in here, and I won't be
doing the outlining for the baby cactus,
the smaller one. Dividing into
different sections. Same kind of needle and
thorn like the second one. But I'm making the thickness of the needles a
little bit more, so making it a bit more thicker, comparatively a bit more thiger as compared to the first
and the second one. Here, too, for the
insights, as you can see, I varied the I varied the direction in which
I added the thorns. And with these we add
in with the third one. Now for the fourth one, we have got the Ruvian apple cactus. We have got lots of
tall vertical systems with multiple upright growths. Instead of creating
simple straight lines, I'm making the lines like this a little bit more
details in this form. Doing the outlining for the
upright growth like this. We have got one more
upright growth in here. We have got a total
of three main systems and two upright systems, dividing into two
sections like this. And in here, we'll be creating a little bit detailed needles
and thorns like this, a total of three
lines like this. Instead of creating
this kind of thorns, if you want you can create
the other variations of the thorn that we
have used so far. But for this one, I decided to make it a little
bit more detail. That's why I'm creating
this kind of needle. For the insides too, adding
the needles like this. For the inside, as you can see, the needles that
I'm adding are on alternate directions or you can see alternate
signs like this. Adding more thorn. Going into
third and the final one. Adding the thorns for the
upright growth like this. Now for the last stem in here, simple three straight
lines like this to green the thorns and the
needle for our cactus. With these, we are done
with the outlining for all the four characters. I'll be doing the outlining for the remaining one
in the second part. See you there. Oh.
7. Coloring the Four types of Cactus: Let's continue where
we left off in here. We'll be doing the coloring for all the in chaces
that we have created. I'm using students
green camelinbapins, starting with this
dark olive color. Mostly, I'll be using two
or three different seeds of the green to do the coloring. In here, I'm starting
with this dark side of the olive green color to create the darker regions
of the cactus. I'm considering that the light is falling from
the top left side, so the right side will
be a little bit darker. That's why I'm using
this darker side of the olive green to do
the coloring in here. Also adding a little
bit of this for the insides to
small streaks with this and now completely filling the insides of our
cactus, the prickly peer. This first cactus,
the prickly pear, it's scientifically
known as Optunea. It's native to America. The flat pads are actually modified systems.
These are not the lea. It produces an edible fruit
called prickly pears. That's why we have got the
name prickly pear cactus. Some species are used
introdtial medicines and food. This cactus is very
drought resistance and can survive extreme heat. Going back once
again with the star, call it to add a little bit more detailing for the thorns. Now for the flowers, using
a little bit of pink. Instead of the
pink, if you want, you can use yellows
and orange too. To add a little bit more detail
into our leaves in here, I'm using a skin colour
over laying it on top of the pink and completely filling the remaining section. And with this, we are done with the coloring for our
prickly pear characters. Now let's do the
coloring for our pot. For the pot in
here, I'll be using two or three different
seeds of the color. I'm starting with this
darker seat of the ocher. I'll be using two different
sets of the ocher. This darker set, I am
primarily adding it on the bottom section to
make it bit darker. Now, going lighter
seat of the ocher and completely filling the top and the bottom section with it. Adding a little bit of this
for the upper part too. Now, going with the burnt and
adding it a little bit on top of the darker side of the
ocher that we used earlier, a little bit on top of
the dots that we created. Now and again using
the darker side of the ocher and completely filling nine sides, and
this is small section. And with this, we are done with a simple coloring
for our first pot. And with this, we
are done with our first character tricky pair. Now moving on to the second one, starting with this darker
side of the green and adding it a little bit
on the right side, since we are considering
that the light is falling from
the top left side. So the bottom right side
will be a little bit darker. I'll be using a bit darker seats of the color to do the
coloring for this. I'll only be using two seats
of the color for this one. This is the first color.
And apart from this, I'll also be using
the olive color to do the remaining section
of our characters. Now, going in with
this olive color and completely filling the entire section of our cactus with this. And some of the facts
related to this is it's scientifically known as parodia also known as ball cactus. It's native to South America, particularly Brazil Argentina. It's known for its down
and symmetrical body. It often produces bright flowers that will be doing the
coloring later on. It grows slowly
and stays compact, perfect for indoor pots and the ribbed body that it has its alpine expand
and store water. And with these, we are done with the coloring for the cactus. Now let's color the flour, starting with this yellow ocher, a little bit of yellow ocher. Now to make it a bit
lighter, using the yellow, completely filling
my entire section with it and overlaying it on top of some of the sections to make that
section bit lighter, to sew a little bit of
reflection by this ball cactus. And as for the pot, you can do the coloring in any manner. And here I'm using this orange for the upper part of the pot. Now for the remaining section, using the two sads of the
orchid to do the coloring, starting with the darker sed. Let's feel the
remaining section. I left a little
bit of white strip to sow a little
bit of reflection, adding a little bit for
the soil at the top. And if you want, you can use
another side of the cat, but I'm satisfied with it, so I won't be adding
any more color. And with this, we are
done with our second one, the ball cactus or
the Neto cactus. Now let's do the coloring for our third cactus,
flowering barrel cactus. In here I'm starting with the
lighter side of the green. Mostly, we'll be keeping
it a bit lighter. This lighter side is completely the darker side of the
coloring for this one. As apart from this, we'll be using yellow for the
remaining section. So this green can be
considered as the darker side. I did not cover
the entire section with it, only a
little bit of it, particularly on the sides of
the fonts and the needle, going with the yellow and completely feeling
the entire section, overlaying it on top
of the green, too. And with these, we
are done with the coloring for the characters, now for the flower,
starting with the orange. As you can see, I'm not
covering the entire sexon. I'm leaving a little bit
of spaces in between. I'll also be using a
little bit of red and the skin colour to do the
coloring for the flower, using a skin colour to feel
the remaining section, overlaying it a little bit
on top of the orange too. Now to add a little bit more detailing and to make it a
bit darker using the red. So this is how we'll be doing the coloring for this flower. And with these we turn with the coloring for the
flowers and the cactus. You can do the coloring
of the pot in any manner. I'll be using shades of green and the blue to do the coloring. Some of the facts
related to this cactus, it's famous for its large
and ramatic flowers. For this cactus, the
flowers only blooms at night and last only
for a short time. It's native to the
South Americas. Some varieties produces flower larger than the cactus itself. It's also known as
hedgehog cactus. And with these, we are
done with the third Cacus. Now let's do the coloring
for the fourth and the final characters for
this section of the no. So in here, I'm using only two sets of the
green to do the coloring, Tallow green and the dark green. Adding a little bit of this
green for the middle section. Adding a little bit
of this green for the middle section and a
little bit on the right side. As you can see,
since we are making this region a bit
darker, the right side, that's why I'm adding a
little bit more on this side, creating this kind of
smaller strokes to add a little bit more
texture for our cactus. So this is Peruvian
apple cactus, scientifically known
as Sirius CERES, using a bit lighter
side of the green, fallow green, and completely filling the remaining
section with it. So I'll be overlaying this on top of the darker side
of the green, too. Instead of using
this, if you want, you can also use the
lighter side of the green. You can also use yellow or to
make it a bit more darker, you can also use the olive green to do the coloring for this one. To make some of the
region a bit more darker, you can over more layer on top of each other to make
it a bit more darker. And with these, we are done with the coloring
for the cactus. Now for the pot, I'll be using two different shades of the green and a
little bit of black. If required to do the coloring, you can do the colouring in
any manner as you see for it. And for some of the facts
related to the cactus, this cactus can grow several
metre talls in the Y. It's alternative
to South America. It produces edible fruit that are similar to
the dragon fruit. It often blooms at nine. It's common in dessert landscapes
and ornamental gardens. And with these, we are done with the coloring for all
the four cactus. And I'll be seeing in the
next part where we'll be doing the coloring for
the remaining cactuses.
8. Outlining Four More Varieties : Welcome to the second part. Let's continue where we laptop. We have got pin cushion
cactus, bunny ears Cacus, Fiery castle Cacus, and dark
prickly pear variation. Starting with doing the
outlining for the pot. We have got a little bit
of curve pot like this. And now let's do
the outlining for the remaining section of
our pincushion cactus. We have got a small own s and tiny clustered spines that
we'll be creating later on. I'll also adding few
flowers in here. Less detailed flower like the first one that we did
for the prickly pear, a set of three petals like
this for the flowers. Now for the thorns,
the same kind of thorns that we created for the Peruvian apple
gatus as you can see, I'm adding the thorns on alternative
directions like this. And with these we are done
with the pincushion cactus, moving on to the
bunny ear cactus, starting with doing the
outlining for the pot. Feel free to make changes to the seats in the sizes
that you have created. You don't have to stick with the pencil outlines
that you have created. Let's do the outline. Here too, we have got a little bit of
curved down sat like this. I won't be dividing into
different sections. In here, we'll be
trying to so that it's a little bit of curved
in sic and have a volume doing the outlining for the last one. Now let's add. Now let's add
the thorns in the needles. Creating this kind of
cluster of needles to so that it has
lots of thorns. Instead of creating this
kind of thorn, if you want, you can create the
other variations of the thorn that I have
sowed you so far. Here, too, if you want to add
flowers, you can do that. I won't be adding
flowers for this one, but if you want, you can
proceed with that, too. If you want, you can add
few more growths to it. And with these, we add them
with our bunny ear cactus. Now for the seventh one,
fairy castle cactus, starting with doing the
outlining for our pot. Now it's to the outlining
for the vertical stems. Here to Almi creating this
kind of simple thorn. The one we did for the
Peruvian Apple cactus, dividing into
different sections. For the Peruvian Apple cactus, we divide into two sections, and here we'll be divided into three or four
sections like this. Doing the outlining for
the remaining cactus. To add a little bit of more characteristics
to the outlining, I'm using a little bit of broken lines like this.
This is optional. If you don't want to
use it, you can just create simple and plain
lines to do the outlining. Adding multiple
thorns on the sides. We have got two or three more
stems to do the outlining, and then we will move on to the dwarf prickly peer cactus. It's a variation of the
prickly pear cactus. It's a dwarf varieting. Creating the outline
for the last one, dividing into
different sections. I decided to add one more, a bit larger stem like
this in the middle. Adding thorns for the
sign. It's optional. If you want to add more thorns for the sign, you can do that, but since it's got
lots of systems, I won't be adding multiple
thorns for the inside. Adis, it will look a
little bit more denser. Moving on to the
last one, starting with doing the
outlining for the pot. Now let's do the outlining
for the remaining section of this dwarf variation
of the prick leaf here, creating this kind of bit organic lines to
do the outlining, a little bit of curvy
lines like this. Feel free to make changes
and adjustment to the same. If you want to create simple
and plain normal lines, you can use that to
do the outlining. You can add multiple stems. If you want, you can also decrease the numbers
of the stems. Now, let's add thorns and a little bit more
details for the insides. I'll be creating this kind
of simple curvy lines for the insides to add a little
bit more details like this. This is often if
you don't want to create this kind of curvy
lines for the inside, you can just simply create the needles and the
thorns for the inside. Creating a cluster of three or four thorns for the inside. Instead of this, if
you want to create the other kind of thorn that
we did for the sixth one, the bunny ear cactus,
you can do that, too, a cluster of
six or seven thorn. And with this, we are done with the outlining for
all the cactuses. I'll be seeing in the next part where we'll be
doing the coloring.
9. Coloring the Various Cactus Plants : Continuing on where we left top, in here, we have got
the pin cushion cactus, starting with the lighter
side of the yellow occur to do the coloring for a flower.
Only a little bit of it. Now going into the yellow, overlaying it on top of
the yellow occur and completely filling the insides
of the petal with this. Now let's do the coloring
for the rest of the cactus. In here, I'll be using two
different sads of the green, starting with the darker side of the green and overlaying this particularly on the
bottom section and a little bit more on
the bottom right side. I'm also overlaying this on top of the outlined
sections as well as a little bit on
top of the nedles and the fawns that
we have created. Create a small
strokes like this, adding a little bit for
the upper part too. Now, let's do the
remaining section. So in here, I'm using the
lighter sd of the green, and we'll be completely filling the inside of the
pincushion cactus with it, also overlaying on top of the
darker side of the green. And yeah, with these,
we have done with the coloring for our
pincushion cactus. Now moving on to the six cactus. In here, we have got
this bunny ear cactus. For this, we'll be using three different shades of the green, lighter and darker seeds, as well as a little
bit of darker seed of the olive green and yellow. Adding a little bit
more darker sad the green for the
bottom right side to make it a bit more darker. Also, I'm overlaying
this a little bit on top of the needles and
thorns that we created. Creating these kind of smaller
streaks with the burros to add a little bit more
texture for our characters. And yeah, with these, we add with this darker
side of the green. Now to make it a little
bit more darker in here, I'm going in with
the darker side of the olive adding this olive, once again, particularly a little bit more
of this olive on the bottom right side to make that region a
little bit more darker. Only using a little bit of this and creating
smaller streaks with this for the cactus,
the pincusin cactus. For this, we have got rounded pads that are grouped together. Now to make some of the
reasons a little bit more lighter, I'm using yellow. Also overlaying a little bit of yellow on top of the
other two colors. Now going with the
light green and completely filling
the entire section. I'll be leaving a little bit of yellow and covering the
remaining section with this, over laying it on top of all the greens that
we used earlier. And with these, we had done with the coloring for
our bunier cactus. Now let's do the
coloring for the pot, so you can do the coloring in
any manner as you see fit. In here, I'm using
dark brown to do the coloring for
our fifth cactus, the pin cushion cactus. So earlier, we did
not talk about any of the facts related to the two
cactus that we have created. This is one of the
largest cactus genera. A 200 species of this are found. It's native to Mexico. It often produces a ring of small flowers
around the crown. It's covered in tiny tubercles, and it's a very bigne
friendly house plant. As for the second
one, I'm using both the ocher and the brown to
do the coloring for the pot. And this bunny ear
cactus is called bunny ear because of
its symmetrical path. It's covered in tiny hair
like spines called glocds. These glocts are very small but are very
irritating if touched. This is also native to Mexico, and it's one of the popular decorative indoor house cactus. And with these, we are
done with coloring for two pots for
the two cactuses. Now let's do the remaining
seventh and eighth cactus. In here, we have got
fairy castle cactus. For this, I'll be
using two seats of the green and darker
than the lighter one, starting with the darker
side of the green, particularly adding it
more on the right side, also overlaying it on top of the needles that we have created and the divisions
that we created using the broken hatching lines. So we have gotten lots
of clustered vertical stems for this fairy
castle cactus. Let's do the remaining coloring. So using lighter
side of the green and completely filling
all the stems with it. I'm also overlaying
this lighter side of the green on top of the darker side of the green to blend the two
colors a little bit. Adding the color for the
remaining two stems in here, it's nicknamed fairy castle because it resemble tiny towers. This is native to Central
and South America. It grows in upright
clustered columns like this, and it rarely flowers indoors. And apart from that, it's one of the most popular
novelty cactus plant. Let's do the coloring
for the pot. In here, I decided to
create this kind of parallel lines to add
designs in this manner. Instead of this, if
you want, you can create any kind of
designs or pattern. Simply using two seats of the ocher and brown to do the
coloring for this one. And with these, we are done
with our seven cactus, fairy castle cactus. Now let's do the coloring
for the last cactus in here. So we have got this
dark peer variation. Starting with the yellow, we'll be making it quite lighter. So only yellow and the
lighter side of the green. Now, going with the green and completely filling
the entire sexon with it. I'm also overlaying
this green on top of the light yellow
that we used earlier. The regions on which we added the yellow will become
a little bit lighter, completely filling the
entire section with this. This is also a variation
of the Optunia characters. It got rounded, clustered pads and it stylized compact
growth like this. Let's do the coloring
for our pot. The same kind of coloring
that I did for the fifth one. And some of the
facts related to it, it's a smaller
ornamental variety of the optuna It stores water
inside its thick pads. It's extremely drought tolerant and can survive long period
without any watering. With these, we are done
with all the cactuses. Now this is optional. I'm using to create small
sados just below the pots. Simple line like this to
add the resemblance of the sados for the cactuses
that we have created in here. And with these, we are
done with this one. And with this, we are
done with this project. I hope you enjoyed painting this colorful and vibrant,
yet easy cactases. I had lots of fun
painting this one. If you have made changes an
adjustment to the paintings, we see your artwork in
the project section, and I'll be seeing you
in the next project.
10. Golden Crown Twins: Welcome to golden crown twins. In here, we'll be creating
golden marl cactus. Let's start with the
outlines for the pot. So in here, we'll be making the pots a little bit
larger line this. Curb rectangular s for the pot. Instead of creating this kind
of pot with this so side, if you want to wear
it, you can do that, too, creating the
bees for our pot. In here, I'll be
creating a total of two golden marl cactuses. It will have a bit
of rounded barrel like sea with deep
vertical ribs, crown flowers on the top, and it will have a little bit of compact cluster like loop. Creating this kind
of bit circular s for our golden marl cactus, one more smaller one in here. On top of both these cactuses, I'll be adding this kind of bit smaller and bit
less detail flour, using orange and yellow
to do the coloring. Apart from that, we'll
be using dark green, light green and yellow to do
the coloring for our cactus. We'll be using the fine line to add a little bit
more detailing in the form of broken
hatching lines to do a little bit of seeding, making the upper and lower
part a little bit more darker. I won't be creating any kind of distinct detail in the form
of thorns and the needles, but if you want to add
those two, you can do that. And here, I'm using Sakura micron fine liner to
do the outlining. Starting with the flower
to do the outlining. Instead of using the fine
liner paint to do the outline, you can always use
the breast pain to do the outlining later on after
completing the coloring. Adding this kind of
broken hatching line to add a little bit more
details for the flower petal. And as for the compact sheet for our golden barrel character, creating these kind of
bit curve lines to do the outlining doing the
outlining for the second one. And now, let's add
the flower for this one. The same
kind of flower. The sides of the petals in here are quite smaller as
compared to the first one. Now, let's divide it
into different section, creating this kind of
deep vertical ribs to divide it into
different section. And here, I'm using this kind of bit broken lines to divide into different section
instead of it. If you want, you can also use the simple and plain
straight lines to divide into
different section. But with this kind of lines, I find it that it makes the painting look a
bit more organic and add another layer of characteristics to
the illustrations. So that's why I use this kind
of bit more organic lines, bit of broken lines or
bit of curved lines. And to add a little bit
more detailing to it, we are going to do this kind of simple hatching
lines in here, bit of broken hatching
lines like this. We'll be adding a little bit of this kind of lines for
the upper part too. But before doing that, let's do the same thing in here for
the smaller characters, dividing into different section, creating this kind of vertical
lips using the fine liner. If you want, you can also add
the needles and the thorn. I won't be doing it, but if you want, you
can do that, too. Adding a little
bit of texture in the form of this kind of
broken hatching lines. Now, in here for the soil,
simple lines like this. Let's do the outlining for the remaining section, the pot. Here, too, if you want
to create any kind of patterns or designing,
you can do that. I'll only be using
two or three sets of the browns or the yellows to
do the coloring for the pot. You don't have to
stick with the same color combination that
I'm going to use. You can use any
color combinations. So feel free to do
experiment on your own. This right side was
a little bit small, so extending it a
little bit more. Adding more details for
the petals of the flower. And as for the upper
part, as I was mentioning a little bit more broken
hatching lines to add a little bit more
detailings and to make the upper part a
little bit more darker. So we are using this kind of hatching lines to
do a little bit of seeding for some of the regions to make those
regions bit darker. Also making this side a
little bit more darker to create the clear distinction
between the two cactuses. And yeah, with these,
we are done with a simple outlining
for our cactuses. If you want to make a
little bit of changes, or if you want to
add more cactuses, you can do that, too. Lightly erasing the pencil ski I see that the ink has
dried up, otherwise, the ink will be smrged on the paper and apply light
presser with the eraser. Otherwise, the intensity of the ink will be
reduced a little bit. Lightly erasing it.
Removing the eraser dust. Now, we'll be doing the
coloring for our cactus. In here, I'm starting
with the orange to do the coloring for the
flower petal first, and then and then we'll be doing the coloring
for the cactuses. Now going in with the yellow. So overlaying this yellow
on top of the orange and completely filling the rest
of the flower petals in here. Also adding more orange in
here for the other layer of the floured petals that lies on the other side a little
bit more of this. Adding the orange for this one. Now going back once again
with the yellow and overlaying this on top
of the orange as well as feeling the remaining
section of the petals, adding it for the second one. And with this, we
are done with the coloring for the flour petals. Once again, using the yellow. Particularly overlaying
this on top of the deep vertical drips
that we have created, a little bit for the
bottom side too, a little bit more for
the bottom section. And with these, we are
done with the yellow. Now let's make it a little bit more darker. So going
in with the green. So the same kind of thing
that we did with the yellow, overlaying This time
instead of overlaying it on top of the vertical
ribs that we created, I'm adding it in between it, making the upper and the lower
side a little bit darker. I'm moving onto the second
one, doing the same thing. This kind of bit curved
lines and creating a lot of smaller and larger sticks
with this dark green. Also using it to
do the outlining. Making the outline
a little bit more distinct with this darker
side of the green. Now adding a little
bit more dark green wherever you
think it's required. And with these, we an
with a dark green. And now finally going
with the light green, overlaying a little bit of
the slight green on top of the yellows and the darker sad of the green that
we used earlier. We are not going to cover the entire yallos in the dark green, but only a little bit of the slide green on top
of the other two colors. Adding it for the second one. And with these, we are
done with the coloring for our characters and
the flour on top of it. As for the pot,
adding a little bit of this burnt sienna now going with the light
side of the ocher and completely covering the
remaining section for the soil. Now we have got only the pot. So you can do the coloring
in any manner, SQC feet. You can also create
patterns or designs, or you can just follow
along with me and do the coloring in the
same manner that I'm going to do using this darker
side of the ocher. And now for the
remaining section, using this lighter seat
of the ocher in here, I decided to create this kind of simple pattern for our pot. Feel free to make
changes and adjustments. And that's put some of
the fact related to this wind marl character with the yellow flower
that we have created. It's native to Mako, and it's also called
mother in law's cushion. I can live over 100 year. Apart from that, it also grows slowly but becomes
large in the wild. It produces a ring of
flower at its maturity, and these may some of the fact related to our project in here. Adding the color in here. And with this, we are done
with the coloring for the pot. Now for the sad, in here, I'm using this dual t
market that I have. Instead of this, if
you want, you can use the normal Greek
colon that you have. Or if you don't want
to add this kind of sados on the side, you
don't have to do this. This is all optional. Adding
it on the other side too. This beside the
petal and the flour. Extending the side a little
bit on the bottom side. This was quite fun to paint, and I enjoyed painting it, and I'll be seeing
in the next project.
11. Blushing Desert Tower : Welcome to Blessing
Desert Tower. In here, we'll be creating
another Peruvian apple cactus with three or four flowers. Starting with the
simple see for our pot. For this pot, I'll only be using red and maroon color
to do the coloring. For the soil, I'll be
using shades of ocher, and I'll be using two
or three shades of the green to do the
coloring for our cactus. Creating this kind of upright
barrel see for our cactus. I'll be creating multiple
groups on the sides, side branches like this. And to add a little
bit more detailing, I'll be creating this kind of
ribbed vertical structure, and later on, I'll be adding few hones and needles
on top of it. So creating more side
branches in here like this. If you want to increase
or decrease the sizes and the numbers of the side
branches, you can do that. On top of all the side
branches that I have created, I'll be adding flowers,
simple flowers. This is our basic
simple pencil sketches. If you want to make changes in adjustment, feel
free to do that. To do the outlining in here,
I'm using Tombosbespin. Let's start with this kind of bit broken lines to do the
outlining for our flowers. For a simple seed like this. With the pencil uske, I did
not create this kind of seed, but you have got the rough idea how you can easily
create this kind of simple flower petals
for our flower at the top of our
Perrone apple Cacus, creating this kind of
bit broken lines to add more texture to the outline
section for our characters, a few more thorns like
this, for the insides. For most of the sections, I'll be creating this kind of
outline for our characters. Instead of creating
this kind of outlines, you can always use simple and plain lines to do the outlining. Here too, I'll be
adding flowers. So as I mentioned, for all the growths
that we have created, I'll be adding the
flowers on top of each. And depending upon the
sides of the growth, I'll be wearing the
sides of the flowers. So for the smaller
ones like this, I'll be creating this kind of smaller versions for the flower, and for the larger one, we'll
be creating the larger one. In total, I have created five
growths for this project. Instead of five, you can
decrease or increase the numbers doing the
outline like this. Now let's add the
flower at the crown. Now for the last growth in here, adding the flower at the top, creating smaller
flower petals in here. Now, doing the outlining
for the remaining section, going over the outline for the ribbed vertical
structure that I did, so I divided it into
two different sections. If you want to add more details, you can use a little
bit of hatching lines. You can also add few
thorns for the inside. I won't be doing
it. I'll be using colors to create the
resemblance of the thorns. Creating the bees for
the cactus in here. Finally, doing the
outline for the pot. Adding the best for our pot, a little bit of more thorns for our cactus and adding
the final flour in here. So if you want to add more
details, you can do that. You can add more thorns, a little bit of hatching lines
to make the upper part and the lower part a little bit
distinct and a bit darker. You can also do a little
bit of seating at the lower section of
the growth to make it a little bit more
darker and to create a clear distinction between different sections
of the characters. In here, I'm applying
light presser with the eraser to remove
the pencil scale. Insert that the
ink has dried up. Otherwise, you will
get smudges all over your paper and apply
light freezer with it. Otherwise, the intensity of the ink will decrease
a little bit. So in here, I'm starting with this darker seat of the
red. It's maroon color. Small streaks with
this like this, adding it for all the flower
petals that we have created. On top of it, I'll be either using the skin
color or the pink. And with these, we are done with this color for all
the flower petals. Now, in here, I decided to
go with the skin color. So overlaying this on top of the baroon colour that
we used earlier as well as feeling the
online sides of the petals that we
created for the flowers, adding it for the last one. And with these, we are done with the coloring for our flowers. Apart from this, if you
want, you can also use yellows and ls to do the
coloring for the flowers. Now let's do the
coloring for the cactus. So in here, I'm starting
with this olive green, so creating this kind
of broken lines. I'm using this color to
create a little bit of darker regions for some of
the sections of the cactus, especially for the grooves
that we have added. Using this kind of
broken lines to act as the hatching lines
for our characters, particularly adding
a little bit more near the vertical
lines and adding a little bit more for
the lower sections of the addisonal growths
that we have created. And with these, we
are done with this. Now going with the dark green
and the same kind of lines, bit of broken lines,
overlaying this a little bit on top of the olive green that
we used earlier. Also extending it
a little bit for the grooves that
we have created. O. Now, once again, going back with the olive color, adding a little bit more this on one side of the cactuses. So I will be considering that the light is falling
from the top right side. So this section, the bottom left side or the left side will
be a bit more darker. That's why I'm using
a little bit more of this olive color on the left side to make this
region a bit more darker. For the remaining
section in here, I'm going with this
lighter green. So we'll be completely filling
the remaining section, the entire insides of
the cactus with this. Also overlaying this on top of the olive and the darker
side of the green, and it carefully beside the
flowers that we have created. And if you want to make some of the regions a
little bit lighter, you can also use a
little bit of yellow. You can add the yellow right
now or you can wait for it. So after adding the green, you can add a little bit of yellows for some of the section. Let me make the green a
little bit more lighter. Adding it for the last
growth on the right side. Now, if you want to make some regions a
little bit darker, you can add another layer
of the greens on top of it. But I'm satisfied with it. With these, we are done with the coloring for our characters. Now let's do the
coloring for the pot. In here for the soil,
I use the ocher. For the pot, the
same maroon colour that we use for
the flower petal. A little bit like this
in here on the side. Instead of using this
color combination, you can use any other
color combination. You don't have to use the
same colours that I'm doing. You can also create
other kind of patterns or designs for the pot. And with these, we are
done with the pot. This is optional. In here, I'm using y to create the Sadows on the sides
of the character. You don't have to use the
same gray that I'm using. You can use a simple and plain y to create the
Sadows like this. You can just keep
it simple without any sados Adding so beside the pot. Now for the bottom section, making it a little bit larger. Adding it on the other side too, and here too, beside
the flower metal. And with these, we are done
with the sing desert tower. I hope you enjoyed
painting this one, and I'll be seeing you in the next project.
Happy painting.
12. Little Prickly Guardian : Welcome to Little Prickly
Guardian Project. In here, we'll be painting
Prickly Pear Cactus. We have already created
one Prickly Pear cactus. This is going to be
a little bit more defined, a bit more larger. In here, I've already started with a simple C food the pot. I'm creating this kind of simple version of the pot
instead of this, if you want, you can
create any other kind or any other
variations of the pot. Now let's do this sketching
for our Prickly Pear Cactus. In here, I'll be
creating this kind of multiple flat owl pads
for our characters. Here, if you want to vary the seats and the
sizes, you can do that. You can also vary
the placement of the multiple pads
that I am creating. For the main stem
or the branches, I will be making it a little bit thicker and for the
auxiliary branches, I'll be making them a little
bit thinner and bit smaller. In here for the top creating
multiple flat oval pads. This is our basic
simple pencil sketch. I decided to extend the
pot a little bit larger. Feel free to make changes and adjustments to the
pencil sketch. Now let's do the outlining. In here for this one, I'm using the Tombos breast paint
to do the outlining. I'll be using both simple
plain lines as well as this kind of bit
broken lines to add a little bit of more
texture to our painting. Instead of doing this
kind of outline, if you want you can do the
other kind of outlines with kind of bit broken lines that we did for our last project. So let's do the outlining for all the pads that
we have created. And then we'll be creating small dots clustered for
the thorns and the needles. Put some of the sections,
as you can see, I'm creating this kind
of bit broken lines. Apart from this,
if you want to add a little bit more texture
and detailing to it, you can make some of
the lines a little bit dynamic by wearing the
thickness of the lines. You can also use the
hatching techniques to make some of the
section a little bit more darker by using the hatching and doing a
little bit of seeding. I'll be doing the seeding, but I'll be using the breast
paint to do that. But to add another
layer of detailing, you can use that like the one we did for
our first project. Here, if you want, you
can add few more pads, but I'm satisfied with
it, how it turned out. Now adding a little
bit more detailing, creating the flowers,
small flower like this. These are not that detailed, very small projections
like this. I'll also be creating
multiple thorns, multiple thorns
needles or you can see Areolas for the cactus that
we are creating in here. Simple shapes for this. For the las, I'm creating this
kind of small seeds, and for the flowers, I'm creating this kind
of larger seam. If you want, you can also
create the needle like thorns that we have created
for other projects. For most of the larger ones, I'll be creating this
kind of small flowers, and for the remaining ones, I'll only be creating
this kind of small las for the remaining
section on top of the pads. As for the colors, I'll be using three colors. I'll
be using yellow. I'll be using green,
and then olive green. I'll be using yellow to make the right side a
little bit lighter. I'm considering that the light is falling from the
top right side, so that right side will be a bit lighter and the left
side will bit darker. So that's why on that side, I'll be using the darker
side of the olive. And as for the
pots, I'll be using ochre and the brown
to do the coloring. I'll also be creating
the same kind of cytos that we created for
the other two projects. Continuing on with the
remaining section, creating small ulas for
the remaining section, as well as some of
the smaller flowers for the larger part
of the cactus. Regarding this
prickly pear cactus, some of the interesting
facts related to it. This is relative to the America. It produces edible fruit
called prickly pear. Its pats are also edible
on prepared properly, and it has tiny spines called glocts that
are very irritating. It's smy drought resistance. This pats that we have
created are not the leaves. These are the estems
of the plant. Yeah, continuing on with
the remaining section. This kind of smaller
hatching lines in here. If you want to create
multiple lines like this, you can do it for the
remaining section to make it a little
bit more detail. Now, for the last pad
in here at the front, small nuls as well as a little bit of small
flowers on top. And with this, we are done with a simple outlining and adding a little bit more detailings for our Prickly Pear characters. Still, if you want to add few
more pads, you can do that. And with these, we are done with the outlining and the detailing. Let's erase the
pencil and sketch, inset that the ink has dried up. Otherwise, you don't get
smudging all over the paper. Also apply light presser
with the reser to erase it. Otherwise, the intensity of the ink will be
reduced a little bit. Now let's do the coloring, starting with the lighter
sads of the color. So yellow, a little bit of
yellow on the right side, also adding a little bit of
yellow for the flowers too, flowers for the top, as well as for the flowers
in the middle. So using a little bit
of yellow like this. Later on, I'll be
using a little bit of red to do the
coloring for the flower. Instead of using
red, you can also use pink or orange
to do the coloring or you can only use the yellows and orchard to do the
coloring for the flowers. As I mentioned, the light is
falling from the top right. That's why I'm adding
the yellow in this side. So for all the pads in here,
I'm adding the yellow. Ticker streak of the
yellow on the right side. So I added it for all the pads. If you want, you can also add a little bit on the left side. And with this, we are
done with the yellow. Now going in with the olive, starting with
creating these kind of smallness streaks with it, add a resemblance of the
thorns in the needle. And now let's add it
on the left side. Thinner streak as compared to the yellow and adding
it on the left side. Also create these kind
of smaller streaks to add the resemblance of thorns and make
some of the section a little bit more denser
and a bit more darker. Instead of using the
color combination of yellow, light
green and the olive, you can also use the
darker green and the halo green or any other seeds of the
greens that you have. Adding multiple smaller
strokes for other regions. Now for the main branches, let's make it a little
bit more darker. So creating this kind of a bit thicker streaks
on the left side. And with these, we
are done with it. Now, going in with the green. I'll be completely filling
all the pads that we have created for the characters with the lighter side of the green. I'm also overlaying this on
top of the darker side of the olive green that we used and a little bit on
top of the yellow. I'm not going to cover
the entire yellow, but only a small portion of the yellow will
be covered by it. And the section that will be covered by the
yellows will appear a little bit lighter as compared to the green
that we are using. If you want, you can also
cover the yellows, too. Going over the outlines, then adding a little
bit of green beside the yellow and then completely filling the remaining
section with the green. Adding in here on the side. So we are halfway there. Oh Now for the remaining section in
here for the larger stems. And as I was mentioning, if you want to add a little
bit more details to it, you can also use the darker
side of the green or halo green to add another
layer of the coloring, particularly on the left side to make it keep it more darker. You can use it to create
hatching lines and do a little bit of seeding for the additional pads
that we have created. And with these, we are done with the coloring for the character. Now let's do the
coloring for the pot. In here, I'm using brown, adding the brown for the soil. Creating this kind of simple
parallel lines as a design. This kind of pattern or design, you can create any
other varieties or designs for the pot. Now going in with this
lighter side of the ocher and completely
peeling the entire section. I'm also overlaying this
on top of the brown too. Making this region a
little bit more darker by overlaying more layers
of the ocher in here. And with these, we are done with the coloring for the pot. This part is optional. In here, I'm using y to do the outlining. So starting with doing the
outlining for the pot in here. And now for the
remaining section. In here, I'm using this dual tip breastpin that I have
to do the outlining. So with this, I get a little
bit of advantage that I can create a bit more thicker
lines. That's why I'm using it. If you don't have, you can use the plain and normal
gcloor that you have. And if you don't want to do it, you can just keep it
simple as it is for the additional pads that we have created on this side
and the right side. And with these, we are
done with the sados. Now let's do the coloring for the flowers that
we have created. So for the upper part
of the flowers in here, I'm using red to
do the coloring. Adding it for the flowers
at the middle section tune. Instead of using this red, you can also use orange or
pink to do the coloring. Small tiny streaks
with the red to do the coloring for the flowers
that we have created. If you don't want
to do the color, you can just leave it as it is simple and plain
yellow colored flower. And with these, we are done with our project, little
prickling garcian. I hope you enjoyed painting this simple variation of
the Prickly beer arcus, and I'll be seeing you in the next project, happy painting.
13. Buzzing Barrel Friends : Welcome to Bging
Barrels Plant Project. In here, we'll be
creating Old Man Cacus, starting with a simple
outlining for aur pot as usual. Instead of creating this
simpler version of the pot, you can create any kind or
any variety of the pot. You can create this kind of
simple rectangular sea for the pot or you can make this
a little bit over like this, adding curve lines
on both the side to make it a little bit curving. So this will be our pot. If you want to add
designs or pattern to it, feel free to do that.
Now for the characters. In here, I'll be creating
three upright column for our old man characters. Here, too if you want to vary
the seats in the sines or number or the numbers of the upright columns
of the characters that we'll be doing,
you can do that. So this will be our three
cactuses for this project. If you want to do
some changes in adjustment to the sketch,
feel free to do that. In here, I'm using Tamosbspin
to do the outlining, creating this kind of outline for the thorns and the needle. For this old man cactus, it's covered in soft
hair like spines. So that's why I created
this kind of needles. For the middle section in here, I'm wearing the directions of the thorns that we are adding. For all the cactuses in here, I have divided into
three sections. If you want to add flowers on
top of it, you can do that. If you want to add few growths on the sides, you
can do that, too. Instead of creating
this kind of outlines, you can create other kind
of thorns and needle that we have created
for other projects. But you can just follow
along with me and create this kind of bit soft hair like spines for our characters. For the middle secon here, I'm wearing the directions of the thorns that we are adding. So we have alternative
directions for the thorns in the middle. Doing the outlining
for the last one. For some of the
sections, I'm adding a little bit more
details in the form of this kind of smaller
lines to add a little bit more resemblance for the pans and the needles. This is ops if you
don't want to do this, you can keep it simple triple lines like this to add a little bit more details for our outline. Apart from doing this kind of
outline for the characters, if you want to make
it a little bit more uniform, you can do that. You can do that by creating simple and plain lines
to do the outlining. Using hatching lines like
this to create a little bit more detailing to add more
texture for our cactuses. So these regions
will be a little bit darker using this kind
of bit broken lines. To make it a bit more darker,
you can add more lines. This is, if you don't want to use the hatching lines
to make it bit darker, you can always use the
colored breast beans, do it later on. Now, let's add the outlining
for the bes of our cactus. Moving on to the pot,
simply doing the outlining, following the seep of
the pot that we created. Adding a little bit more details for the upper part
of characters, a bit of broken hatching
lines like this. And with this, we are
done with the outlining. Let's lightly erase it, ensure that the
ink has dried up, otherwise we will be getting smudging all over our people. Now let's do the coloring
for our cactuses. Here, I'll be using
the three seats of the greens and the yellow. Here I've already started
with a darker seat, so using this olive
green and adding it particularly for the
outlined sections as well as for the
middle region, we'll be considering
that the light is falling from the
top right side. So the sados will be cast
in on the left side. But since this is divided
into different sections, there are two cactuses in front and one in the background. So the sados casted win the two will also be making the
middle region a bit darker. That's why I died it for the inside st. Not to make it a little
bit more detail here, I'm using darker
shades of the green, creating this kind of
smaller strokes to add a little bit more texture
for the characters as well as to create
resemblance of the thorns. And with this, we are
done with the green. Now, to make it a little bit lighter, choosing the yellow. And as I mentioned, we are considering that the light is
falling from the top right, so adding the yellows
on the right side. Adding a little bit of yellow
for the middle regions too. And with this, we are
done with the yellow. And finally, let's do the coloring for the
remaining section. So using green, we'll be
overlaying the green on top of the darker side of
the green as well as the olive green that we use and a little bit on top
of the yellow to. Adding a little
bit of this green on top of the yellow
to like this. Now we will be doing
the same thing for the remaining two cactus, adding it carefully near
the outline section, and overlaying it
entirely on top of the dark green and olive
green that we used earlier. Carefully adding it in
here near the yellow. We don't want to cover
the entire yellow. Adding it for the bees. And with these we are
done with the coloring for our old man Cactus. For the soil in here, using a little bit of ocher. And now for the
pot, for the pot, I'll be using two
states of the blue, sky blue, and the dark blue. I won't be creating any pattern or design instead of that, if you want to
create any kind of pattern or designs,
feel free to do that. In here, I'm starting
with the sky blue. So this will be the reflexion
caused by the light. That's why I created this
kind of smaller stream. Now go in with the dark view and completely filling the
remaining section with it. Feel free to create
any kind of pattern or design or use any other
kind of combinations. And with these, we are done
with the pot and the carcus. You can just keep it ast is, or you can just follow
along with me and create the sados as well as I'll be creating two or
three small bees, starting with a grain
to create the sados. In here, I decided to create a little bit of rougher
texture for the sado. So I'm using this
bras with no ink. That's why I'm able
to create this kind of rougher texture
for the sados. Instead of creating this
kind of sado you can create the normal kind of sados
that we have created so far. You can leave it as it is, or you can follow along with me and add few small honeybees. Before doing that, I'm creating this kind of spiral
pattern to add a little bit more
details to create the path for the bees.
These two are opson. If you don't want to create, you can just leave it as it is. I'm using a bit of broken lines to create this kind
of say pattern. Instead of using black, you
can use any other color. Adding last one in here. Now let's create
very simple bees. Simple oval C for
the body of the bee, circular C for its head. Simple sp like this
for its wings. Here's another bee, simple oval Sep and circular C for
body and the head, and this kind of bit
elliptical C for the wings. If you want, you can
create a few more bees. I'll only be creating two bees. Now going with the breast pain to do the outlining
for our bees. I'll only be using yellows and willows to do the
coloring for the bees. Creating the sting for the bees. Tiny projection for its feet, doing the same thing
for the second bee, creating sting, dividing the body into
different sections, tiny projection for its feet, and doing the outlining
for the wings. Creating its stinger
for this one, and we are done with the
outlining for our bees. Some of the interesting
facts that are related to this old man cactus, it's native to Mexico. White he protects
strong desert sun. It's very slow growing. It takes a lot of time
to grow and to mature. It really flowers indoors and it can leave for decades
with proper care. These are some of
the facts related to our old man cactus, going in with the yellow to do the coloring for the bees body, completely feeling
the insides with it. And as for the wings, in here, I'll be using the same sky
blue that I used earlier, adding a little bit of
sky blue for the wings. And with this, we are done with our project, budging
Barrel friend. I'll be seeing you in the
next project, happy painting.
14. Golden Bloom Optunia : Welcome to this project,
Golden loom obtenia. For the next project, we'll be creating a bit larger
and a bit more detailed, bit more colorful and
vibrant cactuses. In here, we have got
another flowering prickly peer cactus, starting with the
outline for the pot. For this one, I
decided to create a bit larger pot like
this, bit of ovals. And I'll be using two
seeds of the Blue to do the coloring and
I'll be creating circular and oval
sieves as to design. If you want to create other varieties or kinds of the pots, you can make it a
bit more longer, bit, taller, bit more broader. And with these, we are done with a simple sketch for the pot. Now let's create the cactus. In here, I'll be
creating a total of two larger cactus and then I'll be creating
multiple smaller ones. This two will be the two
main stem or the branches. Apart from this I'll be
creating multiple cluster pads, a total of eight or nine, and on top of all of them, I'll be earning yellow and
orange colored flower. Now let's create additional
cactuses on top of it. I'll be wearing the
seams and the sines. Mostly in here, I'll be creating
this kind of bit ovals. If you want to make
it a little bit more broader, you
can do that, too. So for the larger ones, I'll be creating a
bit larger flowers, and for the smaller ones, I'll be creating bit smaller ones. Simple seeps like this
to create the flower, the same kind of flower that
we have created so far. This will be the biggest flower. I'll be creating two
more flowers of the sig. Apart from that, all the
flowers will be a bit smaller. I'll also be creating two
or three small flower buds. For the middle one in here, creating smaller flower bud. Let's create the flower in
here, too, for this one. So this is yet
another larger one. Now for the cluster
pads in here, creating this kind of
bit half open flowers. Let's add one more in here. Creating one more cactus in here that lies behind these
two larger ones, adding more pads on top of it, smaller cactuses, adding small
flower buds on top of it. Now in here for this one,
creating another flower. So this is a little bit
larger as compared to the other smaller flower
beds that we created. And with this, we are
with a simple pencilsk. Now let's do the outlining. In here, I'm using Sakura micron fine liner to
do the outlining. I'll also be adding a little
bit more detailings for the flower petals in
form of this kind of two or three simple
straight lines. You can consider it to be simple hatching lines for the insides of the flower or you can see the middle section. We'll be creating multiple hatching lines to
create the stamens. For the flower, I'll only be creating yellow and orange
to do the coloring. Instead of it, you can use other variations of the colour. You can use orange and ocher. You can use pink and red. You can use blue light
blue and the dark blue. You can also use
skin color and pink. You have got lots of
options to choose from. And with these we
are done with a simple outlining for the flower. Now for the cactus, creating
these kind of smaller olas. On the sides, I'll be creating small needles and the thorns. I'll also be creating few thorns and needle for the insides. And for the lower
section of each pad, we'll be doing a little bit
of hatching lines to do a little bit of seeding
for the flower bed, doing the outlining like
this, simple lines, a bit curved and organic
lines for the outlining. As I was mentioning,
a little bit of curved hatching lines in here for the bottom section
of the smaller cactuses. Moving on to the
third one in here. Let's start by doing the
outlining for the flower. A bit of broken hatching lines for the petals of the flower. For the middle
section of the flour, adding a lot of line to make it a little
bit more detailed. Now, let's do the outlining for the min petals for this flower. Instead of using only orange and yellow to do the coloring
for all the flower, you can also use other colors. So you can create
larger flowers with the yellow and orange for the
smaller one or for the birds, you can use other
color combination. Or for half boomed flower, you can use pink and red. So you can use two or three different
color combinations to do the coloring
for the flowers, doing the same thing,
creating outline, creating smaller anulus for the insides of the cluster pad, and a little bit of curved hatching line to make the lower secon a
little bit more darker. In here, for the outline
of the cactuses, I'm creating a little bit of broken and curved lines to
make it look a little bit more realistic and add more characteristics to the cactuses that
we are creating. Instead of this, if you want, you can create simple
and plain lines too, that will do the work too. Now for the second one in here, same kind of organic line using a little bit of broken
lines to do the outlining. For this two, we have
got three clustered pad. One of the flower is blooming, and the other two
will be half bloom, creating aula a little bit
of broken hatching line. Let's do the outlining for
the half bloomed flower. And with these, we are
done with this one. Do the same thing for
the remaining two. I decided to do the outlining
for the arcus first, and then we'll be doing
the outlining for the flowers and
the flower petals. Now let's do the outlining
for the half bloom flowers. Doing the outlining for
the petals like this. In here, since the sizes of
the petals are quite smaller, I'm not adding the
hatching lines. Before doing the outlining
for the larger flower, I decided to do the
outlining for this one, the cactus that lies
behind the larger two. Doing the outlining
for this circular one, adding the flower
bud on top of it, and for the smallest one. This too has got smaller
flower bud on its top. Using hatching lines to do
a little bit of seeding, creating these kind of
bit broken hatching lines to make the lower renals a bit more darker and doing a little bit of seeding
using this technique. Adding thorns on the side. I'm not making it
that much thorning, but if you want, you
can add multiple thorn. Now for the larger
one, I'll be adding urulas for the inside
as well as few thorns. Randomly adding the
les for the inside. Now for the lower part in here, using the same broken
hatching lines and yeah, filling the entire section with this kind of curb
hatching lines. In here, I'm also making the sides of the hatching
lines a bit larger. So we are extending the
lines a little bit. To give it a little bit
more volume and doing a little bit of curb lines
for the upper part too. Now creating few
thorns for the inside. I'm not going to add a lot
of thorn, but few thorns. So four or five
sets of the thorn. Now for this cactus two, adding the ulas and the thorns. And now let's do
the hatching lines. Doing the outlining for the remaining section
for this one. Now let's create the olas. I decided to do the outlining
for the flower first, and then we'll be
continuing on with adding las and doing the curve
hatching lines and adding the thorns central part, adding more lines a little
bit more detailing. Now continuing on with creating
the ulas for the inside. Creating a few thorns for
the inside and the outside. Let's do the hatching
line for the bees. Curve simple broken lines
to do the hatching. Here, too, we'll be extending the sizes of the hatching
lines a little bit more. Adding a few more lines to make it a little
bit more darker. For this character,
too, we'll be using three seeds of the greens
and a little bit of yellow, yellow to sow some of
the highlighted section and to make it a
little bit lighter. So we'll be using olive
green, dark green, light green and yellow to do the coloring for our characters. Now for the soil, this kind of bit broken and curved line to create the outlining for it. And finally, let's do the
outlining for our pot. And with this, we are done with the upper part for the pot. Now for the remaining section, With these, we are done
with outlining for the pot. As I was mentioning, creating simple circular shapes
for the designs. Instead of creating this kind of simple pattern or
designs for the pot, you can create any other
designs or pattern as you see fit. This is optional. You don't have to
follow along with me. You can create other variations for the patterns
and the designs. For the upper part of the
pot, I'll be using red, and for the remaining section, I'll be using dark blue
and the light blue. I'll be encircling the circles that we have created
with the dark blue. And for the remaining sections, I'll be using the light blue, and for the insides
of the circle, I'll be leaving it as it
is simple and plain white. And with these, we had
done with the outlining for the characters,
flowers and the pot. Let's erase the pencil skin. So using eraser and lightly erasing the pencil
skis that we did. Now let's do the
coloring in here. I'm starting with the orange, so going over the lower section of the flower and flower
petal with this orange, adding it on the other side
of the flower too, like this. I'm not adding it for
the central part. So we'll be doing the same
thing for all the flower and the flower petals and the small flower buds and the half plum flowers
that we have created. A little bit of orange
for the lower side, also overlaying this
orange on top of the simple hatching lines
that we have created. Adding it for this one, too. Let's add it for
another larger one. Adding it on the other side too. Put the smallest bid in here. And with this, we with
the orange for the flour. Now for the remaining section, simple and plain yellow, we'll be completely filling
the entire section with this. Also, we'll be overlaying this yellow on top
of the orange. Carefully adding this yellow for the outlined
section of the flower. I'll be adding the yellow for the insides of all the flour. To make it a little
bit more darker, you can also use a
little bit of red. On top of the orange, you can create
smallness strokes of the red to make it
a bit more darker. Or instead of using orange, you can also use orchard to
make it a bit more darker. So you can use red or orchard to make the flowers a
little bit more darker, adding it for the
larger flower in here. Completely filling
nine sides with it. And with these, we are done with the coloring for our flower, and it looks quite beautiful. Now let's do the
coloring for the cactus. So starting with
the olive green. Mostly adding it on top of the hatching lines
that we have created. We'll be making
the lower regions of the smaller
cactus bit darker. Adding it over the
hatching lines that we created earlier. Also, I'll be creating few
small random strokes for the inside to give
the resemblance of the thorns and the needles. Small strokes like
this for the insides. For the larger cactuses in here, adding a little bit more
of this olive green. Now for the smaller cactuses, adding a little bit less, so comparatively less as
compared to the larger ones. For the bottom section
of the cactus, make them a little
bit more darker, so add a little bit more lines. Make the strokes a little bit more thicker for
the bottom section. Adding a few more
lines for the inside, making this region a
little bit more darker. And with these, we had
done with the olive green. Now, let's go in with the
darker side of the green. Adding this darker
side of the green just below the flower
and the flower buds. Also creating the same kind of smaller strokes that
we created with the olive green to give more resemblance for the
thorns and the needles. And compared to the olive green, I'm mostly adding it for the upper part and the middle part, using this darker side
of the green and adding it in here for the middle
section of the cactus, overlaying a little bit of it
on top of the olive green. And with these, we are done
with the darker green. Now, let's make it a
little bit lighter. So using a little bit of yellow, mostly adding it on
the top right side, small streaks of the yellow
to make this region, the right side a little
bit more lighter. In here, we are considering that the light is forming
from the top right. That's why I added the yellow on this side on the
top right side. Finally, going in
with the light green. So completely filling the
entire section with it. I'll only be leaving
a little bit of yellow to be visible. Mostly for the smaller ones, I'll also be
covering the yellow. But in the region where we added yellow will be
comparatively lighter, and as for the dark green
and the olive green, we'll be completely covering it. Let's do the coloring for
the smaller cactuses first, and then we'll be doing the
coloring for the larger one. Added carefully
near the flowers, we don't want the yellow and the orange to mix
with the greens, carefully filling in the green inside the outlined section. Now for this larger one, leaving a little bit of yellow to be visible on the right side. Now, let's completely fill
the inside with this screen. Overlaying this screen on top of the olive green and
the dark green. Now feeling this
remaining section. Making the bottom section
a little bit more darker by adding more layers to
green. Now for the second one. Feeling the entire
section with the green. Adding the green carefully
inside the outline section. Also for the lower section
of this clustered pad, add a little bit
more green to make it a bit more dark
the lower sections. Adding the green near
the outline section. Now let's completely fill the insides with
the slight green, not covering the
entire yellow in here. With these, we are done
with the green and coloring of our cactus
and its flower. Let's do the coloring for the
pot for the soil in here, using a little bit of ochre. The only thing that
remains is the pot. As I mentioned, I'm using
red and the blues to do the coloring.
Let's get started. I'll be completely feeling
the inside with it. I'll also be doing
the outlining for all the patterns and the
designs that I have created. This process is going to
take a little bit of time. Still, if you want to
create other kind of variation pattern or
designs for the pot, you can do that, or you can
just follow along with me and do the coloring in the
same manner that I'm doing. Till we are doing the coloring, let's talk about
some of the facts related to this
flowering prickly pear. This prickly pear cactus is from the optunea species
of the cactus. Most of the optuna species
bloom in the spring. It has got cluster of pads
that we have created in here. It has multiple bright
yellow flowers, sometimes yellow,
sometimes oranges, and it has got compact growth. This kind of bright
and vibrant flowers attract bees in the pollinators. Damper Center, Center
and dump and dam And some of the cactuses from this Optunea family
produces edible fruit. It also thrives in
the rocky soil. And in here we are done with the lighter
side of the blue, now going with the
darker side of the blue and using it
to do the outlining. Using this to do
the outlining for all the circular seeds
that we have created. W We have got three or four more, and then we'll be doing
the coloring for the bees. I'll be using ese to
do the shadows as well as using red for the
upper part of the pot. Let's do the coloring for
the top and then we'll be creating the bees using the red to do the
coloring in here. Instead of this, you can
use other colors too. You can also use darker
side of the blue. And with these, we are
done with our pot and the cactus and the
flowers. This is optimal. If you want, you can
create the same kind of shados that we have created
for the sides of the cactus. But in here, I'll only creating
the sado for the base. And with this, we are done
with our golden plum Optunia. I'll be seeing you in the
next project, Happy painting.
15. Cactus Companion : Welcome to Cactus Companion. In here, we'll be creating a
total of three characters, different varieties
of the character, starting with a simple
outlining pullover pot. Basically in here, I'll
be creating this kind of cylindrical
seep for the pots. Feel free to make changes and adjustment to the
seeds of the pot. Instead of decorating
this kind of pot, you can create any other variety or any other seep
or side of the pot. Creating one more pot in here. For this one, I'll be
creating barrel cactus. For the middle one,
I'll be creating sugaro cactus and
for the third one, I'll be creating Otonia micro
dis or buningear cactus. As for the coloring of the pots, I'll only using two
seeds of the color. Brown and yellow
occur to coloring. I'll also be using y
to create the shadows. And as for the cactus, I'll be using the seeds of the green, light green, dark
green, and olive green. I'll also be adding flour
now let's create our cactus. In here, I'm starting
with the middle one. So for this one,
I'll be creating sugaro cactus or you can
say young colnar cactus, the same kind of cactus that we have created in
our earlier project. I'll be creating total
of two main columns, and on the sides, I'll be creating
multiple growth. By multiple, I mean
two or three growth. Here, too, if you want to value the seeds inside,
feel free to do that. Let's add one more,
a smaller one. Now for the barrel cactus
in here, simple oval seed. Now create into
simple shapes like this for the additional Cactus. Now moving to third and the
final one, but ear Cactus. Make it a little bit
more and larger, adding additional
cactus in here. Now for the second main branch, let's make it a little
bit more larger, adding additional
characters in here. And with this, we are done with a simple pencil
escape, the outlining. For this in here, I'm using
Sakura Micron fineliner. Simple lines like this. I'm also using a little bit
of broken line. I decided to make the side
of the pot a little bit larger extending the side
on both sides a little bit. Doing the outlining in here for the additional cactuses
that we have created. We have got additional projections
of the cactus in here. Now, let's do the outlining for the first one, the
barrel cactus. In here, I'll be
creating a little bit of different kind of thorns. I'll be using white
sakura micron jelly pin to create the thorns. Instead of creating
that kind of thorn, if you don't have
sakura micron pin, you can use the other kind of thorn that we have
created so far. And the color in here
will be a little bit different from all the projects that we have covered so far. And with these, we are
with the first one. Let's do the third
and the final one, bunny ear Cactus, starting
with the outlining our pot. Simple cylindrical C like this. I forgot to do the outlining
in here for this one. So creating the simple
cylindrical C for the pot. Moving back to our
bunny ear Cactus. You don't have to stick with the pencil sketch that
you have created, feel free to make
changes and adjustment. As you can see in here,
I'm not strictly following the outlines that I created earlier with the pencil sketch. I made changes in
adjustment as required, doing the outlining for the additional
cactuses on the top. I read the pencil sketch. Now let's do the coloring. For this one, I'll be
using sides of the green, darker shades of the green. So starting with the dark green and adding it on the right side. Apart from this,
I'll also be using halo green and olive green. Beside this, I'll be adding the halo green and
for the left side, I'll be using the dark green, the olive green, creating this kind of stroke
on the right side. And with this, we are done in the dark green going
in the halo green, adding it just beside it. We are not going to
cover the entire section for the middle
portion like this. Okay. Now for the
final branch in here. And with this, we are done
with the hallo green. Finally, going in
with the olive green. Adding the olive green for the remaining section
on the left side. Instead of olive green, if you want to make
it a bit lighter, you can use the light green. But for this, I
decided to create a little bit of darker
variations for the cactus. So we'll be using this
color combination for most of the cactuses. Completely filling the insides with this. Now for this section. Filling the entire
left side with this. On top of this, I'll be
using jelly pin to create simple lines simple
broken lines to create the resemblance
of the thorns later on. Now for the sugaru
cactus, here, too, I'm using this dark side of the olive green
on the left side. Besides this, I'll be using
the light seed of the green, and then I'll be using
the dark side of green. Instead of using halo
green for the middle, here, I'll be using the
light seed of the green. On top of this, on top of this, I'll also be adding flour
using yellow and pink colour. I'll also be using a
little bit of aqua colour, adding the olive green for the additional
cactuses on the sides. Branch adding in for
this largest one. Creating a few more
streaks in here for the middle section.
Adding it in here too. So smaller streaks
with this olive green. Now for the light green, adding india beside this olive green, I'm also overlaying a little bit of this light green on
top of the olive green, adding it for all the cactuses that we have created in here. A few more additional streaks
with this light green. To avoid smudging of
the color by my palm, I'm using tissue paper. Enough for the remaining
section in here, filling it with a dark
seed of the green. I'm not going to entirely cover the green that
I used earlier. Only a small section
of the green will be covered darker sd of
the green like this. Adding it in here for
this smaller region. Now for the remaining
cactus, the same thing. Carefully adding it beside the lighter side
of the green and then feeling the
remaining outline region with this darker
side of the green. Right now, this are not
looking that green, but when using the white
to add more details, it will look far better, adding it for the
additional cactuses. Now for the smallest
one in here. Nough for the final one
instead of coloring it in the same manner that
we did for the earlier two, I'm making a little bit of ens. In here, I'll be
creating this kind of patches using the
sads of the green, dark green, light ring
and the olive green. So you can just
follow along with me, or if you want to
do the coloring in any other manner,
feel free to do it. With these we are done
with the dark green. Now going in the olive green. Adding it comparatively less, creating smaller streaks like
this with this olive green. Now for the remaining
section in here, I'll be completely filling it with the light
shed of the green. Completely filling the
outline region with this. To make it a little bit lighter, you can also use a little
bit of yellow color. And let's put the flowers in
here, I'll be using yellow. And with these, we are
done with the coloring for three cactuses using jelly paint to create this kind of
small simple lines. And creating the resemblance
of thorns like this. If you don't have this
or if you don't want to create this kind of pattern
or designs for the cactus, you can always create
you can always create the same kind of thorns and needles that we have
created so far. This is optional, but I'll be going to cover all the cactuses
with this kind of lines. And this process is
going to take a lot of time since we have
got three cactus. So you've got the rough idea how we'll be creating
this kind of line. So you can follow
along with me and add the detailings
like this or you can opt out and read
the other kind of simple thorns and needles
that we have created so far. This is our third or
fourth Optunea cactus that we have created
in this class. So this is Optunea microdasys, bunny ear cactus, the name the bunny ear because it
looks like money ear. It has tiny hair like
spines called glaucoids. This is one of the very
popular house plant cactus because it's easy to propagate. Continuing on with the
remaining section, creating simple lines like this. Also, as you can see, I'm
following the same of the characters and adding
the lines in that manner. For the last one. Also, if you want to vary the siges of the lines, you
can do that, too. You can vary this piecing. And instead of creating
this kind of simple lines, you can create
other variations or other designs or pattern that
will be interesting too. And with these, we are done
with our first character. Now for our part. Here A
using brown and yellow occur. Three simple parallel lines, and for the remaining section, I'll be completely filling
it with the yellow ochre. Going in with this yellow
ocher and completely filling the remaining section in between the parallel lines. For the upper part two, I'll
be adding this yellow ochre. And with these, we add them
with our first cactus. Later on, I'll also
be adding the flower for now continue on with our
middle one, the second one, for the sugaru cactus In here, we'll have to create
bit more longer lines. Here as I was
mentioning, later on, I'll be creating pink
and yellow colored flour on top of each cactus. For the barrel cactus, I'll be using yellow color for the bunier cactus,
I'll be using red. Now for the larger
one, completely filling the entire
region with this. So this cactus, Sugaro cactus is also known as
Yang Column Cactus. This is one of the iconing
desert cactus of Arizona. It can grow up to 40
feet tall and may live up to 150 to 200 years. And the thing about it flower
that it blooms at night. White in here that we are adding is clearly visible for
the darker region, but for the lighter
region, the light green. So it's not that much
clearly visible. Continuing on with
the second one. For the pot in here
too, I'll be using the same color combination
and seen pattern or design, parallel lines with the brown, and then filling the
remaining section with a yellow ochre. For the upper part
of the pot in here, I'll also be using the yellow
ochre and a little bit of brown and I'll be creating
shadows later on. In here for any of the project, I have not created any
kind of background, but if you want to experiment
with creating background or create any pattern or designs or any kind of text,
you can do that, too. We have got only a small
section to add the lines to, then we will be moving on
to our prickly pier Cactus. The lines in here as I
was mentioning on top of the lighter set of the
greens and not a visible. You can use the
black fine liner to add lines like this or the
lighter set of the green. That will be interesting too. Now for the smaller one, getting multiple
lines like this. Now for the last one, following the seep of the
cactus and adding the lines using the jelly pen. If we have not created
this kind of lines, the project would
have been completed. I'm using the tissue paper to avoid smudging of the
colors by by palm. And with these we had
done with our characters. Now let's do the
coloring for the pot. Adding a little bit of brown for the upper part for the sewing. Now, creating simple parallel
lines using the brown. For each individual pot in here, you can create other designs. You don't have to
stick with creating the same kind of design
for all the pots. And with these, we
turn with the brown, now going in with
the yellow ocher, adding the yellow ocher for
the upper part for the soil, now completely filling
the remaining section in between the parallel
lines with this, adding it for the
bottom section, and with this, we adn with the
pot and the second cactus. Now for the third
and the final one, following the sweep
of the cactus and adding the lines using this
jelly pen for the insides. For our barrel cactus, it's also called
golden barrel cactus. This is the third barrel
cactus that we are creating. This cactus can kneel over 100. It grows slowly and
it's very compact. Apart from that, it also
stores large amount of water. Adding it for the second one, following the sep of the cactus. And with these, we are
done with this section. Now for the final
one, once again, following the s. Now
for the larger one, I'm starting with the straight line in the middle and then I'll be following the
sep of the cactus and adding the lines like this, making the lines a
little bit curvier, making the lines a
little bit curvier, following the oval
seep of the cactus. Now for the other
side, the same thing. As we move towards the right, I'm making the lines a
little bit more curvier. And with these, we are
done with the jelly pen. If you want to add more details
or if you want to create any other kind of pattern or designs with the jelly
pen, we agree to do that. You can create
patterns and design on top of the pot using
this jelly pen. M for the pot, I'm
starting with a brown. I'll be creating the same kind of simple and normal design, three simple parallel
lines with this brown, and then I'll be filling
it with the yellow occur. Adding it for the
bottom section. With this, we are
done with the brown, going in with the yellow occur, starting with adding
it for the upper part, now peeling it for the
remaining section. And with these, we are
done with the coloring for about three cactuses
and the three pots. This is addisonal.
We are going to create flour simple
flour seeps like this. These are simpler
versions of the flour. Instead of this, if you want, you can create a bit
more detailed and a bit more defined
versions of the flour. For this, I'll be using yellow. A total of five flour for our barrel cacatus Put
the money ear cactus, simple petals like
this for the flower. I'll be greeting three
or four flowers on top. Simple seams like
this. I'll be using red or maroon or pink
colour to do the coloring. Greting one more
smaller flower in here. A bit more detailing. Erlin I was not going to add the flour for the middle one, but then I decided why not
add flower in here too. Adding the flour in here, a bit larger flower for
this columnar cactus. Greting this kind of oval seeps with hatching
lines in the middle. Now for the petals,
numerous petals like this. Creating the petals
like see for this one, too. Now for the last one. And with these weturn with
outlining for our flower. Let's do the coloring. For the first one, the
barrel cactus in here, I'm using yellow to
do the coloring, completely filling
nine sides with it, applying two or three
layers of the yellow to make some of the
section a bit more darker. For the columnar cactus on
the sugaro cactus in here, and here, I'm starting with the ocher for the lower section. Making it a little
bit lighter by using yellow and completely feeling the outlined region with it. As for the petals in here, I'm going to use
only single color using skin colour to do the
coloring for our petal. You can also use a
little bit of pink or red to make it a little
bit more colourful. And finally, for
our bun ear cactus, using red, adding the red for the outlying
region for our petals. And with these, we are
done with the coloring for our flour and flower petals. This is optional, using red to create sados for the
best of our pots. Simple seeps like this
for the sad does. And with these, we are done with our project Cactus companions. I'll mesing you in the
next project. Cool
16. Ruby Tipped Optunia : Welcome to Rubi T OptuniaPject. Here we are creating another
prickly pear characters, starting with a simplified
sp for our pot. Instead of creating this kind of simple variation of the pot, you can create any
other kind of pot, you can make it a little
bit more broader, you can make it a bit larger. So feel free to experiment with various seeps and the
sizes for the pot. I'll be using two or three seats of the color to do the coloring, using brown, as well as yellow ocher to do the
coloring for our pot. Now let's create our cactus. This will be the main stem
of our trickle pear cactus. We'll be creating lots of
flat oil pad for our cactus, a total of six or seven, and on top of them, I'll
be adding the flowers. Creating oval pads on the sides. Here you can play
with the seeps and the sizes of the pads
that you are creating. You can make it a
little bit larger. You can make it a bit smaller. You can also change
their placement. I'll be creating very
simple variations of the flower on top. Adding the flowers on top. The flowers are optional. Creating few more
additonal pads in here. As I increase the
number of the pads, I'm increasing their sizes, adding the flowers
on top in here too. This is going to be
our simple pencil sketch for our characters. If you want to make
some changes and adjustment to the pencil
sketch, feel free to do that. Here we have got
one mean branch and three stems coming out of it. And on top of that, we have few more additional branches
or few more additional pads. Now let's do the outlining for this here I'm using
Sakura micron fine liner. And let's start with doing
the outlining for the flower. Not the entire section of
the flower is visible. We are only doing the outlining for the petals that are visible. And for the lower section on the bottom part of the petals, we are doing a little bit of hatching lines to make it a
little bit more detailed. Simple hatching lines like this, following the conto the seep of the petals to add
the hatching lines. Now, let's do the
outlining for the cactus. So I'll be using this kind of bit broken and curved
line to do the outlining. Instead of creating this
kind of lines, if you want, you can use uniform and clean
lines to do the outlining. On the sides, I'll be
adding multiple thorns, and let's divide into
different sections. Mostly, I'll be dividing
into three or four sections. These are just rough estimate,
and these are optional. If you don't want to use this, you can just proceed with you can just proceed
without adding it. Dividing into different sections
for the upper one, two, using this kind of
mid broken lines to divide it into
different section. On each sections, I'll be
adding multiple thorns. I'll be clearing two or three simple and plain lines
to create the thorns. Now, let's do the outlining
for the remaining sections. For the auxiliary
branches in here, the same kind of line, better up and curved line
to do the outlining. Using this kind of lines make the whole project look a little bit more organic. That's why for some
of the section, I use this kind of lines. Dividing into different
section using this kind of bit broken
line on top of it, I'll be adding the
flowers later on. Let's do the outlining for
the remaining section, the largest system in here. And in here, since this
is the largest one, so the two auxiliary branches of the characters
that are attached to it, I'll be making those region
a little bit thicker. So this kind of simple
lines like this. So I'll be adding
more lines later on, doing the outlining for
this auxiliary branch, the flat owl pads
that we have in here. Let's do the outlining
for the flower. Instead of creating
this kind of flower, as I mentioned, you can create other variations
of the flower. You can also create the
smaller flower buds that we used in
our last project. You can also create
half bloom flowers. Adding one more flower in here. Only two or three petals of the flowers are visible in here. And for the lower section, we are doing a little bit of hatching lines to make it a
little bit more detailed. So with these, we are basically done with the main outlining. Now we'll be adding
more detailings in the form of this kind
of stripped lines. And after that,
we'll be creating and adding multiple thorns and needles for the insights as well as near the outlined regions. For dividing the cactuses
into different sections. Let's divide this largest
one into different section. Apart from that,
we'll also be using a little bit more
hatching lines for the lower section
of each individual stems to make those
region a bit more darker. Quitting lines for this one, dividing into
different sections. Now let's do the
outlining for the pot. Still, if you want
to make changes and adjustment to the seeps of
the pot, you can do that. Doing the outlining for
the base of our pot. And with this, we are done
with a simple outlining. Now, let's create
multiple thorns throughout the entire region. Creating this kind of
small bumped seed, and on top of it, we'll be
creating two or three thorns. This is optional too.
You don't want to create this kind of simple
bumped set or areolas. You can just directly start with creating simple
thorns like this. Pair of two or three
thorns on the sides. I'll also be adding thorns for the inside or the inner
regions like this. You can also add the thorns on alternative direction
if you have divided the cactus
into more sections. Adding the thorns on the sides. Let's add the
thorns in here too, creating uls and adding
thorns on top of it. And as I was mentioning in here, I'll be adding the thorns
on alternative side. For this one, in here I decided to add it on the left
side and for this one, adding it on the right side. So we'll be adding the thorns on the remaining
sections of the cactus. This is going to take
a little bit of time since we have to create
lots and lots of thorns. Adding a few more thorn in here. Now for the smaller ones. For the smaller ones, adding four or five batches of
the thorns like this. For the intersections in here, one or two pair of
the thorns will be enough. Moving on to this one. Now for the insides. Apart from the outline and the
middle regions, I'm also adding some thorns
and random ling like this, adding it for this
larger section in here. Creating simple saps,
simple projections like this for the irreguls
and on top of it. And on top of this, we'll
be adding multiple thorns, a set of two or three
thorns like this. Moving on to the inside
and creating thorns. Now for the last one,
adding thorn in here, Now, we have got
only two sections. Let's quickly create
more thorns for the outside region as well
as for the intersections. After doing this, we'll
be using a little bit of curve lines to do hatching
for the lower sections. And as for the colors in here, I'll be making the flowers
a little bit darker, so we'll be using reds and pinks or skin colour to do the
coloring for the flower. As for the characters, I'll only using three
seats of the color. I'll be using yellow, light green, and dark green. For the pot, I'll be using brown and a little
bit of yellow occur. I'll be creating very
simple parallel lines as the pattern or you can
say designs for the pot. I'll also be using
a little bit of green to create the
shadows for the pot. Now, as I was mentioning, using this kind of small broken lines to make the lower regions a little bit more darker,
a bit more detail. Simple lines like this,
broken hatching lines. If you want to make it a
little bit more darker, you can add more lines. And to make it a little bit more defined and a
bit more detail, you can add more thorns
for the inner region. Instead of creating this
kind of two or three thorns, you can create simple
one or two thorns that we have created so far
in our earlier projects. And with these, we are
done with the outlining. Let's erase it so that the ink has dried up
and then lightly erase it. We don't want the ink to
be smudged on the paper. You going that erast dust? Let's start with
coloring our flower first and then
we'll be doing the coloring for our characters, starting with the maroon color, adding a little bit for the
lower regions of our flower. Tiny strokes of the
bras like this. Instead of using this,
you can always use yellow red and orange
to do the coloring. For this one, I forgot
to add the detailing, so using the fine line
to add more detailing. Now, going in with the
red and making the flour, the petal of the flower a
little bit more detailed, creating a bit larger
strokes like this. I'm overlaying
this red on top of the maroon and
creating this kind of larger strokes
following the seep of the hatching lines that
we created earlier. And adding it for the last one. I'm also doing
outlining for some of the section of the flower
petals with these. Doing the outlining for
the flower petals too. And now in here, I'm
going with a skin color and completely filling the
outline region with this. And with these, we are done with the coloring for
our flower petals. Let's do the coloring for
the remaining section, the characters, starting
with the yellow. So for this cactus, I decided to keep it a little
bit rough texture. So mostly, I'll be
using this kind of arms strokes to do the
coloring for our character. Wearing the crecia on the
breast to create this kind of bit thick and thin lines to
create this kind of strokes. Yellow will be the
lightest color in here. I'll also be using light
green and dark green. I'll be adding the
darker green on the upper part and the lower
part of the characters. And that's what the light
green will be overlaying it on top of both the yellow
and the dark green. We won't be covering
the yellow entirely, but some of the
sections of the yellow that we are adding
right now will be covered with these, we
are done with the yellow. Now going with the dark green, creating the same kind of
lines by wearing the recess a little bit bit of thick
and thin lines like this. So creating this kind of strokes and wearing the
side dish of the strokes, too, to create this
kind of lines. Mostly, as I mentioned, I'll be adding it for the upper
and the lower part. Adding it just below
the flower and a little bit for the
lower sections like this. Apart from this,
you can also use the olive green colour to add
another layer of detailing. Put the larger stems in here. As you can see, I'm
making the side dish of the lines a little
bit more larger. Add it accordingly
for the smaller one, make the side dish
of the strokes quite smaller and
for the larger one, make the sides a bit larger.
Adding it for this one. Now, fine in here, making this region,
the lower part a little bit more darker. And with these wet
with a dark green. Fine, going with
the light green. The same kind of strokes. For the lower and upper regions, we'll be adding a
little bit more green. Also overlaying it on
top of the yellow. As I mentioned, I'm not going to cover the entirety
of the yellows. Some of the yellows will
remain visible like this. Instead of it, if you want to cover most of the yellows,
you can do that, too. But as I mentioned,
I'll be aiming to get a rough texture
for this project. That's why I'm
creating these kind of strokes and do the
coloring in this manner. Make the upper part and
the lower part a little bit more darker by adding
more greens there. Continuing on with adding the green for the
remaining section. Now for the last
mean branch in here, creating this kind
of dynamic stroke. Making the lower
region bit more darker by adding more layers
of the greens in here. And with these, we are done with the coloring for our characters. Let's do the coloring
for the pot. As I mentioned, I'll
only be using browns and the yellow ocher to
do the coloring, starting with a brown. The upper part of the pot will be covered with this brown, and apart from that, I'll be
creating two parallel lines. And then for the
remaining section, I'll be filling it
with a yellow ocher. Also making the bottom section
a little bit more darker. Feel free to create any other
kind of pattern or designs. I'll be adding the
parallel lines later on. Let's feel the
entire section with the yellow ocher first,
and then on top of it, I'll be adding the
two parallel lines to create simple pattern or
you can see simple designs. And finally, going
back once again with the brown to create
simple pattern like this. And with this, we are done
with the coloring for our pot, going in with the green
to create the sados in here just beside
the base of our pot. This is optonal if you don't want it just leave it as it is. And with this, we are done with our project, ruby
tipped Optunia. I hope you enjoyed
painting this, and I'll be seeing you
in the next project.
17. Numerous Mini Cactus : Welcome to the bonus Project. In here, I'll be creating a
total of 16 small ccnses. I've divided the people into
three different sections. And in here, I've
already started with creating different
kinds of pods. For this row, I'll be creating a
total of seven pots with seven different
kinds of cactuses. For the next row, I'll be creating a total
of five cactuses, and for the last row, I'll be creating a total
of six cactuses. So a total of 18 cactuses. Feel free to experiment with different seeds in the
sizes for the pot. Right now, I'm showing
different examples of the pot, but when I'll be doing the
outlining with a fine liner, I'll be making all the
pots of similar size. As for the cactuses,
I'll be creating the varieties of the cactus that we have practiced so far. I won't be doing the
coloring for any of them, so feel free to do the
coloring on your own. And this is our
last pot in here. Now, let's create some cactuses. In here, we have got
the castle cactus. I'll be creating four
cactuses in here. Right now, I've created two, and later on I'll be
adding two more. Feel free to experiment with the seeds in the sides as
well as the placement. For the pots on the second row, I'll be adding it in
between the pots like this. Before creating the cactuses, I decided to create the
outlines for the pot first and then we'll be
creating the cactuses. In that manner, we can overlay the cactuses on top of the pot. That will make the whole
process quite easier. A total of five
pots for this row. Feel free to increase or
decrease the number of the pots. And mostly for the first
and the second row, I'll be creating this kind
of simpler version for the pots when I'll be
doing the outlining. For the third row,
I'll be creating a different kind of pot. In here, I decided to
create this kind of square or you can see a
rectangular C for the pot, a total of seven
part for this row. I'm trying to maintain this uniform distance
between the pots. If you are not that confident, you can always use
the roulette to divide the paper into
different sections. In that manner, you can easily create the pots or you can use smaller sizes of
the paper to create individual araces
along with the pots, creating the upper
part for the pot. Now, just adding this
simple rectangular s for the upper part of the pots. So these are going
to be our 18 pots. This is our sugaro cactus. Only two auxiliary branches
in here for our cactus. The third one decided to
create barrel cactus, feel free to create
other varieties or other species of the cactus, simple oval sap like this. For this two decided to create another variation
of the oval cactus. So here's our second
barrel cactus. Now for the fifth one,
call them nar cactus. In here, we have
got columnar cactus and I'll be creating multiple smaller cactus alongside it. These three are going to
be the main branches, and these are the
auxiliary branches. Now moving on to the sixth one. In here, we have
got bunny cactus. For this one, too, I made some changes when I
did the outlining. Here's another sugaro cactus. This is a little bit larger since we have got
more area in here. And this is going to
be our first row of the cactuses for
our bonus project. Now let's do the second
row for this one, and decided to create
another bunny cactus. Before doing it, let's add
the upper part for our pot. Now, in here as I
was mentioning, I'll be creating another
bunny ear cactus. This will be a
little bit larger. In here, we have
got comparatively more species ears compared
to the first row. So I'll be creating bit larger cactuses and some of the cactuses will be
overlaid on top of the pot, but mostly it will be only
remaining in this area. Here's another barrel cactus. For the third one in this row, we have got this
prickly pear cactus. Here's another barrel cactus. So the fifth cactus
of the second row, here we have got dwarf
cactus, oval pads like this. For this one, I'll be
creating multiple one, simple oval sets like this. And you can add
as many auxiliary or smaller cactuses as you want, making this one a
little bit larger. When I'll be doing the
outlining, as required, I'll be making changes
and adjustment to the pencil sketches
that I created. And we are done with
the second row. Now for the third row in here, here we have got more area compared to the first
and the second row, a bit more larger cactuses, simple cactus like this. Let's create another
variation of this cactus, a little bit more broader and bit thicker pads for this one. A a few more smaller ones. And we are done with
the second one. For the third one in here and decided to
create a simple one, a total of three cactuses. Here's another one. So
another ricky pear cactus. In here, we have created lots of prickly pear cacus
and varl cactus. And we are done with
the fourth one. We have got two
more. For this one, I decided to create a bit
larger and bigger one, adding auxiliary branches
of the cactuses, smaller columnar
saps for the cactus. Then with this, we are
done with the fifth one. Now for the last one, let's create one more barrel cactus. This time, I decided to
make it quite larger. Big circular seep like this. With these, we are done
with a simple pencil sketching for all
the 18 cactuses. Now, let's do the outlining. Mostly in here, I'll be
creating this kind of organic and curved line
to do the outlining. I'll also be adding additional
elements such as flowers and birds or adding a few
more additional characters. Feel free to make
changes and adjustment. You don't have to stick with the outline that you have created. For the third and
the second row, I'll only be doing the outlining for the pots that I created. But for the first row, I'll be making kings to the
seeps of the pot. I'll be creating
the same kind of pots that I created
for the second row. But if you want to experiment with different kinds of pot, you can also create varieties of patterns and designs
for the pots. Continuing on with
doing the outlining for all the cactuses that we
have created in here. Outlining the top of our pot. Let's do the outlining
for the top first, and then we'll be doing the
outlining for our cactuses, doing the outlining
for this one. Doing the outlining for the
third and the final one. Adding a little bit of
detail by dividing into different sections to give it a little bit more
volume and depth. I won't be adding the detailing
for all the cactuses. Feel free to add any kind
of details as you see fit. I'll only be adding
the detailing for this kind of cactuses.
For some of them. I won't be doing it
for all the cactuses. Making the lines a little bit more thicker by
adding more lines. Now for this one, the
burning cactuses, here I won't be adding
thorns and needles too, so feel free to create or
add any kinds of thorns. Outlining this one.
Here's another variation of the prickly pear cactus, the same kind of
line that I use, adding additional one in here. Now for the remaining
section of the upper part, one additional in here. Going over the outline for
the remaining section. And with these, we
are done with the fifth one for the sixth one, starting with doing
the outlining for the upper part of the pot. Now for the remaining
section of the characters, simple oval seep using this kind of broken
lines to the outlining. I decided to add a
little bit of detailing, so I'll be adding few thorns for the inside
as well as glucoids. With these, we are done with the third row of our cactuses. Let's do the outlining for the remaining section, the pot. For the second part, I'll be doing the outlining later on. And with these, we are
done with the outlining for most of the pots
and all the cactuses. Since this is going to
take a little bit of time, and we have created a lot of
pots and lots of cactuses. In here, I've increased
the speed a little bit. If you want to follow
along with me, you can reduce the
speed or you can pause the video for this cactus. In here, I decided to create
this kind of broken lines to do the outlining and adding
the details for the insights. Doing the outlining for the pot. So as I was mentioning, I'll be changing the seats of
the pot for the first two. I'll be creating I'll be transforming all the
pots into this simpler s. For all the taller cactuses, or you can say
columnar cactuses, I'll be adding details, and a few lines like
this for the sides. But for the remaining cactuses, I won't be doing it like
the prickly pear cactuses or the barrel cactuses. I won't be adding much
detailing for them. If you want to do that,
you can do it later on. Now for the fourth one,
same simple kind of pot. Outlining the simple oval sap. Feel free to make changes
and adjustment to the sp sizes as well as the
placement of the cactuses. Let's do the outlining
for the pots first, and then we'll be doing
the outlining for the cactuses. Simple
saps like this. Another columnar cactus in here, adding a little bit
of detailing for the inside and creating a few additional
auxiliary cactuses. And with these, we are done
with the outlining for all the cactuses
for the first row, doing the same thing
for the second row. Starting with doing the
outlining for the pot first and then we'll be doing the
outlining for our cactuses, carefully doing the
outlining for the pots, near the cactuses
of the first row. Especially here, carefully doing the outlining for
this first pot. Now we'll be doing the outlining for the remaining five cactuses. Still, if you want
to make changes to the sides of the
cactuses and the pots, as well as the placements,
feel free to do that. We are done with the first one. The second one,
the barrel cactus. For this additional project, we have a lot of
columnar cactus, barrel cactus and
prickly pear cactuses. You can experiment
with different kind of thorns and needle. You can create
varieties of flour. You can also do a little bit of hatching technique
to make some of the sex and bit more darker. You can create varieties of patterns and designs
for the pot. You can also create
designs and patterns for the cactuses tube that
will be interesting. And if you have any other ideas, feel free to use those tube. And with these, we are done with outlining on our cactuses. Now let's erase it. I decided to add a little bit more detail
for some of the cactuses. For this one, creating this
kind of smaller areolas. Adding a few thorns
for this one. I won't be doing it
for all the cactus, but this is just
another example. So I'll only be
covering up to here, feel free to do the
coloring in any manner, add additional
aliment as you want. And with this, we are done
with this bonus section. See you in the next video.
18. Class Conclusion : Congratulations on
completing the mini cactus, a seven day challenge. Over the past seven days, we have painted vibrant, playful cactuses using use
paints and fine liners, from simple down forms
to tall desert towers, from soft texture to tiny
flower and decorative pots. We have practiced
building seats, layering greens,
adding highlights, and creating texture
with a small stroke. I hope this challenge
helped you to feel more confident
using rush paints. Don't stop here, try designing your own
character variety, experiment with
different pot patterns, change the color palette, maybe create a full character
collection on one page. And if you enjoyed this class, please se your project
in the gallery. I absolutely love seeing your interpretations
and color choices. Thank you so much for joining me in this creative journey. Keep drawing, keep
experimenting, and I'll be seeing you in my
next class. Happy painting.
 Vishal Munshi