Transcripts
1. Introduction: life is full off colors, and the most colorful thing in the world is black and white. It contains all the colors and at the same time exclude all thinking this in mind. I more Anissina from India thought off painting two monochrome acrylic painting using some cool acrylic colors. This class, especially designed for Big nose, were new to this acrylic medium. By the end of this class, you'll have the knowledge off blending, denting, using values and shade with acrylic medium. You will be ready to create your first acrylic painting, so hope you'll enjoy this class and, um, very excited to share this class with you, so let's start with it.
2. Some Techniques: Hello, friends. Welcome back. So let's talk about some techniques. So what is monochromatic painting? Morneau means one using single color that is here. I'm using the province a blue on, applying different tints and shades to its. So here, the monochromatic color, which is one color which I'll be using for the painting as Winsor Blue. So this is a main cargo on your With this main color, I'll be you applying the technique caller stinting. Denting means adding color to the white. So here I'm adding Winsor blue to white toe. Create a different value off color so you can see how the light blue color comes up. This technique I'll be using in my background bending, so this is called as denting technique. Andi. For the landscapes, I'll be using the different shades technique for painting the whole landscape. That is the foreground. So this is is the tenting technique which will be applying in a background painting. Now comes the shade shade is something that we use, like gray color, black color to dark in the color. So year I have used black color on you can see the shade off the color. It's so dark so shade is basically darkening off the color, using grape brown black whatever you like. On this shade, I have list D, lighting it by adding a little white to it. Again, I'm using great color to create a different shoot. So this technique I'll be using in my landscapes when I'll create the mountains so this technique will be used. When you apply different shades toe these landscapes. It gives very nice and right realistic look to it. So now let's see the painting technique, which will be using we'll be applying values. Know what is values First will apply the dark color and then will apply little white to it on the next layer. And in the second layer, it's complete white with a little bit off blue collar, which is already on the brush on this whole color. Well blended, moving to and fruit can see how nicely it is getting blended. So this is the technique he just called as adding values is from doc to lighter shoot, and after creating the smooth background, we will be creating the mountains that shade techniques like shading you, adding black color to it to create a taco shade off it. You can see how the mountains are coming up with such a nice color to it. So this technique will be using in a hole two paintings which will be creating in an X Class. But before that I'll tell you what all the materials that will be required for moving forward to the in expanding. So here you can see the tenting spelling is wrong, which I'll corrected. So this is the spelling, which is T i N t i N g zyl just corrected. So this is the denting method adding white to de culo. These are the shades 12345 So these are the shades on these two method I'll be using in my whole painting gear. In applying the sheets on in the background, I'm applying denting methods. That is, you can also say adding values to it. And our main color here is Winsor Blue, which is our monochrome color. So let's start with our next lesson.
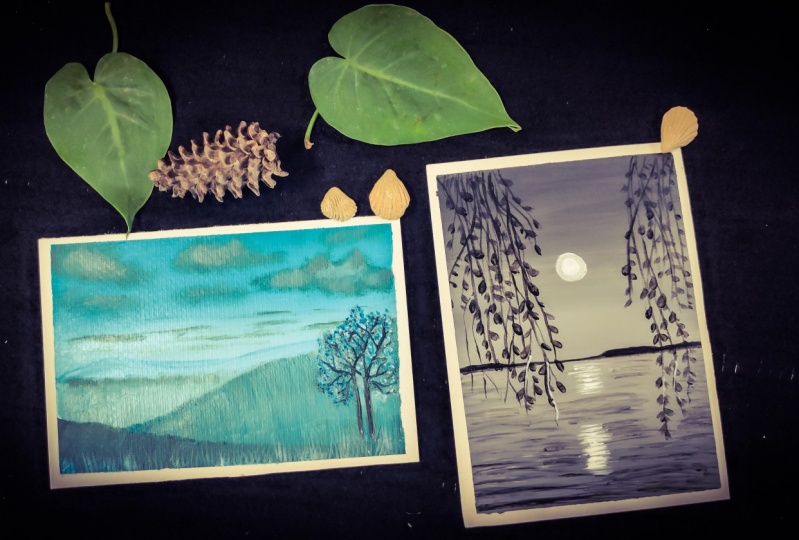
3. Materials Required: Hello, friends. Welcome back. So now let's discuss about the materials which will be required. These are the two paintings which we'll be painting it in our whole lessons. So let's start. So for the first painting, the colors which I'll be using is raw umber tala blue, white. And for the second painting, gray, black and white. So white and black s common for both painting soil. You be using Bordick colors and apart from that oh, abusing different brushes, that is the round brush size zero. This is the rigger brush flat brush size 10. This is Bristol Brush drowned. Brush this flat brush on DTI. Calm brush. If you don't have calm pressure, you can also use fan brush That would be also fine. And apart from this I'll be using these other sponges, which you can easily get from the market. So I'll be using these small its size toe. Create the moon and apart from this, I'll be needing the container. This is the container which will be needing for water than masking tape size one inch on This is the paper which is 400 GSM, a four size paper which I'm using. You for acrylic painting on this whole sheet is very take Anil Just cut the street into two parts on will complete Deport depending. So let's start to edit.
4. Monochrome Painting 1 -Part 1: Hello, friends. So let's start with our for Spain ting. So the materials, as I've already explained, throw number tala blue, white and ivory black. And these are the brushes which will be needing for this painting, says the flat brush size 10. This is the calm brush. If you don't have compress, you can use fan brush. Steel liner, brush size zero. This is again a Bristol round brush, and this is the synthetic round brush. So these are the brushes which will be using for a painting. So let's start with it, and I have already put the masking tape around the paper. And let's start with the colors to Starla Blue and Detainee in White, which I have taken out. So first we'll do the will Addy taco values and then slightly will go with the lighter values. So first the dark values and then the lighter values on, we'll move in to and from motion. Use less amount off water on more off the colors so that blending will be easy for you. If you use lots of water and less mount off colors, the colors will try quickly as their acrylic Andi will not be able to blend it. So it's better if you use thick amount off color and less off water. So here you can see how I'm blending in to win from motion and adding white as I'm going, don't to the bottom part. So you have to cover this whole a background area with the same color. So I'm just blending the colors so that comes even. I'm just adding white to wear, and I'm not using much awful tala blue color in it, because the brush already contains that colored so at the bottom part amusing, just white. And the tallow color is already coming because it is on the pressure so you can see how light color it is coming in, and I'm just lending to it. Just try to blend as much as much as you can until unless you are satisfied that the whole area has been blended properly and there are no lines or fine lines coming out off it, blending is very important and acrylic. Otherwise, you will see the lines in the whole painting, so if you see any lanes, you can use that take amount off color on the top off it and start blending over it. So I'm just blending the colors so you're right and see that there's some lines have added little white and Taleb lewd words. So to a blended nicely, I'm just moving my brush. Do and throw in the same direction. If you have extra colors on your brushes, remove that broke color and again start blending. Can see that the top layer is little bit lights. I'm little applying little more color to it. I'm just blending the whole area again. Undid. Unless you are satisfied that the blending is complete, keep on doing and blend the colors. Use less water. Reassure should be 70 person color on 30% water, so color should be more on water. Should be less then only you'll be able to blend the whole area nicely. Now you can easily see that apart is having Darko value, and the lower part is having it still lie to value. So again there is line. So I'm just blending. I'm taking white and I'm just blending the color. You just need to move the brush in the same direction, and you can easily blend the whole Carla. I think I'm almost done with T blending area. So now I'll be creating the bounty in the background, which is off the same color as that off the background color, which is on the top. I'm using the same brother and I'm just creating the mountain with my flat brush on just blending the color, adding more off white and just highlighting the edges and blending the rest off the area. So this gives a very nice effect off the background mountain off the landscape. Now we'll be creating another mountain, but here I am, using raw number a little bit. It's not coming on. Just let me use it. My brush spit hard. So here I have just used wrong number white Andi tallow blue mixture. Here, Joe number is very light, very light in color, and I'm just stopping the area with my flat brush, creating a slant line. I haven't covered the earlier because I'll be creating another mountain, which is more darker in shade. So I have in this part I have added more off roll. I'm going to it so that it becomes a little darker so you can see more off, remember and more off tallow blue and less off white and using same technique. I'm just filling the area and see how little water way need. So it's maximum color and very little water just to blended the colors. - So just blending the whole a geo. Now for the next mountain, this will be more docker in shade. So here I am, using more off Tala blue and more off road number and just attend off white so and creating my last mountain so you can see how there are different shades off mountains which are coming daughter. There are four mountains which are off different shades and values, so
5. Monochrome Painting 1-Part 2: Hello, friends. Welcome back. So let's complete this painting. So now we'll be creating the clouds. So the same goal which I have created the mountain. I'm using the same Carlo that my breast ill round rush. We just moving my brush in a circular manner to create the counters so you can see I'm pressing the brush very lightly so you don't have to fresh the brush very harshly. It's very light manner, especially the tip off. The clouds should be lightly pressed so that it comes realistic. So these are just basic cloud formations, most probably. In my next class, I'll be teaching you how to create the realistic clouds. So this is just the basic one as the stop biggest related to monochrome. So I haven't focused on the clouds much, but make sure that in my next in class L duty clouds painting, especially the realistic clouds, how toe paint the realistic loads so you can see I'm just pressing it lightly on moving it in the SoCal, a manner adding a little bit of white and creating a little bit off color contrast to it on the color on the brush should be very less and now I'm using my flat brush and just removing excess of water and paint. And with same color, I'll be just creating the clouds which are far away. These are just trade lanes, and I'm just pressing it very late so that the texture off the cloud is many late. You can see how nicely D cloud formation is coming if you have. If you see that there's any dark areas you can obviously light in a bird and up so again using my same brush and adding a little bit off for tala blue and white to give it a little color texture to the clouds, removing excess white so I can see that these are little bit darker color, so I'm just lighting lightning it up. So you have to present very lightly if you press it hard, that textual not come up just giving a little bit off contrast to the clouds. You can also use fell bird fresh. If you have, I prefer round brush. Now we'll do the grass part, so you're I am using my calm brush in applying little bit off tallow, blue on, more off white, and I just moved the pressure in the up four direction. If you don't have a calm brush, you can definitely use fan brush. If you don't have fan brush, then you can use Use your brush tip as well. The toothbrush. Would you use that? Also give a very nice effect so can see. I'm pressing it very lightly so that the picture comes up. So whenever you are creating any cross form, you have to make sure that the brushes when you're using it should be very light on the paper. And now you're amusing raw amber toe. Create the tree trunk. Just using my round brush to create the tree trunk whenever you were using acrylic tried to use less amount of water should be very less that a seventies to 30. I'll take Italy black as I have to make the branches little dark, so I'll just take a little black and and with the black, I'm using my Bristol brush. That is round brush, which I used for clouds, and I'll just do d tapping to create a tree structure, just creating the tree structure by tapping de brush. So now I am using tallow blue on a little bit off white and again doing same technique. When you give different color contrast, it becomes a little bit more realistic as the leaves are not all same colors, it should have vibrancy and that it should have different vibrant colors, which should be reflecting. So see, this is the third layer which I'm using. More fight and less off. Taliban have just created the shape off the tree, and now I'll be taking my rigger brush and just creating the branches and these stems off T tree. So it's rigger. Brush is nothing but the liner brush, which I am using you. So I'm just creating the tree branches. You can see there are two trees which in which I'll be creating the branches which are overlapping each other. So just creating the lower branches and it's not like that. You have to create the same branches which I'm creating. You can create your own, but also but you can use different colors, and if you don't have tala blue, you can use really in blue. You can use ultra marine drew, their different types of blue, which comes whatever color you have at home. You can use this technique to paint. And if you don't have raw amber, you can always use Bon Sienna brown toe mix to create the shades. It completely depends upon the depending and the shades which you create. You can use any color whatever you want. So now I'm creating the grasses debelo, just creating more tall grasses near the tree and just moving in the upward direction and very lightly so that the hair comes so that the hair can be seen. You can see how same technique you can apply with fan brush as well. Now, with my Gregor brush, I'm using white and little bit off tallow blue to create small, small leaves. - So here you can see I have used three color. Make sure one is a white and tala blue Mexico, and the other is complete white and little bit of tallow blue, and the third color is complete tala blue, so that different textures off leaves comes. So I'm just creating small, small doors with different shades off tala blue, so it's almost done. So just make more branches, which has lighting up, just darkening the branches. So I'll take my again at the Bristol Brush round promotional highlight a little bit the clouds, because you can see the clouds have never won Gahler. It has different patterns in it. So I'm just create highlighting. I'm not covering every area and just creating small small areas and just highlighting it. So I hope you guys enjoyed this painting. And I love to see your projects. Please do share me on my scale Ship page. You can also share me on my instagram page as well. That is more in the art gallery. Now let's take out the masking tape. Make sure that you go whenever you are taking out masking tape from the paper. Sometimes t paper comes out. So you have to be very careful when you are taking out to the masking tape, especially with thief 400 GSM paper. This doesn't have happened with 300 GSM, but with 400 years and sometimes deep people comes out. So you have to be a little careful about this on you can see how Oh, nicely the borders coming out. I really love t using masking tape in in each and every painting of mine. So this is the last one. Just take it out on its done. So this is D complete painting. Hope you like this painting and no will begin with our next painting. That is the moon line mood moonlight painting. So let's begin with the are next painting.
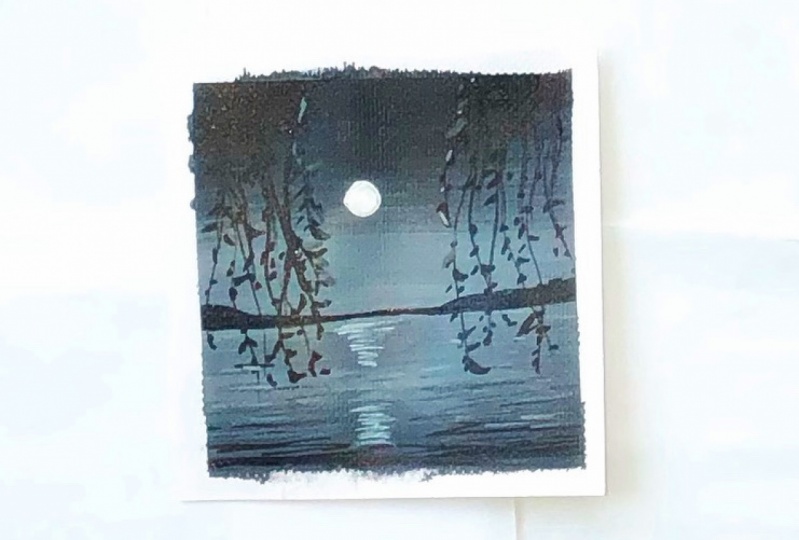
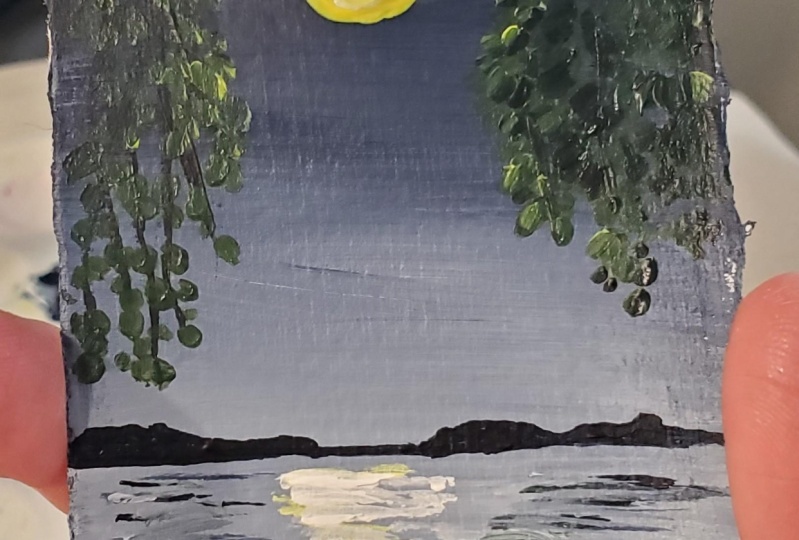
6. Monochrome Painting 2- Part 1: Hello, friends. Welcome back. So let's start with a second painting. So for the second painting, we'll be needing the material studies gray, white and black. And these are the brushes which will be needing that is the round brush the rigger brush on the flat brushes. So let's start. And this is the paper which I have basted in L. A logical manner. So let's start with a painting have just taken on black, grey and white and so sheet. So let's start with it. I'm using my flat brush sized in, and that's a bit of water, my tissue just cleaning my brushes excess water. So just mixing black and little bit of water on the top off it because we have to move in from Dhaka to lighter shade. So first I'm just applying on top and Black Carlo. After that, I'm adding little great to it. You can see that this black color is little transparent, so I'm adding the creek color toward so that to get transparency gets Goward. So if you don't have great color, you can use the picture off black and white to create that great combination. So the whole technique is that the Lion Docker area will be on the top and as we go down, the color value becomes lighter. So it's taco value to lighter value. So you can see I've added white toe gray color more white to great color. And I'm just blending the colors and the corners so that the whole area get skull would same technique I'm have used in my previous painting here. Also, we have to use the same technique, but the color value is different. So as I'm going down, I'm using more off white color and I'm just blending the colors, so same technique. You have to apply here as well. So you have to take lots off colors and less amount of water. Then only you will be able to blend. Now in this spot. The lower area is darker because we are creating water. So what s so it is reflecting the sky. So the same pattern which we have created on the top will be creating at the lower part. - Try to blend the color as much as you can until analysts, all the areas are even. You can see the lower areas dark, so I'm applying more off black toward on just blending it. - If you have excess off war Carlos on your brushes, just wipe it out with your tissue, paper or cloth, whichever you are using to wipe off deep brush and just keep on blending. Still it those office becomes smooth and even so, this whole area's painted now. So let's start with our next creating the moon. So this is a sponge and I have just dip in the sponge and white color, and this will give a nice round shape off the moon. If you don't have, you can do it with your round brush. Also, start necessary to use this so you can see the now nice round shape Moon has been created.
7. Monochrome Painting 2-Part 2: Hello, friends. Welcome back to our last lesson. So let's complete a second painting. So this is now tried. I'll now I'll create a horizon line. Here is the masking tape, which I'm using. I'm just taping a tor is on daily. If you don't have it, it's It's completely fine. You can just create a straight line and just draw the line, Um, asking for masking tape. It is easier for us to create a straight line, so it's good. If you have masking tape, you can use it and that my flat brush without any water, I'm just creating a straight line. So now I'll use my liner brush that is rigger brush to create that bushes. Dad is falling from above. I'm just removed a steep. Once it is dried, you can remove it easily. So same black color. I'm using you and just creating small landscape sort off thing, just creating a shape off the far away land scape on covering the area with deep black Carlo. - Similarly , I'll be using the same technique on the other end off Little Raisin Lane, just a far of the landscape. - So now I'm taking my round brush and just creating the moon in the center because that color wide colors, little light and thes center color is little dogs, so it will clear create a round reflection off it. It gives a very nice effect. Do the moon. Now again, I'll use my rigger brush for creating these stems, which are falling from above. So all are not straight. Some are off different patterns, so you don't have to create all with same patterns. Every stem has to be off different pattern. So some US trade some are twisted. Some a little take so similarly am just creating these stems and same thing I'll be creating on the other side as well. Some leaves are also falling on the water, the same pattern I'm creating as well here, the other side. So some along some a short It's off different different sizes so that it looks little but natural. If you create the same part done and below little like a drawing just with the liner brush , I'm just creating the lanes. So now I'll use my round brush. This is off size one on will be creating the leaves, so here you can see I'm just tapping my tip off the brush to create the leave ship, just tap and slightly removed to stab and slate little. So the same technique I'll be creating I'll be using for creating all the leaves, but you can see so many. I have just applied the same technique on fill the all these stems with the leaves. So same thing I'll be doing on the other side off thes stems, which are falling on the Wardo. So I'm just stopping and releasing, just stopping and releasing year. I'm only using black color and less off Wardo so you can see it's a little bit off the dealing process, which is going on you have. You just need to cover the areas. You can leave some off the stems blank as well. It's not necessary to fill all these stems with leaves. Some some stems can be without leaves. Also. Now I think I'm almost done with the least, but so now I'll take my flat brush and will take just remove excess water from it on, just take white color and just creates just for stop and then create small lines. I'm just moving my brush and his exact manner and just creating reflection off the moonlight. So same technique. It's not a same pattern and suggested two and throw, but not in same pattern. Or you can see in his exact form you have Jerry after just move your brush and no makes little bit off black and just create the here dribble. I'm just creating the river waves with just creating horizontal lines and pressing the brush very lightly. You don't have to press very hard, and the color is not black. It is a mixture off black and white, so the color should not have to be to braid, just moving the brush in a horizontal direction and it's very light. If you see somewhere that there is more dark in color, you can always apply another coat off color over it. This is the one off the advantage off acrylic painting. You can always overdo if you have done something drawn so you can see the lower part has little darko waves and bigger waves. So that spy I'm creating because whenever you are close to it, you get big ovations. Been your father of it. It is light, please, lighter and lighter and lighter so So since this is the foreground which is nearby, so it has to be a little bit taco. I'm just trying to give more leaves toe where I have left, and these are smaller leaves, so it will give what ideas toe the leave pattern as well. So these are not around. These are I'm just creating small, small lines on the branches. So again, another brunch. I'm just taking out on just highlighting some off the branches so that it looks like the moonlight iss falling on that branches. So just highlighting some off the branches with white so that it will appear as if the moonlight is falling on those branches. So I gets It's almost done. So I hope you have you like my Bane Ting. Just just a little bit more off water part So, guys, it's almost done the painting and I love to see your projects. Please do share me your projects and drop a comment and review on it. You can also share these works on my instagram. I'm on instagram as well, but more any art gallery you can share there as well. So I hope you liked the whole class so see how nicely deep or tape is coming out and the borders are coming out. So this is the beauty off the masking tape when you apply. So I mostly applied on all my paintings. So this is the complete painting. Hope you liked my both d paintings on hoping to see your projects soon. Thank you, Aunt. Have a nice day.
 Mohini Sinha, Acrylic and Gouache Artist- Nature Lover