Transcripts
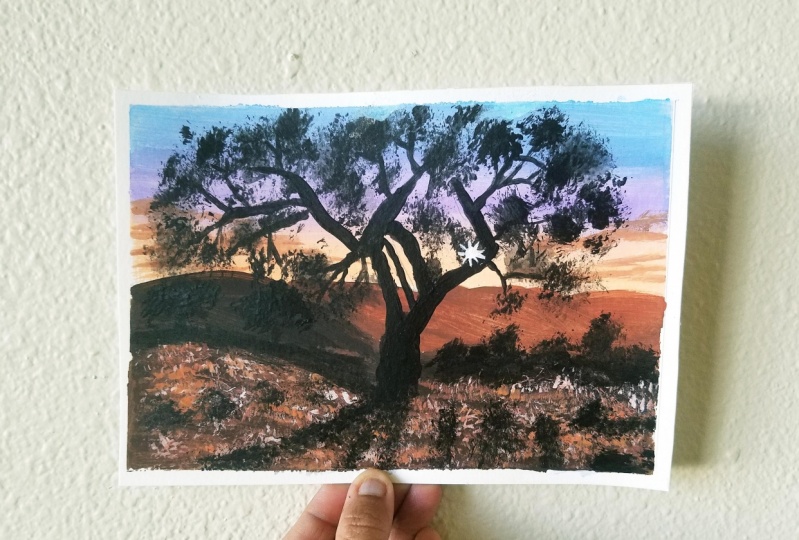
1. Intro: My love towards nature I've been doing. It's because I love how flowers, trees, and animals are so unique. Stretch and conifers. And I focus on the gorgeous flower, for example. You feel so calm energy coming from them. This is suddenly no coincidence that nature gives us calming effect and makes us feel comfortable. Today, we'll be painting together. Nature itself opens. My name is Miletus and now B is India. And I'm an acrylic artist. And today together we'll be painting. This landscape beauty. Hou class is divided into sections that each sections in which you will be learning step-by-step techniques of painting. So Doughboy, well class, you will be learning materials. You will be required for the school painting. Some basic brush techniques, and finally painting the projects, which includes blending technique, tree texture technique, layering technique or the grasses. And how to blend the whole background and create a realistic landscape. You can't wait to see you on painting along with me.
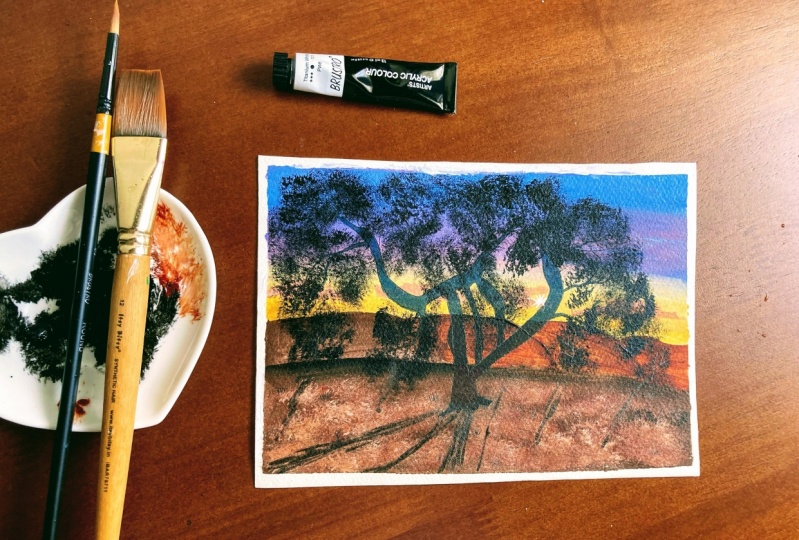
2. Materials Required: Hello friends. Welcome back. So let's start with the colors which we'll be using. So this is the painting which we'll be doing and for the sky will be using cobalt blue, alizarin, crimson, dioxazine, purple, cad yellow, and titanium white. And for this clouds, I'll be using bond sienna and white mix. Apart from that, for a foreground, I'm using here for the first layer, black and raw umber mix for the first courting. And then for the D dealings, I'll be using burnt sienna and white mix first layer, then secondly or GAD, orange and brown sienna. And for third layer also we'll be using to three layers we'll be doing for the whole lot texture. And also Alizarin crimson also we'll be using you. So these are the colors which will be needing for the painting. And apart from that, let's discuss about the materials. So this is the painting which we are doing here. And let's first talk about the paper which we'll be using. Here. I'm using 300 GSM cold pressed paper. You can use paper, Canvas, anything, but here I am using paper. So this is the goal press, 300 GSM paper by Bong. You can use 80 GSM also, that is also fine. And this is the masking tape. Then the scale. Then comes the benzyl and rubble. And these are the brushes, which we'll be using this as the flat brush size 12. Then this is the Bristol flat brush of smaller size. This is the brush size one. These brushes out of different brands. This is liner brush and this is fan brush. All these brushes out of different, different brands. Whichever brand new like you can use some out of rosemary summer of prints. Princeton. So these are different different brands and these different brand colors, I'm using your first as Winsor and Newton Galleria, then golden Liquitex. So these are the brands which I am using u and a BAD from that as a tissue paper for cleaning your brush. This is the water container with having ridges in it so that your pressures can clean easily. These are the holes where you can keep your brush. And this is the water that does a spring glow, which we'll be using for blending technique. And apart from that, you will be needing palette for keeping your colors. So let's start.
3. Basic Techniques: Hello friends, welcome back. So let's start talking about the technique which we'll be using here. So first technique which I'm using as the blending technique, which I have used yard in the sky part. You can see I've used 34 colors and created this guy. So this is the misting bottle which I am using your have applied very little amount of misting bottle from a distance. And after that, I'll be using a flat brush for blending the colors. So the first Scholar which I am using year is cobalt blue, the first layer. And you'll see how this misting bottle affects the blending technique. So this is the first color which I have used. Now. The second color which I am using is dead Xin mix and little bit of alizarin. And I've just makes the color just blended both the colors. After that, I'll be using cadmium yellow. Just cleaning my brush. And cadmium yellow and have used cadmium yellow and add and left blank space in between so that the color does not mix and turns out to be green. Because when we mix blue and yellow, it turns out to be green, which I don't want. So I have just left and just added white to it and start blending. Now again, I'll just remove excess of yellow color and just wash off my brush. And then again, I'll just blend from top. Just taking a little bit more of cobalt blue and just blending it so that that middle line disappears. So this is how we'll be using this technique in our project work. So the second technique which I'll be using yours, just wash off my brush. And the second technique which I'm using here is the DRI texture technique. And here I'm using Br2 brush. That does a bit too flat brush which I am using and just applied the color on the tip. And very lightly, I'm just creating us half circular shape of a tree. And you just have to create a half circle of a tree. And, and you have to just crash present very lightly so that, that tree shape appeals. So you'd want to have to press it very hard. And the color also should be a brush and the color should be dry, then only that effect will come. And the second, sorry, the third technique here I'm using here for the grass one with the fan brush just to remove excess of water and use thick layer of color on your brush, on your tip. And then you have to make your brush in the 90 degree direction and just you have to use your tip and very lightly you have to create those textures. The brush is the brush which I am using, your wrist fan brush. And these textures which I am applying it is with the tip of the brush. Just am using the tip of the fan brush and I'm creating the textures. So in this grass layer, I have used 23 layers of colors then only that grass effect will come. So this three main techniques here I will be using in this painting. So I hope you will like it. And if you don't have these gestures, these gestures brushes, you can also use sponge. So let's start.
4. Blocking The Background: Hello friends, welcome back. So let's start with bending. So this is my sheet and I'll just base the masking tape. And this is the painting which we'll be painting. So let's start with first. Just using the masking tape. You can use any size of masking tape whichever you want. If you want broader borders, then you need large size masking tape. If you need a small borders, then you need small xy is masking tape, whichever side is masking debut light you can use and the Java size paper you want to draw, you can use it. So I'm just pasting it all over. Make sure that you press it to very nicely, then only that proper Bordeaux will come up. Otherwise, there will be chances that the gallows may come inside the borders. So just bless that masking tape very nicely. With all the edges. It should be pasted very nicely. Now this is done, so we know we'll be doing the sketching so nicely. I've just pasted the masking tape. I'm just checking if there are no space, space left. So now we will be drawing this line, the straight line and then the small mountains. So just, so this almost sizes six. So this is almost, so I'm just taking 3 fourth offered. And I'm just drawing the line. Just drawing the straight line. After that with the same line. I'm just drawing the coves so that it looks like. So simply drawing the mountains. Just a rough sketch of it. And this is the line which is dividing the space. So just a little bit rough sketch so that we can easily coloured that area. And now we'll be using these colors. Cobalt blue, alizarin crimson tags in bubble cad yellow and fluid to Daniel white. So this is white, I am using as fluid so that this will help me to paint. So now let's just spring go the water first. So just have wet my brush first, sprinkle the water over those that sheet. Very light water, not much amount of water. Very light. If you don't have the spring blood's fine. You can directly use the color. So if you have it, you can use it because it helps in blending the colors. And if you don't have that sprinkler, make sure that you use a thick brush and take color. And your brush should be read not entirely above it, but it should be read. Then only you will be able to blend the colors. So I've just mixed white and blue and just applying on the upper side. So I have used 70% are white and 30 percent of cobalt blue. So you can see it's very light color. And whenever you are doing any background, make sure that you use take brush. And the color should also be quite lot of amount then only you will be able to blend it. So you are, I've just added, added little bit of alizarin crimson, and I'm just blending it. And a little bit of dogs in Bhopal also. So I'm just trying to blend the colors nicely. Now l just so you can see there are no lines in between and it has blended very nicely. So now we'll be using dbGaP yellow, which is below. So let's take little amount of cad yellow and a little bit of white. So here, cad yellow MT has more and why does less? So just applying the GAD yellow just above the mountains. And I've left the area in between, white that I can blend it with white. And just add a little bit wide and just dotting to blend that color. But still you can see those lines. So from the, so again, ask do a blended color from the top. So I'm just removing that yellow color and just washing off my brush. You wash off your brush very nicely. Otherwise, that Gallo will turn green and just applying that same color and just trying to blend that area which where that line is showing up. And just moving it upwards. Just blending that area. And then we are blending that area. Use your brush very lightly. Don't press your brush, otherwise, the chances that people can tear off, so don't press that brush you. You have to blend that area very lightly. Then only that, that blending effect will come up. Don't press your brush. You have to use your brush very lightly. So now you can see that whole area is left. Now we'll do with the foreground. But before doing that foreground, we'll first create those cloudy effect. And here I am adding little bit of alizarin and cad yellow, the first layer of the clouds. I'll also be using second layer so for just moving the brush in the horizontal direction and yes, using the tip of the brush to create very light shadow clouds. So you can see very light clouds are coming. So after that, we'll be using another color that is born sienna for the clouds. But before that, let's first do the foreground.
5. Blocking The Foreground: Hello friends, welcome back. So now let's start with our foreground. So for the foreground, we are using only two colors. That does. This foreground is black and raw. Umber, I think we'll be needing buoyancy and also, so I'll just take that out as well. So you can see here I'm using Winsor and Newton bond, sienna Winsor, Newton as the brand which I'm using you. So I'm just mixing black and Romberg together and applying on the top mountain ridges on the left side. Here you can see I'm using the same brush, which I use for the background. And same brush I'm using here that has large size brush and I'm just covering that area with the mixture of brown and black. So make sure that your color is quite take them only that color texture will come up. Don't add lots of water to your paint. Otherwise, that brightness and the viscosity of the color will go off. Spinel, your brush is getting dried, then of course you can use like You're my brushes getting dried. So I've just mixed more amount of color and I'm just applying over it. And also you can add water, do it if your brush is not moving smoothly. So water is only required when we are doing some outline or something, or we are drawing some tree branches or that time venacava require the fluid color. You can see the middle area I'm just 0 and the upper am just doing it more dark. And now I'm adding bonds sienna to the same mixture and little bit wij to it. And we'll be covering though, right side mountains. In the right side mountains, I'll just use different varieties and different shades of brown sienna so that there are four to five mountains which are overlapping each other. They all visible clearly. Now you can see I've added little bit more amount of whites, so the color is little bit lighter. What? I'm not liking it. So I'll just add little bit more brown sienna. So you can see bone CNS finishing my valid nodes. So I'm just adding more of buoyancy and onto it. And I'm just making that a reality bit dark. So now you can see how those four to five mountains are looking at. They're quite separate. You can see there are four to five mountains. So I have used different shades of buoyancy and number. I just adding that raw umber and black and white. So now our background bothers almost done. I'm just covering the areas which are left as wide and just giving a shape. Now, what we'll do is we'll create the clouds. And I am using the flat brush. It is of smaller size. And this is completely dry brush and I'm just taking bond amber and just at the tip of it, I'm just moving the brush. What is one delay? And just moving it horizontally and the edges which are coming shop, I'm just blending it because you can see the clouds or not do. The detailing is very shadowy or you can say it very smudgy deep. So there shouldn't be no sharp edges. So I'm just I've just applied on the tip and the brush is completely dry without any water and I'm just creating it horizontally. Just few clouds, Not much. A lot fill the whole area. Just the area which is above the mountain that only am just grief. They're only I'm just creating the clouds. So I think I'm done with the clouds now. So now we'll do with the tree part. So let's start.
6. Detailing Branches: Hello friends, welcome back. So now we are done with the background and foreground blocking. Now we'll start with the area was little bit too wide, so I'm just covering it. Little bit wide. Area was left. I'm just covering that area. Now. What we'll do is we'll draw the tree. First. We'll draw the tree trunk with a pencil. Just do a rough sketch. And then we'll start blocking that branches and stems and leaves. So first, I'm just drawing the rough sketch with my pencil. So in my reference photo, I'll be attaching three photos. And whichever you like, whichever tree you like, you can paint it. And one of them here, I'm showing it. So all the trees are trees out of the front structure, but altogether same. Some are broader and shapes and little bit toil. So the three photos and on that tree for those you can paint any of the trees you want in your project work. So just the rough sketch of the pig branches, we just showing up. And for covering these branches, I'll be using simply black color. And it will be fluid because I'll add water to it. So it's not it will not take because the branches should be little shop also. So you cannot use acrylic colors in. It should be a little bit of fluid, so you need to add water to it. So the branch partners almost done the drawing and now we will fill the gap. So I've just taken out a little bit of black and I'm just adding water to it to make it more fluid. And with my flat brush, I will just cover up the branches which I have drawn as a rough sketch. If you feel like that color is drying up and it does not working fine, just add water to it. This is the best technique of doing it flawlessly. Because acrylic dries very fast and especially in India, some summers, the colors dry lake within five minutes. So you have to add a little bit water, do it. Other ways that color will dry up and it will create patches over the better you add water you can see my brush also some badges, some dry colors are coming up because the color is getting dried up. Now for the fine branches, I'm using your liner brush because I think that is much easy for me to do it. You can also use round brush. If you want. Whatever brush you feel like you're comfortable that you can use it. I think for me liner brushes more easy. So just take your time and do it very slowly. Don't be in a hurry because whenever you are painting something, you have to be completely into it, then only that result will come up. And you have to just concentrate on and like living in now we say. So when you are doing any painting, you have to be with, you don't have to be in a hurry that I have to finish it up to finish it. And then you are in a hardy, you will all mess up your painting. And you will not even realize that. And after the painting is complete, you'll say, Okay, I was in a hurry and I did this. So it's better to take your time and slowly go up. And one thing in acrylic is very good that if you have done any mistake, you can always overdo it. And how can you overdo it? Like if you if these lines are drawing you and some of the lines gets disturbed or something, I don't want that line to what we can do. We can just go once we'll wait for it to dry and then just covered it with the background color. That's it. And if you are using black, then you have to cover it more. I think two or three layers of acrylic painting and then it's all fine. So this is best with acrylic that you can always do your work and you can hide your mistakes. So so take your time and do it very slowly. And if you are brushes getting dried up, just add little red water, do it, mix it in that color. And then again, start ordered. Especially when you are doing some detailing work. Because when he would doing the background or the foreground, blocking, it hardly matters. But when you are doing something in detail, you need the color to be a little bit fluid then only you will able to create the lines and fine lines and sketches. So make sure that when you are doing anything linework or any detailing, your colors should be fluid. Either you use water or there are some fluid colors which comes in Golden and many other brands that also you can use. Like here you can see I've used white as a fluid so that the color blends easily. But if you don't have wide as a fluid, that's completely fine. You can always add water to it and make it fluid. Not very much fluid, but at least that you again, you'll be able to move the brush nicely and blending colors nicely. So finally, some things coming up. I can see this on branches are there, which is giving a nice shape to it. And I'm liking it. I hope you guys are also liking it. And of course you can see my see my posts, see my paintings on Instagram, that is more Heaney art gallery. You can check out there are many paintings which I have done. There are many realistic paintings which I have done. Now you can see I'm just creating fine stems which are coming out from those branches. So very fine stems. So again, for fine, when you are drawing any fine lines, you need fluid color. So make sure that you are using fluid color. Just add a little bit more water to it. Just trying to create little, little branches and twigs which are coming out from the branches just here and there. So this is it, this is almost done. So let's start with our second but
7. Leaves Painting: Hello friends, welcome back. So now we are done with the branches. Now we'll create the leaves. So for creating the leaves, we need these leaves we'll be creating. So for this we'll need breast and flat brush. And here also I'm using just black color, very little amount of black color and I'm just applying on a dip and just pressing the tip very lightly, not very hard, but very lightly. I've just applied the colors on the tip and just creating like a half circle. Like we saw in our basic techniques. So just half of, so goals in different, different directions and different, and little bit of distance. It should not be o, it should be somehow overlapping, but it should be distinct also. So just hop, so goes I'm creating. And in this case, don't use very fluid colors. Make sure that you use take color, then only that texture will come up. So use quite a lot of tech color. So you can see I'm creating a half circles and in different, different directions and leaving some space in between so that you can easily see, okay, these are the leaves and dispatch and this batch. So like a half circle technique, you have to just create the leaves. Some NO vertical direction, sum and horizontal directions. So depending upon your choice. So this is one type of tree which I am doing, but there are two more times and that Bob bought little bit similar. So you can draw any one whichever you like. But I'll post all the three pictures in the reference photo and you can see from that. So if you don't have breast or brush, then you can also use sponge. And that also you have to use dry colors and you have to create an a half so-called pattern. But when you use these Bristol brushes, that small, small dots appear, appears like trees and the leaves are coming out. So if you are creating with the blister brush, that texture comes out very nicely. So I'm just trying to fill the areas which I can see that there are empty and there are some bushes which are on the mountains. So I'm just creating those bushes. Just simply creating some random shapes of the bushes. All for highlighting the area which is dividing the mountain and the planes. Just highlighting the area with black color. And there are also trees which are on the top mountains. The job visible from file. So I'm just creating the dots. Just same technique that I've used in the above, leaves. Same technique I'm using, and I'm just filling the areas which are blank. So this is done. Let's start with the next part.
8. First Layer Detailing of the Foreground: Hello friends, welcome back. So now we are done with the tree part. So now we will be doing the foreground. So for the foreground, there will be many layers. So the first layer will be that burnt sienna. So make sure that your brushes completely dry. So I think I'll use your fan brush because that will be much easier for me. So you're the brushes completely dry and I'm just using burnt sienna and just filling the edge of the brush with full of paint and just creating dots. By holding my brush vertically. You have to hold your brush and a 90 degree direction and just press it very lightly, not hard pressed. But you have to press that brush very lightly. Then only that details will come up. Nice grassy effect will come. And all the breast tumors should be apart. Then only that or texture, that texture will come up very nicely. So you add this brush as Bristol brush does to fan brush size one. And I'm just using that bond, Dumbo, sorry bunt sienna. The doubt, any Watteau? And I'm just dabbing my brush and creating those textures. So this is the first layer which I am using. But again, we'll be using to do three layers to give a nice texture to the grasses. Because grasses and every single color, they are different colors. Some are, some are greens on my yellow. So because of the light effect, these grasses a little bit brownish in shape and the they are dry. So I'm just doing the first layer. So what it is, this is the second layer because first layer was the blocking. And then this detailing. Then again, one layer we'll be using you. So let's wait for it to dry it. A two before that, the tree which I was creating. I'll just do that. I'm just using my liner brush and a little bit more of a shape I'm giving to that three little bit branches in between those leaves. So just random branches I'm creating in-between those leaves, as you can see with my liner brush. So just random branches I'm creating. Wherever I see there is a space where I can create branches and I can join it. I'm just trying to create those ranges. Just random lines which are coming out there, some lines, some branches which are coming out of the leaf, also outer leaf. So just trying to create those. This is the simple and basic structure of the tree, which can start with and then if you can do more. But this is the basic level where the bigness can easily draw these three lines and the structure of it. Now, once we are done with those lines, will be doing the second layer. And also the tree trunk where you can see there are two drip trees which I have created in the far distance that also will be doing it. But before that I'm just creating small, small details and small small dots which are coming out of the outer tree. Just small, small random dots I'm creating. So just enjoy the process and do it very slowly, not in a hurry. So that you can create the exact effect and exact three lines. Just take your time and do it really very slowly. It's not that you have to complete it in one go. You can take breaks in between and then start over again. So if you feel like Okay, you are exhausted painting and just take 10 minutes break and then start doing it again. My flat brush, I'm just covering the areas which I think the blank. Just little dots over here. And now again, let's start with the ground. Make sure that your fan brush is completely dry. Remove extra water from it. And then I'm just using white little bit in Bonn sienna. And using same technique which I used earlier for the second layer. Same technique I am using your, for the toddler. Make sure that you have a very take colors in your brush. The color should not be fluid. You can see here, I'm using quite a lot of colors on my tip of the brush and just creating small, small dots over there. You can see how the textures are coming. And I'm not pressing the brush very hard. It's very light. If you will press the brush hard, that texture effect will not come as it is coming like this. So you have to press it very lightly and pick tick colors in your brushes. Now the second layer is almost done. We'll do the next part.
9. Final Detailing: Hello friends, welcome back. So this is our last part of the painting where we were doing the trees. So let's first make the tree trunk for the distance d, a tree which we have drawn earlier. I'm just making the branches and tree trunk. For the tree. You can see there are two trees which are destined. So I'm just creating some small branches and T3 trunk. Now let's take some orange. This is cad orange of Liquitex basics. So I've taken a little bit of orange and C using my same fan brush and burnt sienna mix, I will be applying another layer over it. So you can see venue apply layers of painting. Well, especially on the grasses and trees. It gives a very realistic effect to the grass and tree leaves. The leaf is black, so I haven't done any layering over that. But the grasses little bit brownish and shade with different textures of Brown's. So I have use your layer technique. So because of the sun does grass is a little bit of brownish color where the sun is reflecting over it. So layering plays a very important role when it comes to any realistic painting. And here I'm not pressing my brush, please don't press your brush. When you are using this fan brush to brush. The ways that effect of TechShop indignant lot come up. You have to use your tip of the brush and dab it to very lightly so that small dots and shapes appear. Now I'm just adding little wide and same color I'm using. Just adding a little bit of weight so that the color shade comes to front. You can see now it does much lighter in shade. And I'm not covering it all a wall. I'm just covering in little areas, not covering it everywhere, just like little dots here and there. So that layered techniques come up very nicely. Now I'm again using my Princeton flat brush, which I used earlier for creating the shadow. So the tree shadow there you can see there are four branches. So I will create, I will be creating for slant lines, lake the shadow of the branches and tree trunk. So I'm just dabbing the tip of the brush and creating the shadow. So you can see how bright it looks when you apply this shadow. And there are some shadows where trees are behind, which is not in picture, but I'm just creating little bit of shadow here and there so that it looks more realistic form. So I think breast to the brush plays a very important rule. When it comes to the detailing, specially the grasses and trees. It plays a very important rule and I use in almost all of my paintings. If you have seen my painting on my Instagram that does more hiney art gallery. You can see in most of the paintings I use these brushes. So I think that first shadow is little bit broader. So I'll just tendon out using the same color, which I use for grasses and I'm just applying over it. So you can see how you can just overdo the coloring. This is one of the advantage in acrylics. And now with my liner brush, I will be creating the sun. Have just taken very little amount of white and cad yellow, very little amount, not much amount of color on my brush. And the scholars take I haven't used any water or any solution in the ER. So just creating a round circle over there. But before that I see that there are very less leaves over the area where I'm creating the Sun. So I'll just create more leaves over there by using the same technique which I used earlier. So just filling the area which I think they are blank and a good bet leaves can be there. So now again, I'm using the same brush, liner brush and creating the sun. Little bit of detailing as left, I'm just creating a shadow on the trunk, tree trunk with my cad yellow and a little bit mix of Alizarin. Now take very little amount of color to create the rays of the sun. Don't take, take amount of color, take very little amount of color on your brush and create those lines. See whenever you are creating any deep dealing, dig enough amount of time and patience to do that. Otherwise, the whole painting will be of no use. So it's better you take your time and do it nicely. Don't be in a hurry. And of course, if you have done any mistake, you can always do it by putting the same color on it. Now this is almost done. So let's take out a masking tape. So your project work will be this. And let's take out our masking tape and see how it looks. You are taking out de masking tape, died to take out diagonally. You can see how I'm taking out. It's not straight, it's in the diagonal direction. I'm taking it out so that the paper does not dare off. So this is the whole painting. I hope you liked this class and do share your project works on any medium. You can share it on my Instagram account also that as Mooney on gallery, I'd love to see your projects. And thank you so very much for watching the class, take care and have a nice day.
 Mohini Sinha, Acrylic and Gouache Artist- Nature Lover