Transcripts
1. Introduction: Hello, everyone. I am E
Aabaji watercolor artist, Basin here in Oslo, Norway. Welcome to the class. Capturing the
atmospheric mood of a busy retreat doesn't require a palette
packed with colours. In fact, limiting yourself
to a single pigment, like Cipia is one of the fastest shortcuts
to mastering the light, shade and value contrast. In this class, you will paint a moody CPS scape step by step. Learn to simplify architecture, counter values and water, preserve bright highlights and add both details that
bring the scene to life. Whether you are new
to urban sketching or an intermediate
painter looking to give your streetscapes
a timeless, cinematic look, this
class is structured, so you can follow
along layer by layer. Grab your paper,
your sepia paint, and a round brush. Let's jump right into
the class project now.
2. Class Project: Your project for this
class is to create your own single colored
escape study using sepia paint or any dark
monochromatic pigment you have on hand. Our goal is not to create a perfectly detailed
architectural blueprint, but rather to capture the
atmospheric light, depth, and vintage mood of a city street using
simplified value layers. Before you begin, download
the original reference photo from the projects and resources
top below this video. You can follow along with
me step by step or use a photo from your own travels to practice these same
monochromatic techniques. As you paint, don't worry about making every line perfect. Instead, focus on
controlling your water to pigment ratios and creating strong light and dark contrast. Once your painting is complete, or even if you just want to share your intel
pencil sketch, take a photo and upload it
to Project Gallery below. I check the gallery
regularly and will be leaving personalized
feedback on your work. Now, gather your tools, and let's head into Lesson three to go over
our material setup.
3. Materials: So let's start painting. This scene, as you
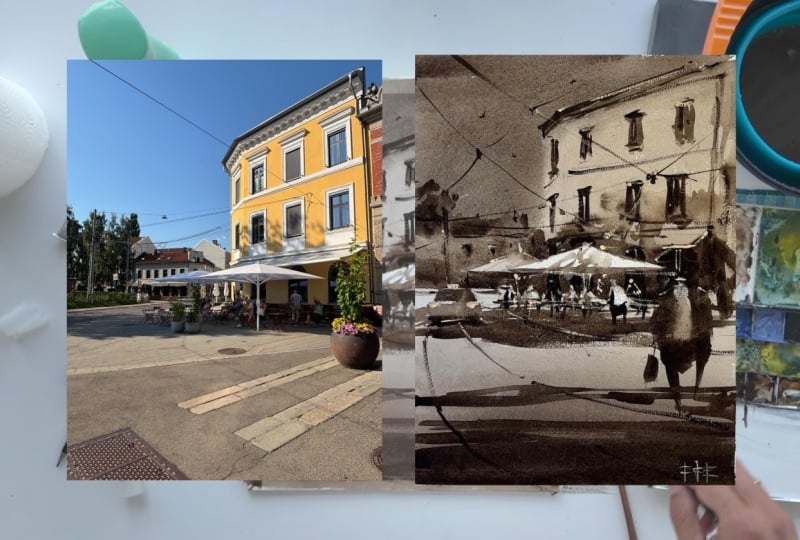
will see on the left, this scene from Oslo, Norway, beautiful building and white umbrella and
shadows and so on. We will paint the subject, as I mentioned before. First, let's talk
about the materials, what we need to have
to make this painting. First, this is tape, masking tape, just to put on
the corners of the paper. Okay. Then this is paper, 300 gram, 100% cotton
paper from Ba Hong, but you can use any brand, but the most important
thing that it should be 100% cotton and 300 gram. Then we have mechanical pencil. This is, I think, four B or six P. I
like four B or six B. Why? Because after first for, I'm able to see my drawing
again. So this is important. If you use just HB, then it disappear and you are not able to see where is
your sketch, you know. And this is eraser. Very soft. This is very important
to have a soft eraser, then you don't
damage your paper. If you have a very hard one, hard eraser, it damaged
on the texture. So please avoid to use it. Then I have two type
of water spray bottle. One of them is the big one. This is, like, very, um very soft and very big one. I use it. Like, I
don't want to have it I have my paint on my paper really dry.
So that's why I use it. This is a small one.
Basically, I use it for just soften
some edges and just on some particular part of my painting to have
some soften wet part. So tissue, we need
to have a tissue. Then yeah, as I mentioned, we will use only
one color sepia. In the end, we will also have some highlights with this
John Brilliant from Holbein, Holbein and Danyel Smith. Then we have we have sponge. This is just to take out of
some water from our brush. We will just touch on this
and we will have more paint. And water. So then
we have brushes. This is for big washes. This is weasel and
skulhair mix from Ru Hong. I will use it for large washes. This is liner. I will use it for the wires and maybe
maybe to sign my painting. And then this is also horse
hair writing, Chinese brush. I like it using it a lot. So then I have three types of three different size of synthetic hair
brushes for details. Then we have water, then palette, but this is sepia. I will only use sepia
in this painting.
4. Drawing: Okay. Then let's start
the drawing now. I always tend to use tend to start with
the eye level first. So eye level is just blow
the half of the sheet. So this is eye level, okay? Then we can throw this building or main
building on the right. So this is in the middle
of the page maybe, but let's make it to
the right like this. Yeah. Then rooftop. Like this. And maybe we can
show the Building. As well Here somewr. This is lift part
of the building, but this is level, okay. So it will come down a bit more. So something like this. Since this is level, so this here we
will have umbrella. Umbrella is very important
in this painting. I will locate it on the right to have because
if it is in the middle, it's not so good. It's just very static
and, you know. Then so this was level, so it should be a bit
Ebo somewhere here. And then Something like this. And we have this, this. Um yeah. Something like this. Then we need to divide it
into two another Yeah. We need to erase
this because this will be just white
off the paper. Then just blow blow
off the umbrella, some stuff, then
another umbrellas here. Something like this. Yeah. Then also we have building
on the background. Let's start something
like this here. Okay. Then some rooftops. And something like this. This part is not so important. So that's why I am not
very precise on this area. So this is level. Let's make it David. Yeah. This was at eye level. So some windows, but you don't need to be
very precise, as I said. I am just focused on
more the atmosphere. Just very simple.
But what's important here just following
the perspective. Okay. Then we have some let's see. So doors and so on. So this was or eye
level, you remember? So then let's put some so
let's say maybe one guy. So when I say eye level, the heads should be
in the same level. You know, maybe serving
something Okay. So but there should be
some people sitting, so their head should be a bit
lower, something like this. You know, lots of
people and some tables and yeah, like this. And maybe more, but they
are a bit smaller since they are a bit far away. Something like this. Okay? And maybe one more waiter here, waitress waiters
taking some orders. So then you're able to see
that there's some shadow. I think this shadow is
coming from the left side. Since sun is coming from the
left, maybe there is a tree. Okay? So we will
have some shadow here and maybe the building
something like this. So what out. And then even maybe we
can put a car here. And the top of the
windshield should be on the same level
with the shoulder. So something like this. Yeah. Okay. Then maybe we can
put a bigger guy here. And maybe have some
pack, you know. Then maybe also, yeah. Then maybe also let's
have one more shadow here to make our painting
more interesting. So we will have
some wired as well. Okay, this is our drawing.
5. Value Study: So this stage, before
starting the painting, I will show you what's
our plan for the value? What's the value is that how our paint is strong
on the paper, okay? How dark and how light. So this will all
create atmosphere. So let's so let me
take some sepia. So we have two separated plans. We will first paint the first
layer, then second layer. The first layer, we will
just leave some part empty. Just white of
paper. Where is it? It should be the lightest
part in our painting. Okay? So another one. So this one. Okay. Basically, this is a bit paint and much more water. Okay? This is it's coming the light second lightest
part in our painting, not white, but with paint. So then we have this
a bit stronger. Okay. So then we will leave white two different
intent of paint. Then we will dry the painting, okay? Then second layer. Then in the second layer, we will have The same,
almost the same. Okay. But since
this second layer, you will paint top of it, so it will look stronger, okay? Then we will use
much stronger one. Then almost no water. Okay. This is our plan.
6. First Wash: So in the paint in the scene, what are we are able
to see that we will leave umbrella white, okay? And then we will have
as you remember, we will have two different value in the first layer one and two. And the lightest part we paint the building and the background
and everything, okay? But sky is stronger
than the others. So we will use the second strongest
value in the first layer, okay? So let's start. This is building. It's some spray, so it will
not dray very quickly. Remember that we will
leave this umbrella white. Okay. Is rooftops. Okay. This part of this umbrella
just much more water. Then we don't want it
to dry very quick. Let's paint the sky immediately. So If it bleeds, let it bleed. Not so important. Even looks
better than it bleeds. If you don't want, you know, you can just take the
water from your brush, then you can today
to take, you know? Okay, then let's continue. And also, what I want that let's a bit careful
about the people, you know, we can we can leave some white
on their t shirt. Okay? Yeah, something
like this. You see? Then just very watery. It's connected. It's connected. Another thing that we should darken the value when we
get closer in the scene. See, light darker and I'm
getting much more darker. So it will give you
feeling of distance. Basically, you are just taking
more paint, less water. Even I'm not going to go to
container anymore, you see? Because I need to
make it darker. Yeah. So first layer is done. We need to dry, dry the paper, then start the second wash.
7. Second Wash Part 1: Okay, now we are ready
for the second layer. Remember that I remember that. Okay, now we are ready
for the second layer. Paper is a bit hot now, we should wait like 30 seconds
more than we can start. Okay, let's start. I will start on the background,
very water mixture. Okay. Something like this. The background should be, low low intensity. But you can use some bit dark version as
well to have some variation, but not so dark, okay? So you see it's started dry. So we need to splay it. We have some trees
on the right side, but yeah, that's all. We have some chimney hair. Then a very watery mixture.
Something like this. I am a bit ignoring light eye shadow
in the background because this is not
are not focal point. We have. We have umbrella there. Just be a light. But we can strong make it
stronger around it. Yeah. Coming to the bottom part. When you are coming
to the bottom of anything, make it stronger. Maybe some windows in
the background, okay? Yeah, we forgot to this part. And also, we need to make the bottom part of
this umbrella, as well. Kind of like this, maybe we
can give some First layer. Okay? Then maybe just maybe
a footpath here. And then wind hield off the car. Remember to touch and
make connections. Okay. Remember to
touch the building. Okay. Let's spray more. Then again, this part, the front part of the car. What is important
here that we need to, maybe first this shadows. You know, that we
had shadow here. But also, we need to darken
the bottom part of this car. See, like this. Spray more. Remember to not spray very
close to your paper. I
8. Second Wash Part 2: So now, let's make. Lots of Lots of paint, okay? Then go out on the people leave some whites in the first layer. Yeah. Also, you see, there was something here. But also Al let's
put some water here. I am doing this because
there's a shadow. There is a shadow, but it's
very soft from these trees. See? Something like
this. We continue. Just going around. People. And here's one more umbrella. Yeah. Okay. Let's spray more
because, you know, we shouldn't forget this shadow. I believe we need to finish
it before before it dries. There's a shadow here. We can leave some untouched places. So just abstract things. Okay. Then now I am switching to smaller synthetic brush
for people and tables. But before, let's spay one more. Okay, I will use dark
mixture for the tables. Let's say this is table. Almost no water because
already wet this area. Okay. And maybe there
are more tables here. And then let's put some colors. So maybe. I am also
leaving the sky white. A strong mixture
of for trousers, there was one more waiter here, but then let's make it darker. Or maybe, something like this. Spray. No, I will just take very watery mixture for clouds may also to this. Okay. Then let's connect
this person as well now. Yeah. So let's give him
something like this. Okay? But I think it should be. Like this. Things now good. When I touch it like this, then I'm trying to make
connections, you know. Mmm. Let's soften this part. Yeah. So this is his T shirt. And then it stronger value. Let's give him back
then much more stronger for trousers, okay? Yeah. Then directly his or him Shadow. Then with the big brush, let's make the other shadow
that we talked about before. What kind of maybe one
like this and one in here. Oh, yeah, maybe. Um, something like this, okay? And let's make it
a bit stronger. And then one more here, leaving some untouched
place in the foreground.
9. Second Wash Part 3: Ally, I don't change during
the painting process, but when I feel
something needed, then I change it. So so this is there's
a car here, right? Yeah. I think it will,
I think it's good. So now time for details. So there is a something like this. Okay. Then we have kind
of watery shadow and leaving some
untouched place. Okay. Then we have windows This one is elsewhere. This one. Okay. And this one. Maybe we can touch it Oops. Yeah. So we have kind of this. Maybe also here. I think
look can look better. Hmm. The Yeah, something like this. There was a door here. Let's go around it. And maybe also here as well. Okay and also we also make the bottom part of this
umbrella with the shadow. Yeah. Now it is very good.
Even maybe we can, to have more interesting. Soften some parts. Yeah, I think much more interesting now. Let's skew some
Durk some places. Okay. Now, time for wires on the sky. So I am using my liner
brush. Very nice. So maybe we can start here
and just connect together. Then maybe there's
kind of this let this. Maybe more One more here. Then maybe some birds. And maybe just put some windows and so on. Yeah. But this, um, I think we can make it
stronger this road lines. Something like yeah. And also Yeah.
10. Highlights & Finishing: Now time for highlights. I will use brilliant because, you know, this pneumatic
look and very warm, instead of using white
quash or white watercolor, I think it is much better. So I'm just taking from this, it it from the tube and just
making some highlights. Some of them we are able
to see in the painting, but some of them I
just make it myself. And maybe here, maybe
here, you know. And also, for sure, we should make it for the head and shoulders O's here. M here. Maybe there's a yeah waters here and maybe
something on the plate, you know, and some
reflections as well. Yeah. I'm just trying to
put some highlights. You know, within the shadow, maybe there are some sunshine
on the tables and people. I maybe this is maybe
**** let's make taxi. 'cause there was an umbrella
here right. Like this. Maybe maybe one
more people here, you know, some
highlights of him. One more maybe here. Mm. And then maybe we can. Something like this. Maybe also some. And also
the lights of the car. Yeah. But this is our focal
point and we can make it make it stronger. Although I think it's enough. Then let's assign it. Okay.
11. Final Talk: Yes, this is the final result. Since escape from Austin Norway, we use only one color, which is sepia, and people are artists are using it just to see the
value as well. Then after that,
they're painting with the different colors, all the mixes, color
mixing, so on. But I find it more important
like cinematic look, you know, like an old photo. So that's why I like
painting with on Sep. So what we have done here, we had building here. We had, like, a background. Okay, our focal
point is this area. So that's why we left some white on the umbrella and some
of the people as well. And but we design
it a bit different. We simplify it in
the background. We put a car here. Even we change the direction. Normally, there's no car here and also there's no road here. But we made it. I think it
made an interesting subject. Then we put a big guy here to help us to create some depth, also shadow as well, to have some stronger shadow. Okay, in the end, I think we achieved some
beautiful painting. I hope you enjoy it.
See you next time.
12. Outro: Congrats on
completing the class. We covered a lot
of things together from breaking down
complexity architecture and planning values all the
way to laying wet on wet sky washes and pulling sharp
high contrast trucks like power lines
and sit figures. Remember, painting in
monochromatic sepia isn't just a fun exercise. It gives your set scapes
timeless sematic mood, while building the core
value control unit for all your future
watercolor work. Now it's your turn. If
you haven't already, please take a clear photo
of your CIPA study or even your initial
sketch and upload it to the project gallery right
below in this video. I check the gallery regularly, and I am always excited to leave feedback and answers
any questions you have. If you find this class helpful, leaving a quick review on Skillshare make a
huge difference. It helps other students
discover the class and allows me to keep creating more watercolor
lessons for you. Don't forget to hit the follow button on my
skill shape profile, so you get notified when
my next class comes. Thank you so much for taking
time to paint with me today. Keep practicing your values, embrace the cinematic
atmosphere and happy sketching.
 Efe Arabaci, Plein Air & Urban Watercolor Artist