Transcripts
1. About this Class: Hi everyone. I'm
Kelly from Cali Mac design and welcome to
modern textured wall art. We are going to be transforming
a blank Canvas today into a really awesome
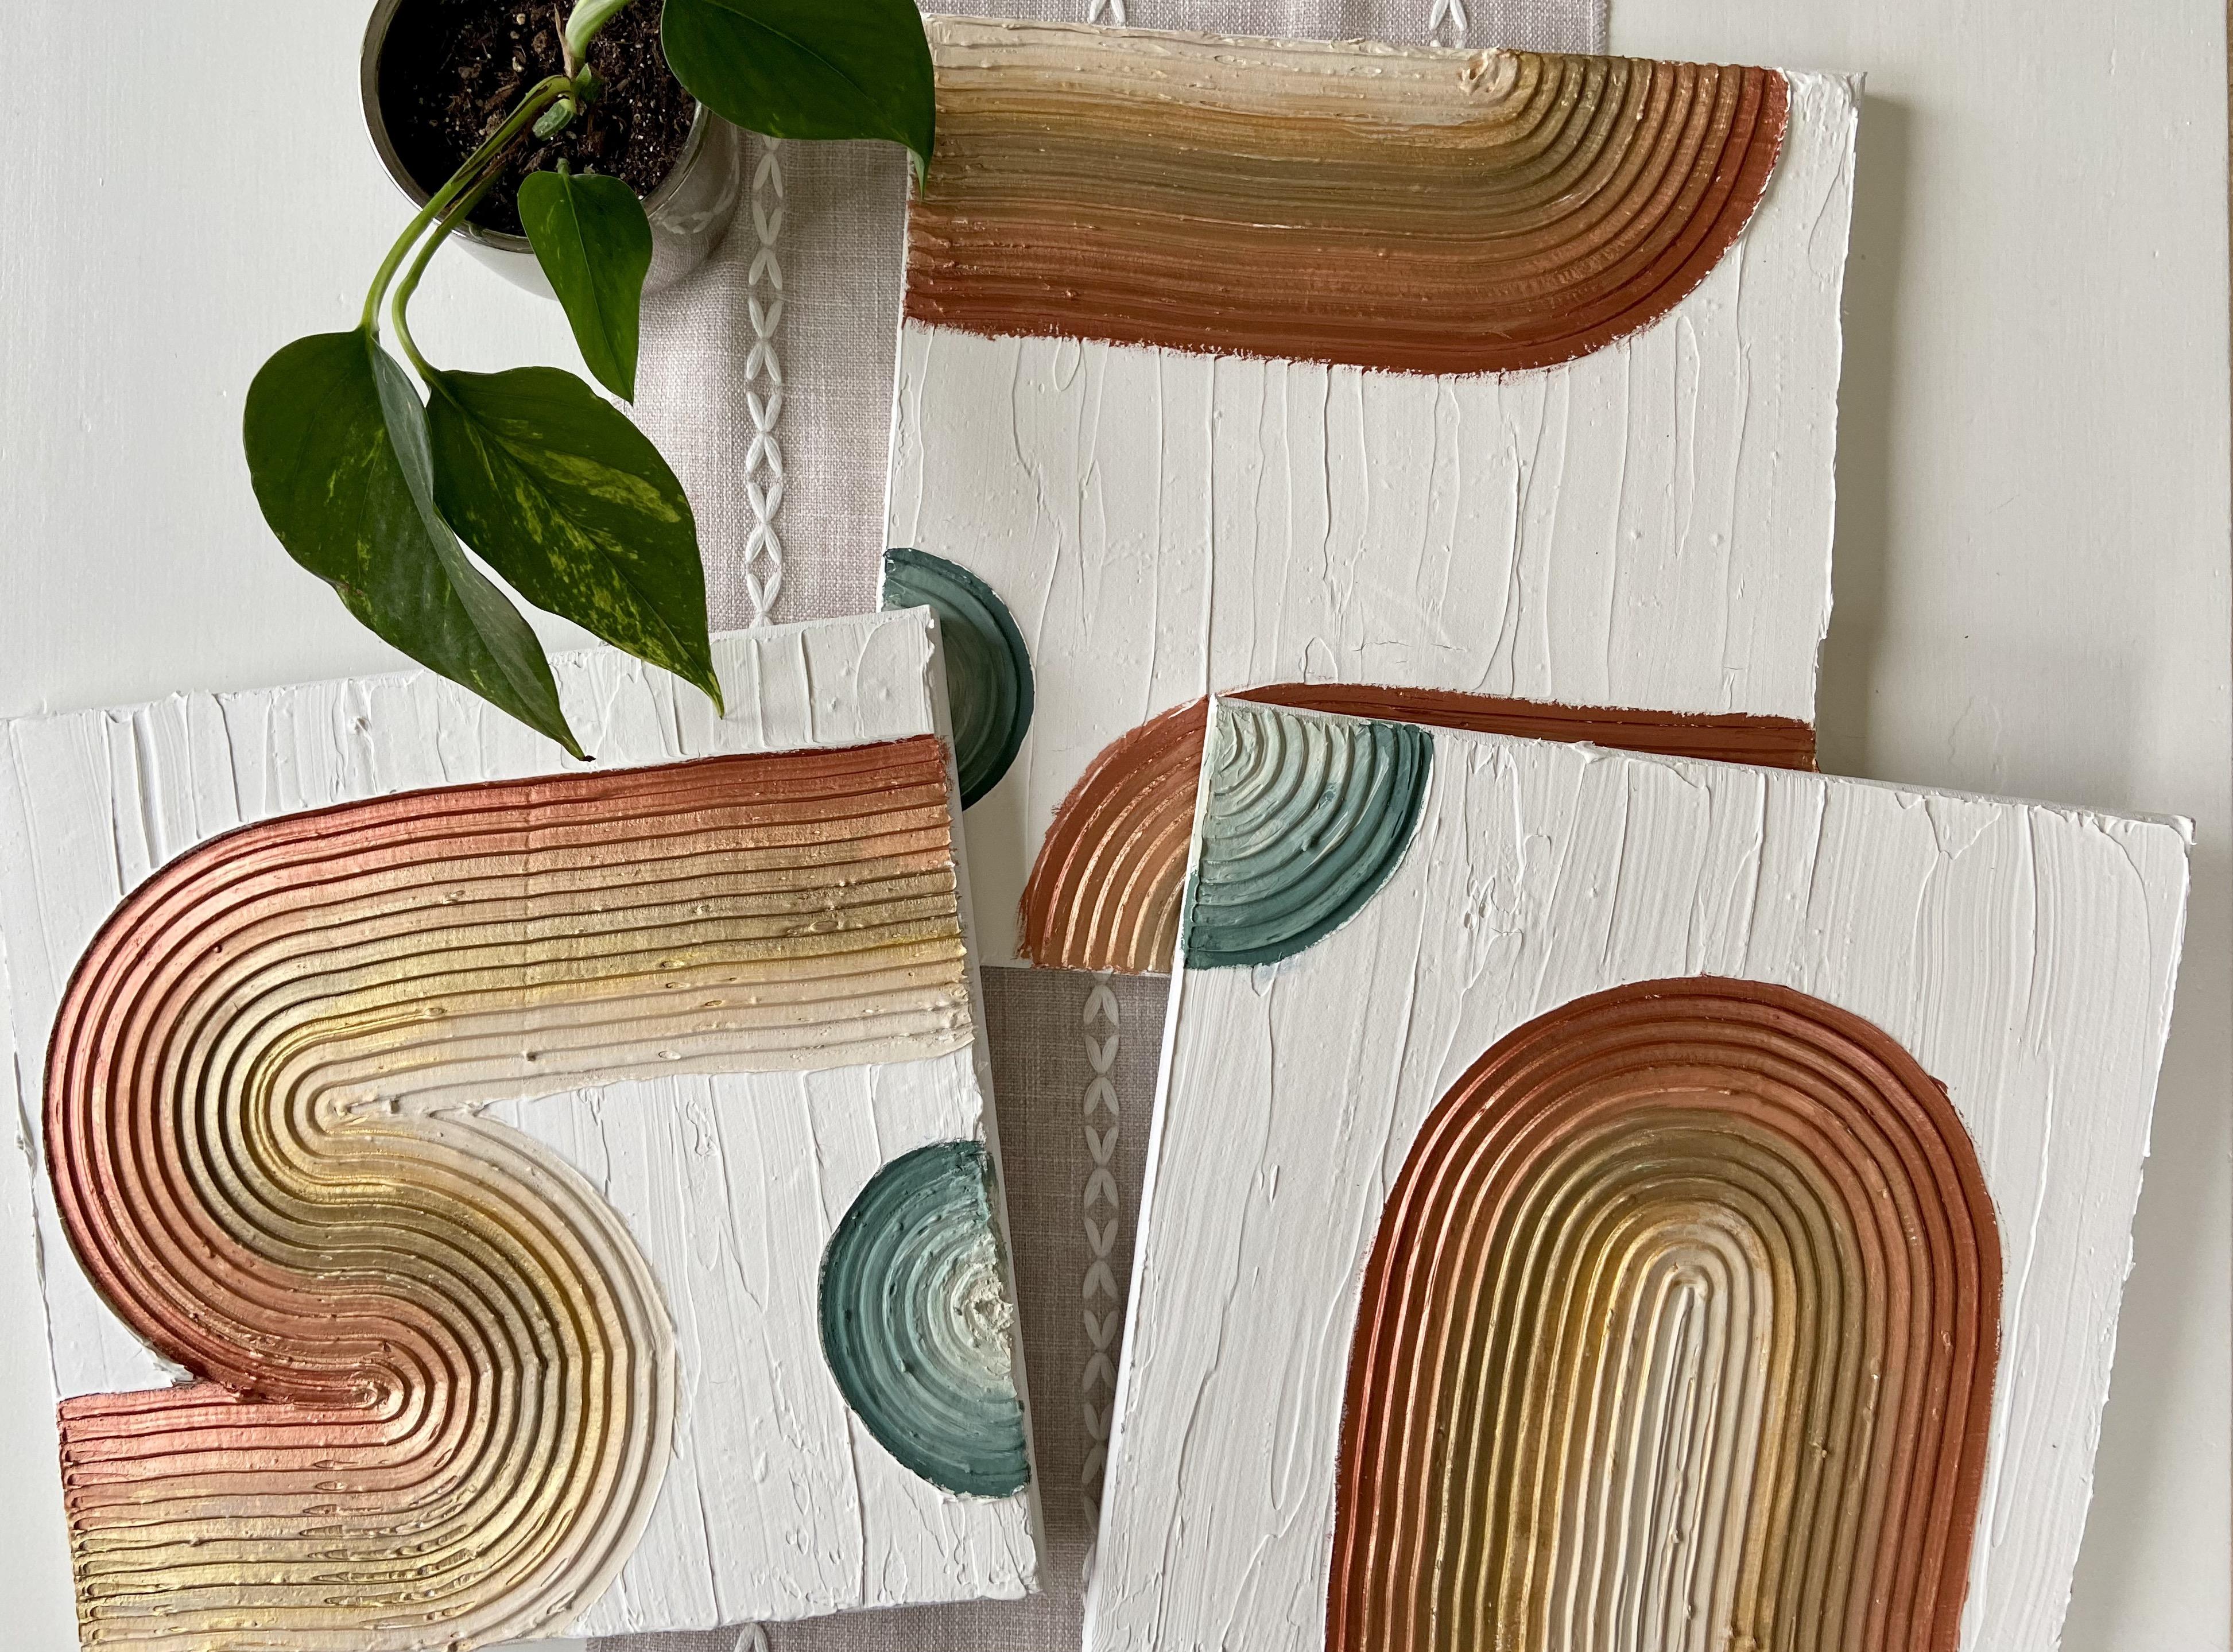
textured wall art piece. You can either go
minimalist with your colors or you can have colors pop,
like the one that I made. Here we go, we're
going to be working on different techniques on
how to build texture. We're gonna be going over
from beginning to end, how to make this project and how to make something that
is unique to you. You can make as
many as you'd like. I'm gonna be showing
you two that I make over this project
and this class. But you're free to do
whatever you want and create a piece that you feel like Represents your own creativity. This is a beginner
level class and a pretty easy DIY project to do. You don't need a whole
lot of supplies. And really with the directions that I'm going to
give you today, you should be able to get going and make as
many as you'd like. I really hope that you enjoy
the project that you work on it and that you've
finished during this class, at the end of the class, that would be great to see
what you come up with. You can upload your picture on the class projects
page so that we can see what you've
made and create a gallery of all of
our cool custom, modern art that we're gonna be doing throughout the project. So we're gonna go
over the materials. We're gonna go over from start to finish how
to make this project. And then once you're done, I would love to see,
let's get started.
2. Materials: Let's start gathering all of the materials you're going
to need for this project. So the first thing
that you need to pick out is your Canvas. You can use a stretched canvas, you can use wood, you can use any sort
of firm surface. You don't want something
that's going to dip. So if you want to use paper, you're going to have
to find something to make it firm at the back, whether that be a piece of wood underneath a canvas
underneath what have you. But you'll want to,
you're going to want something that's firm. If you do use paper, you also wanna make sure that
when you're picking it up, you're very careful because your joint compound when it's dry, we'll crack if you
bend it too much. So you want to be really
careful about that. I'm gonna be using just a
basic stretched canvas. This is a 12 by 16 size. You can buy them in all kinds of sizes, all kinds of shapes. You can get square or
you can get rectangle, you can get long skinny ones. So pick the size that
you feel is best by however many you want to make
canvases your first thing, the second thing that
you're going to need is your joint compound. So this is what I will be using. Basic joint compound. You can get it at any
home improvement store. You can use any
brand that you like, but you want to make
sure that it's fresh. If it's all joint compound, it won't spread as nicely. And so you wanna make
sure that it's nice and fresh to get a nice
smooth surface. If you like a lot
of texture and you don't mind that you can't smooth it out in the beginning and then it's okay to use an older one, but a fresh one will get you
the best finished product. So joint compound is the next
thing you're going to need. Your tools that you're
going to be using. A putty knife, just
your old basic one. You can use metal or
plastic minus plastic. You want to make sure that
you're cleaning off your tools in-between because
you're gonna get a lot of joint
compound on there. When it dries, it becomes
a little bit chalky and it becomes a little bit harder
to work with putty knife. You're going to want
a palette knife. This will help you do some
other types of texture and it will help just kinda
smooth out some parts. Then this is a new tool
probably for some of you. This is actually like a cake smoother slash decorator tool. But the thing that's
unique about it is that it has these edges that
are all different. So you have a smoother side. Then you have this more square, this more saturated
saw looking one. And then this also is another
kind of saw looking one. This will help you get
different kinds of textures. This one is the
hardest to work with, the square one because
you get gobs of joint compound that buildup here and then they end
up coming through. You don't get that with
this one or with this one. But just if you're going
to use a site like this, be careful with that. So this is a tool that
you're going to need. They come in all sorts
of sizes as well. You can get big ones,
you can get small ones, you can get ones with
different kinds of patterns. Not just the three
that I have on mine, but you're going to
want some sort of texture tool with
different kinds of edges so that you can make the texture in
your joint compound. Next, you're going to want
your painting supplies so that will hold you over
for making your piece. You might think about
some protection that you want for
your environment. Let's say you want plastic. I'm going to have
a piece of wood behind my project
while I'm working. Something to protect your carpet or the area that
you're working in. But protection is always nice to make sure that you're
not making a mess. This project is a
little bit messy, so you're gonna be
ready for that. If you have something down, you also will get stuff on your hands so
you're free to wear gloves if that's what you need and you
have sensitive skin. For painting, you're going
to need some paint brushes. Whatever colors of paints
you're going to use. I use acrylic paint on mine. You can use house
paint because this is joint compound. You
use it on your walls. You can use other
types of paint. You can use chalk paint, you can use other types. But I'm just using my basic
acrylics from my paint stash. And then if you have
a paint palette, you might want to
get that out in case you're wanting to make your own colors and
you don't want to use preset colors
that you bought. One of these is always
handy to have out just in case that will be most of what
you need for your project. So your Canvas, your joint
compound and your tools, your protection pieces,
and then you're painting equipment, and
then you're ready to go.
3. Starting Your Canvas: We are ready to start
with our canvas. So here is my opened
joint compound. You can see that I
haven't used it yet, which means it's fresh. The fresher it is, the
easier it is to spread. So if you have old joint
compound that you were using for a home improvement
project or something? It might be a little bit hard. It won't be as fresh
and as easy to spread. That's not that
you can't use it, but just know that it's a
little bit harder to work with. I'm gonna be using
my putty knife and this is how we
start our canvas. So we're going to be layering that joint compound on
our entire surface. You don't want it to
overlap the edges because that means that
it would be really hard to frame or finished the Canvas later on down the line if you
don't have clean edges. So we're going to try to avoid having a lot of
overlap on the edges. But you're going to do a full layer over
the whole canvas, just taking scoops and
layering it on here. This is not a perfect science. You just need to get
stuff on your canvas. And later on down the line, we're going to smooth it out. So just kind of work to
get it all over the place. There are a couple of
techniques that are helpful. If you go the full line. You'll get a pretty even amount
across the whole canvas. But I tend to do that over
and over and over until I have joint compound
everywhere on my canvas. Let's say you put too much on there and you want
to take some off, you can just gather it
on your putty knife and then scoop it back into the
joint compound is container. So not a big deal if you
start off with too much, if you need to
clean up the edges, you can also do that. But you're looking
for maybe like a, like a penny's depths or a coins depth on the canvas
across the entire thing. When you start to have it more or less everywhere
on the canvas, you feel like you're
doing a good job, spreading it over
the entire thing. You can start to try
to smooth it out. Now, the best pieces end up
with a pretty smooth surface. So as you work, I'm taking off my
extra personally, I always like to start with more that I need
because it's easier to take it off when smoothing then adds them in
different parts. But I'm going to start
turning this back and forth. I have lines vertical right now. I'm going to do some
horizontal ones and try to smooth this
out a little bit. You'll notice that because this is pretty fresh joint compound, I'm doing a pretty good job
keeping this pretty smooth. You don't need to have every single bubble solved
or every single line. So let's say you
want something with a lot of texture on your Canvas. You can leave some of
these lines like this. And you can keep texture like that on
your canvas if you want. That's not the look
I'm going for, but it might be what
you're hoping for. I'm just going to go back
to smooth this out a little bit and getting my canvas
to be a good start. Clean up those edges, especially before it dries. And you can have
those smoothing lines run horizontal or vertical. Whichever way you feel
like is going to be best.
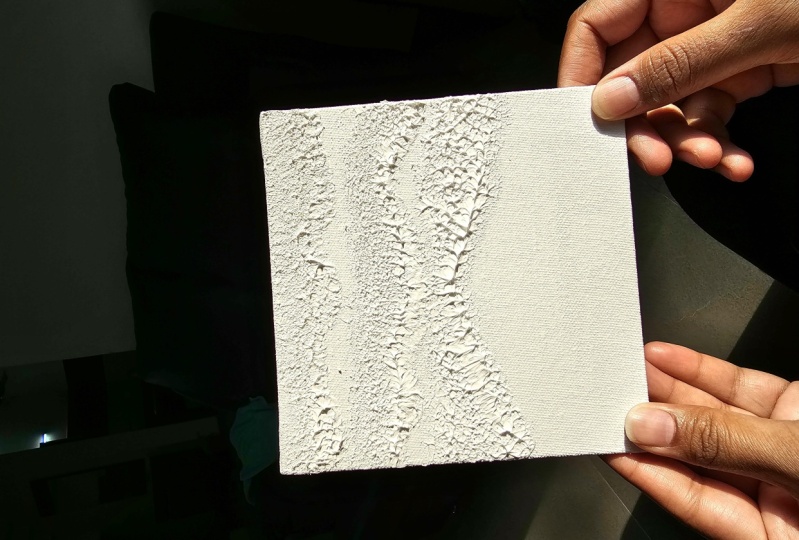
4. Making Shapes: Let's start making some shapes because this is where
things get fun. So I'm going to bring
in my Texture tool. This is my icing decorator. And I'm going to use this
triangular soft edge to start making some shapes. Let's start with a circle. With a circle, what you're
going to want to do is place your tool down and rotate
on one side of the tools. I'm going to hold this
steady and rotate this kinda like a compass works if you've ever
used one of those, I'm going to keep
that one steady. And I'm pressing
down into my Canvas, not with a lot of pressure, but with enough
pressure so that I'm creating all of these lines. I'll continue that
just keeping that middle right where I need it. Well, let's say you're not
super happy with these. You can go back in with your palette knife and just try to even that
out a little bit. It probably won't
be totally perfect. But once you are fully dry, you can also sand
down joint compound and you can go back in and try
to even some of these out. So that's how we make a circle. We, now I'm going to take off that joint compound that
I just got on my tool. And I can wipe that off
on my paper towels. And I can actually, let's say you make a mistake. You're thinking, Oh my
gosh, I don't like this. So you can actually go
back in while this is wet and especially when
it's fresh joint compound, you can go back in
and you can erase. You can basically just restart and say No thank you to
whatever you just made. Go back and remake your smooth outlines
and go forward again. Alright, so next
shape I wanted to do, let's say I wanted
to do an arch. So this time I'm going
to use this edge. I'm going to wipe
this off a little bit so that it's nice and clean and basically just clean off inside of there so
that you don't have little gobs that create
a weird texture. Alright, so I'm going
to use this side this time and we're gonna
see what that looks like. And we're gonna do
a really big arch. So I'm gonna go up
in a straight line. Then I'm going to
start with my arch, which means I'm going to
use this as my rotator. And this side is going to
work like that compass. I'm going to hold that
middle as straight as possible as I go. Now I can come back down
again in a straight line. There we go. Now I've got a full arch, which is kinda cool. Now this one you can see over here it got a little bit messy just because it was probably getting a little
bit full-on there. So what I can do
later is I can go back in and figure that out either with my palette
knife and just smooth it. Or I can let it dry, and then I can use
some sandpaper later. Now, if you plan to paint
your piece afterwards, the paint actually
will hide quite a bit, especially if you're using some cool colors and
some cool pops of color. But if you want to
leave it as is if you just like the white
and the neutral tones, you can leave it
like that as well. And then even out some of the joint compound with
some sandpaper afterwards. Okay, so I'm gonna put this back on so that we
can start over again. Now this is the
most fun part about this whole project is that you can always
go back and say, No, don't just love what I did. And you can start over. Or let's say you're super happy with it
and you're thinking, okay, I'm good with this, and I want to move on and do
a different kind of design. And then you can just
get another canvas. Start all over again. I'm going to smooth
this out one more time. As you can see, I always have my joint compound right next to me here so that I can
clean off my putty knife. If you are feeling like
there's little gobs getting everywhere and you would
rather use some paper towel. You can always wipe them
off on paper towel as well. That's the best part. One small tip for you
as you keep reapplying, your ends might get
a little bit messy. So I'm gonna go through and just clean up those
borders again. Try to make them look
a little bit smoother. Now joining compound will take hours and hours
and hours to dry. But if you're working
on this too long, you're going to notice
that it gets a little bit thicker and a little
bit harder to work with. So you do want to
be a little bit quick in terms of
what you're doing. You don't want to
take forever to make the design that you're
hoping to have. Let's do one more
thing and then we'll start making some
permanent designs in here. I'm going to use this
other serrated edge, does more arc looking one so we can see what
that one looks like. And we're just going
to create some lines. I'm going to just
create some lines here. Part of my tool is
going to start off. Canvas. I'm going to try to hold it as flattened, steady as possible. As I approach the end. As you create lines, if you're creating multiple, you're gonna go in and take off the joint compound
so that you're ready to make another one without adding
more group to your piece. So there we go. There's one more take off that joint
compound that I just had. And maybe I want to make a
little circle over here. Here we go. Here's a little circle. So I've got quite a few
shapes on here now. I've got quite a few designs. I've got some lines on here. I've got my circle. Now, some of these
aren't super clean, especially at the ends here. So I'm gonna go in and see if I can clean
this up. If I can. And it looks a little bit messy, I might just go back, restart. But if you have a
clean enough tool and you don't have a
lot of gunk on there. You should be able to go in there and clean it
up a little bit. So I'm going to keep going. I'm probably going to
change up this design. I'm not a big fan of the lines, so I'm going to do some
arches throughout here. But I think maybe I will just
end this part right here. The part that I didn't love. I'm going to do a big
arch through there. Okay? So I'm gonna go in and
I'm going to come this way. I think. I'm going to make an arch. Alright? So just a lot of different ideas for
designs that you can do. You can do lines,
you can do a mix, you can do all kinds of stuff and just really play around until you ask
something I'm happy with. If you're not happy with it, go back and grab some of the joint compound that you took off and start over again.
5. Other Texture Techniques: I have another canvas that's
prepped and ready to go. And we're gonna do some other
kinds of textures on here, not using the Texture tool, we're actually just going to
be using a palette knife. So one of the things
you can do with a palette knife is create lines. You can just do a
bunch of lines. You can do
interlocking patterns. You might be able to do different kinds of symbols. I don't really know
what I'm making here. I'm just going for it.
But all sorts of things. You can do lines
just with the tip. The other thing you can
do is little indents. So you can do little bits
that are like little swipes. And these might be able
to create a cool texture. You'll want to clean off your
palette knife as you go. But you might be able
to do a lot of rows. Something like this. That could look a lot like
petals of a flower. It could look a lot
like just a texture. Let's say you like
the look of that. And then you want to go back in, kinda clean up these
lines that you have. You could go back in and even it out with something like
your texture tool. So you can do all
sorts of things where you're trying to manipulate this joint compound and create
a design that you love. With the palette knife, you can also do some
swirl motions, right? So you can do
something like that. And we can even that back out. Really, it's up
to you as to what your imagination comes up with in your design since you're able to work and manipulate
for a little bit of time, you can really do anything
that comes to mind. Maybe you really love a pattern like this, where
you're alternating. You want to paint those
different colors. It is really up to you. You can do whatever
you like in here.
6. Drying The Piece: Here are the shapes
that I ended up with. You can see that I've redone, done some swipes with the putty knife here
and here and here. Then on here I've used that Texture tool to
get a full design. The next step in the process to let this dry joint compound usually means about 24 hours to dry depending on how
thick your layer is. You want to make
sure that it's in a place that won't
get stepped on by any pets that won't absorb
anything from the air. Let's say you have a lot of dog hair that falls on things. You don't want it to
fall on your piece. So someplace where
you can probably close the door and let it sit. And then you also want
some where that is level. You could keep
something like my wood behind it or just
put it on a table, but you want something that's pretty level that will
help keep it steady. After about 24 hours, it should be pretty dry. You might notice
some cracks in it. That happens when there's
different kinds of temperatures that it's exposed
to or maybe it's a little bit too
thick of a layer. But you can usually cover
that up with paint. So once you are ready to dry, you're going to set
this somewhere where it won't be touched by anybody. And then we're going to get to painting and finish
this piece off.
7. Painting your Canvas: Alright, so let's
get to painting. I am ready. This is dry so I can touch it. You wanna make sure that if you have anything on your edges, you can break that off. Or you can even take some sandpaper and sand down some of these things if
you want to get rid of it, you can see on down any of those kind of anomalies
in your design. If you want to get
it really smooth, you can even sand
down the edges. If you're going to
put a frame on it, you wanna do all of
that before you get painting because if
you sand it down, it's going to take off
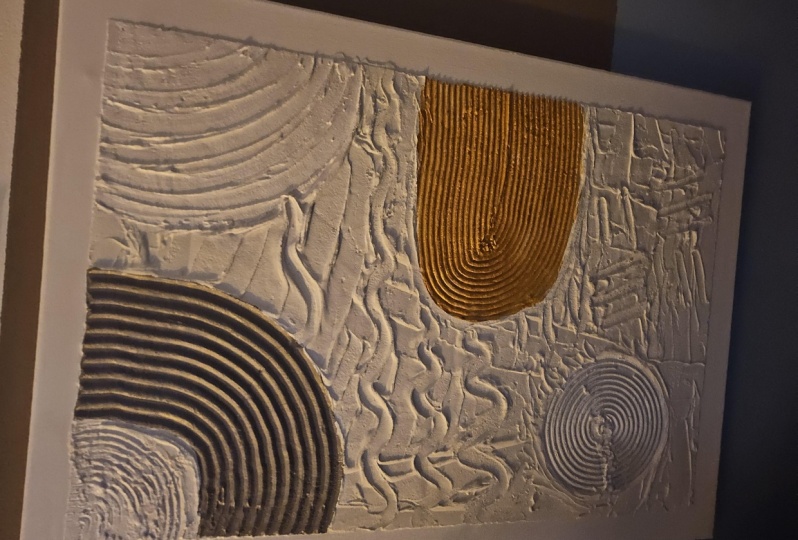
the paint as well. So here's my design. The first thing
that you wanna do is pick your color palette. I've decided that I'm going
to do silver and gold. So those are my two colors. I have these brushes and I'm going to be
painting big blocks. I want brushes
that aren't super, super large because I'm
going to have to make sure that I'm creating
some lines here. You also want brushes
that are in good shape, that don't have things
poking out of it like this because that can get everywhere else and it's
hard to clean it off of the joint compound once
the paint is on there. So whatever you're painting, you want it to actually go
where you want it to go, instead of having it
go somewhere else and try to wash it off because it doesn't come off super well. Okay, So we're gonna
start with some silver. I think what I wanna
do is I want to paint some areas right here
and here with one color. And then I think I want to paint these areas with another. I'll be doing, um, some different colors, trying
to make a full design. Alright, so here, here, here, and here, I think
I'm going to do gold. And then here, and here
I'm gonna do is silver. So I'm going to dip
this in my paint. And I'm just gonna go for it. Different paints will
have different opacities. And you can use different kinds of paint
on joint compound. You can even use house
paint if you want to match it with something
in your house already. Acrylic paint works. You can use chalk paint, you can use tempera paint. Something like watercolors
do not work as well. But there are quite a
few different kinds of paints that you can use. So I'm trying to keep my lines steady within that
line of the texture. And then I'm just
going in and creating a solid coat throughout
the cylinder. So after doing this part, I've decided I need
a third color. So I'm going to use some copper. And I'm going to start
accenting this with a little bit of copper and stick with
that metallic theme. I think when I paint, I tend to have the
color scheme first. Get that ready, and then
I do one color at a time, adding small additions so that I don't overdo
it to begin with. That helps me just take it slow and see what I like and make sure that I
don't add anything. Ultimately, I don't want on there because I'm just
going to do little pops of color on here and finish it off.
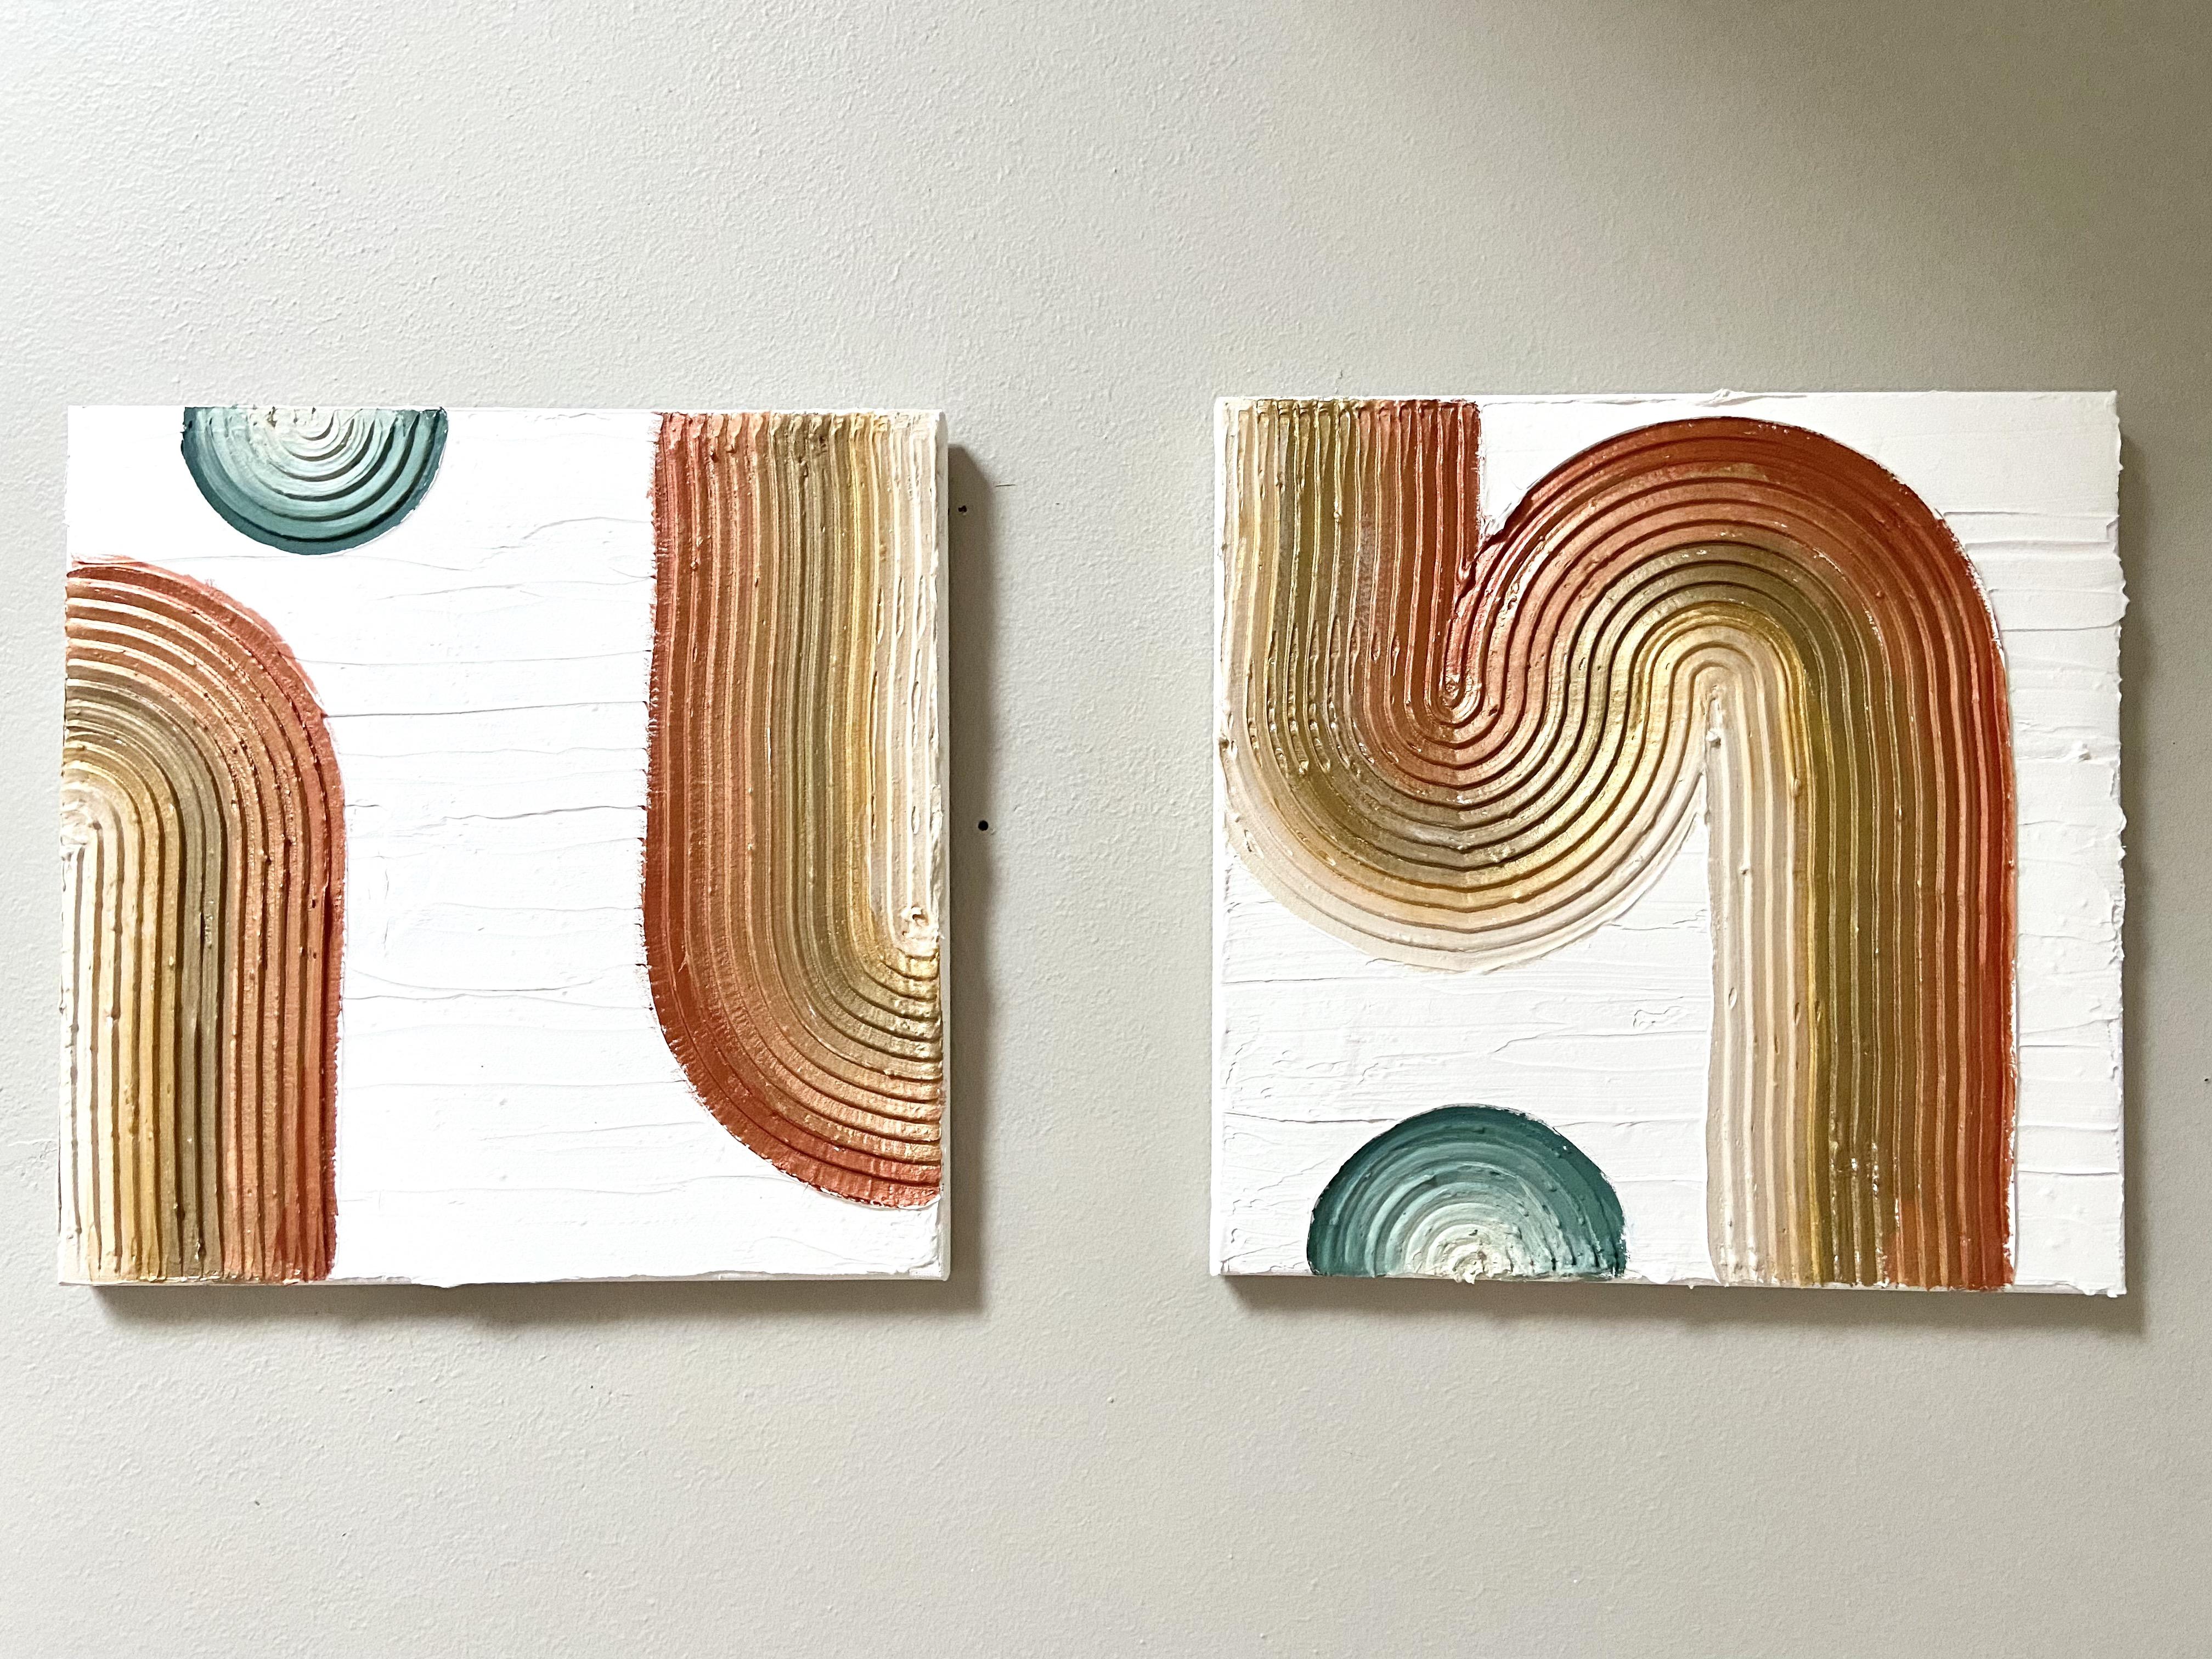
8. Finished Project: Alright, so here's
a finished piece. My final product, this is
one of the ones that I made. Here is the other
one that I made. So I've got two pieces that are ready to go up on my wall. Once you are finished
with all of the painting, there is one finishing
touch you can put on it. If you'd like to paint
the side of the canvas, it will create a frame. I might do it in this
copper color just so it has a little pop of color
on those sides there. But you could also build a frame out of wood to
enclose the canvas. I'm gonna go put this
up on my wall so we can see it in
its final space. Here we are with our
pizzas on a shelf, nicely put together so
that you can see how those designs compliment one another and then
its final space. I hope you really
enjoyed your project. I hope you enjoy
your end result. And please upload a
picture of yours into the project space so that we can see what everybody
comes up with, with different colors,
different designs and different textures. Good job everybody. And I hope you
enjoyed this class. Good luck making more.
 Callie Mac Design, Handmade in Portland, OR