Transcripts
1. Intro to the Class: Hi, everyone. And welcome Teoh textured weaving. I am Cali from Cali Mac Design. And today we are going to be going over some beginner to intermediate techniques that you can use to create a textured weaving. There's a couple of different kinds of stitches that I'm gonna teach you today. I'm not gonna be going over how toe warp a loom or how to do basic weaving. Stitch the over under over under. So if that's what you're looking for, this isn't the class for you. But if you have mastered both of those skills and you are ready to take it to the next level, then we that's what we're gonna be doing today we're gonna be going over the 12 stitch, we're gonna be going over pile, we've we're gonna be going over twining, and then we're gonna finish off so that we have a beautiful texture weaving as our final product. So it should be a fun project. I'm gonna go over the materials that you're going to need. I'm gonna go over the techniques that you're gonna use, and I'm super excited to see what everyone comes up with. So let's get started
2. Materials Needed: all right, so it's important that we all have the right materials to work with. Weeping does take a couple different kinds of fibers, and it does take a couple of extra supplies, so you'll want some warp thread. This is something that you probably have already done if you're gonna be taking this class because you already will have worked your loom. But you will need warp and you will need some sort of loom. I'm using a basic frame loom. You could do a D. I Y loom with a campus and nails. It's really up to you. You'll just need some sort of frame loom. You're going to need a tapestry needle. It's optional, but it's kind of necessary because it's super helpful. You'll want scissors. You'll need yarns of different colors and different weights. I recommend using bulky yarns, but you'll notice that in mine I have used a thinner yarn, but I've doubled it up. So, um, some different options there, but you'll need to some different colors of you are and that you're gonna want to use, and then you're going to want some dowels, knitting needles, something like that. You're gonna want something round and somewhat long because this is what you're gonna use for your pile. We've So make sure you have something on hand like that. Once you have all of those materials gathered together, I think that we are ready to start on. And we're gonna go over how you kind of cast onto the loom or start with your first couple of rows.
3. Twining: First Rows: we're going to start by doing our first row using the technique called Twining. This is where you use a piece of yarn and you're twisting it around these warp threads. It's a great way to start your leaving because it holds pretty strong, and it creates a nice line to start with. You can use just plain leave if you'd like, but this is one that ends up being a little bit more structurally sound as you start to build your leaving. So I'm just gonna loop in this thread this yarn around that first warp string, and this is pretty long. It's about double the length of this weaving, and what I'm going to do is I'm going to twist this in the back. This friend goes to the back, and then I'm going to hook that thread once. There's that twist through the next work string, so it creates this little twist. I'm going to do the same thing, so I twisted. And then I hook the one in the back around a warp thread so it's creating this nice twist. Do it ago. And if you're warp strings are getting kind of weirdly space, you can go back and straighten them out of it. So we're creating this nice to just twist around these warp strings, and this is gonna be the building block to my whole sleeping. So I'm gonna keep going. Okay? So once I'm here, I've done that whole Arrgh. I can either just end or I can keep going. So I'm actually going to do another row back now. It's much harder to go backwards. Well, from, um, right toe left, it's much harder for me. You might find it a little bit easier, but I find it slightly awkward. So this way always makes me think a little bit more. Remember, you're always twisting in the same way. So I'm still twisting towards the back just to remember, right? So there we go. I'm gonna push my two rows together, and this is my first row for my we've or my 1st 2 rows. I'm gonna push this all the way down to this little spacer that I have down here. That's just gonna be my resting spot for all my rows. The ones that I gonna push them down until and if you have this tale, you can then just have that dangle. We're gonna work on the ends after we finish our weaving. So this is the twining stitch. You're creating a nice twist around your warp threads. Those air the verticals and you want to make sure that you have some sort of good anchor to start building your weave. If you want to do plane leave, you can. But this one tends to have a little bit of a stronger hold.
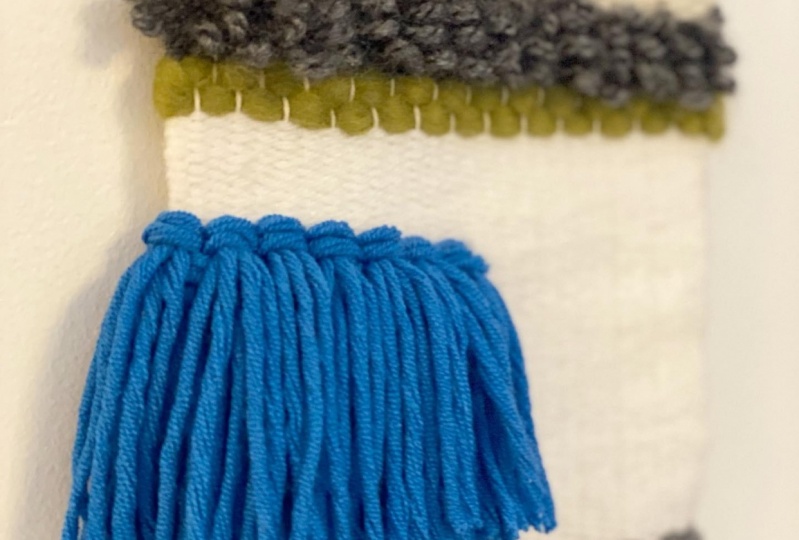
4. Rya Knots: our next addition to our we've is gonna be the Ryan nuts down here, which creates, um, fringe. So, ideally, you can make your Ryan not somewhat a similar length, although you'll probably go back to trim them later. So the fringes all the same. So I recommend using something. I'm using a canvas to measure your fringe length. You could use your arm. You could use a piece of cardboard, but I'm just using this campus and wrapping it around and around, just creating these loops. And you're going to do a lot because every Ryan on is gonna have many different strands in it, depending on the yarn. Now I always use yarn for the EU's 20 um, Rose, that is a little bit thinner, and then I use a little bit figure yarn to create the rest of the textures. The textured weaving styles really work well with bulky yarn, but with thinner yarn intends to be a little bit tougher to see. So I just took this off of the campus just all these loops, and I'm now going to cut them so they just hang crab. So I have a lot of things more or less the same length. I'm going to start creating Ryan out, so I'm gonna use four pieces of this bulky yarn at a time, and I'm going to work into So I'm gonna take thes to warp threads and I'm going to take this end of the fringe and wrap it around and down through those two. And then I'm gonna do the same over here. I'm gonna wrap around and come through down below. Then I'm going to just kind of even it out more or less trying to make it lay somewhat flat up there. And there is my first right or not, you can see it just hangs down below. Great. So that's my first right now I'm gonna put it all way down to the bottom, and then I'm gonna do it again. So I'm gonna take my four pieces, gonna work in my next to, so I'm gonna lay them over coming down and through and come down and through, and that's my second right or not. So I'm now gonna continue doing this all the way around, remember? Lay it over first and then down and through
5. Soumak Stitch: one. My favorite ways to start adding some texture is by using kind of assume, aka variation, which makes it look somewhat like a braid. So I'm going to start kind of like how I did with Twining by creating this loop here. And I have a piece of yarn that's pretty long and I'm going to work from left to right again. And I'm going to bring those two ends around one of the warp threads and then I'm gonna bring both of them through, kind of like a Ryan. Not but sideways. Okay, so I'm gonna bring that whole thing through, and then I'm gonna pull kind of type so you can see that it creates this not here, where it opens up, and then it comes through. So I'm gonna do that again. I'm gonna separate then and then bring those two ends through the middle of it and I work left to right because that is the most natural to me. But you can do this from right to left as well. Normally, when you do some Mac, you're using kind of one side at a time to create that parade. But this you're using both sides at once. You can see when I start to kind of manipulate this and make it even that it's rice to create this kind of braided look. So this is one great way to start adding some texture to your pieces. Okay, so once you have your basic braided shape, you can go back and just kind of even it out. So it looks pretty uniform. And then when you're ready, start pushing it down. It's harder to see right here, but after we start building our shapes, you'll start to see this texture pop out a little bit more as we create the stripes of textures here. So this is assuming variation.
6. Pile Weave: our next stitch is going to be pile, we've. So this is one that creates loops above the warp strings, and it's really fun to add some texture. So there's a couple of different ways that you can do it today. I'm gonna be using little dowels to create those loops. But you could also use something like knitting needles or any other sort of longer a round object that you want, Teoh. So we're going to start with one row of just basic plain weaves. So that's the over under, over, under, over under. You're gonna start with that, and I'm using a new yarn color so you can kind of see what I'm doing here, Paul, all the way to the end. And we recommend using a long strange is because it can be tough to start adding more in once you're starting. So I'm now gonna do plain weave again, but I'm gonna leave it super loose because I'm going to start working in this Dowell. Now I like to just do my plane. We've first and then put the devil in. But you can put the Dolan as you do your plane with, if that's what you want? I'm going to pull this and leave it a little bit loose on that side. And now I'm gonna take my doll, and I'm going to wrap it in these loops that are above the warp strings Already. I'm going to loop it in so it creates kind of a curve around this towel. So I'm basically just twisting it into the parts that are already sitting on top of the warp strings. And this over here is just kind of my extra. If it's not getting tight, you can kind of tighten it as you go. But you do want these to be somewhat uniforms. They don't want to pull super super tight. And you also don't want to lose. Believe it. Super super loose. Now, this pile we've is somewhat of a time consuming one, so just know that it takes a little bit of extra time, but it does add some cool texture. So here we go. It's around the doll that's looking pretty good, gonna even out these ones because they're a little bit looser. Pull it. You do want your ends to be somewhat nice. So you do want to make sure that this end right here. It is somewhat tight. OK, so there's our first pile. We've now to make sure that this is anchored. I'm just gonna do plain weave on top of it. And I'm not gonna work a dowel through it this time because I want it to just be those loops above the couple rows of plain weave. If you do one row of plane plane leave and then you do another row of pile leave, the loops are gonna be all around the same warp threads. But if you do two rows of playing leave, which is what I'm gonna dio you end up having loops that switch off between the different warp threads. So you either have them all in one column or they all end up in different columns that switch off. You don't want to move this Dowell until you have in anger around that pile. We've row. And really, I don't normally move it until I have two rows of pile we've. So now I'm going to do the same thing this way. I'm gonna do my plane. We've but I'm gonna leave it really lose. And as I pull, I'm now going to work in the towel, always working with those that are already lying over the warp threads. Now, one thing about dowels is since it's would it's sometimes a little bit sticky. Something like knitting needles tends to be a little bit easier to push in and then take out for the pile. We've Okay, so I've got to Rose of that pile leave. I'm now going to do my two rows of plain weave. Sure, I'm creating that anchor. And you can decide however many rows you want to put in between these loops, you could do one. You do. You do three it. Really. It depends on how much you want those rose to be spaced out. So here's my second room of plain weave silver and under Over and under. Lauren under. I'm not pulling super tight because I want these edges Do not come in. You know what? Your we've to look like a triangle where it starts to get thinner and thinner and thinner so you don't want to pull those too tight. All right, so there we go. I'm gonna take out my first dowel, so I'm just gonna kind of pull and then press these down and you can kind of see those loops that I've created. So now I'm ready to do another wrote and I have my Dowell to use again. So I'm going to start off with my plane. We've over and under, you'll notice that I'm using a tapestry needle. These air. Very helpful when you're leaving. Not necessary. You can do all of this with your fingers if you want, but definitely helpful. Right? And then start working in from adult. All right, so we got kind of tight over here, so I'm gonna end up pulling thes ones so that it loosens up over at that edge. I don't want it to be super super tight because I don't want to lose this war veteran. All right, dollars in and plain weave. All right, keep going with this. I'm going to make a total of four rows of pile. We've so four rows. This is my own, my third. So I'm going to do one more and keep working on yours, and we'll check back to learn another stitch. All right? So I'm all done with my pile. We've and I'm going to take out my dowels and then you go, You can see those loops started there. All right, So I'm just leaving these ends. You're not gonna do anything with these until we start to finish off our we've. But I am going to do that's Umax variation again and just create a nice straight in between those two. The two stripes of textures we're gonna have so similar to what I did before separating them, wrapping both sides around the war and bringing them through even it out as you need. We're gonna get a nice kind of Breda's a separation of the two stitches that were doing so Next, we're gonna be doing the twill stitch, and it's basically a variation on plain weave. But it does create some nice diagonal lines, and there's lots of different ways that you can do 12 stitch. We're just going to do the basic one. But twill is also what you might use to create lots of different kinds of diamond shapes or , um, any sort of like Chevron patterns so that 12 stitches pretty variable in terms of how you might be able to use it to create the type of texture that you're hoping for so finishing off with this line, pushing it down so that it joins the other parts. You'll notice that when you push down, you start to see this even out a little bit more, so you start to see that texture blended. So there we go. I've got some nice loops down here. From my pile. We've I've got my Semak variation, and then we're gonna start next with the 12 Stitch.
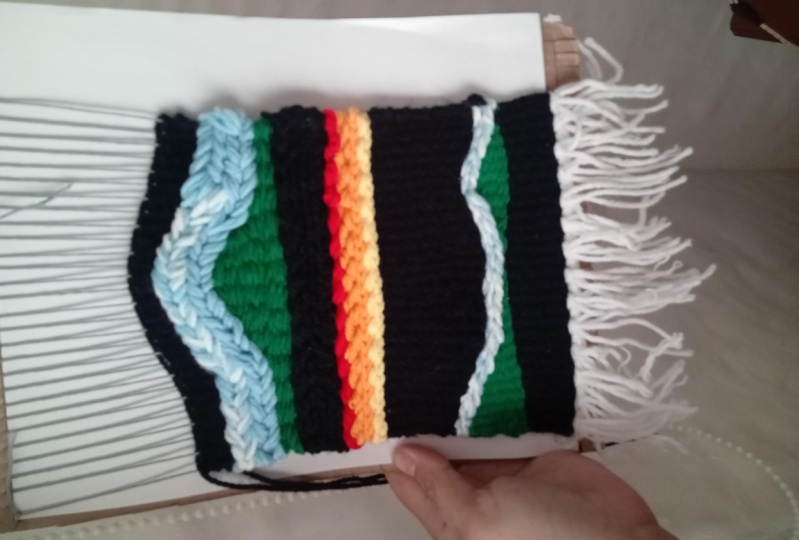
7. Twill Stitch: So we're going to start with our twill now. I'm using a double strand of a thinner yarn. Thistle. At least create some bulk. Um, and the 12 stitches, actually, just a variation on plain weave. You're just going over to an under two rather than over when an under one. So over to under two. And I'm going to just start my first row like that, just following that pattern over to under two. Over to under two. Over 200 to That's my first row. Now, once you do your first row, you're going toe. Always need to switch the warps that you're going over over one. So I'm going at a die. I'm gonna like this. This is what I'm going to start building, which means that these two warps that's where my loop is over both of those. I'm gonna need to have it over both of these. Now I'm switching over one to the left, which means that I'm gonna need to kind of fib this side. And instead of doing my under two, I'm actually gonna go over one under one, because then I can go over to cry, so these sides thes end warps. You're gonna fit those pretty much every time just to keep yourself on pattern. So here we go under two over to under two over two, and then I'm under one right now, so I'm going to pull that type. There we go. All right. And now I'm going to have to fib again. So my over to is right here. I need these to be over to. So I'm gonna go over one under one over to under two, over to under two, over to under to over to. So you'll notice that pretty much every single time you're doing this, you'll do the pattern, and then you'll go back, and you'll kind of fib that side so that you end up with a nice pattern and you can start to see that it creates kind of these loopy lines. All right, so I'm here. I'm gonna need 1/5 this one and go under here so that I can go under and over those. Okay, so I'm fibbing here. I know that I need to be over these two, so I'm now just kind of making it work on that side so that I can continue to pattern. Not always. Perfect, of course. But when you start making this and you have those nice lines, you can't even tell that the sides don't actually fit the same pattern. Right? So I'm going to continue working. I'm gonna continue these lines up. If one line ends at the end here, just pick a new line. Right? So maybe I'll follow this line. Now, I know that those two are two that I need to be over, so I'm gonna make it work so that those are over, so just keep going. Keep doing row after row out until you want to switch. Store next stripe. You want to make a chevron pattern? So you've been doing this one for a while and you want to make it go the other way? You're now going to reverse the direction that you were going when you're jumping over one . So here I have kind of an end, and I'll show you how to work in when you get to the end of your your own how you work in another piece. But these two are over, so I'm gonna know. Move one over to the right and make sure that these two are over. So I'm gonna go over to go over one under two and then over those two and under two. All right? All right. So I'm gonna leave it behind there on that over, and I'm now gonna work in my next piece. Just putting those pieces behind. These two are the unders. So I'm gonna put that piece behind their It'll end up getting those together later and just finish off that road. Okay, So and I got myself jumping to the right now, and here's two that are over, so I'm gonna know that these do need to be over. These two are over. So I know that these dio need to be over time. So I'm gonna go under these two and then over those two. Great. And these two are over, Which means that these two I need to be over, right. So I'm gonna make these two over a swell. I wonder. Two over to under two over to You can tell that when I'm using these double yarns, I'm just kind of flattening it out so that it doesn't have a lot of weird twists. You don't have to do that. but I like it Toe lay flat. So I'm taking the time to do it right so you can start to see that Chevron pattern that I'm going back the other way. So we're going to continue doing that. That stuff. We're gonna do that soon. Mac again. Just create another nice stripe. You can spread out or condense that twill as much as you feel like I spread mine out so that you can see those black warp strings. But if you spread it out, just know that it's not a stable. If you condense your weaving as much as possible, then it's a much more stable peace. So you'll just want to be very careful if you leave it open and somewhat loose. So keep going with that. So Mac.
8. Twining: Open Warp Design: for this next stripe, we're gonna be going back to that twining stitch, and we are going to be using open warp threads to start to create a design. So what I mean by that is thes warp threads. These air the vertical ones, we're gonna leave some of them open, so you're gonna be able to see through them, and then we're gonna be doing a twined, um, like a zigzag pattern to just kind of a great some texture onto that. So using negative space is something that you can also use when you're creating shapes. So normally, Like I said before, when you do your training, you are always going in the same way. I'm usually going to the back when I do it. So I'm gonna start off doing a couple rows of them. But then, at the peak of the triangle, I'm actually going to switch. So this is gonna be kind of where my peak is right here, and I'm gonna know switch. So I'm gonna come to the front Originally, I was going to the back, so I'm now have switching the direction that I'm going, and this is just gonna help me stay on track with which way my design is going. So here's my peak of my triangle right up there and I've done for here and for here. So I'm now going to switch again. I'm gonna go towards the back as I twist. So really, it's kind of hard to see before manipulated. But I'm starting to do kind of a zigzag pattern, and then this one will start coming back up. So you're able to maneuver this. The one thing about doing open warp threads is that they tend to not be super stable. So you just have to be aware of how much you're pushing down any layers you put on top of it. Wait. So there we go. We've got kind of these three triangles here, and we have a bunch of open warp threads underneath it. What we can do is we can add another layer of this so you could do like another thing, Zach on top of this. Or you could do a matching one up here and do the opposite way. You could even start doing some shapes in the middle of it. So lots of different things that you can try to Dio? No. Like I said before, the twining does hold well ish. But when you have those open warp threads, it does get a little bit more unstable. So you just want to make sure you're being careful. I decided that I'm going to do the opposite way. And so going to be using the same stitches, that same training, schooling to sting around those warp friends. So once you've done that, Cemex stitch up at the top, we're gonna go back, and we're going to start layering these back on. So I'm going to do one more stripe of that Chevron twill. And then after that, I'm going to do the same, Mac. And then after that, I'm gonna do the pile week against them. Just gonna build this back up. If you need any help with those ditches, go back to those videos again and re watch those. And once we are done with that, I'm going to show you how to take it off of the loom.
9. Weaving in the Ends: Now that we are all done with the weaving you Comptel, I've done a couple more rows of the pile. We've I finished off with a Su Mac and a twining stitch. We are ready to start taking it off the loom and weaving in the ends. So I'm gonna switch this to the back and we're going to look at what some of these ends look like. You might be able to see that there's just a bunch of extra yarn here. Any time you start weaving in the ends, you're just going to attach one of the ends to one of your needles, and then you're just going to weave it in tow wherever is closest. Now, with these pile weaves, just remember that some of these are loops, so you don't want to pull them too tightly because you might end up messing up some of those loops. And as you start weaving these in, you can tell that some of the ends kind of get tangled together. It's always helpful to then cut the end so you know what kinds of ends you've already put into the weave in which ends you still have to dio So these will be my next to you conduce both of them together. Or you can do them one by one. I'll do them together and I'm just gonna put it right next to this other end. So just put it through a couple of those stitches, always at the back. Pull and trim, Right? So I've got a bunch of different ends to dio you Condell. I've used a lot of colors and I've done quite a few different types of stitches, So this will take me quite a bit of time and definitely not the funnest part about weaving , I have to admit, but it does make it look really nice and a polished end product. So it is an important step, even though it might not be a very fun one. One less note that's really important is that in here where you have the open warp stitches you don't wanna use at that to attach any of the ends, and you don't want any ends to poke out because you'll be able to see them in the front. So try attaching them as much as possible to these two stripes so that you don't have anything here that blocks that view through the warp strings
10. Attaching to a Dowel: Before we attach this straight onto the Dowell, I'm going to fold in these ends to the tapestry. So I'm gonna be doing the same thing that I did with the other ends. And I'm now going to pull them in to this area here using my needle. So I'm gonna take a couple at a time. You'll do groups of three. I'm just going to bring them down. Like I said before, sometimes it helps if these are a little bit longer because otherwise your needle doesn't fit them all. You bring them in, you can kind of even the mouth pull on each of them so that they're somewhat hidden. And then once you're at this spot here, you then can turn them down. So we'll do that for each of these as well. All right, we are ready to attach to a dow, so going to get the down that I'd like and basically we're just going to so on around the dowel with whatever color you want to use. So I think I'll use the white and I'm going to tie right where the end is. E, I haven't tired right where the end would be and now gonna take my needle. I'm going to start sewing it on, so I'm gonna go through it. Doesn't really matter that it's always at the same part, but you do want to make them were or less the same width. I did one here, so I'm gonna go to over. I'm just going in the middle of my Semak stitch. But you can pick where ever you want. We're gonna go another two over. All right? Once we're here, you can just kind of move it around. If you feel like you need to move it over on the dowel, just kind of move it around to your liking, and there we go.
11. Final: All right, everybody. So there is our final product. I have put a little, um, hanger on it, and then I have cut the trim so that it's about the same length. And there's our final leaving. If you ever need to straighten it out a little bit, you can always use a hair straightener, a steamer or something like that to even out the yarn. But there we go. We have our pile. We've we have our twill, we have a twinning, and you have a textured weaving. I hope you enjoyed this class. I hope you enjoy your final product. And if you don't mind, post a picture below of what you make. I would love to see it, and I would love to see what you come up with. Um and I hope everybody had a great time watching this. Thanks, everyone, until next time
 Callie Mac Design, Handmade in Portland, OR