Transcripts
1. Intro to the Class: Hi, I'm Kelly from
Kelly iMac design and welcome to woven
macro many hoops. This is the beginner
class where we talk about very beginner level information around macro me about the
materials that you'll need. And we will be learning, reviewing how to create your
own macro may woven piece. We're going to be
basically using hoops as a loon and learning how to
weave within the hoop itself. So there are multiple
designs that you can make. As a result of this class, you will be learning
how to attach the warp thread to the hoop. We're going to be learning
how to weave within the hoop itself and how
to attach it at the end, we're going to learn
about finishing touches like creating the fringe. And if you want to add something
onto the hoop, you can. And we're going to
talk a little bit about how you might read a pattern in order to
create a pre-made design. Patterns that I've
included here are in the resources part of this class and you're
free to use those, or you're free to create
your own design as well. But we are going to be creating either one or multiple
hoops together. You can create multiple hoops
that are tied together, or you can create
multiple hoops with different designs in them
that are so low pieces, so lots of different
opportunities in this class, it is a beginner
level and we will be finished with a hoop
or more than one. After finishing the whole
class. I hope you'll join me. I hope you learn a lot
and I hope you really enjoy the piece that you make
as a result of this class. Good luck.
2. Materials Needed: Let's talk about the materials that you're going to
need for this project. First things first,
you need a macro, may hope when you look at macro, many hoops, they come
in different sizes. They are talking about the diameter of the hoop
when you look at the size. And I would recommend getting one that's over six inches wide. So I usually use between
810 or 12 inches wide. If you get a smaller hoop, It just means that
you can't fit as much of a design inside. And you might also
want to think about the macro make cord that
you're gonna be using. Because if you use
a thicker rope, then you're also going to
have less of a design. If you use a thinner rope, you'll be able to fit more. But I would recommend getting
an 810 or 12 diameter hoop. And depending on what kind
of design you want to make, you might have multiple hoops, you might put multiple together. You might do different designs and different sizes of hoops, but you can vary your design. You can vary how
much you can fit in the diameter of the
hoop based on the size. So one hoop, they come
in different colors. These ones are nice, shiny gold, but you can find them in
different shapes as well. I've seen rectangles,
I've seen triangles. So you can really
do whatever you would like depending
on what you can find. But when you're using the hoop, you want to make sure that
you will be able to have some vertical threads and
some horizontal threads. So your warps and your wefts, because that's how you're gonna be doing
your woven design. You'll need a hoop. Second thing you're going to
need is some academic cord. So what you're looking for in
your macro may threading is you want the kind that
will fray at the ends. You want them or rope
style one rather than the woven and
a chord like one. Because you want the
frame in order to have the nice fringe on the
sides of your woven design. You're looking for that, that you can kind
of come out and the thread will fray at the end. This is a three millimeter wide. You can buy 234. But like I mentioned before, if you're using a smaller hoop, you're going to want a thinner thread just because you'll be able
to fit more of a design. If you're using a
really large hoop, you might be able to use
some of that thicker thread. This is a pretty easy
project to shop for. You really don't need
too many supplies, but you can accent your design with a couple
of different things. So if you want cool
little accents, you can get little beads or buttons or
something like that, which you might be able to put on a little bit later,
something like this. Up to you. If you want to do
something like that, that's totally optional
and that will come later. The last couple of things
that you're going to need is you're going to
need some scissors. You can tell them mine
are broken from US. But you'll need some scissors. You'll probably want
some good ones with a nice look, sharp blade. Then if you want, I have some resources with some patterns on some
designs that you can use. You don't have to use these. You could do whatever you want
as you make your project. But if you would like
to use the designs, I'm gonna be teaching
you how to read this pattern so you can then
transfer it onto your hoop. After that, it's really up to you if you want to
add anything else, you really just need that hoop, the scissors and the thread
or the macro McCord. I have sometimes used some glue or mod podge just in the knots to make sure that
they don't come on done. Or I have also used the
thin sewing thread in order to put on an accent
like this or a button. So up to you. But you're going to need
a hoop of whatever size. You're going to want your
thread and you're courting of whatever size it is
measured by millimeter. And I am using three millimeter. I'm using three
colors in my design. I have my white, I have my black, and I have my turquoise. But they come in so
many different colors, so you're really able to buy whatever color scheme
fits in your home. Then we are ready to get started once you have all of
those supplies collected.
3. Reading A Pattern: Let's talk about designs. I have included two designs for you in the resources
part of this class. They are made as
patterns on a grid. And I'll teach you
how to read this grid so you can follow
along if you'd like, if you wanna do something
completely different, like on this one, I've used a combination of
different things. You're free to do that because
we're going to just be learning how to set up
your vertical lines, which are your warp threads. And then going back in and
doing the weft threading, which is the horizontal lines. So you'll be able to do
whatever design you'd like. But if you want something
that's already made for you, I have included these patterns. So let's go over how to read something like this
because it looks like a grid and you can see the
different designs in there. But it might be a little bit
confusing to just start. So each of these columns
is a warp thread, that is the vertical. Each row is a weft thread, which is the horizontal. So as you start to
follow this pattern, you're going to see some
are white, some are black. The white part means that
your weft thread is going under and the black is over. You'll notice that
sometimes there won't even be a warp thread depending
on how many you want. For example, you don't
need to have all of these. You'll only need
1234567891011 in order to complete these
nice diamond designs. So you don't actually need all of this if you
don't want to, but depending on the
size of your hoop, you're likely going to have more warp threads so that you
can make a bigger design. You are able to expand these
designs if you would like, if you want to make
the diamonds bigger. But this gives you an
example of how you would do your over and unders in
order to complete a design. So I've numbered your
warp threads down here. If you wanna do
21, then you would have 21 where I've
told you what to do. You are able to have more and then you're going to just complete these designs. So for this first row, you're gonna have
your 21 threads. For this first row. You're going to have
these go under. And then this is going to
be the one that is over. You're going to see
that That's what I've done right here. This black is what
this thread is doing. So under the whole way, under one over, the
whole way under. Next, you've got under, over, under, over, and
then under the whole way. And you'll be able
to see that here. So this second black
thread is under, over, under, over, and
then under the hallway. Next one you're doing the same thing but
you're expanding out. So you have three
in-between now. So you're making the
symmetrical on both sides. You're going to do
under than over. Have three where
you're under again, over and then under again. So that third one, you can see that I've done
that under the hallway, over, under three, over one. And then under again, you'll notice that
as these expand out, you have more overs in a line. And this is really where the leaving comes in
because you're having this nice pattern that's popping out because you are weaving
these in different places. Now you'll notice that
sometimes these warp threads, the vertical ones, we'll
get a little bit shifted. So you can always go back in
and shift them back over so that the design ends up pretty symmetrical and nicely
woven in there. As you can see, with this one. It's going to make
something like this. Something like this is
actually going to make the inverse and look
something like this. So this is actually the back of the design that I'd
already created, but this is what the
inverse will look like. You can tell that instead
of going under the hallway and then over one and then
under some and then over, you're going over the
whole way and then under is where your accents are. So that's what this looks
like. With this design. You're making three
different pyramids. One of them is going
to look like this. Then you're going to shift and the inverse is going to happen. And then the third row
would be this one, but it's going to
lay down in one row. Now this is a pretty
large design. So you might actually
not be able to finish this whole
thing depending on the size of your hoop. But I have included
what you're doing. And then this last triangle, because it didn't
fit on my paper, you're going to go back and
just follow the rest of this. Just make sure that you're
paying attention to these little messages down
here so that you know, okay, well this is where I am. I'm gonna go back up here
and follow this one. Alright, so that's
that one, or this one. A lot easier of a design because you're
just making some triangles. So again, this one only
has 13 warp threads, so it's only 13 across. This would be good
for a smaller group. And you're gonna go under, have one over and
then under again, under and then three over
and then under again. So you're making a nice
block to triangle here. You're doing the inverse. And then you're going to just leave some room
here if you'd like, or you can start again
and make your triangles. So this is an example of what
a triangle would look like. I haven't done the
whole thing over. I've only done three at a time. So three warp threads where I'm going over and then I'm under. And so I've made this
kind of triangle. But if I inverse it, it will look like this. So really, once
you make a design, you have two different
designs on there, the front and the back. You can hang it
with each showing. It doesn't really matter. The knots will just look
different on both sides. And we'll go over the OneNote that you'll be using because you only have to use one for this project in order
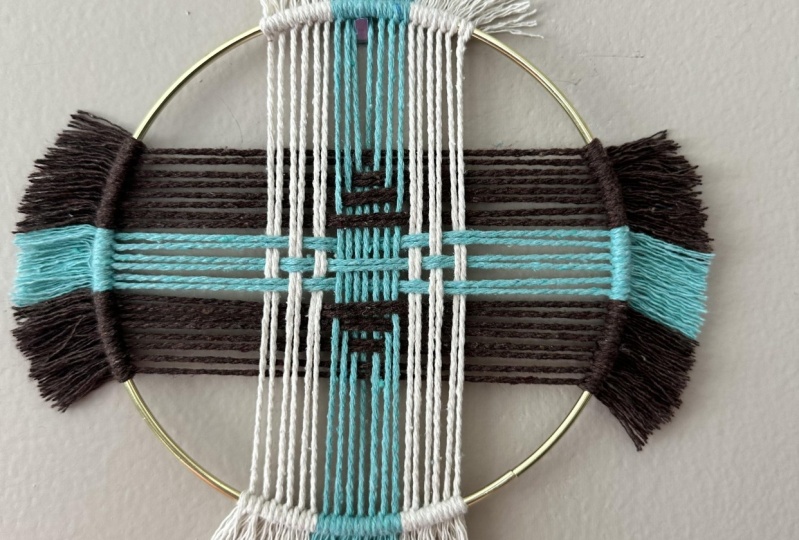
to make it look good. Here's a final product. And that again, is a mix of a couple of
different designs. I've used one of the
diamonds from here, and I've used the concept of the triangles for the rest
of the design. There.
4. Setting the Warp : We are ready to start
putting on our warp string. So I'm going to be warping
with this ivory white color. You're free to choose
whatever colors you want and you can do multiple colors in the
warp if you want to. It's really up to you and the design that
you want to make. But this just gives us some structure so that we
actually have something to weave between when we are
ready to do the larger design. When I'm setting up
my warp strings, I'm going to be measuring
how much I need. Cuttings strips of more
or less this length, so that I'm able to do
multiple across my hoop. This is a time where
you're just going to be cutting a bunch
of different sizes. You are going to
trim these later, so it doesn't really matter if they're not
all the same size. You just want to have multiple. If you want to decide to use one of the patterns that
I've already included, then those have either 13 or I think the other one
was 21 warp strings. So that would be a good
number to start with. But again, it's really
going to depend on how large your hoop is, because that will
help you decide how many warp strings
you're going to need and what kind of design you're
ultimately going to use. Let's learn that not that
you're gonna be using to attach all of your according
to your hoop, you're only going to have
to learn one naught, so that makes it a lot easier, but you're going to do this not repetitively in order to
attach every single end to the different parts
of the hoop for both the vertical warp threads and the horizontal weft threads. So you're going to take one of your strings and you're going to start with it at the
back of the hoop. You want the hoop
to sit on top of the string and you want ends on both sides so that
you can then cut it later to be whatever
size fringe you want. When you're doing
this not you're going to take that one thread, the end, and you're going to wrap it around one
side of the hoop. I'm starting on my right side and just doing a loop
around the hoop. Then I'm going to take that end and I'm going to loop
it around the left. And I'm going to bring the end through that little loop
that I've created on top. I'm going to show you this
again. So don't worry, once you're there, you're
going to pull it tight. Now, this makes a
nice little loop on both sides that you've
pulled your string through. And then at the back you
can actually see that not, but that will normally be
the back of your design. So you won't actually be
looking at that part. Let's do this again, and I'll do a little
bit of a zoom in. I'm starting at the back. I'm folding around and pulling. Now I'm going to
create that loop. Okay? So there's my first loop. I'm creating a little
loop at the top. And I'm bringing that
end on the left. Through the loop. I'm pulling tight. Now I've got two. I'm going to leave
these here for now because I'm gonna do that in a bit to try to make them
as tight as I need them. Let's show you one more time. At the back, I'm going to fold. You can actually go this way
if you want because it's going to be backing up
onto the other nots. It really doesn't matter because you're making it the same way. So I'm just going to keep
doing the same thing, but feel free to
do the other side. Bring it around to the
right and to the bank. Bring it around to the left
and create that loop on top and bring the end
through the loop. And then pull tight. Alright. So now we have
three attached to our h2. Just a couple of tips
for you as you're going. If you do not start at the back of your
hoop all the time. And you're instead doing
your loops this way with your hoop being at the back and you're
threading on top, you're going to get
some weird looking. Knots in there. So you're
going to want to make sure that when you're doing
all of your knots, you are trying to remember that your hoop
always needs to go on top of the thread before
you start looping it around. The second thing I wanted to mention is that you
really don't have to have the same size thread up at top because
you're actually going to be trimming this later. Once you're done with the
weaving portion of the project, you really only need
to make sure that you have enough of an
end on both sides in order to create a nice taut warp thread before you start the weaving
portion of this project. So keep going. Make sure that you have enough warp threads
to start with. And when you're ready, you can start attaching these to the other
side of the hoop. You're going to use
the exact same. Not the thing you want
to make sure is you're going in order because you don't want to
get these crossed. So what I recommend with is just starting with one and
then going from there. So with this one, I'm
going to try to make it as straight as
possible down the hoop. And to me that
looks pretty good. You can see again, the hoop is on top of my thread. And I'm gonna do the exact same, not so turnaround in
one side and around the other side and pull
it through that loop. It doesn't need to be
super, super tight. But you do want it to
be somewhat taught because you want
it to be able to hold this design
without sagging. So you can kind
of pull this end. Hold that, not pull that in. And you're gonna get a
nice tight warp thread. I'm gonna do that again.
Right? Hoop is on top. One side. I'm going to push this side over so that it hits
that other side, around the other side and
pull through the loop there. And I'm going to tighten it
up and push it together. Next one, C, I'm going in order, so little by little, I'm going in order so I
don't get any mixed up. One side. Well through that
loop and other side. So now I've got three
of my threads here. We're going to just
leave these ends. We're gonna do that
at the last step. You don't really need
to do much there. You're really just trying
to create everything inside the hoop before we
start working on the outside. So keep going. And once we have all of
our warp thread setup, we are ready to start adding in some of those designs
with the weft thread.
5. Multiple Hoops: Let's say you want
to start putting hoops together and you want to use multiple hoops and a design, you're gonna be still
using the same, not, but it's going to
look a little bit different based on
where you're at. So I'm going to start
just like we have before with our one
naught on this side here. And pull through tight. Okay. When you're trying to put
multiple hoops together, as you go down the
middle of the hoop, you're going to want to join
these in this same naught. So you'll notice right here at the middle where they join, they're right next
to one another. But as you get further out, you're going to have
some space in-between. So when you're right in the middle where
they're touching, you're going to want to do
one naught around both hoops. And this will help
anchor it together. When you're out here, if you're doing your
warp threading this way, you're going to need
to do one naught here, have a little bit of
space and another not hear the same knot over
and over and over. But just when they join, you're going to want to do
the not to anchor them both. So my both hoops are on
top of my threading. I'm going to go around
one side, one loop. Then I'm gonna go
around the other side. I have my hoop, my little loop that I'm
going to pull through. So this is the larger
version of that knot. And I'm going to pull these, tighten it up so that they are
right next to one another. You can see that this
holds them, right. This is pretty tight. And then I'm going to continue this all the way down the line. The first couple of times when
you're joining two hoops, it does get a little bit tricky because the threading
is difficult to keep straight and the hoops are
moving back and forth. Luckily, once you have
one of your knots done, you can fiddle
with these to make it look like it's more
or less straight. This is one way to join them. The next time that I do this, cut another long piece. The next time I do this, I'm probably going to put another single naught here
and single naught here. But let me show you
what it will look like if you get over here. If you're doing the joining. And you start to
have an area where there's quite a bit of
space in-between the hoops. You're going to do one
not around one hoop. So again, you have the
hoop over the top. You do the one loop. You go around the
other side and pull through the Little
Mermaid and pull tight. So I have this thread and just imagine that there's
multiple here, right? So these ones are
gonna be joined. And I have this little area now where it would
be weird to have a single knot here because
it would just look like way too large
to cover this space. So I'm going to leave this as just a normal
piece of the thread. And then I'm going
to go, so back in. And I'm gonna do a second
not on the other hoop. So I'm going around, I'm gonna go around this side. And I'm going to
pull tight here. So now I've got two
different knots. And this creates another
little woven piece. There's nothing that you
really do with these because it's hard to
weave through here. But it does make it look
a lot more uniform. If you are trying to
join groups together. And then you'll
finish at the end. You'll bring that red down and you'll do I'm not at
the end and pull tight. So as you start to
join your hoops, you're going to have
multiple threads that are maybe overlapping both hoops at the same time to join them. And then you're
going to start doing knots where you have
one on each tube and there's just this
little space in-between where you have your
normal threading. This will create a
nice work for you, for you to do multiple
different hoops at one time you can join as
many as you want, really, but you wanna make sure
that you're cutting a lot longer of chords so that you have enough room to do all
of the different knots. As you add multiple, it tends to get a
little bit more complicated and a
little bit harder. This is how you can start
to join them and have a nice line of hoops with different designs
inside of them. It can create a
pretty cool effect. And you can use different
colors and the different hoops. You can do different things. But this is how you can
start to join them. You can either have them sit horizontally or you can
hang them vertically. Once you're done, you can
really go either way. But the multiple hoops look is pretty cool once you
get it finished.
6. Weaving the Shapes: We have finished with
our warp threads. So we have the structure
to start doing our weaving and we are ready to start putting
some shapes in here. So you might have a plan
as to what you wanna do, or maybe you're using the
pattern that I gave you. I'm just going to start and we're going to
see where this goes. So as I think about what I want, I already have this one made. I want to keep more or
less the colors in here. And the same kind of
idea of a design so that I can have these two
together as a set. So what I'm gonna do is
I'm going to actually start with some black here. And I'm going to create some
more of these diamonds. I'm going to cut a bunch
of different threads. You will likely need multiple of a similar size in order to start doing some
of these shapes. And I'm going to
do the exact same. Not over here on the Horizontal. Now let's say you're working
with a rectangular hoop. You're going to start
doing the opposite, the perpendicular of whatever threads
you've already made. If you're using a triangle, that one tends to
be really difficult because it's hard to get
a perpendicular line. So if you need to
add some structure, you can add some
knots around here. I like to leave some of the hoop empty just because otherwise it looks
more like a wreath to me. But if you want to
add some threatened here and you want it to
have some structure, I can show you what
that would look like. Basically what you're gonna
do is you're going to take a little loop here. And you're going to thread
the loop under and bring it around the top so that you have just a basic
hanging not there. This will create some
more structure here so that whatever
threads you put here won't start creeping up. But it does make the
whole thing more full. So you don't actually
see any of the brass. If you're working
with a triangle, Let's say you might have
to do this in order to create some structure for you to have some perpendicular
threading. But this is just
an optional thing. If you want to add that
structure on there, I can show you that again. You're just making a loop with the smaller piece of thread. Again, putting it around
the back and pulling the ends through the loop
there and pulling tight. And that will add a little
bit more of a wreath. Alright, so I'm gonna take that off because I'm
not going to use that. But I am going to start
with my weaving here. I'm going to put my not on here the same note as we've been doing
the entire time. And now I'm going
to start weaving. So this is where I decide
what do I want to do. And I'm thinking
that I want to do the inverse of what
I've already done. So I'm going to actually put my, my weft thread over and I
need to find the middle here. Alright, so this is the middle. So I'm going to put this under the middle and have it go over. Now, when I start
to weave my shapes, I would recommend not attaching one of the sides until you're done and happy
with the shape. That way you can
always just take it out and redo it as you need to. And it makes it a lot
easier in case you mess up. Because sometimes that happens, we all know that as you go, you're going to just attach
one side of the knots. And then you're
going to just leave the other side loose so that you have some flexibility in case you don't like how
things are turning out. So basically I'm just
weaving this in here. I'm starting to create a design. And I'm trying to go for a nice triangle,
kind of diamonds. And the way that I
did this one was that I would have
three at once, right? So I have two MCs before
I have the three. So I'm going to try to
maybe do the same size. I'm going to every single
time I'm doing one less. Right. So this one, I had all of
these that I went over. The next one, I had one less. Then this one I'm going
to have another one. And I hope for here that I'm under and it's
going to have to be five. So in order to keep that
same shape where I just have to empties in-between
the over-under. I'm going to actually go over
one in the middle. Okay. You can probably start
to see what I mean here. I've got over the whole thing and then under one
and then over, over one, less under three, then over and then over
and then under two because the two is really the separation that I
had in the other ones. So I know that it will
create the same size. And then I'm going
to go one over and then two under and over again. I'm creating the inverse of
the design that I already had in my other hoop for this
set, attach one side. You can kind of tell
that what I'm doing is I'm creating something
like this where I'm over, under, over, under, over, over, under, over a bunch, under and then over
buttons, right? So I'm creating this one. Alright, here we go. I'm gonna go over and then I'm gonna go under the two, right? Because that's my separation. I'm going to go over three, under two, and over three again. Hopefully you're
understanding what I'm doing here, right? It makes more sense the
more threads you get. And as you, as you go, if you're not
attaching these sides, it means that you can
see what you're doing, which is really, really helpful. I'm going to continue
with this and keep making this design as I go. I'm going to remember a
couple of rules here. I'm always going one
less on the one side, and I'm always using two as my separation between my
renders on my triangle. Alright, so I'm going
to continue with this and continue
building this design. I've now finished my whole
black diamond design. So I'm going to start now on the Aqua that I'm going
to do on the sides here. And I'm just going to continue doing just the
one side so that I can start to make this design and make sure that I like it
before I actually attach it. And I'm going to do
again the opposite. You might notice I liked
doing opposite designed. That way it kind of
evens out the threading. It compliments each other
without being the same. But we're gonna do some
small little diamonds on the end here. I'm going under
and then over one, under, one over one again. So what I'm gonna do, I think is I'm going to
plan on doing a design like this with the small little gaps in between the lines here. As you add your accent colors, you're going to notice that sometimes this is
getting kind of full. So you can always tighten it and push those knots altogether. That will help keep it a
little bit more condensed. And you'll do the same once you do the knots
over on this side. You don't have to use different colors if
you don't want to. Um, but you can, if you do want to, I think the multi-color makes it look a little bit more
visually interesting, but it does get a little
bit more complicated. So it's up to you. If you want to do that. If you don't want to, then you can just do
different designs with different overlaps on
the work threading. You can also use your warp
color as a weft color as well. You're not limited to
what you're doing. I'm really liking
the look of this. I'm going to add another one
of these over here as well. But I'm going to
start actually doing the knots for each
of these designs so that I can get a better idea
as to how this is laying. So I'm gonna go one by one. Again. I like to start in
the middle just so that I can go one thread at a time. And I'm going to
start to put these into the same knots as we've
been using the entire time. And I'm going to try to
pull these pretty tight so that I can arrange them
how I like them on here. You'll notice that your
design is going to start to get a little
bit messy looking. But just make sure
that as you go, you are trying to do each thread in its order so
you don't get messed up. Again. You can always not these
as you weave them. But I like to do it a little bit later just so that I know that I liked my design
before I make it permanent. Once you put all
these knots on here, it becomes a lot harder. Undo a design, even
though you can, if you have a
needle or some sort of like tapestry needle, you can usually
undo the knot and then retire later if you want to redo
something on that design. But I find it easier to just do all of the designing piece, do the shapes, and then start to do the
nodding afterwards. As you go, I do recommend
going back in and just evening out the strings as they start to get a
little bit more taut, you're going to want
to go back in and make them sit a
little bit nicer. Have them sit a little
bit straighter. So that is the next step is starting to do the
knots on both sides. I will eventually do this other side over here
so that it's symmetrical. But when you are done
with your weaving, you can start to attach
them on the one side.
7. Finishing Touches: Alright, so my whole
design is done, and I'm about ready to put
on some finishing touches. Before you start
cutting the fringe, you're gonna wanna
make sure that this design is looking
like how you're hoping for and moving around some of the strings to
even out the design. You can also since the sides
in so that you're trying to get a compact weave
everywhere on the hoop. Once you are ready, you feel like it's done. You're liking how it's looking. You can start to cut the fringe. So when you cut the fringe, you're going to cut off
some of these excess ends. And you're going to want to
cut them a similar length, even though you'll
go back through once it's on woven and even it out. So you're just
going to start with as trimming the beginning. Then if you have a comb
or something like that, it tends to be
easier to start to unweaving these with some tool. I'm just going to
use this stick for now and start to weave this. You can do it by hand. You can do it with a needle. You can do with a comb. But it tends to go faster if you're using
some sort of tool. So you're gonna start to
weave these like this. You're going to go through
your whole design. All edges. And then sometimes I use a straightening
iron or a steamer to get some of the
kinks out because you can see that it's kind of wavy. Or you can just keep combing it until you
feel like it's straight enough and then go
back through with some sharp scissors and cut the edges to
be a similar size. You can see on this one, I have an woven at all, right. So I've gone through and
unwell woven and then I code. Take your scissors
and you're basically cutting around the
whole thing in order to give the fringe of very similar size and length throughout
the entire design. These are gonna be my
two designs together. So you can see that
they compliment each other without
being totally the same. And I'm going to
cut the fringe on this one with a very
similar size to this one. Let's say you want to add in some sort of fancy
addition later. Let's say you want to add like a button or maybe you
have something fun. Here's a bunch of
writing stones, right? You can add those on later. And I would recommend just
using some sort of thread to tie them around
your warp threads. You could do weft threads to, it really depends on
whatever you feel like would look good
with your design. Maybe you want some sort
of matching design, right? So it's really up to you
how you end up doing this. You want to make
sure that as you start to do your
finishing touches, you're moving around
your strings to try to relieve it so that it
looks pretty uniform. You're starting to get all of the fringe on woven and
cut to a similar length. And then you're ready to hang
it once once you're done, I use just a nail. The nail through here
and hanging on the wall. But you could also use any
sort of picture hanger, or you could tie a little
bit of thread around it and make a loop to hang
it from really up to you. I'm going to continue with
my French and I hope that yours is turning out in
a way that you love. Race. Almost done. The cutting of the
fringe is the most tedious and the most messy. So if you need a vacuum or something that does help get the little bits that
you are cutting off. And here is my finished piece. I have this one. And then it will come in a
set with this one as well.
8. Finished Project: We have reached the end of
the class where we get to see the final piece up on the wall. You can see that I've attached
it just with a nail there. These are pretty light so
you don't have to worry about anything that will
hold a lot of weight. If you're making
a set or even if you have multiple hoops, you can decide how to hang them. So you might do the same warps so that the patterns match. Or you can even do
it the other way. If you have more than two, you could do more on your wall. But let's zoom in a
little bit to get a close-up of some of that
awesome weaving work. I'm hoping that you're totally
loving how your piece has turned out and that you learned
something in this class. If you want to share a picture
of your final project, the final piece that you made, please do so and upload it to the projects gallery page
so we can all see it. And I hope that these brighten
up a wall in your home. Thanks so much for taking this class and good luck
making these in the future.
 Callie Mac Design, Handmade in Portland, OR