Transcripts
1. Introduction: Hi everyone. I am Cali from Kelly Mac design and welcome to weaving basics. This is an introductory class to the weaving craft. So we will be going over all of these things that you need to know in order to start weaving as a hobby, we will be going over how to warp alone. So how to put the vertical threads on the loom? Well then go on to how to cast onto the loom using the twining stitch. Later I'm gonna teach you how to do plane wave and then a variation of plane wave, which is a two tone we've called the pick and pick. And then after that, we will be taking our final project off of the loom, weaving in the ends and finishing it off. And our course project for today is a super fun when we're gonna be making this cute little coaster set. They're woven coasters that you will be making one in the class, but you'll be able to then use those same skills to create another, however many you want for the set. Or if you're more interested in doing something like tapestry weaving or bookmarks or something like that. You can use the same skills from this class to make that as your next project. So I hope that you find that you learn something in this class. Like I said before, this is just the basics. So this is really getting to know how to use a loom and how to do a nice, clean, plain weave. And then also how to add in a little bit of fun color with a two tone pattern. So we'll start off by kind of going over the materials that you'll need. Then we'll go over all of those three stitches that I talked to you about. And after that, you will end up with a cute little coaster set. Let's get started.
2. Materials: All right, so as we start weaving, it's really important that we have the right materials. You wanna make sure you have the right weights of yarns, you have the right tools, and you have a really, really good pair of scissors. So first of all, you're gonna need a loon. Mine is a basic frame loom. It's quite large as 16 by 20, but yours might be much smaller than this, that is totally fine. You just need to make sure that there's enough warp string excess that you can actually make those ties at the end. So you'll need a LUMO of some sort. It could even be a handmade loom with nails and a Canvas frame up to you. You'll also need some work thread. I have white. I recommend using one color that kind of goes with the yarn colors you pick because you're gonna see the ends as kind of a fringe at the end of the coaster. You're going to need your yarns. So I have two colors. I have a gray, turquoise, and then ivory. And I would recommend having two more contrasting colors because then you see the pattern of the pick and pick really nicely. And then these yarns are not super thick. They are not bulky yarn this, they're not super, super thin either. But you'll want kind of a medium weight yarn. I have a comb to just kinda bat those rows down. And then I have some tapestry needles, which are really, really helpful. They are optional, but they make things so much easier if you have something like this. So a tapestry needle is a good thing to have around. And then lastly, like I said, a really good parents scissors, you're going to want something that cuts super, super nice and clean. So those are your materials that you'll need. And once you have all of those, we are ready to get weaving.
3. Warping The Loom: To start out with your projects, you're going to want your warps string and some scissors with your loop. And we are going to warp our loom. When I say warp, I'm talking about the vertical strings. The weft strings are the ones that go horizontally. So if you hear me use those words, that is what I mean by them. With the work string, I'm using just a theme cotton one. This does not have much give to it. It's not very stretchy at all, but it is quite strong and will hold nicely. So you're alone, might be different than mine. Each room has its own measurement about how far apart these little notches are. So I'm just going to put ten loops, right? So I have 20 warp strings. And that's going to measure about 3.53 inches wide. So depending on your loan, you can make your coasters the size that you want based on the width. Keep in mind that sometimes as you weave your Warp strings to, if you're not getting it enough, slack when you pull it through, will start to go like this and you don't want that to happen. So you're going to try to make them pretty tight, not super, super tight because they do need to have a little bit of give for the material in the yarn to go through them, but you don't want them to be so loose that it's so easy for them to do this while you, we've, so I'm going to tie this off here. Just a basic tie. All of this stuff gets cut off after when we take our project off of the loom. So I'm just gonna do a basic not. And I'm going to bring this around. And I'm going to start doing it ten loops. So there's 12. Okay, so that's 12345678910. So there's my 20 warps strings. And you're gonna wanna tie off exactly on the same side that you tied on to. So I'm going to just kind of roll this up. This is my work thread. I'm going to kind of roll this up and use this as an anchor below here. As I kind of tighten these apps, I'm just gonna pull em a little bit tighter. You can tell over here they're kind of loose because you can pull them down quite a bit. So we wanna tighten those up a little bit. So I'm just gonna kinda go one by one, go through and tighten them up. Like I said before, you don't want them to be really, really tight. Because that way the yarn that goes through for the weft strain and that is going to be a very, very difficult to weave through if they're already too tight. You do on a little bit of give, but you don't want too much. So once I'm done, kind of tightening those up a little bit, I'm going to just kind of loop this around in great here. And then cut off enough for me to tie off over here. And like I said before, these are just very basic. Knots. Does not need to be anything super, super fancy. If you know some fancy naughts, that's cool, but I just use very basic ones. The tying off is definitely the hardest and you can play around with whatever works for you. But you do want to keep it as tight as possible as you make your not I'm rate. So there we go.
4. Twining: Once we have all of the strings warp to, we are going to take some of our yarn, whatever you want the color to be, that's going to be at the end of the coaster. And you're going to be needing a length that's at least maybe four times the size of the width of your coasters? My co-stars or about 3.5 inches wide. So I'm going to be doing about four times that. And to cast onto our coasters, I'm going to my loom 20 inches tall. So I'm gonna do to coasters on this ten work thread. But if you wanna do multiple, you can either do two columns of the rows that you're gonna be using or reward and do another coaster at each time. Either way works. So to cast on, we are going to be using the twining stitch. And there's a lot of different ways to do this, but this one is just the easiest one for me. You're gonna take your string and halfway, you're gonna loop it around your first warp string. Right? So you're gonna loop it. Then you're gonna take each one, each end and your hands, and you're going to twist them on top of each other. Now, once you have a twist, you are then going to Luke, one around the back. Okay. Now I'm gonna take this again on my hands and I'm going to twist, right? And I'm going to loop this one in the back. So every single time I do this, I'm twisting it the same way. So my twist, it looks like this. And I'm just using my hands to twist it. Once I have a full twist, I'm looping around the back. And this is called twining. You can do this with a plane wave stitch and then go back and do the curve. But this is just the easiest for me as I cast on. The way. The reason why I use this stitch is because it's a little bit more structurally sound than a plane wave stitch. Plain weave can fall out a little bit easier than this one. So this one is a great way to start a structure and align for your coaster. This is also the way that we're going to end. Our coaster rates are two ends look the same. Okay? So once we're here, you can see that these ones became a little bit more closer together than these ones. I'm gonna go back and I'm going to try to even these out a little bit. So even though this is a pretty structurally sound stitch, there is some flexibility here. And I'm gonna try to get it to look like every single warp string is about the same with the part. And that looks pretty good to me. Once I'm here, I'm actually just gonna tie this. This is something I do. I actually just tie this so that this one kind of looks like it's about the same width. And we can kinda PUT this down so it makes a straight line. You could put a spacer in here if you want, like a piece of cardboard. But in the end, even if you don't use that spacer, and we're going to be able to use a ruler to just kind of pathways in, make a straight line. And then when we tie them off, it will also add to the look of the straight line. So that is how we use twining to start our coaster.
5. Plain Weave: We have our twining stitch here. I'm going to just teach you quickly how to plain weave. Because we are going to be doing a variation of that for our coasters, you have the option to do just a plain weave. Especially if you're doing a yarn that's dept and died in multiple colors, plane wave can still look really cool with a different colours. Otherwise, I'm going to teach you a variation of plane wave using two different colors, which is called the pick and pick. So for a plane, we've, I'm gonna take my tapestry needle here. And I'm just gonna do the basic over under, over, under, over under. And I'm saying over when I go over the warp thread and then under when I go under it, right? So I'm just doing the basic pattern of over under, over, under, over, under, over under. So you can see that I'm alternating every single one. And I'm going to pull that tapestry needle through. And with plain weave, you're gonna get just kind of this end. And you're just going to leave this here. You're not going to do anything with this. So we're just gonna leave that there and we're gonna pat that down. Okay? As you do the next row, you're OK, you're alternating. So I'm gonna go over the ones that I went under. It was under here. So I'm gonna go over this one and then I'm gonna go under the next one. And so I'm alternating. And sometimes I use my finger to just push the over's back so that my tapestry needle glides through. You can use a tool for that too. But with coasters, you don't necessarily need to because it's pretty short. Okay? So when you're here with that loop, you don't want to pull it super tight rate because that was what I was telling you about. When you're warp threads start to get kind of triangular and it gets skinnier and skinnier and skinnier, Izzy, we've, so you wanna kinda leave this loop. It's helpful to create, I know by arc shape. And then when you have that arc shape, then you kinda had it down. And that will help you not get that triangular look where it gets skinnier and skinnier and skinnier. Okay, I'm just leaving my ends out here for now. We're going to tuck those in at the end. So I know it looks a little bit messy as we begin, but that's just kinda how it goes. I'll do one more example plainly for you. So this one is an under. So I'm gonna go over that one under, over, under, over. Use my finger to push those back. And one thing about weeding that's really nice is that if you look at your row and you have a mistake, it's very easy to just go back and weave and then relieve. Approaching that loop. I can make that kind of arch, makes sure that my ends are sensing it in. And then pad it down. And then this is the look of the plane we've paying little by little as you playing leave, you're gonna kinda pat it down and then it ends up kind of blending in, say You can't see those warp strings as much. But this is just the basic plain wave over, under, over under. Make a loop opposite for the next row. But try to do that arc so that you don't get your Warp strings headed inwards and getting skinnier.
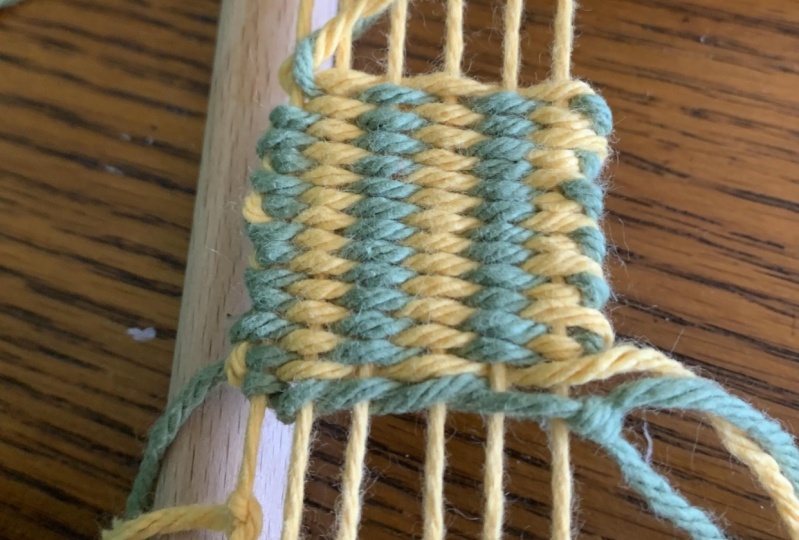
6. Pick and Pick: Once you're done practicing plane wave, we are ready to start on our next variations. So for this one you're going to need two colors. And for the coasters, I've been using a thinner yarn. It's not super thin, but you'll want something that can lay pretty flat. And that when you talk to the ends and at the end, they don't make the whole coaster kind of stick up at them. So, so you wanted something somewhat thin. And I'm gonna take my two colors. I took about like 34 arms length worth. And I'm going to put my tapestry needles on. And we are going to be doing a technique called the pick and pick. So the reason why I did such long, I'm trying to unwind it here. Such long strands of yarn is because I don't want to run out in the middle of the coaster because then I'll have to tuck in some more ends and it will have a little, little bump in the coaster. So I'm gonna try to make the coaster with just these two strands and no other ends that only ends will be on the corners of the coasters. So I'm gonna start going this way and I'm gonna do my plain weave. So that's the one that we just practice. The over, under and with the twining that's there. It doesn't matter which way you start. You can start under or you can start over. So with this end, you can leave it out. Or if you want, you can always ticket through. Because like I said, it doesn't really matter. Okay? And that's going to be your first row, right? So once we have our first row, I can kind of pat it down now with the second color. Okay, and you're gonna be coming the other way. So with the gray, I came this way with the white. I'm gonna go this way and I'm going to start doing plain weave, like what I would've done for the second row. So I'm alternating, I'm going over on the ones that are under, I'm going under on the ones that are over. So I'm doing a plane. We've just like it would have been my second row if I did it in gray. But I'm doing it in white. So I'm gonna take this through. And once I hit my end, she's going to kind of leave it there. Okay, so this is the way that we start to do the pick and peck. So I have my first row of each color. I'm going to now go back to my gray and I'm gonna do clean. We've again, okay. But this gray piece here needs to lock this white place into place. Okay? So it needs to go around it so that it locks it on there. Now I'm gonna do my under overs again and pull it through. And you're going to kind of see what I mean here. So with this loop at the end, you can see that this loop is now going around that white piece. If it didn't do that, this white piece, I can show you by taking it out. If it didn't do that, this white piece would just be here. And when I pull the grey, it's going to pull it through this string. So what we want to do is use the previous color. Use that as kind of an anchor so that the loop at the end always stays at the end. Okay? So this loop is now holding that whiten Place and the White is also making sure that that loop doesn't go in past where we want it. Quite. So next we're going to do our white. Again, it's just like plain weave, just like I would have done this row even if I was doing it in grey. You're gonna pull it through. And you're going to see that this loop again is holding that gray in place. Alright. So I'm still kinda using this arc and then putting it down. So what you get is you start to get some rows with these kinds of diamond shapes. So these white ones will always be here, and then the gray will always be here. So it'll be kind of like diamonds striped vertically as you start to build this. So time for the Gray Again. We're going to start with a plane. Leave my similar to what we would have done even if it was the white. So this is called the pick and pick your using a plane. We have stitch and you're doing all the plain weave rows. You're just using two colors in order to do it. Alright? And then you get this nice ends. When you do this nicely with these loops, you get these nice ends where the colors are switching off. And it's still a nice clean and to the coaster. Okay. Alright, so I just did the grey, which means I need to do white. And it's definitely possible that sometimes your urine gets mixed up here, which mine is doing right now, so I'm having to go around it. Okay. And going to again, make sure that this is holding in place. Maybe it's looping around the grain and I'm gonna do my plane leave again. All right, so you're gonna wanna continue this all the way up until you get however big of coasters you're wanting to make sure that as you go you're warp strings do not go like this and start to get tighter and tighter together. And then you might also find that as you go, these inner strings get a little bit more tight because there's things being fed through it. So after a while, after a couple of rows, you might just wanna go through and kind of even them out again to make sure that they're always at about an equal in equal length apart. Ok, so keep going with this. We're gonna do this probably up until maybe 3.54 inches, 3.5 crowley long. And then that will be our coaster. We can also repeat this over and over and over. So once you have one coaster done, I'm going to be doing a second one up at the top of my list. But you are free to just do the one. We'll take it off the limb and then you can make another. So keep working. And we'll check back. Once orchestra's pretty much done.
7. Twining (again): Alright, I'm finishing up my last row here. And that is not linked. So I need to put down through the light and then the gray. So this is my last row. I'm gonna make sure that those ends look good to me. And then I can start again with my twining row. So we're gonna do the exact same thing that we did down here to cast on. And we're going to be doing that exact same thing up here to finish off. So taking my yarn, I'm going to loop it around this left warp string. And then I'm going to start twisting. So I'm going to bring this into the back. And then once I have that twist and we're going to hook that swung around and pull it through. And then again gonna twist and then hook, that's one around the back. So that in between each work thread here as one twist. So I'm gonna keep going with them. Okay, so there we go. We have our ends over here. We've got loosens over here. And we have one coaster we've finished off. The coast are on both sides with this twining, so it's got a nice structure to it. And then we are going to be folding in the ends. A little bit later. I have a larger looms, so I'm going to be building another coaster up here. But if you just have one and you are good to go, then we are now going to learn how to fold in the ends and take this off the loom and tie it together. You will end up having little coaster that looks like this. And you can see with that pick and pick stitch that you have your rows of ivory and gray for me and whatever two colors you ended up picking for you. So this is what the ending poster will look like once we take it off the lymph.
8. Cutting off of the Loom: Once you have your coast are all woven and done. This is the back of my Lume. Now I've turned it over and I'm going to start tucking in these ends that are just kind of hanging off to the sides? No. Originally I had told you that it's really great too. I'm kind of even this out with a ruler or something like that. So you can make sure that whatever kind of tool you have on hand here, just kind of evening out this line. I just have a column. And then what we're going to do is start weaving these in using our tapestry needle. So this is when our tapestry needle is really quite helpful because we can get through some of these stitches. And ideally, we only have ends on the four corners. If you have one in the middle because you ran out of yarn or something, you want to tuck those in as well. But ideally we just have it on the four corners. So there's one. And I'm just putting these through a couple of stitches. And then we will cut them. Cut whatever is left here at the end. So this is my favorite reason to have a tapestry needle around it makes it so helpful and it really does make it way, way easier to do this. Alright, so there is not one. And I'm going to just continue doing this around the coaster. Once you're done weaving in those ends, we're going to cut these as close to that woven in area as possible. And this will make them look a lot more finished on the back. So there we go. There's our woven back of a coaster just with a couple n's tucked in here. And we're ready to start taking this off the loom. So I'm actually going to cut these things that anchored it on. And then wherever you have a space that is good to cut it off, you are now going to make that cut. So I'm going to cut it here. And you can cut it at the top or the bottom. I'm going to cut this off here. I'm going to make sure that when I move my loom, everything is coming off. And you might have some ends that are longer than others, just because you hadn't tied on there. Here we go. Here is our coaster. So we're gonna start now to kind of weave in and finish off these warp strings. So I'm actually going to be tying them. And you can do them in groups. So I'm going to be doing groups of four. But since I have 20 strings, that is a group before, if you have a different number of strings that isn't occur before, you can also do a group of two. So I'm gonna take my four. And this is a little bit hard depending on how long your Warp strings are. But I'm just going to tie a knot with all of those four coming through. Bring it down to where that line is. And then I'm gonna tighten it up so that way I have it gathered altogether. So there we go. There's my first or not. And I'm gonna continue to do this with all of the rest of the strings. Alright, here we are. And as a last step, we're gonna cut this off so that they are nice to end is short. And this doesn't have to be scientific or perfect in any way. I'm just going to cut these so that the ends are lot shorter. Just kind of create a nice fringe. But to the other side. And there we have it. A nice woven co-star. Here's a look at the back with those went ends woven in nice and neatly. And you can always trim those and this is ready to be used. You can use these same skills to make a full set. You could do ones in different colors. But again, we've got that nice pick and pick stitch with the sides, with the alternating colors and the two tone clusters.
9. Final Project: Alright everybody, so those are the weaving basics. And I really hope that you enjoyed this class. I hope that you learned something. And most importantly, I hope that you just absolutely adore your little woman coaster set. We made one today, but you are free to continue making them in the future and make as many as you want for your house or as many as you want for gifts sets. And I would really, really love to see the color combinations that you pick out and how these turn out for you. So once you're done making your set, I would love if you could take a picture and post it in the class project section below. Because then I can see what you make and see what you were inspired to do. So I hope you enjoyed today, I hope you learn something and most importantly, I hope that you continue to weave.
 Callie Mac Design, Handmade in Portland, OR