Transcripts
1. Introduction: If you search for shopping a minimal plastic fabric wallet, you see these results, but how we can make one? Imagine Sarah has a workplace. Nazi has a beauty salon. Tim is in the dining room of
his home, and Park Energy, a company that is about
renewable energy, has a big entrance hall. They all have
something in common. The space is empty, and they want to fill it
with something decorative, but not with figurative patterns
or repeatable patterns. So they ask you to make
a wall art for them. And you, a creative person who likes the tranquility
of working with forms, make a three D fabric
wall art for them. Hello, my name is Hadis. And in this class, I
teach you how to make that three D decorative Waart. This class is for you.
Welcome to the class.
2. Project 1: Fabric Cut: In this lesson, I explain you the material and tools you need, and also we cut the fabric proper to the shape
of our canvas. What we need for this
art project is Canvas. I chose round one. You can choose rectangular
square eclipse triangle based on what you like. Texture. I use ceramic
texture. Wood glue. This type of glue is white and after drawing it
becomes transparent. A glass of water. We also need fabric. I use fasten and acrylic paint, and the tools, art
spatula, brush, scissors. First, I want to cut the fabric that we need to cover the camas. If you go to buy fast, the seller might ask, do you want medium or T fabric? You can choose what you prefer. Here I chose medium. We want the cloth
to have wrinkles, so we should cut the cloth in a little bit larger size to be able to produce
the wrinkles. I want to cover
half of the canvas, so I put cloth here and cut considering the xs margin. Okay.
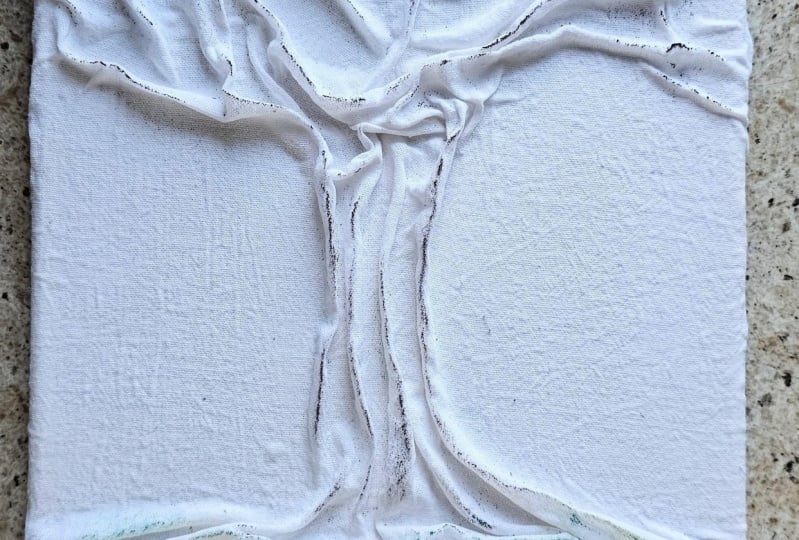
3. Project 1: Shape Forms: Now in this lesson, we make a liquid mixture and form the shape we want using
the fabric on the canvas. To have the fabric, stay in the forms that we want, we soak it in a liquid mixture. Now we make that mixture. Have a bowl, either
glass or g of water. The temperature is mind, not so hot and not so cold. If you use very hot water,
fabric might shrink. Now add one spoon of wood glow. One spoon is based on the
size of my fabric here, you can change the amount, and it does not need
to be very precise. Now, stir it, Then I add
about a skin texture. Here it looks this
texture is old and dry. I will tell you later what to
do to prevent this happen. But now, let me just
open a new one. Okay. Okay, now we add texture and we stew
it well to solve it. The final mix is like dog. I mean, drink that is made
of mixing yogurt and water. You see, it's not very
watery, but not very. Now, I soak fabric
and the liquid well. I personally also prefer to add some wood glue over
it by my hands. Now then ring it very well
and let the excess water go. Now I put it on canvas and shape the
wrinkles that I want. Since I will cover the
wood canvas with texture, we don't need any
canvas preparation. Just I rub my hands on
the canvas on the surface to cover it with the excess of mixture that is on my gloves. Notice to put the fabric
in a way that we can bend the margins
around the canvas. To fix it better and more, you can add wood glue on
some points like here. For fixing the
margins, use stables. But here, since our
work is not very large, I have a simpler and
better solution. Use texture bend
fabric and stick the margins over the corners of the canvas and fix
it with texture. Here, because the camera is low, I should turn the canvas
back to show you. But you can do this step just by holding a canvas in
a slightly angle. No need to turn it back. Okay, I turn back the camas, correct the forms, and put
it in a place to let it dry. The time it needs to
dry depends on where you are temperature
and also humidity. So let it dry. I should clean the table
now both you at home or your studio can cover table and the ground with
a spreadsheet. Here, just because I
didn't want to have excessive reflection on the
camera, did not do that. Now I close the lids of
wood glue and texture. After it dries, I show
you the next step. Okay.
4. Project 1: Add Texture: Now the fabric is
dry and let's apply texture on the canvas
and over the fabric. Now it has dried, I touch it. Yes. It's dry now. It is about 4 hours and half
that I have left it here. Now I want to cover
it with texture. I use art to cover this part of Canvas and brush
to cover over fabric. I take some texture. Notice to mix it well, so let any probable
bubbles leave the texture. Okay. Now, look, I pick and put some texture with the back
of patula under canvas. Very randomly in
random directions, I start rubbing the esptula. Look at the movement
of my hands. We don't want to cover
all the surface. We just add some
texture to some parts. Now we want to add a
spider web pattern. I dab the ropatula
on the canvas. Da da. Move your hands in different directions and
get a random pattern. No need to do this all over
the surface, some parts. If you think your texture
is sick and heavy, you can splash water
on it and mix it. Now it's time to
cover the fabric. Use a wet brush and pick a rather large
amount of texture, put it on fabric, and then by brushing
it spread it. Use water to do this smoother. Continue this and
pay attention to cover all the deep spaces too. Okay, now I have
covered it all with texture and I made
patterns. I let it dry. The color of texture we
turn corns after being dry. You can add acrylic color to the texture
before applying it. But here, I prefer to
paint it in the next step. Now that we don't need to
work with wood glow and texture for a long time to
prevent them from drying out, splash a layer of
water over them without stirring and
then put the leads on.
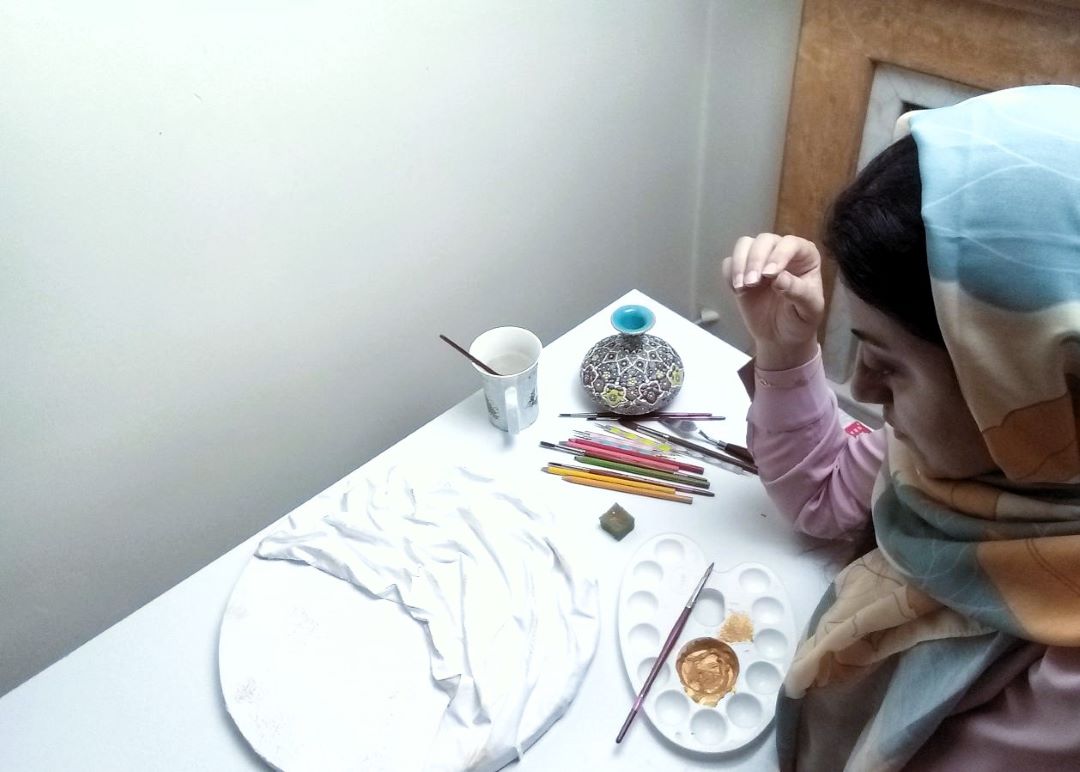
5. Project 1: Paint: Okay, it's now time for the
paint to enter the scene. In this lesson, we
paint the texture. Okay, I have left
it over at night. Now the texture is
completely dry. As you see, the color
turns corn silk, so now I want to paint it. Here, I painted with white
and add some gold touch, but you can paint it with whatever color you prefer
or your client asks for. You can also paint this
part of canvas with one color and the fabric part of the canvas with
another color. For example, you can color
this with shiny white, black and so on. I use acrylic paint, which is a water based color. It covers the surface
underneath completely. Acrylic paint is in a
way that after it dries, it does not solve
anymore with water. Pay attention to paint
all the deep parts too. Also, I cover the
corners of the canvas. Now it is finished, I let the paint dry. Probably I will paint it
another time to cover it well. After that, I will show you
how to add some goes on that. Okay.
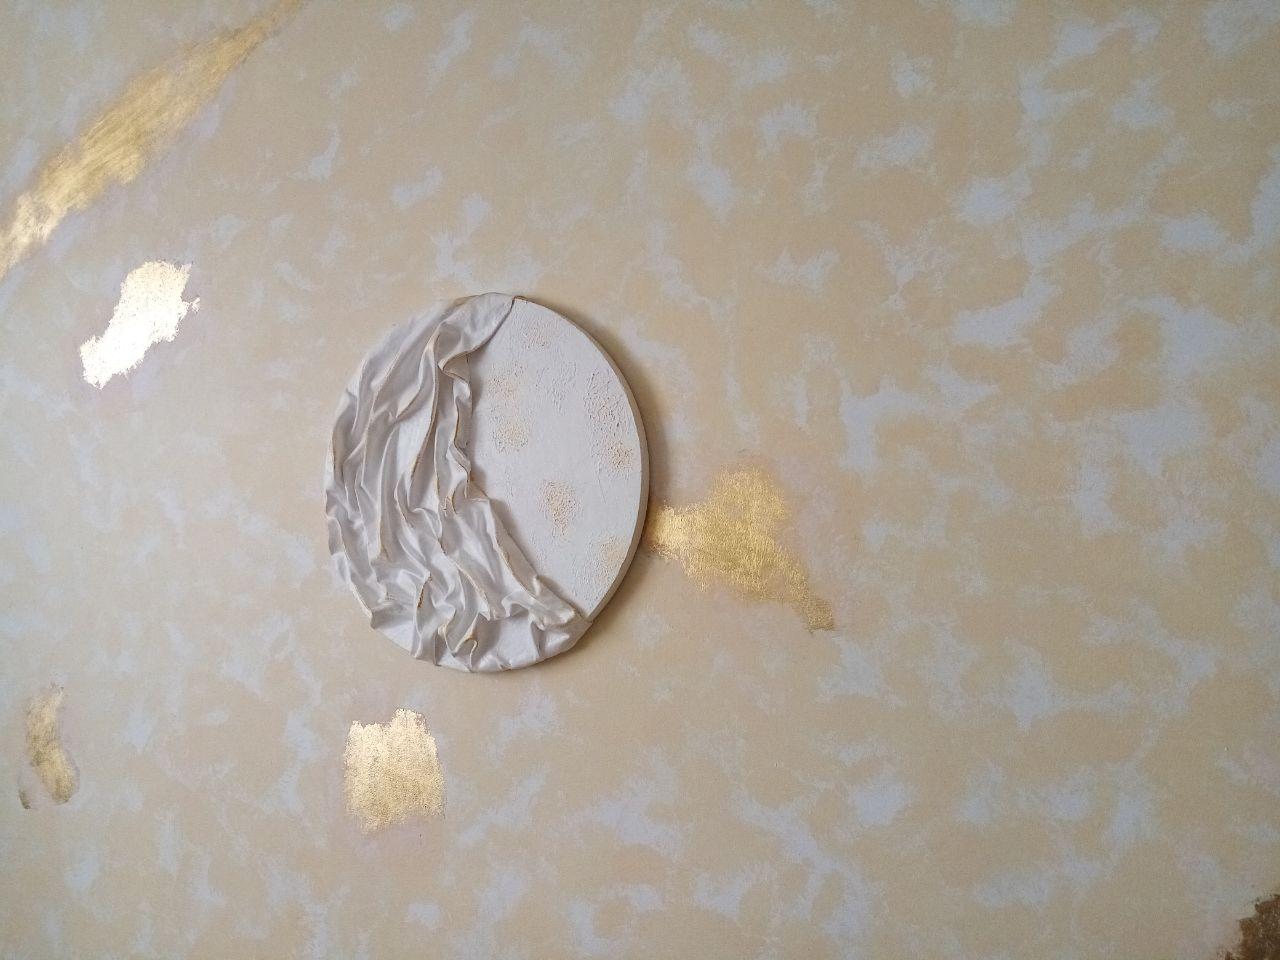
6. Project 1: Golden Touches: We can continue adding more
details. In this lesson. I teach you how to
use a sponge to add more touches of color
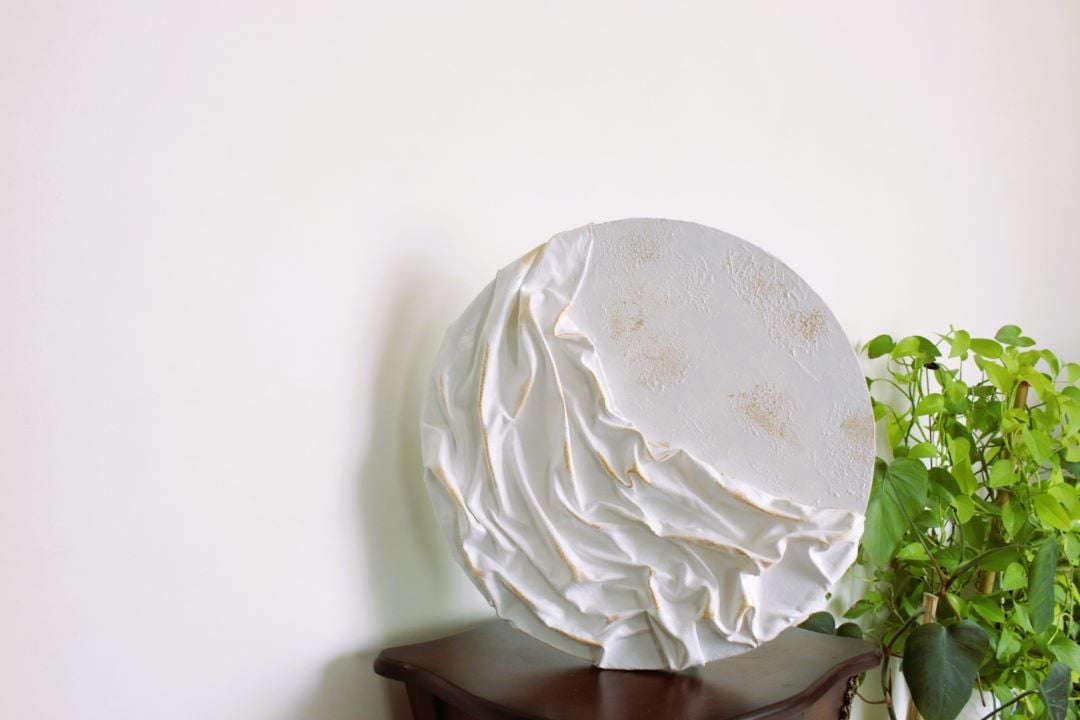
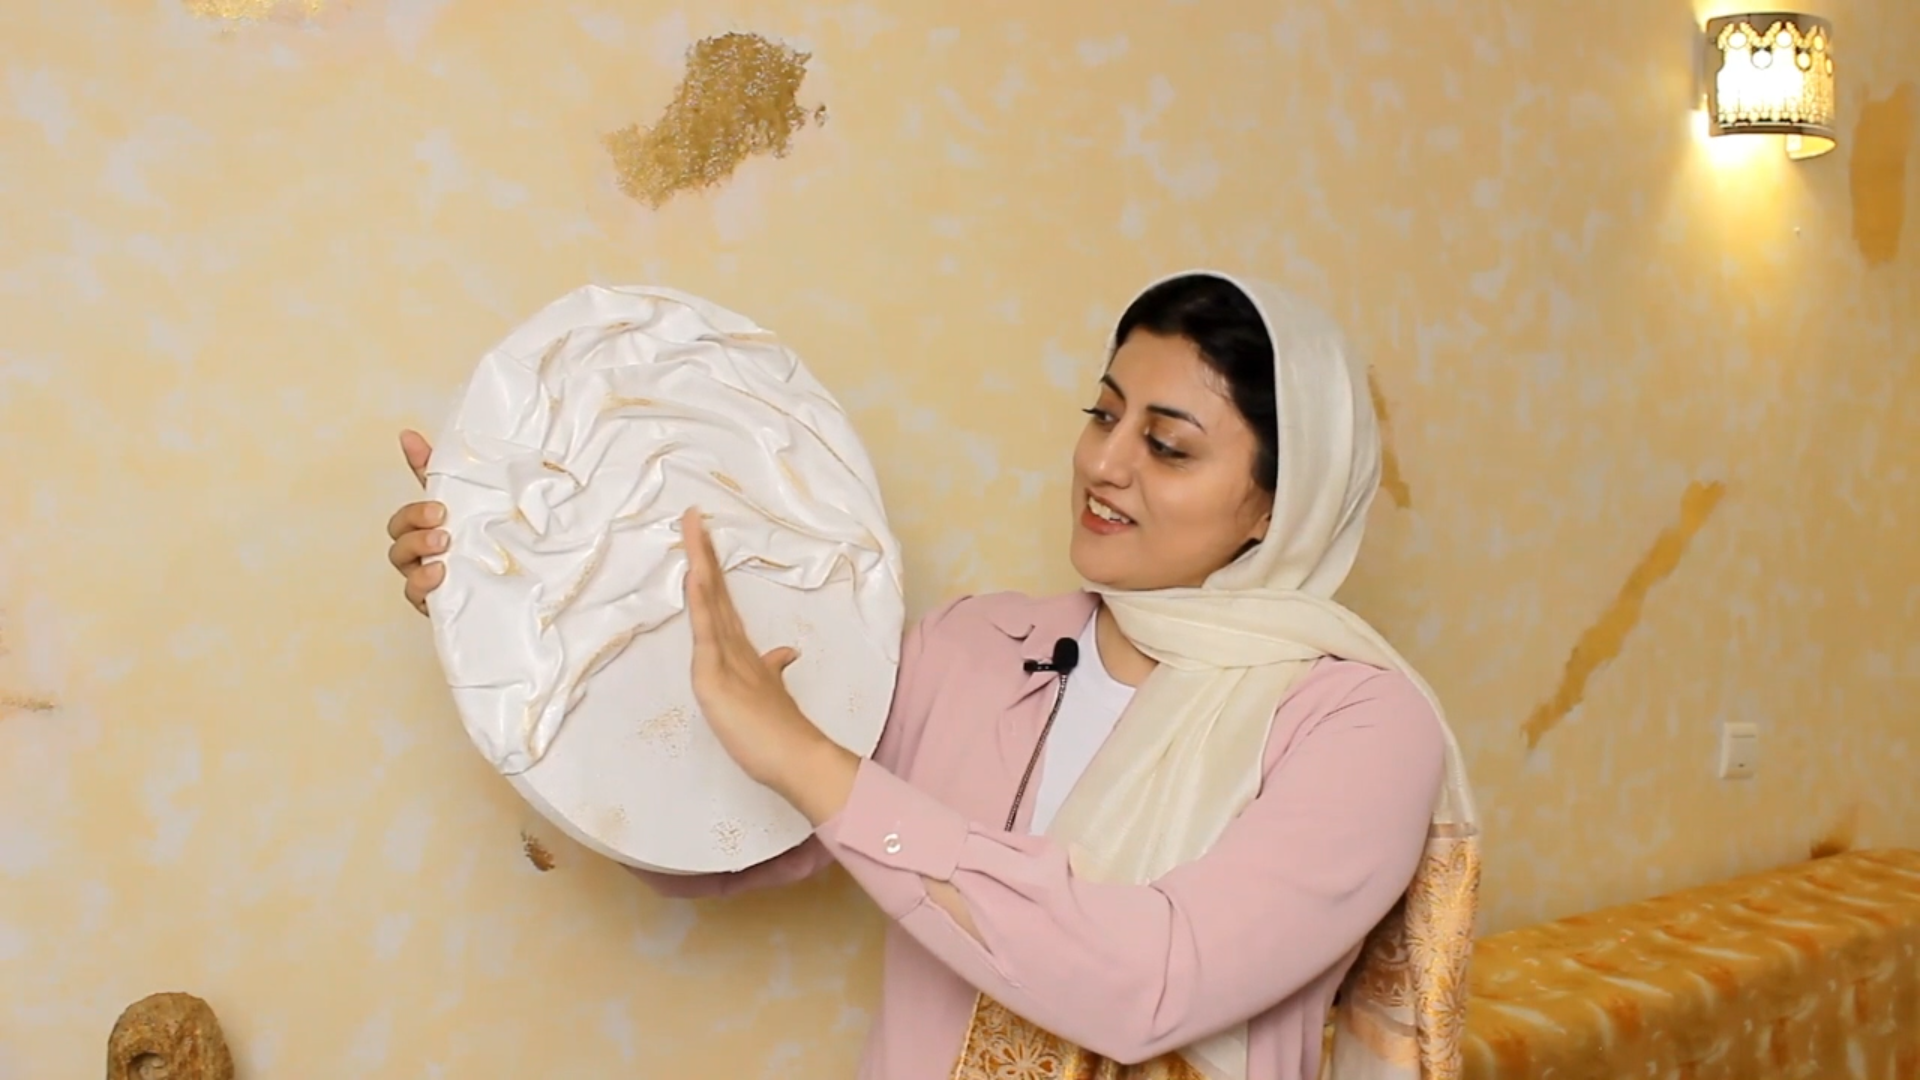
over the wallard. Look how beautiful it is. Now I have applied painting
two more times and it is dry. Now it's a complete work and you can use it as a
decorative wall art. But I add some gold
touches on it too. You can use brush or sponge. Put some gold acrylic
paint on a palette. Put the sponge on that. And dab the sponge for
sometimes on a surface. We do this to get the
excess paint on it, so it gives me a real
smooth and slight touch. Okay, now I gently very
gently with no pressure, put the sponge on the surface. So the parts of the
texture that are extruding will be
covered with gold paint. Now, I touch some parts of
the fabric section two. Do this very gently
with patients. Take some steps back, look at your art, and then continue to
apply the touches. The colors you apply are
totally based on your choice. Or if it is a commission, contact their client
and let them know. For example, here, I could make it black with gold touches, white with silver touches,
and other variations. For example, a beauty solute might order pink
with silver touches. Let it dry and come to
the final lesson. Okay.
7. Project 1: Wrap-Up: Well done, congrats, and thank you for being
with me by far. By far, you learned how
to use a technique using fabric and texture to form
patterns over the canvas. But of course, for
larger scale projects, there are other
techniques, for example, using metal grid
instead of fabric or using wood sheet
instead of canvas. These types of works are
abstract and minimal. The beauty of them
is in the forms, the shapes, the colors, the patterns, the textures, and the abstraction they
have from the physical work. To enhance their beauty
and show their beauty, you can use light. So I recommend to hang
them under a light, or you can add a
light above them. And also, you can suggest your friend or
at your home place or your client that hang this wallart on a wall that
has an angle with the window. So when the sun ray and
sunlight enters the window, it hits the wallart
with an angle and show the up and downs
of the wall art. I hope by far you have enjoyed learning and hopefully
then creating your wild art and
adding beauty to your home workspace
or your friends home and workplace or
your clients workspace. Okay, my dear creators,
keep creating, keep your home workplace
and work beautiful by your art and also by
your beautiful smile.
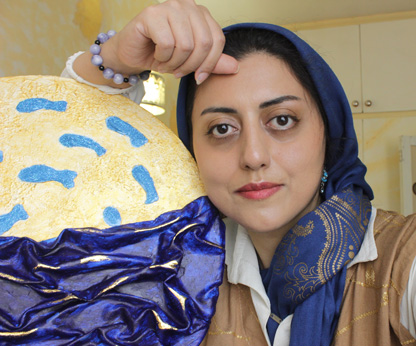
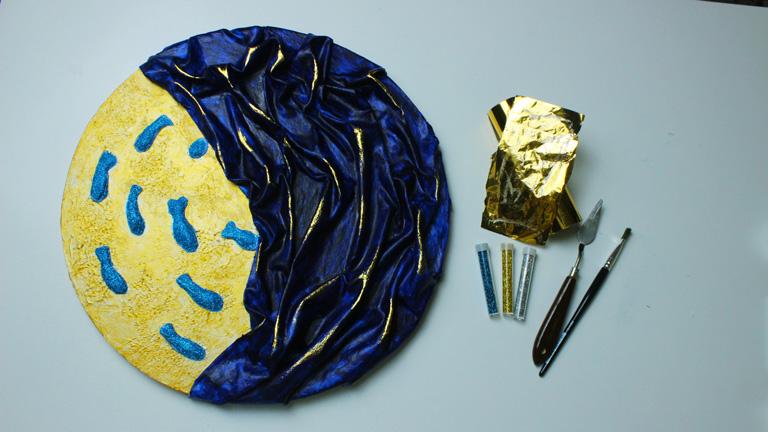
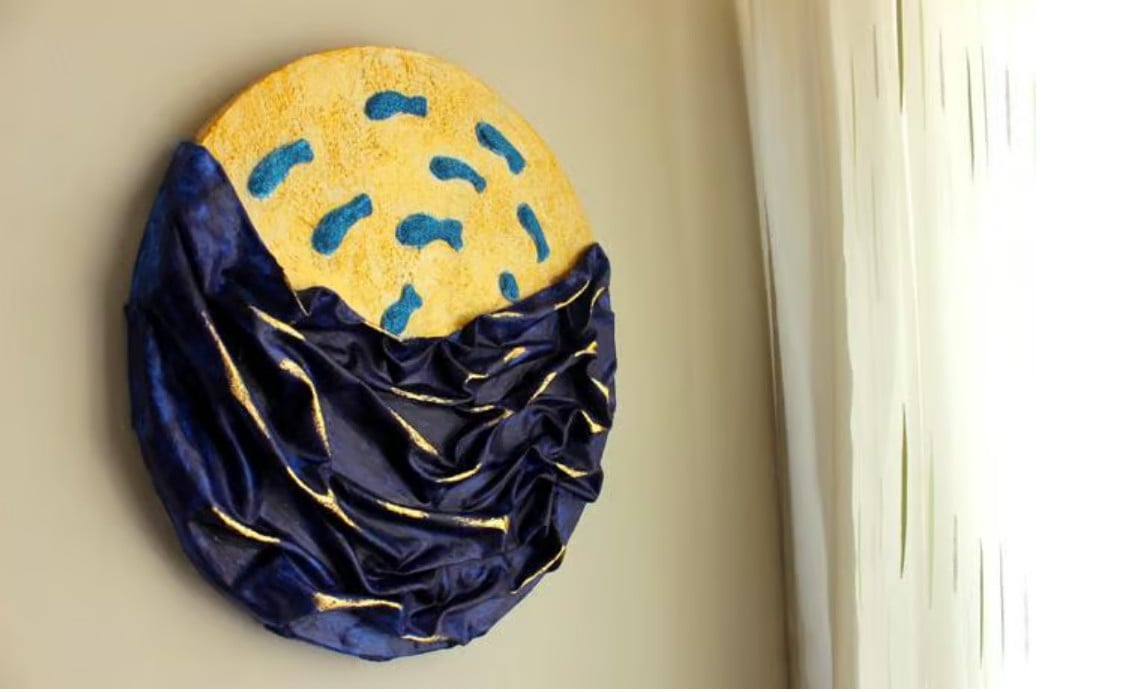
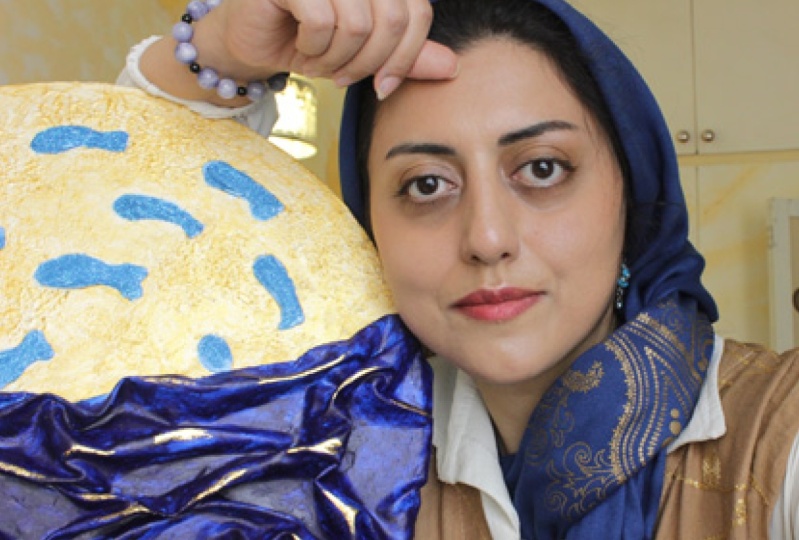
8. Project 2: Definition: If you search for shopping
a gold plaster wall art, you see these results. But how we can add gold
embellishment ourselves. We learned how to make a
treaty minimal wall art. We learned fabric technique. How to turn that
art into this one. I learned this CaspNC. I will teach you
three techniques. First, how to make emboss shapes on the
canvas like these fishes. Second, I teach you
glitter technique. We apply this technique
on the fishes. And third, I teach you
foil bond technique. We apply that on the waves to make a reflective
metallic effect. Everybody who is interested to learn and create
are welcomed, see you in the next lessons. Oh
9. Project 2: Embossing Fishes: In this lesson, we decide about the arrangements of fishes
in our canvas and then we learn how to make and bust
shapes using texture paste. Okay, the idea that
I have is to turn the fabric part referring to water and adding
some fishes here. Now, let's decide
about number, form, and arrangement of the fishes before starting to create
them with texture paste. I use pieces of
paper. I cut them. First, I try a single fish. We can draw with pencil. But here, to make it
visible under the camera, I use a marker. Now, on another piece of paper, I try drawing two fishes. And now on another
piece of paper, we try a combination
of three fishes. Then now I draw an
arrangement of small fishes. Yes, you see, I don't
draw them randomly. I have some invisible
circles in my mind and draw the fishes over
those imaginary circles. This is a good tip that
in character design, logo design, and composition, you always use invisible shapes like circle,
triangle and square. Let's try them all.
I prefer this one. Now I try to transfer
the design and canvas. You can use pencil. Here, again, I use marker to
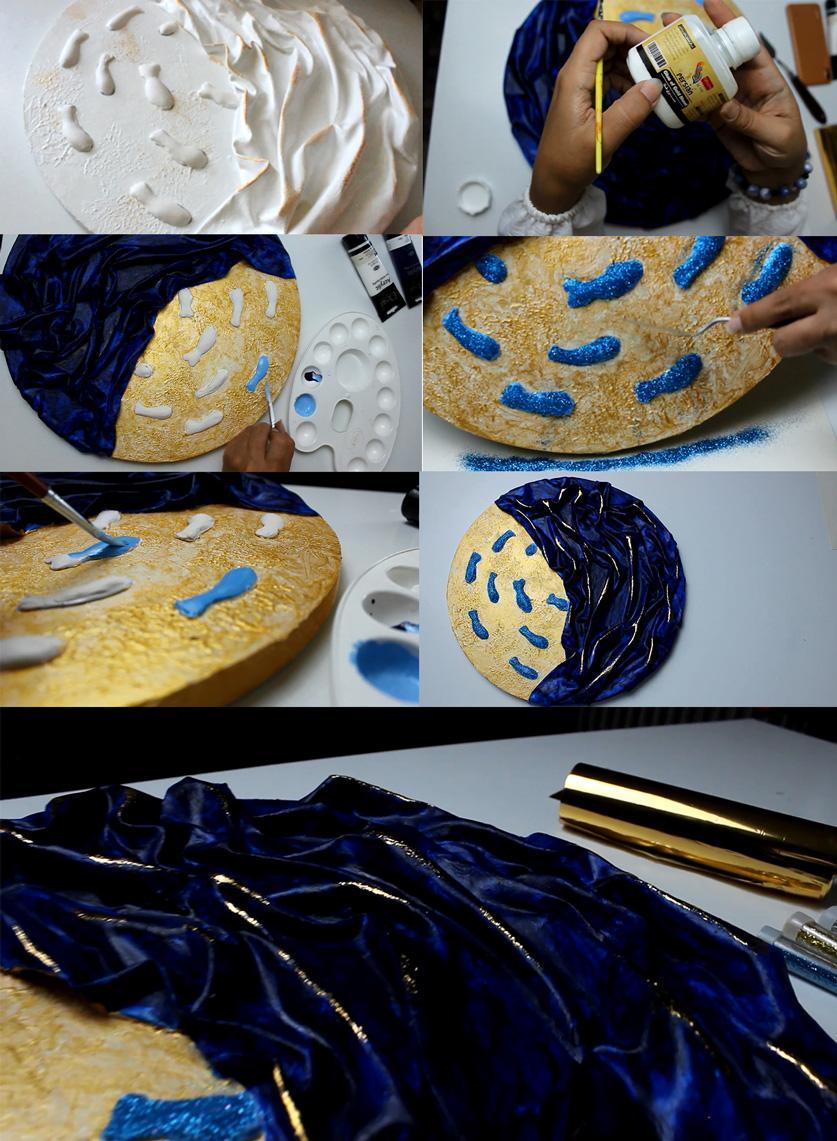
be visible under the camera. Okay, the design is ready, and we go for applying texture paste or modeling paste to form the tree de bust forms. To apply the paste on canvas, we make a cone
using plastic bag. I use a glass or a mic to fill the bag with
texture paste easier. The plastic bag should
be a little bit thick. Here, I use both a thin
plastic and a thick one. So you see the difference. I place the glass and put the corner of plastic
bag in the glass. Then I pick amounts of paste
and put that in the bag. I shape it like a cone and then cut the tip with scissors. By pushing the paste
toward the hole, we draw borders of fishes
and fill inside of them. This thin plastic
needs more power, is not efficient
and might be torn. Yes, it's torn off. Now I use the thick one. Fill it with paste. You know, walking with
texture paste is so relaxing. You should be patient, and that takes you away
from the rushes in life. Now I cut a hole and
start pouring paste. I think I need to make the
hole larger to work easier. Let's cut it with scissors. Yes, now I draw the borders of the fishes and
pull the case inside. Notice this step needs speed. Right after this,
you should start forming the paste
into fish shapes. So if you think you can't be fast or your canvas is large, or you want to pause
and take a rest, then instead of working on all
the fishes simultaneously, do it one by one, cover one fish with paste, shape it, and then
go for another. Here we use brush,
artspetula and water. We dip the brush in
water to make it wet, and start forming the
paste, resembling a fish. Add more texture if needed. Be very patient and enjoy
this concentration state. We call it flow state. In flow state, mined focuses in a way that you
don't feel passing of time. Okay, I have finished making
forms and let it dry. Let them dry, prepare
some acrylic paint, and see you in the next lesson.
10. Project 2: Painting: Now it's time to cover the paints you want
for different parts. Here I cover the
waves with dark blue, here with golden color, and the fishes with light blue. I prepare some blue colour, mix it with a little
bit of water, pour it over canvas, and start covering
the fabric part. First, I use a big brush
to cover the surface. And then I use a smaller brush to work on the details
of their wrinkles. Look at different angles to make sure you paint all
over the wrinkles. Since it's resembling water, I don't want it to
have a flat color. I like the dark and light
in different areas, so I paint it only once
to keep these patterns. Now it's time to
color the flat area. We can leave it white. Also, light blue is nice choice. But here, I pick golden color. This is also a good
choice if you want to have your art both
and with energy. I have another class on
my channel that helps you learn how to choose
combinations of colors. Save it to attend later
after this class. I pin the link of it down below. Okay, now I prepare gold paint. I cover the surface
with a brush. I want to paint it with pattern. So look how I change
the direction of brush and how I
use short strokes. Now it's time to
paint the fishes. I want a light blue, so I mix white and blue
to make a lighter blue. In my other class about
colors and storytelling, I have explained
how to make tins, shades and tons of colour, bookmark the class
to watch it later. Look, they are now
dry and smooth. Now I gently start
painting the fishes. Do this carefully. Now, let them dry. In the following lessons, I teach you two techniques glitter technique and
foil bond technique. Let the paint dry, and then we go for adding
embellishments to our art.
11. Project 2: Glue Technique: Okay. In this lesson, I teach you how to use a
special glue to prepare the surfaces that
you want to add glitter or metallic
effect over them. I want to give a theme
to my decorative art. So I want to cover fishes
with blue glitter powder, and I want to add some
metal shine to the waves of the sea as resembling
reflection of sun and wave. There is a special glue
called gold sheet glue or foil bound adhesive or foil
bound glue or gold leaf glue. When you cover a surface
with this after leaving it for some hours,
it becomes sticky. So you can stick gold sheets, silver sheets, and so on. Here, I have a brush that I
use it only for this glue. Since your brush will be sticky, don't use a good
expensive brush. Just put a regular brush aside and every time
use only that one. I also here have
an unusable lid. I pour some glue in it and
start covering the fishes. Mm. Well, then, now I want to cover some small part on the
edges of the waves. In my other class, I
taught you how to cover wrinkles with the touches
of gold acrylic paint. But now I want to
create a metallic look, so I use glue. I add some yellow color to be able to detect the
parts I cover with glue. Now I brush some small
touches of glue on the edges. We are done, leave it for at
least 2 hours and come back. The glued surface should be
prepared and sticky by then. Okay, now let the glue
get active and make a sticky surface on the places that you want
to add embellishment. Let the glue be there
at least more than 2 hours and that make
a sticky surface. See you in the next lesson.
12. Project 2: Glittering Fishes: Okay, now the
surfaces are sticky. Look how it looks
when I touch them. It's now time to learn how to
add glitter powder on them. Now, more than 2
hours has passed. Look, When I touch it,
it's completely sticky. I pour glitter powder
gently over the fish area. Now using a brush, I gently spread
glitters to make sure all the sticky parts are
covered with glitter powder. Then I pick a piece of paper, put it under the canvas. No. Lift the canvas and with hand or a pen or a spatula gently
that over the surface. These strokes makes
scalia fall on the paper, and you can collect
them for later uses. Now, the embellishment
of the fishes are down and we go for
the next technique. And the next one is a
wonderful technique. Come to the next lesson
and I teach that.
13. Project 2: Foil-bond Technique: And the next part is to add some reflections to the
edges of the waves. In this lesson, I teach you how to make that metal effect. In the previous class, we made gold touch effect, but now I want to make a gold reflective
effect like metal. This material is
called foil bond. This is a gold color. They are available in
other colors like silver, copper, rainbow, and so on. I got a piece of it. It has two sides. One of the sides are
a non shiny side. We stick this side over
the sticky surface, rub it and or with
a piece of cloth. Then we remove the foibon fast. Look, a golden metallic
effect is on the sticky part, giving a reflective effect. I repeat this for all the parts that we have applied
glue on them. Look at the foil bond. You see the parts
that we use are now empty of the coating layer. Repeat this until there is
no sticky part remained. Wow, look, it's so beautiful. In the next lesson, I talk to you about the project.
14. Your Project: Okay, now time for the
project of this class. What is the project
of this class? The project of this class
consists of three parts. First, an image,
second, a title, and third a sentence. First part, image. In the image part, you
draw a rough sketch of a Canvas art idea that
you have in your mind. Then with arrows, you define
which of the one, two, three techniques you have
learned in this class, you want to apply to
which part like this. O and the second part, put a name for your art. For example, Chocolate Hops. And in the third part,
write a sentence about where your art you
can imagine is used. For example, on the
wall of my dining room, in the hall of the company
that my sister works in or in the wall of the spa saloon that is in my city
in that street. In the project and
resources section, I have put a sample project, so you can download
and check that. By the way, if you
want to do more than a rough sketch,
yes, that's welcome. You can add a drawing. If you buy some of the materials and you have
experimented with them, yes, take your photo
and share that. In the project, Gary, please make note that
to share a project, you should go to the
project and resources. So right now, make
your project, and yes, you can and it's possible
that you add changes, you make them change
or add other photos or remove something later
and update your project. See you in the next
lesson for the sum up.
15. Final Thoughts: Thanks for being with
me by far and congrats. Some final news I should tell you first about the materials. I didn't name any brand during the class
because it's obvious. So brands are available in
different parts of the world. So if you have any
question, please, yes. Ask in the discussion board. Also, I put a file in the resources section,
check that please. And yes, yes, yes. If you have any experiments, if done any techniques or you have innovated
any new techniques. Yes, take your photo
and share that in the discussion board with
me and other students, they say sharing is caring. The other point and
the final point that I want to mention is
their review section. I myself, when I want
to buy a material, a product online or attend some classes or buy a digital product,
read their reviews. So please write a
review for the class. So other new students can
decide whether this class fits their goals or
their interests or not and decide based
on your reviews. And I ask you to please
make note to use the sections project discussion
and review separately, for example, if you want
to share your project, use project section, not
the discussion board. Or if you have a question, ask that in the
discussion board, not in the review section, because if you ask that
in the discussion board, then the other students can read the answer and learn more. I wish you success, and I hope you create
an experiment, and I wish you success in
your creative journey. And make sure to follow
my channels and sketches for upcoming new techniques
and creative projects. See you soon and goodbye.
 Hadis Malekie, Detective in C4C Flat