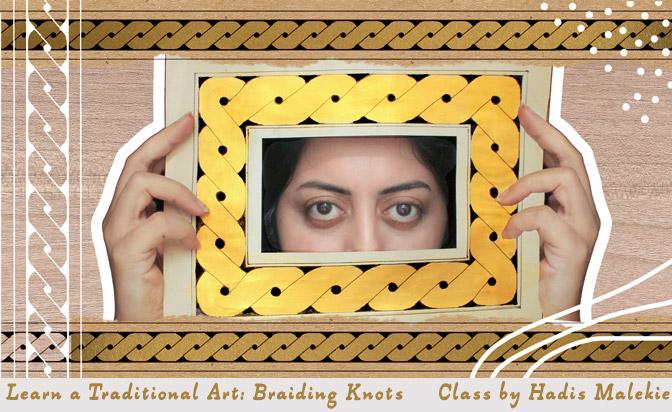
Transcripts
1. 5th intro mix: Hi, Addie. Hi, What some. How are you? Thanks. I'd need the north, but want
to decorate it. Let me see. This is beautiful. Well, I can teach you adding some decorating borders to this, so it would be so
much impressive. Let me show you. I have
two of them in my book. Yes, I want to see,
like this or this. These are very
beautiful borders. Yes. They are very
awesome and beautiful. I learned them in traditional
book illumination. So they are historical. Yes. For years they
used this art, I mean book illumination in books such as literature books
or other precious books. This art is called Tai. Nice, but isn't it
difficult to learn. Oh, no, it's not difficult. I teach you three
dot based brading. That is very easy to learn. Great. What do I need? You need paper or
cardboard, pen, pencil. And if you like, one, two, three colors gh, and a rule. And then what should I create? Your project for
this class is to make a bookmark with
this pattern on that, or a blank paper with two
shaped decoration around that. Or you can add these
patterns to your art. Hey this, how did you
get into this art? You know, I make animations
and I do photography. I found out that
this pattern can have that specific
feeling that I like. I mean, academia esthetics in photography and book movie
theater in animation. Also, I was familiar
with this when I was a teenager. Are you ready? Let's get started. Yes.
2. Straight Lines: Okay, now let's get started and learn how to braid
straight line. Now we want to make this. To make this, we should
draw two parallel lines and then mark the dots
underlines and draw the lines. But it's too small. So I have prepared that
in a larger scale. You see there are
two parallel lines. The space between
two dots on a line should be equal to the
space between two lines. Here, I use a ruler to measure the space between two lines
and mark that on the line. They're saying on
the line below. We should find the
intersection of the diameters are
used the role there, and find the intersection
of the diameter. And now I make the
dots noticeable. It's important to
make them noticeable. Let's name the dots on the
above line, first row, the dot on the intersection, second row, dots
on the line below. Third row. Now time for
connecting the dots. We draw a line from
below that of first row, toe under the dot on second row. And for this line from above
the DOD to above the dots. So let's make it another
time and another sketch. From right to left
from below the dot, two below and other dots. Now for second row, from above the DOD to above, from below to below, from above two,
from below, below. We continue that for, let's draw it a
bit smaller size. We use a ruler to mark the dots, especially when we
cannot do that by eyes. If you want to work
on smaller size, you can also use grid paper. Grid paper is also a good way, but here I use plain paper to show you how
to find the dots. Now we make the dots. Notice several. I am drawing the
dots of second row. I make the dots of first
and third row. Notice. And now tell me. Yes, it's time for
drying their nods and the lines connecting the
dots from below to below, from above or from
below to below, from above of secondary
to AB over third row. And now an attention for you, always draw the line
just a straight. Do not make care of
lines like this. So here I connect the
dots with straight lines. Now we want to add curves to
make the nods more messy. But here I have the dots. And for the dot on the
first row and third row, I add some carrots. Look at here, what happens? Here? It's now like two threads. Are we doing around each other? Now, lets me add curves
to this smaller size 12. I play it in fast forward. You see it's like two stems
are weaving around it. Are there. Let me show that to
you using your pencil. This is one instead, and I use blue pencil. And this is the other stuff. I also color the space between two parallel lines with yellow, whatever you like. Now, let's make your project
in the project gallery and post whatever I
drown by far in that. And the next lesson, I will teach you how
to decorate corners.
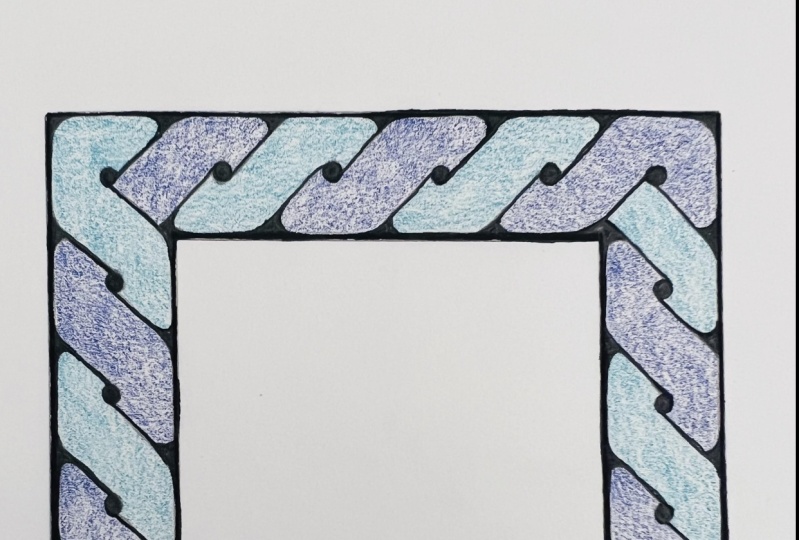
3. Corners: If you draw a table around your calligraphy painting or illustration, it has corners. So this is an, I wanted to teach you how to decorate corners
of their borders. Here I have drawn air corner. I have marked the
dots with pencil, so here I make them more
visible with them market. You draw with me too. We have another dot here. Another dot on the corner. I am now making the first
and third row dots. And now we go for
second row dots. I make noticeable dots. It's now time for
connecting the dots. Do not connect. These dots. Connect from first row, two, second row from below to below, from above to below two below, above two or below two
below, above to Apple. Do not connect these
dots as whole. For this side, you can rotate the paper so
you can imagine it better. First row, second
row and third row connect from below to above, two above, below to be low. And now it's time
for adding curves. Let me change my pen. Gay. Add curves. Look at this dot. This is new because
they have corners. Also. This dot, this dot is also new. Look how I add curves to that. These curves are the
same for straight lines. And you know this character, look how the stems
are more visible. Now, let me challenge
you for two corners. Remark the dots. I have marked them with pen and now I am making
them more visible. The first row, the third row. And now I make the dots
on second row more of it's now time for connecting. Imagine one line
as the first row, the other dots on second
row and third row. Then apply. The rules from
below to below are first to second row,
from above turbo. Second too. Third row. Here also I add another
line and we do not connect. Guess that. Don't forget that. We go for another slide
from below to below, above two above here. That would become
like the other side. You consider one of the
lines as first row, the other as third row. Then apply the road
from below to below, from above to above. Here we miss a line. So I add this to the now it's
time for adding the curves, the curves and corners and
make curves near the lights. As I draw please, you work on your project. Now you can see the
stems are more visible. You are to this lesson,
to your project. And let's go for the next
lesson that is about coloring.
4. Coloring: I add colors to your work. You need to do some steps
in a specific order. Let's learn them. Do you remember this pattern we might end the
previous lessons. You might ask why I did
just a sketch that, because the truth
or dare is not to first draw with ink
and then color that. But first we draw with pencil or with some special
pressing technique, and then we color that. And after that, we draw
lines and dots with ink. Let's color that. You can use, whatever color that you like. But here I use colors that
are used in traditional art. Now, I am painting
with parish and blue. Parish and blue In Paris
Yan is called larger art. That is the same color of a stone called larger
words in English, that is lapis lazuli. The color of LED is
now as your ally, which is also
called Persian blue is widely used in perishing art and architecture
and other kinds of bar. Now, I use another color
for the other stuff, that is total cost. Turquoise is also
the color of us tone called turquoise or in Persia
and it's called fears. Their cries and perish and blue are widely used in
Persian art, e.g. in Tom's, in museums
and in Musk's. Now you can see the term of actor who was famous
for poetry and Sufism. And now the time who was a
polymath known by mathematics, astronomy, poetry,
and philosophy. This is the term
of Camelot Morgan, who was a famous Iranian painter from just the past century, not form of centuries. Here you can see these
colors are widely used and these architectures are in
a city called Nature book. You can see I have drawn
a line parallel to each line that is just to make it beautiful
in advance classes, I tell you admins techniques
to draw that line, but you can just use a ruler
like me to draw that line. I colored space between
two close lines. We read. Now it's time for inking,
withdrawal Dodson lines. You can use brush and ink
or you can use marker. Here, I make the dots on
second row noticeable. I now draw the lines. Here. I am working under the camera. So I have some limitation, but put time and make it clean. You see why I draw the lines, I clean their ruler. Now time for drawing
the lines connecting the dots of first and second row and second and third row. Now I didn't curves The
carrot on the corner. And you'll see that the
stems are getting visit bar. Now, let's do it
on a smaller size. You see if I color on plain paper that
would have wrinkles. So please use a paper or
cardboard with more weight. I use pencil and pigment
fine liner for this work. Let's draw the lines. I use just a simple golden wash to color the space
between two lines. Let's add smoothness and shine. I use my bracelets. I use this tone of my bracelet. I got my Putin onion skin pay for and press that with stone. I wrap that. The surface would be
more shiny and smooth. Let's do it for our pattern. It's time for drawing the nuts. I use a pigment fine
liner to draw lines. Here, I draw two parallel
lines on each side. Then we draw the dots first and third row and
the dots on the middle. The second job. For connecting the dots, you can use brush, a tiny brush and ink. You can use pigment, fine liner. Working with brush
needs more control, but that would be more
beautiful than traditional. Now let's do it again. You can recall repress to
make it shiny and smooth. And then we use a roller
to add the border lines for the other side, for the other L-shape. As you are watching me, please start your work
to just right now. Don't limit yourself. Don't let perfectionism
stops you. Whatever you have, just
peaky them and start. Now adding the dots
are second row and now connecting from below to above. A smaller size
projects like this, you can skip adding curves. You can add curves, but if you like, you
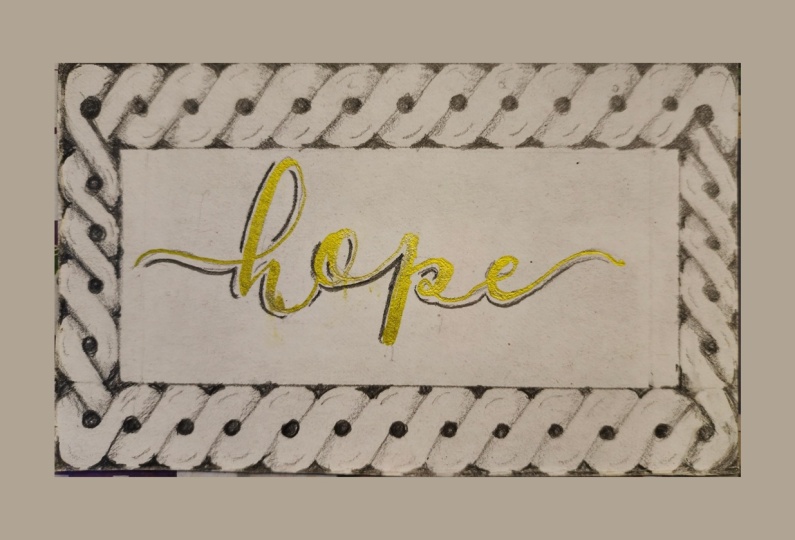
can skip that too. You have your bookmark. Now, please add your completed
project to your project. Your project. The next lesson, I will give you some up
and the final tides.
5. Project: Welcome to this class. This class is a practical skill you should do to
learn it better, exactly like riding a
bicycle. You should do. And learn it better. Each lesson, please
post whatever you have drawn into their
project gallery, e.g. on less than three, you post what you have drawn, debt and lessons for your ad, whatever you make to
your previous slide. Skillshare has a very
good opportunity and that is free feedback
on your project. So I suggest you use that and always post steps
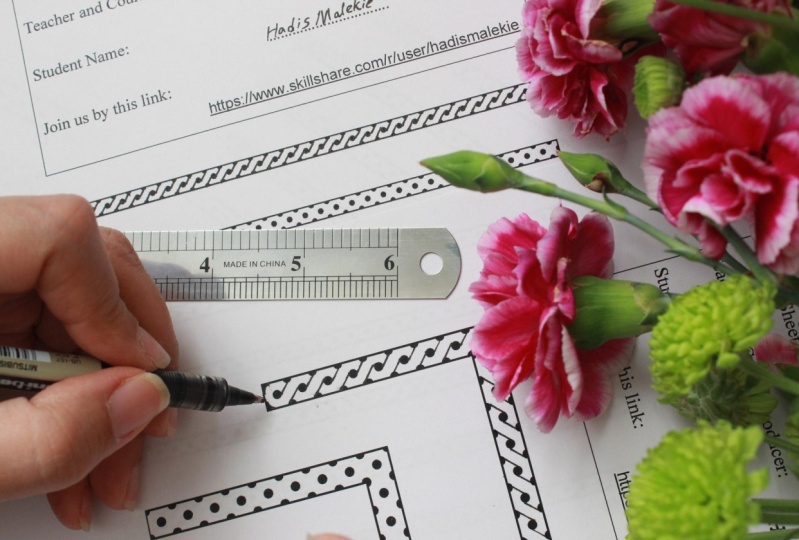
of your project, not just the final project. The materials you'll need for
this class are simple pen, paper, or cardboard ruler. But for your convenience, I have made a link in
the project description and the resources so you
can use that if you want, but just take it simple
and use whatever you have. Now, your final
project is to make a bookmark with this
pattern on that. Adding two L-shaped
decoration to have paper. But feel free to use this pattern on larger
scale if you want. You can use that on larger scale for decorating
whatever you like. Don't forget to share your
final project to the gallery. And also there is an option and a Skillshare that
is called review. Please write a review
for this class because your review will
help this class stay longer on this platform
so your friends and other people can learn
this precious arts. Are you ready? Let's learn.
6. Sum-up : Congrats that. Now you are here. You now know how to make three based notching and braiding around the corners
or as a decoration. You can use that in books, but not only that, he can use that for
decorating mirrors, for decorating laws, and use
that in interior design. You can also use
that and embroidery. Thank you for being with me. By far. Now, you can be ambassador of this
are to the road. You can share whatever
you need to your friends. You can tell them about
this art or if you want, you can share the
link of my class to your friends about
posting your project. I have a suggestion for
you and that is next, please hold your art and
your hand or put it on your side and then take a photo because
you're human being, you have made that garden
your hands by your soap. You have emotions,
you have innovation. So I asked you to hold that
R and then take your photo, take a selfie or if you prefer not to show
your face, okay. Holes that are in a way
that the photo is taken. Not true. And also please share
reviewed in this class. As I told you, I think the review to this
class can make it longer on the platform and also others get attracted to learn this art. I also motivate you to share
project and review together. I mean, you take a video and you are holding your
project in your hand. You tell me whatever you
like about this class. This is a very interesting art. I share some keywords and some hashtags and the project
description and resources. So you can use them. Search for this art, see more of this art, and train your arms about
the colors, the patterns. The next lesson, and
in the next classes, I will teach you
either patterns, either way, dairy and
other types of this art. So please bear with me the
next classes and don't forget to follow me
in the next lesson.
7. Bonus: Creating Together: Welcome to this lesson and
let's do the project together. First, let me feature the first is Sudan who posts
that have projects? Let them fish as you can see how project the curves, the lines, and some printable yes, these PDFs that you
can download them from Project and
Resources section, then you need to print that
provider ruler and pen. Here you write your name
on top of the paper. And I wanted to do
the waiting here. For first part, I
don't use a ruler, just do it by hand. You can do that with me to see. I don't fast-forward
the video because I want to let you see how
much time does it take. That's so fun and relaxing. Also, it needs concentration and helps us to increase
our concentration. Yes, you can print that
and do that with me. While now. Let me just add curves
to their corners. And the other side.
That's enough. I guess. Now let's do that for
L-shaped high rotate that. And this time I use ruler. I rotated that. Make it clean as I scroll the ruler not to spread
the ink over the paper. Now we are getting
close to the corner. As you remember, we don't
connect the one on the corner. Now. Dissection. I didn't know if you do that when
you're on the phone or not, but you can have some
of these prints. And when you wanted to do del y talking on the phone
or you're waiting. You can do this. The paper, awesome
concentration and relaxing. We are now close to the end and then adding
curves to the color. Now. Yes, we are down and I
want to see your project. Thank you.
 Hadis Malekie, Detective in C4C Flat