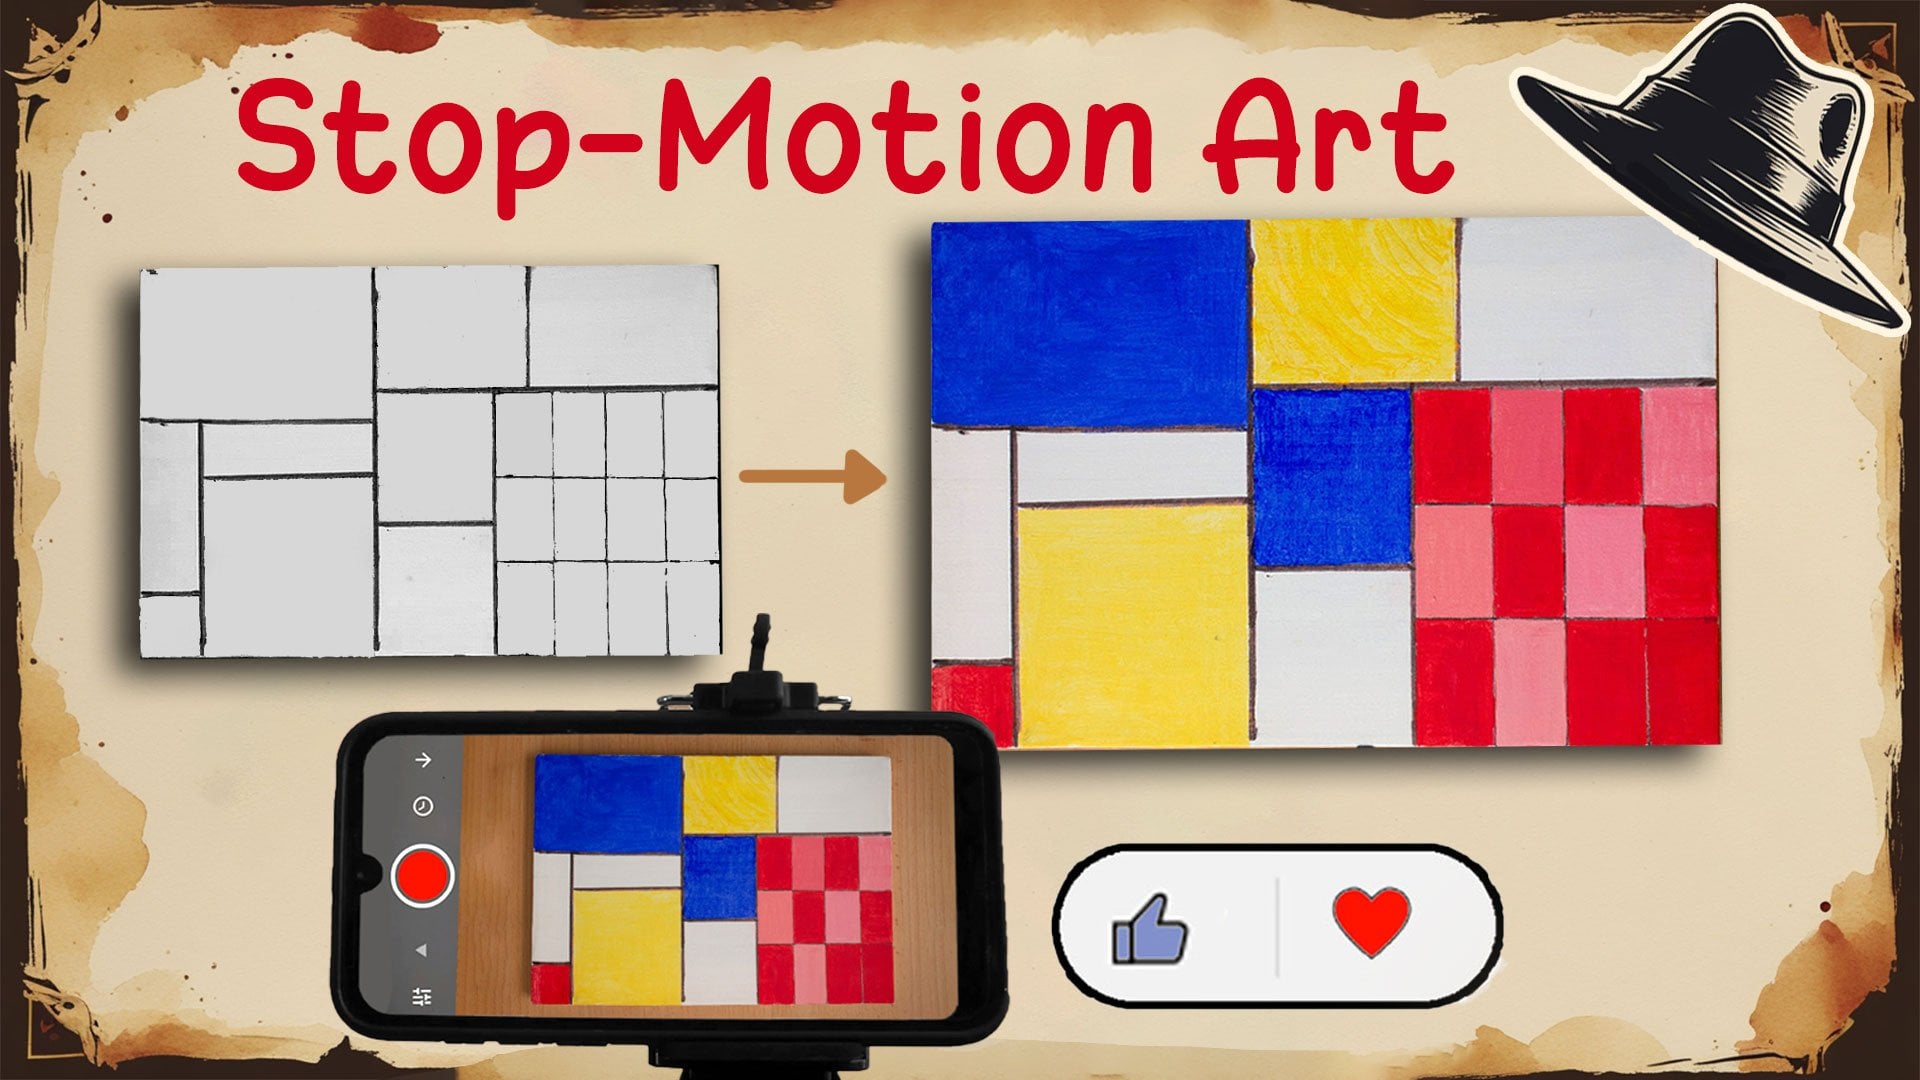
Transcripts
1. Introduction: If you search for shopping
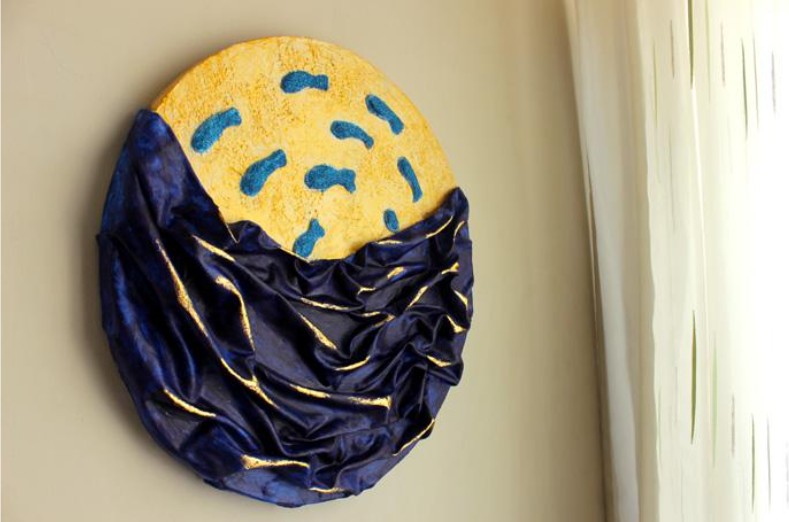
a gold plaster wall art, you see these results and how we can add gold
embellishment ourselves. In the twin class of this class, we learned how to make a
trey minimal wall art. We learned fabric technique. In this class, I will
teach you how to turn that art into this one. I named this CaspNC. Hi, my name is Harris Malachi. In this class, I will teach
you three techniques. First, how to make embos shapes on the
canvas like these fishes. Second, I teach you
glitter technique. We apply this technique
on the fishes. And third, I teach you
foil bond technique. We apply that on the waves to make a reflective
metallic effect. Everybody who is interested to learn and create
are welcomed. So see you in the next lessons. A
2. Embossing Fishes: In this lesson, we decide about the arrangements of
fishures in our canvas, and then we learn how to make emboss shapes using
texture paste. The idea that I have is
to turn the fabric part referring to water and
adding some fissures here. Now let's decide about, form, and arrangement of the fissures before starting to create
them with texture paste. I use pieces of paper. I cut them. First, I
try a single fish. We can dry with pencil, but here to make it visible under the
camera, I use a marker. Now, on another piece of paper, I try drawing two fishes. Now on another piece of paper, we try a combination
of three fissures. Then now I draw an arrangement
of small fissures. Yes, you see, I don't
draw them randomly. I have some invisible
circles in my mind and draw the fissures over
those imaginary circles. This is a good tip that in
character design, logo design, and composition, you always use invisible shapes like circle,
triangle, and square. Let's try them all.
I prefer this one. Now I try to transfer
the design and Canvas. You can use pencil. Here again, I use marker to
be visible under the camera. Okay, the design is ready
and we go for applying texture paste or modelic paste to form the three
D embass forms. To apploly the paste on canvas. We make a cone
using plastic bag. I use a glass or a mark to fill the bag with
texture paste easier. The plastic bag should
be a little bit thick. Here I use both a thin
plastic and a thick one. You see that difference. I place the glass and put the corner of plastic
bag in the glass. Then I pick amounts of paste
and put that in the bag. I shape it like a cone and then cut the tip with scissors. By pushing the paste
toward the hole, we draw borders of fishes
and fill inside of them. This thin plastic
needs more power, is not efficient,
and might be torn. Yes, it's ton of. Now I use the thick one. Fill it with paste. You know, working with
texture paste is so relaxing. You should be patient, and that takes you away
from the rushes in life. Now I cut a hole and
start pouring paste. I think I need to make the
whole larger to work easier. Let's cut it with scissors. Yes. Now I draw the borders of the fishes and fill
the space inside. Notice, this step needs speed. Right after this,
you should start forming the paste
into fish shapes. So if you think
you can't be fast, or your canvas is large, or you want to pulse
and take a rest, then instead of working on all
the fishes simultaneously, do it one by one, cover one fish paste, shape it, and then
go for another. Here we use brush, art specular, and water. We deep the brush
in water to make it wet and start forming the
paste, resembling a fish. Add more texture if needed. Be very patient and enjoy
this concentration state. We call it flow state. In flow state, mind focuses in a way that you don't
feel passing of time. Okay, I have finished making
forms and let it dry. Let them dry, prepare
some acrylic paint, and see you in the next lesson.
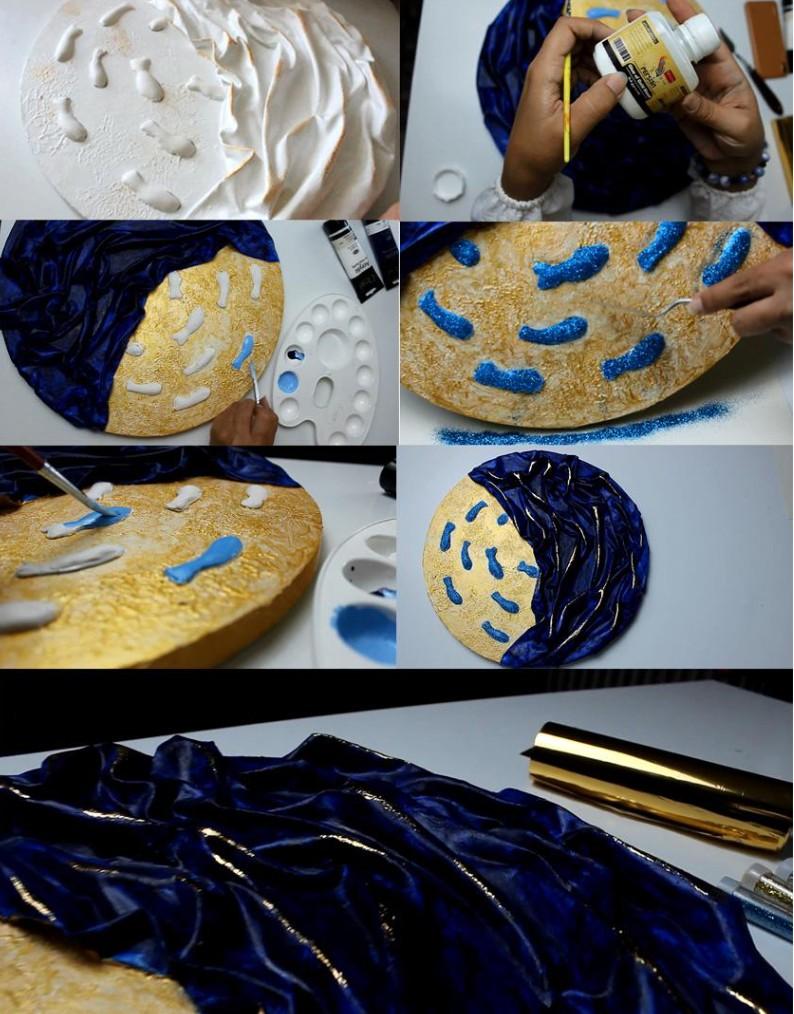
3. Painting: Now it's time to cover the paints you want
for different parts. Here I cover the
waves with blue, here with golden color, and the fishes with light blue. I prepare some blue color, mix it with a little
bit of water, it over comas, and start
covering the fabric part. First, I use a big brush
to cover the surface. And then I use a smaller brush to work on the details
of their wrinkles. Look at different angles to make sure you paint all
over the wrinkles. Since it's resembling water, I don't want it to
have a flat color. I like the dark and lights
in different areas, so I paint it only once
to keep these patterns. Now it's time to
color the flat area. We can leave it white. Also, light blue is nice choice. But here, I pick golden color. This is also a good
choice if you want to have your art bold
and with energy. I have another class on
my channel that helps you learn how to choose
combinations of colors. Save it to attend later
after this class. I pin the link of it down below. Okay. Now I prepare gold paint. I cover the surface
with a brush. I want to paint it with pattern. So look how I change
that direction of brush and how I
use short strukes. Now it's time to
paint the fishes. I want a light blue, so I mix white and blue
to make a lighter blue. In my other class about
colors and storytelling, I have explained how to make ts, shades, and tons of a color. Book the class to
watch it later. Look, they're now and smooth. Now I gently start
painting the fe. Do this carefully. Now let them dry in
the following lessons, I teach you two techniques, tie and Foil bond technique. Let the paint dry, and then we go for
adding amshments to. Oh.
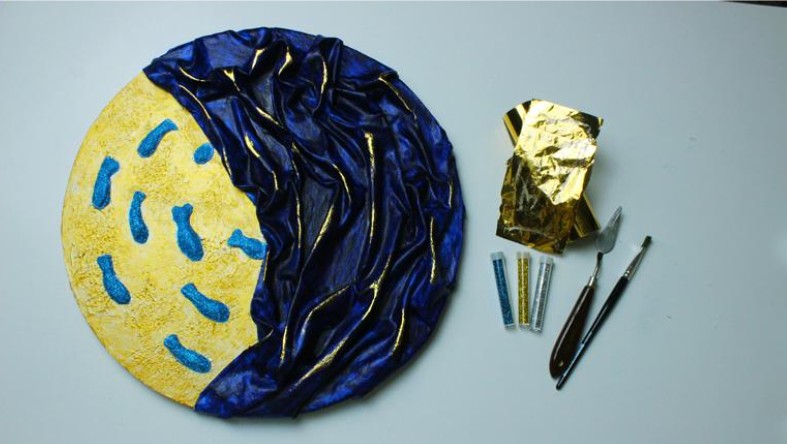
4. Glue Technique: In this lesson, I teach you
how to use a special glue to prepare the surfaces
that you want to add glitter or metallic
effect over them. I want to give a look theme
to my decorative art. I want to cover fissures
with blue glitter powder, and I want to add some
metal shine to the waves of the sea as resembling
reflection of sun and. There is a special glue called gold sheet glue or foil bond ads or Foil bond glue
or gold leaf glue. You cover a surface with this, after leaving it for some
hours, it becomes sticky. You can stick gold sheets, silver sheets, and so on. Here, I have a brush that I
use it only for this glue, since your brush will be sticky. Don't use a good
expensive brush, put a regular brush aside and every time
use only that one. I also here have
an unusable lid. I pour some glue in it and
start covering the fishes. D. Well, then now I want to cover some small parts on the
edges of the waves. In my other class, I taught you how to cover wrinkles with the touches
of gold acrylic paint. But now I want to create
a metal so I use glue. I add some yellow color to be able to detect the parts
I cover with glue. Now I brush some small
touches of glue on the edges. O h. We are done, leave it for at
least 2 hours and come back. The glue surface should be
prepared and sticky by then. Now let the glue
get active and make a sticker surface on the places that you want
to add embellishment. The glue be more than 2
hours and sticky surface. See you in the next lesson. Oh.
5. Glittering Technique: Now the surfaces are sticky. Look how it looks
when I touch them. It's now time to learn how to
add glitter powder on them. Now, more than 2
hours has passed. Look when I touch it,
it's completely sticky. I glitter powder gently
over the fish area. Now, using a brush, I gently spread
glitters to make sure all the sticky parts are
covered with glitter powder. Then I pick a piece of paper, put it under the canvas. U. Lift the canvas and with
hand or a pen or spatula, gently dave over the surface. The strokes makes scalor
fall on the paper, and you can collect
them for later uses. Now, the embellishment
of the fissures are down and we go for
the next technique. The next one is a
wonderful technique. Come to the next list
and and I teach that. O M
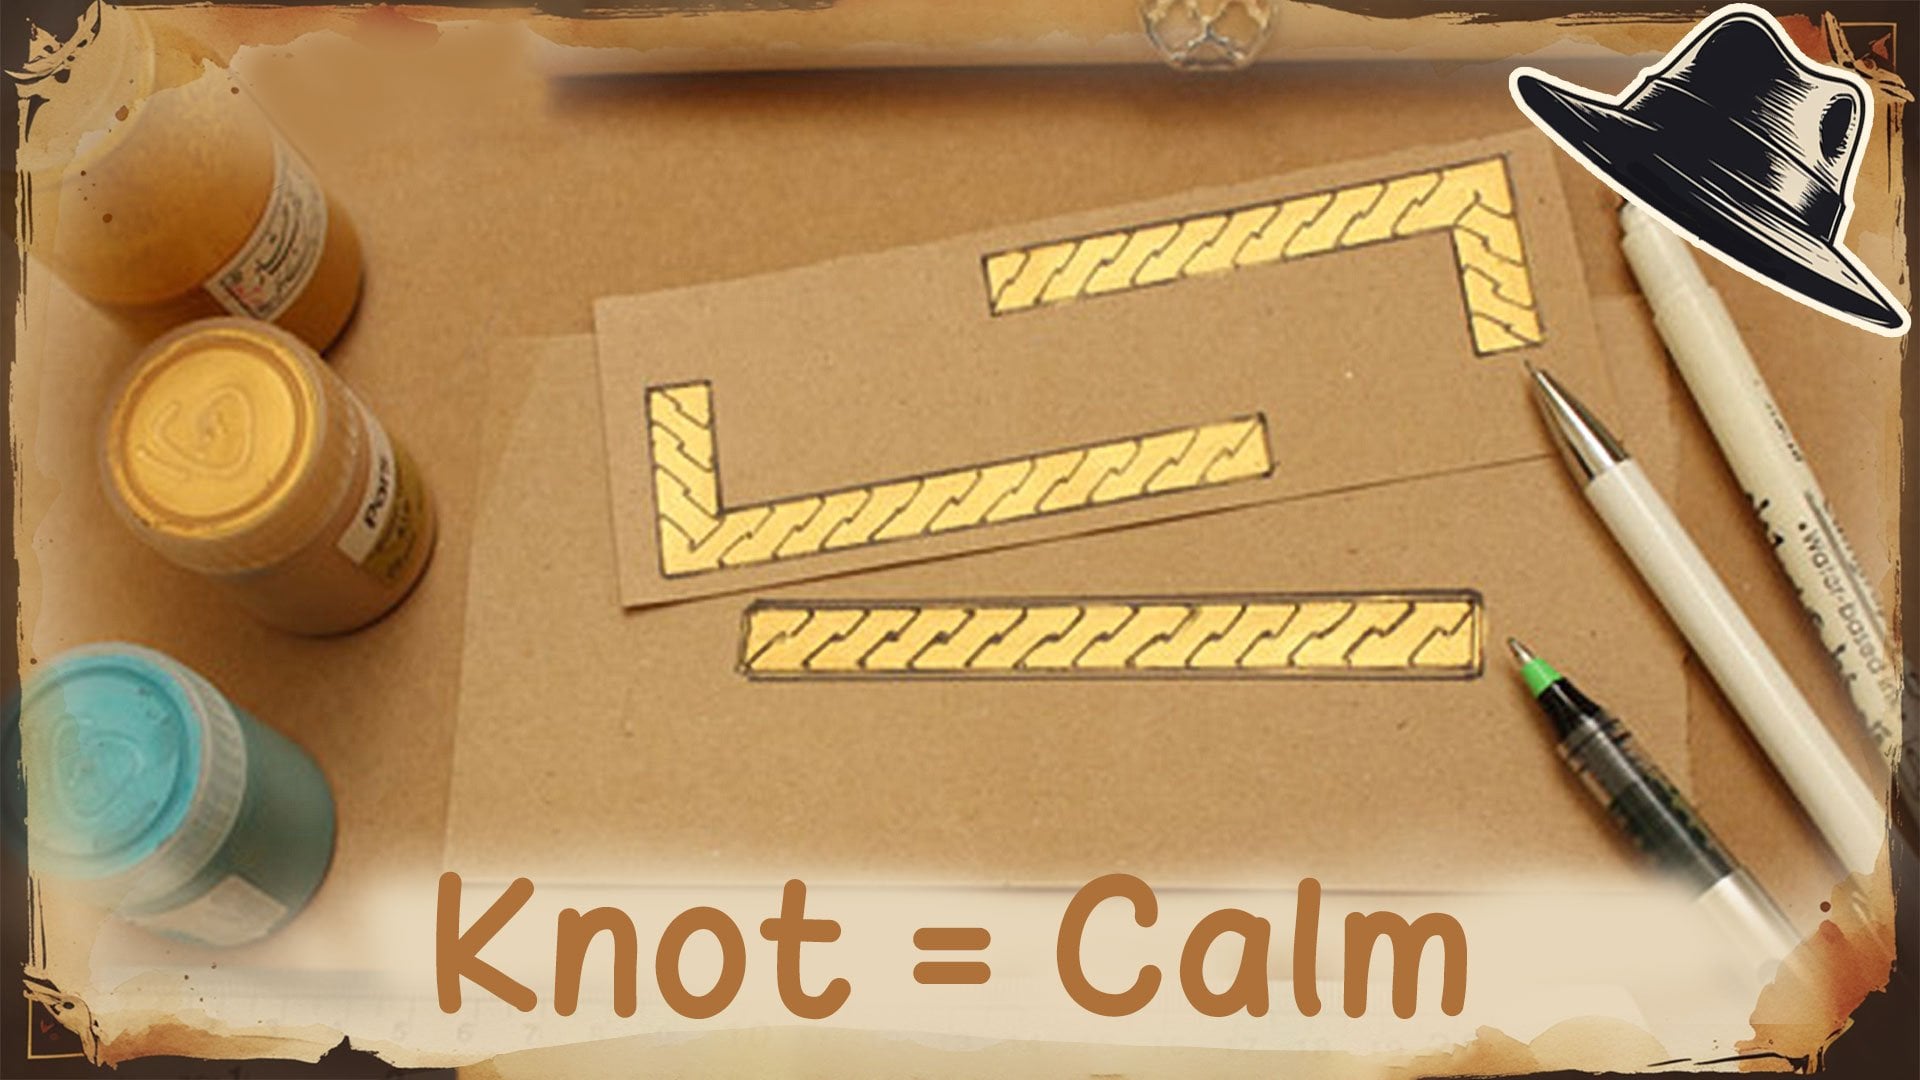
6. Foil Bond Technique: The next part is to add some reflections to the
edges of the waves. In this lesson, I teach you how to make that metal effect. In the previous class, we made gold touch effect, but now I want to make a gold reflective
effect like metal. This material is called F bond. This is a gold color. They are available in
other colors like silver, cop, rainbow, and so on. I got a piece of it. It has two sides. One of the sides are
a non shiny side. We stick this side over
the sticky surface, rub it hand or with
a piece of club. Then we remove the
foi bone fast. Look, a golden metallic
effect is on the sticky part, giving a reflective effect. I repeat this for all the parts that we have
applied blue on them. Look at the foil bond. You see the parts
that we use are now empty of the coating layer. Repeat this until there is
no sticker part remained. Wow. Look, it's so beautiful. You see, the result of
this technique is totally different from the
other technique I taught you in my other cast, which was about
adding touches of gold acrylic paint
over the edges. I paint the cast down below. And the next lesson I talk to
you about the project. Oh.
7. Project: Now, time for the
project of this class. Of course, for the project, I don't ask you to make
this complete art. I am the teacher and I feel the responsibility to make
a complete and big project, so you can believe that
the techniques that you learn are
applicable in projects, you can accept commissions or make projects and sell them. But the project of this
class is a smaller scale. What is the project
of this class? The project of this class
consists of three parts. First an image, second, a title, and third sentence. First part, image,
and the image part, you draw a rougher sketch of a cavas art idea that
you have in your mind. Then with arrows,
you define which of the one to three techniques you have learned in this class, you want to apply to
which part like this. The second part, put
a name for your art. For example, chocolate hopes. In the third part,
write a sentence about where your art you
can imagine is used. For example, on the
wall of my dining room, in the hall of the company
that my sister works in, or in the wall of the spa salon that is in
my city, in that street. In the project and
resources section, I have put a sample project, so you can download
and check that. By the way, if you want to do more than a off a sketch,
Yes, that's welcome. You can add a drawing. If you buy some of the materials and you have
experimented with them. Yes, take your photo and
share that the project, gy. Please make note that
to share a project, you should go to the
project and resources. Right now, make your
project, and yes, you can and it's possible
that you add changes, you make them change
or add other photos or remove something later
and update your project. So you end the next lesson
for the sum up. Oh.
8. Final Thoughts: Thanks for being with
me by far and Congress. Some final lists, I should tell you first about the materials. I didn't name any brand during the class
because it's obvious. Some brands are available in
different parts of the ward. If you have any question, yes, ask in the disc. Also, I put a file in the resources section.
Check that list. Yes. If you have
any experiments, if you done any techniques, or you have innovated
any new techniques. Yes, take a photo
and share that in the discussion board with
me and other students, they say sharing is caring. The other point and
the final point that I want to mention is
their review section. I myself, when I want to buy
a material product online or attend some classes or buy a digital product,
read their reviews. Please write a review
for the class. Other new students. Can decide better whether
this class fits their goals or their interest or not and decide based on your reviews. I ask you to please
make note to use the sections project discussion
and review separately. For example, if you want
to share your project, use project section, not
the discussion board, or if you have a question, ask that in the
discussion board, not in the review section, because if you ask that
in the discussion board, then the other students can read the answer and learn more. I wish you success, and I hope you create
an experiment, and I wish you success in your creative journey
and make sure to follow my channels
and speeches for upcoming new techniques
and creative project. See you soon and goodbye.
9. Intro: Look at your hands, look at
the leaves of the trees, the lines from triangles. This shape seems to be the
quiet architecture of a world. We can also see that in a bird flowing or in the
structure of crystals. But what if we could
speak its language. In this class, that is
exactly what we do. First, we put on our detective
pad and discover them. Then we grab our creative tools. We create them first with
the sound of a pencil, and then with the glide of
a brush, we make illusions. We let a flat surface
breathe with dimension. I'm Hadis Maliki, your host, and by the end, you won't just see triangles. You'll understand how
to give them depth, and in doing so, you might just find a little depth of your
own and the passes too. Welcome to the workshop
and see you there.
10. Analyze: Welcome, and it's now time
to put on our detective hat. We want to do a mini project, and that is to find triangles
in photos or painting. You choose a photo and a
painting and detect triangles. I show you how to
do that on laptop, on mobile, or you
can just use print. I want just to do that. On laptop or computer, you can use a printer screen
software called Light shot. Using that, we can
take screenshots. Here I have prepared some of my photographs and
famous painting, this one, we try to
detect triangles in them. You can use your paintings, your photographs,
whatever you like. Let's start by this painting, the milkmde by ermir. I press printer screen button. Then here we have tools
line two and color to. Here I want to draw
red triangles. I start by the largest
triangle I can see. The milkmaid and the
table here also, we can see a triangle
that is made by perspective of the window and
the entrance of the light. What else we can find? We can go more in detail. For example, here, we can see that our eyes
transfers between eye, the elbow, and the milk. Also, a shadow here
forms a triangle. We can detect another
triangle in this shadow. Let's go further in details. Here, we can also see triangles and here also on
the wrinkles of the skirt. Okay. Now we save the photo. Let's go for another photo. This is a photo I
take from a cake, and here we can detect
a triangle on top, and you can also detect
the triangles that are not obuse because we know the base is
also a triangle. What is important
is that we train our eyes and our mind
to detect these forms. Save this one also. We want to post this as project in the project
section of the cast. Now this interesting photo. You see, we feel
good about this. It feels like rhythm,
like harmony. Let's find triangles
and see what happens. Do you remember we draw
triangles on the milkmaid? In that painting, we practice to first see the largest triangles and then go to the smaller one. We practice how to solve problems in larger scale
and then go to details. Here, the triangles
are at the same size, but they had the rhythm. They are all now toward
the center of the plant. You see? All the triangles
that we detect far, by far, are toward the
center of the plant. Now a wonderful thing happen. Let's continue. Yeah, this one, Locate here. And now the triangles
are pointing outward from the
center of the plant. So we have another
rhythm, another harmony. These harmonies, these rhythm, these patterns made our eyes
please from the visuals. When we do this practice, we train our eyes, and we can use this
in our paintings. In fact, nature is a
very good resource to inspire us to get
freedoms, to get forms. Let's go for another photo. This photo is me, and I posted it for
free on a platform, and I noticed many
people use that in their blocks that
is so happy for me, that's an honor for me. Let's start by detecting small triangles this time
and then go for larger ones. We can see a triangle
between hand, between eyes, and between pencils because our eyes transfer
on this triangle. Also the triangular
shape of body, the shoulders and the waist and this triangle here,
the negative space. And this photo is the one
that I took in the park. I remember I was sitting in a corner and
I was taking photos. I found this very interesting. This photo was also participated
in two exhibitions. One of them was in London. Here we detect triangles, this one, this one, and also on the floor, the perspective
gives us Triangle. Please notice that you
should not make and detect many triangles
in all of your photos. No. One of your paintings or photos can only
have one triangle, and that is the one
golden triangle. Hadis, I prefer to work
with mobile. Can I do that? Of course, Hadis is famous for making classes that are
easy for everyone to do, at least equipment needed. So pick your phone, whatever operating
system it has, and open the photos
and paintings. Press edit on your photo, then find a tool to draw over
the photo, pick a color, and pick a line tool and
start drawing triangles. Even one triangle can be the
one that you have detected. Maybe one photo has
only one triangle. That is also a good one. Save the photo and post it as your mini project in
the project gallery. That's it. That was so easy. Are there any other
option? Of course, yes. If you are interested to
work with another software, for example, you like to work with Photoshop, at Photoshop. Okay, you can use that or Photop that is free
online software. Or if you are not comfortable
with digital devices, you can just print the photo or painting and draw by a pen
or a marker over that. Do this and I'll see
you in the next lesson.
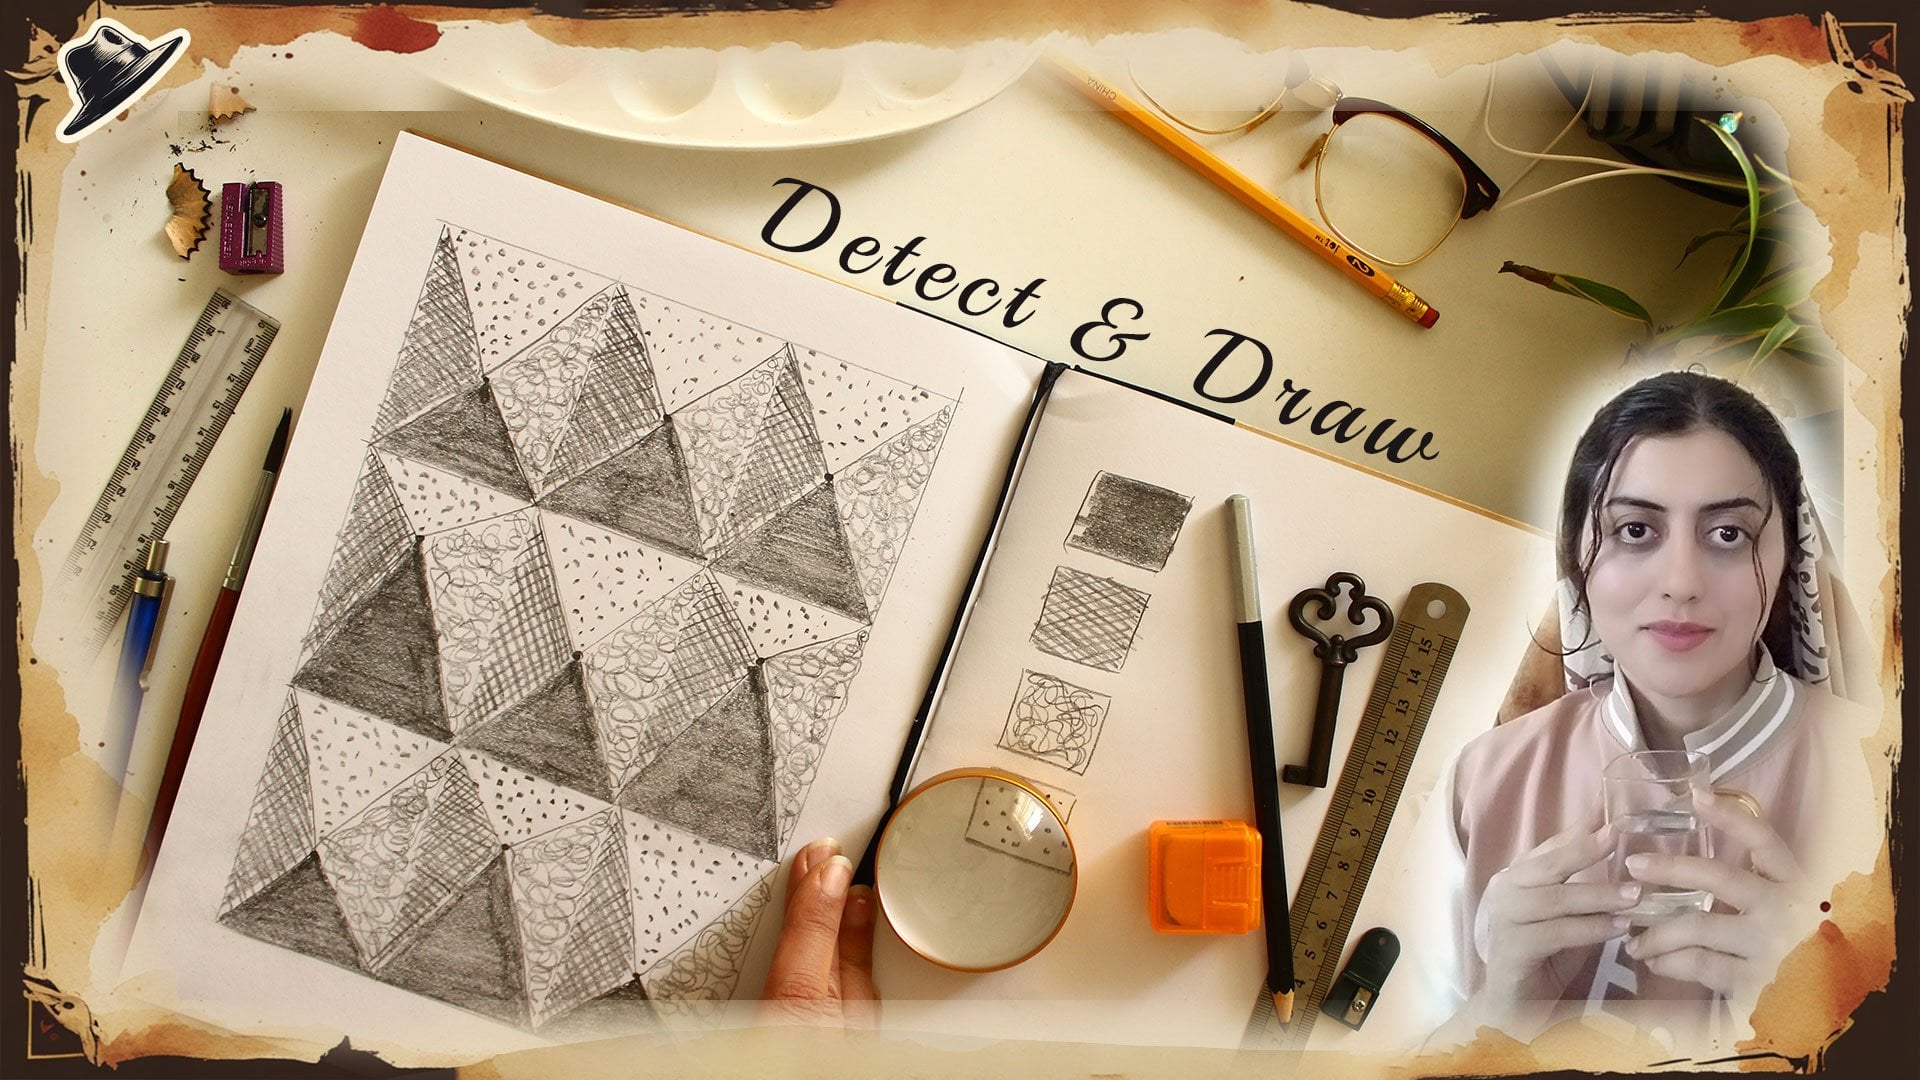
11. Pencil Texture: Welcome back, and now it's
time for your creative hats. In this lesson, we
want to create. We want to create
things with triangles. Here is a small
sketch I have made, and now we want to
perform it on this paper. In this lesson, we need pencil. We want to do the pattern
only with pencil. Yes. And now, be with me, do the work, and let's see
what magic will happen. Here, we want first to divide the blank page into triangles or squares,
whatever you like. Just making triangles,
and that is enough. We don't want to
be very specific, very calculated, very detailed. No, no, no, draw triangles from the squares
that we are making. Have you ever heard the
fear from blank page, a blank page that we
don't start drawing on that because we
want to first plan. No, divide it and start and
let's see what happened. After dividing the
page into rectangles, now we put a circle
or a better to say, a dot on each rectangle. You can put it exactly
on the center of that. That is also a way
of making shaves, but here, I put
them very randomly. And then using a ruler or no, just by hand, connect
the dot to the corners. Both ruler and drawing
board hands are acceptable, both being so calculated
about numbers and also make it
roughly or acceptable. It gives the vibe. For example, here, I want to
have a loose sketchy one. I use this method, and this is the last dot that
I connected to the corners. What we can see,
it just seems like some nails and some threads
that are between them. Yes, it just look like a web. Our imagination can
see it just like that. But now we want to
add magic to that. We want to make it emerge. We want to make this paper
waken up and not be flat. And the magic is
that we use values. We want to add black and white. We want to add darkness
and lightness. Here, I draw four squares
as the reference. One of them has
the darkest value and we cover it
with black pencil. This is square, we use
it as the lightest. But instead of cover
it with a light value. I use dots. Yes,
we can use dots. We can use patterns to add value to our reference squares. And in this one, we use the scribe doodly
lines to add value. And for the third square, we use hashing or hatching. We use hatching and
add some values. I want to add more,
make it darker. So another layer of lines, and also we can go further
and do crosshatching. This is crosshatching. So you see by texture,
we made values. And this is our reference. We want to paint it
over the squares. But how to decide which of them should cover
which triangle. Imagine the light is
on the top right one. So the light rays are
coming from the top right. So the bottom triangle should be covered with the darkest
value with black. Take your pen and cover the lowest triangle on each
rectangle with darkest value. We are making the
values from top. Our mind is seeing it from top. So I like the effect and the pattern in that there's no force to make it
just be solid and very flat. No, these patterns are
also likely and lovely. What we are doing is
that we are trying to make what we are
imagining come true. We have in our imagine that
this can be a tree D shape. This can be a shape that
light is from top right. So the bottoms are black. What our eyes are saying
that is not yet that tree D, that not flat page. But we are creating
our imaginative word. We are repeating
that to make that. Or try to make our
imagination come through, to make the
imaginative world and the real world be the same
is so stress relieving. We are so concentrated
in the process. And now we go for
the second value. Again, considering the light
rays are from top, right, so the left triangle on each rectangle should
be the third tone. That means not as dark as black, but also not very light. And here we apply our technique
that was cross hatching. And for the less darker, we use scribbling, our
second value pattern. And the top triangle. What pattern we
should apply on that? Yes, we put our first reference for lightness, that is dots. You see in the first triangle, the three D effect is emerging. We go for the next one and
apply cross hatching to this. You can also use a roller and using that is also a
technique that you can control the hatching easier. We can complete this rectangle first and then go for
other rectangles. But here, we can also first do all cross hatchings and then do all scribbles and then
do all dot patterns. That's all depending on how
you want to experiment. You can experiment both. I remember when I
was in kindergarten, I wanted to do things like this, first one lines, then
all the other lines. And our teachers was saying, No, it's not correct. And now, when I think
back, think about it, I think we cannot say what is
wrong and what is correct. We can experiment. When we do one rectangle,
then one rectangle, then one rectangle,
we are experiment with one small project
and then continuing that. That is a way of thinking. And when we do all
the dark triangles, then all the cross
hatching triangles, that is also another
way of thinking. That way of thinking made Ford make factories to produce cars. And we can experiment with both. Now we go for the
scribble pattern, and you can do it with
whatever order that you want. Just you can use a handkerchief. So when you put the hand
on the graphit of pencil, it does not spread or smudge. If you have problem
with the smudge, you can start from top and then go for the next row and
then go for the next row. This is a technique to
make the work clean. If you're working with
pencil, of course, that's another story if
you are working that on the wall with
paints, and so on. You see what we are
doing, we are repeating. We are repeating patterns. This repetition in nature
is what nature is built on. Tessellation that is putting
similar things together. We are practicing this also. Nature can inspire us. And now look at the pattern. We see triangles on top of that. These triangles looks empty. They look like the
pattern or caught there. But our imagination know that they are part
of the pattern. They are part of the shape, and the light are covering them. So we cover them with dots, and we make our illusion
after the parts come true. Covering parts,
covering surface with dots is also a
technique in printing. If you Google or search or ask AI about half tone,
that is the word. I recommend you search for
that half tone printing. Also, adding points to
painting or coloring by points is a school
of painting that was called pontism that was
about impersionism. In that school, instead of
coloring a surface with green, we add yellow dots
and then blue dots. And when we look from far, we can see green color. Okay, now the magic
has happened. Now we can see how our eyes
see the treed pattern. And we have applied four
textures on the pattern. Let me zoom and you
see the patterns. Our shape or magic
has now happened. In the next lesson,
we will use pains. See you soon in the next lesson.
12. Colorize with Brush: Welcome back in another lesson. In the previous lesson, we use a dry media. We used pencil and we
created this illusion. In this lesson, we want
to try a wet media. Here, we use acrylic, but you can use whatever
you have access to. You can use watercolor, you can use coffee. Yes. In my other class, we used coffee to
make vintage paper. You can use that glass to
make vintage papers too. Like the previous lesson, I want to prefer four
values of color. Here we have black
color and white color. By mixing them, we make
four values of color. I add water to black
color and mix it to make the brush move
smoothly on the paper. Now it's time to
make the values. I put black color
in four places and then add different amount of white color to them to
make different values. And you see how it's
interesting by adding different amount of white,
different values emerge. Acrylic paint is a
water soluble paint. And using water, you can
make it move smoothly. So here I mix black acrylic paint with
white acrylic paint. I choose two types
of paints that are both water soluble
or water based. Here is the first value. Let's add some more
white to that to make it lighter to show more light. We want to make an illusion
with these values. And now we create a
little lighter values. So we add more white to that. This is good. And for
the very light one, I mix the gray that I had here. You know what? It's
interesting that in real life, we had gradients of color. Yes. In real life, we had
gradients of color. But here or in the
previous lesson, we break that into four part. We break that as a step, not as a gradient. It's like that in real life, for solving the problems, we break that into sections
and then we solve them. We make the gradient
into discrete values. We use this technique in
problem solving and also in mathematics and in everything. And that's very interesting. Here, I make three rows. Despite the previous lesson
that we break the surface, the page to rectangles. Here, we make triangles. Here, we make
triangles like this. First draw the horizontal lines, then select the dots. Here the same. You can make it make the pattern
so geometric or no, put the dots in random places. After connecting
that, then you put a dot on the center or no, not the center, just
inside any triangle. And by connecting these
dots to the corners, we form a pattern. Let's see what happens. Can you guess what D, what illusion of tree D we can extract and apply
to this pattern. By far, it's just a web. It's just like
threads and nails. But our imagination
can make it Tre D. Try to imagine how you
want to make the change. If there was a pattern in
the three D real life, if there was a light, then what triangles
were brighter. Let me here teach
you a trick, too, and that is using a paper
stick, paper blue stick. You can use that. And before sticking
that on the paper, you stick that to the cloth, so it's not very sticky. So after peeling that
off of the paper, your paper is not damaged. Here, I apply that to the parts that I want
to protect them. Here it is paper. That's okay. We can be precise. But if you have a commission of performing this
one on a wall, or you are doing
that on a wall art, on a canvas, then this
technique can help a lot by adding stick
on wall or on canvas, we can prevent the acrylic to spread on places
that we don't want. Now it's time to apply the
values to the rectangles. Here, again, I assume that
the light is from top right, but you can assume
whatever you like. So we have different triangles
and four values here. The triangles that
are on the top side, that the light hit
them directly should be lighter like this triangle. Gently apply the paint on that. The good point about acrylic paint is that
it's water soluble, and it has a
difference with guash. And that is when it gets dry, then it cannot be
solved in water again. So the next layer will
cover it completely. The layers that you put over each other will
not mix together. That is the characteristics
of acrylic. Each layer is its own layer. When it dries, then it won't solve in any water or any
other color on top of it. Now I clean the brush, and we go for the next
series of triangles. If the light is from top right and the rays are hitting the triangles
from top right, so the triangles that
are on the left side, these triangles might and
must have the second value. They are not the
brightest value, but the second value like these triangles that we
are painting together. You see here, the illusion of Tre D is emerging gradually. It's like we are looking
on top of pyramids. Pyramids of Egypt, have
you ever traveled there? I have not yet. And I have
researched, and I think The pyramids of Egypts
are in different shapes, both having a
triangle as the base, that means three sided pyramids and also few of them four sided. Also I read that there
are eight sided. That's also interesting. Now let's go for
the third value. The triangles that are on the
left side of our pyramids. So the lights are hitting
them a little bit. Working with wet media is
having another experience. It's smooth, it's fluid. It has movement. And also, since the outcome
is clean and it's near to the material that
is applied to walls, so they are used in
fo painting too. You see here, I am not very
careful about the lines. They are exiting
intentionally the borders. I want to show you how acrylic paint can cover
what is underneath. Now, we cover these triangles that now they look like holes. But we cover that with the
darkest value that we have made with pure black and look
how different it became. Now our eyes are living. This is obeying the
rules of physical world, obeying the rules of light. Look at here. I intentionally go outside and cover the stick just to show you that
we can peel that off. I was telling you that we are applying the rules
of physical world. That is how masters do. They did not color the surface. I'm talking about
the realistic one. Not color the surface, but they applied how light
would appear the colors. Now, I covered the sections that the color was
outside the border. You see it covered the
underneath completely, and we can correct
anything that is unwanted. Acrylic paint covers
the underneath if and only if it's dry. You should wait, and acrylic is getting dry very
soon, unlike oil paint. Now I peel off the
stick, and you see, this is a very powerful
and good trick to do when you are painting
on wall or a wall art. I really like the result. Look at the result. It's
really like stones. It's like we have made stones. That's amazing. And this
was the previous work. Awesome. Make these projects and see you in the
summer blessin.
13. Summup: How was it? Congrats
creative detectives. I want to see your detections
and your creations. Thanks for being
with me up to here. We talked about triangles. We put on our detective
glasses and detect triangles. Then we picked a dry medium and resembled
crystals but with textures. After that, we picked
a wet medium to make the flat paper
get its dimension. You know what to do now. First, write a class review and your takeaways
from this class. It helps others to
choose the class, and it helps me in creating
my future classes. Then share your works, detections, and
creations as project, and then come to the
discussion board and share your thoughts with
me and other students. Can wait to see your projects and see you and
then next classes, don't forget to
follow me so you get notified of my future
classes, see you
 Hadis Malekie, Detective in C4C Flat