Transcripts
1. Intro: Hi, welcome to Modern
Black Work sampler. Hi. My name is Becka Rahn. I'm a full time teaching artist based in Minneapolis, Minnesota. I specialize in
fiber and paper art, kind of a mixed media
intersection between those two. So I use a lot of fiber art
techniques like embroidery, and I also combine
them with paper and other kinds of more non
traditional materials. In this class, we're going to do a non traditional style sampler, instead of kind of the
classic embroidery sampler where you do a satin stitch
and a running stitch. This set of stitches are all
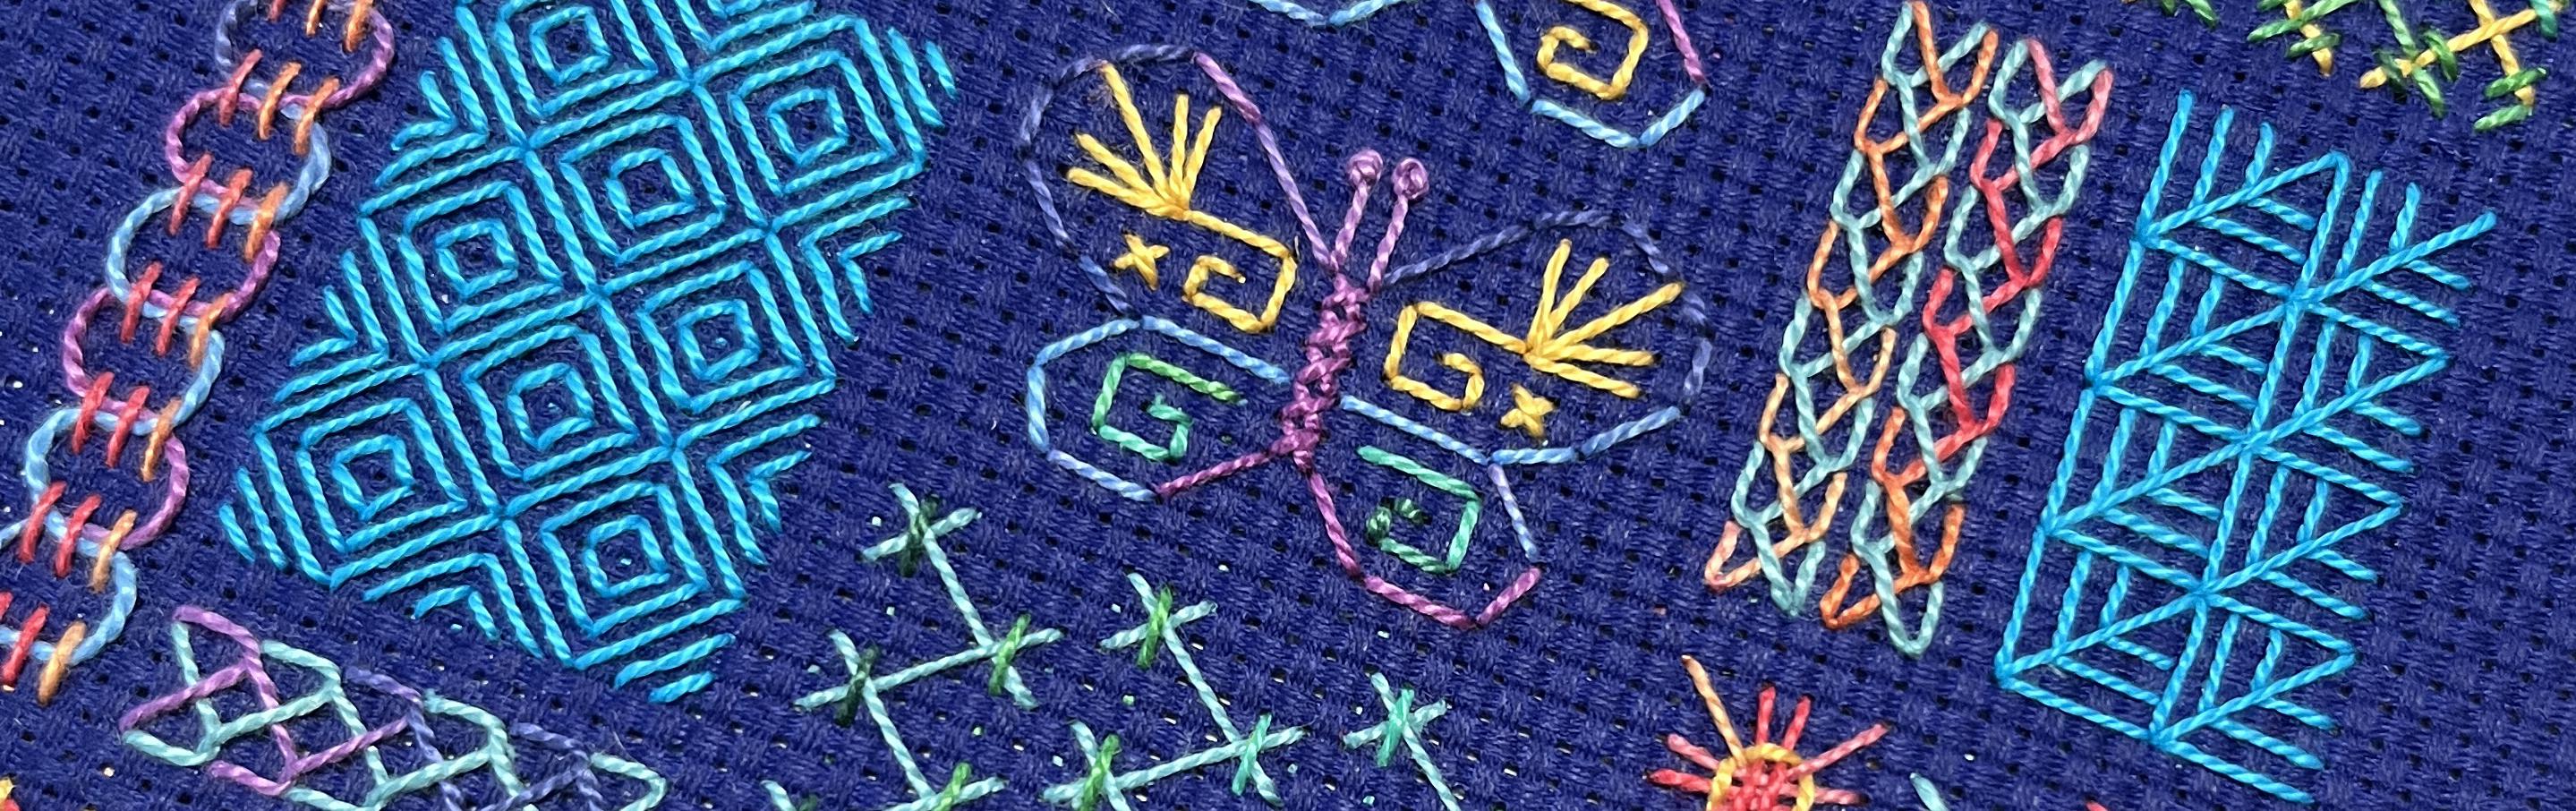
based on a gritted pattern. So they are worked on a kind of fabric called an even-weave, sometimes known as cross
stitch fabric or aida cloth. And these stitches are basically designed to look really awesome
on this kind of fabric. Now, the style of
embroidery is based on a really ancient technique. It was popular in
the 15th century. You can find examples
if you look in museum collections like this one from the Victoria
and Albert Museum. Black work is sort of known. Its distinctive
style is that it is repeating patterns of kind of geometric shapes that are stitched in black thread
on a white background. In this class, I'm going to take a kind of more modern
approach to that. So we're going to
shake it up with using different colors and combining
colors into stitches. But they're going to be based on that idea of repeating patterns
that can fill a space. Traditional blackwork
embroidery was done mostly with two
different stitches, the backstitch and one
called the Holbein stitch. Now, here's a fun fact,
at least I think so. The Holbein stitch is actually named for the painter
Hans Holbein, because in the portraits that he painted from that same era, he was so detailed that
scholars can recognize the stitch from the tiny
detailed parts of his painting. So they named the stitch
after the painter. In this class,
we're not going to stick to just two stitches. We're actually going to
use 14 different stitches. Some of them are based on
those traditional stitches, and some are more
modern interpretations. I wanted to add
some more stitches that kind of keep the same style are still
inspired by black work, but let us kind of explore different ways of combining color and using
variegated threads. You don't have to have a lot of embroidery experience
for this class. It's helpful if
you've, you know, stitched a few things with
the needle and thread before. But otherwise, you can
just jump right in. Every lesson has got step by step instructions for how
to do every single stitch. We'll talk more in
the next lesson about what your project
is from this class and how you can choose kind of different options to make the kind of
project you want to do.
2. Project Options: So let's talk projects. There are kind of two different ways you can use this class. So option one is to complete
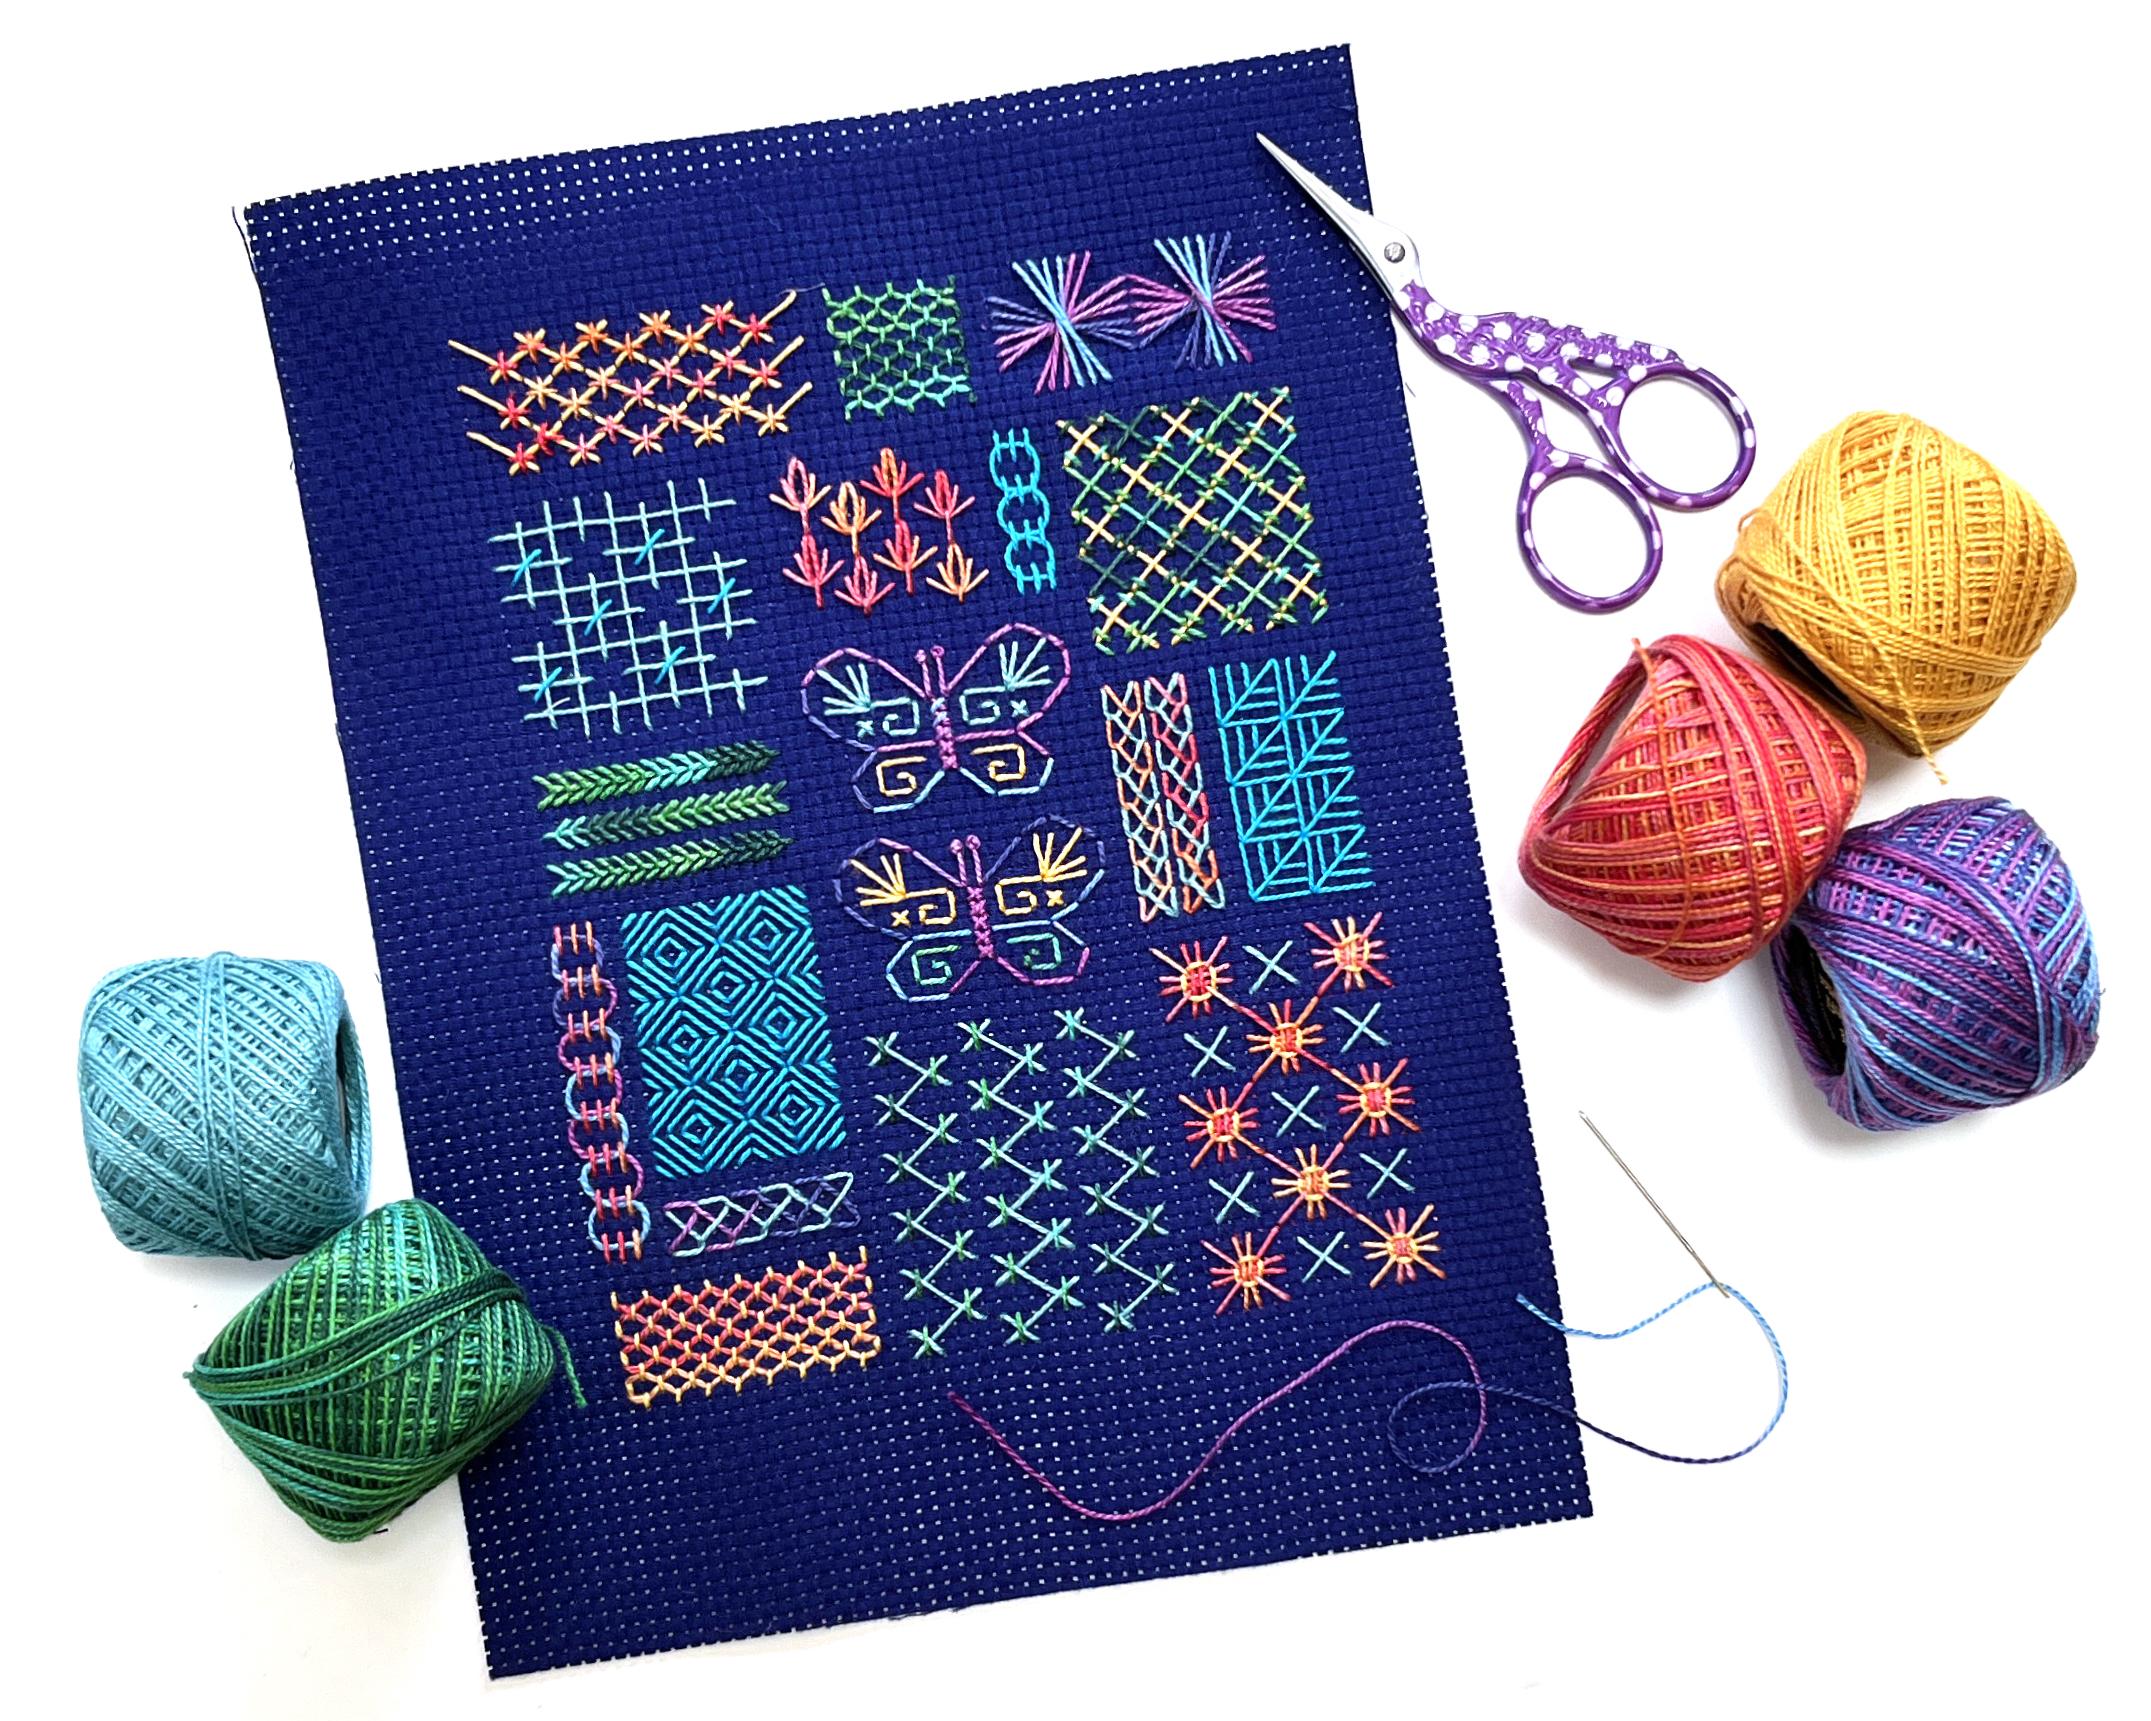
a sampler like this. This is what I'll be stitching
through all of the lessons and kind of completing everything
together as one piece. So each lesson, we're going to cover each of the
different stitches, and I'm going to
talk to you about color choices and
placement so that you can create kind of a
cohesive sampler of all 14 stitches altogether. Now, if you don't feel like
making a whole sampler, then you can pick and choose. You can jump around between the lessons and choose the
stitches that you're really interested in and stitch small samples of just that
stitch and maybe try filling, bigger spaces with it. So that's also an option. So you can think about the
projects for this class, kind of like a choose
your on adventure. If you want to create a sampler, then I'm going to walk you
through how to do all of those different
stitches and make kind of one cohesive
piece at the end. If a sampler isn't
really your style, then choose option two, where you can just focus in
on one particular stitch. For instance, this is
the Brighton stitch. You can stitch a sample and then use it to create
your own projects. Like this book I
finished this morning. This is the Brighton
stitch stitched on the cover of just a
little book that I made. And you can explore
things like that using your choice of
stitches from this class. So I wanted you to be able
to kind of pick the way you want to use this class and what makes the
most sense for you. The most important part
of choosing a project, I think, is sharing
your project. We would all love to see
an example of what you've decided to stitch in the
project section for this class. Not only is it fun to show
off what you've accomplished, but it's also really
great for everybody to be able to see the
different kinds of fabrics and threads and color
choices that you make to help everyone
have more ideas, more creative things that you
can do with these stitches. So be sure to share
your project in the project section when
you're done stitching.
3. Materials & Tools: All right. Let's talk
tools and materials. No matter what style of project
you are going to stitch, you're going to need
the same materials and tools to get started. So let's talk first about the fabric we're
going to stitch on. This is a piece of what they
call even weave fabric. It's also called Ida cloth
or cross stitch fabric. That's what I'm going to
use to stitch my samples. There are other kinds of embroidery fabric that
you can use that have the same gritted
texture to them. But I think this pattern is really designed to work
best on Ida cloth. Now, the fabric that you want to look for is what
they call 11 count. 11 count means that there are
11 squares in every inch. If you use an 11
count like I do, your finished piece is
going to turn out about 6.5 by 5 " if you're going
to stitch the whole sampler. So you can use a size
fabric that's a little bit bigger that has fewer
squares to the inch than 11, but I wouldn't go any smaller. And the reason for that is that some of the stitches
we're going to be making, if you stitch on a
smaller size fabric, the pieces of the
stitches will just be too small and they'll be
really difficult to stitch. So ideal is an 11 count. Now, you'll notice
I've stitched all of my samples on
this nice navy blue. You can use any color
that you want to. This is kind of turning
black work upside down by doing a dark background with lighter colored stitches. So you could stitch on a
white or a cream if you want a more kind of traditional
appearance. Okay. Now that we've covered
fabric, let's talk threads. Now, I made a choice
to stitch all of my samples in what they call
a size eight pearl cotton. Now, this is a kind
of embroidery thread. I love the kind
made by Wonderfll. That's the company
that makes it. There are other ones out there. And this is a size eight, and that is ideal for this 11
count fabric that we have. Reason I chose pearl cotton is because you stitch this
thread as all one thread. It stays together like
this as opposed to a cross stitch floss
or embroidery floss, where it is made up of six little tiny individual threads. A lot of embroidery
works with that, and it's a great thread. But the stitches
are going to be a lot more crisp and distinct, as you can see here
when we're working with this one more solid
strand of thread. You can absolutely substitute in DMC floss if
that's all you have. I would use three of those
small strands of thread together to make up a thread that's about the same
size as this Pearl cotton. Now, I have put in the supplies
handout for this class the colors that I'm using for exactly the sampler that
I'm making in class. But just to kind of give
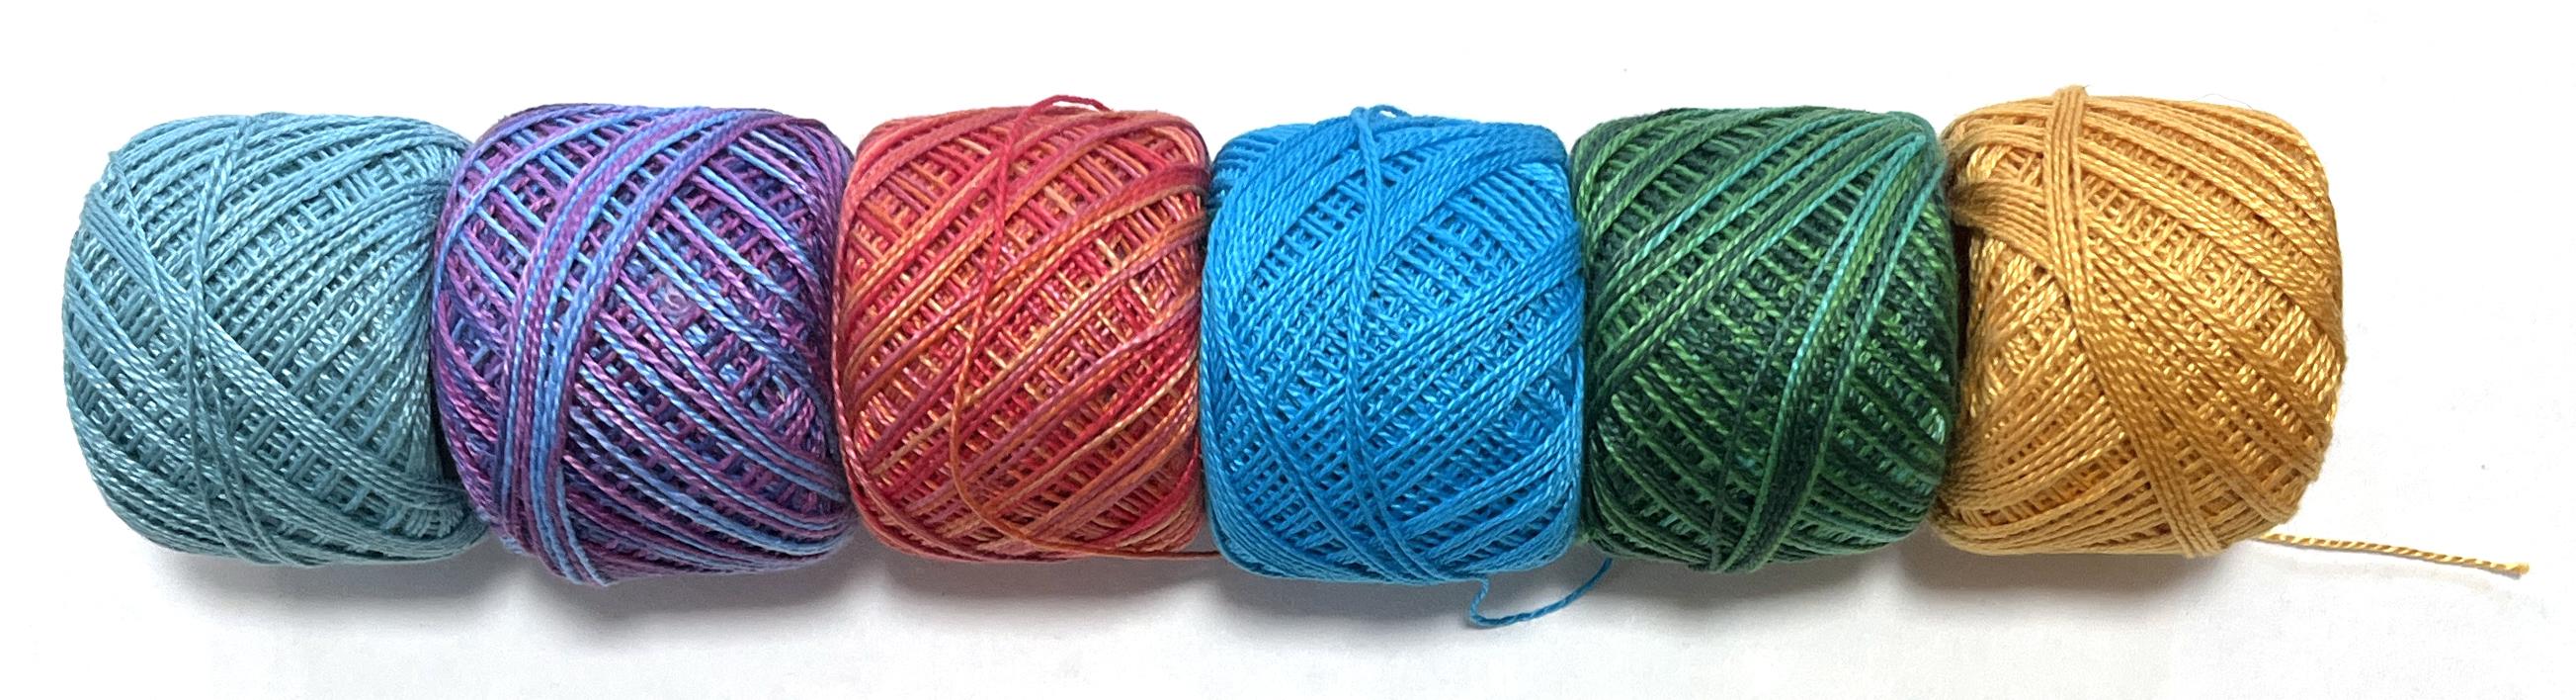
you a little breakdown, I decided to use three variegated colors and
three solid colors for this. And you'll notice that my colors are very
much the same value, which means none
of them are much lighter or much darker
than the others. So you're looking
for about six colors that are about the same value, the same lightness or darkness. You also want to make sure
that whatever colors you're using are a good contrast
to your background color. So I didn't use any
blues in my sample here so that they would really show up against
that blue fabric. Color choices are, of
course, up to you. You can do this with more or
fewer colors if you want to, but six is kind of what I
balanced out the pattern to be so that you get
a nice distribution of color across the pattern. Okay? So pearl cotton thread. You will also need a
cross stitch needle. So even though we're
not doing crossstitch, a cross stitch needle is kind of the ideal
one for stitching this because cross stitch
needles have a blunt point. And that helps us kind of guide the needle through
those little holes in the fabric we're
going to stitch through versus splitting it or
splitting the thread. So that kind of ball point, that rounded point on the
needle is really helpful. I've got a size 22, which I think is great for working on this size of fabric. A couple of other optional or maybe not so optional things, you'll need a pair of scissors. I think it's helpful
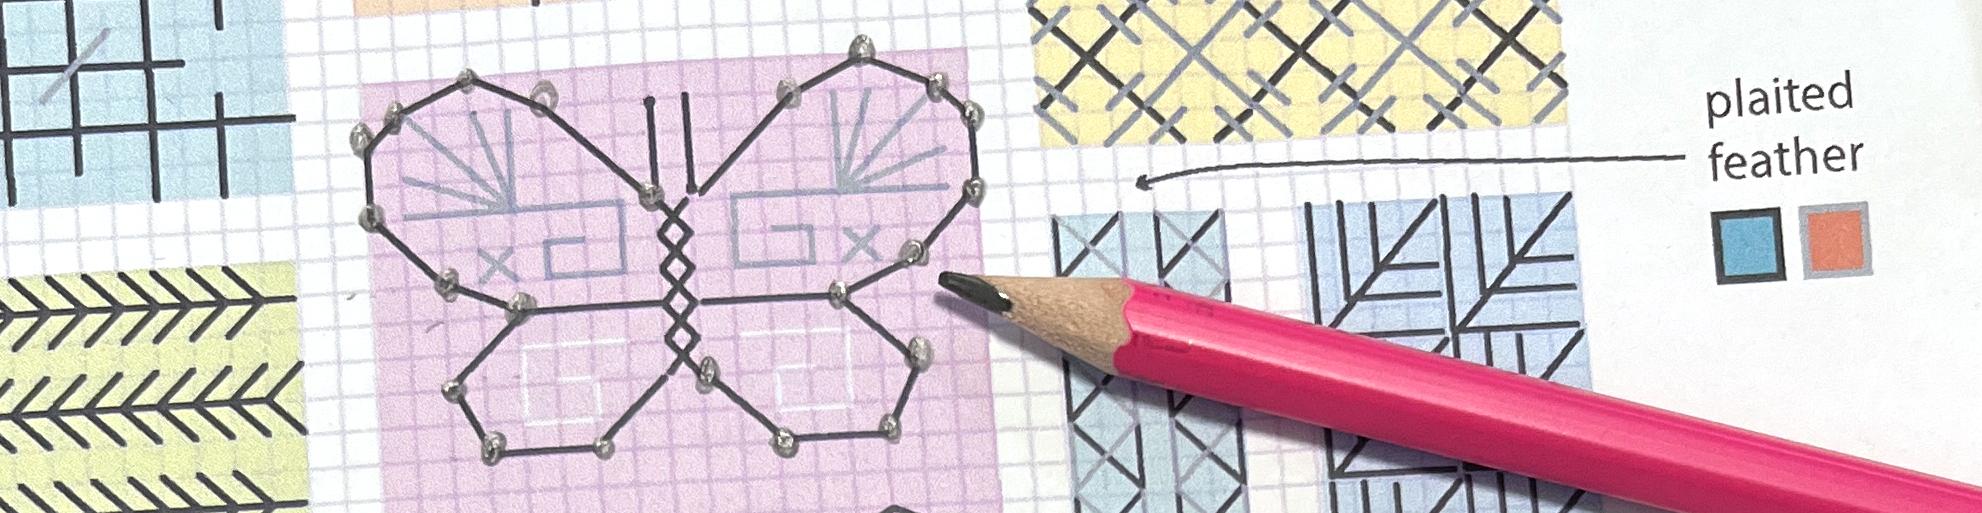
to have a pencil in some of the stitches going
through teaching each one. I have marked things on
my pattern in pencil, and I think that can be really
helpful for helping you count and decide where
things need to be. You can see this one has got some things all
marked up on it. Okay, the last piece you'll
need is the pattern. This is in the download section
that you can print out. You don't have to
print it. You can look at it just on your
screen if you want to. But again, I think it's
helpful on some of these to be able to make some pencil
marks as you're counting. So the pattern is
meant as a guideline. Not every single line
of thread that you see on your piece is going
to appear on the pattern. This is just helping us to be able to place all
of the stitches. One other thing
I'll point out on the printed pattern up
here in the top corner, I've given you a little section
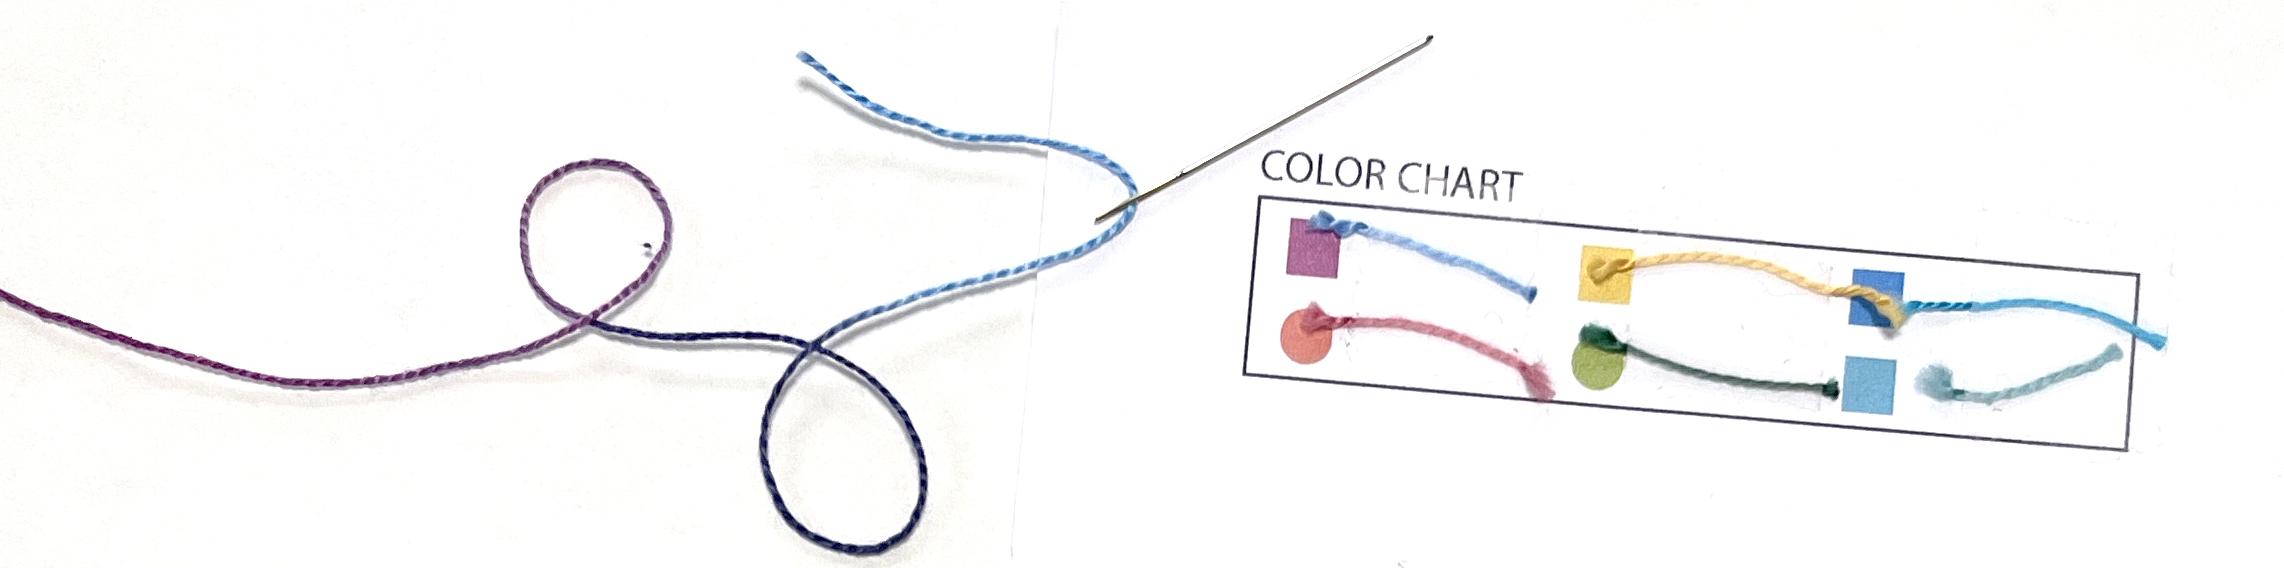
to create a color chart. And so what I have done is after I chose my
colors of thread, I just cut a little
piece of each one and taped it down here next to
the little color block. And we'll talk
through how I'm using the color blocks when we
get into the lessons. But basically, this helps me remember that anytime
I see a yellow square, I'm going to use
my yellow thread. I made mine kind of match, but you might be doing
completely different colors. So I think it's helpful
to have this color chart, like, attached right
to your pattern piece. So as you're choosing
your colors, you can just tape
down a sample there, and then you've always got a
reference to look back at. The last optional material you could use is an embroidery hoop. A lot of people like having that to hang on to as you stitch. I personally don't like
working with embroidery hoops. They just kind of get in my way. So you'll see I'm just
stitching the fabric. Now, this Ida cloth is
pretty stiff, usually, and so it's pretty easy to stitch on with
or without a hoop. So that is an optional thing up to you if you want to use. One last thing to note, I also included a close up
photo of my finished piece. Sometimes it can
be helpful to have a photo to look at
as you are stitching your stitches to make
the connection between what the finished
stitch looks like and what you see on
the pattern piece. So you can also download
that JPEG and have that reference
photo that you can zoom into to help you
with your stitches. Okay, that covers
all the materials you'll need to do the project. If you are going to stitch small samples and just pick
and choose your samples, then of course,
you don't need as large a piece of Ida cloth. You can use just scraps
of what you have around. So let's jump into the first
stitch in the next lesson.
4. Tied Herringbone Stitch (Part 1): Okay, our first
section to stitch is this first block in
the top left corner. I thought that would be
a great place to kind of get our pattern established. And this is a tied
herringbone stitch. So we're going to work
this one in two sections. It is in two colors. And you can see here, I have filled out my color chart with my thread colors just with
a little piece taped down. So the thing I will point out
is the pink squares here. I don't actually
have a pink thread. I didn't pick one, but
I'm using this one as my pink because there's a lot of that kind of
pink purple in it. That's how I decided
to match it up. So I'm going to
look at the colors that I want for my
tied herring bone. And you absolutely can break these rules and do these in
whatever color you want. Reason that I kind of
selected them out and spread them out is so that when we get done with
the whole thing, the colors are kind of balanced, and they are spread out kind of throughout the
sampler so that you don't have a whole
bunch of green in one section and a whole bunch
of yellow in another one, so that they're kind
of evenly distributed. So that's why I did it
the way that I did. Alright, so for the black
part of the stitches, I need my yellow, which is
going to be that color. And then I need the orange to do the gray part
of the stitches, and that's gonna be my orange. So these ones are going
to match up pretty close. The other colors I can
set aside for right now. And for the most part, on all of these stitches, I'm going to start with the
part of the stitch that's in black first and then work
through the gray ones. So the black part is
usually the foundation, kind of the part
that we lay down. So I'm going to start
stitching in yellow. So I'm going to grab
a piece of thread. And I got to find the end here. It's always the hard
part, right? There it is. And I'm going to cut
a piece of thread about 14 " long or so, and I'm going to
thread my needle. When you're working in
cross stitch, especially, I have heard a lot
of people really discourage knots and not
making a knot in your work. Um, there are a couple
practical reasons. Like the holes in this
fabric are pretty large, and so a knot can pull through. For this, we're not
doing cross stitches. And so I'm going
to break that rule and tie some knots because I
want these things to stay. On some of the more
dense stitches, sometimes you can
just catch the end of the thread like underneath your stitches on the back side, but not all of them work that way to be a
very secure thing. So I'm just going to tie knots. So I'm gonna make a
knot in my thread. Okay, before I move ahead, I just grabbed a piece
of white foam core, which I'm going to
set down on my table. I realized on camera, you can see the holes
in the fabric a lot easier on the camera if I have something really
light colored behind it. So that's why there's a
pause in the video there. I just swapped that in. So we're going to start in the top left corner
of this pattern, and our thread is
going to come up right there on that
top left corner, and we're going to kind of
work our way across from left to right and then kind
of go down this block. So I'm going to bring my
needle up because I know I cut this piece about
an inch larger on every side than my finished
design is going to be, I'm going to bring my
needle up in a hole that's about an inch away
from both sides. It doesn't really matter,
where you start this. You're just establishing
where that top row will be. So I'm going to bring my
needle out there that's about an inch from either side, and I'm
going to pull it through. And then we're going to do
just a little bit of counting. We're going to do a
herringbone stitch. And so a herringbone
stitch is going to go from top left down here to the right, and that's the first stitch
that we're going to see. So it goes if I'm counting
squares, it goes over one, two, three, four squares, and it goes down
one, two, three. So we're making ones that are
four wide and three tall. Okay. I'm looking and I'm always counting where the
hole is in the fabric. I'm going to count
over four holes, one, two, three, four. I should have four squares basically between
where my thread comes up and where
I'm going to go down, one, two, three, four, and then I'm going to go
down three, one, two, three, right there, over
four down three, and I'm going to pull
through, and that's the first part of my
herringbone stitch. So we would stitch
it the same way if we were stitching
on regular fabric. We just don't have
kind of the markings of that grid to follow. All right, so now the second
stitch of Herring bone, if we look at our chart, it goes from the bottom left
here up to the top right. It's the same size stitch. It's going to go over
four and up three. But we're going
to come back one, two, and bring up
our starting thing. I'm going to go two to the left. So this is where my
first stitch went down. I'm going to go back
two to the left, one, two, and I'm going to bring
my needle up right there. Two to the left. Okay. And now I'm doing
my same size stitch. I'm going to go over four,
one, two, three, four. And this time I'm going up
three, one, two, three. Like so. There's our first
pair of herringbone stitches. Now I'm going to keep going
in that same pattern. My next one, I'm going
to go back to the left. At the same top edge. So I've gone two squares
back to the left. I'm going to pull
it through. Now I'm going to go over
four and down three, one, two, three, four,
one, two, three. And as you get a
few stitches going, you'll be able to
see where the lines are like the line
and the pattern. They're all going
to align together. Okay. One more time I'm
going back to the left, two squares, one,
two, and bring it up. Now we're going back
to the right again, one, two, three, four, and up, one, two, three, so that it's lining up with
those previous stitches. And I'm going to continue
working my way across. So back two and pull through
over four, down three. One, two, three, four. Yep. I got it in
the right place. Okay. So if I refer
back to my pattern, I have one, two, three, four, five stitches that are going to lean kind of towards
the right side. So I've stitched
three, one, two, three, so I don't go too far. Next stitch and one,
two, three, four. Go back to three, four. There. Okay, now I have one, two, three, four, right
leaning stitches. I want to do one more
that leans to the right. So I'll do mine that
leans to the left. One, two, three, four. Okay. And my last
right leaning stitch, three, four. So. Okay. Checking my pattern
one more time. I've got one, two,
three, four, five, that lean that kind of go
down towards the right. And I need one more stitch, that's going to
go back up again. I've got one more stitch at the end that kind of points back up back and over 41 more time. All right. That is one row. We can compare here of
herringbone stitch. So we're going to do
three rows like this. You can see if you
come down the chart, there's another row that's
exactly the same that starts at the same line
where the last one left off. It's one, two,
three squares down from that top corner and I'm going to go all
the way across again. And then do that one more time, three squares down and
go all the way across. Now, I like to stitch the herring bone from the
same side every time, doing the rows the
same direction because the overlap of the threads will change if you were to stitch
going back the other way. So I'm actually going
to tie a knot here and then start my next row again from the left
and work to the right. So tying a knot on these kind
of stitches is a little bit trickier because there's not a good place to anchor
your thread into. So I do a couple
different things. If there's a stitch
nearby that I can slip my needle underneath and tie a knot, I try to do that. Basically, make a
stitch backwards towards one of these stitches and I try to mimic what's
going on in the front. I'm actually going
to slip my needle underneath this stitch down here on the backside. Now I have a thread
that's nearby, and now I can tie a knot
anchoring it into this thread. We can tie a knot the
same way we have done in a lot of different
embroidery classes. I'm going to slide it through
underneath that stitch one more time and pull
until I have a loop. And then I'm going to slip
my needle inside the loop once and inside the
loop second time. And then holding
the fabric down, I'm going to just
gently pull, pull, pull, and that should pull a knot right down close
to the back of the fabric. I don't want to pull
so hard that I distort the stitch on the
front side, okay? So I'm using my fingers to kind of help stabilize
that, right? And I'm going to trim
off with a little tail. And I'm back to the other side. So now we're going to
repeat the same thing and do a second row of
herringbone stitches. So I will get you started. I'm gonna tie a knot again. And my second stitch starts at the same kind of line
as those first ones, but it's one, two, three
grid squares down. So it's in the same row actually where those last ones left off. Okay. You can't really see my needle there, but that's
where I'm coming up. Okay? And I'm basically copying. Whoops. I went a row too far. I came up in the wrong space. Let me fix that. It is
good to double check. Alright, there we go. Now
it's in the right spot. Okay? Now I'm going to do the same
thing I was doing before. I'm gonna go over four,
three, four, down three. Then I go back to squares on that bottom side
of the stitch. And I'm going over one, two, three, four, and up three, which will be in the same hole as a
previous row of stitches. Those are going to share a hole. So it gets even
easier as you stitch these because you kind of can see right where the
stitch is going to go. You don't have to
count quite so much. All right? Same thing. I'm going to go back
to that is actually in the same hole as another part of the stitch from
the row above. One, two, three,
four, and down three. Okay, back to up meeting that
previous row of stitches. Now I go to the left two. Okay. And I just keep stitching that same pattern all the way across matching
that first row. Okay. There are two rows. We're gonna do one more. I'm just gonna grab
another piece of thread and speed up
the video a little bit and stitch one more row exactly like this, just below. Oh Okay. There is my finished
Herring bone section. Now we're going to do the tied
part of tied Herring bone. So we're going to
switch colors to the orange thread or whatever
your orange color is. And for this stitch,
we are going to make basically their
cross stitches, but they are kind
of on a diagonal, so they're like a plus sign. And we're going to do that over every intersection of
our herringbone stitch. And I like to stitch these kind of one
row at a time again, and I do one stitch at a time. So every time your herringbone
stitch crosses each other, makes that kind of X shape, we're going to
stitch one of these, like, plus signs over top of it. And I try to just kind of establish a pattern
that I do these in. So I'm always going to do my
horizontal stitch first and the vertical stitch second so that they're
consistent the whole way. So I'm going to come
up right one hole to the left of that first X, and it's actually 12
grids across and one, two down, if you want
to count grid lines, but I'm just coming one
stitch to the left, and I'm going to go across two squares right across
the center of that X. Like so. And now I'm going to do the same
thing top to bottom. I'm going to come. Actually,
I'll go bottom to top. I'm going to start
at the bottom, bring my needle up at the square that's right below the X. And go across two grids. So there is one
tied herring bone. Okay. And then I'm just
going to work my way across that first line of
stitches that we stitched, doing the same
thing at every axe. So now I'm going to
skip up to the one that's the next one
over to the right. And I'll do the same
thing. I'm going to go across first, across
two stitches. And then I like the way these colors
look together. When I was ordering kits, I told some of my
previous class students, I had colors all picked out
and I had a sample stitched, and then they were sold
out of some of the colors. And so I ended up
having to switch for the class kits to completely
different colors. So it will be a surprise to
me what these ones look like. I'm pretty sure they're
going to be awesome. Alright, I have
gotten all the way across with my row of ties. Now, these stitches
are symmetrical. It doesn't matter if I stitch them starting at
the left side and going across or starting at the right side and going
back the other way. Since my thread is already
over here at the right side, I'm going to stitch
the second row of these just working
my way backwards. That way, I don't
have to tie a knot and have a big thread across the back or
anything like that. I'm going to do
them the same way. I'm going to do the
horizontal stitch first. Then the vertical. Here we go. But now I'm just going to work back towards the left side. And you can work these any, like, either way, whatever
makes the most sense to you. I just like to be sort of
efficient with my thread. Okay, I'm going to
speed up the video here and just continue
stitching these. I have one more row of
stitches to do when I get done with this on that third row
of herring bones that we did. And then we will
finish this section. There's our last tied
herringbone stitch. I'm going to tie
knot on the back, and that is going to finish
this section of the design. One thing I want to point out, we do have another section of the sampler that's
the same stitch, a slight variation on it, and that is this block
that's right down here. This is also a
tied herring bone, but we're going to
swap the colors instead of doing a tie stitch, both vertically
and horizontally, we only go one way. I also took those
herringbone stitches and I turned them 90 degrees. These are the same
stitch here and here, but they're going to
look totally different. I'm not going to stitch that
second block right now, even though that's this lesson. I'm going to do it a
little bit later on in the process because
I really don't like having to count all
100 stitches or something like this to get this placed in
the right place. I'm going to work my
way down this side a little farther before I do that so that we can start this one and not have to
do all of that counting. Okay?
5. Toroko Stitch: Nine. Alright, our next stitch, we're going to do
the Turoco stitch. Taroco is a kind of couching. And so one more time, we're going to stitch kind of a layer of foundation stitches, and then we're going
to come back and put another layer in a different
color on top of it. So my Turoco stitch works in my color chart in kind of
the two shades of turquoise. So I'm going to use the lighter one to do the first
set of stitches, and then the darker one is
going to come back here and do some kind of
tie down stitches. So I'm going to start
off with this one. And this block goes just below the one that
we just stitched. And this one you're going to
have to do some counting. We are going to make some
really long stitches, and so you're going to have
to count some grids to get those so they're
just the right length. Okay, so one thing
to notice about this particular stitch is we're going to start by doing the
really long horizontal lines. You can see there's one
here that's one stitch that goes all the way
across the whole block. So I'm going to start with doing those horizontal
lines, so there's one, two, three, four, that go
across horizontally like that. Now, it doesn't start at the corner of the block
here that's in blue. We actually need to count
down here to get this placed exactly right from
the previous stitch. And so if I look at
my last stitch was up here where I can count
from where that one starts. I'm going to go one, two, three, of the yellow, there's 12 squares
between, and then one, two more to get to the spot
where the stitch starts. So three, four, five, six, seven stitches down from here to here to get
this one established. And it's in the same line. So those should line up
with the previous section. Okay. So I know I need to be
right on this line of grid, and I'm going seven stitches
down from this point. From that section, you can always refer
back to the drawing. So one, two, three, four, five, six, seven. That's my whole right there. I'm kind of marking
it with my thumbnail. And before I do any
part of this stitch, I'm going to bring
my needle through, and I'm going to
count that again. One, two, three, four,
five, six, seven. So my needle is coming up right there. And I'm going
to pull through. Okay. Now we're going
to stitch across. This is a really long stitch, and we're going to go I can
kind of count these in twos. So two, four, six, eight, ten, 12, 14, 16 stitches across. And a thing I will notice
is that the end of this stitch kind of
is going to line up with one of my herring
bones from up above. So I can double
check myself that I have all 16 going across there. All right, so back to counting, you can kind of see I like to glide my needle along.
That's how I count it. One, two, three, four, five, six, seven, eight, nine, ten, 11, 12, 13, 14, 15, 16. And I can see, yes, where my 16 is is
going to line up with the right side of that
herring bone stitch, so I've got it in
the right spot. I'm also making sure that
I'm going straight across. I haven't dipped down a row, and I can pull that one through. So there's the first stitch
of our Turoco stitch. Okay. Now we're going to
do three more like that, and they are spaced out one, two, three, four squares apart. I'm going to zig zag
these back and forth because this is just
a straight stitch. My thread is coming out on
the right side right now, so I'm just going to drop
down one, two, three, four. So four grids, one, two, three, four and come up. And now I'm going to go
all the way back over. It's going to match
this left side. It's much easier once you get that very first
stitch established. Right? Okay. We're going
to do that two more times. Going to drop down
one, two, three, four. Go all the way back across, making sure it lines up and one more like that. Okay. Now, we're going to make
a tick tack toe board. We have really long
stitches that are vertical, and I've got one, two, three of those long
vertical stitches. So I'm going to stitch
those the same way. And I'm looking at sort
of as a reference, my thread is going to come up right here, which is one, two, three, four stitches
over from the edge. And it's two stitches down
from my previous line. Okay? So I'm coming
over one, two, three, four, and then
down two, one, two. So right there, it's hard
to see the needle. Okay. And I'm going to go straight up. And if I look at
the top edge of it, my thread is going to
stick up two stitches above that horizontal
line we stitched. So I need to go one, two
past it, right like that. And you can do one
more double check. Whoops. And you can see
my line is crooked. I put it in the wrong spot. I'm over to the left.
One stitch too many. I'm going to undo
that. Try again. All right. That's better. Then one double
check you can do. Every one of these
pattern squares has two grid squares between
the one next to it. There should be two blank
squares between these two. I can see that I have
the right spacing. Now I'm going to work
to the right and this is the same
spacing as before. I'm going to go over four and copy that last stitch I
did and straight down. Then over another
four, And back up. Okay? So we've got kind
of a tick tack toe board. And at this point,
I often need to change thread because I don't
have an awful lot left. I still have a little bit here. So I'm going to start stitching the sort of secondary lines. So you can see now we've
got those big long ones in. Now we have these kind of long plus signs that are in
the middle of those grids, and I'm going to stitch
those next kind of the same way that we stitch the plus kind of
signs up top here. So I'm going to do them
kind of one at a time. And I'm going to start with
the horizontal and then do the vertical part of
it. So let's see. Just looking to see
where my thread is. I think I'm going to tie a knot, and I'm going to start again on the left side so we can
establish a pattern. So once more, I don't have a good spot to tie this off
that's really close by. I'm actually going
to sneak over here and tie it behind
this other set of stitches because I don't want to have a big thread
across the back of my piece, so I'm just going to slip
the thread underneath there. Tie my knot right there. There's a way to tie a knot just and use your needle
to help tighten it, and I never seem to
get those very tight. Like, I feel like it's always
super loose when I do that. Alright, I'm going to go ahead
and grab another piece of thread mine wasn't very long. And we're going to start
on those secondary pluses. Starting back here
on the left side. I've got this one to
start right here, that horizontal line
and this vertical line. So it is one, two, three, four, down. It's right between those two long stitches
that we just made, and it goes over one, two, three, four, five. It's going to cross over the vertical and go past
it by one stitch. I'm coming up between those two. I'm going to go
all the way across the square plus one
more beyond it. Okay, and then I'm going to do the second part of that plus. Okay. The second part of
the plus is going to start, again, between the edge
and the first line. We're going to go right
in the middle of that, so two squares over. And I'm going to go
one past the line. So one past the line
is right there. Sorry, that was hard
to see the needle. And then I'm going to cross over that next line and
one more square. Okay. Then I'm going to
move my way to the right, and I don't have a plus here, but I can see I have a half
a stitch right there that's between second and third or the first and the
second vertical stitches. So I'm going to do this little
half stitch that's here. So it overlaps my
horizontal thread by one and goes to the top. So overlapping inside
this grid by one. There's lots of
ways to count this. I am using those long stitches that we established and kind
of counting off of that. But if it makes more sense
to you to count it from a corner or something like
that, you can totally do that. All right, so that's that
little vertical stitch. Okay, now I have
another plus sign. So I'm going to do the
horizontal part of it first. So this is two squares in. It's right in the center of
those two long stitches. It should line up with the
previous plus sign that I did. Coming up, I'm going
to go all the way across the square plus
one more grid line. And then do the vertical, which is I go one square
above the line right in the center and stitch
one grid below the line. Big plus. Okay, and then there's one more half a stitch
right here on the edge. I'll do that one up at the same level and
then across the line. I Okay. That was kind of our first pass. We did that first third
or a little more. Now there's two
more plus signs on the next row of squares on
that kind of middle row. I've got one here and one here. You could tie a knot. You could make a stitch across the back. I'm going to work from right to left just because my thread
is on the right hand side, and I think that's going
to work out for me. I'm going to stitch the horizontal part of
this stitch first. Okay, so it's right in the middle of the
next square down, so this square right here. And it goes all the way across the square plus one more stitch. Like so. Okay, then
I'll do the vertical, which is I'm going to
go right in the center. It's lining up with
a stitch above it. I go one grid past the horizontal thread and then come down and
go one grid past. Next one over, there's nothing. The next plus sign, I shouldn't say there's nothing,
there's stitches here. But the next plus sign is going
to happen in this square. I'm going to do my
horizontal part first, which means I'm coming over to this vertical thread and
I'm going to bring it up. It's two away from
the previous one. Then I go all the way
across the square plus one. Then stitch the vertical, I go one above one below. Okay, so that finishes one, two. Now we just have this last row, which is like the first row. We've got a plus sign here, we've got a plus sign here, and then there's two half
stitches kind of in between. So one more time, I'm going to start with the horizontal part. So I'm going to come over
here to the far left side, and it's in this
third row of squares. So left side. I'm going to go across that
square plus one more. And then stitch my vertical, which is one above the line
and one below the line. Okay, then there's
a half stitch. So it's in the middle
of the grid squares, and it goes one above the line and then matches
the bottom edge. So one above the line, and it's going to line up here with those other
two long stitches. Okay, next horizontal stitch. I'm coming up one to the left of this long vertical stitch and going all the
way across plus one. And then in the center
of that square, I'm coming up above the line by one grid and below
the line by one grid. Then one more half
stitch right here at the edge come one, two over and then over
from that vertical line, then I'm coming down at
the bottom of the grid. All of your outside threads
should be in a line. But there's not one
in every square. They're a little bit irregular. So that is the foundation
of the Turocostitch. We've got all of the
black lines stitched now. So we've got one more little
set of tack down stitches. So Turoco stitch is a it's
considered a filling stitch. So it's just kind of
this I don't know, tile kind of pattern of stitches that would be used to fill in a large
area of something. I'm not tying a very
good knot here. There we go. I twisted my
thread somehow weird there. Did not make a good knot. Alright, tie a knot. Now I'm going to
switch colors to my darker turquoise or that second color there
that's on your chart. And this one we only need to
make a few little stitches. So these are diagonal
stitches that are going to go across the center of those kind of Xs that
we just stitched. So it's a tie down stitch, a little bit like
the ones we did on the tied Herring bone
in the last lesson. And these are in gray,
so you can see here. And it goes one grid kind of away from the
center and one grid over. And all of these are going
from top right to bottom left. So again, just kind of
stitch them in rows. I'm going to do the first
two, and then I'll do the next row and then
I'll do the next row. So there's only six of
these stitches to do. Okay. I'm going to start my first one. It's going to go right here
over this far left hand plus sign and I go one grid down and to the left of the plus and cross over and
go up one like that. Then I move over to the next plus sign and I do
the same thing. There's two. Okay, I'm moving down to the
next row right here. Next row of squares. I'm going to go over this one. And I'm just stitching this one from the top to
the bottom this time, and I'm working my way back across because that's the
side that my thread is on. So cross like that. Then
I'm going to the next plus. Again, if it makes
more sense to you, you can absolutely count
the number of stitches. So there would be one, two, three, four, five, six, seven, eight, that I'm coming over from my previous
stitch here. If that makes more sense to you, you can count
them that way. All right, two more
stitches to go. I'm going to stitch
one over this plus. And then move over
one more right here. And that is a finished
section of Turoco stitch.
6. Fly Stitch: Okay, our next section
is the fly stitch, and this one is
only in one color. I think this one's really
pretty in a variegated color, as you're thinking about colors, if you're choosing
them as you go. So we're going to
do three rows of fly stitch and two of them
go the same direction. Fly stitch kind of has
a way that it points. So the top and the bottom row kind of go
the same direction, and then we're going to vary it. The middle row is going to
go the opposite direction. Okay, so I'm going to grab. I'm going to stitch this one
in this variegated green. But Okay. And we are checking here. We're going to start.
Our stitch starts right at the top left
corner of this block. So we need to go two down from that previous
toroko stitch section, and we're going at the
same line off to the left. So I'm going to skip 12 rows and bring my needle
up right there. I'm two below this
toroko stitch section. And the fly stitch, we're
going to work across. It's going to go two
stitches kind of vertically, and it's going to go one
stitch horizontally. Alright, so fly stitch, I'm going to start by
bringing my needle straight down one, two grids. And I'm going to
pull this through, but I'm not going to pull
it all the way tight. I'm not going to
close up the stitch. I'm leaving it just a little bit loose because we're going to catch this loop
with our next stitch. And so I'm bringing my needle up between those two grids
that we just stitched. So there's one row
in between there, and I want to go one
square to the right. So I'm in between
those two stitches, and I'm one square to the right, and I'm just going to hold
this up close so you can see, hopefully move my needle. Okay. And the loop of thread
goes around the outside of my needle. All right. When I pull that through, I'm going to pull that previous
stitch until it kind of closes up right on the thread. There we go. And you see it makes this little
kind of V shape, and the Vs are pointing
to the right right now. Okay. To finish this stitch, I'm going to do one stitch. I'm going to go one
grid to the right. So one grid straight to the
right and make a stitch. Now I've got kind
of a sideways Y. And that's all there
is to this stitch. We're just going to keep doing this over and over and over. Okay? So I'm coming up one stitch to the right of my
previous one. There we go. Trying to move the
needle so you can see. So I'm just one stitch
over to the right. I'm going to go straight
down two stitches. I'm going to pull this through, but leave it a little bit loose. Now I'm coming up one grid
to the right of that, which is actually where
my last stitch left off. I'm coming up in
the same hole where my very last stitch ended. There it is. Needle
is coming up there. Try to hold this up close. The thread is to the
outside of my needle. One more time I'm going
to pull pull pull pull until that V lays
down on the fabric. And then one stitch
to the right. These are really close together, which I think makes a
really cool texture, and we just keep going. I come up one square to the
right of the previous stitch. I go straight down two squares. I leave that a little bit loose. I come up one more stitch to the right
right in the center. Right where that last
stitch left off. And when I pull this through, I also pull that loop
closed or kind of into a V, and then I finish it with one
stitch to the right. Okay. One more slow. I come
up one grid over. I go straight down to
leave it loose. Come up. One more grid to the right, but right in the
center, top to bottom. Threads around the
outside. Pull, pull, pull. Make a stitch to the right. Okay, we're going to keep going. We have one, two, three, four, five, six, seven,
eight, nine, ten, 11, 12, 13, 14, 15 stitches to go across, I should end at the same line where your toroko stitch ended. So you can kind of keep
an eye out for that. All right, I'll keep stitching them slow for a
couple more stitches, and then I'm just going
to speed up to the end. So brought it up. I
go straight down. Now I bring it up again where
the last stitch left off. Pull and one stitch
to the right. This is one stitch for sure, where the rounded
point needle will help you just push that last stitch out of the way instead
of splitting the thread. The last that straight stitch at the end should line up with the
previous stitches here, that last little tail end. So we're going to do the
next row of fly stitch. We're going to skip
one grid in between, there'll be one blank
row in between, and then we're going
to do another row of fly stitches pointing
back the other way. So instead of going to the right every time
with the stitches, we're going to go to the left every time with the stitches. I unthreaded my needle
accidentally. So let me fix that. Okay, I still have
plenty of thread, so I'm just going to start
my next row of stitches, and I'm going to go back
towards the left side. So I'm starting this one in the same line as the
previous stitches, but I want to make sure that
there's a gap of one row, one grid line in between these. So I'm coming up right here, which is two stitches below
that last like center. And we're working the same way. So I'm going to go down to I'm going to leave it a
little bit loose. Then I'm coming up
one this time to the left side between those two stitches and
I'm pulling through. And now when I stitch down
that little tack down stitch, that little straight
stitch, I'm going one stitch to the left
instead of to the right. Okay, so we're just
changing direction, making the stitches
face the other way. But they work the same way. So I go down I go
one to the left, pull it tight, and
then stitch down. You can double check.
There's one blank row between those two
rows of fly stitch. I'm going to continue back here, and then we turn around
and do one more row facing or pointing towards the
right, right below that. Again, there's one
row gap in between. Alright, there's my three
rows of fly stitch. I love how this one looks in
a variegated thread where the color just kind of changes as it works its way across.
7. Guilloche Stitch & Maltese Cross: Alright, this next lesson, I'm actually going to
put two stitches in this lesson because these are pretty simple ones
that go pretty fast, and it's going to help
to do the two of them kind of alternating so
we can get them placed. So the next stitch
we're going to do is this little section
called the guilloche. So there's a guilloche
stitch here. There's also a little
more of it right there. And the other stitch
we're going to do is the Maltese cross, which is this one
up in the corner. That's going to
help us, I think, get these placed if we
stitch those three together. So I'm going to start with
this line of guilloche stitch, and it starts with
the orange color. We're going to do this
again in two parts. One is we're going to lay down some running stitches first
in that orange color, and then we're going
to come back and do some threaded lines
underneath that. So starting with the orange, or whatever color you're
representing with orange here. This is just a running stitch. These stitches goes over
two grids, skip one, so it's a little bit
uneven, unbalanced, over two stitches under one, over two under one. We can do these just
as three passes zigzagging back and forth. Again, there's two
spaces between the fly stitch and
this next section, and this first row of
stitches is going right along the edge what will be the
left edge of our sampler. I'm making sure I've got two
spaces after my fly stitch. Okay, and I caught the
end of the thread. Don't want that. All right. So I'm going to go over
two and then under one. Go over two. Under one. I think this is the easiest
stitch we've done so far. Okay, I should count one, two, three, four, five,
six, seven, eight. So there's five, six, seven, eight. And I like to double
check everything, one, two, three, four, five, six, seven, eight, three, four, five, six, seven, eight. All right. Then I'm going to
move over one grid square, and I'm just going
to go back and sort of parallel that line. So we're going to have
three parallel lines of running stitch all right
next to each other. And I like to just exact
this back and forth. Okay. There's our
foundation for guioch. So I'm going to tie this one off because we're going
to switch colors. Okay. Now we're going to swap two.
For me, it's the purple. It's whatever is your
pink color on your chart. So it's this kind of
variegated purple and blue. The second part of this,
this stitch could also be called a double
threaded running stitch, but they call it a guioche
and what we're going to do is we're going to make kind of a wavy line that goes underneath these stitches but not through the fabric. And so it's going to kind of S curve back and forth
under these stitches, and then we're going to double back and go back the other way. So I didn't draw
the complete line on the diagram just because it got too messy and confusing. So it will kind of look
like this on the edge, but the center will have more going on than
it looks like. So we're going to come up in this first set of three
running stitches. I'm going to come
up right underneath basically the middle
of the stitch. So there's one hole
underneath that, and I'm just going to kind
of push the stitch out of the way with my thumb
a little bit so I can just come up right under it
with my needle in the middle. And I'm starting
on the left side. And now I'm going to go
down to the next row of stitches and I'm going to slide my needle underneath
all three stitches, one, two, three, going
from left to right. I'm going to pull this through. And this is a little
bit of a judgment call how much thread you
leave out here. So it's all about the tension and how big a loop
you want there. So I'm going to pull
mine about like that, and I'm going to try
to be consistent. So now we go down to the next row and I'm going
to go back towards the left. I slip underneath one, two, three, and try to slip under
and not split the thread. And I'm going to pull, again, establishing, how big that loop is that I want to
stick out there. And we're gonna keep curving just alternating back and forth. So slip, slip, slip. Then back towards the left side. Towards the right. Oops I slipped under the
fabric. Just the thread. And this one, you can see I'm bending the fabric
a little bit as I do this. This might be a place
if you're working in a hoop that you
might take it out of the hoop just to be able to
slip under those stitches a little bit easier to do just
this part of the stitch. Then I'll slip
through my last one. There's one set of S curves. Now I'm going to go
back the other way. This time, I'm going to go
just working backwards. I'm going to go back up
and now I'm going to go through this one
from right to left. So the opposite of
what I did before. This is where you just have to be particular about not catching any of those
previous threads. So I'm going back through. So there's almost
like a circle around this very last one on the loop, and now I'm just going the
opposite way of my last set. So just being a little
slow and patient so that I'm not
splitting threads or going through the fabric and trying to make my loops match. I happened to stitch this
in double variegated. Like both two variegated threads ended up being in this one,
and it's kind of crazy. All the different color
combinations I'm getting. Okay. So. And then the last stitch, I like it to look the
same as the bottom one, so I actually slip underneath
those three and then bring my needle back down in the
same hole that I started. So I finish the slip. Like, se. And then I'm just
going to go back down through that same
center hole there. I think so. And you can adjust these a little bit once
you're done stitching, just to get them all kind
of balanced and even. But there's one
section of guilloche, and then we're going
to do another section of that up towards the top, but we're going to stitch
the Maltese cross first. So I'm going to
tie this part off. Let's see. Find a good stitch. I can anchor this too. Okay, Maltese cross. We have to do a
little counting to place this first stitch
and we're going to start by bringing our thread up right here where
I circled it. It's on the left hand
side of the stitch to the very top one
on the left side. We're going to
have to count past this little cloud fill section because we haven't
done that yet. I'm going to go one, two, three, four, five,
six, seven, eight, nine, ten, 11, 12 across, and one, two down. Let's get that placed first. So one, two, three, four, five, six, seven,
eight, nine, ten, 11, 12, and I'm putting
my thumbnail by that, and then I need to go
down one, two, right? So that's the spot for my
first part of the stitch. I always check that twice. You want to get this
in the right place so you don't have to rip it
all out and stitch it again. Okay? So I've got my thread
coming out in the right spot. Now, we're going to
work the Maltese cross in kind of two parts. There's two stitches
right next to each other, so we're going to do the
left hand one first. And I'm going to stitch the
horizontal parts first. You have to count the
very first stitch. Once you have the
very first stitch of the section done,
it's much easier. So bear with me. So I'm going to count over, and this first stitch
is going to go from the top on the left to
the bottom on the right. Okay, so I need to come over the whole width
of this stitch, which is one, two, I'm
gonna count it up here. One, two, three, four, five, six, seven, eight, nine. Okay? And then I
need to come down from where that thread is one, two, three, four, five. Okay, so nine across and five down from
where I am right now. Okay. One, two, three, four, five, six,
seven, eight, nine, puts me right there, marking
it with my thumbnail, one, two, three, four, five. Okay. And I'm going
to pull that through. And that makes kind of
a sharp diagonal line. Okay? Now, it's easy. Once we have that first
stitch established, our threads on the right side. So on the right side,
I'm going to go up one square in the same line where my last stitch left off. I go up one square, and then I'm going to
come back to the side, and I'm going to go
down one square on the left from where
the stitch started. Now I have this
shallow crisscross. On the left side, I'm
going to go down one. I'm going to go across to
the right and go up one. So you see once you've got
that pattern established, that's really easy to
zigzag back and forth. On the right side, I go up, so I go up one, back across. Then go down one. Back across. And last one, we go up
one more And back cross. Oops, I caught thread there. Alright? There's the first
half of a Maltese cross. It looks kind of like a bow tie. We're going to do exactly
the same thing again, but now we're going to
do a top to bottom one. So my last stitch
ended right here. So we did this part. So I'm going to skip
over and I'm going to start the next one right here. And we're going to
do the same thing. From here, we're going
to count across nine, and we're going to
go over five. Okay? So we got to count
that first one, and it is two down and two to the right of where
my last stitch left off. Okay? So I'm going two down, one, two, and two to the right. So my next stitch is going
to start right there. And just like we did here, I'm going to count nine
across the stitch. One, two, three, four, five, six, seven, eight, nine, and then five, one, two, three, four, five. And you can double
check yourself where your needle is going
down right now should be two over and two up from where this part
of the stitch left off. You can see that on the picture. Once I have that first
one established, now I'm just zigzagging
back and forth. My first stitch here
is going to go one to the left and then come down
and go to the right side. Then one to the right. Go back up to the left side
of the stitches. One to the left, go back down. One to the right. Go back up. One to the left,
and go back down. That is a Maltese cross. The one next to it
is exactly the same. It's going to share holes with its neighbor here along
the right hand side. I probably have enough thread that I can start the next one. I'm going to start my
next stitch right here on the right hand side of the previous one and I'm going to do it in
the same pattern. So I'm coming up right here. I'm going over nine
and down five. One, two, three, four, five, six, seven, eight, nine, one, two,
three, four, five. And you can double
check yourself. It should line up with
the other stitch. Yep. All right. And we're going to
zigzag back and forth. So I go up one and across, and it's sharing a hole with a previous stitch.
Then I go down one. Okay, there's the
horizontal part. And then we'll do the
vertical part the same way. So I'm going to count
down two and over two. That's going to start
my stitch right there. And then I'm going to count
up nine and over five. Three, five, seven, eight, nine, and one, two, three,
five, right there. Yep. And gagging back
and forth again. So I go back to the left and then to the
right on the bottom. And I'm just barely going to
have enough thread. Okay. And you can double check. You should have six rays
in each of these groups. So there should be six stitches vertically and six
stitches horizontally. All right. And then
we can tie off. Alright, to finish
out this lesson, we're going to do
one more section of guilloche stitch
that'll be much easier to place now that we've got the Maltese cross in place
because it's right here. So it starts two squares
below the Maltese cross. And you'll notice
it's not lined up with the edge of your
Maltese cross stitches. It's actually one stitch over. We're going to do
another tiny section of guilloche right here
with just four stitches. And this one, you will notice, is stitched in all
the same color. So I'm using whatever
your dark blue is. I'm doing both the running
stitch section and the woven section of it in
the same color this time. So it gives it just a
little bit of a different. Okay, counting from
the guilloche stitch, I'll help you get
started on this one. So I know I need to
go two down from the bottom of the stitch because there's always a two stitch gap. And I'm going to go, let's see. I'll go from this bottom
corner of the stitch. I need to go one, two, three to the right or
to the left, sorry, three to left, one, two, three, and that will give me the space that this first
running stitch starts. Okay, so I'm going
one, two, three, and I need to make sure that I'm leaving two stitches, one, two, or two grids between. So that should bring
my needle up right. There. And before
I stitch anything, I'm going to double check that. So I'm one, two, three, over, and I'm two down. Yep. And I should be one grid to the left of those
guilloche stitch. Alright, and now one stitch over from the
Maltese cross stitches. I misspoke. Now, you know
how to do guilloche stitch. You can jump back and
rewatch that if you want to. I'm just going to
speed up the video as I stitch this little section. Y Okay. And there's our second tiny
section of guilloche stitch. Actually, looking at mine, I'm
going to try to smooth out those circles a little bit. Mine were not quite
all the same size. There we go. I like
that a little better.
8. Brighton Stitch: Next up is the Brighton stitch on my sample here,
that's this section. That's right there. It looks like this
on our pattern page. Okay, we're going
to stitch this one in whatever color you've
assigned to blue. For me, that's this
bright turquoise. And one thing before we
start stitching this, I want to point out
about this stitch is kind of the way
that it's formed. It looks really complex, like, there's a lot of lines, and this one
actually breaks down into three by three squares. And so I'm going
to show you that. I want to just block off some sections of
the pattern so we can just kind of focus down using a couple of post it notes. So if I look at just a three by three
section of this stitch, like so, and I'm going to
zoom down a little bit. You can see that. This block
is just five diagonal lines, and they go across
one square, two, three, two, one, and they're all leaning
the same direction, and these lines are
all one square apart. So we're going to stitch
the first section of it as this block with
just five stitches, one, two, three,
two, one, like this. Now, as we move across, we're going to do
this a row at a time, each row is three squares high. If we move to the next square, just move my post at note. The next square is the same, five stitches, if I just
block that with my finger. But these ones are slanting
the opposite direction. These were going up. The next ones are going down. It's the same pattern of
stitches, one, two, three, two, one across those
diagonals as we go. As we work our way
across the row, the next block, we're back to the same as we
did for the first one. It's again, five stitches
that are leaning up and then our last block is
five stitches leaning down. So they just kind of alternate, but it's the same pattern
of stitches every time. Now, if we move down a
row to do the next row, we're going to go
down three squares. One, two, three, and if I just
block off the top of this, you can kind of look at this is exactly the same pattern
we were stitching before. But instead of starting with a block that kind of leans up, we're going to start with
a block that leans down. So you kind of do the
opposite of the one above it. But then they work their way
across exactly the same way. So there's five
stitches leaning down. Then we go to five going up. Then five going down,
and then five going up. The pattern continues the rest of the way through this block. So we're just working
little three by three sections for all six rows. So there's one, two,
three, four, five, six rows across on this one, up and down, six rows. We'll make our Brighton
stitch section. Okay, so I'm going to zoom
back out a little bit, and we will get our
first stitch placed. So we're going to count again from one of the last
stitches we made. So we'll count over from
the guilloche stitch that we did in the last lesson. So the last stitch here, the top edge of that one, I'm going to go over one, two, because there's two blank
squares between these two. And so my first
stitch is going to happen in this
first square here, but I'm going to come up one
row down because I want to come in the bottom left
corner of that square. So I'm going to go
over two and down one, and that's going to set me up
to start this first stitch. Okay, so counting over
from my guilloche, one, two, and then down one, and I'm going to
bring my needle out. Okay. Now we're going to start our pattern of diagonal lines. The first one we
do is going to go diagonally across one square, and it goes to the
right one and up one. So right and up is my
first one square stitch. Now, I like to zig zag
these back and forth, so I don't have as much
thread on the backside. So to do the next stitch, I'm just going to move
over one to the right. Come up. And now I'm going to go back down
towards the left side, and I want to go over
two squares this time. I'm just counting the
diagonals on the squares. So I'm going to go one, two, and that's going to line up
with my previous stitch. I come down. So there's a diagonal line that's
one square away. I'm going to keep
zigzagging across. This next one, I'm going
to go three stitches. And to start it, I'm
going to go down one, kind of keeping in line with
the other two stitches. And now I go up to the right
across three, one, two, three, Okay, so that's
one, two, three. Our next stitch is going
to be two squares long. And this is kind
of the right side of our little square
that we're stitching. So I'm going to go down one to start out the next diagonal. Down. There we go. Down one. And now I go back diagonal
across two squares, one, two, And then one more
stitch to finish this off. I'm gonna go one
square to the right. And my diagonal just goes
across one square this time. Okay, so there's one
Brighton stitch block. So now we're going to
do the next block, kind of going the diagonals
in an opposite direction. Okay? So I'm going to
start in the bottom left corner of this because my thread is here on the bottom, and I want to stitch this kind of going from left to right. To make my very first stitch, I would come up in the same hole where
my last stitch left off. And so I would pull out my
last stitch if I did that. So instead, I'm
going to start it in the bottom corner of this diagonal instead of just
stitching it from the top. So I'm going to go
over one and down one. Bring my needle up. Okay? And now my diagonals are
leaning the opposite direction. So now they're going
to kind of lean up this way towards the left. And so I'm going up one kind of diagonal across one square, and it's going to share a
hole with our previous block. Okay. Next, I go up. We're going to do
that next diagonal. Just trying to push my
thread out of the way. I don't want to
split it. Okay, so I've gone up one square. Now I'm going to go
across two stitches, two squares for the
diagonal, so one, two. Okay, move to the
right one square. Okay. Now back up this way. Three, one, two, three. It should be in the same hole
as that previous stitch. Okay, so I've done
one, two, three. Now I got to go
back to two, one. So I go to the right
by one square. Go across two
diagonals, one, two, and last one, I go up one
and across one square. Okay, we're going to do two more blocks like
this in this row. So my next one is
going to go back to the diagonals will lean the
same way as my first one. All right, I'm going to
start the next stitch. Our first stitch is
going to be a one stitch diagonal that's going to go
right here in the next row. You can start it from the top or the bottom edge.
It doesn't matter. I'm going to go
down and start it from the bottom edge
of that diagonal, which is sharing a hole with
the previous stitch. Okay. And now I'm slanting
towards the right, kind of up towards
the right this time. So I'm going to go up one take my needle to the
right one square. Now I go across two
stitches, one, two. Again, it should match that pre stitch. Now I go down one. Back towards the right across
three, one, two, three. Now I'm down to two stitches, so I want to go down one because I'm at the right
edge of my square. Cross two, one, two squares. And my last little one
stitch at the corner, so I go to the right one Okay. Now, we're just going
to repeat what we did in the second block. So I'm going to start this by going over one and down one. And these are leaning
again up towards the left. There's one. This
one goes across two. This goes across three. The right back down across two. And my last one across one. Can do a double check.
Your last stitches here should line up in the same line with your fly
stitches from the row before. And actually, it should continue that same line with the
toroko stitch up above, so you know that
they're all aligned. So now I finish one
row of Brighton. I'm going to actually tie my
thread off here because I want to stitch the next one
again from left to right. I'm going to do the
next block of three. It'll be three high and it'll have four little blocks of
stitches just like we did. But we're going to start
at the diagonals going in the opposite direction
from the row above it. The row above, they're
leaning this way. Our row below, the second row of stitches is going
to lean this way. And it helps you to
look at the picture, you can grab a post note like this and just put
it at the bottom of the row so that you
can kind of block out what's going on below that, and it might make
it a little bit easier to follow
the pattern if you like to be able to follow the picture as you're
doing your stitches. Okay? So I'm going
to tie off this row. I'm going to speed up the video and just stitch the next row, and then we'll check in again when we are at the
end of this block. And one little note to
start the next row. I want to stitch this
again from left to right. And so I want to start with the bottom stitch of this
and be able to stitch one, two, three, two, one going
kind of from left to right. So I need to count down
to start this stitch, and it's going to start one, two, will be the top
part of the stitch right here to get to that section
where I do the one stitch. I just wanted to point that out. We go to count
down a little bit, just so you can start on the very bottom, the
left hand stitch. There is my last Brighton stitch and I'm going to tie
off on the back. I don't know about you
guys, but I think this is one of my favorite sections
on this whole sampler. I just love the way
this stitch turns out.
9. Cloud Fill Stitch: Okay, our next section is
called a cloud fill stitch, and we're going to do this
block right down here, but there is a second set of cloud fill and a
block right up here, and we are all set up on our piece to be able
to fill in that block. So we're going to
do both of those sections in the same lesson. So we're going to
start on this one on the bottom left corner. This works in two colors again. So we're going to
do a foundation set of stitches with yellow, which is whatever color you've assigned to yellow,
which for me is yellow. And then our second set of
stitches is going to be in whatever you've assigned
to your orange section. That second set of stitches
is not shown on the pattern. I'll show you that when
we go to stitch them. It made the pattern look too complicated and messy
to put the line in. But here's what it's going to look like when
we're all done. Now on this sample, I used a
variegated colored thread, which is why that second set of stitches is all
different colors. So we're going to start
by stitching what looks like the yellow stitches
here on this one, and then fill in with
that second color. In our second section
of cloud fill, it's actually going to
be all in one color. Again, on this sample, that was a variegated thread, so it looks a little
different here. Alright, so let's start
out with our yellow, and we're going to lay in
those foundation stitches. So I've got my yellow thread. That's kind of mustard
gold color for me. The first part of this stitch
is just a running stitch. It's actually the same
stitch we used to start off guiochT cloud fill is related
to the guilloche stitch. It's a similar
kind of structure. All right, so we're
going to stitch a series of running stitches. They're going to be one square
high and one square apart. So there's one square gap, and the columns
kind of alternate. They're off by one
row as we go across. Okay, so we can count down to start the
placement of this one. The bottom of our
guilloche stitch is here. We need to go down one, two, and that first row of
stitches is going to be in that same column of holes. Okay, so going as far
to the left, one, two, down, bringing my needle
up in that second hole. Okay, and we're going to
start with running stitch, which is just I'm going
to go down one square. I'm going to skip one
square and come back up. Here we go. Stitch one square. Skip one. Stitch. And one more. So there's just four stitches
in this first row. Okay. I'm going to do similar to what I've done in
several other places. I'm going to zig
zag back and forth. I'm going to go over
one column and go down one to start the next
row because it's offset and I'm going to work
my way back towards the top. So I'm going over
one and I'm going down one from where I left off. My next stitch is
going to start there, and I'm going to do
the same pattern. I'm going to go one skip one, do a stitch. Skip one. And this also has four stitches. Okay, I'm going to continue in that pattern, adding
running stitches. I'm going to match
this block here. So you can count. There's one, two,
three, four, five, six, seven, eight,
nine, ten, 11, 12, 13, 14, 15, 16, 17, looks like. And your last row should line up with your Brighton
stitch up above. So it should be in that same column of stitches so you can kind of
double check yourself. Okay, I'm going to speed up
the video as I stitch these because I don't
think we need to go through them slowly
step by step. And then we'll meet back to do the second half
of this stitch. Okay, to start this next
section of cloud fill, I've got my orange
thread ready to go. I'm holding my piece kind of sideways because I
think it's easier to do this kind of going away
from me with my needle. So I'm going to start by
bringing my needle up at the bottom of this very
first running stitch. So if I were facing
right side up, it's at the bottom
of the stitch, I'm going to come out
at that same hole. And I'm going to thread underneath each of these
stitches as I go across. I'm not going to go back
through the fabric again until I have reached
the end of this row. So all the rest of these
are going to just be slipped underneath
the running stitches that we've already laid down. And this first pass across, I'm only going to go underneath the first two row of stitches. And so I'm going to kind
of zigzag back and forth, alternating between just
those first two rows. Okay? So the first one
I'm going to do is this second row that
I'm coming to here, the one that's on
the right side. So I'm gonna slip
underneath the right side stitch. And pull through. Then I'm going to go
under the left stitch. Back under the right stitch. And try to slip underneath the threads
and not split them. That's where the blunt
needle will help with this that you're just going
underneath those stitches. And I'm alternating
back and forth, left, right, left,
right, left, right. I'm just pulling the
thread tight enough that it lays kind of flat underneath
those running stitches. I don't want to distort
the stitches at all. I don't want to pull
it so tight that it's like pulling them out of place. Okay. Got. Three more. Two more stitches under
that one, under this one. And then when I get to
the very last stitch, I'm just going to go
down right at the end at the bottom of that last
stitch in the row. So back through the fabric. So there's one little zigzagging
line of our cloud fill. Okay. For the next row, because my thread
is on this side, I'm going to stitch this one back going the other direction. I'm just going to spin my fabric around because I like it. I like to hold on
to it that way. I'm going to start this
one by coming up at the top of the running
stitch that's on the end. And we're going to zig zag again going between the
second and third rows. So one set of stitches we have already slipped
underneath once, and then we're going to
slip under the next one. Okay, so I'm bringing my needle up at that very first stitch. And I'm going to
zigzag back and forth. So my first one, I'm
going to go to the right. It's sharing a thread
with that previous row. And now I'm going to do that
same zigzagging motion. I'm going to do one to the
left. Then one to the right. One to the left.
One to the right. And again, we're trying not to split threads anywhere
if we can help it. And And you can see there's now kind of
a little diamond pattern that's happening between
those two slipped rows. Okay, same thing. When I get
to the very last stitch, I'm going to go down at the
top edge of that last stitch. So I kind of stay in
pattern. All right. Now I'm ready to go back
towards the right side again, and we're going to
do the same thing. The left hand stitch here is
going to be the same row. It's going to share a row with the previous one we did and
then we'll do one new row. So like one we slipped through
before and one new row, we're zigzagging back and forth. I'm going to start this
one by coming up at the bottom or the right side
of this next running stitch. There we go. And
zigzagging one more time. So I'm going to start
by going to the right. Then the left, which has
already been slipped through in our last row and back to
the right. And so on. I'm going to speed up the video. Here you got the
idea of how these slipped stitches work
and we will meet back when we have
finished slipping all of the rows of
running stitch. There's the last bit of cloud fill that
section is finished. I love using variegated
thread on this section. I like how it does a
color gradient there, which is really fun. Right, so I'm going
to tie this off. I'm going to get you started on the other section of
cloud fill up here. But you know all the
instructions already. So we'll kind of get started of how you place that
first section. And the only difference
with this one is we're going to stitch
both parts of it, the running stitch and
the slipped stitches, we're going to do
in the same color, and that's going to be
in whatever color you've assigned to green
for this section. I'm going to tie this off first. Okay. Got that. I'm going
to swap to my green thread. And we'll take a
look at our chart. So we are going to. We're going to count over from the end of our tied
herringbone stitch. We're going to go over one, two, and our first running stitch
is going to start there. So this one is a little taller. This one was only four stitches. This one is five and then
four in the next row. So it's kind of
alternating five and four. And you're going to do ten. It looks like one, two,
three, four, five, six, seven, eight,
nine, nine rows across. Okay. So we'll get that
very first part started. So I'm going over one, two from my tied herring bone, and I'm doing the same
kind of running stitch. It goes one square, and then we skip a square
and stitch a square. Okay. And one double
check we can do. Our last row of running
stitch should be 12 away from our Maltese cross. So there should be a gap
of two squares there. All right, I'm going to finish
stitching this section, and we'll just do a quick
check in at the very end, and you can see the
finished section, the other section of cloud fill. All right, there is
my second section of cloud fill stitch. So one there at the bottom.
And one up at the top.
10. Plaited Feather Stitch (Part 1): Okay, our next section to stitch is the plaited
feather stitch. And we've got this again in
two spots on the sampler. We've got one little
section down here. And then we've got
kind of two rows next to each other on this
little section right here. We're going to stitch this
one right now in class. We're going to come back and stitch this one a
little bit later after we've done some of these other blocks just to
help us with placement of it. We're going to learn the
stitch right now and then we'll revisit in another lesson a
little bit later on, coming back to stitch
that other section. I do that mostly just
because I don't like having to count a
huge distance across. I always make a mistake. Okay, so the platted feather, we basically do two rows of feather stitch one
on top of the other. And there's one little twist
where we do the platting or we are braiding it,
plating, platting together. So the first stitch stitch we're going to do are the
ones indicated in black, and that's going to
be in my aqua color, whatever I've assigned
to sort of aqua up here. And then my second set is going to be
whatever is in pink, and the pink for me is
this variegated thread. So I'm going to start out
with the aqua colored ones and do this first section. So I'm going to get some
thread ready to go. Okay. I'm turning my fabric
a little bit this way. I think the stitch is a
little easier for me to stitch if my fabric is kind
of facing this direction. And we are going to
bring our needle up. At the top corner here
where the stitch starts. It's going to be two over from my guilloche stitch
and it's going to be two down from the edge
of my Brighton stitch. You'll notice I don't have a stitch right here
at the corner. There's not a
thread right there, but I need to have a
gap of two and two. That's where I'm going
to start my needle. I'm going to come over
from guioch and two over from the Brighton stitch and bring my needle through. Okay, so these platted So this section of
plaited feather stitch is three squares wide, and each one of our stitches looks a little bit
like a check mark, and it's going to be
two stitches high. One thing I want you to
notice is this section is a little bit larger than the stitches over
in this section. Okay. So the first
part of my stitch, I'm going to go
towards the left side. I'm going to go one,
two, three squares, and I need to go two
squares down, one, two. I'm going to make
this kind of part of this stitch in one motion. So I'm actually going
to bring my needle down three squares
over, one, two, three, and I'm going to bring the
needle tip up two squares down so that I'm kind of just making a stitch so I
can park the needle. Again, that's three towards
the left and one, two down. Before I pull that
stitch through, I'm going to take my
thread and I'm going to go underneath the tip of the
needle from right to left. I'm kind of hooking the thread underneath the tip
of the needle. Now I'm going to
pull that through. What happens when I do that is we're making that
checkmark shape, and it's caught the thread on the beginning
of my next stitch. Now we're going to do a checkmark shape going
to the other direction. I'm going to do that same
parking the needle motion. But this time I'm going
to go back to the right, one, two, three, to the right, put my needle down,
and then go one, two, down and bring
the tip back up again. Over three, down two, and this time I'm going
to bring the thread underneath the needle
going from left to right. We're swinging back and forth. Okay. Now I'm going
to pull through. And you can see now I've got kind of a check mark shape going the opposite
direction. All right. Now we're going to swing
back to the left again. One, two, three. And this is in the same row that my thread is coming out
of that last stitch. So one, two, three,
back to the left. Go down two and park my needle. Then my thread wraps
from right to left. I moved my needle to the
left and my thread is moving to the left. Pulling through. Next stitch is going
to go to the right. I go one, two, three, down two. I went to the right
with my needle, my thread also going
towards the right. You back towards the left again, one, two, three, Needle down. Two stitches. Needle
went to the left, so my thread goes to the left. I think we've got one
more stitch to go. Back, one, two, three. My needle tip should
be coming up right in line with the edge
of my Brighton stitch. My needle went right, so my
thread goes to the right. Okay, that's one set
of feather stitch. We're going to finish this
off and then we're going to stitch another row of feather stitch right
on top of this. So to finish this
one off because I have a loop of
thread going around, I'm actually going
to go back down in the same hole that this
thread is coming out of, and it's going to catch that loop of thread
that's already there. I don't want to
pull so tight that I pull that to the back side, but it's just making
a tiny little stitch. That's going to hold
down that corner. Now I can tie this off on
the back and finish off this first row of feather
stitch. And trim my thread. Now I'm going to switch
colors of thread. I've done one pass. Now I'm going to swap to my other color. We're going to do
exactly the same stitch, the same pattern of going
over three and down two. But we're just going
to start it going the opposite direction
than our previous row. This time, I'm going to
start on the left side, which will actually
be the same hole as my previous one started. I'm trying to block that so
you can see, there we go. My needles coming up
in the same spot as that very first checkmark shape. I Our first stitch the last time we went
towards the left. This time we're going to
go towards the right. It's going to work
exactly the same way. We go over three,
one, two, three, which happens to be
in the same hole that this last stitch left off. We're going to park the needle
bringing it down there, and we go up or we go down two, which actually matches up
with that stitch underneath. My other checkmark. We're going to share holes a
lot in this one. Our needle went to the left, so I'm going to wrap my
thread from left to right. And I'm gonna pull through. And it makes a figure
eight shape where my previous checkmark
went one way and my new checkmark is
now going the other way. Now, here's one little
variation that you do to make this a
plaited feather stitch. We're going to braid
these threads together. Before I start the next stitch, I'm going to do
one little thing, which is I'm going to slip underneath this diagonal
line right here, get my camera to focus. This diagonal stitch right here, I'm just going to
go under that one. Just slip my thread underneath. And now I'm going to
start the next stitch. The next stitch, I'm going
from where I left off, I go over three, one, two, three, which is going
to go down right there, shares a space, and then my needle tip pops
up down to squares. Sorry, move some threads
out of the way there. My needle went to
the left this time, so my thread is going
to wrap to the left. Wrapping towards the
left and pull through. Oh We're only going to do that little extra slip when we're heading
towards the left. When we're going towards the
right, we don't do a slip. The next stitch, I'm just
going to do the same. One, two, three, over. My needle goes down, goes
down two squares and pops up. I went towards the right,
so my thread wraps towards the right. Pull through. Okay. This next stitch, we're heading left, so we're
going to do the little slip. So we're just going to slip
underneath that diagonal bar. And then we go one, two, three, pop the needle
tip up two squares down. Go. My needle went left, so my thread goes left. We don't slip anything
going to the right, so I just count one, two, three. Needle goes down up. Nle went right, thread
goes to the right. And one last stitch, we're going back to the left, so we're going to slip
under that last diagonal. And then we're going over one, two, three, so we go
right in that corner. The needle goes down two. Needle went left, so thread
goes left, and pull through. Then we're going to finish
this side the same way. My thread color almost
matches my fabric right here. I'm just going to
stitch down again in the same hole that
that threads coming out of to make a tiny little tack
down stitch right there, that finishes our little section of plaited feather stitch. I'm going to tie that
off on the back. Now, to stitch the next
section of platted feather, I'm actually going to
revisit that in this lesson. But what I'm going to do
is stop the lesson here. I'm going to move on and
record some other things so that I can fill in some
of the pieces over here, making it easier to place our next section of
platted feather. And then we'll
come back to that. So there'll be a pause here, and then we're going to
come back and finish up our section of
platted feather.
11. Rice Stitch: Our next section is
called the rice stitch, and it's this one right here, which looks crazy complicated. And it is right
here on our chart. This one again is
stitched in two colors. Now, it looks really complex
and you can't really see where one stitch
starts and then stops. But it's really a series of just big Xs, big cross stitches. And then we're going
to do a series of little tack down
stitches afterwards. So we're going to start this
one with the yellow color, whatever you've
assigned to yellow, and we're going to do some
alternating cross stitches, and then we're going
to come back and do a second pass and then
a third pass in green, whatever color you've
assigned to green. Okay. So I'm going to
start out with the yellow. Okay, and we're going to
start out by stitching big Xs in the yellow color. I'm going to use these post it notes one more time to block off a section so you can see the little bits of
these stitches better. So these are going to be
three squares across again. So there's three by three. You can see there's
just one black X in that three by three section. We're going to
start out by making that three by three cross stitch and we're going to work our
way again across the row. We're going to ignore
the gray stitches here. We're actually skipping
one, two, three. We're going to do another X. That are shown in black,
that's three by three. We're going to skip
three, one, two, three, and we're going to do
another three by three X. Post it notes a little
bit crooked there. That first row, we're
just going to make three cross stitches, big ones. When we move down three
stitches to go to the next row, we're alternating. We're going to skip
because those are in gray. We're going to skip
one, two, three. There's another X
that goes right here, one, two, three, and another
X that goes like this. We're going to keep alternating like that all the
way down the block. We're working just like we
did in the Brighton stitch. We're working in rows
that are three high, and so we've got one, two, three, four, five, and a half of what we're
going to work across. Let's start with those big Xs. I've got my needle
and my thread. We are going to start this
we're going two down from our Maltese crosses and we're going over from our
guilloche stitch, and it's going to match up
with both of those things. I'm looking for two and two, and that's going to get me to the top left corner to start. I'm going two to the right of my guilloche stitch and that should be two down
from my Maltese cross. Okay. So I'm going to
do a cross stitch. I'm going to stitch each one of these individually, I think. My first part of
the cross stitch, I'm going to go over
three, one, two, three, and down three, one, two, three, and make a stitch down. That's going to make
a big diagonal line. All right. Then I'm going to go back over to the left hand side. I'm going to go back to
one, two, three squares. This should be
right in line with where my first stitch started. Two, three, right there. Now I'm going to cross. Now I'm going to
go back over one, two, three, and up
one, two, three. So I'm just making
a three square X. Okay. I'm going to try to make all of my s
do the same thing. So I'm going to start at the
top left corner and go down, and then I'm going
to go to the bottom left corner and go up. So all of the crosses of the cross stitch are
going to go the same way. So my next one, I'm
going to skip three. I'm going to leave a
blank, one, two, three, and so my next stitch is going to start in the top
left corner there. Okay. And I'm doing the
same thing I just did. One, two, three, over,
one, two, three down. And then I'm going
to come back to the left, one, two, three, and make that cross by
going right three stitches again and up three
stitches. Three by three X. And then we've got one
more that fits in here. We're going to skip three
again, one, two, three. That gets us to the top corner. We're going down towards
the left three and three. This should line up with the outside edge of
your Maltese cross. Going back to the left corner. There's our three
big cross stitches. Now we're going to keep doing rows of those that alternate. My next one is going
to start right here and they're just going
to be two in this next row. I've got a stitch right there, and then I'm going
to skip three and I'm going to do a
stitch right there. I am going to tie this
one off only because I don't like really big stitches going across the
back of my work. That's just my little
picky details. I'm going to tie
this off and start again going left to right. You can stiturs however
you want to, honestly. A Next row of big Xs and two in the next row. And it's going to
start where this last one left off because I'm
going over three, one, two, three, so that puts
the top left corner at the end of that
very first X stitch. So same pattern we were doing
before three and three and back Then my next one, I count one, two,
three over again, which starts at where that
last stitch left off. Now, as we look back
at our pattern, we're looking at just
the black lines again. We have another row of one, two, three big Xs, then a row of two, one, two, then another row of one, two, three big xs. Then we've got a half a row. I'm going to stitch all
of these full rows. We'll come back and talk
about that half row. I'm just going to
speed up the video a little bit while I stitch. Okay, this last row, we are just making. Basically, we're going to start this row of Xs that
would go right here. But instead of
stitching all stitches, all three squares, we're
just going to do one. So there's just one. It's
like a third of a stitch. And that was just to make
the whole pattern work out. So I'm starting it just like I was doing another
row of big Xs. But instead of going
one, two, three, I'm just going to
go one stitch over. Then I'm going to continue. Then the next part of the
X would be right here, but I'm just going to do
the top one square of it. I'm just going to do
that one like this. Then same thing
over here. I've got one little diagonal stitch
that goes right here. You can just double
check this from the black lines on the pattern. That's the part of this
that we're stitching. It is just the
black lines. Okay. So I've got the last little
third, one third stitch. There, I'm going to tie off, and that's going to
finish the first pass, the yellow section of this. We're going to switch colors, and the second part of this
stitch we're doing in green. Alright, I think
this is actually the easiest part of
this stitch is we're now going to do the same
three by three big Xs, but we're basically going to
fill in the checkerboard. So in every gap that's
right here between yellow, we're going to put
a big green X. And when you look
on the chart here, there's a big green or a gray. There's an X there
and an X there. The next row, there's going
to be three, there's one. Two, three, and they are
just going in the holes. I'm going to start my
first one right here. That'll be the top
left corner of it is the top right of that
previous stitch. It's going to share a hole. I'm coming up there
and I'm doing the same pattern of cross stitches because I want
them to cross the same way. I'm going over three
and down three. That's going to land
in that same hole. We've already got two stitches
that are sharing that. Then I'm going to go
over to the left three, which shares a hole
again with two stitches. This sometimes can take a little wiggling to get your needle, not to split the threads, but just to push them out of
the way. I'm stitching back. I felt there was a
knot. Let me fix that. There we go. And then I'm stitching again from the
bottom left up to the top, it shares a hole with that yellow stitch
we did previously. So green thread is a little dark on the blue here
for this stitch, but you can see I'm
just filling the gap in between with large stitches
in this other color. So I'm going to start
this one the same, go from the top left down and from the bottom left Okay. Now I'm going to
continue to fill in the Xs the whole way,
fill in those gaps, and then the same thing
on this bottom row, we're going to have some
little one third stitches, is to fill in where those
partial Xs are going to be. All right, so I'm
just going to speed up the video and go ahead and fill in all of
those big Xs there. So we're making kind of a
checkerboard of cross stitches. Okay, there's the
finished section of large cross stitches, and I'm just going to hold
this still so you can pause the video here if you want to double check yours against mine. And then we'll go on
to the last step. All right, so the last
stitches are also done in the green or the
variegated green thread. I'm going to grab
another piece of green. All right. And the
last little bit, we are doing little
diagonal stitches. But I think the way
to remember this is to help you with getting
these placed correctly. Is this last pass we are only stitching over
yellow stitches. So the only place we're going
to make these little tie down these little tack down stitches are on the yellow Xs. Whatever color your
first color was. As we look, it's just a
little one stitch diagonal, it goes over one square and
they alternate direction. We've got one that leads towards the left and
then towards the right, left, right, left, right, and they are on every yellow X. And then we go down and
we do the same thing on the bottom of the yellow Xs and they're going
to alternate again, it goes right, left, right, left, right, left. Then we skip down to
the next row and we do the same thing to those
yellow Xs left, right, left, right, and then we
go to the bottom of left, right, left, right,
and work our way back. I'm going to zigzag
this back and forth across because it doesn't matter what direction
these stitches go. I was pickier about the Xs because I wanted every X
to cross the same way, but these ones won't all right. We're going to stop. We're going to start in the top left corner on
that very first yellow X, and my diagonal is
going to go just across that first square from
bottom left to top right. I'm going to bring my
needle up right here, one row below that X,
where that X starts. So I'm going one square
down to bring my needle up. Find the spot. There it is. Bring my needle up and
then I'm just going across one diagonal crossing
over the yellow. I've got one stitch that
leans towards the right, and then I go over one square. I do a stitch that
leans down slopes down. I skip the green, and I do that same thing
to the next yellow. So I go bottom left and stitch over
one square diagonally. Then I move over a square. The dark green part of my thread is just hitting right now, so it's a little
bit harder to see. Then I skip the next green and I do the same thing
again over the yellow. I go from left, cross over that corner, then move over one and
cross over the right. Now I'm going to do
the same thing on the bottom of that
same row of Xs. I'm from where I am right now, I'm going to go down
one square and bring my up. Right there. And I'm going
diagonally across one. Then I'm going to move over
one square and go diagonally across the other
corner of the X. Now you can see all four pieces of that X have a little
diagonal across. I'm going to keep working my
way back towards the left. Again, I'm skipping
the green stitch and I'm only doing this
to the yellow stitch. Cross that diagonally,
move over one. Cross diagonally. One more time skipping
the green cross and going one two or the yellow one. Now I'm going to skip
down to the next row of yellow Xs and do the same thing. There's two yellow
xs in the next row. I'm going to put those
same diagonal stitches across each of those. I'm just going to
work my way back from left to right again. Go over the top of the Xs to skip the green. A two. Now we have to do the
bottom of those yellow Xs. So I just go down one square and work my way back
from right to left. Dig other end, skip the green one and two. Split a three. Okay, now I'm going to
continue in pattern. I go to the next row of yellow
Xs and do the same thing. So I'm just going to
speed up the video until I get to the
very last row, and then we'll meet back
just to talk about finish. Alright, this very last row, we actually have a few more little of these diagonal
stitches to do. And again, it's just
over the yellow. So there's a little
yellow stitch here, and there's little
yellow stitches here. It's basically just going to be one stitch over the same
thing we've been doing. But just so we finish
out the pattern there. So I'm going to go over
the yellow stitches with our little diagonal. I really love how this pattern
ends up looking like plat. I think. And then
I'm skipping over, and I'm doing this
little diagonal stitch, again, the yellow stitches here. I think it's really
helpful to do this one in two colors that you can
keep track like that. I think it's easier to count, sort of, if you have the two
colors to kind of alternate. Alright, there's my last stitch. So there is our finished
section of rice stitch.
12. Plaited Feather Stitch (Part 2): U All right. Now that we have this
rice stitch section in, we actually can go
back and put in our other section
of platted feather. It's going to be a lot
easier to place now. So we're going to stitch it the same way as we did
this other section, platted feather over here. But our two colors are going
to be we're going to start again with the aqua color for our first thing, that's
going to be the black. Then our second pass we're
going to do in orange. And the difference with these two sections
of platted feather, this one was three
wide and two tall. These ones are two by two. So that's the only
difference there. You're going to count
over two stitches and up or down two stitches
to create that. So I'll get you started on these little sections
of plaited feather, and then you can revisit
the previous video if you need a refresher
on how to do this stitch. So I'm going to start
this with the aqua color. Okay, to start the stitch, like we did on the
section over here, I want to bring my needle up on the diagonal part of
it to start with. So I want to start at wherever
the diagonal stitch is. As I'm looking at this,
my diagonal is here, that starts the diagonal
part of the stitch. I'm going to go over
12 from this line, so this is going to line up
with the rice stitch section. I'm going to the right two, and I'm going to
go down two from that rice stitch
section. 02 and down to. So one, two, one, two. So my needle is
going to start right there, pulling it through. Okay, and plaited feather again, we're doing we're going to
go starting to the left. We're going to count
over on this one. We're going to go two
stitches to the left. Nedle goes down, and then we go two stitches down and we're
kind of parking the needle. And because the
needle went left, the thread goes to the left underneath. And
we'll pull through. Okay. Then our next stitch
is going to go to the right. So we're gonna count over one, two, and 12 down, so the needle goes down and then down two and
pops back up again. And our needle
went to the right, so the thread goes to the right. Okay, so following the pattern, we're going to stitch
one, two, three, four, five, six, seven, eight, kind of checkmarks. That's how tall
it's going to be. And I would stitch
the first column and then the second column in
the same color and then go back and do your second
color and the platted section. Now, I'm noticing on the screen, I have a miss print
on my pattern piece. I have one of the V sections like marked going the wrong way. I will make sure that
the PDF that's with this class has that corrected.
So yours is correct. So ignore mine that's
there on the screen. Okay, one more time
you can go back and visit the plaited
feather stitch lesson. If you need a refresher
on how to do that stitch. I'm going to complete
these two columns of stitches and then we'll
check back right at the end, just so you can see
what they look like. Okay, there is our plaited
feather stitch, Part two.
13. Tulip Stitch: Okay, our next section
is the tulip stitch, which is right here, this
block in the middle. And here's what this
one looks like. Now on this sample,
I stitched it in a variegated thread
so you can see there's all kinds of
colors happening there. This is actually a
one color stitch, so we're only going to use whatever color you have
set as your orange, mine is a variegated orange. Tulip stitch is based
on a chain stitch. So we're going to do a
little detached chain with some extra details. Okay, so first thing, we've got to do a
little counting to place the corner, to
place the top part. So we're going to
start the tulip stitch with kind of the teardrop shape
part of the stitch. So we stitch that first,
and then we do the stem, and then we put in these
little like petals, and then we'll kind of
go on to the next one. So I need to place this tip of this stitch is
where we're going to start. So I'm going to come
two down again, from the block above. I can look at the bottom stitch of that tied herring
bone, two down. Then I'm going over
four, one, two, blank stitches, and then 12 from the Turco
stitch section. We're going to go down
and over four is going to place the top of
that tulip stitch. I'm going down to one, two, and then over four
from my Turocostitch, one, two, three, four. That's going to bring
me up right there. Okay. This has some similarities to the plaited feather,
plaited feather stitch. So part of this is
going to stitch a little bit like the
platted feather stitch. So we're going to kind
of place the needle to do this first part
and park it there. So we're going to go down
and up with the needle. And our tulip stitches are I think they're
three stitches high, one, two, three squares. So we're going to
make this loop, this part of the chain stitch. It's going to be
three stitches high. So I'm going to take my needle. I'm going to go down
in the same hole that the thread is
coming up right now. So it's coming out of that hole. I'm going down in
that same hole. But instead of pulling
it all the way through, I'm going to take my needle
down one, two, three blocks. One, two, three, and pop
the tip of the needle up. Now I'm going to wrap
my thread around the bottom of the needle and
I don't want to twist it. Right now, I can see thread
coming out on the left side, so I'm going to wrap
my thread so I'm going around from the
right to the left. I'm not crossing
over the needle. I'm not putting a twist in it. Then I'm going to
pull that through. What happens when I pull that through is I'm going to have a loop and my thread is coming out of the
middle of the loop. I'm going to pull that loop down until it just
sits on the fabric. I don't want to close
it up completely. I want to keep that
teardrop shape so it's a little bit
open at the bottom. If you pull it too
tight, it'll just close up and it'll look like two threads right next
to each other. Then the bottom part
of the tulip stitch, the stem, we're going
to go down one, two. We're going to change that. I'm just going to point it out. On these two last
ones on the bottom, the bottom of the stem
is only one stitch high, but for the rest of them, we're
going to go two stitches. I'm going to go down
two grids, one, two, and make a stitch down. And this stitch is
going to do two things. It's going to make that
straight part of the stem. It's also going to kind of
tack down my chain stitch. So that's a detached chain
that we've made so far. To turn it into a tulip stitch, we now do two kind of slip stitches like we've done with gioche and
several other things. And our two slip stitches, there's kind of a U
shaped stitch here. And then there's kind of a
flatter U shaped stitch here. So I like to start with the one closest to the chain stitch. And so I need to go to
the left and down one. So over one and down one. And that's where I'm
going to bring my needle up from the tip of
our tulip stitch. So I'm going left and down
one, left one and down one. So my needle comes
up right here. I'm going to slip
underneath the stem. I'm just going to
slide my needle from left to right
under the stem. Then I'm going to go
down again one, and one. I go one to the right and
one down. It's symmetrical. It's going to be in
the same spot on the right side of the
petal as the left side. I'm going to pull that through. Okay. And now we're going to do that second kind of
U shaped stitch. And this one, instead
of going one and one, we're going to go two to
the left and two down. Okay? So I'm going to go
back over to the left side. I'm going two to the
left from that point of my tulip and two down from
the point of the tulip. That's where the stitch starts. I slip under the stem. And then I'm going
two to the right and two down. One,
two, one, two. I like to stitch these
going left to right, so I'm just going to do the
next one towards the right. And this point of this
one is just going to go it's one block over from where my last
tulips stitch left off. So my last little
petal is right here. I'm going to go
one to the right, and that's going to be the
top of my next chain stitch. So I'm moving one
grid to the right. We're going to do
another detached chain, so I'm just holding the
thread out of the way. I'm going to go down
in that same hole. I'm going to go down one, two, three blocks and bring my needle tip up. One,
two, three, yeah. Alright, I'm wrapping my thread under the
tip of the needle, just making sure that
I don't twist it. So if I cross over the needle, that's going to put a
twist in my stitch. So I just want to
make sure that I'm not crossing over the needle. I'm just going either left
to right or right to left, as long as you're not
making a crisscross. Okay. Pull through. Again, don't close
it all the way up. And then you're going
to go down to one, two, and make a stitch
down to make your stem. Okay, then we're counting
one more time for the petals from the
tip of the tulip. So you're going to go to
the left one and down one. Slip under the stem and to the right one and down one
from the tip of the tulip. Okay. And then same thing. We're going to go two
and two this time. So I'm going to go to
the left two and down to which'll be right there. Slip under the stem. To the right two and down two
from the tulip tip. Okay, there's two
tulip stitches. Okay, we got to do a
little counting to place the next one because we're
going to go back up again. So if I'm looking at maybe it's easiest to count
from this tulip tip. So my second tulip, I need to go over one, two, three, and up one, two. Okay, so it's one, two, three, one, two, will get
me to the next tulip tip. So counting from wherever
it makes sense to you. Okay. Going down in the same
hole. Moving down three. One more time, just wrapping
underneath the needle, making sure I don't criss
cross over. Pulling through. Go down one, two, Okay, now counting back
from the tip again. I'm going over left one and down one. Slipping underneath. Right, one and down one. There. And then
left two down two. Slip. And right two down to. Okay, we've got one more
tulip stitch in this row. I'm going to tie off
after I finish that one. And then we've got
four in the next row. And the only thing to remember that's different
about the next row is the second and the
fourth one that you stitch. You can see the stem is
a little bit shorter. It's one stitch instead
of two stitches. Otherwise, they're
going to start right at the base of the tulip
stem before them. Okay, so I'm just going to
finish stitching this row, speed up the video, and
we'll meet back when we get to the end
of this second row. Okay, there is our finished
tulip stitch section.
14. Tied Herringbone Stitch (Part 2): Okay. It's a good time now
to fill in another gap. We're actually going to
do the second section of tied herringbone stitch now. That was the very first
stitch that we did, and we've got another section of it that is right down
here in the center. And there's a little
variation on this. You'll see our first one, we have the stitches going horizontally, the
herring bone part. On this part, the stitches
are going vertically. We're stitching them the same way, we've changed direction. And when we go to do the
tied section on the top, we did two ties, horizontal and a vertical. On this bottom section, we're only doing
one set of ties, which is a little one
stitch that goes, in this case, vertically across. Okay? So I'm not going
to do an entire lesson again about tied herringbone stitch because we've
done that before, but I will get you
started on this section, and then we'll revisit it at the end when we
got it all stitched. Marked on our chart, we are going to use our aqua
color to do this section, that is this one, and our ties
are going to be in green. That's what's set out here. I've got those colors ready to go and I'm going to
pull off some of my aqua and we're going to get started with
that herringbone stitch. Okay. I'm actually
going to turn my piece. I think it's a little easier to kind of get started on this. If I turn it, easier
to hang onto. And we're going to start. The very first stitch of
this herring bone pattern is kind of half a
stitch just to get the spacing to all work
out on the design. We're doing just one little
half stitch to start with. Okay, we're going to use
the Brighton stitch to kind of help us locate where
this first one starts. So I've started it with
kind of half a stitch. There's a short one
that starts out here. So we need to place
the top corner of this stitch to
kind of get started. So we got a little bit
of counting to do. Um, so it's going to come over from the edge of
our Brighton stitch. I'm going one, two, three, four. So four stitches over. And I'm going to count from the bottom of the
Brighton stitch section. So from this bottom corner,
I'm going to go one, two, three, four,
five, six, seven. Seven is going to place
the top edge of this. Okay? So one, two, three, four, five, six, seven, kind of up from the bottom of the
Brighton stitch and one, two, three, four, over. Okay. So from the
bottom of my Brighton, one, two, three, four, five, six, seven, and I'm coming over one,
two, three, four. Whenever I have a big section
that I count like that, I'm going to pull it through, and then I'm just
going to double count it and make
sure that I'm in the right spot because there's nothing worse than having
to tear it all out. Okay, so I'm one, two, three, four from the edge of
my Brighton section, and one, two, three, four, five, six, seven. Okay, looks like I'm
in the right spot. So our very first stitch, we're just going to go over two and towards me and down to. So over two and down to gets us the little half stitch
start on this one. Okay, and a little reminder
about herringbone, we then go back to
stitches, one, two. I'm going to go back
to stitches, one, two to start the next herringbone
stitch going this way. Okay. And this one's a
slightly different size than our first one, so
I'm going to count this. So I'm stitching
up to this corner. So this is the next line of
stitching that I'm doing. So I'm going over
one, two, three, four, and I'm going up one, two, three, four, five. Alright, so from where I am now, one, two, three, four. And then one, two,
three, four, five. These are nice big stitches. Then herringbone again, I go back or towards the left two. Now I'm going to do that
same four, five pattern. I'm going to go to the right,
four, one, two, three, four, and down, one, two, three, four, five. Okay. That's got you started on the herring bone. So
you can continue. You're going to do three
rows exactly the same. They've got one stitch or
one square gap between them. Then when you go to do
the tie down stitches, these ones only have a horizontal and not
the vertical stitch. I'm going to finish
stitching this and then we'll meet back the end so
we can just review that. Okay, there is our finished tied herring
bone section, part two.
15. Laced Wheel Stitch: Okay. The next section we're going to do is this
bottom corner. And that is a stitch called
the laced wheel stitch, and it's also kind
of interspersed with some cross stitches. So this is our first stitch that has three different
colors going on. So we're going to do this
in three different parts. We're going to
start with orange. That's going to be the black
parts of these stitches. We're going to go on to
stitching in yellow, and that's going to be kind
of the lighter gray part. That's going to be these
little circles we see here. And then finally, we're going to switch to the aqua color, and that's going to be the X's that are in light
gray on this one. Okay, so three
different passes that we're going to do for
this laced wheel stitch. All right, so we're starting
out on this one with orange. I'm going to grab
my orange color or whatever color you have
assigned to the orange block. Oops. Thread snips were not as sharp as they
could have been. And this stitch starts out
basically with a cross stitch. So the same stitch we were using for the
rice stitch up here, we're going to start
with a base of some cross stitches and
then we're going to stitch some other things
over top of those. So as usual, we're
going to locate the top left corner
of this to start. So we have a couple of things
to work off of this time. I'm going to count
from the bottom of my plaited feather stitch. So I need to come down 12 from the bottom corner of
the plaited feather stitch, and it's going to be two away from our tied
herringbone here. It should line up in line
with the platted herringbone. Okay? So just two
down from there is going to locate the
top left corner. So one, two brings
me out right there. So the first thing we're going to do is we're
going to make a great big I forgot
to tie a knot. Let's start that again.
Tie a knot this time. To stitches down. Okay, we're gonna make a great
big cross stitch. So the same way we did
the cross stitch is for rice stitch, but
this one is bigger. It goes one, two, three, four, five, across,
and five down. So I'm going to stitch
it the same way. I'm gonna go top left
to bottom right. Then I'm going to
skip back here and do bottom left to top right. Okay, so I'm going to
do that unit first. So, one, two, three, four, five, and one, two,
three, four, five. It's a really big stitch. Okay. Then I'll go back over
to the left side, which is also five to the left, and cross over to the right, five and five again. Okay, so that's the first part. Now we're going to make two horizontal and two
vertical stitches. There are one, two
that go across, and then 12 that go vertical. I'm going to do the
horizontals first. This horizontal stitch is
going to start 12 down from that top corner and it's in
align with everything else. Two down, bringing my
needle up right here. I'm going straight across to the other side of the stitch, so it's going to be
five stitches long. Okay. And then I can stitch the other one going
back the other way. So I can just go
down one stitch, one square and go back across. Okay, and then I'm going to do the same thing with
the verticals. I'm going to start
at the bottom, and I'm going to go over two
stitches or two squares. They keep saying that wrong. So two squares over. Go up five. I move to the right one and down five. So it's kind of a tick tack
toe board on top of an X. Okay. We're going to make three, four, five, six,
seven, eight of those. And as we check out, we're
kind of doing a checkerboard, sort of a style thing too. So we've got we're skipping a five by five square in the middle and then
we're doing one more. And then the next
row alternates. So there's a five by
five square that's blank here, and then
we're doing one. So I think what I'm going
to do is I'm going to stitch this one next because it's the next
one towards the right, and then I'm going to
do this one and kind of treat it like
it's a zigzaggy row. So I'm going to stitch
one, two, three, and then tie off on a knot, and then I'll do four, five, six, and then seven, eight. That's kind of how I'm going
to stitch these units. All right. So I'm
going to count over. I've finished this first stitch. So I'm going to start this next one at the top left corner. Of this stitch, which is really close to where my thread
is coming out right now. Okay? So I'm going to
go top left corner. It's going to share a hole with this first one that I did, and I'm going to stitch
it in the same order. I want to do the same
order every time so that the layers of thread
match on every stitch. So we're going top
left to bottom right, and this is a five by
five again, one, two, three, four, five, one, two, three, four, five. Okay? Then I come back over to the
left side five stitches, and I go from bottom left to
top right, five and five. Okay. Now I'm going to stitch
my two horizontals. So I'm coming two
down from the top. And I'm going five
across dropped need. I move one square down and then go five
across back the other way. Okay. And now I
do two verticals. I'm going to start the
vertical at the top this time. So I'm coming over one,
two from the corner. And I'm going all the way
across five stitches. Move over to the right
one and back five. One more of these. I'm going to do the one that's
in the corner here. I'm going to go up
and start it in the top left corner again. There should be a gap of five by five in between
these two stitches. Top left to bottom
right, one, two, three, four, five, one, two, three, four, five. Back over, it's going to share a hole with that
previous stitch. And finish the cross. Then I'm going to
do my horizontals. Horizontal. Move down one. Back. And then I'll skip down to the bottom. Go to the top. Move one right. Right there, There's three of
our layered cross stitches. I'm going to tie
a knot. I'm going to do that same thing again, one, two, three, and then I'm going to do
one more row, one, two. I'll speed up the video and
we will meet back when we have finished all of
these layered crosses. Okay, I've got all of my eight kind of layered
cross stitches done. Now we're going
to switch colors, and we're going to do the laced part of this wheel stitch. So I'm going to yellow, and we're doing these little kind of loops that go around
the center of these. So I'm going to swap colors. So I'm bringing my
needle up and you have to kind of push some threads
out of the way to get up. But I'm going to come one, two stitches over and one down. So it's going to come up
right here kind of underneath the space where all of these stitches are
crossing over each other. So you just want to find that
hole and push the stitches kind of out of the way
because you don't want it. Don't want to split
thread anywhere. So I'm just pushing
stuff so I can come up. There. Okay. Now I'm going to make a circle
going around the stitch. I'm going to go clockwise, and I'm going to weave in and out of these
existing stitches. I'm going over all of the
horizontal and vertical ones, and I'm going under
the diagonals. My thread is first going to
go over those two verticals. Then I'm going to slip
under this diagonal. Move my thread so you can see. Going over the two
horizontal under the diagonal, under over. Then we're going to go
underneath this last one and you go under the thread and it goes back down in the same
hole that you came up. We're just making
a circle around. I'm going to go under that
diagonal stitch first. And then just push it out
of the way to stitch down, and then you play with
the tension of this loop. Because it's just all loose
under there, you can pull. Sometimes you need
to move it around with your fingers
or your needle, but you just want
to make a circle that's even that circles the
center of those stitches. All right. And I'm going
to do the same thing, just kind of work my way in the same order around
these stitches. So I'm going to come up again, two over and two down
from the corner stitch, pushing things kind
of out of the way. I just hold that with my thumb. That might make it easier. Go. Okay. And then I'm working my
way clockwise around. So over under O, under. Over, under. Over. Under caught the corner of my fabric. I got a re thread my needle. And then I'm going
to go back down in that hole where my
thread started. Okay. Just kind of
just a little bit. And I keep going. So I'm
going to do the same thing. Come up here, and then I can either tie off or
just make a stitch down. And I want to do that same
little circle pattern around each one of these
layered crosses. Okay, there's my last laced
section with the circle, so I'm going to tie
off that color, and then we have one more
set of stitches to do. And that actually finishes what they call the
laced wheel stitch. But I decided to fill in this section just
a little bit more. It looks a little empty to me. And so what we're going to do is one more set of cross stitches, just plain cross stitches
in each of the gaps. So these are marked
kind of in pale gray on the pattern sheet. We're going to switch to
the aqua colored thread. And these are just three
across and three down, and they kind of sit right in the center of those
open squares. So these squares
are five by five. We're going to stitch
a three by three. So I'm going to swap to
my aqua colored thread. All right. And I'm just going to stitch a series of crosses. So this one is going to start one stitch
over and one stitch down from the last or the very first one of
these that we stitched. So this is going to center it right in the middle
of that empty square. And I'm going to go
one, two, three, diagonally, and
then go up three. And back. I'm going to do a cross stitch like that and just
fill in each gap. I always start them again in the top left corner
and go left and down and then do the second part of the
cross the other way. That finishes out our
laced wheel section. And
16. Foliage Stitch: Okay, you've probably guessed
where we're going next, which is we have a
little hole right here. We're going to fill that
with something called the foliage stitch,
which is right here. And on this sample, got a lot of extra
threads hanging out on this one. It looks like this. Okay. This on our pattern is marked as being
in our darker blue. So whatever your darker
turquoise color is, that's this one for me. And this is another
stitch kind of like the Brighton stitch that works
kind of in little squares. So it's made up of little units. Each one kind of
looks like a leaf. So I'm going to get my thread and my needle
and one more time, we're going to count over so we can place the top part of this. So I'm going to start on the top left corner
of this stitch. So it is 12 over from our
plaited feather stitch, and it's two down from
our rice stitch section, so it should fit right in there. And each one of these squares, these leaves we're going
to stitch is four across. It's four across and four high. So they're going to
make little squares. We're going to stitch eight
of these foliage stitches. Okay, so I'm coming
again over two and down two so over two from the platted feather and down
two from the rice stitch. So it should line up with
your plaited feather stitch. Okay. And I'm pulling through. So this is almost a variation on
this Brighton stitch, where we're doing a set of kind of diagonal
or in this case, a lot of horizontal and vertical stitches kind of in an order. The first one I'm going to
start doing is I'm going to do a vertical stitch
and I'm going to go four stitches straight down, one, two, three, four. Then I'm going to
zigzag back and forth. I'm going to go one row to the right and I'm
going to come up one. I've gone one over and one up. Now I'm going to stitch
back to the top, which will be three stitches. It's one less than the last row. Then I'm going to go
one to the right. This time, I'm going to do
one less than the last row. I'm going to go down two, one, two, Now we're going to do the same set of
stitches horizontally. I'm going to start
at the top and do the two stitch
part of it first. I'm going to go from where
my last stitch left off, I'm going to go over two,
go to the right two. I'm going to come back
and meet the bottom of the two that are the
two that goes vertically. So I made a little L. Now I'm going to go to
the left and down one. So left one down one, which is going to
be the same hole where this next vertical
stitch left off. And I'm going to stitch
back to the right, lining up with this
right edge here. It's going to be
three stitches long, just like the vertical
one it's matching. Then I'm going to
go down one row. I'm going to stitch
right back to this corner and meet
the four stitch. This one should be
four squares across. You've got three stacked Ls. Then to finish this stitch, I'm going to come up to
the top right corner, that's going to
be right up here. I bring the needle
from the backside. I'm coming right up here. This would be two
over and two up from that last L. I'm going to stitch from this top right corner of my square all the way back
to the bottom left corner. I make one diagonal stitch
across the whole thing. That is one foliage stitch. We'll do one more.
We're just going to work these in
little rows of two. I'm going to start again
at the top left corner. Go down four, which will be sharing a hole with
our previous stitch. Then we go over one up one. Stitch back to the top edge. It'll be three stitches lung. Then over one towards the
right, and go down two. Then we go over two, which should line up with the outside edge of all
of our other stitches. It should be right in
line with everything. I meet the bottom of the
other two length stitch. Then I go down one left one, which will be at the bottom
of the next vertical. So we're making these
little V shapes. Okay. And out to
the outside edge. Down one. Back to
the bottom corner. Okay, then I go all the way up to the top corner of the square, which is going to
be two over and two up kind of from
this last little L. It's the other
corner. Like that. And I stitch back. To make
the center of the leaf. We're going to stitch
six more just like that, and they're going to go in
little rows they'll be two, two, two that'll finish
off this foliage section. I'm going to go ahead
and just finish stitching these and we'll meet
back when those are done. Okay, there is our finished
section of foliage stitch.
17. Butterflies (Backstitch & Algerian Eye): Okay. The very last section of our sampler is the butterflies that go right here
in the center, and you can see we have
an opening left for them. And the butterfly section is a little bit of choose
your own adventure. I'm going to stitch
mine kind of following the pattern colors
suggested here. But my other sample, I
kind of did a variation on that because I wanted
you to be able to see a couple different ways. So the butterflies are stitched
in kind of a combination of they use backstitch
for most of them. So we're going to outline
the butterfly shape in backstitch. So we'll do that. They have an
Algerian eye stitch, which is this little
kind of radiating one. So they each have
that in a section. They've got some cross stitches. We've done big cross stitches, so we're going to do
some little ones, that makes the body. And then there are
two pistol stitches that make the kind of
antennas for them. So there's a lot of different
stitches going on here, but only a little
bit of each of them. I like to start with the
outline with the backstitch, and then we'll figure
out how to fill them in. So you can choose how you
want to outline yours. I'm going to follow the pattern. And so on the pattern
I have it marked, the outlines or the
main black part of these are going
to be in my color, which is marked
pink, which for me is actually this variegated
blue and purple one. So I'm going to start with that. And for the backstitch, there isn't really a pattern that you learn for doing this. We're really just going to
have to do a lot of counting. That's why I left the butterflies
for the very last part. So you've had a lot
of experience now with counting and
placing stitches. The two butterflies
are identical, so kind of once you get one set, the other one should be
kind of familiar and easy. Okay, I think the
easiest place to start the butterfly is
the very top of the wing. So there's a little bit
of a point right there, and it's right at the
edge of the pink block. So I think that's the
easiest place to start. And I'm going to kind of
just start there and work my way clockwise
around the butterfly. All right, so I am going off of my tulip stitch block maybe is I'm going
to go, let's see. Where's a good place
to count from? I guess I'm going to
go from the edge of the Turocoblock I'm
going to count over one, two, three, four, five is where my little point
of the butterfly wing is. That's five over.
And it's going to be two down from the very bottom
of the tulip stitches. So not from this point, but the very last stitch here. I need to go two down, there's two stitches between
every block, and I'm going over five from
my Turoco block there. Okay. So let's start with that.
Tarocoblock. I'm going over one, two, three, four, five, and then I want to
make sure that I am two down from the lowest part
of my tulip stitch. So it looks like I'm starting my butterfly
wing right there. And I'm going to recount that
because I always do one, two, three, four, five, and then it's one, two down. Okay. So now you just have to follow the pattern
for the butterflies. So we're going to do
the first stitch, and I'm going to, let's see, zoom down
just a little bit. Okay. Our first stitch, like I said, I'm going to
start going clockwise. We're looking for corners. So corners where it hits a grid is where we're going to
stop and start stitches. So this very first
one goes over one, two, and down one. So there's a kind of an
intersection right there. So I'm going to go
over two down one. That'll be my first stitch. So, one, two, and one
and pull that through. Okay, that kind of
gets us started. Now, backstitch, once we kind of have done that
very first initial stitch, the way backstitch works
is we're always going to go to the end of
the next section, and then we stitch back
to where we started. So my next section ends, one, two, three over, and
one, two, three down. So my next corner
is right there. So I'm going to bring
my needle up one, two, three, one, two, three, and then I'm going to stitch back and meet
my previous stitch. This will make sense
when we do it. I'm going to go over
one, two, three, and one, two, three, down to double check that. One, two, three, one, two, three, pulling my
needle up right there. Now I go back and I meet
the previous stitch. I'm going to go back down
in the same hole. Okay. Our next stitch, there isn't a stitch that goes
across the top of the head, so I just skip one, and I'm going to come up
one grid to the right. One grid to the right. And now I'm doing a mirror
image of this last one I did. So I'm going to go one, two, three over and one,
two, three up. So there's the next
kind of corner. One, two, three, I Okay. Sorry, that didn't
get on camera. All right. Looking for the
next corner right here. So I go over one, two, and up one, one, two, one. And back to meet my
previous stitch. Okay. Hopefully that should match what it looks like
on the left side. All right, next corner is
going to be right here. Go over one, two, and down one. One, two, one. Back to meet the
previous stitch. Okay, my next one is here. So I'm just going one
down and one over. One down, one over. Okay. Next down
two straight down. And you can double
check yourself here when you
stitch that stitch. It should be two away from
your edges over here. All right. My next corner is right here, which is down two and left two. Then I'm going to
do this little part in here that goes over two and down one.
Over two down one. I'm just going to keep
going around the outline. I'm not going to stitch
this little piece yet. Now I go back out
over two, down two. Back to meet the
previous stitch. Okay. Down to, left one. One, two, three. I go three straight to the left. Now, one, two, one, two, gets me to right there. We've made it around one wing. Hopefully, this stitch is going to line up so that this half of the wing,
those are in a line. Now we're going to keep
going. We're going to go straight across one. There's no stitch there,
so we're just going to skip over one square. Then over two down two. Okay. One, two, three,
straight to the left. Left one, up two. Right two, up two. Left two, up one. Left two, up two. Straight up two squares. Right one, up one. And this should close
up our butterfly. We're gonna go over
right two and up one. And hopefully that meets
up where we started. There's our butterfly outline. Okay. We're going to do exactly the same
thing on the bottom one. The two butterflies
are identical. So you can just follow
the same method to place the other one. Notice that the bottom
of the wing here is one, two, away from the top of
the wing on the next one. All right. The next
part I'm going to stitch on this is I'm going
to do the pistol stitches, the little antennas, and I
still have plenty of thread, so I'm just going to kind of
move my needle over here. I might just slip behind
a stitch or so on the back just so that I don't have a big
loose hanging thread. I'm going to start the
pistol stitch right down here kind of at the
base of the wing, and I'm going to bring my
needle up at that same hole. So it's right where the
wing kind of starts. Okay. And this one to
do a pistol stitch, I think is easiest to lay
this down on the table. And we're going to go three
straight up, one, two, three, that's the spot where our needle is
going to go down, but we're going to
do a little wrap with the thread
before we do that. I'm going to hold my needle
kind of going horizontally. I'm pointing towards the left, and I'm just going to
pick up my thread, and I'm going to
wrap it over top of the needle and back
under towards me. I'm going to do that twice over top of the needle
and back towards me. So I'm going to do
it three times. Over the needle back towards me. We're going to make
a three twist. Alright. Holding onto that, just keeping the tension
so you don't lose those little wraps
you just made. Count up one, two, three, and that's the hole
you're going to go back into. And before you pull
your needle through, you just want to grab this end that you've been
holding onto and just slide those twists so they sit down at the
bottom of the needle, kind of tight
against the fabric. All the twists are right
there down at the very base. And I'm just keeping
my thumb on it to keep a little bit of tension so
that doesn't come undone. And now I'm going
to pull through. And when I do that, it's
going to leave a little knot, a little twist right
there at the top. Okay, I'm going to
do the same thing. One grid over. I'm going to start again
at the bottom of the wing, or I guess this is
the top of the wing, but that end of the thread. I'm going to lay it
down on my table. Holding my needle,
pointing to the left. I wrap over and under
back towards me, back towards me, over back
towards me, three times. Holding the tension on it, I'm going to count up
one, two, three grids. And put my needle back
down through that hole. There we go. Before
I pull it through, I'm just going to
pull on the thread to pull those twists right down against the
bottom of the needle. I'm going to move some
threads out of the way, so I can hold that
up and you can see it really well. There we go. I've pulled the twists of thread right down
there at the bottom, and I'm just holding
it with my thumb and then I'm going
to pull through. There we go. Two
little antennas. All right. I still
have some thread. So I'm going to
keep going. Now I'm going to stitch the
body of my butterfly, and I do this in the same color. I've got five little
cross stitches, and they're just
one square wide, one, two, three, four, five, I'm going to do these
just to kind of be efficient. I'm going to do a stack of them. So I'm going to start
in the top left corner, which is the same
place as the kind of base of the wing and
the base of our antenna. So I'm going to bring
my needle up right there. Maybe. There we go. Okay. I'm going to stitch
all five of these stitches. I'm going to do half
the stitch first, and then I'm going to come
back and do the Xs on them. I'm going to go down one
to the right, one down. I'm going to do five
stitches just like that. I'm going to go back straight
back over to the left side. I'm going to go one to
the right and one down. These are halves
of cross stitches. I'm going to go back
to the left one. Go down and right.
Back over to the left. Down and right. And one
more stitch like that. Straight back to the
left. Down and right. Okay, then I'm going to
make the other half of the cross just
going the same way. But I'm going to work back up. Okay, now I'm going to do
the other half of the cross, but I'm going to work the
same way just going up. I'm going to start in the
bottom left corner and just do all the stitches going
up and making the crosses. This is just the speed cross stitch way to do these because they're in a
nice column like this. All right, bringing my needle up there at the
bottom left corner, and then I just go right and up one and that finishes
that first cross stitch. Then I just keep
going the same way. I go back to the
left We one up one. It's kind of the opposite
of what we just did. Back to the left,
right one up one. Back to the left. And lasts one up. Okay. I am now out of thread, so
I'm going to tie mine off. I I like to stitch the outline
of the butterfly first because I think
it's easier to do the decoration in the wings if you have that outline
going for you already. Okay, so we got one
butterfly outlined. Now we've got one
more little set of stitches that I need
to do in the same color. We have a little
horizontal stitch that goes right here that
divides up the wings. I'm going to get just a short
piece of thread and do that next so I can get the whole outline
of the butterfly done. I would have just done
it with the same thread, but I ran out. My piece was too short. Okay. So I'm going to make two little horizontal stitches, one on either side of the body, and they just go from
the little indent where the wing kind of comes in and they go straight across
till they meet the body. And then I'm going to just
skip over to the other side. Skip that row of cross stitches and go straight across here. So now I've got my whole
outline of my butterfly done. I'm going to switch colors. So you can do the
decorations and the wings in whatever color
combination you want to. On this, I marked it, so the tops of the wings on one butterfly
or done in one color, and the bottom of the other
butterfly is the same color. And then I alternated, you do a different color
on the bottoms and then repeat that on the top.
So that's what I'm gonna do. On my chart, it's marked that the next part I do
is the kind of aqua. Okay? So the aqua color is going to be the
dark gray, and for me, that's the top of the
butterfly wings over here is all in the little bit
darker shade of gray. So I'm going to pull
some of that color. And most of the wing decoration, we've done the stitches before. There's a little
section of backstitch, and there's a cross stitch
in the top of the wings. So we tie this knot. So this little like curly
cue is just backstitch. We've done backstitch all
the way around the outside. And then there's one
little cross stitch there. The new thing we haven't done is this one called an Algerian eye. It's a lot similar to the
foliage stitch that we did. Okay? So I'm going to start with the Algerian eye part of this, and then we'll stitch the
rest of the kind of pattern. So I'm going to start on the
left most vertical piece. I'm looking for that highest
point on the butterfly wing. We started on that on this side, and I'm going over one
to the left one and down one from that highest
point on the wing. Over one down one. Just right. I can see the hole. I just can't get my
needle through it. Okay. So it's coming
up right there. I'm stitching this. It's going straight vertical
three stitches. I'm going to go one,
two, three, down. Okay. And I'm making
five rays of this stitch that all are going
to start out here and end at the center point. So the next one is
going to go one over towards the right from
where my last stitch was. So I go straight
over to the right, and then it comes to
that center point. Okay. The next one goes over 12. It's actually going to share
a hole with your backstitch. It touches the outside edge of the wing, so it
goes over one, two. It's touching the outside
of the wing outline. I hold it where I can fabric
isn't all flopping around. There we go. Okay. And back
in the same hole. Okay. From there, I go
straight down one. No, two. Straight down two. I was like, wait, that
doesn't make sense. I go down two stitches
straight down, or two squares straight
down, back to that center. And then one stitch
straight down. And back to the center. So if you were to keep going all the way
around in a circle, that makes a full Algerian eye. We're using like a quarter
of an Algerian eye. Okay, from here, I now go and I stitch this little curly
cue in backstitch. So I'm going to
bring my needle up at the place that my
Algerian eye Oh, no. Because we just
ended that. Okay, so I'm going to bring my needle up. The first part of my
backstitch goes one, two, three, towards the
left, one, two, three, and then comes back and meets this
Algerian eye stitch. Then I go straight down two
and go back to meet it. Then I go to the right two. Up one. And to the left one. Makes a little tiny spiral. And then to finish
off my wing design, there's one little
cross stitch that sits just one square over from that. I'm going to move over
one square and stitch. One and two. The other half of the wing is just the mirror
image of that. So it works exactly the same. We're just doing a mirror image. I'm going to tie off my thread
here and then I'm going to stitch the same thing
on the top of the wing. A Okay, there is the top of
the butterfly wings. Now I'm going to switch colors one more time for the bottom. On my chart here, it says that is yellow for the
last little parts, so I'm going to
swap to my yellow. And this last little design on the bottom of the wings is
just some more backstitch. It's another spiral kind of
going the other direction. Okay. And I'm going to start on the one on
the right again. So I am coming kind of
from this horizontal line. I'm coming one down, and I'm one over to the
right from the body. That's where this
is going to start. And we're going to
do backstitch again. So I'm going to start
just my first stitch. I'm going to go forward. So three. And then
I'm going to go down two and up to meet it. And then to the left two. Yes. Okay. Then up one and
one to the right. And that's all there is for that bottom section of the wing. And same thing here, we're going to do
the mirror image of it on the other side. So I'm just going to
make a stitch across and mirror image that. So over three 22. Okay. And I'm going to tie
that off on the back. Now, the butterflies, you
can really have some fun. This is a little bit where
you could personalize your project a whole lot. Your second butterfly is going to work exactly
the same as the first. But you could trade the colors around and do completely
different colors. If you look at your design
and you're like, oh, I really would like
more orange in mine. Like, do your next butterfly
with some more orange. I'm going to follow
what's written on the pattern just so that we
have an example of that. So I'm going to
outline mine again in the same kind of purple
and blue variegated. And then I'm going to
stitch in aqua and yellow, but I'm going to flip flop
the two colors on that. So that's kind of
what it says here. So I'm just going to go ahead and stitch my
second butterfly, and then we'll meet up
when that is all finished. Okay, there's my
finished butterflies. And actually, I got almost all the way
to the end of mine. And instead of stitching
aqua on the bottom here, like the opposite
of the top one, I decided I wanted more green. Even though it looks kind
of the same on camera, it wanted a little bit
more green for me. So I stitched it a
little more green. So there is our
finished sampler. In the last lesson, I'm
going to talk about ways to finish this and
what you could do with this project
when you're all done.
18. Finishing & Wrap Up: So let's talk finishing and a little wrap up
for your project. So when you're all
done stitching, there are a couple of things
you can do to kind of finish your piece and make
it look really awesome. So if you're like
me, you might have been stitching and
at some point, like, folded over the fabric
or you might have used an embroidery hoop
and you've got some wrinkles and
crinkles in your fabric. So the best way to take
care of that is to grab just a terry cloth towel. So I have just a bath
towel here as an example. And the reason I
like terry cloth is because it's got this
plush kind of surface, I'm going to take
my finished piece, and I'm going to
lay it face down on top of the terry cloth towel. And I'm going to press this from the backside just with my iron
and a little bit of steam. And what the terry cloth
towel does is that it allows your stitches
to kind of stay, like, nice and plump and rounded
instead of ironing on, say, like an ironing board, which would flatten and kind
of smoosh the stitches. So this is going
to let everything kind of stay nice
and plump and round. A little bit of steam helps
to get the wrinkles out. So you've got a nice
finished piece, whatever you want to do
with it when you get done. Okay? So pressing from
the backside with a little steam on a
terry cloth towel. Same thing goes for
your small samples. That's a great way to just
kind of finish them up. Now, of course, you can
use this bigger piece. You can put it in a
frame. You can stitch it onto the pocket of a bag. You can do all kinds
of things with it. And we'd love to see. Of course, if you want to share your project in the project
section of this class, if you're going to use
your sampler piece for the pocket of a
bag, for instance, I would put another piece of fabric on the back of it just to protect the back
of your stitches and those knots that
you tied and so forth, especially if it's used for something like a pocket
where you're going to be putting things in
and out of it and it's going to kind of abraid on the back of those stitches. So just a lining fabric, I like to use something
that's similar to the color of my fabric
just so that it doesn't, um emphasize the little
holes in the fabric, like you can see the light
coming through them here. So I would back mine with
something dark colored, black or navy blue like my
fabric color that I chose. Okay, last little wrap
up for this class. Thank you, first, so much for joining me and
stitching along with me. Remember that you can use all of these stitches to create
your own projects. So many of these were designed to be what they
call a fill stitch. So it's supposed to fill as large or as small an
area as you want to. So you can be creative, like the book I showed
you earlier on in class and use these stitches in many, many different ways. I hope you enjoyed making a
modern Black Work sampler, and I will see you at
another class again soon. And
 Becka Rahn, Artist & teacher, paper & fiber art