Transcripts
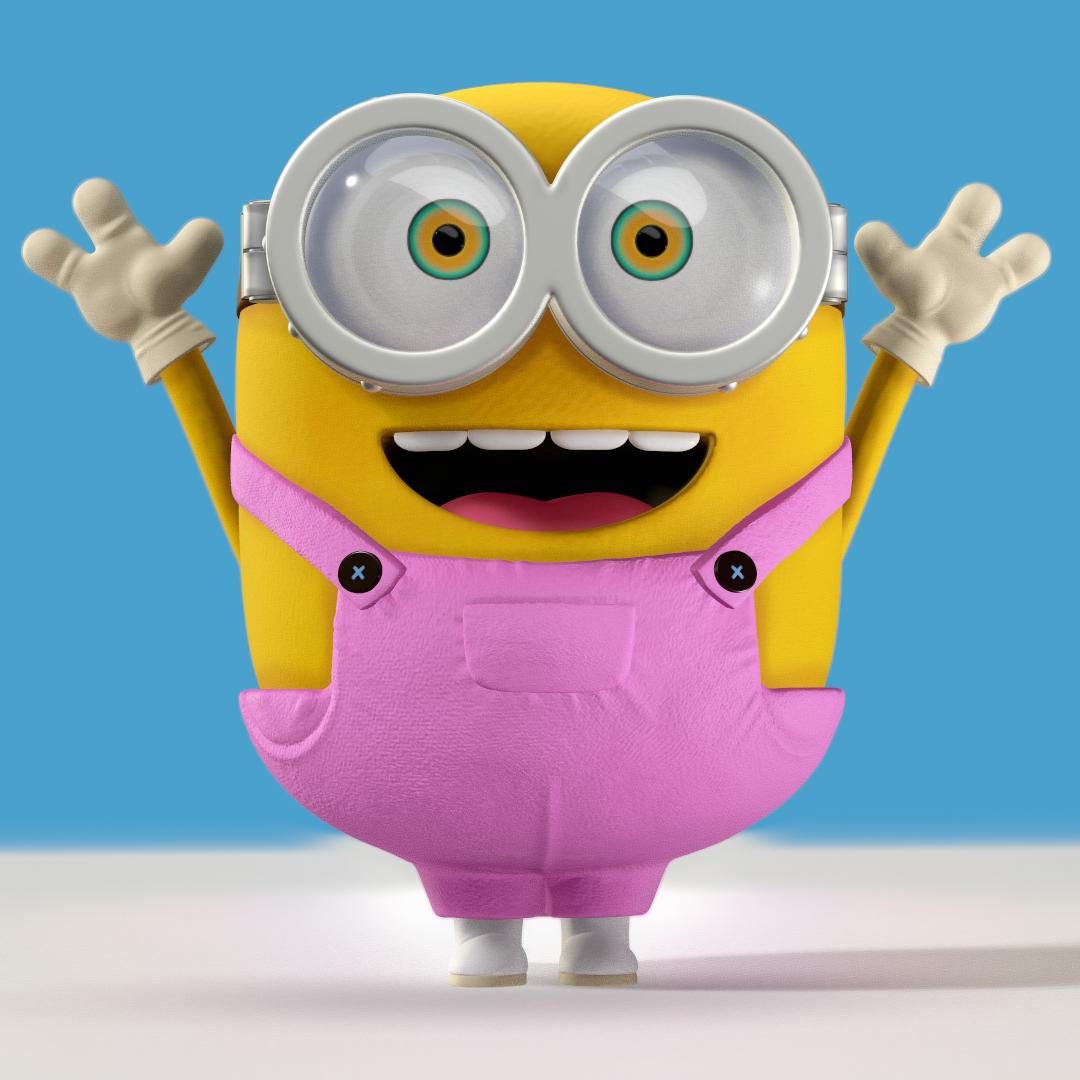
1. Model-a-Minion! 3D Character Design in Nomad Sculpt: What's up guys? Drug food aid here. Thanks for joining me in
Brooklyn, New York, we're going to make a minion
the level of details in the quality of the
scopes that you can get with nomads, sculpt,
it's insane. So you're going to learn
a lot in this class. It's as much about
the process as it is about getting to the
end and making the menu. We pretty much go through
everything you need to know. From the blocking out, the modeling,
sculpting, coloring. I love coloring
and nomad sculpt. I tried to bring into procreate that didn't
really work for me. I color it right? No man. I mean, a gene texture that was very difficult to figure out how to
do a gene texture. I kinda sat there just
recording and deleting and recording and deleting until I got something
that really worked. So a few of the other
things you'll learn in this class is how to make eyes. I really loved making eyes. I came up with this
way to do really cool, glossy, colorful eyes. And you'll be or use it in all your characters
after this class, I also do texture. I wanted to give us an
overall some texture. And also I wanted to give his, his skin some texture
because he feels guilty. I've never felt dominion,
but I feel like they would be sort of like like fealty. Then you can go ahead and
make things with texture. It's really not that difficult once you just know how to do it. And I'm going to walk
you through all of that in this class
and then sums. This is one of my favorite
most complex scopes to date. This minion really gave
me some problems and some issues that I really
enjoyed figuring out. And that's really the key
takeaway for the class. It's just working through
issues and figuring out different problems
and then figuring out the solutions to those problems. Alright, let's move on to the next video,
the class project.
2. Class Project: What's up, guys, welcome
to the class project. By now you know me, I don't go on and on
about the class project. We're gonna make a minion. There's a lot to go over. There's a lot of moving pieces. Minions are as complex as they are acute, but
you in the right place, I'm going to go through
everything step-by-step slowly so you can follow
along and understand it. And if you do have any issues, don't hesitate to post
them in the discussion. We'll get through it. I'll get you through it
and will continue to move forward and make
our cute little minion. Alright, let's move on to the next video. Getting Started.
3. Getting Started: Okay guys, so we're going
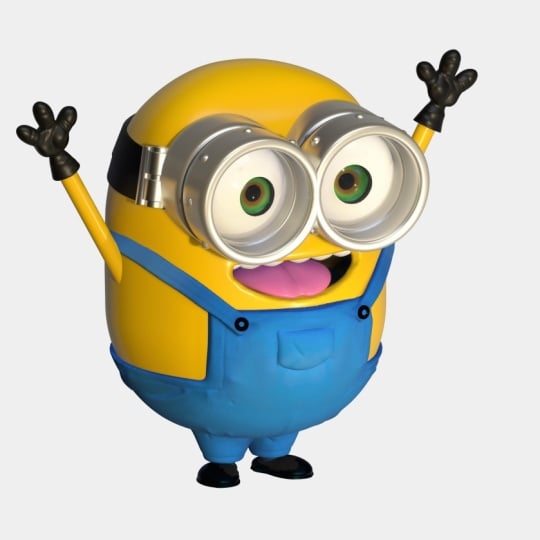
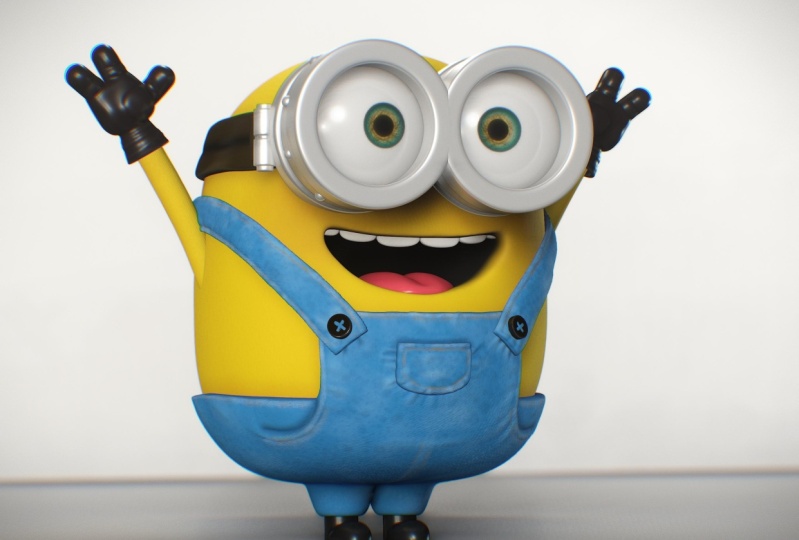
to make this little minion. We're going to start from
the very top and open nomad. Now we're going to just
import our image into our, into nomad so they can
use it for reference. So firstly, we
just want to go to this little picture
icon reference image. Tap on the image,
import from photos. Or it might be under files, wherever you send it to
your iPad. But here it is. And now you can tap transform. You can adjust it
until you're happy. I think something like
this is pretty good. And then you tap
your screen once, and then you can go back
to moving your sphere. Another thing I'd like to do is first make sure that
you're in orthographic. So just tap this icon
on the top here, all the way to the right
of the left icons. This little camera,
orthographic. So that's going to take care
of any perspective issues. I always sculpt in orthographic. So then we go to this little
sun icon and we're in PBR, which is the default. And I'd like to
sculpt in makeup. Makeup. This makes it easier to see the clay from
me or the mesh. I like to call it Clay. His mom named CLI
have a whole ugly. So let's validate our sphere. And this sphere will be the
start of our little minion. Let's make this into a pill shape because his body
is more of a pill shape. So we'll go here to symmetry. And we want to
uncheck the red and just make sure that
we have the green. Why? Because that's what
we're going to use. We're going to stretch
this sphere out. The next we'll go to our gizmo. And we want to make sure
that we have symmetry on. Then we're just going to
take this and stretch it down till maybe
something like this. He's not very he's
not that long. So maybe something
like that works. I think he's a little bit
wider. He's little bit wider. So let's let's just take our gizmo and then you would
just kinda widen them out a little bit by using
this red sphere. Let's make them a
little wider like that. And I'm not sure. I don't think he needs
to be any longer. I think this is probably good. Now that we've gotten
him widened up a bit. So I'm going to
voxel Ramesh this. So then we can use smooth and we can just smooth them out. So we'll go here, a voxel. And I'm going to
remember it 200. Then I'm going to go to smooth. Symmetry is on, that's okay. And actually we can just go
back to regular symmetry. And intensity is about 70, radius about 01:41, 50. And you can feel it closely. You see all these at
all sort of squares. So we're just going
to smooth all of that out k. And also note that I'm sort
of smoothing out a little bit more along the bottom
and along the top. Because if you notice
when we stretch it, There's a slight bend in
the in his in his body. It's not too bad, but
it's just something I noticed when you
smooth just smooth more underneath and on top so that it pushes back the clay a little bit and that will get a little
bit more evened out. So let's take our move tool. And the intensity, my
intensity is all the way up. I have symmetry on and
radius is about 02:30. So I'm just going to stretch
out his little sides here. Just so he's a
little more accurate because he is quite punchy. So just push them
out a little bit. I think that's good. Then I'll just go ahead and
smooth around that again. Okay. He's also a little bit
flatter on the bottom here. So we'll use move again. And we're just going to
stretch out these two sides. Obviously symmetry is on, so we only have to do one side, but just pay attention to
the other side as well. And then we'll also
turn him and just make sure that he's
fairly even underneath. So we're going to use Move
again the same sizes. And we'll just pull the
clay down a little bit. Just so it flattens amount. Then I'm going to turn it
to the side, to the left. I'm going to pull
this down as well. So I'm essentially
just making sure that he's nice and smooth. On the bottom, that everything stays
consistent and round. And of course this doesn't
have to be absolutely perfect. But I can't really, I can't help it but to try and make everything as
perfect as I can get it. Which includes all of
these little details. To try to keep everything round. Sort of pushed his butt
out a little bit there. Okay. So once you're happy, once it's fairly round and you're happy. You can take smooth and just
smooth out the whole area. You'll notice this is
something I do a lot. Anytime I really
moved the clay or manipulate the clay, I smooth. Okay. I think that's pretty good. I'm just spread it out a little bit. Okay. Notice I'm just I'm spinning it. And any parts that
don't look street. I'm just sort of
pulling them out. Okay. So let's go back to our to the front. Okay. I think that looks good. Okay. So just make sure
that you're happy. You just want the
bottom to be flat. And of course, just
look at your reference. So we just want to
match the shapes in our reference and just make them nice and pudgy in nugget like. So now let's name this
mesh, display his body. So it'll go in our scene. We'll just rename it potty. So now let's clone it
because we're going to use this to get the shape of the bottom part of
the little overalls. So we'll clone it and
let's rename it overalls. So make sure that you're on your overall mesh.
And we'll go to trim. And we'll use the rectangle. And we're just going to trim the whole top half just
about to where this line is. So now we'll take our
gizmo and we're just going to make this a little
bit bigger than our body.
4. Overall Leggies: So now we'll do the little
parts of his pants. Ruby use cylinders for that. We're going to
mirror them and then we'll adjust the top
part so it sort of spreads out to go into his
little egg-shaped bottom. So let's go to the scene
and we'll add a cylinder. And we can rename
it pant, pant legs. Alright, so we'll just
drag our cylinder down and we can shrink it up and move it
over. And let's mirror it. Right? Looking pretty good so far. I'm just going to
adjust this a little bit and just bring this
down a little bit. So it's a little more even. Always, always continues to
adjust as you're as you're working through if
you see something that's not right adjusted. So let's go back to the
gizmo tap on our cylinders. Let's bring them down, make
them a little smaller. So now what we're
gonna do is I'll bring them out so you
can see what I'm doing. So you can adjust the tops and the bottom and you can
make a hole in it. So that's what hole is four. Now. There's a whole. So we can make it we can make the hole
bigger or smaller. So let's tap on Edit. Then you have these tools here. Here you can make the
hole bigger or smaller. Here you can make the whole
cylinder bigger or smaller. You tap radius again. Then you can adjust both
sides of it like this. So that's what we need. We're going to bring
it up to the pants. Whoops. When it drag it up to the pants. And then we can just adjust
it until it looks right for r little, r little guy here. So his legs are
actually quite small. So I'm gonna make these
actually smaller, bring them closer together. So you basically just want
them to look like this. It's okay if they're touching. And I might The only
thing I might do is make these a little bit
thicker on the bottom. Just close up the
holes a little bit. I think that's a pretty
good place to start. I'll make them a little smaller because his lips are very small. But they're Y2, so maybe I'll
wind it up a little bit. Okay, I'm pretty happy
with his little legs here. So now we can make this little front
plate that's going to, it's going to attach
to his overalls. So this looks like
a square to me, like a flat plate, so
we will use a square. So go here and we can
actually validate our mirror. We can validate this and
just call this pant legs. Now we'll go back here. We'll add a box. We'll drag it out in
front, flattened it up. We can take it off edit. So now we're just making
this front square part. So we're just going
to try to match that. Something like that. It's probably good. That's gonna go Let's
try to get the rent the width the basic width of it. So it looks like
something like that. Maybe a little wider. I don't see that
looks pretty good. So obviously we have the
problem of the bend. It's not really going
to conform around his little belly because I
think that's a good height. I think that's a good height. To make sure you don't make
it too tall or too short. Just sort of judge
it from the from your reference because
he needs his mouth. His mouth can go here and
then he has the big eyes. But there's only a little
bit of head showing. So for now I think that
this is pretty good. So what I like to do
in this situation is I'm going to use move
and I'm just gonna, I'm just gonna move. Let's bring it out
a little bit more. So I'm going to validate. And then we go to the Move tool. And I usually make the
move tool really big. And we can actually
drag this out. So I'm going to use symmetry. I'm just going to drag
it out from the middle. To give it that bend a
little bit more on the top. So now we'll just
go back to gizmo and we can just slide that back. And then hopefully we'll
have something that will look more like it's resting
on his on his little stomach. And if you see that
like it's still not quite as bent as
we need it to be. We can just go back
to the move tool and make sure that you're
on that front square. And you can just move it out. You can move it out more
and then just drag it back. I think that's pretty good. And eventually we're gonna be voxel merging all this together. So don't worry too
much about down here because all this is going to be fused together and we'll smooth all of that out. You can actually, I'm just going to bring out his pants a little bit more in the front. We have a little bit
more room for that. So looking at some
of these references, you can tell that the back of the overalls is pretty much
the same as the front. It's a square, which
makes our lives easier because we already
have one square in the front. So essentially we're
going to take this and use symmetry to flip
it to the other side. So we're going to clone
it and then flip it. So we also have a
square on the back. The front and the back is a
different symmetrical split. So I've turned it to the right. And I'm just going to
turn on the lines. Just so you can have an idea
of the symmetry points. I'll tap on the his, his body. You see this red line. So this is symmetry
left and right. Because we're looking
at it from the front. But if I turn it like this, that's a different symmetry. So let's do e.g. green is top and bottom. We want blue, we want the Z
because Z is front and back. So hopefully that makes sense. So z is front and back. So that's where we need to
do because we want to mirror this box which is on the front
of him to the back of it. So now we'll go to symmetry
around z for front and back. And we'll hit world. And don't forget right
now, I'm on the body, so let's just tap on the square just to make sure that we're where we need to be. So symmetry is z, Ron world. And we've tapped
on the front box. So let's clone it because we don't want to
get rid of the front one. So let's just clone it
and name this one back. Okay, so now we have
front and back. All of these settings
are the same. We just going to
switch left to right. And there's a dialog pop-up is going to come
on and be scary. It always pops up. I
don't understand it. But we're just going to tap. Yes. And now we have a square on
the front and on the back. So let's make the little
pocket in the front, this little pocket here. And we'll just use a
little square for that. So let's add a square or box. And very similar to how we made the little
pouch in the front. We'll bring it forward, shrink it, bring
it forward again. And let's just get the
general size that we want. So something like that
seems about a decent size. Maybe it's a little wider,
something like that. So I'm going to drag it out so you can see what I'm doing. There is need to be that long. So I'll just use the little sphere to
stretch it back in place. I think something
like that is okay. So I'm gonna go into the
options for the box. You'll see them
here. And there's a thing called parameter. So I'm in this little cube here where we're multi-region box
when everything else is. I guess you can see it. I
don't know why I always feel like I'm going to lose you. I always feel like I'm
going to lose people when I just go to this menu
really quickly. Hopefully you can see that
clearly every time I do it. Anyway, so the perimeter, we're gonna move to two. We'll do linear subdivision. And then we're going
to validate it. Okay? It's actually quite thick. I don't think I meant it to be that thick, but that's okay. Or that the vertices
are quite high. But that's okay. So let's smooth it out. Let's go to Symmetry
and turn them all on. So I went to symmetry and
tapped both green and blue. And I'll tap symmetry here. And I'm just going to
smooth this really quickly. I'll just
smooth it out. Okay, now, I'm going
to turn off why? But I'm going to keep x and z. So now we'll go to
our flattened tool, make it a little bigger. And we should be able to flatten
the sides fairly easily. Flatten them a little bit more. So we're just kinda,
we're just trying to match that shape of the pocket. I think that actually
looks pretty good. So now I'll just use smooth. Smooth it out. Let's go ahead and voxel
Ramesh this at 200. So we're back at the
little multi-resolution. Will vote go to voxel and
Ambry measured at 200. And let's just go, let's stick with,
let's turn to z off. And now it's just smooth. This. If it doesn't want
to smooth like mine, then we'll just remember
it at a lower number. So we'll try like 1150 or so. And maybe even
lower. There we go. Now let's start to smooth. I probably didn't need to
do the double, do the two. When I set the parameters. I think I just made it
a little too dense. But if that happens, if you ever can't smooth
or something like that, then now you know to just
remeshing it at a lower number, just go as low as you need, as you need to go until
it starts smoothing. Because you can
always then rematch again or sub-divide again
if you wanna do details, but just always bring it
down until you're able to smooth it and get it the way that you want, that you wanted. So let's go to
gizmo and bring it back to where it should sit. Something like that.
Then we can do the same exact thing that
we did for this part. So we'll go to move it
a little bit smaller. And we can just pull this out, some pull that top edge is out. Now we can just move it in. And I think that
looks good. Just want this to be a tad bit
straighter like that.
5. Overall Strappies: I would say the hardest
part is the straps so far. So we're going to work
through that nice and slowly. And hopefully it won't
be too annoying to do. But I did come up with a way. So let's slowly work through these little,
these little straps. So these are gonna go
all the way around. They're going to
curve, they're going to start here and curve up and go around to there. So let's go to our scene
and add a cylinder. And much like we did before, we're going to tap on
the little cylinder for the other options. And we're going to do to the perimeter of two
and linear subdivision. Ok, so now let's drag it out to the side and we'll shrink it
with the green sphere. I think that's about
it. A decent size. So now we'll just make
it really, really big. Shrink it again. And we'll just move
it into place. So as you see, there's a button and this kind of goes over
the, underneath the button. So it's on a
diagonal and it goes out and around to the back. So first before we slide this in and start maneuvering it, we want to make a
hole in the middle. So let's tap hole. And we want to make the
whole thinner than this. So let's tap Edit. And I don't think
this is what we did, is we what we want, okay? So you only need to hit
Edit once and then you have these options where
you can make the, you can make it a
little thinner, can make the ring thing thinner. So let's slide it in. So it's just about
touching his body. And then we can we
can adjust it so it comes out over the body
or over the pants. So all I did was just use the sphere to sort
of stretch it. So they went over the pants and not just touching his body. Okay. I think something
like that is pretty good. So now that we have at generally in the place where we want it, It's a little bit of
weight from the body. And it's a little bit
over where his genes, because the strap is
gonna go over the genes. So that's a pretty good spot. So now let's turn
it to the side. And we can go ahead and
validate it from here. So we'll validate. And
since we're on the side, we have to use a
different symmetry. So let's go to Symmetry. And instead of x,
we want to use z. So z, but makes
sure you tap X off. So we just want to use
z. And as you know, on the bottom I have show
line and show plane. So you can, you can
check those as well. So now we can see, I can see the center line. The symmetry is going to work
on this side and this side. So now we'll use our Move Tool. And you see my move
tool is very big. It's about like 480. And I'm just going
to slowly move this up so that it's sort
of arched like this. So that it's sort
of coming around. And it is quite tricky. But you have full control
once you're moving it. Just be slow and just keep trying until you
get it's how you like it. Make sure that you
have symmetry on. So we're going to drag
this up like this. And until we have
something like that, I think that actually
looks pretty good. So we can make, move
a little bit smaller. And then we can just
drag this part until, you know, because we
want this trap to come straight on the edge. So I'm going to grab it around here and then I'm just
going to drag it down. Maybe a little bit more
to something like that. You'll see that it
did this, still doing the same thing
on the opposite side. And I think that looks
really good so far. So now, obviously
it's not touching. We want it to be
touching his body. So I want to make the move
tool a little bit bigger, maybe about for 20 or so. And the reason why I'm making
the move tool so big is because then it will
move everything as one. And it won't, it won't
manipulate and push this out of having a nice smooth
singular strap. So we just want to push
it closer to his skin. So I'm just going to slowly work it until it starts
to touch his skin. It's going to bring it in. Okay. I think that looks pretty good. A couple of spots right here. Just pushing on. You can even make move smaller. Do something like that. But I think that
looks pretty good. I just want to make
this flat line. So I'm just going to drag
the edges a little bit more like this. I
think that looks good. So now we're just
going to trim it. So we can use the trim tool. And I'm actually
going to turn it on its side because I like
using the rectangle tool. So if I turn it on its side, then I can just use
the rectangle tool and cut it like this. Let's take a look at the back. That looks good as well. I noticed when I, when I look underneath, I'll just
use the move tool. There's some spots that are a little bit too
close to the skin. So I'm just gonna go
ahead and pull those out. And I made the move
tool a bit smaller. So I just have to be careful, make it a little bit
bigger with my movements. Because the main thing
that I want is I want it to look like a strap. I don't want it to
look too manipulated. I like it a little flatter
and I think that I will just push the gene, pushed the, this part back
some when we get to it. Or remission. Remission at 200. Why I keep saying sub-divide. And then we'll use smooth and
we'll just smooth it out. Hopefully it's
smooth, it'll smooth. Okay. Still looking a bit soft. So once it's smooth, Let's
take pinch, pinch intensity. Let's move intentionally
to about 60. And let's move the
radius to about 70. And then let's just
pinch these corners. Pinch these edges. Make it look real professional. Let's pinch all this. Give it a nice edge. Given pension there. Because pinch also
relieves some of that, some of that weird texture issue on the edges. I don't like that. I like a smooth mesh. Like my clay smooth. All right. Let's get these
front edges looking good. Okay. That looks, I
think that looks good. I did see some extra
space here, right here. So I'm actually
going to just move this, move it in a little bit. I think I'll pull
this out a tiny bit. I'm actually going
to take it off symmetry because some parts are, his body isn't a
completely symmetrical. So some parts might stick
out more than others. And I want to put it,
I'm going to push it right up against his skin. Then be able to loosen it
up or I want to this is all the extra stuff
that this is why my scopes take take
forever because I'm always I'm
always do an extra. I just want to stretch this
down a little bit just to give this some room for our little button because he
has a little button there. I want to make sure that I
have enough room for it. I'm just lifted
out a little bit. So this should be enough
room for the button. So let's just check the back. And I'll just do the same thing. I'll just pull it a little bit. So we have room for that button. Okay, there we go. So let's go ahead and flip our strap
to the opposite side. So first let's name it strap. We go, It's called cylinder. Now we'll rename it to
strap and we can clone it. Alright, so now we just have to mirror from right to left. We're looking at
it from the front. So that means that the
initial enabled it, the initial symmetry will
come back into play. So that's not X or Y. Of course I would say that
it's not z or y, it's x. So it's the red X we want. And we want to use world. That way. This is right in the center. So again, want to make sure
that we're on our strap, but we just cloned it. So make sure you're on strap. One. Doesn't matter
which one you're on. Now we're just going to
mirror it from right to left. So symmetry, we're using x. We use in the world
right to left. Here's the scary window. Yes. I'm so glad it worked. Sometimes there might be something I leave out
and it doesn't work. I have to re-record. But now we have two straps. And he's looking good. So far.
6. Butt-ons: So let's do the buttons. Will do some buttons real quick. Button shouldn't take too long. So let's use a cylinder. So we'll go with plus,
we'll do cylinder. And we'll bring it up. And I'm gonna, I'm
gonna touch snap. And you'll see 90. You can type 90. And if it doesn't say 90,
and snap just allows you to snap it 90 degrees or whatever degree you want
in a certain direction. Only if you're using
the colored directions. If you notice. There's green, there's
red, there's blue, and then there's this
dark gray or black. This will actually
do in a minute. In the older version,
if you touch that, if you try to use the black, it would still do it normally. But now it looks like
all of the it looks like they all react to the snap. So I just really explain something that
didn't need explaining. But that's what happens
when you have a new build. I'm sort of learning
things myself. So we're just going to shrink
it until it's button size. Nothing too fancy. It
actually looks pretty good. I don't think I
have to manipulate it or smooth it at all. I'll go ahead and mirror. Now we'll just make it
small and will just fit it right on
top of that strap. Just remember to take
it off snap when you wanna do more fine tuning. Whoops, there we go. And let's put this stuff
is a little tricky. But the more you get
used to the gizmo, the easier stuff like this, we'll get attended bit bigger. Let's take a look
at the reference here that looks pretty good. And he would have some
buttons in the back as well. So let's take this mirror and
we can actually validate. It. Will validate, we'll
call this Buttons, we'll rename it buttons. And we can flip it
from front-to-back. We've been using a lot
of symmetry lately, so we're going to clone it. And we're gonna go
back up to symmetry. We're gonna go to the Z world. And even though there's, there's left to right
and right to left. I think we would just want to
do flip object. Let's see. Yeah, flip object works. I'm curious if left or right. Okay, That works too. So I thought that they both
should work in this scenario, but I wasn't certain. So now let's just slightly move it so it's
there right in the center. And this one is not. So as you can see, this button is actually pretty perfect. But this one is off. It's too far over. And these are the back buttons. So if you want to fix that, you can go into your buttons. I'm going to rename
this back buttons. So just so I always
remember back buttons. Okay, I know this also because this little
cubes his back. So you can go into your buttons, pressed the three dots, and then hit separate. So now we have both of
our individual buttons. So we can go to the
button in question, and then we can
move it as we need. It's a little tricky. If you want to move the
gizmo to make it easier. You can hit pivot. Then you can actually
pivot the gizmo, e.g. okay, this looks pretty good. But want to make it so it's
nice and straight like that. So what that does now
I'll tap pivot again. See now I can tilt it and then I can use this to just bring it straight down. Whereas before it had to like sort of maneuver it and it
was a bit more difficult. E.g. if I wanted to bring
it straight this way. I can tap pivot. Then I can turn this into that green line is pointing the way that I want it to move, the way that I want it to go. Press pivot again. And now I can drag it exactly
where I want it to go. So this pivot option
is very useful when you need to move something
in a certain way. So if you try to
adjust your pivot, but you don't see
these rings like this. And just go here and tap
world to turn world off. And then you should
see the rings. And just remember, after
you change your pivot, after you move it
however you like, then just tap pivot again. Then it goes back
to regular Gizmo. So now let's add some
shapes for the arms, for the legs, which
will actually be boots, and also for the little goggles. So we'll add a cylinder. And this one we can call legs, or we'll call this one boots. So we'll bring that down. And we'll just put it
inside the little pants. Maybe something like this. And then we can mirror it,
make them a little bigger. So maybe something like this looks like
Here's a little bit of space in between, so maybe something like that. Okay, so we can go ahead
and validate that. And now we'll add
another cylinder. So the cylinder, That's
gonna be the arms. I think the easiest
thing to do would be to create the thin cylinder. So let's just, I just slide
it straight out forward. Take care not to go, not to move it left and right. Because you always want to
be able to maintain this, the center of symmetry. So I'm just bringing it
straight out. I'll shrink it. And then I'll just stretch it. So you can either stretch it
this way or you can hit Edit and then just pull this
green tab like this. So these are gonna be our arms. But we'll make one and
we'll create the hand. And then we'll flip
it to the other side. So that will be easier than tilting it and
putting it in place. Because then when we make
the hand will have to make the hand straight and then
tilt it and put it into place. But if we do it this way, then we have the arm. We can make the hand on top. We can use symmetry as much as, as far as we can. And then we can tilt
the whole thing, the whole arm, and then
put it into place. So let's go ahead and
rename this loops. So this cylinder is
within this mirror. Sometimes when you add a shape, it, it goes within. So let's hold it
and just bring it out just so we
don't get confused. Let's rename it to arm. You can call it arms. That will be the arms. So let's add another cylinder. And this will be,
Let's move it up. This is going to be
our head band strap. So let's move it all
the way up so we can see it. Shrink it. I'm gonna, I'm gonna take off edit because it's a little
easier to maneuver. Here we go. Something like that. And you
might have to reshape it. And now I'm just going
to position it sort of around his head a little bit. You can see this brown. It's a very small. So I'm gonna go
ahead and I guess I can't I can't subdivide
until I validate it. So instead, that's why
I'm gonna go ahead and do the post subdivision. And I'll do it twice. And I'll do linear. That makes it a lot more dense. So this looks pretty good. So this is what the goggles
are going to be on. So it doesn't have to
be perfect right now. But as long as we put it in place that way, in
the next video, we can come back and
start working on the boots and arms and the
goggles and things like that. But this is a good start in
blocking this stuff out.
7. Hand in Glove: So let's make his hands. So it looks like
we can use maybe a small box for the
palm of the hand. And then we can probably use maybe two spheres or maybe two pill like shapes
or the fingers. And we'll add a sphere
for the pump for the little piece here, and maybe another
sphere for the thumb. So we'll just work out
a hand by using shapes, by blocking out the
shapes of the hand. And then we'll, we'll
voxel merge them together. And this looks like it could be a cone sticking out that way. Alright, so let's, let's, let's shrink his arm
down a little bit. So click it might be
a little thinner. They're pretty, his
arms are pretty thin. Okay. So let's start
with adding a box. So we'll add, we
have our box here. And let's just rename it home. So we'll move it out.
And we'll position it over our arm here. And we'll make it
just a little bit thicker than the, than the arm. Now let's just shrink it down, but I have to resize it
again and do it this way. Okay. So his his palm is just a little bit wider than his arm. It's not that much bigger. So I just use cues like
that from the reference to gauge how big
certain things are. So I think something like
that feels, feels okay. Alright, so now
let's try a cone. It could be a cone or
actually could be a cylinder. Let's try the cylinder. So we'll add a cylinder. And this will be gloved bottom. So we'll do the same
thing, will move it to our glove and we
can shrink it down. So I'm just making it basically the widest part at the bottom. So maybe something like that. So now we can use
our editing tools to make the top of
the cylinder smaller. So we can actually do
whole as well loops. Sometimes it moves kinda funny. So let's tap edit
and let's figure out the sizes that we
want different things. So this is probably
good for the glove. And we won't see the top, so we don't really have to
worry about the top too much. So let's hit radius. And let's take this orange, this orange dot, and
we'll pull this in. So something like that. Now I'm gonna take, I'm gonna get rid
of edit so I can just maneuver this
and move it up a little bit just so it matches
as close as I can get it. And I think that actually
looks pretty good. Let's take a look on the side. Just move this
over a little bit. Okay, I think that's
a good start so far. So now let's figure out
these little fingers. When I usually do, when
I usually do hands, I use the tube tool. But that might be a
little too complicated. So I'm thinking we
might do to pill type shapes for the two fingers and maybe even the same
thing for the thumb. But let's try, let's try it. So let's add a sphere. We're bringing it up
to the general area. Okay? Then we'll shrink it. Okay, so now we just have to do that same pill type shape
that we made before. So let's validate our sphere. And then we'll go into symmetry and we
want to stretch it. We want to do top to bottom
because we want to stretch it out from up and down. So we'll go to the green. Why? We'll make sure
that we have symmetry. And then we'll just drag it. Make sure you don't drag
it the opposite way. You'll definitely know. So then we're just going
to drag it down. That looks pretty good. So we'll just make
another pill shape. Alright, so I think that works. So I'm just gonna go over here
and just name this finger. Okay, so now let's
turn off symmetry. And we should be
able to just move it around once we
turn off symmetry. So now we can shrink
it a little bit. And we can sort of
move it into place, shrink it down some, maybe make it a little bigger. Okay, I think that
looks pretty good. Now let's just clone it. So you can clone through here. You can go to the finger and tap clone or songs in your Gizmo. As long as you and your Gizmo, you can clone here as well. So I'll tap clone and I'll
drag it over like this. Now of course you see that the hand isn't really
straight like this. So we'll just have to just these fingers once we get them all, once we get them
all squared away. So let's clone again. Let's bring this one down and over. And then
we'll just turn it. This will be the thumb. So generally something
like that, I think works. Let's look at the overall size of the orbital size is good. Maybe the square is a
little bit too big. So I'll make it a
little bit smaller. Maybe I'll make this
a little smaller too. Okay. Okay, so now we just
have to make it a little more truer to
what we're seeing here. So let's tilt this first finger. We're just going to
tilt it a little bit and bring it off like that. I think that looks pretty good. I'm even going to bring
it off a little bit more. I'm going to tilt it
a little bit more. I'm going to tilt this one a
little bit the opposite way. I'll bring it down
a little closer. Maybe we'll just make
them all touch bigger. So something like
that is a good start. Again, this is just, we're just blocking this in. So it'll look better once we actually have upsell merge and then smooth it out
and stuff like that. So we also need an area for this part and I think I'm just going to use will
validate the box. And then I'm gonna use inflate. Inflate is great because you can just inflate different areas. So we can make that you can make that little
round peas for the thumb. I'm putting a little more in Fleet like this is
obviously very big. But once we do some of that out, we're gonna lose
some of the shape. So that's why I went a little
bit bigger with my inflate. Okay, So now another thing is these edges is sticking out. So I'm going to take flatten. And I'm just going to
flatten those edges. I'll do the same
thing down here. So I just flatten those
edges out a little bit. So something like that.
8. Hand in Glove 2: Okay, so our hand is
looking pretty good. We can go around
and just make sure there's no sharp edges, like they're sharp
edges on the back. And we can just make sure
we tap on that shape. And then just go to flatten. You can flatten out
any sharp edges. And also I just
want to make this a little more round here. So I'll just take inflate again, makes sure I'm on the palm. And I can just add
some clay here. Doesn't have to be that
pretty because we're going to really mess everything. And also if you want to, you can do things like
if you wanted to tilt the the fingers a little bit, make them a little more dynamic. You can do that. Tilt as little fingers. Do the same with the thumb. You can also you can also drag if you want
it to drag some. I'm going to go to my
symmetry and I see the green. That's why it's nice
to keep these on. And I'm gonna change that
to change it to the red X. And maybe we'll just drag
the bottom a little bit. You can turn symmetry
on or keep it off. I'll just make the
bottom a little wider and just stretch it
to to the palm. Okay. So I think that's pretty
good for the hand. So now we'll just voxel merge
the hand together at 200. So we just want to
make sure that we grab all the elements
of the hand. So we'll grab the palm, finger, finger, finger to and
the glove bottom. And I don't think this is
yeah, that's something else. So all we need is these five. And we'll box L3 mesh
at 200 voxel merge. Okay, so it looks
pretty terrible, but that's okay
because we're going to smooth this puppy out. So my smooth is on
radius is about 01:40. That intensity is about 70, which you might have to adjust
it depending on how big your you made your initial
shapes and things like that. So you might have to
adjust that a little bit. I'm actually going
to need symmetry because the hand
isn't symmetrical. So I'm going to
turn symmetry off. To smooth. Smooth around here. I'm going to smooth lightly
around here because I don't want to move the shape too much. We go, It looks good. It looks a lot better. And again, if there's anything
that you see that you wanna do, like e.g. I think I was a little too
crazy with this little bump. So I'm just gonna take flatten the flattened tool and
I'll just flatten it some. I'm just going over it and
just flattening and flattening flattening the mountain
because it's a little too big. Okay. So it looks better.
Flatten that down a bit. And then maybe we'll take
the inflate and just add little roundness
on this side. So that's the other
part of the hand. So add a little
roundness here too. Then we can his gloves. He has a little pudgy fingers. So you can do an
inflate here and here, something like that. Then we'll just go
over everything in, smooth everything out.
Keep it nice and clean. Just smooth this out. And it's great because we really
want it to be subtle. You know what I mean? Like these things don't always have to be
really heavily defined. It's just that subtle sort of, you know, puff of the finger. And you can do someone top two. We can go back to inflate,
make it a little bigger. You can do some up here as well. And round that out a little bit. And maybe we'll do it
with the thumb as well. Then we'll just smooth, smooth everything out. And then once you have
everything where you like it, I might actually do inflate again down here just to make
it a little more defined. So when I do it this time, I'm just a little more careful because I'll smooth
it out a little less. And now I'll just smooth ever so slightly just to sort of
blend it in with the size. But when I go over the front, I'm just gonna go
very lightly just so it's just smooth enough, but it has a little more detail. Okay. That looks pretty
good as a glove. It looks like we can do some
let's take inflate again. It looks like we can
do some down here. So we'll just sort of go around. We can actually hit Solo. Am I make it a little
easier to control so we can hit Solo and then sort of go around this bottom
part like this. Right now, my
radius is about 50. Another thing that works well
for sort of creases like this is using crease. But sub gives you a more
sharp crease like that. Let's move some of these out. Get them looking a
little more natural. In some of my smooth over,
a little bit lighter. Just to maintain. The shape doesn't
melt away completely. That looks pretty good.
And these are a great way. The inflates is a great way to add some more details
to your glove. Wherever you might
want to do that. Maybe we'll add some
little inflate around here to this kind of thing. You can put a glove on and
see where the glove pools, even on your own hand. Things like that. We'll add
some around here as well. Just kinda smooth out
very softly so it keeps the shape just at the end, so it looks it looks natural. Okay, I think that
looks pretty good.
9. Bootlegging: All right. Let's make
his little booties. So we already made his legs. And that's going to serve as the heal pretty
much for the boots. Because obviously here it
just looks like he has boots on legs and boots. So this will be sort
of the bottom part. We can make the front part. I think the best way to
do it is probably make a sphere and then just ship
it to the form of a boot. So first I want to add
a plane to the floor. Just, just something
so that we can see what the what the
ground level is. That'll be easier when we're
making our boot and stuff. So let's add a, let's just add a box for now. And we'll drag it down. Make it bigger. So we can actually
we can probably make it just about to there because he
doesn't really have that much space between
there and the floor. So this will be the heel. Then we can make the
front part of the boot. So we can just validate
and let's call this floor so we don't forget. And I'm gonna move it
out of the mirror. So let's just rename it floor. Okay? So now let's make a sphere. So we'll make a sphere
and we'll drag it down and we'll shrink it. Okay, It looks
pretty good so far. Sort of just bring it into place and then we'll just stretch it and push it until it's kinda looks like
the front of a boot. Boot. And a boot doesn't look like
his his feet are too big. So just keep that in mind. Isn't a huge feat. You get a little wider. So I think that's
actually pretty nice. So we just have to think
about it a little bigger. I think something like
that is pretty good. You can ever make up my mind. Let's take a look. I think that looks pretty good. So next we'll mirror it. That way. We have one on the other side. And now we can adjust
them so they look so they look more
like more like feet. So the way we'll do that
is let's go ahead and validate both of these and these can be renamed
these boots round. I just tried to keep everything nice and labelled otherwise
I forget what everything is. So Boots round. And we can probably
use the Move tool. And it will be easier if
we're only focusing on the The maybe the cylinders of the legs and the
browns and the floor. So let's take those. So we have the boots. We have the boots, the
floor and the boots round. So we've highlighted all
those and now we'll hit Solo. And it's okay. It's alright that we can
only see half of it. We'll have to just
edit this one side. And I believe that will
mirror on the other. Let's just do a quick
quick check of that. Quick check. Yeah. Everything works the way
that I thought it should. So I think that's a little bit easier way
to adjust this actually. So let's just go back to that. So I'm going to
highlight the boots, the floor, and then the
legs in its solo again. So now we can just this, this will essentially
be our boot. So you can tap on
each, each one. And I'm just going
to skinny this up a little bit
with the move tool. So I'm just going to pull it and just make it even with
the with the round part. It looks pretty good.
Now the only thing on this is his boots or a little rent more
round in the front. And we seem to have lost a
little bit of that roundness. So I'm just going to pump
them up a little bit. Same thing just
using the Move tool. And I'll just drag this down so that the Buddha
is pretty even. I'm just pushing down now. I'm pushing down the back part
of the boot a little bit. Now we might, we might add a, we might add, let's
go ahead and add it. Let's take inflate. And let's tap on this part of
the, this part of the boot. And so it looks like this is
actually not dense enough. So I'm gonna go ahead
and I'll subdivide it. So I'm gonna go to more tirades and then I'll subdivide it. And then we'll try that again. Okay, so once you're happy with your boot and your little round boot
front, Let's take a look. Un-solo them and just
see how they look. Whoops. I think they look pretty
good, pretty happy with them. Alright, so we can voxel merge
these together, actually. Will voxel merge the front
part in these boots part. So we'll tap on the mirror
and the boots up here. What's up on the
mirror and the boots? And we can just voxel,
merge them together. So go to voxel and will
rematch them together. 200, right? So then we'll just
do some smoothing. I'm noticing that my, you can see that my symmetry is off. And so let's
double-check that world. Local. For some reason. Whenever I go to
World and local, now the symmetry is
in the right spot. I'm not sure why that is
and why that happens. It's happened to me
a couple of times. But at least now we're
in the right spot. Okay, So his boots
look pretty good. So now we can add a
soul to the boots. Well, before we do that, let's actually just trim it. And then we'll go ahead
and take the trim tool. We'll make sure that
we're on our boots. And we're going to
use the rectangle.
10. Bootlegging 2: Then we'll go ahead and
take the trim tool. We'll make sure that
we're on our boots. And we're going to
use the rectangle. And we'll just trim the boots. So we'll just make a square. We'll kind of use the
floor as a reference. And then we'll just trim them. Alright, so now let's
hide our floor. We'll hide the floor because
we don't need it right now. And we have our boots. And let's take a cylinder. We'll drag it all the
way down to the bottom. Shrink it up. And we can go ahead and
change the parameter. So we'll go back in the
cylinder options and change the parameter to two
linear subdivision. Now we'll just shrink it, move it over, and we'll hit mirror. So we basically just
mirrored our cylinder twice. We can skinny it up a little bit and bring it to the front. So now I'm essentially
going to spread this. I'm going to spread
the cylinder out so it covers the
bottom of the boot. And I'm going to use the
boot as a reference. So here's a front view of what the boots look like with
the cylinders underneath. So it will tilt, it will make sure that
we're on our boots. Right now. I remember it's what It's the cylinders
are mirrored. So when we take our move tool, it will also affect
the left cylinder. So let's see if we
can tap bottom. So we have the exact bottom. Now, I'm basically just going to use Move to bring these
in the right direction. Okay, so here's the front view
and here's the back view. So you can see that it does
curve around a little bit. So you just have to make
sure that you try and follow the little boot. And actually think that can
probably make the foot, the shape a little bit better. With the soul. The soul, actually it
looks a bit better. So I'm going to tap on the feet. And I'll just bring
them in to the soul. Go. And I'll just continue to adjust until I'm happy
with happy with the Soul. I think that looks good. So
now let's just drag these up. So we use our gizmo and
we'll just bring them up, sandwich them onto the boot. Maybe we'll make them
as Smith smaller. We will just slide it
back a little bit. I think that works. And just continue to do any adjusting
that you need to do. For the Soul. I think that looks pretty good. So I'm going to smooth
the bottom of the boots. Because remember we trimmed and sometimes
trimming leaves the, It'll leave the edge a little
bit, little bit crusty. So now I'm just
smoothing the boots out just so it has a
nice soft round edge. Again, like I was saying before, if it's really bad, if it doesn't, you know, if you can't get some
of the kinks out, you can actually, you
can actually voxels. Voxel, remember it again at 200. So you can voxel
remember it again. And that will recalculate
all the vertices. And it will result in
a smoother smoothing. And like I always say,
I like a smooth mesh. So sometimes I have to. Symmetry wasn't on,
should have been on. Gotta will always watch
your symmetry because symmetry is tries to
get me all the time. So I think that looks great. Now I'm going to
tap on the soul. Was already on the soul. And I'd like to smooth
that out as well. Just make it nice and soft. They're cute characters
so they don't really need to have a lot
of hard edges. Are sharp edges. Just keep
everything nice and soft. Okay. Pretty happy with pretty
happy with the boots. Let's take another
good look at them. I think they look good.
11. Arms Overalls: Okay, So let's get
his arms a little more together and where
they're going to be. And also we can voxel. Remember, ramesh
is it'll overalls. So let's grab the
hand and the arms. See there's the, there's
the arms. Or the arm. Will make sure that
we select those here. And then we'll use our
gizmo and we'll just put them in the
general position. They're gonna be maybe
something like this. You can tilt it a little bit. What kind of get a feel? They're obviously very big. Shrink it up a little bit. And just sort of put it
in the general position. Doing that to be
perfect right now. As I, as I continue
to make it perfect. Hopefully you can
hear the music. Okay, and also another
thing I noticed is that the hand is tilted a little bit. So I just make sure that you tap the glove and then you can go ahead and just tilt
it a little bit, maybe something like this,
maybe a little more. Like it might be
a little bit too much til I think that's better. Yeah, I think that's
a little bit better. Okay. So it's right underneath the
strap. So that looks good. And it actually looks like
it's a little tilted. You don't really
have to do this, but I think I might just take the Move brush and
make it really big. And I'll tap on the arm. And then I'll just
tilted a little bit. Whoops. I didn't even validate
the arm, it looks like. So let's mirror the arm so that'll make that
easier and validate. And now let's see
if I can move it. Yeah, just a little bit. So it's sort of tilted it
and then I'll just bring it back out because his arm is tilted a
little bit like that. So you can choose
to do that or not. I mean, it just depends on
really your preference. I mean, it looks fine actually
if it's straight two. Either way. Let's voxel
Ramesh, this square. So we're going to
box this square, the back square and the
overall bottoms and the legs. So we have the pant legs, we have the front, the back. And then we want the
religion only three. And we're missing missing
this old overalls. How did they get way down there? So let's move this
up. Move it up here. So we have the overalls
pant legs front and back. N. As usual, we'll
voxel, remember at 200. So we'll go here. Voxel 200, like so, that looks good. Then
we can go to it. We can grab our smooth
brush and in smooth, smooth this out. He's looking good. Then you just continue
to smooth this out. He may have some
little issues like this and you can go ahead
and just flatten those out and just use your
flat flatten brush. It's very soft. The
clay is actually very, very soft. Clay is very soft. So you can either be very
gentle with flattened. So you can be very
gentle with it. Notice how I use like a
gentle voice as well. And also you notice
there's some divots, like some slight divots. So I'll just take clay. And clay is intensity
is about 50, radius is about 85. Then I'll just add
some clay there. Were if I notice that there's a point where it goes in and it should be
round. Same thing with here. There's a slight there's a slight depression
right across the middle. So we'll just add
some clay there. A little bit more here. So I'll just add some clay there so it sort of looks round. Then you just go ahead
and smooth that out too. So you have a nice round
front, nice round bottom. Just smooth, smooth some more. Okay, This is looking good. We can actually push the, push this back a
little bit if we want. Let's try move a
radius about 200. We can just push this
back or pull it back. Should be the same
on the other side. Same thing with here. We don't want the
straps really going that much into the overalls. So we'll just pull this
back a little bit. It's okay if it's
going in a little bit, but you don't want
it too obvious. I think that looks
good. In another trick, you can take a pinch
like we did before. Intensities about 60,
radius is about 70. And then you can just,
you can just sort of define these edges out
a little bit more. Let's take our crease and
let's just follow this edge. I still have it on sub because that's where
we're headed on before. So I'll go back to pinch and just go along
this edge right here. They'll just give
us a nice plane. It will make it look
really professional, gives us a nice clean plane. And by plane, I just
mean this is a plane, this surface, but then we have this plane here,
this flat plane. It's always nice to just
really define those. It gives a light, a nice place to land. And it really helps out
with just making the, making the model
look really good. Okay, that looks good. I might not voxel
Ramesh the pocket. I think it looks good
without remission. So I might not I might
not remember it together. Okay. So while we're here, let's go ahead and
flip the hand. So we'll tap on
the glove bottom. We'll go ahead and clone it. And I'm just going to rename
it to this one will be glove to this one
will be gloved one. Alright. So we'll take loved one
and then we'll flip it to the opposite side. So we'll go to symmetry. X is the one we want. We want world because
we want to flip it completely on the other
side of everything. We want x, we want world, and then we want left to right. So we'll tap it
and then tap yes. And there we have our
globe on the other side.
12. Overall Checkup: Okay, So I wanna go in and make sure that
everything is clear. In our scene. We have the body, the back, which is
now the overalls. So let's change the name of
this from back to overalls. Okay? So now we have the strap, which actually don't
even know what that is. So when I don't know
what something is, then I'll select it and then
I'll move it up and see. So it looks like an extra strap. That's odd. Not sure
how that got there. So let's just hide it for now. So then we have so these
are the actual straps. So I'll rename these
overall straps. Okay. So we have overall strips. We have buttons. Let's make sure these
are all the buttons. Let's get rid of this gizmo. So we have buttons. So let's hide everything else. So these are the front buttons. Okay, so let's rename
these front buttons. And we can probably just, if we find the other buttons. What is this? This is okay. So this is the arm. So these are the arms. So I'm gonna go to this mirror
and I'm gonna validate it. Okay, so now this is armed, so I'm going to rename
it arms glove club to okay, so somehow we have an extra
glove in there as well. Happens, I guess. So
here are the gloves. And I should probably save, I should probably save
this globe in case anyone who has trouble
with the gloves, so they'll be able to access the actual glove that I made. So I'll just export
it as an OBJ. Okay. We actually don't need
this extra gloves, so I'm just gonna get rid of it. And we don't need
that extra strap. So I'm gonna get rid of it. Okay, I'll bring
everything back. So we have a cylinder here, so this will be, let's
change this to head strap. Then we have the floor. We have boots round. And then we have this mirror, which is the boot soles. So let's validate it and
rename it to boot soles. And the y always want
to put SOUs ALS. And then we have
the back buttons. So we can see the back buttons. You can actually take
them out of here. And then we can just
join them together. And we'll delete this.
Let me have a box. Not sure what the boxes. Let's see. Oh, that's the pocket. So
that's the front pocket. And I'll move this up
with the overalls.
13. The Perfect Fit: I think we need to shrink down. The overall is a little bit, I think mine are a little high. And I'm thinking if his
eyes are about this big, there's not gonna be a lot
of room for his mouth. I think I need to
shrink the overalls. So what we'll do is we'll
highlight the overalls, the pocket and the
straps and the buttons. And we'll, we'll
squeeze them with the gizmo will shrink them down. So let's make sure that
we grab all those. We have the front pocket,
the overall straps, the front buttons,
the back buttons, which I probably should
have brought up. And I think that's it. So let's solo and just see
what we have right now. We just need to shrink it. So let's use our gizmo. And let's just use this sphere and shrink
it a little bit. Like so. And then we can bring
it down a little bit. Okay, I think that's good. So let's just take
a look and make sure everything
is how we like it still I think it still
looks pretty good. Now that I'm happy with
the adjustments that we made with the overalls. The only thing that I'm
seeing is this sort of bytes into his arm a
little bit too much. I'm used Move tool and I'm going to make it really small
radius about 190. I'm going to tap on the strap. Make sure symmetries own. Now I'm just going to move
the top part out and up. So we'll take the top part
and we'll move it out. Maybe you need to make it a
little bit bigger than this. So I bring it up a little bit. So it's sort of like his
arm is smushed against. It. Can even bring woops, even bring it back a little bit. Like his arm is
smashed against it. Then the bottom part, I'm
actually going to drag in. So I'll make my, I'll make the move tool a
little bit bigger. And I keep accidentally
hitting the body. So I'm going to tap the strap and then I'm going to hit Lock. So now I'm gonna go. And if your lock, if you
don't have lock here, then go up to this option
here and just tap Lock, because then it'll
show up there. So now that we're
locked on the strap, I'm going to bring
this part down, make it a little bigger. So something like that. So it looks like his arm is
maybe pressed against it. Bring the rest of
this trap a little bit a little bit
further in as well. Okay. Just so his arm
is pressed against it because it was a little too much going into his arm for me. Alright, I think
is looking great. I liked the new size. I think we have enough room
for the mouth now. Alright, so I think
the next thing we'll do is start to block in the goggles because we have the goggles and the
mouth and the eyes. So what started working
on all that stuff next?
14. Googly Goggles: So let's start blocking
out the goggles. The fun part. I do have another
image that I just looked up to sort of get a better understanding
of what they look like. So it looks like
two cylinders with a smaller maybe cylinder in the middle and one on each side. And you have two cylinders
with a small cylinder going through them
with a little bit of space here and then
you have the strap. So it looks like we'll
do one cylinder, two cylinders, and maybe a
thin cylinder in-between. So everything is together. Then after that, we'll do
123 more cylinders for this. We're gonna, we're
gonna cylinder this up. Alright, so we'll go here. We'll add a cylinder. And we'll just generally put
it in the right position. Let's go snap. That way. We know that it's
moving 90 degrees. Move it over and will mirror it. Let's move them a little
bit further apart. Shrink them. Just sort of figure out the
size and the placement. It looks like they're touching. Like they're about there. Maybe a little bit bigger, maybe even a little bit bigger. And further apart. So I'm thinking maybe
something like that. They look really silly now. But I think that's
kinda where we're at. Maybe a little bit smaller. I think that looks a bit
that looks pretty good. So essentially, you can
just barely see the straps on both sides and you can just barely see the head
and they're touching. So I think this is a good, I think this is a good spot. Before we validate,
let's make the hole in the middle. So we'll do whole. And that's to edit so
we can edit how wide this hole is. Okay. It looks like it's
probably around there. I think that looks that
looks about right. We really don't need
them to be this long. So we'll go ahead and use this green button
should bring this up. And this will be like the first, the first ring of
the of the goggles. Let's take a look at our guess. So that's pretty
thick. So something like this will be
the first ring. Maybe even a little, maybe
even a touch, touch smaller. I think that's good.
Before I validate, I'm just going to clone
this. So I'll clone it. And now I'll drag that one back. There's not that much
space in-between the two. I think it's
something like this. Now I'm going to grab
both of them and then use the gizmo to sort of bring
them back to the face. So great start. I think the only thing I'll do next
is we have to make the thin. We have to have it. So these are together. So we'll just clone another one. And I'm just going to
rename this one thin. So we'll bring it up
so it's in-between. We'll make it smaller. And we can also just
make it thinner. So we'll tap Edit. Let's see what we
need to do here. Maybe the blue. And then maybe let's
make the whole thing smaller. Now let's
see if we can. Here we go. So I made the hole size smaller. And then I used the blue
the blue little dot here to just adjust the
thickness of the ring. Yes, that can be a
little confusing. But essentially you just
want to make another ring, make it smaller and make
it even on the inside. We will be putting
the eyes in there. So that's not
extremely important. But I'd like to be,
like to be thorough. The most important thing is
that there's this change, this difference happening here. And we can actually
join all of these. So let's, let's go ahead
and validate these. Okay, good. And they're
already joints, so we're going to
name this goggles. So let's add these
cylinders here. It looks like there's one
cylinder down the center, we'll pin and then two cylinders
on the top and bottom. Okay, so we'll add a cylinder. And we're not going
to mirror it yet. So we'll just bring
it into place. Okay. And I'll just shrink it. I'm going to tap Lock because I keep tapping on the
parts of the mesh. And it's dangerous
because sometimes you can re-size something without
even noticing, noticing it. Now I'm just going to shrink it. Just generally put it into
the place where it should be. I think we'll have to
make this traps sort of coming up a little
bit to the goggles. And I actually might expand
the top of his head. It's not so round
just so it goes up a little bit more
and then curves over. But we'll see, we'll deal
with that when we get to it. I think that looks pretty good. Maybe we'll make it a
little bit thinner. Think something like
that is pretty good. So we can actually clone this. And then we'll shrink it,
make it a little bigger. Maybe something like that. I'll bring it up to the top. And then we can clone
this one as well. And drag it down. I think that looks pretty good. We can just even these
out a little bit. Freaked out that I was I
had everything locked. Okay. So this first one I'll rename pin because it's sort of
like the pin in the middle. And then we have
these two cylinders. And I'm just going to hold these and I'm going to attach
them all to the pin. That way we can
just collapse it. Okay, let's take another look. Okay, so the strip
connects to this. This is on the very
side of the goggle. So we have our pen
that we just made. And then we have a little round cylinder it looks like for the strap and then
this strap comes off. Okay. So there's a couple
of changes I want to make before we are and just as we move on
as usual with my scopes. So I want to add, I'm going to add a
new reference image. So of course I included
this image with the class, but you can go online. Obviously, these
aren't my images. You can go online and have
plenty of references. But let's add this other photo. Or a little minion friend. And I'm actually going to go back here and just hit
Transform and Transform. So I can just make a little bit smaller or a little bit bigger. Okay. So it looks like the back one is
a little bit smaller. And also this one also there's like a like
a plate that goes around. It looks like as I
complete that goes around with little spheres
in the whole thing. So at least there's 123455
little spheres on the sides. So we'll go to the goggles. And I think I'm just going to go to the Options here
and separate them. So now we have all our,
all of our pieces here. So I'm going to join
the two front goggles. I'm going to join.
Okay. And these are the two back goggles. So I'll just join those as well. Just the two back goggles. So we have the front
ones in the back ones. This must be the middle. Will join the middle
ones as well. And just name them all. Um, so they don't get
you don't get confused. Back and front.
15. Goggles Part 2: Okay. So for the back goggles, I think I just want to
make them a little bit smaller or a little bit thinner. And it kinda want to round
off this, this back part. So I'm going to sub-divide these ones because I
don't want to ruin I don't want to ruin the
shape of them too much. So I'm gonna go here, multirate and then just
sub-divide them once. And I'm going to put a mask
on the front side because I like the front side, I
don't want to ruin that. So I'm gonna go to
select mask rectangle. I'm just mask the front. So now on the back. So I'll take this smooth brush and let's see what
our symmetry is. So right now it's
just left to right. I think that works. We'll do Y2 for a
top and bottom. Let's go world and in local, press world and then
local because it's, then it jumps to
where it should be. It's kind of annoying
that it does that, but, you know, what can you do? So we just want to
smooth this out a little bit and make this back ring a little bit more round where it
touches his face. Okay. Something like
that I think is good. Let's clear this mask. Going up here and
then tapping clear. So we'll just clear the mask and make sure that it
still looks good. And we can probably smooth
smooth it a little bit. Okay. Okay, I think that
looks pretty good. So looking at
another photo here, there's actually like a cap. There's there's like a cap
around the front around the front part and then these little screws
that are around the side. So, so far everything
we have is good. It's just we have to make
this cap on the front. So after looking a
little bit further into the cap situation, I did make it. I can show it to you here. So I did make a cat, but I actually don't
like the way it looks. And I think that it was just an optical illusion
of what I'm seeing. I think that it's actually
one piece and that these spheres are on
this singular piece. So this actually can hide. Get rid of. So we don't need to
make this extra piece. I'm just going to
fast forward to the part where I'm
making the spheres. So you can make the spheres
the same way that I do. And we can skip the whole
part where I'm making the front cap because I
don t think we need it and it doesn't look, doesn't
make it look better. Alright, so back to the video. So let's make the little, the little round cylinders. They're gonna be right in here. So we'll use a sphere
and we'll use one of the new features of
nomads go up to 1.68. So we will firstly
just add a sphere. We can bring it to the general
position, will shrink it. I can see it's mirrored,
so I must have yet, it's underneath
this mirror thing. I'm going to take
it out of there. So I'm going to hold this. I'm going to bring it up
to underneath the goggle. And we don't need to
mirror it just yet. And let's name this ball. Goggle. All right, so let's
make it the size, about the size that
it needs to go. So we'll shrink. It. Might be a little
bit too big still. Maybe top he will make
it easier to drag it in. Okay, So we essentially
want something like that. We want five of them from
about here to about the top. So actually I can bring this
down a little bit more. I think it should
start about there. So let's try and use
the curve option. So we'll go back to our
screen, are seen here. We have the ball goggle. So now let's go ahead and curve. You'll see this long piece that comes up and you
see another one here. So we have the original one
and then we have one on the last point on this line. And that's why you
have the two here. And I think when I
counted there was five. 12345, it looks
like there's five. Not that it's a huge
deal either way. Let's adjust this and
we'll drag it to five. So now we have the five spheres. So now we'll take this point
and we'll just drag it out. And I find it a little
easier to tap on these and make them black. So I'm going to tap
where the balls are. Now we can just, we just
have to adjust this. So let's say we tap it left. So we want this line to
be straight up and down, because this is our curve. So right now we're
just going to make it go straight up and down. You can tap tube to
get rid of the gizmo. Since it's just in the way. Gizmos always in the way. Okay, so now we have it
straight up and down. Sometimes it's easier to
focus on one angle and then turn it and
focus on different, different angles and
things like that. Okay, so now let's tap front. We can just move these
more into position. So that looks pretty
good actually. So now we can turn it and
then we can fine tune it a bit. We'll bring them out. So maybe we want just
half of them showing. So now we can just fine tune
them so that we have half, half showing that one
looks pretty good. We'll bring it out a little bit. Looks pretty good. Vitamin vitamin can
go over a little bit. And maybe something like that. I think that looks pretty decent because they don't
take out that far, but they stick out enough. So I think that
looks pretty good. So you can also just make
sure that the spaces work. It's going to slide this over. So it takes a little finesse, but just keep working
on it makes sure that everything is perfect. You only want to do it once. So you just want to
make it really good. So you only have to
do it once so you don't finish and then say, Oh, I wish I would've straightened out these silly ball
bearing thingies. Okay, so now we have
these spheres here. And we can mirror them
same way we always mirror. Let's rename them so
we don't get lost. So we'll rename them. My
name is Goggle balls. Alright, goggle balls. So now let's just clone it. And we'll go to our symmetry. And we want x because
we want left and right. So we want to flip
it left to right. I guess we can go world doesn't make, doesn't make a difference. But left to right. And then they should be
on the other side and it should be just as perfect. Good. This is another reason why
I like to keep everything symmetrical because it makes this kind of stuff a lot easier.
16. Goggles Part 3: Now let's adjust this,
this little piece. Let's can take it off lock. So we're going to grab all of these pins in both cylinders. Let's just reposition this. So we'll use our gizmo
and we're going to reposition it onto the goggle. Because it's trapped, seems
to go right on to the goggle, will make it a little bigger. And even though
I'm bringing it a little lower than the strap, I want to put it in the middle of in the middle of his Goggle. And I need to make it a
little bigger actually to think that looks a
little more accurate. So let's do the same
thing for the pin. Okay, so we have the pin and
then we have the cylinders. So we'll go cylinder, cylinder. I don't know why the
arm is selected. And we'll just join this. So now we just have one pin. Let's bring that up to goggles. So this is why I labeled everything because it's
so easy for things to just get confusing and
for things to get lost. The goggle balls, I'm going to select those and join them. Snowing, have the goggle balls. We have the front ring, the back ring, the goggle balls that we just made on the curve. And then we have the pin. And then we have the middle, which I think is just the
middle little middle piece. Let's see. Yep. That's the middle piece. Okay. So yeah, Granicus
were pretty good. I think. I'm pretty set with those. Pretty happy with those so far. I think I might actually expand the top of his
head so it's a little more round because it looks like his head
is a little flatter. And right now mine
is very egg-shaped, so we might just flatten
this out a little bit. So it'll it'll work better with the strap
and the goggles. So we have to make
sure that his head is the right shape on top. And their heads
are a little bit, they're not as
egg-shaped there if they're flatter on
top as I was saying. So let's adjust that. Hopefully it won't be too, too difficult to change that. So just make sure that
you're on the body layer. And you can see the symmetry
since I have the line on, you can see that I
have x, I have z, it looks like, and
I want x as well. So this is what I want because when we manipulate the head, I want it to work both left
and right and front and back because we want to expand his head and
all the directions. We don't need the green
because we're not, we're not worried
about the bottom. So let's use Move. And now let's just try
and expand his head. Was just sort of
bring it out towards the edges. Sort of like that. I think that's actually
more closer to the minions, the shape of their actual head. So I think that
looks pretty good. So now I want to get
rid of the front and back because I just want
to adjust the front parts. So I just want to adjust
the front hemisphere so we need to get rid
of the blue symmetry. So we'll tag that. So now we just have left and right, which
is what we want. I'll make the move to the move
tool a little bit smaller. Because in an ideal world,
I'd like this strap, the head strap to come
all the way here. We have some room to stretch out the head a little
bit more here. So we'll bring it out like that. I think that's a great start. And he actually the shape
of him and he actually looks a lot better being that this is more flat up
against the goggles. So now that the
heads, the head shape is in a good position. So now we can adjust this cylinder that's sort of
fallen inside of his head. We can adjust that to
match up with this, to go right behind this
little piece here. And we can always adjust this
a little bit if we need. I think, I think what's more
important is having this be even and go around to the goggles and match
up with the goggles. So we'll make sure
we're tap on unlocked, will make sure that we
tap on the head strap. And obviously that's a cylinder
right now, which is fine. And now I'm going to
lock it so I don't accidentally touch
anything else. So I'm going to go
ahead and validate this so that we can use some, we can use the move tool. So we want to go to symmetry and we want to affect
left and right. We also want to affect
the top and the bottom. Okay, so once we have
our symmetry on x and y, we want to make sure
that we have symmetry triggered here as well. So now we can just drag out, we can use the Move tool and
drag the, the edges out. Like this. That's
actually almost perfect. Drag it out a little more. We can make it a little smaller. And just I think that's
actually really, I think that's actually perfect. We can also drag
out here as well. Depending on how thick
you want the strap. Let's drag this part
in a little bit. You don't need it that
far away from his head. The best way to
change the best way to since I want to pull
the bottom part out, Let's get rid of the
top and the bottom. So now I'll make the
move tool a little smaller and it'll pull
out just the bottom. And I just want to add
that this is all like very, it's very complex. Like we're actually doing some pretty complex
mechanics here. So don't be discouraged if you have some trouble,
if you get stuck. That's what the discussion pages for or the discussion area. So feel free to reach out if you just don't
understand something. Because I can make
some I can figure out ways to just make it
easier and make it more, a little bit more digestible. To the best of my ability. K, This is looking good. So let me just drag move it
all in a little bit more. That looks good. Okay. I think that looks good. I'm pretty happy with that.
The way that that's looking. So while we're here, it looks like I need to mirror our pin because I don't
see it on the other side. I don't think it's anywhere
else on the canvas. So we'll just go to the
pin, will clone it. And then we'll go to our
symmetry, will go to World. And then we'll just
do left to right. Now our pin is on the
other, the opposite side. We can go ahead and
join the two pins. I think I want to move
them back a little bit. I think I want to move them back inwards towards each other. Let's see if that works. The smarter thing that
I would have done, the smartest thing
to do was to be to not to not duplicate
it just yet. Get this perfect
where I want it. And then duplicate. Sometimes I sometimes
I tried it. I get two I get too excited
and I skipped steps. Unfortunately. You know, I mean, you learn from my mistakes. I learned from my mistakes too. Alright, so I think we're
looking pretty good. Pretty good there. I might have to push his
head back a little bit, but we can do that later on, but just want to
make sure that we get the basics right now. Okay. And I'm actually
going to trim, let's trim this
cylinder just to get it out of the, out
of the goggles. It's not really
that big of a deal, but it kind of annoys
me at the moment. So let's take trim, unlock, and let's
go to our cylinder. We can lock the cylinder. And let's just trim this. So I'm turning it on. I'm turning it
looking down so we don't accidentally
trim it and then triple trim all the way through. Because when you trim like this, then sometimes it'll trim
all the way through. He didn't, which is good, but sometimes, sometimes
it can do that. So let's use the Lasso. Just trim this. Check the back. Nope, still looks good. Okay. That's better. I feel better. Now that we're happy with the pin. I think
we're happy with it. Do I want to make
it a little bit? I have this trap. Let's bring the head
strap up, the goggles. So we'll go back to
the pen and maybe just make it a
little bit bigger. Maybe a little fatter,
fat little pin. Here we go. And while I'm here,
let me just make sure that I don't
want it even fatter. Because it might be nice to be nice to have it there because that would actually work
better with the strap. Okay. I think that's fine. Okay. Sometimes I
really I really tend to overthink things
and I can't help it. So now that's actually clone it. And let's go to Symmetry. And we'll go to World
and then left to right. Yes. Then we have our pin
on the other side as well. It's looking good. Okay, so our pins
are looking great. So now let's add a little
tiny baby cylinder for this little part of the
strap will add it right here. That'll be pretty easy. I don't see how that will force me to do
anything too complex. So we'll just make it small, drag it out, put it
where it needs to go. I'll make it the correct size. Should make it the
correct width first, and then make it
the correct length. So it looks like it's
probably about right here. Just kinda nestled in there. Maybe we'll give it a little
stretch. Take it off snap. So we'll just give it a little
stretch, kinda like that. And we'll validate
and we'll just do, we'll rename it to what is this? Let's see what this
is. As always, things just like popping
up. Let's hide it. Okay, So this is the, um, strap extra will make
that this trap extra. And we'll clone it. And then we'll just symmetry
world left to right. Okay, so now it's on both
sides and we're good. Let's just join these together. So we have strap extra. Let's see what this is.
Just a big cylinder that's just chilling in there. I'll delete it. All right. It's looking really good. Really happy with it so far. Okay. So I really want to
adjust the forehead now. It's a little too forward here. It's moving in a
little too much. So let's unlock all my symmetry. I want to make sure
that I'm in x because I definitely want to be an
x and I think that's it. I think I want to push
in the middle a little bit like so and maybe even just smooth it so that it moves
back a little bit. Maybe we'll just move it
back a little bit more. Let's make sure that
the Move button is big enough so
it doesn't really, we don't want it to really start manipulating
anything else around it, but we want it big
enough to just be a nice natural curve down. And I think that looks good. Like this. Now I'll just smooth
this out a little bit. Okay, that looks better. So let's try this. Who can bring the goggles? So we have all the goggles. Head strap, the front to back, the goggle balls to pin the
strap extra in the middle. So we want to take all of that. We don't, we don't
want to do body. So let's take all of that and
maybe just move it forward. Do I have this trap
included as well? I do have the head strap. So maybe let's not
include the head strap, just the goggle parts. So maybe we just need
to move them forward. Like that. Maybe even a little bit more. So now that we've done that, the strap actually hasn't
changed that much. But let's focus on the head. Now. Now that we've done that,
we just have to adjust the head as well. So we'll use move. And let's just adjust this head and go forward a little bit. Yeah, I think that's I
think that's perfect. You can move this up a
little bit to like it there. Let's tag the head strap and let's lock it so we
can just lock it in place. And again for the head strap, we want to do the
top and the bottom. And we want to do
left and right. We don't, we don't need
the bank right now. So let's just pull this out. Let's make our move
tool a little bit bigger and we'll
just pull this out. Here we go. Here we go. So now it's attached. It looks like it's more attached and we can just pull it to
get rid of that open space. Okay, I'm very happy
with this traps. I'm happy with how the goggles
are resting on his face. I think we're at a good I
think we're in a good spot. I think I'm still on track. Let's unlock and tap the face. And I just want to try
to smooth a little bit. I just want to get a
little bit of that, a little bit more
of that Goggle. So once you're happy
with your strap, then you can rejoice and we
can move on to the eyes.
17. Googly Eyes: Okay, So we've made
it past one of the most difficult,
complicated parts. Now, let's work on the eyes. And this should be fun. Hold on here. But first we're going to make the glass that's actually
in the, the goggle. Let's take a look at
another image of it. So obviously these goggles
should have glass. You can't really
see it that much. You can't really see it. So I guess it's up to us if we want to
put glass in there. We can always take it
out really simple. Just add a cylinder,
a thin cylinder, and that will be our
front part of the glass. So let's add a cylinder. And also make sure you're
saving numerous times. Save, save, save. So we'll just bring
out our cylinder. We're on snap so it
will snap it forward. And then we can
squeeze it together. You don't have to be on edit. So squeezes together. We can tap mirror
and then we can just slowly maneuver
it into place. Okay, so we just want to
get the right size so that it's not poking
out anywhere. And good. So now we have that
That's looking good. And also another thing
I forgot to do we can do really quick is just to tap on the spheres are
the goggle balls. And we can actually just
slide them up a little bit. I don't want to
be that far back. Just like that. Okay. So now let's change it
from Metcalf to PBR. So we'll tap this little circle, will tap, I always lose it. So we'll tap the
shading menu and instead of Mac app
will go to lit PBR. And now we can start to see
kind of how we shaping up. So for the lenses, so we'll tap on the
lenses, the cylinders. Let's now tap on the
little circle and we'll do refraction, paint,
glossy absorption. Then we tap on this color
bar and bring that to white. So now we have our
lenses in there. All right, let's make
sure that they're white and Glossy panel. Okay, so now we have
our cylinders in there. They're looking good and we
can just hide them for now. Let's go, let's
go to the mirror. Let's validate it and then
just call this lenses. We can actually drag this into goggles because it's
part of the goggles. But we want to hide it because
we can always bring them. You can always bring
them back out later. Okay, so now let's
add our eyeball. So we'll add a sphere and we'll bring it to the
Ford, and we'll bring it up. And we're actually
going to keep it quite big, comically big, even. Because we want it to rest
inside the goggle like this. So we just want to line it up. So we want to line it up
pretty much like that. I think that looks
pretty perfect. Straight back a little
bit. I think that's good. So now that we pretty much
have our AI in place, we can go ahead and rename
this sphere to Iwate. And also let's bring it out of the goggles and
put it right over. So I'm just gonna long
press it and drag it up. So it's its own
piece right here. And we're going to clone
this a couple of times. So we'll tap here clone and
this one will be, I erase. So let's clone I erase
this one we can named P1. So we have Ira, Hi
white, IRAs and P1. And these were all
going to use to shape our eye and shaped the iris and pupil
and things like that. Okay, so now it's easier to just concentrate on the sphere. So we're gonna go up here and we're going to
tag Iwate in IRAs. And then we're
going to hit Solo. So let's make sure that we turn Lock off if you have it on. So we'll turn Lock off. So now let's go to IRAs and we're just going
to pull it out. We can validate it. So what we're gonna do
with IRAs is we'll shrink it down and we'll make that
the concave part of the iris. So we're going to shrink
it down pretty small. Because they have
pretty small eyes. Will shrink it down and
then we'll bring it out. Because we only want
really the very end. And we can actually squeeze, we can actually squeeze
our circle a little bit. Because we want it
to be very shallow. We don't want it to be too deep. I would say squeeze
it almost halfway. Maybe even a little more. So it's like so it
looks like a scuttle. And then just put
that into the eye. Maybe a little
less than halfway. I think something
like that looks good. Let's get rid of my gizmo so
you can see what I've done. Because we just want the
very end to be concave. He is very, very
small eyes tube. We can make it a
little bit bigger. It's a little small. So let's make it just a tad bit bigger. I think that's good. Bring it out a little bit more. Not going to lie. I did a test right
before this and I just add it to concave. So just make sure you
don't put it to concave. Concave means like a
bowl, the bowl shape. So we don't want it to
deepen the eyeball. Okay, So this should be good. So what we're gonna
do now is take, I erase and I wait, we can tag them both. And then we can voxel
rematch them at 300. But before we hit 300, so let's just scale to 300
on the box will merge. But before we get there, we want to make
sure that I erase. We want to make sure
that I erase is erased. So we just want to
tap the eyeball. So now we have our, our
IY and then our IRAs. You can see what's going
to be carved out, deleted. So now we can go ahead
and voxel Ramesh, our 300. See what we got. It Looks good. It's not too concave. Okay, So that looks pretty good. So I'm going to take
smooth and just go ahead and I'll
put the brush a little bit bigger just to
get rid of some of this, like, you know, some
of these ideas. Just smooth, smooth,
smooth, smooth. Alright, so we're looking good. That was a good first step. We have our concave. So let's bring up
P1. So we'll tap P1. Then we'll bring it out. The other one might disappear. But we'll just go back
here and we'll tag the eye white and P1. And then we'll just tap on P1. It's a little weird
with the solo. It might take some
getting used to, but hopefully, hopefully you guys are
following along with me. Also, if there's if
there's an issue, like you can just do
it with this showing. So like don't get,
don't get upset if the, if the solo is not
working or you get confused, just
do it like this. Maybe I'll do the
rest of it like this. Alright, so we're on our P1. Let's double-check. We're on P1. So now we want to just paint
this matte black so we don't get it
confused with Iwate. So we'll go to our pain
here, go to black, turn the roughness
all the way up, paint, and then
we can shrink it. So again, this is
going to be our, this is going to be our
pupil will make it smaller. So maybe something like this. And there's some shortcuts to
like we might not even have to really carve it out. To be honest, like you could probably just go like
this and push it in. And it would actually look fine. But there's another,
but you could also carve it out the
same way that we did. The same, the same way that
we carved out this bowl. You could do that
with the pupil. And what's kind
of interesting is if you've had this
sphere colored, when you carve it, like it
will leave black on the, on the the Iwate. Like wherever you carve like that would be black
if we made it red, wherever you carve,
that would be red. Which I find interesting. Anyway, I'm getting sidetracked. Let's see if I can go
back to this solo stuff. His finds it a little easier to kind of move stuff
around and do things.
18. Tricksy Eyes: So now we'll add some
color to our pupil. But we want to start with black because it's just
always nice to have a nice black rim around your
iris that I say pupil iris. So recoloring the iris which is, whoops, which is this part here. So we want to be on high white. Firstly, we want to
make a new layer because we want to be able to edit these if we need
or change if we need. And we also want to be
able to color on the base. So make sure that
you're on Iwate. And go here and add a layer, we can rename this black. So that'll be our first layer, and we'll make the other
layers as we go on. So now we're actually
going to create a new, like create a clone brush. And that'll make it easier. Let me delete the ones that
I've already made so I can just start from
scratch so you can see the whole process. I like to make spheres like make round paintbrush strokes. But I also sometimes like to
use my regular paintbrush. So that's why we're going to clone paintbrush and do
it on something separate. That way, if you need
to go back and forth, you don't always have to go
in and change the settings. I wish to settings
would be saved on the clone brushes, but it's not. But I still like to
have a dedicated brush to do my circles. So let's start walking
through that now. So once again, we are
on our black layer. We're on the Iwate mesh. We don't need symmetry, so we can turn that off for now. So let's take our paint and
just tap on it and tap clone. And we can name
this pink circle. So then it will show up
down here, paint circle. So now we'll go into
the paintbrush options, the paint options by touching
this little icon here. So the first thing we
wanna do is scale it. So just bring up the scale so that it's all
white inside the red. 1.4 would work. Then we're gonna go down to fall off and we want to tap it. And we want to tap this
straight line for fall off. And we'll scroll a
little bit more. And he grabbed dynamic radius. So now we have a circle brush. Alright, so symmetry is off because we don't
need symmetry. But you want to make
sure that you tap front, the exact front, because
that will help you out. Because this little red dot
we know is the exact center. So when we pull our circle out, then it will just make
a complete circle. Something like this. But
we're going to use black. Go just like that and it
looks pretty good. So there's a couple of
terms that you may have heard with nomad sculpt in
3D and things like that. And we can actually use their RI as an example of a few things just to keep in
mind when you're sculpting. So if you notice the eye
white is 336,000 vertices. That's a lot. That's really, really dense. And we don't really
need it to be that dense because it's just an eye. And as you can see, when we made our sphere, It's not that crisp. It's not that crisp and clear. Let's we can cut back on the size of this I
by using decimate. Decimate will reduce the size by reducing the vertices
mathematically, somehow, I don't
really know the lingo. But it brings the size
down because this is huge. So let's go into here
where we have multilayers, voxel, den, Topo, and Deci uv. So we want to be there. Then we want to hit decimate. Now you see that the mesh is 168 k. So that's a
pretty big difference. So let's decimate again. And now it's 84. And you can
sort of play around with it. I think I'll just stay
at 84 and cut my losses. And now we can deal with
making this clearer. I mean, it's pretty
it's pretty small. It's not that bad, but
when you look close, it just looks a
little bit messy. So here's what I would
do in this situation. So we have our Iwate. It's nice and small will not
2s is not extremely small, but much smaller than it was. So what we'll do is we can
use our regular paintbrush. So that's just the
regular paintbrush here. That's why I separated these two because sometimes I like
to go back and forth. So with the regular paintbrush. And we're just going to
use the same color black. But we're going to
use dynamic topology. Then topo or Dine topo. I don't know. But we're going to use
this little diamond. It's right to the
left or to the left. Is right here. Next to decimate
dynamic topology. So we're on our brush. We're on the same color as our
black circle for the iris. We're going to tap enabled. And you'll see the
little diamond here. The intensity is all the
way up with the brushes. Fairly small itself,
race is about 20:24. So what dynamic typology is, is it sort of lays a clean, dense path as you're going
along like with that tool. So e.g. the whole eye doesn't
have to be super dense. But dynamic topology will make the area in front
of whatever you're doing, dance. That way. It looks that way. It appears to be very detailed, even though the rest of the
sphere isn't very detailed. So hopefully that sheds
some light on it. But we're going to
use dynamic topology to make this a little clearer. And another trick for things
like this, you know, we've, we've consistently stayed
with the symmetry, which is always very important. And it will make
this a lot easier. So we have our red
line down the middle. If you look in symmetry,
that's the x plane. So if we want to make this
sharp with the paintbrush, we can use the Y plane as well. So now you see the green. And that's going to help us out. So now we can just go back to our paint tool, Ron Den Topo. And just, you can just
do one of these. Whoops. See what happened is I stayed a little bit too
long and then it started started to do
the color pick thing. I got to turn that off. So anyway, back on the sphere. If you just draw like this and you notice
it just takes care of it takes care of
the other sections. So I'm gonna go over it again just because I
feel like it's not perfect. Here we go. So that's how we make
this more clear, more precise just by
using dynamic topology. And it does add some vertices
because like I was saying, it adds the vertices along the path so that we can get
it looking crisp and clear. But the rest of the eye,
we don't really need all that extra space. But now it's nice and pretty. We can turn dynamic
topology off. You can tap the diamond here, but I like to go back up here, tap the diamond, and
then disable it. Otherwise, I'll forget about
it and then I'll, sometimes, I'll be using a tool and I'll be utilizing it,
not realizing it. So just disable it. I think that's better. So back to the color. Make sure that you're on
your eye. Front again. We'll go to our layers
and then we'll add. And you can check out the light, the colors of the
actual minions eyes. I'm gonna do my own colors. So let's name this
one greenish Aqua, I'm going to name mine aqua. So we named this layer aqua. And let's go back
to our pink circle. But we're going to change
something in the settings. So we're gonna go here to the little pencil
setting for fall off. We're gonna go back
to where it was. So we're going to use this round one out Powell output L two. So we're going to use
that for the fall off. So now let's go over
here and pick our color. So I'll do it like a
nice deep aqua blue. It looks nice. Okay. So you don't want to get
paint all or anything, you just want to grab the color. Now you can drag out
from the middle. You're going to like this. We have a nice fade. Looks really good. Something like that. If you want to get it
stronger, you can double up. I feel like I'm going to sneeze.
19. Tricksy Eyes 2: Okay. I've recovered back.
We can continue. I'm a real person
with a real nose, real sneezes, really annoying. Now we can, hopefully
you kinda get the idea. We're going to add
another layer. We'll make this one orange. And then we'll pick
a nice orange color. Make it a little lighter.
Something like that. Then I'm going to drag
out from the middle. We have a nice orange double up, a little, little more saturated. Now I'm going to get
crazy and I'm gonna go to for like a yellow and
make it a little lighter. And just give a little
kiss along the, right, along the
outside of the pupil. So something like that. I think that looks nice. Of course, you can do any color. You can match the color
of the, of the minions. But I just want to
do my own color. Okay, so our eye
is looking good. Looking good looking good. I'm not certain
yet if I want to, if we're going to use the lenses because it doesn't really look like you can
see their lenses. But even if not, we still have to make these
shiny areas on the eyes. And if you notice, you can
kinda see the shine on mine. And that comes from the environment because
we haven't let him yet. So all of these lights
are just the environment. So the environment is here. So it's in this little,
little shading menu, this little sun, the light menu. So this is the environment
and I made this in Procreate. I made this environment, so I've included this. So hopefully you've already
have this downloaded. And if you want to import it, and this is where
you just have to import any type photos. And then you just find
it and you import it. And you can use anything
for foreign environment. It's just all of these
shapes and colors like that's I designed it
because I liked having the, having these nice round
pops of light here. That's what I designed it for. So if we want to
make this glossy, and also there's a really nice
pop of light on the pupil. So let's create that. So the first step
is we're going to have to clone our Iwate. So let's just clone and
also let me just say, I don't really save a
lot. So let's save. So we've cloned our eye white. And the next thing we wanna do is turn it into a refraction. So let's turn it
into a refraction. And we're gonna
go to absorption. We're going to tap absorption, will tap this color line
and then we'll bring it up to white paint glossy. And then index of refraction. Let's just bring
that down to zero. So that actually looks pretty
interesting in itself. We could possibly keep that
or we could do it this way, because right now it's still, it's still going to be concave. Which is cool. But if we
don't want it to be concave, then we can actually just spin the circle because the back
of the sphere is not concave. We didn't make
anything back there. So we can use the gizmo
and then we can just flip it twice because I
still have snap-on. We flipped it twice. And now it's, you can kinda
see it's sort of like a, like a lens there. So I'm going to drag it back. I don't want it to be
sticking out that far. I want it to be right in
front of what we've made. Like that. If you see some triangles are some squares is kinda Blache, you can just smooth it out with the smooth tool. And
it should clear up. I'm gotta be careful. Put too much pressure on it. So I'm just gonna move
it up a little bit. I'll just move it up a touch. Alright, so to get that
nice pop of light, I think the best, I think my best bet is to
actually pull out the pupil a little bit in X and also
paint it like glossy, because right now we made
it like a matte black, so we need to paint
glossy so we can try to get that pop of light. Let's go into here
and then tag P1. And you can go ahead
and validate it. And let's rename it pupil. So we'll just use
our gizmo and we'll just stretch it
out a little bit. And let's, let's peanut so
we can see the pop of light. So I just want to paint it black and then you want to take away all of the roughness, pain all. So now we can sort
of see it a little bit and let's just
stretch it out. Something like that. Now you can see that pop of light on it. I think that looks great. I think that looks
really good. Now let's get this white pop. I want it to be more crisp. So let's actually take our oops, I actually almost
showed my secrets. So I had to undo that. So what we're gonna do is we're going to take
the eye white one, which is the clear part. So that's the clear
part we added on. And let's just box a
3D mesh it at 200. Mesh at 200. And now we can take our smooth
brush and smooth it out. And should get a little clearer. Yes. Yes. So now it's just a little
bit clear and it's not going to push down because
we voxel remixed it, which made it more sturdy. Even though sometimes
the number is higher, it doesn't always
correlate to how soft or how valuable certain,
certain things are. So I like to just remeasure
200 because it sort of puts me back in that
middle ground where I'm comfortable and I sort of
understand where it is. Alright, doubly good.
20. Trimming & Fixins: Okay, I'm gonna get rid
of these symmetry lines. I don't think that we
need them anymore. I just want to see it
as an all its glory. So now we can go ahead and trim all this excess bubbly
from around it. We don't really need
and all that stuff. So to do that, we'll use the trim tool. We use ellipse, and
then we'll use flip, makes sure that flip is engaged. So essentially with flip, it's just going to
erase everything outside of the
circle that we make. So let's just make sure that
we're on the right layer. We're on IY, That's
the white part. So we'll just start in the
middle and then we'll go out. And it's gonna be important
that you bring it out quite far and you let it go. So when you bring out the circle and it might
actually be actually no, we don't need,
I don't need to do. I was going to bring back
the symmetry things, but we don't really need to. So now let's go to my white and we're going
to do the same thing. Just use the trim tool. And let's bring it out from the center In Sri
member to go a little wide with it. Perfect. Now we have an I am working inside of our
inside of our lens. And if you see any excess
like that looks like it might be Let's see. It looks like it
might be some excess. I mean, yeah. It is so that we can
actually trim that as well. So let's take it off of flip. Let's use lasso. See if we can trim that. There we go. If you see any excess,
yes. Just trim it off. And this actually looks like
excess of the white tube. So we can go to the I wait. And let's trim this. Yeah, there we go. So just look out for
things like that. Trixie Trixie eyes. So the reason why it
was important that we bring the the trim out wide is because
we're going to need a little more room to move the eyes around
once we set them. So in order to set them, we're just going to mirror this. But first, we'll go into scene and let's
just connect these. So I'm going to long press it and you see how I just
connected it underneath. You just move it up and it
connects automatically. So I wait, I wait one and pupil, I'm going to rename this. Whoops, I'm going
to rename the, the, the secondary one to
clear this called cornea. Now, I mean, it's
not really because it goes around the whole thing, but it's close enough. So we have IY, cornea and pupil. So now these are all parented. So it's just good to
keep them together. So let's go to Iwate. The main parent will go to plus, and then we'll go to mirror. So now we've mirrored this. I now we wouldn't be able to
move them both in and out. But you can't do it on a mirror because we tried to
do it on mere even if you even if you if you do it if you tried to do it on mirror is just kind of go like this. That's not what we want. So you'd have to
go to high white. Now. You can move them
outwards and inwards. And we want to just move
them inwards a little bit. So we want to find
a good spot to where it looks like
it looks realistic. I think maybe something
like this is good. So I just have to be careful because you just don't want
to come too far off of. You don't want to
come too far out. Or two for n, because then
you come off of the thing. But let's see if
we might be able to get a little
more real estate. If we make them a little, if we make the eyes a little bigger, you make the eyes
a little bigger, then you have a little more
space to come inwards. I think that looks pretty good. I think that's a good
it's a good space. So once you do that, just, you know, you may have to
do some extra trimming. It looks like I have to do
some extra trimming for sure. But just make sure that your eyes are in the
spot that you like. Make sure that they are
and you want them sort of. Notice how I put them
sort of inwards. That's how it looks like
that he's looking at camera. Because they're inwards. I don't think I want to
go anymore inwards with them makes it doesn't
look too bad. I think that that might
actually look better. Let's see. Yeah, that looks better. It looks way better. So there's a couple of
things that I noticed that I have to do that I didn't do. Like box will rematch
these this front part. So these are very small. So I don't want to Vasa we
miss them now because I'm afraid that they won't look clear because they're
just they're so small that the size is very low. So when you're on
the front here, the front part of your goggles. Let's just go ahead to multiracial and the
sub-divide them. So once you sub-divide them, Let's voxel rematch them at 300. So we'll go back here. Voxel will rematch them at 300, just so we don't lose any
shape or any any to make sure that they're copacetic. Okay, that looks good. So now we can go ahead and
smooth this out a bit. They don't need too
much smoothing, but smooth them
out a little bit. Alright, that looks great. So the next thing is I noticed that I
have this line here. And I'm pretty sure that's
from the middle ring. This middle ring. So I've
tapped on the middle and I just want to try to slide it back because I don't
want that showing. So I'm going to slide it
back until I can't see it. But this still looks good here. I didn't cite it back too far. Oops. He went to accidentally
touch the d's mole. Okay. So I'm gonna save,
you should save. It's looking good. And also
here's something if your, if your eyes feel like
they're a little too like if they're sticking
out too far because the eyes really don't come
past the, the lenses. Here's another little
trick you can do. You can take the mirror and everything within
it and your Gizmo. And you can actually
just, just squeeze it in. If you need it to be thinner. You can just squeeze it
in like that and you can move it up or move it back. But you can move them
altogether. However you need. I think that looks good. I'm happy with the
eye placement. Now let's just go ahead
and trim around the eyes. So there's a few ways
you can do this. Firstly, as you see the
tools they haven't showed up and that's because we have
multiple things selected. So let's just go to Iwate. Let's actually
uncheck these two. So we're just on Iwate. So there's a few ways to do it. You tap on it again, the
tool should come back. You can do trim,
ellipse and flip. And you can do the same thing. Just go from the center
of the circle out. And you can trim that way. But just remember when
you trim this way that you don't want
to have symmetry on. Because if you have symmetry
on and you try to do it, Goes Bananas like that. So you don't want to
have symmetry on. So let's turn symmetry off. And I'll do this one this way. Like that. It looks decent. And it actually mirrored. It looks like it,
it it did this. You did the function, so it just mirrored everything
I did on this side. So we don't need the symmetry. It looks like a car to the
other side. Pretty good. And there might be a
little bit excess, so then you just have to
trim it with the lasso, something something like that. Who but I forgot I had flip on. So luckily it didn't
really do anything. If you're going
to use the Lasso, then don't use
flip note to self. So now we can go
to the other one. Let's go to cornea. And we can do the same thing. Let's do ellipse and flip again. We're on the cornea
ellipse and flip. Let's make sure
we're in the front. And let's just drag out
from the wait a minute. Cornea ellipse flip. Why aren't you letting
me drag and let's see, maybe it's a tap on it again. See, it's tricky. I
did tap on it twice. I was wondering why
it wasn't working. So now we're on trim. The lips, flip around, the cornea will drag
out from the center. I'm going to do that one again. It looks like something
funny is going on here. Oh, I had symmetry on. It's tricky. I told you it's tricky. It even gets me. There's always so much
to think about and so many things to think about that it's really normal
to make these mistakes. It's really normal. Don't get too stressed about things like that
because as you see, it happens to me all the time. I make silly mistakes like that. But the key is just kind
of after awhile, then you, you are quicker to understand what you've done wrong and
how to not do it wrong.
21. Pie Hole: A really, really
happy with the eyes. Let's go back to
our original photo. That's my little
guy right there. I love this photo. So
now let's do the mouth. The mouth is sort of like, kinda like a banana shape. And to me it looks like the
easiest way to do it is, well, there's two ways
we can do it with a cylinder and we can
do a Boolean operation. So we sort of carve, we carve it out. Or we can kinda do with
the lazy way using layer. I'll turn the intensity up. I'll turn the size
down to about 50. You had Sub, make sure
you're on your body layer. And then you can sort
of do it this way. This is not really cheap way and doesn't let them,
it doesn't look bad. I don't know why I'm
turning it on its side. I'm so used to doing that. So there's one way to
do it using layer. And then of course
you could just keep going like that to
kind of get the depth. So that's one way to do it. If you want to be a little
bit more precise with it, then you can add a cylinder. Snap-on. Remember we have snap. So we can snap it forward. And before we validate, let's go ahead and
set the parameter. So we just be tapped here. We'll set that parameter
to two linear subdivision. Let's just validate it. We need to make that
kind of mouth shape. So maybe it will just shrink it up a little bit like this. And we can take our trim tool, make sure that we turn flip off. And we can do rectangle
or we could do, we could do ellipse. Let's do rectangle. Much, just trim it,
something like that. So now let's just
smooth out the edges. We don't need to
match it perfectly. Because once we make, once we do the
Boolean operation, once we remove this and
make the mouth area, we can sorta, we
can edit it while it's a mouth rather than,
well, it's a shape. Alright, so now we
can kinda check the size, see what we like. Maybe I'll just speak
a little wider. Feels like it should
be a little wider. Like that. Then I will move it into
position with our gizmo. It's kinda big. That looks pretty
good. Maybe I'll just make it a
little bit thinner. Kind of give it a little
bit more separation from the overalls. But overall, I think
that looks good. A little wider. Maybe. Once you have a shape that you like. Then we can go in here
and we have our cylinder, which we can hide. And then we just have
to find the body. Let's see, where's that
body right above it. So now we have the
body and the cylinder, and the cylinder is hidden. So that's gonna make
our Boolean operation. Now we'll voxel 3D mesh. And let's do, let's do 250. Will go crazy. So 250 box L3 mesh. And now we have a
nice mouth cut out. So looking good. So
let's just move it out. All right, It's looking good. I might even I might even
move this down a bit. Just grab this and
just move it down. Can even just move this
down with the gizmo. That's good. So I think that
looks pretty nice. And sometimes if
you want to get, get rid of these little
dimples, that's kinda tricky. Sometimes you can
pinch them together. Loops, be back on the body. Sometimes you can pinch them together and then you
can smooth that out. And just makes for
a cleaner smooth. Okay, I think that's good.
22. Teefies: So let's make his little t fees one of my favorite
things to make. So it's making me because it'll teeth and his little tongue. So I like to use spheres. So I'm going to add a sphere. Bring it forward, bring
it all the way forward. So you can see what I'm doing. So I'm going to shrink it down. And then I'm going to smoosh
it together like this. Right? Now, let's just fit it. We can just move
it back and we can just fit it until
it looks right. So we'll make it smaller
and a little bit wider. It looks like
they're kinda squat. So maybe something like this. So I can see 12345 of them. Let's make it a
little smaller. 1234. So it looks like there might
be a little bit smaller. As you know, unlike
all about details. Okay, I think that's decent. So I'm going to validate this. Now we can worry about the
shape a little bit more, so I'm gonna make it
a little thinner. Then I'm going to use drag. I'm going to turn on symmetry. Might have to go in here,
okay, It's on local. So I just want to
be on on local. So the reason why I'm
using drag is because his teeth seem like they're
a little more squared off. So I don't want to
have them to round. So now that they're a
little squared off, I'm just going to hit Solo. Just so I can see that the tooth and we can use the
flattened tool. And I just want to flatten
the bottom and the sides. And you could actually flatten
the front a little bit. If you're feeling crazy. K, Let's un-solo
and see how that looks. I think that looks good. I think that fits for our needs. Remember, you can
always you can still, if you wanted to make
it a little bit more flat, move it around. So we'll just position it
persistent it there for now. It looks like they're towards
the front of the mouth. Maybe they're so
that's looking good. So we can mirror this actually will just
tap, Add, tap, mirror. And and that's
another thing I did. I stayed on mirror so they didn't You have to go to sphere. And then you can separate them. Separate them and actually want to angle them a little bit. Let's take it off snap. Because now they're straight, but I want them to be a little
more form to the mouth. So I'm gonna just
going to angle them a little bit like that. It looks like there's a
little bit less of a gap. So we'll do, we'll do
that. I think that's good. So now we can clone this. So we have another sphere. And let's move this
further, further out. And now we're just going to
position them to our liking. And are these small window, these around the same size? A little bit. I think there's a little bit
of space between the teeth. That feels good. Alright. I think that works. I don't really think we need
to make any more teeth. I think that looks good enough. So you can't see his
teeth on the bottom, so we really don't have
to worry about that. Thank you. Ipad is trying to
put me to sleep. So we just have to make
his little tongue. So this should be pretty simple. We use a sphere. Sometimes I even forget how to add a sphere. Sometimes it starts to
get late and I forget, simple things will
move the sphere up, flatten it like so let's bring it up a little bit further just so you can see. Roughly something like this, I think is good for a tongue. Make it a little flatter
and a little smaller. So we'll go ahead
and validate it. And then I'll use
my flattened tool. For some reason,
I always flatten out the sides of the tongue. Lips. Sure. You're on the right
mesh. Oh, you know what? That's what was happening.
I am still in mirror. So I'm going to bring this
sphere out of mirror. And that's one of the things
you have to be careful of because I didn't mean
to have this in mirror. But it affects how you sculpt and it affects how
everything looks. So that's just something that you have to be careful about. I'm actually going to undo. I'm going to undo
all the flattens. I'm going to
validate it. But now I'm going to bring
it out of mirror. And I'm just going
to name it tongue. And then I'm gonna
go to the mirror, which is the teeth. And I'm going to rename
that Tethys as I always do. Okay, so now I'm just going to, I'm going to rename this
one eyes just so I know. I can collapse these layers. Okay, we're looking good. Now we have the teeth and
now we have the tongue here. So I'm going to
flatten the sides. I think I'm gonna do
something a little different. I'm going to inflate. I'm going to turn symmetry on. Just inflate the tongue. And I'm just going to
smooth everything out, make it nice and smooth. I'm going to use crease. And I'm just going
to draw it down. I'll actually turn symmetry
off because I don't really need to use symmetry. Here we go. I don't, you don't
want to have a sub on. So you want to make
sure you have sub off. I think that looks good. Just smooth out a little bit. So let's take a look at this. Inside is garb. Let's see, shrink
it up a little bit. I think that looks great. And I'll go in the body layer. If I want to unlock, I want to make it
a little deeper. You can take layer like I was
showing you before on sub. And you can just
sort of make this a little bit deeper here too. You want to go above and
beyond, which I like to do. Sometimes you can make that a little deeper and
then you can smooth it out in their little extra credit or something like that. Alright, we're at a
good, We're doing well. We're doing well. So I think he's pretty much, you know, he's he's pretty
much in a good spot. Next, I just think we should first light him and
then color them. But great job so far, we're really trucking along.
23. Light Bright: Alright, so now it's time to
light our little menu here. And there's two quick things
that I want to show you before we add in
our first light. The first thing is sometimes these little icons
are kind of annoying. So this is how you
turn them off. So you just go to the Scene menu and then go down
here and you'll see these little icons
so you can tap them both and turn them off. Because I don't usually click
them to do what they do. It's just an easy way
to go to whatever, like the eyes, like the
symmetry and stuff like that. I don't really use them, so I just wanted
to turn them off. Another thing is
let's add a plane. So right now we have a box for the floor. We have
the box there. But let's add a plane instead. So I'm going to take
this floor and delete it because we don't need it. But let's just add a
plane, bring it down. And we'll make it big. So maybe something like this. And then we'll just
make sure that it's lined up with the
shoes correctly. Here's another little tip. When I'm lining things
up with the shoes. I would say it's
a point. We're on orthographic so
you can't see it. If we were on perspective,
you could see it, but run orthographic, so you have to just tilt
it a little bit. But what I like to do
is drag it up just so it covers that initial shadow. Just a little bit. Something like that. I think that's good. We can validate it. Another really quick thing. Let's go into the
eye, the cornea. And let's go into the options. So go to this little
sphere and reflectance. So you want to make sure
they refraction is down. Otherwise it'll look real crazy. So makes sure index of
refraction is down, but you can bring
reflectance up. So that'll make this light, this reflect even brighter. So it looks skewed. So let's find a nice
view for little minion. Maybe something like this. Let's go ahead and
turn perspective on. So just tap a little camera, rent orthographic right now, change it to perspective. And usually when
I do perspective, I don't like it up too
much. So there's ten. Let's do maybe just let's
take a look in the photo. And the photo It's
probably around here. And that looks good. So you can just put it
somewhere where you like it. I think I might go like 15. So now I'm gonna just gonna
find a nice spot that we can continue to work on
him that looks good. He's in the middle.
That's pretty good. Okay. This feels like a good position. He's in the middle. I like it. So now I'm just
going to hit, you can hit this little icon here or you can just go to the
camera and hit Add view. And I'm just going to
rename this center stage. So now you can always
go back if you, you know, if we're
messing with it, you can always go back. And I'm so confused. I'm thoroughly confused
as to which has happened. So let's try that again. All I did was positioned him. It went here. I did add view. So we'll call this one center. Center stage. Center works. So I must have done
something wrong with center stage. So we'll
just delete that. You can do a side view as well. Something like this. Whoops. Sometimes I accidentally long press something with my fingers. I know it's kind of annoying. So let's save this. I'm going to save
this one as well. Well, what happened
to my overview? Here we go. So I'm going to save
this one as well. This can be 34. I think that looks good. Okay, so at least
we have on now. Let's try this again. Center. I don't know what's going on. Okay. So we have three-fourths
and we have center. I'm just going to save this because I don't know
what's going on. Save. Let's turn our environment off. That's all this. Ambient light is
all environment. So we'll go to this little icon here and turn the
environment off. Once you environment is off, now we can start lighting
completely fresh. So we'll go to add light. And this is our world light. So let's name this world. One. We can tap gizmo and
we can move it off. It doesn't have to be in
the center word lights. It doesn't matter
where they are because it's almost like the
sun coming down. So good position for this. So in the image. Let's move. So in the image, the sun or the, the world light is
coming down from here. The shadow is behind him. So let's try to emulate that. I think something
like this is good. So right now, this little
arrow is pointing, points in the direction
of the light. Whoops, lost it. I'm gonna, I'm gonna go to
the lighting thing and tap light icons because sometimes
I like to get rid of them. So that's so it shows the icon. So now I can tap on
that and continue. So we'll put it roughly
in the same position. Something like this. And that's pretty good for now. And I'm actually going to want
to soften up this shadow. So we'll tap the little
three dots which goes to the light, the light menu. It's the same thing as
if you were to go here. And then you were to
tap on this bulb, It's the same menu. Except now I have
two of them up. So let's soften the shadows. So here we go down and
you see shadow here. And institutes to softness. Makes it nice and soft. You can choose how
soft you want it. You can see the difference. So just this makes all
the shadows softer. So that's the first light. Now let's add another light
to shine from this direction, just to light up some of
these shadows from behind. So we'll name this one, whoops, we'll name this one W2. So that's world too. So let's flip it. I'm just saying I'm
adjusting it so that the light this way so
you can sort of see. So I want the light to be on
the opposite side of him. So maybe something like that. So now the light is coming from behind and it's hitting
him on that side. So another thing that I that I like to do is
change the material. Because right now he's
very, very shiny. So let's just change
all the materials so that it's softer. And then we can come
back and we can adjust the different materials. Like obviously the
goggles are going to be a different material
than the overalls, which will be different from the gloves, things like that. So let's take the body when we can just
change everything now. So we changed the tongue, front pocket
overalls, the plane. We don't want to do the eyes yet because we'll do the eyes. The eyes I think
are fine as they, as they are. Overall. Straps, front buttons, arms, gloves, boots, souls,
and back buttons. So we chosen all of those. And let's just change it to
put the roughness up to like, you know, 0.5, 20 or so. Okay. So now it's a lot softer. And it's just, I find
it better to light this way versus having
everything super, super shiny.
24. Material World: So we can change the gloves and the teeth and maybe even
these pieces of the goggles. We can change the
material just to make them a little closer to
what there'll be in the end. So let's go to let's see
where the teeth are here. The teeth. Let's make sure
we have both of those. So here are the teeth. I'm going to change that to
make them a little shinier. So I'm gonna go to,
you know, 0.1 or so. Paint all. So now the teeth can be shinier. The gloves, I'll
tap on the gloves. Those can be shinier. Maybe it like 315 or so. So now the gloves
are shinier and I think the boots can probably
be around the same. So I'll just hit pain
all because it's still the same the same level
that we did the gloves. And we'll keep
this souls because the soldier usually
like rubber or something that would be more
than like a leathery boot. So for the goggles, goggles. We have the front, the back. And let's see. I think all of this
would be the same. The pin, the middle. Yeah. So I think all of these would be actually the same material. So let's just go ahead and make them a little
shinier for now. So we'll make that
a little shinier. So we already have two lights. Let's add a spotlight coming
from up above shining down. You can actually see on
the image there's a light. You can see the shine from
a light coming from above. So let's just zoom out. And we'll go to our lights. And we'll add a light. And I'll rename this one
top-down. And let's change this. So I'll tap here and
change it to a spotlight. Let's tap our gizmo. I do wish that gizmo
is automatically triggered when you put a
light in, but that's okay. So now we'll shine
a light from above, sort of like here, and then
we'll just bring it up, bring it up higher. And that's really bright. So you can soften
it with the blue, the blue dot softens
it. That's hard light. So we can solve in it. This is the cone angle, the orange is the cone angle that makes the cone bigger or
smaller, the cone of light. And I believe this is intensity. Oh no, that I think there's
just moves it around. What that does. Anyway. So now we
have a light above. I can sort of bring it towards
the front a little bit. Let's just lower the
intensity of it. Because it's right now
it's really bright. Okay, that looks good. So we do have another
light that we might, we might put in the front. But for now let's actually
turn on our environment. And you can see
it's really bright. So once you turn on your
environment, and again, this is the one that I use, you need to turn
the exposure down. So turn the exposure down. And I'm going to put mine
up to about maybe 0.35, 0.3, 51 or so. That might be good for now. Maybe I'll turn it down to like 3.3, I think is good. So another quick
thing I wanna do is we can tap on the eye, which should bring
us to the cornea. If not, just go into the eye and make sure you're
on your cornea. And I'm actually going to raise the reflection up all the way. So I'm going to tap
on this little sphere and just raise this up all the way so that our reflected light is
as bright as it can be. The only way we'd
make it brighter is to bring the environment. Light up more, but we don't want to bring that up
because it's going to change the lighting
on on everything. So we're just going to move the reflectance up a little bit. Here's another small
adjustment I want to make to the light that's top-down. So right now, right
now the light is really bright on
the top of his head. But instead of that, I think I just want the light to sort of hit the top of the head, but also offers some shadows
for this plane here, where it curves
down his forehead. And I want it to shine
a little bit brighter, just off the top edges. So in order to do that, Let's first bring
the light down. We'll bring it down
closer to him. So that way it's easier
for us to move around. So in order to do what
I'm, what I'm thinking, I basically need to
bring the light back further and then tilt it up. So let's go to the
front view and you should be able to
see a bit easier. What I mean, I'm going
to bring it back, bring it down a little bit
more so we can so I can bring this brighter or bigger so
you can see what I'm doing. So we move the light back and
now I'm just tilting it up. Notice how when I tilt it up, you can see some of the
shadow behind and in front. I'll bring it down
a little bit more and even push it back
a little bit more. So when I go like
this and bring it up, you'll see that it just
has a pop of light here, which I think I
might like better. So now let's go
into the Options. And we can just lower
the softness of it. We can make it a little
bit brighter on top. Let's see that. Let's see. Imagine if that's our view. And we can even turn the
intensity down a little bit. But now we have a nice, We can see the shadow
for the forehead. And it's not so bright
on top that it's lost. There's a little bit
of brightness on the edges of the
top of the goggles. So another rule of thumb, it's always nice to have
some shadows behind. Granted this one, this light is really bright on the side. But it's also because when
we made the other light, there was a dark shadow here. So now I just added
in some light. So it's always good to kind
of go back and forth and just think about how the light
is hitting the surface. And it will take some time. There's so many ways to
move and adjust the lights. But the more you do it, the more you'll notice like
little things like that. Like I want to take
advantage of this, making this shape like good. Even when we look
from this angle, we have the light shadow
and then shadow behind. So just keep in mind those things like when you
see 3D characters and 3D art, really study how they use light and shadow because it really makes a
huge difference. So now we're going to
add the very last light, and we're going to
add it in the front. We're going to use
it as a world light, but we want to make a nice
pop right on the pupil. So this is gonna be my
main, my main view. Something like this where we
already have a center view. So that's gonna be my main view. So when I add the light, whoops, I guess I
didn't delete it. So we're going to add the light. And we'll rename this one. Let's just name a key. So again, this is a worldwide. So it doesn't really matter
where we position it, but I'm going to put
it I'll leave it here. So now we're just going to
turn the light and just, we're going to use
our ring and just, just so it's shines right in
the dark part of the eye. I think something like that. It's pretty good. So maybe something like this. A little more little
more on the top-left. I think I like. So that's
good for the last light. And I think it's sufficiently brightens up our scene as well. Let's, I'm gonna go to my
lights and just turn the icons off so we can see
what we're doing. Okay, I think that looks good.
25. Colorful World: So now might be a good time
to take a screenshot and saved because I think
it looks pretty good just with white
and the textures. I really loved the
way that looks. So. You can always
take a screenshot. I'll take one like this. And even one with post-process
will look good. Also. Like to take screenshots.
It's good to just take screenshots as you go. Alright. So I'm going to undo
because I don't really need all turn post-process off. And let's save. Gotta make sure you save often. Okay, So let's start
coloring our minion. So we're on the body right now. Just make sure that your tap on the body will go here
and let's add a yellow. Yellow looks pretty good. Actually, I can see him
peeking out from there. You can always move your, your, you can move
your image around. You can just go to Transform if you want to move it so
you can see the colors here. Something like that.
So we're on the body. That looks like a
pretty good color. Maybe it's a little more orange. That looks good. And you can see there's no
shine or anything on his skin. So you wanna make sure
that he's fairly rough. So I'm putting mine at 0.8 pane. Alright, that looks good. So now let's do a
general blue for the, for the gene, for the overalls. We have overalls, the front
pocket, and the straps. Overall straps. Let's actually take these, let's move everything up
to where it's buddies are. So we have the overall,
overall straps. Front pocket can go in overalls, front buttons, back buttons. Let's move these up as well. So front buttons, back buttons. Let's move all of
these into overalls. Just collapse some of
these to make it easier. Goggles. I don't know why
the lights in here. Let's take this line out. Keep that separate. It's always good to organize.
Keep your scene organized. I'm just going to save I'm
going to save quite often now. Just because somebody had arms, gloves and we can put
the let's move this up to so we have arms with
gloves nestled underneath it. We have boots and boots soles. So I'm going to connect
those boots, boots, soles. We'll just rename these boots. And our lights. Let's bring our lights out too much now we have our lights. And these are
actually the views. I'm not sure why those
are in eyes either. So let's bring the views out. Center, bringing that out too. Now we have eyes, overalls, Tethys, arms, gloves. Okay, So now it's a
little more organized. So this should, this
should help us out. For the tongue. We
can just go pink, sort of like a reddish. So something like that. It
doesn't have to be too rough so you can bring the
roughness down a little bit. Maybe something like that. Go pain all for the teeth. Even though can join
these together. We can actually
validate this to, let's just go to
TVs and validate. And let's join them again. There we go. That's
what I wanted. So now the teeth
are just one piece. And we can make this
white even though they look white and let's
actually paint them white. And then bring the
roughness all the way down or a little bit more than all the way
down, maybe like 0.1. I think I started
with the overalls. I don't know how I
got sidetracked. So let's grab the overalls and front pocket overall straps. And these are blue. So let's go to bring
the roughness up. Firstly, applying the roughness
up to like maybe 5.5. And that's fine. A decent
blue that's close. I think something
like that is good. Feel a little bit off. There we go. That looks like a gene color. So my number is five, F A7, E7. Again, that's flat. Five F A7, E7. I think that's a good color. Roughness is at 0.5.
I think that's good. Maybe even a little bit more, maybe even 0.6, 0.63. So that's decent for now, the buttons are
black, it looks like. So we'll grab the buttons, front buttons, back buttons. And we can actually
join these together and just rename them buttons. The buttons are black. So I'm gonna go all the way
black. I might just go. I'm gonna go, I'm gonna
make them a little warmer. We'll do something like
this. Almost black but not exactly black. But maybe we have the roughness down a
little bit so that there's a little shine on the edges because they're
buttons after all. So for the gloves, the gloves are also black. And what we're doing with
the gloves is I kinda like how we set the a squared. Let's tap paint, but we
already set that the material. So lets just grab that material. So now it's the same, it's the same roughness. So we can just change the color. So we'll go to black. I don't think I want to
do completely black. Again. I think something like this is good where
it's pretty much black, but not all the way black. So I think that looks
good and then you can adjust because it might
be a little too shiny. So I'll just adjust
this up a little bit. Just so it's a little,
little tiny bit rougher. Maybe it can be a
little more glossy, maybe something like that. And also we can also grab
the paint from the body. We can tap the arms and paint all the arms can actually be. So I'll just necessarily
the arms under the body. So the boots are also black. So let's just grab the
color of the glove, which I'm actually going
to make darker black. Make sure I'm on the gloves. I'm just going to
actually just make them a little bit darker black. And then the boots, the booties paint them black. And the soles, whoops. And the souls, we can
also paint black thing. I want to make them
a bit rougher. So now the souls are also black. Let's go to our view, center, 0. And also another thing. Notice,
when I tapped the center, it actually moved
the image back over. So I'm gonna, I'm gonna
move the image again. So transform. And I'll move it here. I'll tap on the screen.
Then I'm going to move on, move the minion to
the center again. And I'm just going
to make a new, I'm just going to
update the viewpoint. So now the center
will be here and the little image will be here.
I'll just save it again. Speaking of saving
will save it. There.
26. Dapper Details: So now let's find some
colors for our goggles. So it looks like
this trap is around. So we'll just go to a brown
Let's bring it up later. So maybe somewhere
in a family of their I think looks good. And I bring down the
roughness so I can just see the glare on the image. So maybe 4.421. That's a good start. And
you can also reference, you can look up some minions. Yeah, So it's quite glad they're quite shiny, leathery look. I think that's
actually pretty good. And at some point in time
I'll probably make that that dimple in the middle
because I kinda like that. So I think that's a
good color for now. And for all of this stuff. So we have the front
part of the goggles. Let's go ahead and
expand our goggle here. So we have the head strap
which we just colored in. Then there's the
front, the back, the spheres, and the pin. In the middle, I think
two here in the middle. So this is all like a
shiny, shiny silver, but it's not super, super
like what's the material? It's not super glossy. So let's start with
one of these shiny. So you can go to the
Paint tool and you can tap and then it has some saved. Usually one of the
Silvers is always saved. But you notice that right now, like when you tap on
it, it's very dark, even if you make it gold
mentioned for me to gold. So we tap on silver. And now we can just go into these options and we can
adjust a little bit. So let's bring up the roughness because that will
actually make it lighter. So it looks like
probably something like something like the air is good because when
it gets too light, then it gets a little too rough. So think maybe 0.7 is good. That's a good medium. I think that sort of matches. And of course, you
can adjust it. If you want it to be
a little more shiny. You could just go a
little darker with it. Something like that.
Maybe, you know, this also, you know,
whatever tastes you have. But I think that looks good. Alright, so now we're
gonna do some details in the overalls. So the first thing
that we're going to use is the crease tool. So this tool is right here. So you want to use
the crease tool. And very small, my
radius is about 30, 31, intensities about 63. We're going to leave
symmetry on what we want to make sure that we tapped
sub because we want Sub on. And let's go ahead and hide the plane because that's just
going to get in our way. So we'll just hide the plane. So we go back to our overalls. So now with decreased
tool on sub and symmetry, we're going to trace
down this line and we're going
to bring it over. We're going to do this
little piece right here. So I'm going to start
from here and go down and bring it up like that. And feel free. You can get
it as perfect as you like. It doesn't have to be perfect, but you can just keep doing it until you
get it where you want it. You know, for me that usually takes forever. I
think that's good. Okay. So that was
a crease with sub. So now we're going
to take crease, same thing but we're
going to take off. So just a regular crease. We're actually going
to start from in here and come around right
on the inside of the crease. We just made like that. So we have those
little pocket groups. So now tap sub again. Here's a little crease here. So we're going to make that and we're just going to draw
that line straight down, but we don't need symmetry. So we'll turn symmetry off and we'll just draw a
line straight down. Like that. I think that's good
for you to get it as straight as you want or
as straight as you can. But it's not too critical. That worked better coming from the bottom-up, work
better for me. Okay, so now we're going
to stay with sub on, but we're going to
turn on symmetry. So now we want symmetry back and we're just going
to make a little ridge up here as well. So but she has started
on this corner. Just go along that
edge like that. Since the overall is
have a lot of details. We want to go up here to
multiracial and subdivide it. So just tap sub-divide. And it makes it
really, really big. But we'll be able to put
a lot of details in.
27. Wrinkle Magic: Let's add some, let's add some inflate
tool to make these, all these little creases
are little wrinkles. So we're going to use
the right tool for that. So we'll go to inflate. And very small radius
can be about 20. Intensity have about 75 or so. Make sure that we're
on the overalls. And let's just make
it a new layer. So we have this layer, which is, I don't
know what, this is 0. So this layer is the pockets. So let's name that pockets. I didn't realize that it
did it on a new layer. But it's fine actually,
if, it's fine, if you don't have it on a
new layer, that's okay. So let's just add a layer
and this can be wrinkles. So this will be
our wrinkle layer. So we'll use inflate. And we don't really need symmetry because
we don't want them to be super symmetrical. So let's just turn symmetry off. So now you can take a look at your reference and just see
where the wrinkles are. So they're pulling on the pockets and on the sides here and
off underneath here. So we're just going to
concentrate on that. So I'll go closer
so you can see. So we'll just add some
inflate like this. You can, you can vary
the size a little bit. Something like that
is what we want. Also, you can vary how strong, how strong you want
the intensity to be. So I might like that. Oops, let's lock it so you
don't go on a different layer. I think I like the
intensity more like that. So we'll just go ahead and
add our little creases. So it looks like it's
pulling from there. And then we'll also add some coming out from
this little pocket. A cup on the bottom, make some bigger ones. And we can go afterwards, we can go through and
add kinda smooth some of these down because some
of them might be a little too aggressive. It happens. So something like
that is pretty good. And we can add some of
these kinda go a ways over. There's some that sort
of bring these pockets. I absolutely loved doing
details like this. So you can take smooth and you
can smooth them out a bit. Especially if you,
if you think that some are too defined,
things like that. I just want to smooth them
out so everything is nice and blended together
and looks natural. I think that looks good. Now just go through
and you can add some, there's a little bit here. You can just add some other ones across our, across the body. I'm going to smooth this out a little bit. Back to inflate. I want to add some bigger ones to the pocket on some
that are smaller. This have to be careful because the only thing that you want to be careful
about is going like this. Because you don't want
them to sort of overlap. So you just kinda have to be, be confident in your
your wrinkle making. Okay, so let's add
some more here. You can add some more pulling. I want this to be
one long flat one. Let's make it a little
smaller and just do some ones that are
pulling off of this. And some down here too. Some going crossways. Whoops. And a couple in here. A few here. Almost like it's pulling on the
pants a little bit. Okay, that looks pretty good. Now I'm just gonna go and
smooth some of these out. Sometimes less is more and you just want them to
be nice and subtle. Because you'll let the light, let the light and shadows do
most of the work for you. I think they look much better when they're nice and subtle. And later on we will
add some darker colors. Like we'll add some darker blue and maybe a little bit
of crease lake in the middle. So that'll darken up
sort of in the middle. That'll make it look
even more realistic. All right, until it looks good. I think I would like
to add a bigger one. Maybe just like want
to add a going across. Maybe we'll just add
some smaller ones here around his leg. Of course, you don't
have to go this crazy, but you know me, I just like I love
these little details. I think they add so much. Even when there's subtle. They really add so much
to your character. I think that looks good.
28. Mo Wrinkles, Mo Magic: Oops, let's also
make some up here. Since there's all these
little dimples up here. And around the edges. I'm going to make sure that
these actually go over. Okay, Now let's add someone top. Also. I know my, I can't remember what
the settings are, but I know when my
screen is closer, the brush is smaller
and vice versa. If you notice that when I'm I like it but I
just don't I don't remember what the setting is. There's a setting
to change that. I think it's I think it's
one of one of these things, but I just leave it on. I
just leave them both off. I mean, I believe it's one
of these something like this that controls
how big your meshes and then how the brush reacts. I leave them off. Keep it simple.
Okay, that's good. So let's do the straps
and the pocket. If we can join them. So the
front pocket and the straps. Just put them. Let's
just join them together. And let's see how big they are. So there are 127 k, So they might actually
be just fine, but we just want to
put some of these, we want to put some of these
wrinkles there as well. So let's take a look at the ear. So it's just one has this
really tiny wrinkles radiating. Maybe a little bit
bigger than that. They're all sort of like
that. Maybe not that small. And do I want symmetry? Let's turn symmetry off. Something like that.
And I was just smooth. Smooth it. So it looks way more realistic. Something like that is good. Sometimes you just
flow your work together like someone smooth. Feel free to like
go back-and-forth. Like that's something
that I always do. I try not to when
I'm doing tutorials. But it's really how I work. Like sometimes I, you know, I'll see something
that I want to change or that I
wanted to differently. And you just do it, you know, you just get it done regardless. Alright, that's
pretty good. So now let's do some on the straps. So let's make sure we're on the straps and then
we'll lock it. I'm just locking it so I don't accidentally go in
a different layer. I hate when that happens. We use inflate and doesn't look like there's
too many, but there is some. So it seems like they're more like on the on the outside
coming in like this. Kinda like that. Some
over here as well. Don't wanna go. I want to get that
big because then they'll they'll start to
come up over the button. So just be aware that can do some on the dark side. I need to go too crazy with it also just another side note. You can do sub. You cannot, you can actually do the
reverse to just as an, it's another little option. So we can do go to the
end here and you can sub. So this is the same thing. I usually do it with the
crease, but very similar. Smooth it out and it makes that nice, that nice depression. And they're just smooth
this out a little bit. Just get them a
little more subtle. Good, good. Okay, thanks. Let's do some, let's do
some inflate, but sub c, That's way too deep. You want to be more subtle. Even something
like that is good. Because you have smooth, then you can smooth it
and it really makes a nice, some nice depth. And let's do on the front part. I'll bring down the intensity. We'll just do some
along the front go. That feels good. So once you feel good, then we can, we can move
on to some more styling.
29. Denim Details: So now we're going to
start to do all of the color of the
white in the genes. So this is a little bit tricky. But as long as we move
through it slowly, I think you'll be
able to get it. So gene texture,
obviously it's like, it's like a washed gene color. There's lights and
things like that. So I think the best thing to do is firstly, so we
have two layers. We have the strap and
the little pocket, and then we have the overalls. So for each one. So for the overalls, we're going to add
another layer. And let's just
call that lighter. This will be lighter than, the color will be
lighter than the blue. So it's sort of like a lighter, just a lighter blue. So we'll tag that color by
long pressing on the overalls. And then we just need to make
it like a lighter color. I think something
like that looks good. Okay, so now when
we have that color, we can lower our and our
paintbrush intensity to about 50 and see what
that looks like. Maybe even a little
less, maybe like 35. 35 is pretty good. So first, we're just gonna, we're gonna sort of
lightly put in this white. By tracing along the edges. You can make your
brush a little bit smaller in some spots. And you kinda wanna go over
where the genes are raised. So we're just lightly
just painting on especially where
the genes are raised. There's a lot here. I'm just sort of go in that
same general direction that all the wrinkles are going. Make my brush a little bigger and you just wanted to to same. Just lightly painted. It doesn't have to
be big long strokes. You can do just like Blache
and make it really Blache. Because it is blotchy. It's like doing this
random gene color. So we just want to make
it Blache and kinda messy and don't think
too much about it. So we'll just add a
little dark over here. We'll just add some of
these in some areas you can sort of go over the same the same spot to make
it a little lighter. But there's no real easy way
to do like colors like this. It's just like a gene color. You have to do it manually. There isn't maybe there
is an easier way, but I don't know it. But I just see, you know, what I'm doing 2D. He just had to figure
out how to do things. You have to figure out
how to make things work. I think this is
pretty good so far. I'm just gonna go over some of these just to make it a
little later in some spots. Okay, I think
that's pretty good. So now we can do the same
thing with the straps. Little light in the middle. Just to some patterns
going up and down. Same thing on this side. Some patterns bring it in closer so it's
a little smaller. Okay, so now let's take our, so we're going to make a
different smooth brush. So they're smooth here and we
want to do the same thing. We're going to clone it. So you just tap on it
and clone and smooth. Let's name it smooth color. So that'll be on the bottom two. And you can lower the intensity on the smooth brush is
lower it all the way. So then it's only going
to smooth the color. It's only going to
blend the color. So very similar to what we
did with the paint tool. Well, actually it's
not similar with the paint tool.
What am I saying? But it's just going to move the color and it's not
going to smooth the, it's not going to smooth
the shapes that we've made. So you can also use
smudge. The same way. You can sort of just like
smudge this color around. Sometimes the smooth, we
probably use it later, but the smooth is a
little bit better when it's when the mesh
isn't so dense. We did sub-divide it a lot. So That kinda makes
it a little tricky. Just want to create some
movements in some more movement. Okay? Looking crazy. Right? So now
let's go around the edges. The edges seem to be a little
bit white, like lighter. So let's go around the edges
with our lighter color. I might even make it
a little bit lighter, just a tad bit lighter. And we use a paintbrush. And I'm just going to
go around the edge. We can actually do symmetry, the intensity a little bit. So I'm literally just
going over the edges now. The edges of these pockets, all the edges along
the overalls. I have, I do have
environment on. Oops. I'll make sure that you tap the next day he tapped
the where you are, you're doing the coloring. I can help grow on
the edge there. Go along the back edge
like a symmetry is off. Turn it back off. Okay. Looks pretty good. Okay, so now we have a lease, we have that weight
along the edge. Just use my smudge. Just make some more
movement over here. The pattern, I don't want
it to be too uniform. Okay. I think that's a good start.
30. Creases Pieces: So now we're going
to use crease. And we have symmetry. We can keep symmetry on for now. And my brush is very small. The radius is about 39 and
intensity is about 55. So we want to take
a darker color. So we want to take a really
dark color like that. Then we want to add a layer. And we'll name this one darker. That's on top of later. Also realized that didn't
make a new layer for the, for the straps. I think I did that on just
the same the same layer. But that's okay when
we use the when we use the decrease will make a
new, we'll make a new layer. Matter of fact, I'll
just make one now. Okay, so let's go
back to the overalls. And the first thing
that I wanna do is make a crease down here. So remember the crease
is really small. We're using symmetries, so
it will work on both sides. And I just wanted to
come out here and down. And then you have that really
nice dark crease line. So we did that for both. I'd also like to
do it down here. So I just like to make
a straight line down. But that actually wasn't it
wasn't too much darker there. So I might want to
even make this darker. Let's see. Let's turn symmetry off since this
is just a straight line. There we go, That's what I want. So now that symmetry is off
and we're still on here. Make this a little bigger. And we can just turn the
opacity, the intensity down. You can just make some
really nice creases. And we can take the smooth
brush that we just made. You can actually smooth. You can smooth those out
or you can take smudge. You can smudge them out. You can get some
really nice creases, some really nice
creased textures. So let's go back
to crease. Crease. And this color is a little dark. So I'm gonna go home
and it's going to grab a regular color and just bring it bring it down a little bit. I don't want it to be too dark. Now I'm just going to just sort of bring out
these little wrinkles. Because there's a lot
here in the photo. There's a lot right
around this whole pocket. So I just wanted to make
sure that I add those in. And on the top, I'm
just going to turn on symmetry just so I can
go from the top end. We can actually make
that pretty dark. Okay. I'll make it a
little lighter now. And just make some
few little creases. Then I'll take my smooth. I'll just sort of
smooth them out. So they look a
little more natural. I think it's good. So take crease and I'll do the
same thing over here. Although this looks pretty good. Can even add some like
you can really go crazy with misusing the smooth,
smooth brush now. But you can really
go crazy with these, with these details and
you can get a lot. And this is how I
do a lot of my, lot of my work on, on in Procreate, like in 2D. So I'm just using
the same sort of thinking in the same sort
of ideas that I use in 2D. I make my brush a little bit bigger and bring down the
intensity a little bit. And I just want to like, oops, let's turn off symmetry. And I just wanted
to draw out some of these, some of these bigger. I want to darken up some of these spots that are
a little bright. Maybe darken up
this underside of this little thing over here. So you basically just want
to color in a coloring, but you want to depart
the parts that go in, then you want to add
some darkness to them. That's essentially
all I'm doing. And you can do it with paint, but you can also do it with
things like creased two. So when I use crease, that's why I use the color. Normally if you want
to turn that off, you turn it off like this. But when you tap it, then it does the
tool with the color. So that's called
stroke painting. You see I've put these like
in-between what we raised. I put them in-between
where we raised up. And that gives it a
nice, really nice look. So now I'm just
going back and forth using my crease and paint. I'm just adding some
nice little like tugs. And you can ask, you can use
the Smooth tool like e.g. like I just made these
and they're a little deep, they feel a little deep. So I'll just use the
regular smudge brush because that's softens
the actual clay. And I'm gonna go back, I'm going to go back
a layer to lighter. I'm going to re-add
that crease that we made because I don't
really see it. So I'm gonna go, I'm
gonna make my color lighter and just redo
this little crease here. We want to decrease and
you want to do sub. And we'll just bring this back because it's sort of got lost. But I want to bring it back. Sound, go back to paint, back to darker and then
make my color darker. And maybe just do a darker line. That'll sort of help
it to define itself. Maybe color these little darker. But I'm always going with our kind of going
along with our lines. And I don't know how
much I'm not going to do too much detail on the back because I don't think anyone's really going to see. I mean, I guess I'll
show the back butt, somebody who's crease. And I'm going to take it off sub because we don't
need sub anymore. Tad bit darker. I'll just kinda
smooth this out a bit and go back to crease. Just added some
paint, doesn't really need to be that deep, so I'll just add the paint. The paint looks really nice. When you add the pain and
break up some of these. Make sure you get it
nice and dark underneath the buttons are sort
of holding together. Smooth everything
out a little bit. So you start to
see my, you know, my patterns and how I, how I do certain things. So make sure that you know, that's, that's what you
need to take away from. This is just like
the way that I, the way that I think
about tackling these problems in now
and most of it is just thinking about things in
how I would do them in 2D. It's really helpful actually. Crease. Go lighter on the intensity and
bigger on the size. Paint this out a little bit.
31. Creases Pieces 2: Okay, I'm actually going to add, Let's do will decrease. We'll do a little
crease, little paints. When the intensity down. I'll use regular smooth and just sort of smooth
this out a bit. Just to give his pants a
little something different. Go to crease again. Just keep his pants a
little crease action. They'll just take paint. I feel like I'm doing the
Bob Ross thing. I always get that
on, on, on YouTube. I get the whole Bob Ross thing. And I love it sometime. But that's how, that's how I create the button you have to create you just you just
sort of get lost in it. And that's definitely what I do. I try to contain it because
I don't want to keep you guys for longer
than you need. I know sometimes my
classes are long, but I just hope that it makes sense what I'm doing and
why I do certain things. Because it literally
takes me years to figure out how to tackle some
of these problems. Then that's not on me. It's also a lot of, a lot of time studying
other artists and being inspired
by other artists and figuring out how they do things in it's also
plays a big part in it. So I don't want to pretend like I'm taking all the credit. But that's kinda how it goes. Like artists learn
from other artists. That's the way it is.
Some little creases here. Let's go and close so you can become pretty
good. It small. Smooth this out. We'll even smooth with
the smooth brush. Okay, I think this is
looking really, really good. So maybe we'll just
add a little bit more. Darker, too little. A little darker. Just sort of go
around the button. It's looking good. Little, some little darkness. It's just nice to have a
nice to have some variation. And you have to have
it like, you know, for this gene, which
is like, you know, some of the hardest Material
to like to draw, you know. Oh, that's why I was
on the wrong thing. I was wondering why it wasn't wasn't painting on this layer. I was on the wrong. She
smashed and smudge this. Okay. So add a little darkness
to this and I think we'll just have to
move on a little bit. Okay. I think it looks great. I think it looks
really, really good. Okay, so let's just go back to the pocket layer and just darken it up
in a few places. She little pockets. Okay, I think that looks good. Here. Get that really looking
like a texture. I think that's really great.
I'm really happy with that. So hopefully you guys
kinda figured out a way to get yours
looking fairly similar to similar is as
you can get it. All right.
32. Time for Texture: So now we're going to add
some texture to the overalls. And we're going to
use the stamp tool. So the stamp tools here and make sure you save number one. And also really quick, Let's just lighten
them up a little bit. So let's go to the key light. So we're in this little sun
will go to the key light. That's this light here. And let's just, let's
just make it a little bit brighter so we can
see them more. We can always lower
it down later. Is it a good idea? I think it's a good idea just for now, just so we can see. We're going to add
some texture to this. Tap on the overalls. First, let's make a
layer before I forget. Let's rename it
texts for texture. Let's do the same
thing with the straps. So new layer texts. So now at least if we
go back and forth, we're on the texture layer. So we're going to use stamp. And once you tap stamp, go here. And then import. And this is where you import the stamp file or
the standard photo. I think this is it
in photos or is it in import and files? So it's the gene alpha. I think that's what
I named it, but it's the only like alpha, it
looks like a pattern. So we want to select
the gene alpha. And it's going to go and
you're a little import folder. After you do that, just hit Save this mostly because of trauma and the old world
and one of the old versions, every time I would bring a
new alpha n, it would crash. So stamp tool, we're down here. We have our texture. Alright, so let's go in our
Stamp settings right here. And you'll see our Alpha there. So we want to scale it up so that the texture
covers the red circle. There you go. So now we also want to
lower the intensity. So we can lower it down to
maybe like for us, for good. Maybe we'll lower even
lower to like one. I think one is probably better. Yeah. Okay. So now that we did that, again, we're going to just start on our genes and we're
just going to, we're just going to
add in the texture. So you just pull
and it will start adding the texture closer. So hopefully you can
see I'm just pulling, adding the texture to the genes. I think it's better the
further back you are. Some texture down here. So just make sure you
just gonna kinda go over it and just try
to make it even. I'm going to lock
it because somehow I got on a different layer. How did that go? Then just go around and
add some texture to them. I kinda wish I hand a texture for his actual skin because
they look sort of like faculty the minions do. Okay, let's unlock and go to
the straps and then lock. I'm going do the same thing. See how that looks. It doesn't look too bad. The only difference
between the two is the strap isn't
as it isn't as high resolution as
the as the overalls. Because we remember we
subdivided the overalls. But we didn't
sub-divide the straps. And probably could
have symmetry. I wouldn't ask her. But I think it's okay. We could sub-divide the straps. But if you don't want
to use up that much, I don't want it to get too big, but we could subdivide
this trapped. So I think it's fine
without doing that. And I think it
looks good. I think it looks fine without it. You just wanted to
have a little texture. And I think we, I think
we've accomplished that. So let's actually
add a little bit of texture to the body as well. Because he, he sort
of feels soft. It sort of feels
like little felt. So we can actually use
the same sort of texture, but his body isn't
as the same density. So it shouldn't look too
much the same as the genes. Will just go back
to the Stamp tool. And I'm actually
going to do it a little bit further away. And I'm just going
to pull out and just add a little bit of this
texture to his body. So it kinda looks like this. It's very, very slight. My intensity is only at one. Oops. Let's go back to the body. Symmetries on. Okay, so he should be all
cupboard since symmetry was on. She did his little mouth, nose area, and his arms as well. Okay. Okay. I think
he looks good. Next, I just want to add you
can see here's a little bit of a little bit or redness now that could
just be the shadow. But a lot of times in
characters you add a little bit of redness to the
cheeks and nose area. So let's try that out. Let's go back to the body. And let's actually try
it out on a new layer. So we have a new layer,
Let's name it reddish. And we'll just go with, let's see, it's more like
this color actually. So we'll use that. Go to our paint. And we can lower the intensity. But we have it's
own layer so that we have a lot of
control over it. So let's just go ahead and just paint these colors
and a little bit. Cheek area. Okay. I think that it
looks pretty good. So now I'm just
going to use mice are smooth without intensity, our new smooth brush and just
smooth that a little bit. And then we'll go to the layer. And we'll just see how
we can slide it and make it more or less visible. So I want to be just
slightly visible. So maybe around half,
just slightly visible. But I feel like it's there. Alright.
33. Fine Tuning: So there are a couple
of the things I wanted to do with the strap. I noticed these sort
of ribs in this trap. So I just want to
smooth those out. Because by now you
guys should know, I like a smooth mesh. Okay, So symmetry, It was good. I do like the divot
in the middle. So let's add a new layer
and call this darker. Let's take our crease. And let's, let's tap on here. We'll tap this little icon. It's the eyedropper
will tap the color. So now we have the color of the, of this trap and we can
make it a little darker. And we can use that
for our crease is maybe a little tricky. But let's see what we can do. So let's start towards the back and just bring it to the
front right in the middle. Something like that. I think that's actually perfect. I like that. I'm just going to use paint. And I'm just going
to sort of paint in, make it a little darker
around these edges. Like we can go darker than
that and raise the opacity. Raise the intensity of
the brush a little bit. Three's it up to about half. All of this stuff is
just icing on the cake. Really making this
trap look, look good. I like that. I think I want to
make the middle one a little bit darker. So we'll do the same thing we're on the paint
tool so we can use our finger to
grab the color. And just for that middle one, I think I want to make
it a little darker. So we can bring down we can
bring down the roughness, or we can bring down the color. So do painter. And the same thing
for the pin inside. Okay, Let's see. So if we go down
here to the pin, it looks like it's altogether. Let's see if we can separate. Here we go. So we've separated all of them. So now we just have to
find the actual pen areas. So we found the actual pen, and let's just do
it the same color. Let's do the same thing
with the opposite side. So we should be able
to highlight it now. And just paint it a
little bit darker. Just to give some variation. Okay, so a lot of this stuff
is just icing on the cake. Now what I wanna do is
let's start on the body. So we'll take the color of the body and we'll just make
it a little bit darker, maybe even a little
bit more orange. And then we'll add a new layer. We'll go back to
the original layer. I'll delete this one. And
we'll name this darker. So again, this is
going to be darker. And I just want
to I just want to paint sort of underneath where the overt where his
skin meets his overalls. So I'm just giving it a nice
little nice little brushy. It's a little it's
a little bigger. Let's make this bigger. Here we go. So just adding a nice
little subtle shadow where things are making
contact with his body. It's bring this up here
because this would be pretty dark here. All along the back part of the doesn't have to be much, but all this little stuff
makes a difference. These little details. Little bit aggressive here. So it's smooth that
out a little bit. Maybe even take a race. Take a race and lower the
intensity and just sort of re, sit down a little
bit if you get too aggressive. Sometimes
it happens. Okay, Let's go
back to the color. Make sure we get a little bit like that over
the around the goggles. And we can also do
that around the edges here where there's some contact and then also under the glove. So we'll just add some
color into the glove. How we should also
color inside the mouth. So we can go very, very dark with that color. We want to bring the
roughness all the way up. And we just want to, Let's bring the intensity
all the way up as well. Make sure that
we're on the body. And we'll just color
inside this mouth. And the reason why we raised
the roughness all the way up because you don't
want any share. Anything shining and glistening
like inside the mouth. Because you want
it to show depth. Good. Might even be able to go darker. Darker with it. Because I don't want I don't
like that light hitting the back part of the clay. So I'm just doing
straight black. I really want to
blacken out that mouth. There we go. Alright, that looks
great so we can add a little bit of that to
the goggles as well. So I'm going to take this color. I'm going to bring
it down slightly. I guess we're still in the body. Okay. So now we're on the
lenses or the goggles. And I want to add a new layer. And we don't have to
name it darker because we're not going to add too
many new layers to this. So let's just bring
our intensity down. We'll just go along the edge. Maybe underneath
our little knees. Just like when it
shows a little bit of like where does it
not to be too crazy, but I don't want him to perfect. No, I don't want to to to clean. Looking good. Let's go ahead and join
all of these things again. Which join these backup
should be able to just my symmetry doing. It's weird. Let's change
the symmetry to world. Here we go. I want to do both. For some reason it was
doing only the one side. I wanted to both
of these at once. Little darker even know what? Let's grab the color of this band because this is
supposed to be the same color. So let's just color that in. Make sure the other one
colored, it did good. Let's go on the inside. So now I'm in the
inside rim going to grab that color, make it darker. I just wanted to go along the inside as well and
make that a little darker. Okay. Alright, And last but not
least, it's probably not last, but for at least for
this coloring part, let's take the teeth
will add a new layer. We'll go to like
a tarnish color. So we'll drag a little bit more. And I just want to
color in on the top. Just kinda color that in. And then we can take
our little smooth brush and just sort of smooth
it out a little bit. Okay, so let's tap the teeth and let's change them to subsurface.
34. Into the Shadows: I do want to add a little bit of a shadow on the
inside of the eye. So we're going to tap the eye. Let's make sure that we're on. Actually, you know what, we can. So there are actually a few adjustments that I want
to make right now. It's all about dialing
this thing in. So it's the best and the most perfect
that we can make it. So one thing I noticed was when we did the shadows
around the eyes, I did them in black and they're actually kind
of a bluish color. So I'd rather do him a darkish
blue rather than a black. And also the symmetry
made them on both sides. And I just want to
do a darker blue here and a darker blue here. So in order to do that, I need to we need to
remove the mirror. So we need to fix, we need to fix our
layer here, our eyes. So the first thing is we can
validate the eyes layer. So then we have Iwate. And you see that when you
tap the little triangle, and it has all of these. So this is of course, the right has left and
they're separated like that. And I think what might be
easier is if we join like e.g. this eye white and this high
white, if we join them. So now we just have my
white, the corneas. We join and then we have
the cornea and the pupil. We can join just the pupils. We should be pretty good. We can put the cornea. We can make it almost
just the way it was. Actually. I think it was a white first and then cornea
and then pupil. So just a little organization. So let's actually go, Let's actually go to the cornea. Our layer should still be
intact, which they are. I'm going to drag
this layer down. And these two shadows. So now they're above each other. I'm just going to tap
this little button here to just join them. So that's our shadows. And you can do the
same thing with these other colors, you
can just join them. So essentially e.g.
for the oranges, a long press this
orange and bring it above the other orange,
and then tap that. And same for this. The only thing you
have to pay attention to is you just want your original layer hierarchy. So e.g. we have
the orange on top, and then we have the aqua, and then we have
the black behind. All right. So I know that's it's
an all this stuff is so complicated and but it's, it's important when you
want to do certain things, you have to sometimes go
through the long way. So let's go to R. So let's go to where
we are on our cornea. And let's just hide this shadow. So this is the shadow
and we'll just hide it. Let's actually go
to the eye white. So the white actually has
all these colors as well. I'm not sure how they
actually got onto the cornea, but that's okay. Not a big, big issue. So we'll make our layer and
I say we do it on the IY. We'll just add a new layer. We'll name it shadow blue. Okay, so let's bring shadow blue down to right over the base. Okay. So now we're in shadow blue
and we should be able to just paint and paint on each I. We have our blue color. Let's do a little test. Perfect. So now we can just
paint on both sides. So I'm actually going to
do it in a lighter blue. Just be sure to
be on high white. Lock it. And then add your shadow blue, right above the base. I might be a little
too aggressive. And here's something that's
a little bit helpful. You can go in your brush
options and you can go to various strokes smoothing and turn that all
the way up and that should help with your curve. Something else, you notice
if you go to front, it's snapped to orthographic. So I'm actually
going to turn that off because we were working in, in symmetry or in perspective. So it's snapped to orthographic. So you can turn that
off orthographic snap. So I'll turn it off and then it won't automatically
go back to orthographic when I
use the little tube. So just a little, another
few other little side notes. So let's just take this smooth
and just smooth it out. I want to give a little bit
to the other side as well. So I'm gonna go back to paint. I'm going to lower
the intensity. Let's take it off erase. And I just want to give this
side a little bit of love to just want to darken it
up a little bit and then smooth it with our smooth
with zero intensity. And now we can lower
the, the layer. So we'll go back to our
layer shadow blue here. And we can actually
lower the layer, lower the intensity
of the layer. So maybe something like that. I'm just going to
take my paint erase. So I'm just going to use
erase and just erase it back. It just feels like it's
a little too thick. So I just wanted to
erase that back some just clean it up with
smudge a little bit. I also want to adjust the
lighting a little bit because these are
looking very bright. And I want them to I want
them to shine down a little bit more from this direction rather
than straight on. That might affect one
of our little pops of light, but that's okay. So let's first figure
out which light it is. Okay, So it's that light. So it's our key light. So we'll go to the key light, will make sure that
we're on our gizmo. Can move it over some, since it's a world light doesn't
matter where it is. And I'm just going to adjust it. So it's something like this. This looks a little bit better. It's a little bit more dramatic. And we might even lower the
intensity on it a little bit. Let's see how much darker. I actually like it
with that intensity. Maybe we'll just make
the shadows softer. Something like that. I
think that looks good.
35. Back that Drop Up: Alright, so let's bring
in the background. We have the plane
which is somewhere. Let's see. Just collapse some of
these to make it easier to see. Okay, there it is. So we have the plane. Let's bring that to
the top for now. Okay, so now we can see
the plane and we can also zoom out a bit. Let me save. The plane
is looking good. I'm going to stretch it
out a little bit more. I'm going to duplicate the plane and then
make it the backdrop. So I'll just go here, clonus, and I'll just attach it. So now I'm just going
to slide it back. People always dropping
stuff upstairs. Slide this up. I don't think this
needs to be as high. So we'll just sort of slice it. This is another instance, e.g. we have our side view here. But if we want to
just move this like straight up or down or straight, this way, it can
become an issue. So what you do is once
you're at the level, I'll just do it as an example. So we'll tap, there
are gizmo settings and tap bake and then go
pivot and reset pivot. So now if I wanted to
move it back and forth, it makes it much easier. I do still want to just
hit a little bit more. So maybe like this. Now I'll do the same
thing I just told you. Bake, pivot, rosette pivot. So now I can just move it
up and down. As I wish. We know, we have a
nice little backdrop. Which colors do we? I don't know if I want to
make everything white. It might be a little difficult. It'll be very bright
on our character. But it might, it
might look okay, so let's, it's a
good place to start. So we'll start there. I
don't want it to be glossy. So right now I'm
still on the back. So I'll do pain all. Let's paint the floor
of the same color. Whoops, I'm still unlock. Let's unlock. So paint the floor
the same color and you can see
the ambient light, all the lights that we've added. That's what shows if
something is white or not. So e.g. these are white, but the ambient, the
environment isn't very bright. E.g. if I turn this
all the way up, it's going to get more white. So let's bring it back
down to where it was. So we could bring
it up a little bit. But you can also control
that with the lights. But one thing that's important is when you're doing all this, these kind of things,
they can look slightly different once you do
post-process as well. So you want to do as
much as you can before, like we've done a lot
without using post-process. But it might be a good time
now to turn post-process on so that we'll actually see what it's
going to look like. When for the final render. By render, I just mean what
it's gonna look like when we've completely finished and we've turned post-processing on, and we want to save
it and export it. That's what the product
will look like. So of course, as you see, it's going to look
a little different once we add post-process. Alright, so we're pretty
much on the home stretch. Let's just sort of flow through this environment and
working that out. So let's go to the, the light menu where it with our lights and turn
on the light icons. So if we want to get
this white or lighter, then we obviously have to, we have to lighten the
environment or our lights. So let's try the
environment first. Obviously this is with
the environment off. But let's turn it up. Sometimes you can tell when the highlights start
getting really, really bright, that
it might be too much. I think two is the
most I want to go. Next. It doesn't look bad, brighter, but I don't wanna go
too bright with it, but I wanted to still try to get the floor a little bit lighter. So let's see if any
of these lights are affecting the floor. So our key light is
affecting the floor. And our world light is
doing a little bit, but it doesn't seem
like it's doing a ton. So let's go to the key light. Let's see it's information here. And maybe we will just
raise the intensity. So I have it. I'd like to
maybe like 214 to 13 to 14. So that's not bad. Let's
look at the world light. Let's just see if we
were to angle it a little more down,
what would happen? The world light is right now. It's just the light that's giving some shine right here
to the to his right side. But let's see if we
shine it down a little bit. My own snap. No, I'm not who I must
be turning it somehow. So I think I was just
using the wrong rain. I think I'm going
to use the red. So the red makes the
floor very bright, but it's also just
going to change. Sorry, that's the cat playing
with birds behind me. So it makes it nice and white, but it also just
changes, you know, we don't have that nice
shine on the back. But now I know we
did have a top-down. So we do have another option. So let's undo this and put our light back where we had it. Now we have a light,
we have a world light shining towards his back. And we do have top-down. And let's see how
much that's doing. It's doing something, but
it's not really doing a lot. And as you can tell that like when we change it and color it, you do have to adjust
the lights quite a bit. So let's just see
if we can get this brighter by turning
this into a world. Light will tap on the light, or a directional
light, I should say. We'll tap on the light. Let's just make sure
that it's still pointing down. It looks like it is. So let's just make sure that
it's oh, you know what? This is new. This is new for me. So if you notice that
when I when I spun, this is spun all the lights. And let me show
you what my cat is doing to leave the birds alone, okay? I can't catch the birds. They're outside.
36. Home Stretch: Alright, so guys, I
apologize for the cat, but she's having a good
time with the birds. So what was happening was I was turning the
light and they're actually connected
to these lights. I believe that's the issue. See, they're all connected. And I didn't realize that
that's what would happen. So we just need
to separate them. So we can just drag each light out and just make
them separate lights. So that's just
something to note. Because I didn't
I didn't realize that if you parent-child them, then they would all act
as one if I the top-down. So now let's just adjust this. That gives us a much
brighter floor. I think that looks that
looks pretty good. Sometimes like to go
back and just see, I mean, it is very
bright on his head. And we might actually
have to get brighter. If we want to get the
floor to be white. Let's make sure that
we can change it with the color at all or with the
roughness of the glossiness. The more rough we go. I don't think mental illness
will change it at all. No. So the more the more
roughly put it though, the lighter the floor is. So obviously we'll paint
it will paint it white. And we can try to
we can try to raise the exposure a bit for top-down. I'm also noticing that
it's a little bit yellow. So let's actually
make the color white. Whoops. There might have actually,
what we've been seeing. The color is now white and
let's see, is at 1.39. Now, whenever I bring it down, maybe 1.31 is the most I can go. And hopefully you probably
cannot see the difference. But I can see that
it's slightly, you just want to,
you're going to have to gauge it with your eye. To maybe 1.34, I think is good. Okay. I'm just experimenting
now. Pardon me? Likes the floor a
little bit of a different like not as bright. But for now we're
going to leave it all bright because I feel
like that's classic. Minion. Territory is Albright.
And we have, we do have the shadows
here. Alright? So we have top-down. This makes it very
bright to world one key. I think it looks
good without the key actually. And world too. So let's quickly just go
through post-process. And then we can call this done because the rest of it
is going to be however you feel like lighting it and whatever you
think looks best. So let's go to post-process. I think it looks fantastic. It looks really good. I'm
really happy with it. You can see the floor
is a bit lighter still, but I'm actually okay with that. That isn't really
bother me too much. So post-process, let's
go ahead and save. And by now you can go through
and mess with post-process. I'm going to turn my render
resolution all the way up. I want to be able to see it as close to finished as I can. Reflection is on.
I have max samples for resolution,
global illumination. So when you turn that on that actually make it,
made it brighter. Because I think this is, it just bounces the light off of things, which looks really good. I don't know if I want
it that much though. I like it. But maybe just not, not as much. So we'll just do a
little bit for now. Ambient inclusion. I definitely want to bring up. I'll bring up the size. Well, a lot of times I just have to
like sort of toggle these until I can
get them right. Can probably turn bloomed
down a little bit. But I'll leave it on. You can add a
vignette if you want, or you can leave it white. I'll add a vignette
later if I want to. So I think I'm just going
to turn tolerance up a bit. But I think at this
point in time you can sort of float off
and you'll just have to mess with these things
and adjust them until you get until you get
it, how you want it. Alright, I think all
this looks good. I'm just going to adjust
the lights now the way it now that we
have post-process on, I just wanted to just
the lights a little bit. And also I want to turn on
and see this line here. I'm going to make sure that
I turn on depth of field. Alright, so let's
see, maybe I can lock him so I don't focus on
anything else. Okay. Clearly it doesn't work. It's probably a setting
somewhere. All right. So let's just adjust to adjust the lighting and see what we
have and see what we like. This lady is making
it very bright. Think I'll turn
top-down off for now. We have world one. World one is making it
very bright as well. But I like some of
that brightness. So then we have our key,
and then we have W2. Okay, So this is
like a back light. I like this light, so I'm
going to work with that first. And maybe just make it brighter. I think it looks great. So make that nice and bright, happy with that light. Our key light is very bright. So firstly, I'm going
to bring that down. Might even turn
it in, turn it to a spotlight later,
or road light. That actually doesn't
look too bad. I think that looks good. Then top-down. Top-down is way too bright. So we can experiment by, maybe we'll make it a spotlight. So maybe we'll turn
it into a spotlight. And then we'll do sort of
what we did in the beginning. Maybe we'll try to shine
it right at the top of his head and hitting
the goggles. So maybe something like that. Okay. Just figure out
what I like better. See if I want to turn the
environment up a little bit. It's kinda nice. This is a little dark. So maybe I'll just turn the ambient occlusion
down a little bit. Okay, so I'll just bring
this down a little bit. I like it in the eyes
but I don't like it underneath
underneath the goggles. That's the only thing. Okay. So I think that's good. Well, I guess I should
show you how to export. Let me just save. And of course to export, you just go to
this first folder. And firstly, you want
to save before you export just in case it would crash or
something like that. So just scroll all the way down. And you have screen,
you have all these. You just pick whatever
one you want. For k. Export PNG is very high. So just know your limitations with your different
iPads, but you'll know, but as long as you
save it and you'll be good, if it does crash, then you have to save it to
a smaller export setting. There we go For k, Save Image. And that's it. Okay, very last thing, I forgot the buttons. They need to have their
little thingy on them. So let's use clay. And I don't know what colors. Let's see what colors. They are. Little buttons are there blue. So little buttons look
like they're just blue. You can make you can make
them any color you want. Somebody who's Clay? I'm going to turn
the strength up, make it small, and
you can use blue. Gonna get to the back buttons. Didn't do a good
job on this side. So I'm going to turn symmetry off and then just do
this one. Separate. Okay. Now he's official.
Sure. You get them in focus. Now is official.
37. Thank You!: All right guys.
Congratulations on getting through all of those classes. That was a lot. I mean, this was one
of the most complex characters that I've ever made. And then on top of it,
filming and recording. But it even helps me. So teaching actually
helps me as well. Because I can't just float
my way through things. I have to try to figure
out a way to come up with a formula that I can say and explained that it makes sense. So once again, I really appreciate you guys
being with me. This is so much fun
and the outcome. I mean, I love the minion. I never really, I never
really looked at them quite. I guess you don't really ever look at anything quite the way you do when you make
a 3D sculpture of it. Because you just have
to spend so much time concentrating on every
little tiny detail. And you really get
to appreciate what you're making and what you're
doing in the art, e.g. in this reference art, you really appreciate it
on a different level. And speaking of appreciate, I appreciate all you guys for supporting me here on
Skillshare and taking my classes and
posting to make sure that you post to the class
projects so I can see. And so everyone else can see. And if you post on social
media tag me drove per day. I love showing you
off and I can't wait to see your minions. I can't wait to see them.
Of course, I'm on YouTube. I actually already have a
continuing education class. That's what I might
start calling them. So after I finished this class, I have to make the
thumbnails for the class. So I actually did
that live on YouTube. So that video is live
on YouTube right now. So you can go check that out. Youtube.com slash drug-free. Dave, Of course, if you
want to see more of my 2D work in 3D work,
instagram.com slash drug-free. Dave TikTok, add me on TikTok. Tiktok is becoming one of
the more fun social media. So make sure you
check me out there. This is going on way too long. You've already spent
a lot of time with me, so I'm going to let you go. But again, I appreciate
you nama stay. I don't know why I just
wanted to say that. And I also appreciate
everyone for calling me the Bob Ross
of nomads scoped. Like I get that so
much on YouTube that I remind them of Bob Ross and I love
it. I'm here for it. Alright, so make sure
you upload your minion. I want to see, I
can't wait to see and thank you again
for taking my class. As always, keep drawing,
keep sculpting. I'll see you all
in the next video. What's up, guys
drug-free Dave, here, I just wanted to tell you about my newest Skillshare course, course at all, a minion,
model and Minion. I'm living now making a minion modeling and
Minion. I don't know. I learned a lot
making this class. And I know you're
going to learn that, learn a little, a
little a allele.
 Dave Reed, 2D & 3D Illustrator - Brooklyn, NY