Transcripts
1. 3D Kawaii Workshop in Nomad Sculpt: What's up, guys drug for
Dave here and welcome to another Skillshare
exclusive class. This one is called
the Kawhi workshop. We're gonna be working
in 3D and nomad sculpt. I'll be using the iPad Pro 2021, but nomads scope is
available on iPads and iPad Pros and Samsung tablets. So I really loved making characters and doing
character designs, putting them together,
sculpting them, modeling them.
Very cute, simple. So not only is this class
all about cute characters, but it's all about making
our scene and making our models with
efficiency in mind, we're going to take
extra steps to make sure our poly count stays
low where it should be. We're also going to
focus on composition. We're going to add a background in and we're going to make our scene fits seamlessly
with that background. And we're going to add
our little characters in. So it looks like that, that is the background scene. We're going to make
it really blurry. Lot of artistic
stylization coming into this class because that's how I work and that's
what I love to do. This class comes with
a ton of free extras. I'm going to include a
whole room so you can use your characters once
you've finished them to populate the room. I made all of these assets
really cool assets. And I'm going to
include those all with this class because it's just fun to use your characters and put them in a physical space and move them around in
a physical space. Alright, so that's my pitch. That's it for this intro. I really had a great time making this class and I'm looking
forward to joining you in class so we can make some really cute little
Kawhi characters. Alright, so let's move on to the next video class project.
2. Class Project: All right guys, welcome
to the class project. I'm so glad to see you here. So we have a lot, we go over a lot in this class. It's a lot of classes, but I can only do 12 minute chunks because I
like to fill them in for K. And that's the
biggest, that's the, that's the length it takes for the classes to be able to fit onto the Skillshare platform. So that's why everything
is usually around 12, 13 min anyway. So it makes you download
all of the extras. There's a bunch of extra images. The environment, which I'll tell you how to put the
environment on. That's the one that I use
with all my projects. I usually just keep it on
this particular environment. I think the most
important thing is just that the 2D drawing images. That way you can bring them into nomad and you can just
use them as reference. Of course, like I always
say in my videos, feel free to go rogue and
do whatever you wanna do. Make the change of the colors, make things bigger or smaller. The gist of what I'm teaching, I think it'll be easy to follow. Feel free to experiment
and do things at your own pace and the way
that you want them to look, again, this is your art. I'm just kind of walking
you through how I do it. I'm using Nomad sculpt 1.70. We will be using subsurface
scattering and a few of the other features that are
on the new versions of nomad, especially the way
that I connect my layers and my different
meshes and things like that. So it's important
to make sure that your nomad Skulpt is up-to-date. It'll be much, much
easier doing it that way. Also, if you have any issues, you run into any problems
or you're just curious, you want to ask me a question? Just put it in the discussions. I'm happy to go through them
and we'll figure out a way to get you over whatever
hump you might run into, whatever wall you
might run into will get you fixed up
and get you moving. I think that's about
it. Um, I did. I am including a lot of
extra, so just look through. You don't have to
download all of them. Oh, and another real, another really fun
thing is the room that I the room file is not very big at all because I'd
been working on decimation. So another thing that
you'll learn in this class, decimate SMA, decimate
brings down the file size. So we're going to get
the quality that we want at the lowest poly count. So the lowest size, because sometimes it's
very easy to work in a large size if you
want a lot of details. We're gonna do things
very minimally. Kawhi is very simple. So this class lends itself well to decimation and learning that, and learning how
that process works. But make sure you
download the room at the end of the class. You can use the room,
you can light it, you can put your characters in it and just have a fun time. That was one of the fun
things I had after class. I built this whole room. And I think I'll
do another class with room building and interior design because
it's a lot of fun, especially when you
have characters to populate this space. So I think you'll
really enjoy that. Alright, so without further ado, let's get to the next video. Getting Started.
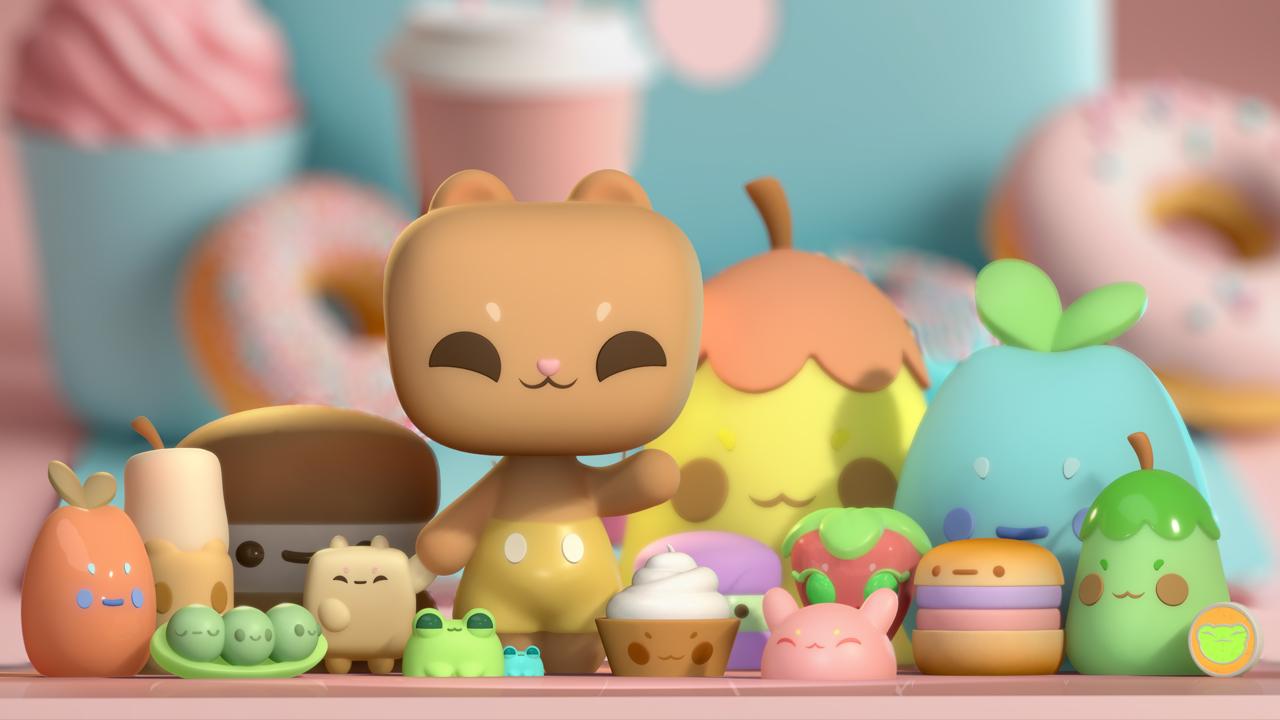
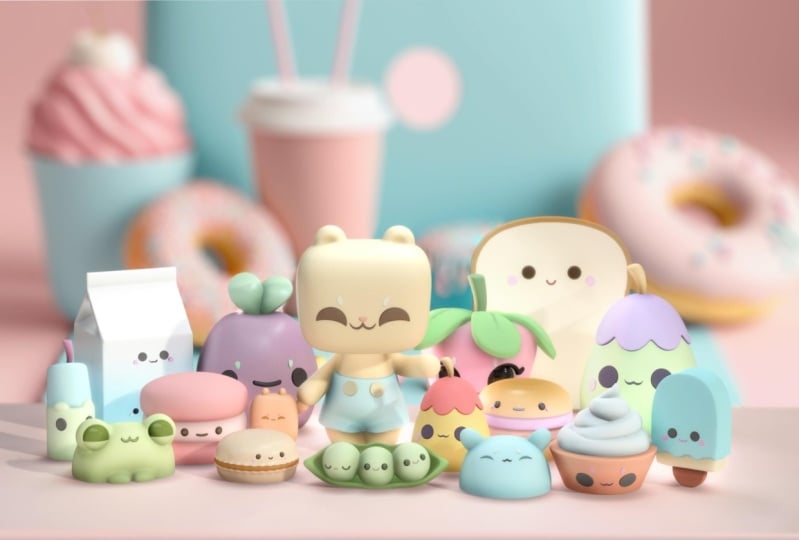
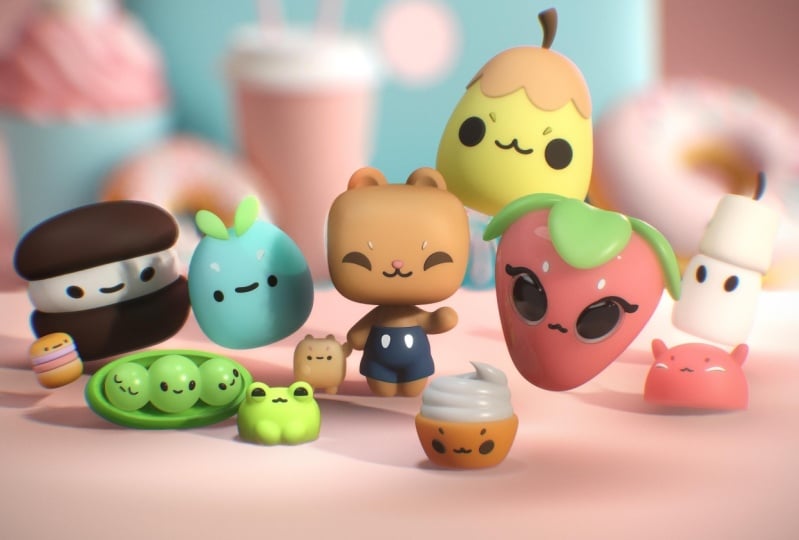
3. Getting Started e*: These characters
Kan, are great for background characters
populating your scene. They're really cute,
really simple, and we're going to
have a great time making these in nomads sculpt. So let's start out by bringing the image into nomad scoped. So we'll just go here.
Reference image. You can tap here, Import photos, and then you
can just bring in your photo. You can tap the
Transform if you want to just place it around the scene. I've shrunk bind and
placed it about here. We don't need it to
big since we're just using it as a reference. We actually need to
make two tools to new tools to start
out that we'll be using a lot for this tutorial. I'm in essentially,
let's just validate this just so we have access
to the rest of our tools. And we're going to use, we're going to go
to smooth, tap it, cone and just do smooth color. So this new smooth, this new Smooth Color is just going to be for
smoothing colors. So once we add colors, if we want to make
a nice gradient, will use this one smooth color. The only thing that
we wanna do is bring down the intensity to zero. So this way there
will be no intensity, but it will just
smooth out the colors. I'm just gonna do
a quick example. So of course I always do my sculpting in Mecca,
which is right here. But I'm just gonna
put it to let PBR. You don't have to do this.
I'm just doing this as a just to show you what I mean. So I'm just going
to paint it white and then I will take half of it and her I'll just color half of it orange
with the paint tool. And I'll color maybe
some of the dark color. Now I'll use my smooth color. And I'm just going
to smooth that out. Then we have a nice,
beautiful smooth gradient. So this is what
we're going to use smooth color for when
and if we need it later. But it's also a great
tool to just have, as you can see, I
have mine here. It's a great tool to
have in your tool set. That way you can leave
your regular smooth, smooth brush for
when you need it. And then when you just
want to do color, you can go back and
forth without having to change the options. We're going to make another
clone of the smooth tool. So we'll tap it clone. So let's just rename
it to rounded edge. This way we don't
get it confused with the other Smooth Tool. Let's hide the sphere
and let's make a box. So we validate our box. But we want all the
edges to be rounded. Now that we have
our rounded edge, will just go into the options. So the first one
is the pressure. And your pressure is probably
going to be like this. So just change both of them, tap on it and change it to flat. So they should both be flat. Now you can go to
the Options here. Scroll down to fall off
and change it to flat. And then we'll go
down to stroke type and change it to dynamic radius. That's all the
settings we need for. Rounded edge. Start from the middle
and then just drag out. And here's an example
on a high poly mesh. You can't see it, but
it's definitely working. In this tutorial, we're
going to concentrate a lot on decimation. Decimation is in this
window, you have this here. So this is decimation. And essentially like right
now my sphere is 6,000. If I were to decimate, it, cuts it in half to 3,000. So we're going to
concentrate on a lot on decimating our scopes, keeping our poly count low. So I want to run through
a quick example of how the new brushes
are going to be used. So this is all about solutions
and making our shapes as smooth and as clean as we can for the lowest
amount of vertices, for the smallest size. Let's say we want to make this, It's like two buns with two cylindrical shapes in
the middle. Quite simple. But you'll notice. So I'm going to tap front because I like to make sure that my my meshes perfectly
front facing me. And remember, we don't have, we're on orthographic
and not perspective. So we want to be
on orthographic. And of course, I
always sculpt in that. I always sculpt in my cabin
instead of sleep lit PBR, I just find it easier and
makeup. If you notice. When we use trim, I like to use the rectangle. We wanted to make the
top part of the BUN. We could do this. But you can see all these
artifacts if we just trim, not very, not very good. So one way to get
more detail and make it cleaner is to raise the
resolution of our sphere. So we can go here, we can go to the mall tirades and you can subdivided
a few times. I subdivided it three times. It's 393 K. That's very big. But you can see when I trim
it, it's a lot cleaner. And that's very similar
to if I was to go back. So if I was to go here and voxel remeshing it pretty high. Voxel remeshing pretty high. Let's say like 500 to 500. So now it's also quite big. And when I trim it, you
can see it's the same. It's pretty clear when
I trim it that way. So either way is fine, either subdividing
or voxel remeshing. Since I box will read mashed,
I'll just leave it here. You can see there's some
squares on it, but that's okay. And the shape isn't
quite what we want, so we want it
rounded like a bun. And then we want to have this similar shape
but on the bottom. So I'm going to show
you a few tricks on how to get there. So firstly, since we're
looking at the front, the easiest thing to do
is if we could just pull out the edges to make
it more round here. And the way that I would do
that is to go to Symmetry. And then see these planes. The red plane is there. I'd like to tell, I'll just
turn these on for now. So you can see,
so this symmetry, the x is this. I turn that off
and turn this on. The green. You can see
the green is here. So the green is actually
a flat plane there. So it's gonna be top and bottom. And I turn this off
and turn this one. You can see this one is the
front side and the backside. So if I want to pull
all, all of these out, the easiest thing
is if I could pull out simultaneously
on the whole thing, it would be more even. And to make a round
edge like this. So we want the green one. But not only do we
want the green one, but we want to raise
this up to maybe like Let's just do,
Let's do eight. Now you can see that round
circle and it has eight. So when we move, when we use the move tool, it's going to pull out on
each one of these nodes. That's what it's
going to, that's how it's going to be used. See when I touch it, all of these red dots are, what's the tool is going to
actually pull like this. See? So that'll work really well because
we're going to use move. We're going to raise
the move tool up a bit. So it's not so acute. So we're going to pull out on each one of these
edges like this. Let me get a little bigger. So something like
this is pretty good. So we just want to
get it closer to that button type shape. And I actually think
that works pretty well. So now you can see
it's still round, but you can see that it's
more sort of been shape. And that's what
we're looking for. So now the only problem
is this shape is 343 K, which is way too big and
it has the little squares. So this is where
rounded edge comes out. Because now you have, we have this edge here. And if we were to
decimate it right now, if you already decimated
and bring it down to 5,000, it's not really, it's
not clean at all. See what happens there.
So let's go back to 343 K. So this is when rounded edge
really comes into play. So there is a slight
issue that I noticed, but I'm going to keep it in,
in case it happens to you. So you can use rounded edge and just drag out
from the middle. Now notice that there's
these cracks in it. So if that happens, just undo. I'm just remission. So let's say all we
mess it like 500. So just remember it. So those cracks aren't there. And then just go back to
using the rounded edge. So just drag out
from the middle. I'm actually going
to do it a lot. Might even make the size
a little bit bigger. And I'm just dragging out from the middle over and
over and over again, which is smoothing
out the whole thing. You noticed the little
squares are gone. So that all I did was take the rounded brush and just drag out
from the middle. Nice and smooth. So
this is actually good. But again, this is 601 k, which is way too big. But now we can go to decimate,
decimate once, twice. I think before we'd
got it down to 5,000 and it looked
really terrible. So let's keep going until
we have something usable. So right now it's 2000. But if you look at it, it
looks exactly the same. And it's only 2000, I
don't think it'll work up. I go back again, but
let's live dangerously. I can see a slight slightly different
Let's see if I step back, see it's slightly. But I think for example's sake, we have a down to 1,000, which is very, very small. So that's actually pretty good. It's very good because now
the size is quite small. I'm going to move it
back one to 2000. I think that's pretty good.
4. Ice-Cream Sandwich-Burger: This is looking good, so we're going to continue to make
this little character. So let's add a cylinder
and we'll drop it down. Right now. If we try to use, let's
just validate it. If we try to use
the rounded edge, it's already very
small as 1,000. So we tried to do it now, it's going to take too
much off and it's not bad, but you can still
see that it's just, it's a little too
simple to start with. So we can actually change the options for the
cylinder before we validated. Post subdivision two and maybe linear
subdivision if we want. I'll leave it off. Now we validate the cylinder is 21 k. So now let's try
the rounded brush. So now we can just make it
nice and soft and round. So that's actually perfect. And again it's 21
k. So we want to at least bring this size down. So now we can decimate because
we did the rounded edge. So we'll go back to
decimate 105 to 1,000. Now. Let's just close this. So we have these two
cylinders, we have the top. Let's clone this one. And we'll drag this one down to complete our
little sandwich here. So we have sphere one. But as you can see, it's still obviously the same, so we just need to flip it. And we're going to use
that same symmetry because the green
is top and bottom. We'll go to Symmetry.
We're using the green one, which is top and bottom. And then we can just
do flip object. So then it'll just flip it
from the top to the bottom. And the only difference
at the bottom, it's a little wider
here than the top. So we just need to
do the same thing that we did on the top. So we'll go to our
symmetry or on the y. But let's make about eight
of them like we did before. We'll take our Move brush. And we'll just sort of widen
this out a little bit. So something like that. I don't know what's
going on in the middle, but we'll just push that. We'll just leave it. You could push the middle down, but we're not really going
to see the middle anyway, but you can always just push
that down a little bit. So now it's a little bit
more of a bottom bone shape. I'll just ease it
down a little bit. Maybe just like that. Now it's a little bit more
of a bottom bun shape. And we'll take the cylinder
from the middle that we cloned, bring it down. So maybe something like that. We can bring this top bone down. It can make it a little
bigger if we want to. Alright, I mean, even
that I think is cute. It's very, it's very smooth and we're not
using a lot of size, which is the main thing. Let's bring this
down a little bit. So normally I would
make all of the, you know, create
all the characters in Metcalf and color them. But I'm going to run
through this just so you can see all
of the benefits. And this is pretty much
how we're gonna do all of the other shapes. Um, so let's just
change this to let PBR. I'm going to change the color to white and just adjust
the roughness. Pain all it's looking good. Let's do the same with looks like these didn't get painted, so let's just paint those. Make sure this is
painted as well. Actually, I forgot to just
go like this and pain all. Okay, so let's say we want
to color these been colored. So one easy thing to do is just take the top and the
bottom and join them. And this one can be Patty one. This can be Patty two. So for the button,
let's use Select Mask. And then we'll use rectangle. And we'll just do
something like this. And then we'll take
the bottom part and do something like this. So now we just use the mask so we can just color in
one particular part of it. But let's invert it first. So let's take the mass will
go to the Options and invert. And then let's color it. Maybe just like a brown
been typed color. So maybe something like this. Pain all. Then we'll invert it again. So now we can call it
in the other part, same color, but we'll just
make it nice and light. Pain all. Then we can go to the mask
settings and just clear. Maybe I'll make that
a little bit lighter. There we go. And now we'll
use the smooth brush. And we can just smooth this out nicely and make
it a little smaller. So we'll just smooth this out. Like so. If you find
that you want it to be a little, Let's see. So we'll just make our
brush really small. We still have symmetry
on, so we go. So we'll just take
our smooth brush will make it really small. And just smooth out this edge. Now we just have like a smooth, a really smooth dynamic
for our button. Let's color these in. Let's make this one
like a light pink. We'll make it just
like a random. I don't even know
what it would be. Let's make this one like, uh, we'll do like a
light bluish color, pale bluish color,
something like this. And really quickly I'll just
turn off the environment. I'll add a light. Then I'll go into post-process
and turn that on. And then we have, you can see we have a really nice shaped, we have a really nice shaped
3D mesh for very small, low poly count, low
vertices count. So this is essentially what
we'll use for most of these. And this will be the result. And as you can see, you can get really,
really great results. And you don't need
that big size. So we're going to
use these tools a lot for most of these. And we'll just continually
work through all of them. And we'll come back to
this guy later and add, or maybe we'll just come back
to it after this and add his eyes and the mouth. But one other thing that
I might do is do all of the eyes and the mouth parts. Because once we have those, we can continue to
reuse them as we need. And then I think
that'll be very useful. Then we can just
concentrate on shapes. So I'm just gonna get
rid of this light, turn the environment on
and turn off post-process, and go back to my cat. This is code for finally, because we call it
them in those colors. I'm just going to connect these. So now we have our little, let's call it R Little
Ice Cream Sandwich. So now we have our little
ice cream sandwich and we can hide it for now.
5. Ice-Cream Eyes: So since we have this guy up, let's go ahead and
make some eyes and a little mouth for them. I mean, why not? So we can do them pretty simple. We can just use two
spheres for the eyes and then use this fear
and stretch it. So we have the mountain. So we'll go here and
just add some spheres. We'll just make
them really small. But of course you can make
them any size that you want. And that's one of the
really fun things to do is just to experiment. Let's tap mirror. So
we have two of them. Here we go. So we have two eyes. They're far apart,
maybe around there. We can just move them
back into the bun. Alright, those look pretty good. So let's go ahead
and validate those. I'm just gonna validate this. So now we have the eyes, Let's just change it to eyes. And we want to make a mouth. So this is actually a
pretty cool, pretty useful. So we're going to
add another sphere. Let me get pretty small. So we want to make like
a pill type shape. So I'm going to validate the sphere that I'm
attempt symmetry. So when you tap
symmetry and then you pull it does stretch. It'll stretch like this. So maybe something like
this for the mouth. I was going to shrink it,
but I forgot that I have to. Voxel. Remeshing
also just shrinks. Actually. I mean, it
doesn't look too bad, but usually Boxer we mentioned
it before, I shrink it. So that's a good shape if we can make it smaller
just like a nice pill shape. I just like you
want to take round and the end isn't, isn't flat. So this is just how I
make these pills shapes. So let me go ahead
and voxel ramus, this is just like 200 or so. So I'll re mesh it. And I don't think we
need symmetry anymore, which is Do pivot, reset pivot. Just so we know that's the
pivot is in the middle. And I'll just shrink
it down a little bit. Maybe I'll even stretch it. I didn't really want to
stretch it, but that's okay. Now let's move to smooth
it back to the face. To complete the face. Maybe a little smaller. And the one thing that
I like to do and that I noticed is obviously
the bun is rounded. So one thing that I, that
I always do is I'll take the Move tool and I'll just
pull it out from the middle. Just so it's a
little more rounded. And then I'll just take
the gizmo and push it back into the mouth. So pretty simple. Lower it, just a smidge. So pretty simple. And then we can color these in black or a dark color later. But at least we have this first little guy
done pretty much. And of course afterwards,
later on we can color all these characters
and things like that. I think we'll just concentrate
on the shapes. For now. We'll do the shapes and then
we'll, we'll go from there. Alright, let's hide
this little character so that we can move
on to the next one. And actually before we do that, I always, there's always
something I forget. Let's add all of these together. So the eyes and the sphere,
Let's just join them. Join them. It's a
pretty big mesh. It's a pretty big shape. The eyes right now is 58.6 K. We can try just decimating
and see how they look. I'm actually quite good
at even down at 3,000. We decimate again. I mean at 1,000 even look good. So honestly, I'm just going
to leave them like that. I think they look fine. Let's just attach them. So now we have our ice cream sandwich
completely together. I just find that very
easy to just have. When we continue to
make another one. Then we can, we can
do the same thing, will just group
everything together. That way just keeps our
scene nice and organized.
6. Rounded Box Head: Alright, so let's do the
character in the middle. That's the main character. I guess maybe just because
it's in the middle. So let's hide our
ice cream sandwich. And I think I want to actually
start with another sphere. We could start with a box, but then we'd have a
lot of rounding to do in her face or his
face is very round. So I think I'm actually going
to start with a sphere. I might have accidentally put it inside the ice cream sandwich, so I'm just going to bring
it out. There we go. So there's our,
there's our sphere. So I'm gonna go ahead
and validate it. So what we need to
do with the sphere is similar to what we
did with the button. So it's very sort of squarish. So we just need to
make it squarish. Let's look, let's
look the top view. And let's go to symmetry. And the x is good. But we need this angle as well. And I think that's
gonna be blue, just following this blue
ring, so that's the blue. So that's what we want. We also want obviously the
bottom as well. Whoops. Because we want
anything we do on the top to also
happen on the bottom. So let's use the top view because since we're
making a square, we wanna be able to
see all four parts. So we use move. And let's just do a little test. That's actually quite good. Now we can just do the shape
that the face looks like. What it looks like to me. I think it's
something like this. Maybe I'll make it
a little smaller. Make it a little
smaller if, you know, to get the edges a little
bit more, um, more square. But I think something
like this works. But now you see there's
an issue there. So let's, now that we
have on the front side, Let's do the same thing and just sort of make
it kinda squarish. Let's turn it on this side
and do the same thing. And hopefully this
works is actually the first time I'm ever
doing a square like this. It's actually not bad. Let's pull this
out a little bit. Let's take a look at the front. So it's actually pretty good. I'm noticing that I
want the top part to be a little bit wider on top. So if I want it to
be wider on top, but not on the bottom, that we need to
eliminate the symmetry. That's everything
that happens here. What happen here? So that's
the green symmetry line. So go back into symmetry
and turn that off. So the other two symmetry lines are what happens
is in the front, is happening in the back. That's the blue one, back in front, and then
left and right. So I think that's
where we want to be. So I'm going to make
sure I'm in the front. I'll make the move tool
a little bit bigger. And I just want to bring out, bring this out a bit, maybe
a little bit bigger even. I think something like
that feels, feels right. And then you kinda have
to make up the back. So what I wanna do is I don't want to mirror
the back and the front. I just want to bring
that back out. So the head is like, you know, kinda like the
back of the skull a bit. So I'm turned to the right. And I want to
eliminate the back and the front symmetry,
which is the blue. So I have eliminated that. So now it's only left and right. So if I do this view, you'll be able to see
when I bring it back. It's only bring in totally
affecting the back part. And this is all just
kinda making it up. Like I just feel like since
the head is like this, I'm just going to continue
the back of the skull. So that's another thing that you have to do with
these characters. You kinda have to
just make up how the anatomy is going to look. And that's just
from the anatomy of animals like our skull, like we have our skull and then it's coming to kind
of round in the back. So that's how I kinda
come up with those ideas. Let me just pull this out
a little bit because I see a little bit of
a depression there. Okay. I think that looks pretty good. Make any last-minute changes
you might want to make. But all in all, I think
that looks pretty good. Alright, so I might just want
to smooth this out for now. So let's take smooth or
regular smooth brush. And let's just see if it's, let's just see how
it looks when you smooth that it actually
looks pretty good. The only thing I was
worried about is I might have to remember it. See how I get these at all.
These are warm naughts. So I'm just going to rematch this voxel Ramesh and I'll
remission it like 200. So this will make it sturdier. It makes it, it
makes it quite big. But we can always decimate now. Now we know how to decimate. So you see, remeshing kinda
got rid of those nuts. They're still there
a little bit, but it's looking a lot better. Now I'm just smoothing
out the head. And that's it. I'm
just smoothing it out and making it
look nice and smooth. I like a smooth mesh. Okay. So I'm pretty happy with that. And that's, that's the that's the basic shape of the head.
I think that's pretty good. So now we can go ahead and make these two little round
ear type things. And that's pretty simple. I think we can just use a
sphere and stretch it out. So we'll add a sphere and
we'll call this one ears. And let's call this head too. Alright, so we have
the ears and the head. So let's bring the
ears sphere up. Make it a bit smaller. I can move it over here
so we have two of them. Maybe I'll flatten them a little bit and kinda pushed
them to the back. Maybe have them lean
back a little bit. I think that's pretty good. Maybe I'll make the
head a little wider. Make these little wider. But I think something
like that is perfect, perfectly fine. So we'll go ahead and validate. If you want to make
these little, like, if you want to make two
little depressions in the ears, you can
actually do this. So we can. Let's go ahead and
validate the mirror. So join children and I'm
going to rename this ears. So now we have our ears. So we can actually clone this. And then we can move it up. So it's like right in front. And we can use this to make one of the same
thing that we did, like a Boolean operation. So maybe something
like that and you can make it a little,
a little thinner. Oops. Let's turn on symmetry. If
you want to move these like in a symmetrical way
than just tap symmetry. And then you can
still move them in the same way that we did before. So let's say we wanted them
in the middle of the ears, so something like that. And now I'll just take
both of these are hide the replicated
ears or hide those. Then same thing
like we did before. Voxel 3D mesh and a box. We meshed pretty high
because I won't clean cuts. So I'll voxel remiss had 500. You don't have to box
where you miss this high. Again, I'm just going to save. Because I always say before
I do big box will 3D meshes. So voxel, we mentioned 500. Let's take a look at this. It looks decent there. That's a little too deep. Whoops. So I'll just move them, move it up a little bit. Maybe it'll just flatten it. Maybe something like that. You just have to kinda
figure out where you want it, where you, where you want that to be, even if you even want it. So we'll just Fox every Michigan at five-hundred,
see what we get. And then you have a
nice little depression there in the ears. And
we'll do the same thing. Let's use a smooth, all. I'm going to delete
these because I don't need a secondary
version of them. But I'm going to rename
this one rounded edge because I think
that's a better name. Every time I do like a video and I've talked about
certain things. I wind up with so many
extra tools because I like to walk you guys
through how I make the tool because
I'm sure there's always people that
just don't have the tool and haven't seen it. So I wanted to take a
minute and do that. So rounded edge. I'm just gonna make sure
that my settings are right. Flat, fall off grabbed dynamic and
pressure radius is flat. So this is 325 K. So I'm going to drag this over them so that
everything is nice and round. And then I'll do my decimation and bring it down really low. So I think that's pretty good. 2000 I could step back
and make it clearer, but I think this is fine. This is fine. Okay. So the head is 164 K. I'm not sure if I'm
going to merge that with the body, but I might. So I think for now I'm
going to leave it. But I'm going to always
remember to check all my shapes and just make sure that I know what
the vertices count is. Because now we can bring them
all down to lower numbers. Because we're gonna be
making a lot of characters. So we want to just keep
all the numbers low.
7. Rounded Box Body: Alright, so let's make the body, I'm just thinking about
which shape will be the most efficient
way that I would do this shape. And the shorts. So first, let's use a cylinder. The cylinder has a lots
of different uses. Uses. One of which
is the editing, where you see these
little nodes. So let's tap radius once. And now you see these
two orange ones. So this is how you can move
the ends independently. So now I'm just going
to shrink this. Let's tap the front. And I'll shrink
this to about where it looks on the, on the drawing. So maybe something like this. And I'll move that
up a little bit. So now we have
something like this. Maybe I'll move it back. Like the neck would be a
little bit further back. So now this part has to be rounded and then to round
little legs coming down, so it's like this. But for this rounded part, I think a sphere would work. So let's use a sphere. We can go ahead and validate it, will bring the sphere down. And we're just sort of match
it up with this cone here. Maybe we'll make it
a little smaller and flatten it out a little bit. So maybe something like
this will bring it up some. And I'm just going to
try to match it as best I can to the cone. Thank God, I think something
like that is perfect. That looks good. So obviously this is too long. Well, we can adjust
this later as well. Like we can. Well, firstly, we can do this, can bring it down some that's probably a
little more accurate. So maybe something like that. It's okay that it's not
touching the neck right now. Then last but not least, the two little round legs. So let's use fears
for that as well. So let's, these
two are the body. So let's just join these for
now and just rename it body. Let's add another
sphere, bring it down. This one will mirror, will separate and this
will be our legs. Is it all, ladies? So we'll put them in
the general area. Let's use this orange sphere
to sort of stretch them out. We bring them together. And let's actually take the
blue ring and twist them. Make them a little
sloppy, a little taller. So maybe something like this. There can be a little
a little skinnier. So something like that is pretty much how the
little the little legs are constructed them a
little bit this way, but I might want the
front and the back to, um, to extend. So let's validate. So we'll take a look at this. Let's use the move tool. So right now let's
take a look at the symmetry for the leg. So if I turn symmetry on, so right now this
symmetry is activated, but I also want front and back. You see the gizmo,
this blue line. I want the blue symmetry. I'm gonna go to Symmetry
and turn on the blue line. So this way I could do things
in the front and the back. So I'm just going to stretch it. So it sort of has more of
a smooth shape like that. So let's use move will stretch the back
out some and the front. I don't think it has to
go all the way really, just a little bit. Okay. I think
that's pretty good. One other thing that
I'm going to do for these these legs, I'm just going to, you know what, I'm not
gonna do it now. I was going to clone nice. But I think we're
just going to make new spheres in a moment. So I'm not going
to clone him yet. I was going to ask sometimes there's there's multiple
ways to do something. So I'm just trying to figure
out the most efficient way. That's the least confusing. I think this is good for now. This serves as his body, his little waste, and
his belly and his legs. So I think this is
pretty good for now. I just want to bring the
legs maybe in a little bit. So maybe something like that. So now let's take all of these and voxel
Ramesh them together. I'd like 200. Let's make sure I have all that. He has. So I want
these, the body. But one thing that's
important to note, see this mirror for the legs. We want to validate that
first and join children. That way it maintains the
correct central line. So now we'll take that in the
body and will voxel Ramesh that at like 200. Okay. Now we can take our smooth
brush and we can just, you know, just
manually smooth out. Is it a body or her
little body? Okay. So this is going to be our
basis to make our pants. This is an I use, actually
use this method a lot. So now let's, so this is
the body, Let's clone it. So we have body one. Let's take our gizmo and
make it a little bigger. So we made it a
little bit bigger. I'm sure I'm in the front. And now we just want to
carve the shorts out. So we'll use trim.
And for the top, I'll just use the rectangle. And I want to trim. I want to make sure I'm above. I want to make sure I
get the whole part. You don't want to do like that. So you just want to make sure
you get the whole thing. And I think probably
something like this is good. And then for the bottom, I want to do a slight
curve like this. So I'm going to use the line. And remember symmetry is on. So if I do a line this way, it's going to do the
same thing will be here. So maybe a little
bit above the thigh. We'll do a line like this. And then we'll cut
it and it cuts both. So let's box voxel mesh. This shape. Just so it kinda makes it
a little bit stronger. So let's voxel Ramesh it at 200. Okay. Alright, so the
only thing that I want to do for his
for his legs is I do want to extend this
out a little straighter. And that's just
old-fashioned manipulation. I mean, that sounds bad, but we just want to
manipulate the shorts. What I'll do is kind of
like just stretch and pull. So I'm gonna pull this out. And then I'm going to
a little bit higher, push it down until
I get what I want. So I'm going to pull
this out and then push pull up the very bottom, and then push it down
until I get it to be as straight as I
can get it to be. Something like this. It's not perfect, but it, but it is kinda
fun to manipulate. And I also want to just have
more space around the leg. I'm just kinda pulling out. So I have more space around that lake and you
can do the same thing. You can pull out and then push if you want to try to
get that straight as well. Now I'm just kinda pulling out. So there's a decent amount of space from the from the thighs. So something like this. I
think that looks pretty good. The sides are kind of straight. I think they look
straight enough. So now we can use
our rounded edge. And then we can just
round out these shorts. Due to a bunch of time. We have a nice rounded edge there. I think that looks great. We can also smooth, smooth
it out a little bit. And the reason why I smooth
out a lot as it just brings like a uniform thickness to the scopes that I
really, really like k. So I think that
looks pretty good. Now the only other thing
that I wanted to do, what I do want to adjust this. I don't want this part
to come down so much, so I'm just going to slowly
just push it up a little bit. This is just more of a
extreme detail thing. I just want to push
that up a little bit. And I kinda want to pull these
out a little bit more on the sides and just make it as straight as
possible on the sides. Okay. I think
that's pretty good. So I don't like how
the legs are touching. I'd rather have them separate. So I'm going to trim those
off using the rectangle. So a trim off the
legs, wrong mesh. Make sure you tap the legs. Trim those off. You can actually trim up
higher than that. I'll trim all the way up here. Because the more you trim, the the lighter you are, the less polygons
your mesh would be. So I trim that and then I add a new sphere, bring it down. And then we just
do the same thing. We can mirror it,
make it smaller. Now the big difference
between these, but these fears and
what we had before is now we have that nice
separation in the middle. So we'll, we'll
pretty much just do the same thing that
we did before. We'll tilt it over. I'm going to tap world. And I'm tapping world. So it just changes my symmetry. So now we have
something like this. Will make the legs
a little bigger. Yeah, I think something
like that works. Oops. I'll go ahead and
validate these. And if I want to
adjust the legs, go like we did before, I can but I actually think
they look pretty good, so I don't think I
have to do that. I think I'll just leave
them as they are. But I think this is a
great start for the body, a great start for the shorts.
8. Arm Tubes: So let's move the
body into place. So we have our mirror
here for our legs. Let's just rename this legs. And we can actually validate. So we validated our legs. Makes sure there's still
yet, they're still separate. So we validated the
legs are looking good. And now we have the body legs. The body one will
rename body one shorts. Alright. So we'll just tag all of those and then
we can just bring them up. And we can see the difference. Obviously it's much bigger. So let's go ahead and
just shrink it down. Bring it up a little bit
closer to the drawing. Lot. Cuter. I think that's pretty good. Okay, so we're going to
do very simplified arms. They're just, they're
just very round, but they're in
separate positions. So we'll use the tube
tool and we'll use one going down like this and then just one
a little bit more. I'm tilted up. And then we'll add
two spheres on the end to make them
nice and round. So let's use the tube tool. And we'll make the first
one. We'll use path. And we'll just start here 12. And I think that's all we need. I think we just need
something like that. I think too crazy. Let's just move
it into position. Usually the arms are
slightly towards the back. And let's go ahead and
bring this into the body. And we'll bring the
elbow a little bit down so that it looks pretty much like, um, like the drawing arm
is a little bit behind, but coming up like that. I think that looks perfect. So we'll just make it
a little bit wider. And we can actually
make the front part. Let's tap radius. And then we'll maybe
we'll make this a little bit thicker here. I think something like
that. It looks really good. So now we'll just have to match this arm on the other side. So let's, let's see what's
a good way to, let's do. Let's tap on another mesh and
then go back to the tube. That way we can
leave this one on validated so we can
edit it if we need to. So the next arm, Let's do path. We'll start here and go one. And then we'll go to
something like this, will tap the green button. And now we have our other arm. Let's bring it slightly to
the back and into the body. Alright, so we want
to bring this elbow back and maybe even bring this forward
a little bit. Oops. So I think something like
that, it looks good. You will bring it and
make it a little lower. But I think that works. So I'll just kinda show
you what mine looks like. We'll make it a little thicker. And then we'll go ahead
and make the front. So we'll tap radius. We'll make the font
a little bigger. I think that it looks, it looks good and it looked fairly even. So I think I'm pretty
happy with these shapes. So before we validate those, the arms, um, I don't know how they aren't
got all the way up here. Let's just bring them together. So let's add some spheres
to go on the ends, just to make the
ends nice and round. So first I'm just going to save. And let's add,
their first sphere. Will go down, will make
it a little smaller. And we'll just have to
maneuver this until it's kind of where we want it to be bigger. And I just want to try to
make it as even as possible. I think that looks pretty good. I'm going to validate the sphere and then I'm going to clone it. And I'm just going to fit
it to this arm as well. Okay. I think that
looks pretty good. Make it a little bit bigger. Just so it says a
little bit more even. I think that's a good fit. So let's just take a quick look. And I think that's a good
fit with the drawing. I might make this arm
a little bit bigger, which is a little lower. So I think that I think
those are pretty good. I'm pretty happy
with these arms. So now we just have
to validate them. I want to take the
corresponding, so this tube in this sphere. And just voxel
remiss them at 200. Alright, so this one, I'm
just going to rename arm up. And then I'll just
take my smooth and just smooth this arm out. That looks good. Then we'll take these
two voxel ramesh 200. It looks pretty good. And I'll rename this one arm down and save. And of course, if you have
any issues like this, you can just use your
move tool and just sort of sort of movement to
the body a little bit more. But I think that's good.
So now we can also, if we're happy with the head
and the body and the arms, we can actually just voxel, merge them all together and
kinda live dangerously. Hey, let's do it. Why not? So let's take we have the ears, the head, the arm down, the arm up the legs. Let's leave the legs. Let's actually leave the legs. And, but we'll take
the body as well. And let's see what it
looks like if we walk, so merge them together. And let's walk so
merge them together and I'm going to do 400. And let me save. I'm gonna box or we
miss them together at 400 and just see
what it looks like. It looks pretty good. So now you can sort of smooth everything
together and just make sure that it all
looks nice together. Which so far I think
it looks really nice. So it's exciting times to
rehash things together. I think the ears and
everything looked good. I like the I liked
the arms, the legs. So I think it's looking
good. I'm pretty happy with it right now. Okay, so let's see
how big the body is. The body is for 78 K. So I'm gonna do
one rounded edge. Probably don't need to,
but I'm just going to do a couple of rounded edges. And now I'm going to actually lower the body, the poly count. So let's decimate the body. And let's just see
how it's looking. So far everything's
looking good. 11859. I'm just reading the number
of vertices as we go down. Taking a closer look. Still looks good.
Still looks good. So now we're at 3,000. I can see a little bit
of artifacts here. So I'm going to back up one
step and leave it at 7,000. I don't think that's too bad. So the shorts or one-fifth. So we've already done, I've already done the
rounded edge on the shorts. So now I'm just going
to decimate those. For now too. I think 4,000 is
where I want to be. And we might have
to bring women to bring this up if we
want to do details, but for now, I just want
to get everything as low as I can. The legs. Maybe I can decimate
those wants. We have 6,000 and see what looks like if
we decimate them again. I think it's good. It looks good. Little too much
shorts in the front, so I'm just going to move
the legs up a little bit. Here we go. Good.
9. Main Face Details: So the next bit we're just
going to do various cuts. And this is going to
be the same, the same, or very similar to do all of these eyes and all
these little details. So we're going to use shapes
and we're going to sort of carve out all these
separate shapes using the Boolean operation. And I'm going to walk
you through that. So for this one, we have this sphere, but it's cut on the bottom. And then we have round
nose and then this, the mark for the mouth. Two spheres for this to shape spheres for these little
dots is what I call them. So let's start out
with irregular eyes. So for the little hamburger guy, I did spherical eyes. I think for him, I'm going to do more cylindrical shaped eyes. So let's start with a cylinder. And matter of fact,
let's go ahead and just connect
these right now. These are the shorts, is a little legs.
This is the body. We're good to go. Okay, so let's add a cylinder. Let's tap snap and 90. So we can move it 90 degrees. We'll make it smaller. We can take it
off, edit for now. So now we'll move it back. Shrink it to about what we like. And I'm going to tap mirror and then I'm going to separate. And we can just put them in the general position
where the eyes are. So I think it's probably
something like this. The nose and stuff
would be right here. Okay. So I'm going to
shrink these down. So something like
this will be good, but we need to make these, need to make these cuts. So the best way to do that
is a Boolean operation. So now that we have the eyes generally where we want them, we can go ahead
and validate them. Now we have our mirror
and our outlets. I'm going to name
them your eyes. And I'm going to
name these cylinder. So we have our two cylinders. They're pretty much
where we want. So I'm gonna go ahead
and validate this. Validate Join children. Yes. Now we have our eyes. I'm just going to
separate for now. I don't know why, but I just want to separate
them for now. Alright. Yeah. Okay, So firstly, I'm
going to clone the eyes. Now we have two pairs of eyes. I'm going to tap symmetry. Let's name this one I erase. Or I erase. Sure. So let's move it out
and down a little bit. And now we can, we just
have to figure out how we want to make the cut loops? Let's stretch it out. We're just stretching. So
weird pivot, rosette pivot. Let's move these
back into place. There we go, That's better. Okay, So I'm going to tap
front and I just want to make this shape with these eyes. So let's move away a
little bit bigger. The closer. You notice how
isn't as round as this is. So I'm just going to shrink it. And even just tilted
a little bit, I'm going to go off of snap and just tilt
it a little bit. Maybe shrink it a little bit more, stretch it. So I think this looks pretty similar to the
shape that I want. So I just use these fears to make this into the shape because this is the
shape that we want. I think that's pretty good. I think that's pretty
good. So before I do that, before I cut these these eyes, I'm going to clone them again. I'm going to bring
them to the bottom. And I'm going to
rename them, I dots. And I'm going to hide it.
I'm going to clone I dots. And I'm going to rename that. Shorts. Will just
rename it buttons. So if I doubts and buttons. So we're in good shape, we'll take the eyes and
the eye, race, erase. Now I want to tap on erase. So this is what you should have. This is going to extract
that shape from the eyes. So let's voxel a 3D
mesh, nice and high. So we have a nice cut. Let's save like I always do. And then I want a
box whose rematch? For 50. Again, you don't have
to have to go this high, but I don't usually get crashes, so I'm going to lean on higher
rather than lower mesh. We have our nice little eyes that looks very close
to the drawing. Pretty happy with that. Looks like I can bring them
down a little bit more. So that looks good. And it looks like they might be
tilted. So let's see. Hopefully I can yeah, I can still adjust
them like that. I can move them further
away or closer if I want. I think that's pretty good. Okay. So obviously,
this still looks a little weird as that is. So I'm just going to use Move and I just need to pull them out so that there so that they match up with this shape a little bit better. So I'm going to concentrate
on just one side. And I'm just going
to pull it out. It is kinda tricky
because you don't want to get too crazy with it. So pull it out. And then I'll check the positioning,
see how it looks. I'm just going to tilt. So I'm just tilting
them just until the feel like they're in the right place and
now that they're close, I'm just going to use move
and just kinda go rogue. And you can just slightly like kinda pushed them so
they're fairly even. There's probably better
ways to do this, but this is the way that I
usually that I always do it. Everything looks fairly even. They don't have to
stick out that far. Pull this out a little bit.
They look fairly even. Now, they're a little
bit over the surface of the head and I think
they look great. Okay, so now we just have
to figure out for the nose. Let's just make a
little spherical knows. Keep it. Just keep it simple.
For now at least. I'm going to validate it. Push it in. So maybe something looks like the nose is a little bit higher, a little bit wider. I'm going to flatten
it a little bit. Now I'm just going
to use Move and I, I just wanna do a
little bit more of a make sure symmetries on. I just want to do a little
something like this. I think that's pretty
good. And maybe just a tad bit smaller. Here we go.
10. MainFaceDetails: "W" Mouth: So now let's do a
similar thing like we did with the eyes for
this shape on the mouth. So we'll just start
from scratch. That's right, I did.
We're going to use these for the dots
and the buttons. So I'll just start
with a new sphere. Actually not a sphere,
excuse me, with a cylinder. Let's start with the cylinder. Snap. Right? So for this cylinder, I'm
actually going to start out with high resolution. So let's tap the
cylinder here due to then linear subdivision. And we can validate it. I'm going to shrink
this up some. And actually it was
kinda dumb of me. Before I validate
it, I want to mirror it and then bring it over. Like this, even though we
could do one at a time. But I think this is pretty good. Maybe maybe around their works. Don't need to be that wide. Maybe something like that. So I think that
looks pretty good. So let's validate that. We have our cylinder here. And I'm gonna go
ahead and validate. I want to join children. I'm going to keep instances. We have our one cylinder
here, so let's clone it. And this cylinder is
the one we're going to use to cut everything. Whoops. Just makes sure
that when you're on oh, wait a minute, wait a minute. I didn't make a mistake. When I'm, when I
clone the cylinder, you have to make sure
that you go and clone, like you have to clone
the meshes in here. So now I can clone it. And now I have the
same thing again. So now I can bring
it up. Stretch. Whoops. Let's do pivot, reset pivot. Well, it didn't work
that time. Fortunately. Usually it works. There we go. I guess you just
have to press on it. So these I'm just
going to add together. So this cylinder, I'm just going to join all of them together
because it doesn't really, doesn't really
make a difference. Probably doesn't make a
difference for that one either, but let's do it. Let's join the other
cylinders together. So we'll join them. So we have cylinder, two
different cylinders. So let's take the
one, the bigger one that we just
put out in front. And we're just going to
use this to cut into that one to make that shape. You can kinda see it even now. So that's all we're gonna do. So we just need to
get that shape right. So let's make this bigger. Maybe you can stretch it. We don't want to
stretch it too much. So if we're looking
at it from the front, this is pretty good. That's a pretty good tax so that we might be able to
get what we need out of that. I'm trying to look to see
if we need more space here. Because if so then
I'm maybe I just need to drag this up or stretch it. But I think that might be
perfect for this shape. So let's try it out. There's only one way to learn. So we have both cylinders. I'm going to hit the
eyeball on the bigger one. And then voxel 3D
mesh, pretty high. Boxer remiss at 400. Ok, so merge. And that's
looks pretty good. Pretty happy with that. So I'm going to tap on this and let's see if we can just
use rounded edge on this. Now, let's see how that looks. So rounded edge, it looks like it's doing a pretty
good job on that. It's holding its shape nicely. You can still tell what it is. So now that we've done the
rounded edge brush tool, let's go ahead and decimate it. Good. I was hoping I can get it down to one if I can do it again. Pretty good. It's a little 4,000 is
still even a little big. But I think it's
actually going to be black most of the time. So I think I'm happy
with having it at 2000. I think that's decent. Okay, so let's make sure
that we rename this mouth. Let's rename it W mouth. The one good thing about it is once you make these shapes, we can use them for
other creatures. So we're spending a lot of
time on this character, but we have the eyes like
this, we have the mouth. So we can reuse a lot of
these shapes in the future. Pivot. There we go. So let's bring this in. And actually before we, Let's actually save this. So go here. Let's save it. Let's save our
project first of all. Now let's save this
is just an OBJ. Only include selected
objects yet. So we only want, we
only want them out. Export OBJ, save
to files, assets. And I'll just rename
this W mouth. And I'm actually going
to, I'm going to, I wanted to be a
little bit bigger when I, when I save it. So if I'm on the next project, I can decimate it. So I'm just going
to save it over in that file that I just saved assets W mouth,
Save and Replace. So now I can just
easily bring it back to bite you doing ad seen that I wanted
to make another one. Array. So now let's pivot reset pivot. I don't know why that always
keeps getting unresearched. So let's shrink it.
Shrink it a little more. And now it's just a game of
placing it where we want it. So it looks like the drawing
is a little bit smaller. Maybe even a little bit flatter. Maybe I'll just bring it into
the face a little bit more. But I think that
looks pretty good. So it's not exactly like the mouth like this can be a little curved a little bit more. Let's see if we can just
do it with the move tool. Looks like our, there we go. So I just, I just went to world symmetry because
local, There we go. Local looks like it's good too. So let's just see if we can just drag this down with
the move tool, who might be to get a little bit more of a curve out of it. We bring this up, this down. So it's not so bad. That's not so bad. So sometimes you have to make those little tiny
edits if you want. But I think that looks good. I'm going to use move also to sort of just bring
it out a little bit. So it's a little more curves to match the head. Okay. Well, we think of
that pretty good. A little bit smaller, a little bit higher. Okay. I mean, I'm
pretty good with that. I think that works out.
11. Eye Dots: Okay, so for the i dots, even though I did, um, I do have the dots here. I'm just going to delete
them and start over. And I'm just going to
start with two cylinders. Let me name all these first. So this is mouth. I remember it a
name, this stuff. So this is buttons. Buttons. It's probably
a lot easier. So we can plug
those in right now. Let's tap symmetry. And now it's just a matter of just sort of adjusting these. Just so they're on the
surface of the shorts. I think it looks good. You can feel free to move them around. However you see fit. It's probably a
better positioning, maybe down a smidge. That looks pretty good. So now for the eye dots, we probably could
do the same thing, but I just want to make some new ones that
have cylinders. So snap, shrink them
down fairly small. And mirror. So that's the general area. A wider these let's just
shrink them up a little bit. Okay, So I think they're
looking pretty good. So let's validate. And I'm now going to go to the cylinder and
I think I want to work with just this one, so I didn't validate it yet.
I still have the mirror. And I'm going to work
on this one because everything is going to
happen on this side as well. So I want to make sure that I have the front and the back. Because when I when
I pull this up, I want the back to pool as well. So let's check out these lines. There we go. So we have the red, which is left and right. And then we have the green, which is front and back. So maybe we'll try
Angeles tied drag. Drag loops, gotta do symmetry. Okay, that's not what I want. So let's get rid of the red. Now. We just have the green symmetry. So anything I do up here? Yep, that's exactly what I want. And all I want to do is
drag this a little bit. Maybe just have very simple, slight shape like that. I mean, that's
exactly what I want. So I'm going to
actually save these. So this cylinder, I'm going
to save it as an OBJ. Save to files. And I'm
just going to name it. I dots. That way I
have them saved. I can bring them up later. I'll do the same
thing with the eyes. Although Let's see the eyes. The cylinders are 20/500, so they're very small. The eyes are bigger. And I don't think that I did the rounded edge on the eyes. So let's just do
that really quick. Okay. Bunch of rounded
edges on the eyes. Now let's just decimate 157. It looks pretty good. I
think I'll save it here. Will be J, save to files, the Kawhi eyes one. So I'll save it and let's see if we can just
estimate it again. I think I'll stop at 3,000. That's pretty good. Now we have our dots here that
we can move into the face. Maybe a tad bit smaller, and maybe a little bit more. They're facing up a little bit. Let's get it off. Snap. There we go. We think something like that. Perfect. I'm so happy with this
little character. I think it's really cute so far. So I think this is pretty good. The only other thing
that I would do, and maybe not even
right now is add a crease here later on. But I'm not gonna do that now. Let's just double-check
all our shapes. 3,000, 5,000, the
buttons are 5,000. So let's change that. Let's take the buttons in
this voxel, re-image them. It's like something
absurdly high, like 300. And then sues the rounded edge. So we did a rounded edge. Now let's decimate. Now we have them to 2000. So I think that's,
that's much better. Okay, so I'm pretty
happy with this. The only thing I can think of is maybe make this a
little smaller. So I think I'm pretty
happy with this character. I think she looks
true to the drawing. Just double-checking
right now here. Pretty happy with it here. So I'm going to call it,
I think this one is done. We can move on to some
other characters.
12. Low Poly Legs: So let's just quickly make a little platform so that we can have a reference for
where their feet, you know, where the
bottom part of them is resting on a surface. So I'm just gonna
use a cylinder. You can also use this
box if you want. But let's just add a cylinder. And I'm going to go through
the process of well, maybe I'll just leave it
like this. It's 1256. Probably don't need
to do too much to it. Squeeze it down a little bit. And probably something
like this is good. And what's interesting is it
looks like it's off-center. Maybe it's not,
maybe it just kinda looks that way for some reason. Might just be because
the character is back a little further. Let's see what that looks like. Is it is perfectly straight. It just goes to
show that our eyes sometimes just don't really see things the way that
they are actually. Alright, so now that we
have the surface, that is, the characters are gonna
be standing on the legs. I don't want to keep the
legs rounded at the bottom because if you ever
get this character printed or something, it's just sort of unfinished. And I like to finish
the characters. So we had the cylinder here. I'm just going to relabel it floor and I'll just
bring it down. So we have the Florida on
there and we have his legs. But if I get rid of the floor, you see the legs are rounded, which isn't right.
They should be flat. Whoops. Okay, so now that we have this cylinder back, I'm
going to tap front. So I know I'm perfectly
in the front. I'm going to tap the legs to
make sure we're on the legs. And in order to get a clean cut, I don't want to
just trim because the poly count is so low, the trim will look really bad. And even if this was hidden
underneath the floor, I still don't like that. But we still want to maintain this nice crease
down the middle. So we just need a
voxel ramus this at a really high number so that we don't lose
any of the detail. And then we can so
we can trim it. And it will still be
a nice crisp trim. So we have the legs
and let's voxel, rematch them pretty high. So I'm gonna do for 50. So let's save. I'm going to
remiss the legs at 04:50. And you see they had
these funny shapes but you still have that nice
crease in the middle. Now when we trim, I'm just going to use
rectangle. We trim. It's nice and clean. So obviously I'm not
going to trim there. That's just so you can
see the trim line. So I'm going to trim right below where they where there's
contact with the floor. You just want a little
bit of space there. So something like that. Now if I hide this, so you can see the bottom,
it's nice and clean. So we just, we can
use rounded edge. I'm going to make it really big. And then we can just round do
like we were doing before. Just sort of round
off this edge. Sometimes it takes awhile. It looks like it's not
doing anything but, and also if you wind up leaving
the lesson or the class, so you went up closing nomad. Just remember that you
have to go back and reset the falloff and the
grabbed dynamic radius. So every now and again,
I just go back and check to make sure that
the falloff is flat. Grabbed dynamic radius, and the pressure
settings are flat. Because if you go out of
the program and come back, it will reset unfortunately. Okay, I think that looks good. So let's bring the floor back. And now we can do what we
always do and decimate. So we can decimate half. So I just touched
this by accident. I don't know what it was. I wish I remember what that was. It. So I just went up, turning it all the way down, all the way off to 0.2. Then I was able to get back to 2000 and I think it still
looks perfectly fine. So that's what I'm
gonna go with. Because we still see
that nice crease down the middle, which
is what I wanted. Okay. We're gonna, we're gonna
use this cylinder, this floor for the
other characters. So we can trim them first
so we don't have to go back and trim them
after the fact. We can do we can make the
shapes, we can trim it. So then when we do the high, the hiring mesh or
the high sub-divide. And we do the rounded edge. We can do all of that at once. And it'll, it'll already be a flat bottom
because we'll do it. We'll do it all in
one process for the rest of the shapes since
we have the floor now. Now we'll do the same
thing we did before. Let's just organize
these layers. Alright, so this is eyes. I guess I don't really need to talk you through this by now. I'm sure you understand
what I'm doing. Just mouth. I'm going to rename this W
mouth so I know what it is. So if I want to take this one
and put it on another mesh, I can find it easily. Yeah, that was the hideouts. And that is exactly why I
need to label everything. Let's just, let's leave
the floor or now. Okay, So all of these
nodes is below the eyes, mouth is below the nose. Buttons are above the legs, shorts or above the legs. I dots are above the eyes. And let's rename this one. Main character. We're middle character. Okay, so now we have the
main character and it's all altogether and organized. So let's save. Alright, so
now that she's organized, we can move on to
the next character. I think we'll just start
from the top down. And let's do the sudo
for AGI character next.
13. Little Froggy: Alright, so let's work
on the little frog. We're going to keep the
rest of the scopes simple. I always say that and I'm like, Dave, I know you're not gonna
be do everything simple. Okay, so let's start
with a nice sphere, I think for the little frog. So let's bring it down. Let's make sure
we're in the front K. So right now I'm seeing that this looks right about to where he
would be hitting the floor, something like that. So let's go ahead and validate
it and then tap the front. So now we just need to make it, It's a little bit higher up. Let's change this. Let's just make this
the frog a little bit bigger. Here we go. Alright, so we can
trim off this part of the, of the sphere. So let's go ahead and trim this. And now we can start to
shape our little frog. So let's use the move tool. Let's use symmetry. So we have left and right. Let's bring these his little
sides up a little bit. So let's make the move
tool a little bit bigger. And then just bring the
size up a little bit. Let me get a little
bit smaller so we can kind of get here we go. So something like that I
think works. That feels good. So I'm going to assume that
when we turn to the side now that I want to make
this part flatter. So I'm just gonna kinda maneuver this so it's a bit flatter. Maybe something like that. It might even be a
little bit more flat. So maybe something like that. Since it's still, since we
haven't really done any, it's still quite low poly. You can even do
something like this. You can use the trim tool and you can even
start to trim it. Let me go a little bit closer. You could even
trim it like this. You know, maybe
he's like something like that and we'll smooth all this out so we can
smooth out these lines. I'm kinda like that. I'll just leave it
like this for now. So the back is Lubeck
is actually okay. If you wanted to,
you could just pull out the back a little
bit, something like that. So let's give them
a little tail. So we'll just add a sphere. Will shrink it. Really cute little knobby tail. Make it really small. Let's make it a
little longer. Flat. Just a little knobby tail like
that, I think looks good. So I'll go ahead
and validate it. And let's give them too
little pops for the eyes. So we'll do the same thing. We'll add sphere, the sphere down,
make it smaller. Mirror. You guys know, I
like to, I love to make little frogs like this. Figure out where we
want it on the head. Maybe around here. A little bit further away
from each other. And I feel as though they'd
be flattened up a little bit. I'm going to stretch them a little bit because
they look like they're sort of stretched out. Twist them, stretch
them a little bit more. We think something like that. It looks like the,
looks like the image. So I'm gonna go ahead
and validate these. And I actually want to
bring the back part out, so I'm going to turn
it to the side. I just want to stretch
the back part out. Let's turn on symmetry. So it does both at once. Maybe something like that. I think that's pretty cute. And I'm actually, I think I want to flatten
this out a little bit more. So there's a couple
of things you can do. We can try flattened. As long as we're on this sphere. We can flatten it a little bit. I actually really liked
the flattened tool. Would it be careful smoothing x. I don't want us to
move it too much. But I think that's pretty good. Now let's do his
little, little legs. And we might be able
to just clone knees. Let's clone. Let's go ahead and
validate the eyes. And we'll rename this eyes. Then we'll clone it. And then we'll rename this legs. Pivot, reset pivot.
Now we'll move. Is it a Legs out? And we'll just try to
match the drawing. I'm going to make them
move it up a little bit. I think I'm just going to
flatten them a little bit more. Looks like they're closer. So I'm going to tap symmetry and move them closer together. But not touching. The way I feel like these are really big comparatively to the yeah, I think it might
be more like that. Actually I'm going
to go to World so I can just move them up street. So here's the eyes. This must be the tail. Body. Part of me wants to
up a little bit. Maybe, maybe we just do
something like this. Sum. I'm just
grouping them back. That's actually pretty
cute. I think that works. I just sent them
back a little bit, but I'm sure you saw
let's live dangerously. That's Fox will refresh
the whole thing at 300s. So we have all our
shapes will voxel 3D mesh at around 300. Alright, so now
everything is together. We can use our
rounded edge brush. I'll just make it small. And I'm just going to
round everything out, smooth it out pretty
easily, quickly. So that looks pretty good. Everything looks pretty good. So now we can just
figure out what we wanna do for the
eyes and the mouth. We can always use
the same mouth, but maybe we want to
do it a little bit of a different style
of mouth for him. Maybe. Let's do the eyes first. So we can use either
cylinders or spheres. I think for this character,
spheres might be nice, but it might be nice to
inlay them a little bit into this eye socket area. Let's add a sphere. Will bring it down forward
and we'll make it small. And we can go ahead
and mirror it for now. And we'll just kinda
put them in position. Let's look at the drawing
and see what we have. I think I might just want
them a little bit bigger. I think I kinda like that. I think I might just want to adjust adjust these so they're a little more
rounded around the eyes. Just want it to be a
little bit more cute. Alright, so now let's,
let's trim the eyes. So we'll go ahead
and validate them. And we can use trim. We don't have to use symmetry. I'm going to use the rectangle
and I'm just going to trim the eyes like that. Okay, so we have our eyes there. So I'm going to validate
them enjoying children. So I got to make sure
I change this to body because this
can be confusing. So this will be the body
because this is his main body. These are the eyes. Will clone, the eyes will just
rename it to eyes, erase. So we'll hide the regular eyes will tag the body and I erase. Then we will erase the eye. So now we can box,
or we may see Ramesh these together at a high number. Let me just see. So we'll voxel, we messed him
together around 400. And we have a nice
cut out there. So voxel marriage of 500. So there we go Still. I mean, it's not perfect, but it's the best
that we're gonna get. Unfortunately. So let's
use rounded edge. So let's just round
this a couple times. It's not so bad once we round
it out a couple of times. And I'm actually going to
use the regular smooth, smooth around this as well. Just a little bit, give it
a little more smoothness. And let's bring back our eyes. And I'm just going
to inlay them. See when I tap on them, the gizmo, it looks like it's gone. Inhibit rosette, pivot. I'm just going to end
lay them a little bit. Might even I might have been flatten them this
way a little bit.
14. Little Froggy Face: Kinda like, kinda like I'm
flattened a little bit. And you don't want, Let's do one more one more thing
while we're here. Let's give him a bottom eyelid. So we can do this pretty easily. So we have the eyes here,
we have the body here. Let's clone the eyes. Will make them a little bigger. I have to move them
in a little bit, but we can adjust this later. So now let's hit front trim. I'll use a rectangle. I'm just going to trim
these about here. Now you can sort of adjust it. Maybe something like this. I think that looks pretty good. Here's a little bit better. So I'm gonna rematch them at
like 400, 400 rounded edge. So now that we've
done rounded edge, let's go ahead and I'm
decimate these objects. So decimate, ideally we want to
bring these down very low. So that's great. The eyes, they're just fear, so we should be able to
decimate them, Okay? Okay, 1,000 is fine. Now we have the body
and we might as well just trim everything now
while it's nice and high. So trim around the body. And I'm going to trim
everything underneath this little line here. Okay, So now we're nice and trimmed to my rounded edge few more times just so that bottom is nice and
rounded and smooth. Now I will subduct,
now I'll decimate. So hopefully we can
just get back to six. And I'll be happy. We got down to four. Perfect. Okay. So we got it down to
four, so I'll take it. So next we just had to
figure out his little mouth. So I think we'll use
a different method to get his little his little mouth. Now he has another,
Here's a W mouth as well, but it's just shaped a
little bit different. It's, it's not sharp. It looks like nice and round. So let's use, let's tap front. Let's use a tourists. I'm going to rename
this W mouth. I can put the eyes, just gonna join the eyes. So W Mt. Whereas our tourists
were bringing down, I'm gonna do snap 90 like so. And shrink it up and
bring it to the front. Alright, so it looks like it's probably the right fatness. Maybe a little bit fatter
if you go in, you can. So once you hit Edit, you
can see these little, these little nodes,
these little dots. So this one we get a
little bit fatter. Okay? Now the pink one, we'll use two. If it'll let me. Here we go. Pink1 will use to do it in half, and unfortunately,
it's the wrong way. So let's just see
we can flip it. We can't flip it yet. We can flip it this way. Boom, boom. Alright. So I'm gonna bring
this down about here. Then we'll mirror and
I'll just move lips. Me tab edit so I
can move this over. And then we can
start trying to feel out what the best
course of action is. So I'm just moving
more into place. And it's gonna be
small, so okay. So it's pretty small now and I think I want them to be
a little bit thicker. Here we go, Something like that. It may be stretched out a bit. Let me get off snap
and then maybe just like adjusted
because I'm noticing that his smile or her
almost something like that. I'm gonna go ahead
and validate that. I think that looks pretty good. So now the only thing is it needs to be
rounded at the edges. So for that we can
just add some spheres. And we'll have to do
the same thing we did with the arms and
the other character. Right? Get these into place. Would be nice if there
was just like a, some sort of tool or
command where you could just make a tube and
then make the end, like, you know, keep
the end flat or make the end completely
spherically round. I don't think that's a word. Spherically. Noticing that this has
stretched a little bit. That's okay. So we'll just
stretch it a little bit. Okay, so maybe something like
that I think could work. So validate. And I'm just
going to take all of these. I'm going to validate them all. Okay, validate. All right, It's looking good. So let's voxel Ramesh, everything at like 250. Now let's do it. Let's
try rounded edge. Rounded edges. Okay, let's just do good, old-fashioned Smooth. Make it a little bit
smaller. Smooth that out. And here I'm going to use flattened and just
sort of flatten this out here a little bit. Just very gentle because
you can see that the shapes are still very soft. Extremely soft. Let's box will remeasure again. Anyway. I think I mean, I think it's working out even though it's even though the
clay is very soft. I think it looks pretty good. And it might be
easier to just use the Move tool and just sort of squeeze
everything together. And then just smooth it out. Okay? All right, so let's
name this WU mouth to reset, pivot. Let's move this back onto his face. See how
we're looking at. Looks like it needs
to be a little bit smaller, slanted a bit. I'll just use Move and
I'll just try and give it a nice slight slant. So how did that happen? Sometimes I think there's
a ghost in the machine. Okay. So maybe
something like this. Looks like it's a little
higher in the drawing. It's not bad. Okay, so let's decimate the mouth and see how
small we can get it. I think 2000 might be it. We got it to 1,000
eyes or 3,000. Let's see if they'll
go any lower. They still look
fine. Bodies 4,000 lids are 1,000 here,
so this is great. All the shapes are
very, very small. So let's just organize him. I will name, rename this
one for AGI for AGI body. Okay. So now he's good. Let's move the floor below. Whoops. I think frog
is pretty good. So we can move on to the
next. And I'll just save.
15. Little Pear: Alright, so let's work
on this little sort of perish guy here with the
little thing on top. So we'll, let's work on him. Let's see what we get. So let's, let's
validate this floor. Alright, so I think
we'll start with a sphere would be
the best for him. So let's start with this fear. And we probably want something like the one at the bottom flat. So something like this.
But you know what? I'm actually going to push up the bottom just because
I want it to be. You have a flat
surface like this and something is very like he's very round and you can
see that there's like you won't wait to show
on this surface. So you kinda want the
bottom to be rounded. So sometimes cutting it off
street, It's, it's fine. But when you get into the
really like micro details, sometimes I just don't like it. So let's experiment with that. So for our sphere, I'll just validate that. And let's take move. And I want to, I want to push up the whole
sphere pretty equally. So I wanna, I wanna
do not only this line with a line going across
which I believe is blue. Yes. So now it's the blue line. So now I'm gonna go symmetry. I have my move tool. So now we can just
kinda push it up. Let's just see what that's like. Might not even have
to trim it really. Okay. I think that's I
think that's decent. Much just smooth
it a little bit. So we smooth it up so we
probably don't even have to really trim it. To
be honest with you. I think that's pretty good. So the only thing I wanna
do now is pull the top-up. So we'll just make it
this, this pear shape. Let's make sure
we're on the right. Let's see what am I doing wrong? Let's see if I can work this out on smooth. That makes sense. So back to move. And then we'll
just pull this up. There we go. So you
kinda pulls up. And exactly the way I want. I want to try to make this a little more a little punchier. Like I want the bottom
to be a little easier. Yes, yes. Here we go, Something like that. Another thing that you can
see is I tried to turn it. I tried to really
look at a lot of angles here that looks nice. That's actually a nice shape on the bottom. So
something like that. Let's go back to the front. Just so I don't
get too confused. You know where I am. Alright, so let's just lift
this up a little bit more. I think it's sort of
a shape like this, sort of almost like a dozen others like little
candy, That's the shape. Okay, so this is pretty
good. And I kinda like it. I could I could
bring out the sides more if I wanted to be more
accurate to the drawing, I would probably bringing
out the sides more, but I kinda like I
kinda like this. So I think I might just leave it because I can
always do another one. I can always, I can always clone this
and then just hide one. So let's just name
this one secondary. And we can get two for one. So we'll just hide that one. So we have our sphere here. And we want to make
this sort of like a, not a helmet but just on and
off something on the top. So we want to take our
sphere, which will be our, let's just call it perish. I don't know, it's a weird name. It's going to be pear shaped. Alright, so let's rematch
this to about 400. We're going to make
it really dense. Mesh perished about 400. Okay, So I'm just gonna do a few rounded edges just to
make it nice and smooth. So I'm actually going
to make a little bit of a different shape. Instead of this shape,
I think I wanna do sort of round circles. I think that'll be kinda cute. Let's take select mask, the lips, and makes sure
it's not on unmask. Let me turn symmetry on. I think we want green. That's what I want. We want the green symmetry line had to go through that
because symmetry is still, kind of still kinda confusing. So let's do about, so we want the green
symmetry line and we want to bring this out to
about six, I think. And then I'm gonna do my
circle right about here. So now I have six circles
and maybe I'll do seven. Maybe I'll go back
and just to seven. Let's see how that looks. Okay, so now we have seven. So now I'm just going to go
to the regular mask brush. Let's actually take the mask off and bring this
back down to one. And then let's just paint
all the rest of here. So once again, we
just use the mask, the selected mask tool. And we use the ellipse to make all of these circles
using the green symmetry. So we just tapped on green. You can't be tapped
on anything else. If you just had to be tapped
on one symmetry color. And then I brought this
up to seven, the radial. So then we, that's how
we did the circles. I don't know why
sometimes I repeat things, things that
are confusing. I just feel like I
need to repeat them. So this is kind of a cool shape. I like it. So now
what we can do here is we can extract from the mask. So we can take this mask and
extract a layer from it. So we're on the
Select and Mask tool. We're going to tap the
mask options here. And for shelf thickness, I think I want to
do like maybe five, maybe around 0.5 or so. Border smoothness is at
30, closing action shell. And this is, I don't think
we're only using split, but you can see my settings
shell and then fill. So those are my
settings for this. Now we want to hit extract. So let's see what we get. We go. I think that
it looks pretty nice. So let's, let's refresh this. So let's rematch
this flight 400. And now let's do
the rounded edge. Just a nice rounded edge, and that really
preserves that shape. It looks great, I think
looks really fun. Now let's tap on parish
the original one. Because when you use the mask, you have to remember that the
mask will still be there. So we can go back
to select Mask, back to the Options and then clear because we don't need
the mask there anymore. And also when you, when we extracted this shape, it creates a new mesh. And so we can call this air top. So now we have the pair top
and we have the parish. Alright? And you can actually change
if you want it to be not as sticking out as far
you can shrink it a bit. Something like that. If you
fancy. It looks better. A little bit smaller. Maybe just a tad bit smaller. Okay. I kinda like that. So now there is a little there's
little divot in the top. And I'm not sure how
I want to do that. Let's concentrate on
this little shape here. And I think for this
we'll just use a, we can use a cylinder and will bend it and then
we'll just round it out. I think that's the best
way to the best way to go. So let's look, let's make
sure we're on the front. Let's add a cylinder. Alright, so let's shrink it up to around what
the top should be, maybe something like that. And then I'm gonna hit radius once so I can make that small. And then I'll use the green
to just drag the bottom down to maybe about there. So I'll go ahead
and validate this. And I will smooth the top. Pie doesn't need
much more than that. And then I'll use Move. And I'll make it pretty big. And we just want to
make that bend in it. So I'll just bend it like this. I think that's pretty good. So now we'll just have
to move it into place. The top. Let's make sure we're
looking at it from the front so we
don't get confused. So I don't get confused. I think that's pretty
good actually. So you can make a little
bigger or a little smaller. Who maybe smaller is better. In round out the top a
little bit more if you want. It needs to be a
little more rounded. Okay, I think
that's pretty good. So now we can just add some little button eyes and a mouth. And he has too little
to little dots as well.
16. Little Pear Face: Alright, so let's clone, Let's make some love. We wanted to be cylinders
or a woman to be. Let's do let's add cylinder. Like cylinders for the eyes. Snap 90. Okay, We'll bring this
down, we'll shrink it up. We don't need to edit right now. We're bringing out forward. And let's just put this
where it should go. So I'm thinking symptoms
somewhere like there. So we'll do mirror,
shrink it up. We can sort of audition it around where it's
supposed to be. I think that looks great. And while we're here,
I'm going to turn on I'm going to validate this, validate these two guys. And let's name them
eyes before we forget. We can actually validate
them here. Join children. So this can be eyes save. So we have our eyes here
and pivot, rosette, pivot. Okay, Great, So
we have our eyes. So let's let's let's
ramus these at 02:50. Still not showing
up on world local. Oh, there we go. So all I did was hit
world and local. I cycled through world and local and they
actually showed up. So the blue is what we want. So the blue is actually usually
it's the, it's the green, but I guess the blue is what
I was actually looking for. And the reason why
I was looking for the blue is because
eventually we're going to clone this and we're going to make the dots by
going like that. So this is good. For now, Let's clone
this, clone the eyes. And we'll just call
this one eye dots. And we'll just hide it for now. So let's get these. I's
squared away first. Oops. Okay, so we're on the eyes. But you see when
you push them in, they're not quite
as they need to be. So let's tap symmetry
and then let's, let's go back to
the red symmetry. So I think we need to go
back to the red symmetry. There we go. That's
what we need. So let's spin it
outward a little bit. We'll bring it forward. Because they need to be then
DB sort of in line with the with the surface
of our little pair. So yeah, just think
something like that. It's actually pretty good. And of course we can always, you can always
adjust a little bit. Let's do world, which is
tilt them back a little bit. So maybe something like
that when we come back. I think that's pretty good.
So they're pretty big. So I'm going to do rounded edge and just round these
guys out a little bit. And now we can decimate them and see how low
we can get them. They're little, they're
a little jagged. So I'll keep them at 2000. I think that will
work. Alright, so let's bring back I dots. Will bring it back I dots.
And we'll move them up. Okay, so for i dots, we want to go to war
and make sure that we're on symmetry local. We want to use the
red and the blue. Alright, so you see
our blue line here. The red one is straight
in-between them both, so we can't really see it. And I'm using Move. And now we can just maneuver these and just make
that teardrop shape. Let's make this a little bigger. Something like that. He's pretty cute and I actually really
liked these shapes. So now we just have to
maneuver them onto the, onto the skin the same
way we did the eyes. So we'll just move them back. That's weird. Oh,
that's the plane. And that's very odd. I've never done that before. Cool and weird. Alright, so this is
a little tricky. Let's make them around the
size that they're going to be, which is fairly small,
maybe like that. Let's move them into position, which is somewhere around there. Then we'll just use these rings to sort of just rotate them. Take them a little bit. So let's check the bottom UP. Rotate a little bit out, a little bit more this way. I think that's perfect. Now we do have a mouth that we already made and let's see if
we can bring that back. I don't think I've showed
you how to do that yet. So let's save and let's add at the scene assets. So if I dots quite eyes, W mouth, so let's
tag that on Open. Then we have our mouth here. So we can just shrink it
and put it into place. Then we can stretch it this way a little bit
and there we go. Yeah. So when it's
smaller and it's pretty good spot and actually,
I feel like that fits. The only thing is I
want to just bring it out and just curve
it a little bit. Here we go. So just
give it a little curve. I think we're good to go. So that's a pretty good spot. I think we're good. There's
our little parish guy. The only thing that
we have to do really quickly is check the numbers. So this is 545 K, which is pretty big. So I'm just going to save
because I like where we are. So let's just decimate
all this stuff. Because we definitely
don't want it that big. Good 4,000. We want
to stick with 2000. We'll stick with 4,000. That's not bad. I think twos. Okay. So two's okay. Let's see how this is. Only 2000s. I think that's okay. Let's see if we decimate this. One's still looks fine. I dots 39 k. So let's decimate these
and see how low we can go. They're starting to look
a little bit unwieldy. So let's give them
the treatment. So we'll voxel rematch them. High. Boxer, we miss them like 350. Did that work? So boxer Ramesh,
rounded, rounded edge. So now let's decimate. Good. So now they're at 1,000. The eyes are at 39
K. And I think I already did the rounded,
a rounded edge. So let's just decimate and
see how low we can go. We got them down to 1,000. And the mouth is, or the mouth is 8,000. So let's decimate that to 1,000. The body decimate this. 643-021-6842, starts to
look a little wonky. Very wonky back here. But that's alright if that
happens, just go back. So sometimes that happens, I'm not sure why. But sometimes that happens. But usually if you
just go back and read decimate, you'll be okay. So maybe we'll stop it at two. And we'll call that. Great. Perfect. So perish pair top cylinder, this is, let's call
this the stem. That up their eyes dots. Then we have secondary. So if we wanted to
do something else, we could with the secondary,
I'll just connect it. Why not? Great, so that's, that's
a biblical character.
17. Fruit Pudge: Okay, so I think we'll make
this little round guy next. Let's find, right, let me
think about where I am. Sometimes they just start
clicking around randomly. So let's do Transform. Transform. Let's bring
this little guy up. So we'll work on Him. And we can actually
use a lot of, oh, first, I guess I forgot. This is the new smile. W mouth. And I just want to add this
together with this group. And now I can hide it. But I think what would
be easier is if we clone it and we use this shape to make this because we're
pretty close actually. So I'm going to take paratope
and I'm going to clone it. Whips. And Trent don't make this
mistake that I just made. So before you clone it, you have to make sure
that you have all of these things inside. And then you can clone. Now let's hide the original one. And let's name this
one fruit punch. So now we have fruit punch, which is pretty much the same. We can get rid of the
things that we don't need. We don't need. Where's the
top part? Oh, that's there. That's the fruit punch part. The top part, the
top part is this. So let's rename this
one fruit punch. So this will be like, this is essentially the original one. So we have the stem
which we don't need. And then we have
the I dot so we can bring that up to the
new fruit punch. The eyes. We can bring up to
the new fruit budge. And the W mouth. I think we'll
put a different mouth on him so we can delete that. We don't need the secondary. So we'll delete that. And we don't need this top. So we can delete that. So now we have our
new fruit budge. It looks cute as it is. So first the dots are
a little more round. So I think the easiest thing is just to leave
it how they are. But we can drag, we can make drag really small. And you can see they're both
still have the symmetry. I think we just need, I don't think we need
the blue anymore. So let's just try to make
these a little more rounded. So maybe just
something like that. I'm going to need to
do too much to them. So the eyes, Let's make the
eyes a little bit smaller, just to give it some variation. So smaller, we'll move them
a little further apart. Then we just might have
to adjust a little bit. Although it still
looks pretty good. I think we can bring it
down a little closer, maybe tilted a little bit out. But I think that
looks pretty good. So there's, there's
a bunch of ways that we can do to this mouth. It could just be, it
could be very simple. Let's just do it simple. Sometimes I like to
over-complicate things. So let's add a sphere. I'll shrink it up. So we'll shrink it up.
We'll validate it, and then we'll tap symmetry. So now you can
stretch this fear and it will make this long kind of pill shape, bring it in. So maybe something like this. Okay, so the only thing is
let's take the symmetry off. Sometimes I have issues
with, with move. Let's see if it yeah, we can't really, we
can't really move it. So let's go ahead and
voxel remeshing it. We measured at like
200, around 200. So now let's see if
I can move it yet. There we go. Now I can move it. I'm going to make my brush
really big just to get like a little bit of a smile
for this little guy. I'm going to turn symmetry back on and just smooth it out. So let's see if we can
drop the decimation. Here we go. We have
it down to 1,000. So now I'll just bring it in, maybe a tad bit smaller. And then I'll just give it
that band that I always give. The shapes. They fit a little bit around the face In the height. And this one, let's make
it really in-between. And somehow it got a little bit, There's a little bit off center. It looks a little
bit off center. So I'm gonna go to the gizmo, that gizmo options
and move origin. So that should bring it
back to the center pivot. Pivot. Let's see. I'm always obsessed with having everything perfectly
in the center, so that actually worked. Okay, so now we have to adjust the shape of this
to make it rounder. I probably should have done
that first, but that's okay. At least we have
this worked out. We'll just have to move
the facial features up to be on the new surface
once we alter this. So let's change this
symmetry from the green. Can turn that off
and we can just use the red and the blue. This is the symmetry we want, we want to use because
we want to move this out and just make it more round. So we use the move
tool pretty big. That front. Now we just want to
round out the sides. So maybe something like that. You see we lose a little
bit of the face details. But we want to also, this sort of goes up and
comes in in the middle. So we'll have to make our
move tool really small. And we'll just have to sort
of bring down this center. It can be a bit tricky. I'll make the brush
a little bit bigger. And I'll bring up these sides. And then I'll simultaneously
make the brush smaller and try to bring it down little
by little in the middle. Sounded weird. So maybe
something like this. Smooth, lightly smooth
it out up there. So that actually
doesn't look too bad. We'll turn it to the side and
we'll bring we'll use move again and we'll bring out because we want it to
be round here as well. So move it out like this. So it's nice and round. So maybe something like that. And I'm actually
going to rematch this because it looks a little wonky, like you can tell that
it's not the most perfect. So I'm going to box will read
mesh it. Maybe like 300. And I'll use the rounded edge just to smooth it all quickly. Let me check my settings. Settings, your goods
settings, you're good. Okay. I just want to
double-check because sometimes a lot of
time passes and i'm I can't quite remember
if I turn the program over, close the program or not. So I'm just going to
take my smooth and just smooth out the shape. Okay? So just kinda smooth
it out a little bit. And I think I'm happy
with the shape. So let's see if we can
decimate it and bring it back down. Sure. I check the back this time. And just remember the reason. I'm one of the biggest
things that I've learned recently. That
looks pretty good. We're down to 1,000,
so that looks good. One of the main things
that I've learned recently is the decimation
process and it really, really comes in handy. So let's take the nine dots i3 and the sphere. The
sphere is the mouth. So let me rename that now. Now we'll just have
to bring those forward and hope that
they work pretty well. Oh, it looks like it
does work pretty well. Actually, looks pretty
good. Then of course, you can just alter these. You have it as you like, just make it a little bit
more flat to the surface. Maybe bringing them
out in a tiny bit. That looks pretty good. Then we just have to do these at all. These little distill the
leafs using cylinders.
18. Fruit Pudge Leaflets: Alright, so we'll make
one leaf and then we'll use an array to duplicate it. So we'll do add you cylinder, let me save. So Add Cylinder. And I'll shrink this down. I think that's a good
place for the leaf. And I'm not going to mirror it or do any of that stuff yet, so I'm just going
to validate it. And let's walk slow,
Let's remeshing it. We mesh it at like 300. And then it's using
a rounded edge. Can smooth out
these little ribs. Make it nice and smooth. Now let's, let's, let's
look at the top view. And now we can just
sort of make it a leaf shape using a move. That's odd. I'm not sure why. My move tool is being funny. Okay, So this is another weird
thing that I've noticed. Inside always throws
me for a loop. So we wanted to move
this in a certain way. We wanted to just stretch this out without it being strange. And you can see there's all these strange
things happening. So the first thing is, I want the bottom
to match the top. So let's turn on
the green as well. You see that line right there. So now we have the
red and the green. So that works how
I want it to work. But notice how all this
other weird stuff happening. Like it's very like boxy, it's not smooth at all. I noticed that that
happens when I have the intensity up at 100. So if I bring the
intensity down some, I'm going to make the
brush a little bit bigger. So when you bring
the intensity down, then it acts more like normal. You don't get any of that weird, any of those weird shapes. So this is this is
how I want it to be. So just remember if you
ever have issues with the move tool and things
are moving, kind of funny. So I'll turn it up
again, even up past. See that this only happens
when it's a past 100 or 100. So I need to bring
it down to like, you know, 90 or so. Then we can go ahead and make our move tool
a little bit bigger. And we'll just make
the top round. And then the bottom. We'll just sort of
bring together. We have a nice, cute
little leaf shape. Almost looks like a guitar. Pick. Alright, so now we can use move and we don't want
to top and bottom anymore, so we'll get rid of this. We use move, we can make it, let's make it a
little smaller first. And we'll use the move tool. Just to give it a nice bend
will make it really big. You just give it a nice bend. Something like that. I'll
use the rounded edge again. I think I'm just going to
work with the one for now. So I'm just going to
position this one. Then I think I'm just
going to clone it. I'm just going to clone
it and move it over. For this instance, I
kinda just want to match a little bit
closer to the image. I don't always feel the
need to match the drawing, but for this one, I just want to match it
a little bit better. Maybe I'll turn this
one a little more. Camera, camera forward. In a sense. Let me go
to off world so I can, because I want to squeeze
them in the correct way. I think they look pretty
good. I'm going to select both of them
and then shrink them. Okay. I think that's actually better. Now I just have to make sure
that they're in the middle. So I'll move them both up. And then I'll tap
each individual one and maybe I'll just
drag it a little sharper. Actually, I think I
like it how it is. I don't think it needs
to be too perfect. Reset pivot. I want to set the pivot a little bit so I can stretch
it the way I want. Okay. I'll do the same with this. So I'll just, I'll
just adjust the pivot. Let's do pivot, rosette pivot, and then adjust the pivot so I can line that up with
the bottom like that. I'll tap pivot again. So now I can stretch
it this way. I can sort of bring it. So the bottoms are touching. Yeah, I think I
like that better. Okay. So I'm going to put
these together. So these are the leaflets. I'm going to join them
and rename this leaflets. And then we have
everything else together. And I think we're good. So let's just check the sizes. So these are 383 k. So let's use the rounded brush and just
make sure these are nice and rounded. And let's decimate. It's not bad. So we're at 1,500. I think that's good. So
let's check the eyes. The eye dots the
mouth and the body. So all very small. So I think we're doing well. And that's our
little fruit budge. Safe.
19. Choco Cream Sandwich: All right, so
moving right along, let's go ahead and
hide this guy. And let's go back to our
image and see what's up next. So this one should
be pretty easy. So the do the pseudo one
looks like a little macaron. I'm gonna make this smaller, since you can pull the
images up separately. So let's start with a sphere. So we'll add a sphere,
will bring it down. And then we'll use the
green circle disorders. Smoosh it together a little bit. Let's go ahead and
validate this, make it a little bigger. So now let's use selective
mask and the rectangle. And we'll just make a
mask about halfway. I'm gonna do that again
and make sure that my canvas was straight
by hitting front. Okay, so now we're going to take the gizmo and move this up. Not too much, but
just a little bit. So maybe something like that. I'm gonna go back
to Selective Mask and I'm going to clear it. And then I'll use rounded edge. No. What is this? When
did this happen? Who front-facing vertex? I don't know why that's
like that anyhow. So she figured out why
he was doing that. I'm glad I figured it out now. Okay, so now we will
do the same thing. Gizmo, move it up a
little bit like that. All right, and we'll go back
to the Select Mask, clear. We'll do a rounded edge. Smooth this out. It's a nice smooth little puck. I like that. Alright, so
let's go back to the front. So this one, I don't know
what I did with it just now. Okay, so this one will
be the top component. And let's make this
one the middle. And then we'll clone that, will make this one the bottom. Alright, let's take the
top and the bottom. And it looks like they're
a little bit bigger. So we can make them a
little bigger like that. And the only thing with this bottom part is I might want to just
trim it a little bit. So let's take all of
them and move them down. And we're still going
to use this floor is kinda like a gauge. Will bring it down
to about there. And just the bottom one, I'm going to re mesh. So I'll remeshing it
had like 250 and then I'll trim it so that we don't
have that extra going down. Trim, rounded edge. I'll just round it
out a few times. And then we'll go
ahead and decimate it. Go down even lower. Let's see if we can
decimate these. So let's get all of these
down to just a lower number. I think that looks possible. Alright, and all we need
for these is some eyes. So let's just use some
spheres for the eyes. Slow to close. The eyes are kinda like here. So let's validate those. And then let's add
another sphere. Will validate it.
We'll make it small. Two symmetry will make
it into our pill. Maybe something like that. We measured a 200. Just make sure it's
nice and flat, will use move to push it out. And if we want to give
them a little smile, we can push it
down a little bit. And then we'll move
it back into place. That's pretty good.
Can feel free to make it smaller, thinner. That's weird. But I guess
we still can't use oh, you know what, It's
still mirrored. So let's take it
out of the mirror. So this is the I. So
let's validate that. Join children. This is the eyes. I was wondering why he
kept acting so strange. It's because of this fear
was still in that mirror. Let's make this mouth. Okay, so we have
the top, middle. Let's do eyes, mouth,
middle, bottom. Simple enough. Now we should be able to further
manipulate this if we want to. Perfect. Alright, I think that's good. I'm pretty happy with
this little rascal. So we'll just link all these up. And then we'll call him. I got to figure out
let me figure out what the name of this thing was. So something like this. This is exactly what I
was trying to look for. And don't forget to save.
20. Cute Strawberry: Alright, so great job. So far, we're
moving right along. And let's actually do the
little strawberry now. So let's open, Let's open it. Let's hide this. You have to name this. I'm going to name
it Chaco cream. This one will be Chaco cream. So let's add a sphere. So bring it down. And let's make this into
the little strawberry guy. Let's focus on him. I can actually bring in
these little characters to see reference image import because I saved them
all separately. Okay, so we have our little
strawberry character there. I think I'm gonna do
him in like maybe like four sections kind of thing. So if I validate and then I
do are nifty red and blue. And move. Let's turn to symmetry on. Hopefully you can
hear the people walking around upstairs. It's quite loud. Alright,
so we'll move it. I think something like
that is pretty good, pretty easy. I think that works. So what we do need some leaves. So for this leaf, we can use the radial. Will use, I think we'll
use sphere and radial. So let's add a sphere,
will shrink it. Let's go ahead and
validate it for now. We just have to get this
looking like a leaf on top. So let's stretch it first. I kinda want to flatten out. I don't want to
flatten all that out. So let's take the
flattened tool. I'm going to put the
intensity up a little bit. We'll take the
flattened tool and just flatten out the side. Got symmetry. Okay, so that's nice and
flat on the side. And if you find that your
symmetry tool is very strong, then makes sure to
check the pressure. Because if this is flat, then if you try to use
the flattened tool, it'll like push right
through anything. So if that happens, if you try to flatten and
it just pushes really hard, then check your
pressure, setting, your pressure and just
uncheck Use global settings. Because I know sometimes
I get a little tied up because for the rounded
edge, we want flat. But for just the
regular flatten, we want the pressure
to be normal. So it hopefully
that you don't have that issue so you don't
have to worry about it. So let's take the crease. And I'm going to take
it off of symmetry. So we're only doing, so we don't have two separate lines because if we do symmetry, then we have two separate lines. And it's a bit harder to
follow the one crease. So I'm just going
to undo symmetry. And we want to make a
line down the middle. So maybe I'll do it again.
You get a little deeper. So something like that. I'll take my rounded
edge and just round it out a little bit. I think that looks good. So now we'll take our Move brush and we'll just push it up
to give it a nice bend. So we'll take move. And we want to put a really
big, almost like 1,000. And it was going to
push up on the bottom. Give it a nice bend. So now let's bring it down. Because this one is sort
of coming off the top. So let's move it forward. Let's use the blue and just
shrink it up a little bit. Now we can kinda just adjusted until it's
where we want it. See on the front. That looks pretty much like the drawing
man, that's pretty good. We can always bend it a
little bit further forward. So now we have one. So let's make four with
this four in the drawing. So let's do PV rosette pivot. Just so the gizmo is at the
right spot and never is. So now let's, this
is the strawberry, let's name this strawberry. Let's name this one leaflet. Now for the leaflet, we're gonna do add Radial
four. That's perfect. And that's actually
exactly what we want. So that's exactly what
we're looking for. Of course, we can go to the leaflets and make
them smaller if we want. But we just have
to push them into each other so they
don't look too silly. There are kinda cutting
into the strawberry. So moved might be a little bit
cleaner because move will, it'll adjust more of the leaf so it will
look more uniform. So let's try that. Here we go, just so it
looks like it's resting on the on the strawberry. I think that looks good. So
let's go back to the front. Alright, so we have
our strawberry, we have our strawberry leaflets. Let's rename these leaflets. And I think I'm going
to keep them for, so I'm just gonna go
ahead and validate them. Alright. Now let's add the I. So let's add two spheres. So we'll drop it
down. Mirror them. Okay, So probably
about that big, but they look like
they're sort of oblong and they're sort of tilted. So I'm going to make
them sort of oblong. And then tilt them a little
bit out so I can match, match the art, the drawing. Okay, so now we need to pull them back to the surface and it before you
go all the way, you can bend them a
little bit like that. Now I'll just bringing
them all the way in. And obviously they're not
going to go in straight. So you just have to adjust them. So there's sort of a little
more flat on the surface. Okay, Now let's maybe
move them in a little bit more and see how that looks. It looks pretty good. Yeah, I think that looks
I think that looks good. So this is step one. And you can put them
in as far as you want. So we can, we can honestly go ahead and just
validate these right now. So let's just validate
join children. And let's rename this eyes. Alright, so let's clone this, and let's rename this one. Pupils are P1
shorter than pupils. So we have eyes, we have pupils. Let's use the tube to
a really quick and just make some eyelashes. So I'll just tap
the front actually, and I'm going to turn it
a little bit like this. I'm gonna do path.
So let's do path. We'll start about here. Will go up. You're going to have to tap
and drag these things. K. So maybe something
like this doesn't look like I don't really
have them going to far. Maybe one more. And then it comes
up. I'll double-tap at so it's a little
bit of a harder stop. So something like this. And then we'll hit the
little green dot mirror. So I don't forget radius, so we can make this side bigger. Let's move it out a little bit. Make the size smaller. And then as always,
you can sort of bring that into that little crevice. And think that
looks pretty good. So let's drag this dot out
from the face a little bit. Looks like I have it
going up quite a bit. Alright, so something like
that, I think looks good. So let's validate it. Let's take smooth and
gently smooth the end. Nothing I'd like to do is take flatten and flatten the side. Just like to flatten. So there's a nice curve there. Just like that. I kinda want this to be more and more flat up against the eye. So I'm just going to
pull this down some, I'm just going to smooth
this a little bit. Alright, so this is the,
this is a good first step. We're actually going to
have to color this to sort of finish it up. So let's take PBR. So we're going to change
from MCAT to let PBR. And then we're gonna go to P1. Well, let's go ahead and
let's go ahead and validate these really quick
joint children. And let's just name
this lashes or lashes. I like to name it lashes. So we have the lashes. So P1, Rex, you're
going to paint black. So we just go to black here. Roughness is pretty much
actually we didn't. We can do glossy
as well, painful. So that's P1. Those are the pupils.
Let's hide them. So for eyes, let's go
ahead and clone the eyes. And let's paint them white. So we're gonna go
to White pain all. So now we have eyes and we have, let's rename the one
we just painted. Let's rename it. Buys erase. We have regularize,
we have IRAs. Let's just hide
regular eyes for now. So what we need to do is
take IRAs and we need to do a Boolean where we cut
this shape out of the head. So let's save.
21. Cute Strawberry 2: For now, I'm just going
to color it like a light red, the body. It actually looks
cute like that. So now we'll take the IRAs
and the strawberry ID IRAs. And now we'll go to our 3D mesh and we want to
remeshing it pretty high. So when we measured it like 400. So it cuts it out, but it leaves that like
white where it was. I'm going to use
rounded edge because you can see the strawberry
has like those, like it got kind of jagged. So now we have IRAs
switches the body. So we'll rename it
to or strawberry. I mean, we have the eyes, so let's unhide the eyes. And actually it might be okay. So we have the eyes. Let's change them here. Let's change them to fraction. Pink glossy. Bringing the index of refraction
down some absorption, will tap the color
and go to white. Now we're pretty good for that. So let's go back
here and unhide P1. This is black, so let's go
to P1 and let's shrink them. We use the gizmo
pivot preset pivot because the gizmos never
in the right spot anymore. And then we shrink the eyes and see they're
kind of sticking out. So let's tap symmetry and just sort of spread
them out a little bit. So let's take the eye, the lashes and we'll
paint them black as well. I'm going to turn the
madness way up on those. Look at those eyes. I love it. You could turn them
and they still pretty much look like eyes. So let's just decimate
and see what happens. So we'll go to decimate or on the body will go to decimate. Wants to look in our rise, to look in our ray. Still look in our array. Thousand 4,000, 2000. Still looks okay. It's not perfect.
You can see these like some of the issues
that happens unfortunately. So let's just take
this pink color and let's just see if we can, let's see if we can
paint some of these. Actually don't mind if the paint goes over into the
eye a little bit. I don't really find it to
be that big of a deal. I just don't like
it on the outside. It looks bad on the outside. I don't think that looks
I mean, it's not too bad. It's not it's not perfect. But I don't think it's too bad. Let's do white. See if we can just clean that
up a little bit in there. Here we go. So with a little way
you sort of clean it up and I'll take it. So let's go back to my cap. Alright, that was, that was, that was a lot. That was a lot. Alright, so let's do, let's do the mouth and I want to
do them the way that I do with the two pills
are the two spheres. So let's add a sphere, Bring it down, and
we'll validate it. Symmetry. Shrink it. Okay, so I want a pretty small, so maybe something like this. So I'm gonna go ahead and
voxel Ramesh this at 200. So then we can, we can move it, we can give it a
little curve here. All right, and I want
to add a mirror to it, so we'll do add mirror. Oh, that's interesting. Add mirror. Let's take symmetry off. There we go. That's what I was trying to do. Symmetry gets me sometimes. So that's what I wanted
to now I'm just going to validate these join children. And I probably won't be able
to give this a bend yet. So let's just voxel
remiss them together. 200, same thing. 200 onto my rounded edge. To just make sure
it's nice and smooth. Pivot, reset pivot. And then we'll move
this back into the face. A little thicker. Alright, that looks
pretty decent. Let's take a look at the drawing here that looks pretty decent. Maybe a smudge smaller. Now I'll just give it
that slight little bend. Like so. That's pretty much
it. We can just take a look and see what it
looks like with lip PBR. So that's pretty much
what it will look like. I'm just paint this with a so
you can get a better look. I think it's
adorable. I love it. We do need to do the dots. Almost forgot about them. And let's add, Let's save first. And let's add some
into the scene assets. So we have some dots here. Let's go ahead and add those in. They are quite big.
Shrink them up. Can we separate know
with symmetry first? And then we'll move them
away from each other. Maybe rotate them
up a little bit. And I really want to
make them smaller. So you just have to adjust
adjust them to your liking. These close, I usually went up putting into a little
far away from the eyes. Let's put these little closer. I like that. Now let's just move them in. And looks like we have to
make this a little bit. That looks pretty
flat with the skin. Might have to go. Here we go. I think that looks good. So we have I dots. So let's just put
all these together. Let's make this
strawberry up there. And we have the leaflets. Eyes. Lashes will put the
pupil under the eyes. We have the mirror.
What's the mirror or the mirrors? The mouth. Then we have the eye dots
will put these over the eyes. Okay, So let's check sizes. I dot so 39 k. So let's
do rounded edge on these. And then let's decimate 1,000. I'll take it, the mouth is 23 k. So I think we can just
go ahead and decimate this one k, I'll take it. Lashes. I think we can
probably just decimate them. Hopefully. 1,000. I'll take it I'll try not to say I'll take it
after every single one. Leaflets are 24. And I'm pretty sure I already did
rounded edge on these. I'll do it once
more, twice more. And then I'll decimate 12 point to who that might be a little,
little, little chunky. For me. I'm gonna go back. So I'm gonna go
back here and I'm going to do the treatment. That's what I'm calling it
the treatment. The treatment. Let me save just in
case the treatment is, I'm going to voxel
Ramesh really high, like 400, remeasurement 400 and make them
really, really big. And then I'll do my round edge. So we're not really
sacrificing any of the details because I
remembered a really high. So now let's see if we can get the decimation
lower than that. 1715000, 2000. I'll take 2000s. I'll take that. All right. So let's just
check the eye dots. The eyes. The eyes are 12.2 K. So let's decimate those. Once, twice. Three times. Still looks okay. So let's check the pupils. P1, 12.2 K. So let's decimate that. 1,000. That's good. And then the lashes we did. Mouth. We did. Okay, good. So it's
all connected there. We have our strawberry. Let's go back to my cap so we can start our next
little character.
22. Little Bread: Alright, so our next
little character will be this little guy right here. So let's go back to Nomad. Can hide our strawberry. And then we can pull in
this image, import photos. And it's this little guy. Okay? I think that's good. Alright,
so first things first, I think the best way to
do him is to do that. The sphere thing that I
always do and make it into a cylinder and then
stretch it across. I think that's
good plan for him. So atmosphere. And it must be in here,
so let's take it out. And I think this, I think will name
him little bread. I don't know why,
but little bread. So he's gonna be a little bread. Alright, so I'm going
to bring him down. And let's validate. I can't get it to work. There we go. So I validated it. And then I went to
just the green. So I turned this off
and go to just green. And I turn symmetry on. So now I can make that shape
that I wanted to make. Just shrink it. So I
think something like that symmetry off so I can
just move it around freely. Now that we have this shape. I think I need to
voxel remission. So I'm going to box
so Ramesh it to 31 is fine. So let's walk. So we meshed. And now I want
to see if I can do symmetry. Change this back to red. So we're changing the symmetry
back to red and that's it. And I want to try to
pull yes, there we go. So I just want to pull this out. Try to give us that shape. Let's go ahead and use
the rounded edge on this. Just smooth it all out and
get it nice and smooth. And I'm going to
see how wide it is. Let's make it a
little bit thicker. Feel like he would
be a little thicker. I'm going to take smooth and
I'm going to go ahead and take all of the different symmetries and I'm
just going to smooth, smooth out the ends. There we go. This
is a little more, It's a little cleaner. So now it's a little now
it's smooth and all sides. Alright, I'm gonna
save this shape. Because I can see myself
using the shape again. I'm going to save it to Files. Rounded, cube,
flat. Good enough. So we can sort of adjusted, I think it needs,
it might need to be a little more round. So let's go ahead and
take, let's take off of, off the green. But
the rest we want. So now let's take Move
and now we can just sort of turn symmetry on and
we can just expand him. He's a little round and
the mid section seems like maybe he's a
little more round here. So maybe something like that. I'll just smooth it all out. So it looks a little better. It looks a little better. Let me just stretch them
out a little bit more. So now let's just
give him some hands. So I'm gonna add a sphere. And this will be his love, his arm that's on the left. So let's shrink it a little
bit and let's spread it out. Maybe it will flatten it to that way we could put it a
little bit away from his body. So maybe something like this. Sort of similar like
with the frogs arms. Bring it nice and low. And before I, it's a little, it's a little
rounded at the end. So I'm gonna go ahead
and validate that, but I'm going to use Move. And I kinda want to
turn symmetry on. I just want to round it out. So it's a little more
little punchier. Arm. Now I'm just going to twist
it just to match the drawing. So something like
that, I think works. I'm going to clone this. I'm going to bring it out here. Whoops. I'm just going
to rotate it up. Because it's almost
like he's holding our other little
character's hand. Somehow a kind of wave from sometimes they get so lost trying to move
this stuff around. So don't you're
not far behind me. If you get lost
two, I'm the same. I get lost all the time. Okay. Maybe I'll just take move, turn off symmetry and just
stretch this out a little bit. Yeah, I think that's cute. So now we'll put
two little Google too little pops on the top. So let's join these. These are the hands or arms. We'll go ahead and connect them. Now. Let's add another sphere. Can mirror. Maybe we'll
flatten these up. So maybe something like this. So I'm thinking
something like this. It's kind of cute. So I'll go ahead
and validate those and I'll rename these. Let's validate them. Actually before
we validate them. Let's take this
mirror out of that. And let's go ahead
and clone these. So let's take the first to validate them, and
let's rename them. Rename them. Let's
call them Horns. Now these, you can make, we can turn these into the legs so we'll make them bigger. Bring him down. I want to make sure
I'm on the spheres. Otherwise you won't be able
to move them left and right. So I think that works. Maybe a little bit. Something like that. Maybe a little squatter,
little closer together. Okay. Let's move this. It's going to move with
them. That's okay. Alright, So I think that works. So let's just make
some cylinders. Let's use some cylinders. So let's do snap forward. Turn it off for now. Mirror. Okay, so maybe
something like this. Let's take it off snap. I think that works. Validate those. So let's validate these. Call these the eyes. Then we'll clone them.
And we'll call it dots. Pivot, reset pivot, movie I dots up and make
them really small. Worries me that one. Okay, So we'll come
back and we'll continue with the eyes.
23. LIttle Bread 2: Alright, so let's just adjust these dots with move to move. Let's see how this looks. That makes them
look kinda angry. So maybe we'll keep
it simple like that and just make
them really small. Steps. Symmetry. Here we go. Maybe we'll put them on a little
bit of a diagonal. Let's good shooter in the body. Okay? And now let's do it. We'll do the math the same
way that we have been. So we have our trusty
cylinder, we validate it. I feel like that was
really confusing. So I'm just gonna do that again. So we have our cylinder here, not mirrored, bring it down, bring it out, shrink
it, and validate it. And now we'll turn
symmetry on here. So now we can pull it out
and we can shrink it, will make it a little fatter. Okay, so that's good. Let's go ahead and box. So remeshing it at two to 20. Do rounded edge. And we'll
move it a little bit. Oops, let's make our move tool
of a bigger, move it out. Give it a nice curve. And we'll give
them a nice smile. Good, cute. I'm happy. The only other thing
that I'm thinking of doing is maybe taking these eyes, a clone them. If it reset, pivot,
make them bigger. Symmetry. And I kinda part of me wants to make
this character have those very slanted
eyes like this. I just think that would
work for this character. So let me make this fatter. I just think they would
work like this guy, this glue character affiliate
needs to be really happy. We have the eyes will highlight, both of them will
hide, the big ones. Will save, because I'm
going to do high Vaux, sorry, mesh like I always do. So we'll voxel,
we mesh like 400. Here we go. We'll take our rounded edge. Just round these off. Okay, and it still looks okay. And then we'll go ahead
and decimate the eyes. Go to 2000. Let's bring this
up a little bit. Make it a little smaller since the eyes are a
little bit smaller. Okay, Good. All right. So the only thing we have to do here is something's bugging me. I don't know if it's perfectly is a perfectly in the middle. I can't quite tell. If that happens. Then I just go to gizmo, move origin, recent pivot, and then I just
bring it down and bring it back to the middle. Okay, That feels better. Right? Did we check the sizes? How big is this thing? Okay, so we just
need to decimate. We decimate this big block body. And maybe we can get one more. Yeah, still looks alright. Horns decimate these. Arms and legs. Eyes were decimated. Dots. Go ahead and
round edge them. And let's see if we can
decimate them twice. Good. The mouth. The mouth. So let's round edge this mouth. And let's decimate. Good. So everything
is 1,000, 100,000. Okay, So I'm pretty happy with this little character.
I think he's cute. So I'm just gonna, I'm
just gonna put the eyes. I dots the sphere. What's the sphere or
that's the mouth. Mouth. Right? So this little red. So let's go ahead and
hide Little bred. And we'll look back what
the next character is. And I think I want to do, I think will do this
character next. I think we might do some
whipped cream or some cream. Maybe flat on the ground. And because maybe the
strawberry can be like in a little thing of cream like
that would make more sense. You could actually
be just in that. Anyway. So we'll do
this little guy next. We'll go back here. And let's just
replace this image so that we're all set for the next video photos.
This little guy. All right. So I'll see you in
the next video. We'll start working
on this little fella.
24. Li'l Whippa: Alright, little whip up. So let's, first of
all, let's just save. And let's start this
with a cylinder. A cylinder here. And let's shrink it
up a little bit. And we can validate
all actually, we can use the tools here. So let's use radius. So we're using edit,
edit and radius. And we can make the top wider, which is exactly what
we need. Really big. So I'll make the top wider. And we can go ahead and
validate this. In the summer. There's only 1652, so it's
very, it's very small. But we're probably going
to let's just go ahead and box or remission it
like 300 for now. And then we'll use rounded edge. I just think the
rounded edge like it just looks, it looks better. Let's go ahead and
smooth around the edges, around the, let's grab
the green and the blue. And we'll just smooth
around the sides. Okay, Let's go
back to the front. And now let's just decimate. Will try to bring it back
down to where it was. Good. But now it's nice and rounded. I think, just think
that looks better. Okay, so for the whip cream, we want to do that kind
of a creamy swirl, but we're going to use
tourists is for that. So let's add a torus. Whoops. Let's add a tourists will
bring it down, shrink it. And you can tap, Edit if it's not already on. And let's use the green sphere, the green node to make,
make it pretty thick. And then we can shrink it again. So maybe something like that. So let's clone it will
clone it, will bring it up. We'll make it a little smaller. And then let's tilt
it. Let's go to the front and then it's tilted. And we'll bring it
down. And we'll call that one bring it up. And we'll shrink it. Lets tilt it the opposite way and make this one a little fatter k. So I think that
looks pretty good. So let's clone it again. And we'll bring it up. And we'll tilt it the opposite way. But we're actually
going to take this pink and we're going to open it up. Let's make it a little smaller. Okay. So we do have that space in
the middle unfortunately. So I think to get rid of that, Let's take the one below and just open it up a
little bit more. Then we'll take this
one in fat and that up to maybe we just need to
twist it a little bit. Kind of angle it
up a little bit. There we go. That
kinda closes it. Closes it up a
little bit better. So now for the very top, I'm going to go ahead
and validate this one. For the very top.
Let's just use a tube. And we can connect
the tube to here. So we'll do path and
then go start here, 123. And we'll tap radius will
make this part really fat. We can sort of connect that
to connect it to this. Whoops. Let me turn spline off. That might be a
little bit easier. Now. Spine on. I really I didn't work with
spline on for a long time, but now I just kinda leave
it on a little bigger. So I think we just kinda
want something like this. I think that works. I'll add another node so I
can sort of get a little more twist on it. Like the drawing has. Okay. I think that looks good.
The only other thing I want to do as you can
go ahead and validate all these tourists is I'm just going to tap this one
and I think I want to drag it up a little bit
into this other one. Kinda like that. I think that's decent
for like cream. I don't think it has to
be like really perfect. Mine is definitely
isn't perfect. And let me just shrink
this end a little bit. These two, I want to, let me validate this one, our voxel merge those two. So let's do this one and
this one that's voxel, merge those together to build it to 58 because
that's what it was at. And let's save. So I
want to smooth these. I probably could have did that. Had like 200, to be honest. And I think I want a box
swimmers the rest of this. So all of these tourists is, I think I want a box will
merge all these, like 400. So voxel merge them all together and then I'll
do the rounded brush. So we still have some decent
details in those rings. The only weird part
is this up here. So I'm just going to
try to work this out. Let me turn off tree. We don't need any symmetry. So this is the only weird part which I can work that
out. Now it looks okay. You can even take
crease if you want to make the crease a
little bit better, you can take crease
really small. You can increase this. You can do your
rounded edge again. He did smooth this
out a little bit. Okay, it looks alright. So some form of that using the, using the tourists has just
makes it a lot easier. I tried to use the two before
and it really didn't work. But I don't mind this one. Let's turn it to front. Let's go ahead and decimate. Look. I saw a little
bit of a difference. So maybe we need to
hang out at 4,000. Cylinders is very low.
25. Li'l Whippa 2: Okay, so now the rest of this is just the regular
stuff that we've been playing around with. Maybe we'll do some
cylinders for eyes. Will do snap snap that twice. Here we go. Turn it off to mirror. Put them in the right spot and the same thing they
look like they're sort of oblong untilted
out and just get off snap. And they're tilted out a
little bit tad bit smaller. Okay. So these are looking good. So
I'm going to validate them. And I'll rematch them. And like to 50 and
do my rounded edge. I'm just going to
smooth out the liquids. They need a good smooth. They don't wanna be smooth. Okay, we're getting there.
There's smooth now. Alright, and there
were just tricky. We're fighting the
system. So I'm going to bring them
into the surface. It looks like so angry. It's kind of cute. Well, put them up this way, open them up this way. I think that looks good. So we can actually validate these and
call these the eyes. This cylinder will be the Ripper base whipped cream. So let's clone the eyes and
just make some quick I dots. Pivot receptivity. I'm dragging them out and
make them really small. Symmetry. I think I always do that. I literally always
forget to hit symmetry. And one of the other builds, it was, it would just be on. So as it was perfect, I never had to worry
about doing that because symmetry
was on by default. But now it's not. So I'm
constantly will go off. World. Didn't
change. That's okay. So that's a decent spot. I do want to take drag and just drag these out a little bit. So something like that. Let's
bring him into the surface. Okay. So something like that. And then that actually
we can just we can probably bring in the mouth. And to scene assets. W mouth, open. Shrink it up. Bring that in. We'll shrink it up to about where we want it. I think that's a good size. We want to make sure that
it's nice and level. Then we want to go ahead
and put our little bend in. It. Might've been
a little too much. Here we go. Nice. I think that's a win. And we can decimate this little mouth. I'll do the round edges
because I get nervous. So I'll do the rounded.
And then let's decimate. The eyes. Will go ahead and decimate those dots. Go ahead and decimate those. Mouth. The base. Here, everything looks good. So small as we could get it. So I'm happy with that. Good. So let's make sure that
we are all together here. So let's bring the floor
back down to the bottom. Obese eyes. I dots will put
cream and cylinder. The cylinder, oh,
that's the mouth. So this will be a mouth. Alright, perfect. So let's save. And then let's hide this one. So we can move on
to the next shape, which is, let's
see, all of these. Let's do this guy. So we'll do this cat, a
little character next. So let's get set up
for the next one. We will change the image, import photos, this
little character. And of course he's
going to be a sphere. So at our sphere, bring it down. We'll go ahead and validate it. So this will be the star to
our next little character. Alright, rocking and rolling.
26. Puff: Alright, so now we have
this little character. Shouldn't be too crazy. So we'll go to the front. Let's just bring it
down a little bit more. Okay, Let's trim it. So we use trim in
that rectangle. So we'll trim it. And I think we're going
to include those, so we'll voxel Mars
this together. So I'm not too worried about
the details on the bottom. So let's add a sphere. I guess it's in width. Let's bring it out. It looks
like they're both in there. Let's bring this one out too. Okay, So this one will just be puff, puff, puff Ears. Alright, so let's bring
down the ears to mirror. So let's expand them that way. Maybe flatten them out.
There kind of thing. I think I went I'm kinda
pointed back a little bit, flattened a little bit more. The only other thing
I'm going to go ahead and validate them that I want is I want this to
be rounded at the top. Let's turn on symmetry
around that out at the top. We want them to be thinner. It's cool off of world so I
can stretch them if I were, if I want like that. Okay, so we have the mirror, so let's validate this. And this will be the ears. I don't know why I just did
that since I'm going to voxel merge these
two together anyway. That's okay. So I'm going to box them,
merge them together like 300. Let's save before I do that. And go back to boxer merge 300. And I'll do my rounded.
Let me check this. I haven't checked
this in a while. It's still good. Still good. So I'll do my rounded edge. Make sure everything's
nice and smooth. Okay? Now we'll go ahead and decimate this
just to get that over with. That's a little much
Let's step back. I think I'm okay with this. 2000s. I think I'm okay with that.
So now we have these eyes, which we might even be able
to use a little whip as eyes. Perhaps. We could, we might be
able to use little whip his eyes and his eyes, dots. We want the mouth
to be the same. So let's clone all of those. Let's bring these down. So eyes, I dots. And we put mouth. Snowy, have some
ready-made shapes. We can select them all and bring them up and see what we have. I thought I cut that. I cut his eyes. Maybe
I guess I didn't. But they are badly reset pivot. So we might be able to
salvage these eyes. I'm going to do world. Maybe I'll just stretch
them. Symmetry. Okay, so something like that. That's just a matter
of just rotating. And by now like I am pretty I'm just so used
to route rotating. So just take your
time with that. It is confusing. But once you once you start to get it and hopefully by now, it's a bit easier. And that's why I'm not
really going to slow with all of the menial things. But that's also why
repetition is good. Because when you keep
repeating stuff and doing the same things over and over again and it
really starts to stick. At least for me it does. So hopefully for you as well. So I'm just making this
making this thing blend in kinda beyond the
surface I like that. Might be a little too far
away from each other. Okay, maybe something like that. And getting these in the
right spot is so tricky. But that's the business, That's the labor of
love. Okay, cool. So let's bring this up now. The good thing about these
is that they're already, whoops, already decimated. So the only thing we have
to change as the eyes. This is a little different too. I don't know if I
can Let's see if I can get it to look like
it does in the drawing. Something more like
that in the drawing. I can use drag and
drag these together. That actually works
pretty decent. Okay, so let's trim
these up, these eyes. So let's clone the eyes. And then for the clone will
make these much bigger. Much we just want to make, this isn't working out. As I want it to work.
As I wanted to work out. We can make it work. We can make it work.
So the same thing kinda like with all of
them were just sort of we just want to
sort of crap these I want the back to be a
little bit thicker. So for the eyes I'm going to
adjust them so that there's more of the back showing.
If that makes sense. I might even take move in and
bring it back out a little bit and then stretch this forward a little
bit. Something like that. I think that's more what I want to stretch this
down a little bit. Yeah, I think that's
more what I want. That's looking groups. So that's looking good. So let's take the
eyes and the eye. The bigger eyes
hide the big ones. And then let's do, let's save. And then it's remeshing it
at a really high number. Maybe we'll do 400. Noyce. It's exactly
what we wanted. Let's do rounded edge on
these bunch of times. Okay, so now let's
just position them. Position them so they're
sort of equal on the face. It's actually not bad.
It's actually quite good. Here we go. That was the problem. So
bring them down a little bit. That's pretty good. That's pretty close
to the the drawing. I don't even think I
need to change anything. I'm pretty happy with that. Then that's pretty spot on. Let's just sync these
in a little bit more. Here we go. Okay. So I think his sizes are all the sizes are good with everything except for the eyes. Will decimate those. 21000 needs to look good. The mouth, the body,
everything was good. So I think, um, I think we're good with
this little character. So let's put it all together. The puff eyes, I
dots, we put mouth. Change this to
puff mouth. Right? So let's hide, Let's see
what's next to this one. So next we have the p's and
then maybe we'll do this one. I don't know. So let's do the Ps next. To go back to Nomad. Let's change this to
photos to the P's, right? And now we're ready to
go for the next one. Rocking and rolling. I wonder if I said
that last time.
27. Pea Nugs: Alright, so I think
the best way to do this as a start out with the Ps, since those are the heroes. So let's start out with
our spheres. Bit smaller. Alright, so we have
our one P there. I'm gonna go ahead
and clone this. So this one is going to be
middle, just so we know. And this one, the
other one is going to be just two sides for now. So the middle, we can
validate the sides, we can mirror, and
then we can move them off to the sides. And it looks like they're
a little bit further back like that. Then we have to figure out
how to make them being encased in acute simple way. So let's add another sphere. And let's just sort
of figure out a way that that might work. Okay, so we have
the sphere behind, Let's stretch it to about
something that might fit them. Okay, so maybe
something like this. But I plan to move everything
down a little bit further. We want them to be sort of
popping out at the top. So maybe something
like this would work for a nice pea pod. Let's stretch it out
a little bit more so we have some
room on the sides. Okay, I think I like that. So let's validate this. And now let's duplicate this. Let's bring this sphere out. So it's not in the mirror, since these are our side Ps, and this is our pea
pod right here. But let's clone the pea pod. And this second one we need
to make smaller so we can, so we can make a
Boolean operation. So we'll pull it out.
We'll shrink it. Let's make it a little longer. We'll bring the sides in. Now we can bring it
back in like this. Will stretch it a little bit. I think this might, this might work. Might work. I'm going to leave this fear hidden and I'm just
going to trim this. Let's take a look at
it from the left. I'm going to trim
this like this. So let's use trim. Let's use the line. So we'll start about here. And let's just trim
it in half like this. And already looks
more like a pea pod. Let's delete the
one we made before. And let's just take this sphere
and this clone, this one. So hopefully we can get a better Boolean operation from this one. It will shrink decides
shrink from top to bottom. Okay? So let's make it
even more shallow. So let's bring it
out even further. It's kinda hard to tell. Maybe I need to hide the Ps. You can stretch
it a little more. And then Bruce bring it
out and just make it very shallow. Let's try this. I that one voxel
diminish at 03:55. That's the middle
still might not, might be a little too deep. So we might even
need to stretch it. Stretch it some more. Yeah. So maybe
something like this. It's not very not very deep. And maybe I'll even make this wider because we really want
it to be shallow, shallow. So let's try this
voxel or we mesh. I guess it's gonna be 400. I think something like
this is what we need. There's just a little
too much on the bottom. I noticed. So I'm gonna make
it a little bit wider and I'm going
to bring it down. Maybe even tilted a little bit. This is very tricky stuff, but I can't help but to want it as
perfect as I can get it. Alright, so let's
bring these back now. And I think that's pretty cute. Let's push them
back a little bit. Let's stretch this out. But again, we're going
to, let's pivot. And let's pivot like
Let's bring it here. Tap pivot again.
And let's stretch. It. Stretches like that. Perfect. Let's move these two over a little bit more. Snug them up, validate them. And I don't know if I want
to move the the pouch. Move the pouch a little
bit to accommodate them. But I'm gonna do it
with symmetry on. I'll do it a little
bit down here too. I think that's good. I think that's good
enough for me.
28. Pea Nugs 2: As far as the middle goes, it looks like we can lose a
little bit of that middle. So I'm probably just going
to use clay with subtract. I'm going to lock
it on the pouch. If you don t have lock here, then just make sure you go. Oh, where's it to the settings? And just tap. It's gotta be here.
Oh, here it is. So go to these lines and just tap Lock and
it'll show up down there. I'm locked on the loop. I'm going to make this small. Let me check my
pressure settings and I'm going to uncheck, Use global settings for clay. So now it should be, it should work more normally. There we go. Okay, so now we have a little
bit of space behind it. Let's move the middle on back
a little bit more. Locked. I'm going to change
the pivot on him. Move him straight back. Perfect. So now on the on the pea pod, I'm going to use my
round brush and maybe I'll just smooth inside
but the normal brush, normal smooth
brush, smooth tool. I think that looks pretty good. Pretty happy with that. So this took a long this was, this was this took a
long way to get here. I must say. I still
want to make one edit. I want to tilt everything down. So I'm going to take
these my gizmo and I want to tell everything
down like that. That's perfect. Okay. So I'm like, I want to trim this. The pea pod. We use rectangle. I want to make sure
that it's trimmed. I use my rounded brush again. And now I'm going to decimate. Okay, now it's a 2000s. Good. Let's rename it. Pea pod. These are the sides. So I'm going to validate these. But I'm going to keep instances. So now we have both of our,
I'm gonna delete that. So this one can be p, right? This one will be p left, middle. Okay? So let's connect this one. Okay, So that was the hard part. So next we just need to put
the little faces on these. And for these we might, we might just use, Let's see. Let's just use some spheres. So let's do the
first one. First. Mirror will bring it out further apart. Make these a little bit longer. Turn them a little bit. I think that's perfect.
I think that's good. Alright, So maybe we can validate these
and then clone it. Oh, okay, so it's
still in the mirror. Let's take it out for now. Let's validate enjoin children. So now we should be able
to move this clone, it pivot, rosette
pivot as usual clone. And we should be able to easily, not easily, but, you know, but the eyes on this
on this one too. Okay. Let's look at the front. I'm going to see how
much we want him to be looking forward or to the side. I think that's pretty good
for this little fella. Smoothies in a little bit. For this little fella,
I think I want his, his eyes to be closed. So I'm going to add a tourists snap so we can make
it go to the front. Edit and then the pink. Want to separate this? We use the green and make
it a little thicker. Let's do snap twice again, so it's the right way. So this is essentially
what we want. So let's validate this. And let's clone it.
Okay, So for this one, let's add a mirror. I was on the mirror. There we go. So these are gonna be eyes. The eyes are mirrored right now. So let's just kinda
make them around the, around the correct size to
bring them out a little bit. So they'll be around that size. And maybe we'll just shorten
them up a little bit like that, a little less. So we'll put them a
little closer together. So now we can take this mirror and
validated join children. So this will be Eyes closed. And now we can take
our gizmo with two pivot rosette pivot. We can move the whole thing over to our little sleeping P. Can twist it until we get somewhat what
we're looking for. Let's take a look
at the drawing. So that's actually not too bad. Maybe that's perfect. So we'll push it
up to the surface. Let's move it over a little bit. And now let's hit symmetry. And we use the green ring to do the same thing
that we've been doing. Just wanted to sort of
bring it to the surface. I'm going to tap
symmetry again so I can just swivel
the whole thing. And we can take a look
and see how that looks. I think that's
actually pretty good. I think that's
actually pretty good. So now we just need
to smooth this out. Smooth as we'd like them. I
think that's pretty good.
29. Pea Nugs 3: And then we can take the
one that we didn't use. And this can actually be the
mouth for the other ones. Will make it a
little more shallow. Maybe a tad bit smaller. So let's smooth it out. That looks good. Now we'll
just bring it into the face. We can clone this little
one, bring it over. Maybe he's happy to just need to position
it into his face as well. Okay, good. And he just has, let's add another sphere. Will validate symmetry. We've done this a
bunch of times. We'll stretch this out. Make it smaller. And actually I think
we can. How big is it? Heal this voxel Ramesh it 200, I'm going to save because I
haven't saved in a long time. I'll take it off
symmetry and let's move it to position loops. Only make it so big of symmetry. Move it to position. Here we go. Pretty sure if I've
auxiliary mesh it, it should then,
okay, there we go. Now it's doing what
I wanted to do. I thought I did that,
but maybe I didn't. Maybe I'm going crazy. Now. We'll just angle
this into the face. Like so. Okay. I mean, I'm pretty happy with
these little guys. Think they're cute. Peas. So these are the middle eyes, left eyes. It'll eyes. Right? I'll connect. Whoops. So we'll connect those
clothes will connect that. Tourists middle mouth. Connect that. And this must be right mouth. Mouth and this is left mouth. Okay, So these are all together. I'm not sure in the sizes. These can all be decimated
because they're just spheres. That one was already
decimated. The eyes. Does it meet the eyes? Meet decimate, decimate. Okay, So far so good. Everything is decimating
nice and easily. Know hang-ups were taking off a lot of size. Good. I'll take this. Alright. I'm happy with it.
I'm good with it. So let's save. And then let's hide the
floor back on the bottom. Let's hide this and
let's see what's next. I think that's it. This is I don't know if
this little one counts. Pardon me? Does want
to do this though. Maybe I will do it really quick. So we'll come back
and we'll do that little one, that little baby.
30. Marshy: Alright, so I think for that
really little tiny one, I don't even know if I saved it. I might not have saved it. Let's just add a cylinder. Let's make that smaller. Bring it to the bottom. And we're just going
to validate it. We're going to take
our rounded edge. Hello, I'm talking like
that, speaking like this. We're going to round it
out nicely so it looks like a nice little
fat marshmallow. We'll stretch it out a
little bit. There we go. And I don't even remember
what on the drawing. So it's a little marshmallow with maybe two little lumps in the front with another marshmallow
on top. I can do that. I can do that. So we have, let's
name this marshy. So we have one clone. It will bring that
up on the top, will make it a little smaller. And we'll even rotate
it back a little bit. Oh, I don't even know
which way I rotated that. Let's go left and
make sure that I'm rotating it directly backwards. Okay. Well, let's move
this to the center. Now let's get crazy
and let's do move. And on this. Let's just pull, let's just
pull that back out some, let's turn on symmetry first. Just pull the pack
out some. That way. It really looks like that, like that mass has
to go somewhere. And I like I want
it to look like, you know, it's like it's going so I'm just going to smooth
a little bit of that. Yes, it's exactly
what I was going for. So let's look to the front. So now there's two. Let's use our sphere. Sprayed out, excuse
me, my voice. So I'm going to
mirror, bring it out, shrink supreme closer together. Flying it up and just kind
of Open it up a little bit. Yeah, I felt like it
was sort of like this. Let's take another quick
look. Sort of like that. I think that makes sense. Make them a little shorter. So these little mirrors, I'm going to validate
it and join children. I'm gonna join it
with this as well. Voxel rematch these together. I'd like 300. Let's see if this smooth it
all out for me. Let's see if I can
do it the easy way. I'll take my smooth brush
and just hurry it along. Okay. So we have our
little shape there. And we'll add a little, add a little
cylinder to the top. Hit radius so we can, at the top bigger this part, smaller, sort of like this. So we'll validate
it. Make the top. Like that. I want to get crazy. We can sort a squeeze this
part in a little bit. Small, stretch it. And it was sort of just
sticking out, kinda like this. But had a nice bend in it. So let's turn off the
symmetry so we can bend it. And then we'll bring
it back, shrink it. Here we go. Let's tilted a little bit more. Pivot. Okay, so, yeah, I think
something like this. We'll add another sphere. Not a sphere. I think
I want a cylinder. A cylinder. Snap. Taken off, edit
you into position. I don't know why it's doing
that. Why would it do that? I don't understand what I
did to make it do that. That's so strange. I don't know if that's
a bug or feature. Only get bugging me. So this guy only had two
little I's take it off snap. Okay, there we go. So we have that little character to marshy eyes. Cylinder stem. This is marshy top
floor, back down. And we'll just
connect all these. Let's check the sizes. This is huge. So I'll just decimate. Top is pretty small. Eyes think we'll do
the rounded edge. Will decimate those. Twice. Stem is
already pretty small. Okay, Yeah, I'll
take that. Save.
31. Character Lighting: Alright guys, so the
hard work is done. We just have to color and
light our little characters. And then at the very end, we can do something special. So I'm going to include this
room so you can populate it. So all I did was take
the characters that we just made and I
just populated them in the room using like array to make a bunch
of different ones. But you can put them in as
However you wanna do it. But I just thought this was
really fun for me to do. So I wanted to include the room and it would just take me, take me too long to go through
creating the whole room. Since this is just
a character course. But I will do
something like this in the future if you're interested. So for now, let's just
let our characters. I kinda wanna put all
the characters on here, but we'll just like for one. And then we can, we can add more once we
have the lighting. So the first thing
I want to do is just make the floor
a little bit. I don't want to make
it bigger using the orange ring because then
it will, It won't be level. And remember we set all
of our characters so that the floor was the
very bottom of them. So it's easier to just stretch it out this way and then
stretch it out this way. So we'll just have it like that. So that'll be the floor. We can get rid of this image. We can also change from
orthographic to perspective. Okay, so let's set our view. So you can set your view
wherever you like it. If you want to set
it like this or if you want to do
it a little more, it might help to bring
in another character. So let's, let's start
with the main character. So here's the main character. And of course you can make
this bigger if you want to, like you can stretch it out. Because when we add lights, there is also a
shadow and the shadow is going to make a
difference as well. But I think I just
want something like something like this. So we'll see, we'll
see how this works. So make sure that you
check your focus. Mine right now, it
defaults to 19.5. This is more like how we did. This gulps around ten, which is more
versus less warped. But where you can just go
somewhere in the middle. Something like this. Alright,
so let me just set this. I'm gonna put this pretty
much in the middle. I just want a nice
like middle shot. And I'll go here and then
I'll just do add View. And I'd just like to
name them like one. I like to name and
number digits. Otherwise I just forget. It takes too long to write
out front back side. So that's what I do there. Alright, and this character also had the little
bread character. So let's bring in a little grid. Okay, so sometimes
you have to make sure that when you touch it, like when you tap it,
it'll do all of them. And then when you
tap it again, it will only do the first one. You want to make sure
you're doing all of them. Bringing the whole character. Little bread is big. So
let's shrink little bread. We want, I'm like touching
the just touching the floor. I want to make them
a little bigger so that they're holding hands. So something like that. Just have to adjust
it so he's right. Touching the chairs,
touching the floor. Okay. I think that's cute. So I'm gonna put a little bread
up by the main character. I'm going to put them up top. She probably connect them
to think I'll connect them because we don't
have to connect them yet. Alright, so let's, let's
switch from my cap to PBR. Let's take everything. So let's actually take literally everything except for
the camera angle. So we'll take all of
these and change them to, I always do this, I just
find it a little bit easier. We've changed the roughness. Let's change the roughness
to about five and pain all. So that's all the characters
that we just changed. So now we have, this
is not in the middle. Let's go back to my
view. There we go. I always like to view and
then I went up changing it. I like that. I think I like this. You better. Something like this. I'm actually going to
update the view by using this little down
arrow to the circle. So update it. So now that's my view. Okay, so now we can do some
lighting first. So we'll take,
we'll go over here, we'll turn the environment off. Let's turn it down a little bit and then turn the
environment off. And you have a nice silhouette. And then we can add
our first light. Look at that beautiful
already, I love it. So this is actually a good
spot for the first light. This is direction light. I'm going to fly
through lighting because this is
mostly characters. So I don't want to spend
that much time on lighting. So we have one light here. I'm going to rename it to W1. And I do that because
this is a world light. It's like the sun shining
down, It's like a main light. So w1 and I'm actually going to change the intensity
to maybe like 1.5. Maybe even a little
higher, maybe two. Live dangerously and
move it all the way to two. So that's W1. Let's add another light. Would name this one W2. So this is another world light. It doesn't matter
where we move it. I just move them so I can
differentiate them. Now. I'm just going to I
just want to point the arrow, one of the two ways. But I just want the
arrow pointing back at our character to lighten up
the side that we didn't get. So it's just going to
light up this side. So maybe something like this. So we can just see this light
lighting up this left side. I'm going to turn the
intensity down a little bit to maybe like 0.7. So we have a worldwide here. And then we have in the
other light facing this way. And I'm going to turn
it so you can just see which way my
lights are facing. So this one is here,
this one is here. So hopefully that makes
sense, Pretty simple. Let's go back to our view. So now I want to
add an edge light. So an edge light
will just be further back and it will make a nice
white edge on our character. So let's go back to
lights will add. And I'm going to
name this one edge. Alright, so our edge light.
Let's change it here. So we'll tap and we'll
turn it into a spotlight. Then let's look at the top view. The top view, we want to
put the light around here. So we're gonna go straight
back then to the left. And then we're going
to use the green and just bring it over so it is hitting our
character in the back. We want to lift it up two. We don't really want it
on the ground too much. We want to just
on the character. So it's gonna be
something like this. And see that nice white edge. That's what we're going for. Still a bit on the ground. So I'm gonna try to
lift it up a bit. You can even put it
down lower and then lifted up a little bit
so it's off the ground. So this is looking good so far. Now we have one more light, so we'll do one over
top pointing down. So we'll add another light. I usually make this
light a cool light. So this is our, this is our fourth light. So let's rename it so
it doesn't get lost. And let's rename it top-down. I wish I could put these
in order, but can't. So top-down is also
gonna be a spotlight. So we'll bring this one up. So directly up, turn on the top view so we can make sure that it's directly
on top of our character. Something like that. Now we'll take our light
and will stay on world. If you tap world
and it's like a, it's a different axis. This is like the
axis for the light. But since I was on world, I'm just going to stay on World. But either way, Gino's long, as, as long as it gets
to where it needs to go. So this one is going
to be straight down on top of our character. But I want to move
it up so this light is towards the
front of the face. So maybe something like this. Let's bring it up a little bit. Maybe even a little
bit more forward. So maybe something like this. So we'll scale it
down side to side, the intensity down a lot. And let's change this
to a cool light. So I've just tapped on the color and we're just
going to change this to a blue bluish. Alright, let's change this
light to a more warm light. So something like this. We can make the edge light, also a little bit warm. I don't know why
it's doing that. Okay, So let's go
back to our view. To the view. So back to our view,
It's looking good. The next thing I want to do
with the lights and this is something that I just
started doing recently. So all of the lights
except for w1, you want to go into and
make the shadow soft. So going down here to
shadow and just put soft. Let's go here. Soft. Go
to this one and soft. Okay? Alright, so now our
shadows are soft except for W1.
32. Lighting & Background Composition: Okay, So this is a pretty good way to light
just your character. If you just wanna
do a flat thing, you can change the
color here as well. You can change this color
to anything that you want. If you wanted to make it
like a lighter color, a lighter pink,
something like that. It looks really
cool, truly good. And that's a good option. You can also change this to kind of reflect that if you want
to make it a nice pink, something like that, you
can change that as well. So just feel free to change
any of the backgrounds. Oh, I see that this is
white in the camera. Let me see if I need
to change that. That's interesting. This is
more what it looks like. These are some, I guess
some of the challenges. But anyway, I wanted to
do something a little more exciting than
just this background. So if you just want it like
this, you can skip it. But if you want the extra credit and do something really cool, then use the background
reference image. And what you're gonna
do is go to your camera here. Oops, wrong one. So go here and then
do reference image. So reference image, tap it and then bring in the reference
image that's included. It might look a little
bit different than this. Whoops, what am I doing? What am I doing? So once you bring it, it might look a
little bit different than this because I might edit it specifically for this class. But if not, go to Transform and bring it up so that the cherry
is right on the top edge. The end of the Little
Ice Cream thing is running the right edge
and the donuts on the edge. So that's kind of
where you want to be. You can even do it a
little bit higher. But around this area and then just tap on it so
it locks it in place. Now take your character and you can bend it so
it's on the pink part. So there's like a line here and then this part is on the pink. No, I don't think that you can do to make it a little easier. Let's go back to orthographic just so we can lay
this in the right way. Go back to orthographic and
add instead of a floor, you can just add a plane. So just add a plane. We'll bring it down. It's kind of hard
to see in that way and just make it bigger. So we'll make it bigger. I can even see it. So there it is.
There's our plane. And use the, use the
floor that we made. Use that as a gauge to
where the actual floor is. So that's all you have to do. Just bring it up until
it's just over this floor. And I'm gonna get
rid of the floor because we don't
need it anymore. So I'm going to delete the floor since now we have the plane. Let's rename that floor. And now let's just make
it a little wider. And then we can get it off edit. Let's use this blue and let's just widen and widen
it a little bit. So we might have to adjust it. So now just bring it down so that you can make your
character fairly big like this. You know what, we might even, we might even bring
this up a little bit. It doesn't need that much. Let's go to edit and then just bring this
part up a little bit. Maybe something like that. So now we can bring it down. There's less room. So you can make your character
nice and big. And still have some
room in the background. So you just want a
little bit of space between our character
and the background. Maybe we'll bring
it up a little bit. So maybe something like this. Whoops, somehow on did. And one thing that this teaches us using as
the background image, it's flat, it's not
exactly straight. So that's why my background
is a little bit bent. And it's not I can have it like this because then it won't match up with the background. Although you can't
really notice. You don't really
notice that much. So maybe it's okay. But I think this is good. I really like I like this setup, just makes sure
that it's street. So once you get a
straight, this is good. You characters in the middle. This is a great place to start. So sorry, I'm a little excited. I'm very excited to actually, let's validate because we're
just working with the plane. Let's go ahead and
reset your view. So we'll reset one. So now that said, I'm going to go
ahead and save this. Just to do a little test with the light which we're probably going to
have to change. But let's go ahead and
make it post-process. Because there's a lot of
things that we need to see and we need to see
them with post-process on. So e.g. we'll scroll down and just make sure
depth of field is on. Far blur. The background is
nice and blurred out. Near blur. You can take down some. And yours doesn't have to be this high. I don't
know. I don't know why. I just I like to raise
mine to the max. But here's my settings. Global illumination is on. I'm going to turn
it up a little bit. So I have an iPad Pro 2021
so we can handle a lot. You might want to just
bring this down to like 1.25 if it's too much
and if it's too slow. So all these settings we can
go over a little bit later. But just so you have a good
view of what my settings are, I'm just going to
scroll through this. I bring this up a little bit. Bring this up a little bit. Looks good where it was. But you can play around
with this stuff forever. For now. I just want to put
it on post-process so that we can
actually see what it looks like when the
background is blurred. That was the main
thing. Okay, so now that the
background is blurred, we can change the color of
this to match this pink. So we'll go into our color. We want to make
it nice and pink. We want to make it as light as possible and just try
to match it by eye. So I'm just in the, all the way red
and I'm just kinda hear. Then we'll paint all. And you can see
that this is a lot darker than the background. So we want to try to match that brightness
and it's going to take a few things to
sort of match it. One of the things that
will have to change is taking this and trust me, I do this with all
my characters. It's like I'm gonna do it
and it has to be perfect. So I apologize for
going on about this. Hopefully you're enjoying
it as much as I am. So one thing that
we'll have to change, since it's no longer just the, just the plain character. We have to give up
one of these lights to make the floor brighter. Because that's how that's sometimes that's
the only way that you can get a
certain brightness. Of course, we could always go to lights and
turn on the environment, and that does brighten
it up somewhat. But we also want to change one of these lights
to brighten up the floor. So let's go ahead and do that. We'll bring the
environment into it. I think that looks pretty good. I'll put a leave mine
probably at like 1.5. I think it looks good. And now
we'll take, we'll take W2. So if we turn that off, It's not that much
of a difference. So I think we can
handle moving W2. Let's take W2 and
let's make it white. Because, whoops, we're just going to use this to
lighten up the background. So W2, we have our, we have our angles saved. So that way you can get out of this and we can go
right back to it. So what we wanna do is
light up this back edge. Pretty much. We're going to bring W2 back
because we might change it. Let's see how it works
as the world light. If we just pointed down
towards the floor. See we have a lot of this
like a lot of these shadows, which we don't really
want any more shadows. So I'm going to change
it to a spotlight. We could actually change
it to a point light to. Let's try a spotlight first. So let's take this
little orange. We want to bring this up
because that will raise the, that will widen the cone angle. The cone angle is obviously
you can see what it's doing. I guess I don't really
have to explain that. You can clearly see. We made that a lot wider, but it doesn't need
to be so bright. We don't want it to be
super, super white. We just want to
lighten up that pink. So we'll bring it down some
and we probably have to raise the height of it. So let's raise the height up. There we go. Make sure this is
pointing straight down and we can probably raise the intensity now I should have, should have raised it before. So now it's nice and high. We can raise the intensity. That looks okay. So let's go ahead
and go to our view. And you can see it's a
lot closer with the blur. It's almost, it's almost
making it invisible. The break, this is a
little wider here. So maybe we can, oops, we don't
want to move that. Let's go to our light. Which one was it? W2. This is why I always
name the lights because it's easy
for me to lose them. So let's scroll out. And maybe we'll just bring
it over a little bit. And we'll see how that looks. Maybe we can even angle it. So something like this,
I think, is pretty good. But it is a little more
rich than the background. So this is, this might be extra, you don't really
have to do this. But let's tap on the background and just see what
happens when we raise it up a little bit. We make it a little a little
more, a little lighter. And then we paint all. I think that's pretty good. So let's go back to our view. And I would say that
that's, that's pretty good. I think it's a
pretty good match. So all you wanna do is make
it look like it's part of this part of the background. As you can see, it's
like lighter here, it's a little bit darker here, but I'm pretty happy with this. And it's pretty
hard for me to be happy because I honestly like
I can just go on forever. I just liked I just
wanted to match up. Okay. I'm just going to save this. That was good. It looks good. I'm happy.
33. Environment & Character Color: So now that we have
this locked in, we can go ahead and start
to color our character. We make sure that
this is in-focus. I usually focus on the words. That's how I that's why I
tried to keep things in focus. So what colors do we want
to make these a tip? These characters look really
great using subsurface. Scatter around that
subsurface scattering using the subsurface material. I guess it is
subsurface scattering, but I noticed that this
is very bright here. The top is very bright. So I'm just going to bring
this down a little bit. Maybe we have to make
sure we have to look at the ground too and just make sure that we're
keeping an eye on that. So I'm going to bring
that down a little bit and maybe even top-down, Top-down. Just
down a little bit. Maybe we'll even bring this back up because that actually
looks pretty good. Okay. So yeah, just make sure
that it just watch out for really, really hotspots. You don't want to, you don't
want your character to be too blown out, which that's what
was happening there. And also another thing that might make yours different
than mine is the environment. It's obviously it's
also included. So to change the environment, you want to tap here and
then just go to this image. You might have to import
it from your photos. So just go to that image
and just tap this one. My environment right
now is on 1.5. I think we went through that. I guess we can turn the
light icons off too. I was mentioning the
characters being subsurface. So I think this is a good
place to go into it. And we're gonna get
out of post-processed. But for now I just want to
show you what it looks like with post-process,
post-process on. So we have the main
character and let's see. We have the shorts,
we have the legs. So this part is the head. So we can connect the
main character and legs because they're
all together. So the main character in the
legs, I'm going to join. But I want to bring the legs up because unfortunately everything
was connected to that. So I want to connect
everything back to the legs. The legs is now main character. And it's just good to
connect all this stuff. So they didn't, so that
nothing gets lost. And it's also good to connect the parts that you want
to color it together. So we just connected the
main character to the legs. So now we can try to
find a color for them. So I'm thinking maybe like a brown, yellow, it looks good, but I'm thinking maybe
some sort of brown, maybe a color like this. I think that looks pretty cute. And let's check the roughness. You can make it as rough
or as glossy as you want. I don't know if I want them
really plasticky looking. So I usually make
mine fairly met. So maybe something like
this, 5.5, 0.5, 0.55. Something like that I think
is a good level for me, something that I like. And little bread. Maybe we'll make him sort of the same color but
maybe a little lighter. So maybe something like maybe
a little yellow or too. These bread, we can make
them a little yellower. But with a little bread, this is actually another
good thing that we can do. So we'll go to little
bread and we'll take his his little legs. I just do. I want to bring the
legs up and his hands up in the horns slash ears. I'm going to bring those up to, and I want to join all these. Hopefully it doesn't
take us out. It might. I don't know why
he's connected to the light, so I'm taking him
out of the light. And again, it's a
little bit harder since we have post-process on. But let's just join
the legs, the horns, the everything
except for the eyes, the eye dots in the mouth. We want to just
join that together. Oh good. So it didn't it didn't
take it out of order. So now we can just color
everything together. And it's just a lot easier. If you want to add some color. You can always do that
if you want to color like like the legs. Let's say you want to paint the bottom like a darker color? Like maybe like a little bit more of like a toasted color. So let's see if we
want to cover like the legs and maybe the
bottom part of the bread, we can do that and then we
can take our smooth color, which is basically just smooth, but with the intensity
all the way down. That's all this
brushes or this tool. And then you can
smooth out the bottom. So you can always do
colors like that. I think that looks kinda cute. With that sort of two tone. Maybe we'll bring it
a little bit higher, and then we'll just
smooth it out. So something like that. So now we just have the eyes. So let's go to these eyes and, um, I don't know if I want
them completely black. I do want them rough
and like Matt. But you can also
make them glossy and give them a sort of a
glossy look if you want. But I think I like
mine a bit mad at Matt Brown and I don't think
I want completely black. So I'll paint in
this color for now. For i dots, maybe
I want skin color, so I'm going to use the little
eyedropper, but lighter. So maybe just a little
lighter for the nose. Maybe I want like a something like this or even like a
maybe like a pink nose. Then for the mouth. Let's tap on the mouth. Maybe the same
color as the eyes. Make sure we tap on the mouth. We can find it. I guess
we're on the mouth. Maybe the same
color as the eyes. That's cute. So we can feel free to match
these with little bread. You remember we have our, we saved our view so we can
go and closer if we need to. We can figure out what color
we want for as little dots. Maybe we want to get make them like pink as well or something. My hands are a little
shaky because I had like a had a gnarly
headache before. I took some Excedrin. So if you notice,
my hands are very, very shaky, so I
apologize for that. Made the whole thing brown. X it looks kinda keep brown too. Okay, So now the shorts, we can figure out what color we can make them like Mickey. If you want to make
them like Mickey read Something like that, you can make them pink. I don't know what color
I want the shorts to be, but I kinda like the pastel. The pastel vibes. Maybe yellow. I kinda like the yellow. I think that's kinda nice. And then these maybe
we'll make them like a maybe like an off-white
go crazy and do like some middle illness
if you want to really like n here, that's kinda cool. I kinda like it. I do want to audition some
other colors for the buttons. I kinda like a little off white. I don't think any heavy just
a little mental illness. I'll take that. Yeah, I'll take that. So now we have our first
colored characters. I think they look
really, really cute. Of course, another thing
that you can do is add the white circles
here like the, the very common with
Coy characters. So let's change the
skin to sub-surface. You can see it gets
very, very see-through. So I wanted to turn the depth down because I want it
to be that see-through. So usually somewhere around
like one or 0.1, 50 or so. I haven't. But I do like having the
did I turn this off? I know it's still on good. Okay. So just so you can
see the difference, I guess you can see the
difference if you're doing it. Obviously you're
doing this tutorial. You can see the difference, but they'll turn it up just a
little bit just to touch. So also, we've changed
all that to sub-surface. We can go to little bread. Let's collapse that and
go to little bread. I dot. So we'll just go to this, these portions and we can
try those subsurface. Then again, we'll just bring bring it down so he's
not so see-through. We can actually try
the eyes and mouth. So let's try the eyes
and mouth on this guy. We can actually join
the eyes and the mouth, Whatever is the same color.
You can just join them. So eyes, mouth. And I can join them together. And that just makes
it a lot easier. So let's see what they
look like with subsurface. Bring it down to one.
And they look okay. And I just sometimes I
just like to go back and forth and just see
if it's worth it. I think I like them opaque, so we'll leave them opaque. Let's try the
shorts. Subsurface. Opaque, subsurface. I think I liked them subsurface because the shadows
aren't as black. And that's what I
really, really like. That's why I use
subsurface a lot. I don't like the
shadows to be black. Alright, so let's see if there's anything else
where we want it to do. One cool thing that we can do is change this to a pinkish color. Let's change the edge light to a little bit more
of a pinkish color. So we can go, Let's go
all the way up to red. Let's move this over so
we can actually see, um, so we'll move edge
to a reddish color, maybe even a little bit darker. So we have a little
bit of pink in there, something like that. We'll turn the lights back on. And let's go to our view. And
I've extended this video, so we're going to pause there and move
on to the next video.
34. Coloring the Crew: Okay, so first character, done, looks, looks really good. I really like, I'm
really happy with it. So we can hide. These characters, will
hide little bread. Let's bring little bread up. Ice cream sandwich
or all these 0. So for some reason ice cream sandwiches all the way up here. So we'll grab everything and
bring it down to the grand. Go, just touching the ground. And I think all the other
characters should be. They're all in the right spot. So I must have been tripping when they made
ice cream sandwich. So Patty, patty two. So this is simple. Same thing. I'm going to fly
through these colors because you can
take all the time. You need to really cover these. But I don't want to dwell
too much on on the color. What color do I want? Now let's turn the metal is
down and the roughness up. You know, I like my roughness. Think I want to go with
the colored color. Bones are usually
orange-ish, little toasted. I want to make sure
that I'm using kind of like lighter colors. The theme is like very
light and things like that. So I want to make sure that
I'm using very light colors. So let's paint a model and I'll check out how it would look. Yeah, kinda like
a little rougher. Okay. I think that looks good. I want to add some lightness
at the, at the bottoms. Almost like it's almost
like it has been toasted. So maybe we'll, maybe
I'll do a darker top. I do a darker top
and a darker bottom. And let's move this app with their smooth brush
with zero intensity. And what I should be doing, if I was smart, I would have the z on as well. Because with the Xeon, I should align with the Xeon. It would be doing
the back as well. I'm just kind of rushing. I'm just kind of
going really quickly. But yeah, put x0 on that way when you color it
will color the back as well. Like honestly, that's
the story with like 3D you really liked get
smarter as you go on. Just like the more you do, the more you like just get
smarter and you're like, why, why was I
doing this before? So at least that's how I am and I can't do
anything but admit it because you kinda
see it in action as I'm doing these tutorials
and doing these videos. So I'm gonna go much lighter. And do, I wanna do, I wanna do lighter here. And the paint is gonna be kinda thick and it's not going
to go on that nicely. Because, because the
poly count is so low. But luckily for us, these nice feeds are
looking beautiful. At least I think so. I think that looks great. So now we can put any
colors we want for these. Wanna do like an off-white, kind of like the light purple. That looks really pretty. Maybe for this one,
we'll do a pink. We'll do a pink for that. Then for the eyes, we can just do like a darker color like that. So we'll do that for the eyes. I like it. K. And I wonder if we could
actually join all these. I wonder if we join them. Oh, I do want to change. Maybe it will change all of
them except for the eyes. What happens if we join them? We include the eyes back
again. You know what? Let's just leave them. Because in case
you might want to make different ones
and change the colors. Let's just leave them on joined. But sub-surface. If you have any issues or
you don't see sub-surface. This is only 1.7. This is no mask couple
1.7 on the iPad Pro. If you're using a
previous version, you might not have access to subsurface, but
definitely upgrade. It's definitely worth it. I love it. Okay, boom, good. Subsurface, looking great. So that is ice cream sandwich. So let's move right along. So this is the frog. Don't mind my typos. I'm going to change it because I guess I should be professional. Although I didn't mean to
erase the whole thing. I'll give body. Alright, so this is pretty easy. The body and just the body. Let's make it and
make it subsurface. We'll bring this down. We can actually change will change the color of the
subsurface as well. Which is always fun. What color do we want to make
the little frog? I usually make them like a
light like a light green. Nice pale, nice pale green. It matches the pastel palette. I think that works.
That's kinda nice. We can turn on this again. And maybe we want to make the
bottom a little bit darker. So let's try that out. Maybe it will make the
bottom tad bit darker. We can just use smooth. We can smooth it all out. I kinda just like it looks. Okay. Looks all right. I think I don't mind it
just regular pastel. Let's change the eyelids. Hope I didn't join these. Let's see if I can
separate them. Okay, good. So I separated, I
tapped here and I separated the eyes
from the eyelids. So let's join the eyes. This those are the lids. Okay. Because I just like
to be sure what I'm doing. So these are the
lids, so let's join. These are the eyelids. The eyelids we can
just join with. Let's join them together
and then bring them up. This rename them eyelids. So we don't get confused. Okay. Eyelids is the eyes. Can just bring them up
and get rid of this. Okay, We're back in business. Eyelids. Lets just match the color with the
little eyedropper. And we want to make
sure that there's a sub-surface as well. K and then we have the eyes. So what do we want the eyes? Maybe something like
this, maybe a dark brown, maybe a dark green
or dark blue even. Think I kinda like
a darker green. Maybe a little darker
grayish green, something not too scary looking. Maybe we want to
make them glossy. Glossy eyes. Why not? Then the mouth, maybe we'll make them out a
little bit darker. Not glossy. Let's make it more of the
color of the skin with darker. I'll take that. I
think it looks good. Maybe with them done. So that's for AGI body. Alright, so next is pair top. Right will be,
that will be right back and work on this guy.
35. Coloring the Crew 2: Alright, so pair top. Let's see what we want
to be subsurface. So maybe just the stem. Harish, What's parish? Can't tell what I'm hiding here. I'll just hide it. So then we have we have
the top, we have the stem. So they can do re, what's 0? So secondary we turn off and
then perishes the main body. So this secondary, I
don't know why I had that there, but I
don't need that. So let's make this subsurface. We can get that out of
the way and then we can scale it down a little bit. For fun. Let's take just the top part and leave
that up a little bit. We'll make that a little
bit more see-through. Have a little fun with that. You can even do it with him too. They don't always have
to be so dense. Okay. So we'll call it,
we want to make this guy maybe like
a lighter yellow. The frog is a little bit. The frog is a similar color, so we don't wanna go too
much of the frog color. Equal do, maybe we'll do
a yellow for this guy. So maybe we'll do a yellow, maybe the top we'll do like
a brownish, kinda like that. So we'll do sort of a
brownish for the top, maybe a little
darker for the stem. And the eyes can be kind of like maybe a
little more yellowish shy. Maybe maybe something like this. Hi dots, I think can be the
same color as the yellow, but maybe I'll just drop them and make them
a little darker. Or maybe a little more
yellow. And the mouth. I think I'll just
match match the eyes. Okay. I think that's pretty
cute. I like it. All right, Let's
see what's next. Fruit purge. So we do have with us, we
do have a strawberries, so I don't wanna, I don't
wanna make fruit pledge read. But maybe we want to
make this rascal. Let's do subsurface first. Let's see what color we
want to make this guy. Maybe a nice turquoise. Maybe a nice blue. Here. Maybe we'll
do a nice blue. We want to keep it
sort of pastel. So that's a nice pastel blue. For these, we can
just go with green. Being nice pastel green. We'll make these
sub-surface as well. Oh, and I forgot to I forgot
to change the setting before from you want to try to match the
color if you can. So maybe we'll match this with a little more yellow color. Something like that. I think that works for the eyes. Let's do kinda like that. The mouth we can maybe
do a little bit darker. These we can do a little bit
lighter than the skin color. Okay. Nice. All right. Chaco cream. I think I have to do
the traditional colors of that little thing
I looked up before. So this one will be. Let's do subsurface. Let's do brown. Brown is like
oranges but darker. But I don't want to make it
too dark because it's pastel, so I think something
like that will work. And I guess I don't have
the top and the bottom. I'm going to bring the
bottom-up and join these two. Because these two can
be together forever. Looks tasty. So the
middle is white, but we'll do like an off-white
because I don't think we, we don't want to do
just regular white. And for this, I think we'll do, we'll do just a
little bit darker. We wanna do glossy. We'll make his eyes
and mouth glossy. Why not? Nice. I like it. So let me save, so I don't lose all this stuff. Doing well. Strawberry,
which I did color before, I think at some point in time, I must have changed it back. So strawberry, let's
change this color to, this is gonna be
a reddish color. Maybe not all the way red. Actually, that's a nice red. I don't know if I want it. True strawberry red. Maybe just highlight
a nice pastel pink. It's kind of cute. Like that. Let's do subsurface. My default is just like one, choosing my default subsurface. And these will do
sub-surface as well. I should have chosen
them together. But sometimes I'm a little slow. Nice light green for these. I love that. For the eyebrows. Green would actually be
kinda cute, I think. For the eye dots, Let's
do the skin color. But maybe a little lighter. I wanted to a little darker and rough. Okay. So we did the eyes before
what it looks like we have to adjust them. So we'll go back into the eyes. P is the pupil I remember. Okay, So I think this
should be a refraction. That's the refraction. Okay, what am I missing here? What am I missing? There definitely is
something I'm missing, but I'm not sure what it is
into anything on any layers. So my guess is something is
painted a different color. Paint that white, refreshing. I'm not sure what just happened. Okay. These are black. I'm actually not here, not
certain what just happened. But it seems to have helped. If it was just like that I
tapped on the strawberry. It looks like it's
working better now. But when I choose eyes, it's an seems like
it's not see-through anymore. I pulled it up hold
36. PAINT GLOSSY: Alright, so I'm gonna
leave it on so I can try to figure out
what is going on. All I did was hide
everything else except for there was hide everything
except for the eyes. Except because that's the only thing that I need to figure out. I just need to figure
out what is going on with these eyes. It looks like they
have a rough interior. Paint glossy. So somehow the interior
went to rough. That's where that's how
that's what happened. Okay. So at least we know
what happened somehow. I definitely didn't
turn it rough, but somewhere along the way, it That's what happened. And the only thing
that's different now, let me go to my view. And actually, I can't believe I didn't turn post-process off. Although it looks a lot
better with post-process, Hahn will even offer now, the only thing that is different now is the back isn't white. Remember before on
the strawberry, let's add a layer in. The eyes were painted white. I'll turn the roughness up. That's the only difference is that unfortunately
the white is gone. So you might have to
paint it white if you really want that
back part white. And just remember that
since it's so low poly, it might be easy for the
white to come out of. That actually looks okay. Doesn't need to be too perfect. But I think that
looks good. So I'm gonna go back to my view. Yeah. I think it looks good. And
post-process was doing okay. So I think I'm just
going to keep it on and unless it gets too crazy. But yeah, so now that's
our little strawberry me and that was that there's
always like one thing that gets me but
that's part of it. You know, it's kind
of figuring out what you're supposed
to be doing. Okay, so we've got low HIPAA. We'll call it a, we
want the base to be. Okay, so let's put
certain things together. Like the eyes and the
mouth can be joined. The cream and the base
can both be subsurface. So let's scale it
down a little bit and we'll scale it backup
for the cream, I think. For just the cream.
Scale it back up. Only guy mind if
that's see-through. Let's keep it white. But maybe we want a little
bit of gloss on it. We want some gloss on it. So we'll paint that white. We'll take this and
what color do we want? The base? Me just wants it to be like a
kinda like a brown color. I think I see it as like an
orangey orangey brown color. I think I see it,
something like that. I like it and bring the
roughness up a bit. It's really nice when you have varying levels or
roughness in gloss. It really makes it look good. So the eyes and the mouth. Maybe we'll just
make it a little bit darker and go like that. Mountain change. I thought
I put them together. I guess I didn't like I guess I did the
mountain the dots. How well, it will make
these a little lighter. I think I like them darker. Maybe even darker, darker. Alright, good. I think it looks cute. Little whip. All right, so we got puff. Puff. How are you puff? What color haven't we done? We haven't really done
like a pink color. I don't think that way. I don't think we did
like a pink color. You can even make
him like glossy if you want if you
want to change it up. I think I'll stick
with that color. For the eyes, eyes and mouth, I think I can join. Want to use something like that. And then for the little
dots will go crazy and do like a yellow cube. Subsurface, subsurface. Subsurface. I like I'm being a
little more see-through. Cool that maybe the AI puffs, dots to go crazy. Maybe all, maybe
everything does look good. Pardon me? Wants
to change some of the other ones to
sub-surface two. That looks good.
Like Whipple base. Maybe his eyes, his little mouth just takes away that dark shadow
and I just prefer it so much. It doesn't have
that dark shadow. Okay, So let's see. We'll put base of PDEs. Forgot about the PEs.
These are the Ps. So these can be more
of a feel like it'd be more of a pill or green
or something like that. Pea pod would be a
little bit more, maybe a little brighter and
a little bit more yellowish. I think I'm gonna go
with that subsurface, hope for at the painting. We'll do subsurface. And I think this one
is actually cool if it is very see-through.
I'm okay with that. We believe in and turn this a little more yellow or green. Let's make the P's
also subsurface. Shames them no green too. Alright, so now we just
have to make this bigger. Sorry, I should have
done this before. What color do we want? The eyes? I think just like
a rough like that. But I think I might want
them all the same colors. Is closed right eyes, mouth. I like them all the same. Where are those eyes
at? Omid allies? I see. So we'll paint all of
those and then we'll change them all to sub-surface. Cute. I like them. I don't put any
doubts on these guys. It's not bad and make them make them different though.
So that's okay. Alright, so what
do we have next? Minimize this one is marshy. I have a minute-and-a-half. I think I can get
him colored by then. Maybe. So the eyes are the only thing that I
don't want to be subsurface. So we'll go ahead and
subsurface the rest. I think I want that like sort of a see-through, lighter color. I think I like that and I
think I want the bottom, like a little bit, a
little bit more toasted, but I think it might
need something else. Maybe even just like
a darker brown. Let's change the
subsurface hook. Keep forgetting to
paint these guys. Turn the subsurface down a little bit. Okay. And then the stem, I think
we'll just make like a darker, darker color in the eyes. Maybe we'll match that, will change it to sub-surface. Alright, now we
can adjust these. We can adjust these as we go. So when we come back, we will,
our characters are done. So we'll just, I think we
just put them together and set up a nice little
cute little scene.
37. Group Photo: Alright, so first things
first, let's save. Very important. So now
let's go to our view. We have our view here. And I'm just going to put
all of these characters. I want to put them
all in the scene. So I'm just going to
start moving them over. And I'm going to take it
off of post-process so I can do this process faster. So we have the peas. Peas are short. So we think they should be
more in the front. The puff. Also short, but not
necessarily small, but we'll put that
in the front, too. Low. Weber. Put in the front. Strawberry. It's kind of floating. So let's put him
over here for now. Choco cream, Chaco cream. You know what? Let's just
bring all the character. This is bringing all
the characters out. That might make it a lot easier. So fruit punch. And we can actually
change the size is two. So we might have to change the sizes of some
of these things. Some of these guys pair top. What happened appear tops color. I'm loaded up in a
pure tops color. I could have sworn
we colored them. Right. Oh, I know. Stupid
secondary. I'm deleting it. Delete. For AGI body. Definitely needs to
come up in the front. I'm so excited seeing
all these guys together, not going to lie. Very, very excited. And then little bread
and our main character, I think they should
be in the middle. So let's go back to the view. And I might have to zoom out, but I kinda wanna fit
them all in here. Really want to try
to make this work. So let's start with the pair. Top. I'm going to move him up here. I'm going to move him right
behind her main character. Then this guy, I'm
going to move fruit, purge, oppression, even move these because
my hands are too shaky. This guy, I want to
move also back here. Chaco cream. I'm gonna move back behind this. Maybe here. Let's take a look at our view. So we might just have to
zoom out a little bit, I think, to get
them all in there. So let's move this one back. She taught, we can
move, we can spin it. Maybe we'll even make it bigger. You can resize these
companies characters, Ps. It will move them off to the
side and maybe we'll shrink them up. Let's see. So we have little whip.
What can we work on? We put little whip up. I don't know how we can
get all these in here. I think we have to
move it back again. I think this is the only way. That's okay. We'll
work it out and we're gonna get
through this together. Oops. So marshy, smooth, marshy back. And we can just
make them smaller. I think I should just make
a bunch of them smaller. I think that's a good plan. This little character
or bring in tighter. I think that looks good. Let me just save.
Strawberry actually wanted to make like
floating in something like or maybe like in some
cream or something. But it'd be a lot of work. A lot on work. Hey, the little frog. Little frogs, really cute. We'll just make them smaller. These are actually
quite far away. By organizing the scene
is very, very important. And it's actually really fun. It's gonna be really fun when
you add them to the room. But I'm not gonna do
that here because that will take a long time. And I think it's
better if you just do that on your own time. Let's just make some
of these small. Strawberry can be small. This little rascal. Be small. Maybe just like
along the outside. See the strawberries in the way. And I think I want to
make one of these bigger. We'll make this guy bigger. We'll move him up. Strawberry.
So I made him bigger. So that may be the
strawberry can like. Go back here in this
little section. Let's look at our view. Our view is out because it's
way too many characters. But it's really fun. I think. I'd like to move the frog back. So let's save this
view as number two. And I, I think that, I don't think that you probably
follow along with this because you really have
to just make it work. And you might even want
to just go to the, the other environment but smaller. It's really want to
fit all these guys. And maybe the Ps I'll bring back and make them smaller too. But this is actually like
like a framing your scene and all that stuff is also just as important as
your, as your characters. Because if you don't
have the representation, if it's not presented nicely, then it really it really
limits, limits everything. So far in the front. Puff. What are you what are you up to?
38. Group Photo Part 2: Okay, so let's look
at number two. I mean, it's a lot better.
We're getting there. I think we can move this one out some maybe make them a little bigger. I think one of the main
things that I really want is to be able to see their eyes. I want to at least be able
to see most of their eyes. It's pretty cute, pretty cute. Just the strawberry
is still fighting me. But I think I think I'm
pretty happy with this. The great thing is
you can copy that. You can copy and paste these and put more of them
and change the color. Let's do that for one of them. Let's copy. But I have to go in here and
make sure all of this has copied or cloned. It will clone pair top. Since it's really big, we can make a really
small one that work. Save this view. We can make a really small one. We can add him in here. But we can change the color. Maybe he didn't want
to be green now, I couldn't actual pair the glossy top. So there's endless amount of possibilities that you can do. But I'm very, very happy with
these these little guys. I feel like I need something
here, back here as well. Let's take Chaco
cream and clone it. Let's put one here. We can change the colors like a lilac. Since we don't see that much. We do have to sort of I'm gonna put them there then
I have to make sure that he can seem a
little bit at least. Okay, one last one,
last 11 last one. I just thought of fruit purge. This big guy over. Turn them, maybe put
them in the back. Like this. Let's
see how that looks. Maybe like a green. We'll change this to
maybe a browner color. I go like this with it. The Nala, like they're taking
that little family photo. So I'm going to add a new view just in case I like that more. I'm gonna go back
to post-process. And I think it looks great. I love it. And you can't even really see the background,
which is good. It's like you don't
have to worry, don't have to worry about that. Um, the break. What's coming on? I kinda like that. I think that might
be the edge light. That's a little bit on this
character I'm going up on update to update to. Because I just wanted to
check this light edge or there might be a
little too little harsh. So I'm going to turn it down a little bit and
make it not so pink. Alright, so I think I'm
pretty happy with this. Very happy with this. And the only thing I might
change is the strawberry. I feel like his eyes, the pupils of the eyes
should be a little lighter. Released is not as dark. I think they should
be read either. Who? I kinda like that. Maybe I want to
make them glossy. Kinda like that and
it's just a little lighter and a little more cute. So I think I'm going
to stick with that. So I like this view. So it'd be this view. And maybe we'll do
another view as well. But I think this is pretty good. I love it. I'm sold. Alright guys, so I
appreciate all of you. Of course, play
with your lighting, play with the settings, play with the colors. At this point in time,
Just have fun with it. You can change the background, whatever you want,
just make it yours. I'm gonna go ahead and
save a bunch of these. But also when you're ready
to bring in the other back, the other backdrop,
just go to Add Scene. And wherever you saved it just now I think
it's gonna be a GLB. So just upload that GLB and
the background will pop up. And then you can populate these characters in there
and just have fun with it. Just experiment. I
think that's it. So I'm just gonna save these because I don't know we made it, we made enough characters. And you spent enough time. Hopefully you'll have a lot
of information and a lot of character knowledge and a lot of technical knowledge
and things that you've picked up in my class. So I will go back to my face and give you
an official goodbye. And official See you again soon. As a matter of fact, I'm
going to take awhile. So I'm going to save
and we're going to explore is going to take awhile. Carried away was good,
it was good framing.
39. Thank You!: Alright guys, thank you so much. I hope you enjoyed it as
much as I did making it. There's a few times
where I really couldn't contain how excited
I am making these, these characters and just
doing this modeling. I'm, I'm truly obsessed
with it and I love it. And I hope that that
comes through because sometimes it gets
a little tricky and there's things that you have trouble doing or you
can't quite do the way you want to do them or get to get it to look the
way you want it to look. And that's one of the
things that I excel it because I just get,
I'm very obsessed. And since I don t, since I don't have a
formal background in 3D, sometimes I can think of things
a little bit differently. I don't know all the ways
in which nomad scoped doesn't compete with maybe Maya or blender and things like that. So I find myself just
trying to figure out ways like thinking outside of the box to get wherever
I need to get. So that's one of the most
exciting things about it. And that's another reason that I get pumped when I'm doing this class is because I
always learn myself, myself. I'm always learning as I'm
teaching and have issues. Sometimes I mess up or I
just get really confused. I tried to keep most of them in. Some of them I edit out only because this is I don't
want to waste your time, but some of them I think can
be learning experiences. So I do leave the mid hope you'll hopefully you
can hear the cat right now in the litter box. Anyway. So please, if you, if you enjoyed the class, then leave a review. It really, really helps me out. Really, really helps the
Skillshare Algorithm so more people can see it. So leave me a review. Leave any questions
or any comments or whatever in the discussion
or in the review. Of course, let me know what kind of classes
you want in the review. I'm happy I'm happy
to take those on board because I'm always looking
for new things to teach. And I kinda wanna get a
bead on what everyone, the scopes that
people want to do. My classes. That's the cat again. But anyway, I really
appreciate your time and I appreciate appreciate
you spending it with me. This was a long
class, so if you got through this, I'm impressed. I'm impressed and I hope
that you learned a lot. So I'm unskilled among
normal Skillshare. Of course, I'm on Skillshare. I'm on TikTok, I'm on Instagram, I'm on YouTube, all
drug-free, Dave. And one really cool
thing is I'm going to go through populating the room in lighting
the room on YouTube. So I'm going to
continue this class. Well, it's not
really this class, but I'm going to continue. And I just want to show
you how I light the scene, how I lay the characters in. I've already done it once, so I'm just going to delete all the characters
and bring them in. So feel free to check
me out on YouTube, youtube.com slash
store every day. I am going to have that
video where I set up everything and it's gonna be
one of my Skillshare extras. So I have a playlist
with Skillshare extras. So you can follow along with
the class and then you can just kinda keep going and
do more over on YouTube. So I can't wait to see
what you do. Tag me. I will share it in my stories. I love showing off my
student's artwork. Please upload your
code here as well. So upload them here to
projects and resources. And also leave me a review. I appreciate you. As always, keep drawing, keep sculpting, and I'll see
you all in the next video. Before I go, I just want
to give a shout out to some of the people that have been supporting me forever. Shout-out to hon, I appreciate you shut
out the murder lab. I appreciate you. Could all clo I appreciate you. They gave me this sweatshirt. I love it. Shut out
to Article. Article. Actually set me up with
a bunch of cool stuff. Article that's
probably not going to, probably not going to
flash it up on the screen. Or tikka kid OLC club. And also the nomads
sculpt Facebook group. And that group is really supportive and I find a lot
of information on there. Shout out to hold your, he is a 3D artists and he thinks very
differently than I do, which is exactly what
I need because I like to sculpt side
characters and I'd like to be very meticulous
and very detailed. But the way that he thinks
is much more efficient, which is something
that I need to learn and I need
to get better at. And if I'm learning
and I'm getting better than you're going to learn
and you're gonna get better. So just thank you to everyone
in nomadic community. Thank you to you guys because
it wasn't for you guys. I wouldn't be here. So again, encore, keep drawing,
keep sculpting. And I will see you all
in the next video.
 Dave Reed, 2D & 3D Illustrator - Brooklyn, NY