Transcripts
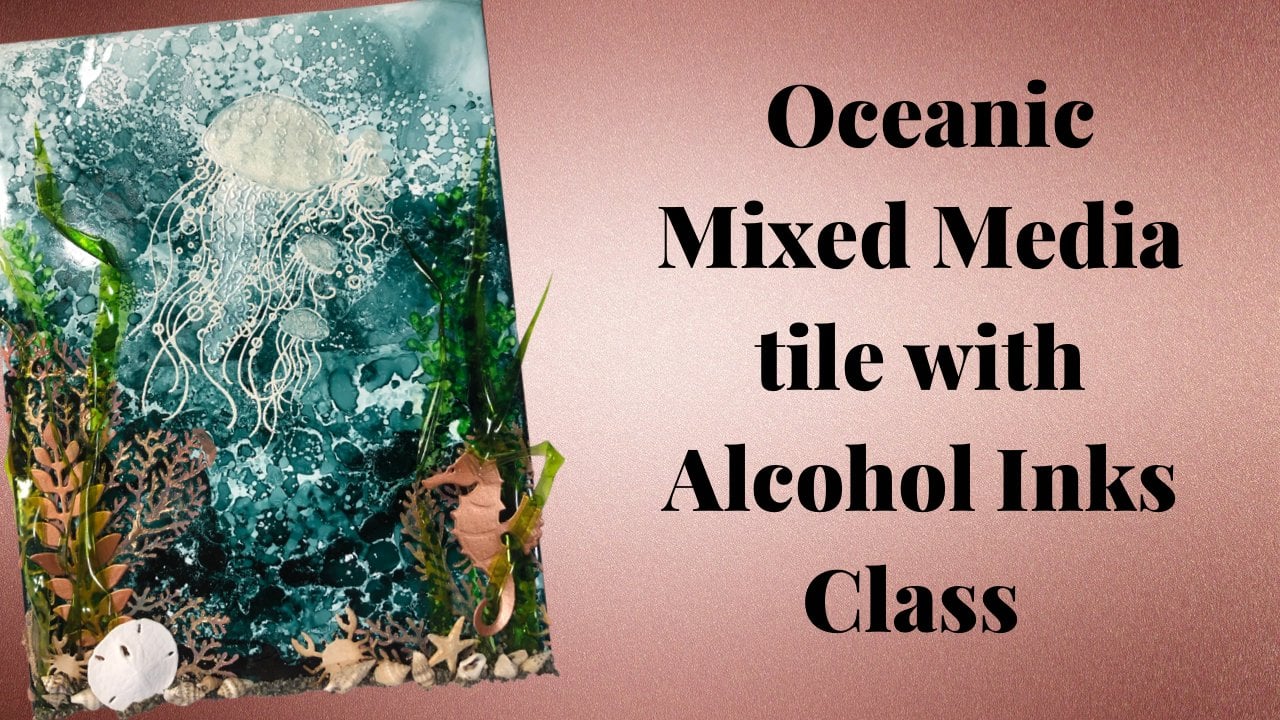
1. Mixed Media Tile Class Introduction: Hey there, I'm Cheryl. Welcome to the mixed
media tile class. Mixed media is simply just putting a bunch of different
products together. Whether it's mediums, paints, alcohol inks, and creating
a masterpiece with it. Let me go show you what we're going to cover in this class. This is the mixed media
tile that we will be creating in this class. This is the sample tile
I made ahead of time. And this is the one
that we were actually going to be working on. The only difference
between the two is this one has gold accents with gold vellum and
statue foundry wax. This one has silver accents with silver vellum and
Sterling foundry wax. The alcohol inks used in the background are
exactly the same. I explained why I
like to use them. They have different
colors that come out of them that I find quite amazing. We're going to use a bunch
of different texture pace to create different
looks as well. Different texture
pace are going to absorb the alcohol
ink differently and create different
textures and different looks
within your piece with very little effort. And then the only
other thing that is changed in this piece is
the verse that I used, the method to put it down
as exactly the same. This is the one here
with the silver accent's not one there. Here's with the gold accidents. You can choose which version
you would prefer to create. But I go through all of
the steps individually and list all of the supplies on the supply list that is
included with this class. Let's go create.
2. Cleaning & Adding Texture Paste to the Tile: Alright, so this
here is the tile that we're going to be
creating in this class. The very first step
is we're going to use some alcohol spray to
completely clean off our tile. Make sure there's
no dust on there, make sure there's
no fingerprints. And then we're going to
use some texture paste. Now I actually have used four different texture
pace on the base of this. So I've used crackle, I've used translucent, I've used opaque and
I've also used Matt. Sorry, the opaque is
actually grit paste. It has got some sand to it, as well as the translucent. Now the reason I did that is because each one has a
different texture to it and each one is going to react with the alcohol ink
just a little bit different. So that's the texture or sorry, That's the translucent
one there. That's the opaque grit paste. This is the crackle. What was the other one?
This is the grit paste. Remember where I
put the other one? It'll come to me in a second. But I'd wanted to see all those different
textures in the way they all reacted with the
alcohol ink differently. I'm going to move
this to the side so that I don't
accidentally get some over spray while I'm
creating my file. Where did I put my spray bottle? I know I just grabbed it. Got it. It was under
or something else. Alright, so this is just
99% isopropyl alcohol. And I'm just going to spray, completely clean this off. Then give it a few seconds
for any excess to dissipate. And it happens super quickly. And you can see
right on the surface if it's still wet or if it is all evaporated. So first one I'm going to
use is the crackle paste. We're not using a
lot of each one. And if you didn't want to use for different pace,
you don't have to. I just wanted you
to be able to see the difference
between each one of them and that they
do add something different to each
to the project. Alright, so I'm
just putting it in a random pattern through
my stencil here, and then I'm scraping
the excess off. When you are using a
stencil with texture paste, you want to be able to see
the stencil through it. You don't want to
have so much paste on there that you can't even see your stencil anymore. Because it's just going to
give you big, huge peaks. And it's going to take forever
for that piece to dry. I'm just going to get
this all the way to the bottom edge
of the tile here. I like to have it
completely random. I don't want there to be
any particular edges to it. I want it to be totally,
totally random. Now, if you're
working for awhile, you can have a dish with some water in it that
put your stencil in it. I'm doing two different
texture paste and then I'm gonna let them
completely dry and I'm going to wash my senseless right away so that the pace doesn't have a chance to dry. And you see how different
that piece looks to this one. They look completely
different from each other. So I'm going to take this one and
I'm going to use this part of this stencil here. I'm going to put this right there. Some of it is going on top
of my texture pace here, but I'm just
concentrating up here. If I get any of that,
That's totally fine. My butterfly is going
to cover some of that. It also just adds a
different texture. So I'm going to do
this like this. I don't want to be
transferring that part there. And once again, I'm
only I'm putting it on randomly and I'm
also scraping it off so I don't have
my excess on there. Put the excess back in
the container here. And now I'm going
to let those dry completely before I
add the next two. And I'm also going to clean off my tools so that they are
nothing has a chance to dry on them and they have and they're ready to
go for the next little bit. So 1 second before
you pause here, anything on the x on the side
there that you don't want? Scrape it off now while
it is completely wet. I'll see you for you,
it'll be a seconds. But once this has
completely dried, right, our first toothpastes
are completely dry. And now we're good to
go for the next two. So now I'm putting on
the matte texture paste. I'm just going to
I'm seeing around the outer edge of the tile because I want to have some space in
the center part four. My alcohol ink and I
also want to have space to stamp averse and emboss
it and stuff like that. So I'm trying to keep my texture to the outside to
give me space to do that. That happens, it's all good. It's not going to stick
permanently to the tile. As well as the fact that
when it's like this, it's going to be very
easy to clean up. Because we're working
on a tile and not a canvas or paper or whatever child doesn't
have any tooth to it. So technically, if you tried, you could pick up, pick
off the texture paste. If that bothers you, you can
always work on a wood paddle and prime it with some kills primer
in order to prep it for working with alcohol inks. But you're not
gonna get the same. Look with the alcohol
inks as you do on tile. And since this is an art piece, you're going to hang it
somewhere or I intend to just have it
leaning on a shelf. I don't intend to
actually hang mine. Chances are nothing's
going to happen to it. Most people don't
pick up their art, so I'm not worrying about it. So now I've got the
opaque grit paste. I'm just going to add a little bit down here
and I'm just using the texture knife or the
palette knife for this. You don't necessarily need to have stencils every single time. I'm just trying to
get some texture. It's nice to have a
pattern for some of them, but you don't need
it for all of them. Once again, I'm going around
the side of the tile, making sure to clean off
the edges and I'm just gonna put it in one other place. Here we go. So now we're going to
let that dry completely. And then once that's dry, we can do our alcohol ink layer.
3. Adding the Alcohol Ink Layer: Alright, so our texture paste is completely dried and we're ready to work on the
alcohol ink layer. Now we're actually
only using two colors. We're using pitch
black and Slate. And what I love about
the pitch black is all these different colors that come out of it
when you're using it. There's only those two colors for the alcohol ink part here. It just adds so much interest to all the different things
that come out of it. Let's move this out of
the way so we don't hit that within spray or splatters. So I'm using this is
actually a curling brush, but it's got two different
wattage settings, so you can put it
in a low wattage and it also has a cool setting. So for using it
with alcohol inks, it works absolutely perfect. So I've got just some
99% isopropyl alcohol in the sprayer, and I also have it
in the bottle here. I'm going to spray first just to put a layer
down and I'm gonna do the black towards the edges and more of the gray towards
the center because I wanted to make sure that I
have a light enough area here, especially to do that
sentiment on there. If it's too dark, you're
not gonna see it. Although having said that, if you end up getting it
a little bit too dark, you can always do a different
colored embossing powder. For instance, that
one was done in black and I have gold
accents for this one. Just to change it
up a little bit, we're gonna do some
silver accents. You could do say
silver embossing. If that ain't color got
a little bit too dark. There'll be a slight little
bit of heat to this, but it's very, very minimal. What we're gonna do
is we're gonna do the anchor on the outside first, and then we'll do the all
the inside at once because the inside is where you're gonna see lines and stuff like that. I want to make sure to have a little bit more
control over that. I'm putting some of
the alcohol down, putting some of the isopropyl down as well to help it flow. You also want to make sure
that you're working on a mat that you don't mind
if it gets stained. This mount that I'm using, it's actually just
a baking mount that I've got a pack of them from
Costco several years ago. And it is easy to wipe off. But if it does get stained
and alcohol ink does stain, it doesn't matter
because it's black. You're never gonna see it
in no matter what color, alcohol, you'll never
actually see it. But you see all those
different colors. This is more green. There's almost like a burgundy, pinkie coral tone there. Part of it is reacting with the different
blending solutions, but the other part is the black. It just has different
colors that come out of it. They loved that about it. If by chance you get a
section that is too dark, like for instance, this
here is quite dark. It's just put some
isopropyl and you could only lighten it from the texture pays to
a certain amount, but you'll definitely be
able to lighten it with the with the tile. We go. So now let's work on the center. I'm going to put
some isopropyl down. Then I'm going to put
some of the slate color. Then more isopropyl can
always add more ink. What I'm trying to do is get that just basically to the edges of the texture paste. And then I'm going to
be moving it around. Because of the way
this heat gun works. It's very gentle. But it's also going to keep
the title justice little bit. And as the tile gets
heated up a little bit, it's going to help to
dry the alcohol ink. And with that, you're gonna get some really beautiful lines with it that add another layer
of texture to the tile. A lot of this is dry. There's just some little pools
here that I'm just trying to get that final drying up. And then there's
some parts within the texture paste because the texture pace is kind of
absorbs some of that alcohol. Some of it is still
slightly wet. I think everything
is pretty much dry. What the caps on
our alcohol ink. I like it like that. So
I'm going to leave it if by chance when you do your center, you
don't really like it. Just grabbed some isopropyl. Do it again, restart. You can either restart
and take all this off. You could wipe it
off if you want. I wouldn't do that simply because by adding the isopropyl and then adding more ink or not, whatever, you'll just
change the color, play around with it
until you end up with something that
you like the most. My favorite part
about working with tiles is there, so forgiving, because if by chance you
don't like it at all, you can take a
paper towel and you can wipe it off completely. It's not going to
wipe off the texture based, but that's okay. We're adding extra accents
and stuff like that. And we want that to be
framing the piece anyway, so I don't want to
have that later. But if you don't
like that center, adding some more isopropyl, more ink if you need a little
bit more anchor, whatever, work with it until you
like how it is and you have it light
enough so that we can add that sentiment. So we're gonna add that
sentiment in our next video. Then we're going to also do some of the foundry wax accents. That first, the sample
tile that I made has this one here. It has statue. So
it's kind of like a Goldie, almost coppery color. It's a really pretty
cool, It's not yellow. This one we're going to do with Sterling because there is some
blacks and grays in here. I just want you to
be able to see how just changing that
one thing too. It can change the
way that it looks. Instead of using the gold velum that we've used for these
dicots and the gold accents, we're gonna be using silver. So we're just going to
change anything that's cold in here to silver. Just so that you can
see the difference between the two things there. Take a look at this exactly
the same alcohol ink colors, but look how this is
much more green on this particular tile
than it is on this one. I love how pitch
black does that. I'll see you in the next video. And we're going to add, we're going to start to add
the foundry wax accidents. We're not gonna be
doing all of them. Some of them are gonna
wait till the end. But we'll see you there.
4. Adding Verse & Leafing Accents: Alright, so now let's
add the verse and our first layer of
the leafing accents. In this one here at my sample, I use this first, this one here. I'm going to just
change the verse up. Only. The verses aren't
exactly the same. And the tiles, you can put whatever sentimental verse
or whatever you want. When I was making
my original sample, I actually couldn't
decide between this one and the
one that I chose. Better compromise than
doing one with each. I'm just using a
verse of Mark ink. I'm going to stamp it and
press nice and firmly. Make sure that
your stamp doesn't slide because otherwise you
are not going to get a nice, clean, pristine embossed image. And then you can
see that I held it down while I pressed in
the all the areas to make sure that it was
completely covered. The excess of the powder
and putting it in my back and my container and then I have this
little tiny brush here. Any powder that
is still on here. If we don't take it off, it is going to emboss. We want to make sure
to take it off. I'm going to brush it right
off onto my scrap paper. They're typically
if this was paper, you would flick it and the
access would come off, I just blew it and
some of that came off. But there's still some areas
like the center up is a here where it hasn't
really come off. And if I go and melted, it's just going to
melt rate on the tile. Best to fix it right now. Then this f here
isn't very clear. You want to make sure, especially for this
because these, the sentiment is so small you want to
make sure you have a really fine brush you want
wouldn't want to take a big, huge brush to try to clean out and try to be
precise with it. I'm gonna leave it like that. The A's are a little bit thick, but they're all a
little bit thick. So that's just the font. So I'm just going to
leave that there. I'm going to close my container. Now for this and for
the Foundry racks, I need to use a heat gun. This is going to have heat, it's going to melt the powder. And it's also going to help the leafing come out of the wax. You need heat in order
to be able to do that. So that gun that we're using for the alcohol
ink, that is not gonna work. There's not enough heat in that. My tile is cold right now, so it's gonna take
a few seconds for the heat gun to heat the
tile enough to melt it. So it's going to happen. You just need to be patient. It's easy to see when it
is heated and when it's, when it's not because it
goes nice and glossy. And when the powder
isn't heated, it still mat and granular, but you do have to wait
for that tile to heat up. Which does happen. Alright, so now let's add
some other foundry wax. Now. You have to shake your foundry wax up to make sure everything
is all mixed together. The Sterling one is thicker
than any of the other ones. They all have here, the ball, they all have
a little ball in here. This one, you can't really hear it quite as much
and it's because of the it's just a thicker
mixture than the rest of them. And Tim Holtz, when
he introduced these, he said that that's just
the way the formulas work. You can hear the
ball a little bit, but you'll never hear it
as much as the other ones. But you want to make sure
that it's nice and shaken up. Put it on your surface. There were only using a little bit at a time and make sure that you put the lid onto the jar while you're not using
it because it does dry a quite quickly and we
don't want it to dry up in the bottle as well. When we go to heat this up, we need to heat
it up to make the leafing come to the surface. We need to make
sure that we're not aiming the heat
gun at the bottle. It will solidify the
stuff in the bottle. If the heat gun hits it or if you store it
in a warm place. So just be aware of that. Then you'll notice that, I mean, that went really
thick fairly quickly. So that's why we only work
in little bits at a time. So I'm basically
concentrating on the edges. I'm going to add a little bit to the surface of some of this crackle paste and
some of the texture paste. But we also have other accidents that
are going on here and anything that we feel
that we missed or we want it a little bit
of leafing at the end, we can go and add that again. Then rather than spending
too much time putting on, on areas that aren't going
to end up being covered by our little accents in our
different texture pieces. Right now I'm just
basically trying to use up what's on my table here. You put it wherever you want it. Lighter hand, you're
gonna get less on there. It's gonna be more
subtle, heavier hand. It's going to be sorry, I have your amount on
there to clean this up. It just cleans up with
isopropyl alcohol. Makes sure that you're
not spraying that facing your tile because
it will affect your tile. It'll affect any of the
alcohol ink on there. You don't have to clean
it up right away. You can wait to clean it up. It's not going to stick to your mat more if
you let it sit there. Just a good idea to learn how to clean up regularly
after yourself. Alright, so I am
using the heat gun. You're going to be almost
like embossing powder. You'll see the difference
in the family wax. The leaving rate
comes to the surface and it gets nice and shiny. There we go. So the areas that I have it on
their super thick, gonna be a lot more glossy, a lot more leafed than the
areas that were very subtle. But I like again, seeing the difference between the parts that are
very obviously lived and the parts that just have a little bit
of silver accents. I'm going to let that
cool In the next video. We're gonna start to die
cutter pieces and prep them in order to add
them to the tile.
5. Prepping Butterflies & Other Accents: Part 1: Alright, so our alcohol ink are gilding, everything
is all done. We need to get all
of the accents ready to put onto the
front of our tile. So let's talk about
this a second. This key here. I don't even know
where I got it. It's a metal key
and I used I used the statue foundry
wax to color it. I happened to have
some wood one, so we're just going to use
that for this particular one. You can use whatever
accidents you want. It doesn't have to be
exactly the same as mine. You could use any charms. You could use dicots. I'm gonna, we're gonna do
some dicot butterflies, but you could also use this
with a dicot and layer it up. So it's got some dimension
to it and make it a foci. I've got some wooden laser cut leaves here that are
gonna be used for this. And again, that can be anything. It doesn't have to be leaves. It could be whatever you want. It could use found objects. Just have some fun
with it and go look around and see what you
have and you can be using for the leaves. All I did was use some
alcohol ink with them. And I just wanted to just
seeing them just so they weren't the bright wood color. That's all I'm
gonna do with them. That and then a little
bit of isopropyl to help spread it around. You could do as much or
as little as you want. I only did the gray because I didn't want it to be I didn't want them
to be black leaves. I just want them, wanted them to not be so bright
against the background. I'm gonna put that
aside and let that dry. And then I'm going to use
the silver foundry wax to accent the edges of them. Whereas my paper
towel, a socket here, we don't want to be
dipping anything else into the alcohol ink. So I'm just gonna use a
little bit of founder wax to color this key. I prefer to use my
finger to apply it. You could. If you want. I'm just gonna put a
little bit more down before doing this
next if you want, you could use a paintbrush. You do have to work
quickly because it does dry fairly quickly. But when I use a brush,
There's not a whole lot. If I go and tap it before
it gets too thick, you can get a better
amount on there. Remember, we're not
going to be seeing this entire key because
it is going to be covered with our
butterflies there. So we're only going
to see parts of it. When I did that original key, I had had a mishap. And there was a little bit
of a dry piece at the end of that bottle that
I had used it, I got a big spot. This is actually how
I colored that one. I just tapped it into
the boundary wax. So when I do that, I lose all the detail that's
on the top of that key. If that's important to you, then keep that in mind
when you're adding your accents to it. I'm just going to clear
this off a second. Clearly excess off
of my fingers. Then let's cut some butterflies. I have this large
perspective butterfly here that we're going to
use in the background. A oily dy would be
really pretty too. Or even if you have the paper Doyle is, you
could even use crochet. Doyle is if you have them
that you want to use. I'm going to use some silver
velum to cut that one out. I'm gonna do that one last
just because sometimes all of those bits take a
bit to come out of the die. And it's just not very
exciting to watch. For my smaller guys here. I have two of them that
are just outlines. And then two of them that have all the detail that
gets cut out of them. I'm doing my silver. This is a textured paper that I just happened
to have on hand. You could do it
with the same velum is just to add a bit of a different texture
behind the butterfly. So you could do
whatever you want. It could be a printed paper, it could be just
a silver vellum, It could be a clear velum,
whatever you're wanting. I'm going to do my butterflies that have the detailed
cutouts out of this paper. And I'm going to do my
outline butterflies with that silver textured paper. The black paper I have here is actually black alcohol
ink card stock. You could use regular black
card stock if you want. What I love about the alcohol
ink card stock is it just has a beautiful
suede like finish. I've got silver
and stuff on mine or whenever that you're not gonna see when
you're doing it. But it's just got a really
beautiful finish to it that you don't get from
regular card stock. So let us get the machine. Cut them both at the same time. I'm gonna put my outline dies. First. The paper on top of that. Then the detailed dies. I didn't cut the
paper down for the first for my sample, but
I'll do it for this one. Because you don't
really necessarily need an entire piece
of paper in there. Run it through. I do tend to put this one back and forth a little bit
just to get some of the detail out of that. The black dye as
the ones that have all the pieces to them. Let's give these
onto the desk there. My paper shifted
to recap that one, but I'll show you how to
put one of the butterflies together and I'll hit that one by moving it back and forth. You do risk that especially on dyes that are just
outlines like that. It's easy for them to
pop out of the die. That doesn't really happen with the ones that have
some detail with it because those blades tend to
keep that paper in the die. While it is still in the die. I'm using a tool
and one good a bit of a brush at the end there. And that helps to pick
all of those bits and pieces out of that die cut. I'm just doing it on my surface here so that you can see it. Typically, I'll do
that right over top of the garbage can. And typically as well by
the time I'm done that there's usually not a ton
of pieces left in here. There are some. So I'm gonna take my diaper bag. I'm just going to
quickly put those out if by chance and you shouldn't have it
because we went back and forth. But if by chance there's a piece that didn't really cut
all the way through. You can use scissors
to help you. You can use an exacto knife
and a mad if you want. Often if it's not cut
all the way through, it's cut out enough that when I push it to
the back and pull it, if by chance the paper
rips a tiny little bit, It's on the back of your card
stock and you don't see it. One little piece right there. That piece doesn't
want to come out. Then make sure that you've
got all the little bits completely out and out
stuck onto the back. One more right there. Kind
of hard to see sometimes with the black card stock
against the black surface here. But that's okay.
6. Prepping Butterflies & Other Accents: Part 2: Here we go. I want a little bit. Wants to stay right
there. Alright, get little bits out of the way. And now what I'm going
to do is I'm going to glue this to the silver piece, but I'm only going to
glue that center body. I want to have the dimension. The cut-out wings lifted
up above the silver, if you prefer, and
you want to glue the entire thing down,
you absolutely can. I just like to look at
that for this project. I will do this other piece off camera so you don't
have to watch that, but the second butterfly gets, goes together than the exact
same way as the first. Then when it comes to the
perspective butterfly, my dy here, I'm going to
cut my paper smaller. Because this big piece of paper
won't fit in the machine. Then because there's so
much detail in this dy, I'm going to replace
my bottom plate with the precision base plate. That's just going to help
it get a lot more detail. Cut out of that butterfly. In order to do that,
most of the time I have my die blade facing up, but for this I have
it facing the plate. And it has to be this
side of the plate, not the side of the plate
that has the label. I'm gonna run it back
and forth a little bit. Because there's so much
detail in that die. I have yet to have one shift. What I want to make sure
that I give that guy a chance to get through all
those little bits and pieces. Typically for a die this detailed I would to
change angles on it. But because this dye is so big, there's no different ways
you could have the angles on the machine. We don't
have that option. Now just like that
smaller butterfly, what I'll typically
do first is go like this with the tool
and one could get as many of those pieces out while I still have
it in the dye. Because this is vellum. It's a little bit more delicate. And by leaving it in the dye that just protects
it a little bit. And look at all of
those pieces that came out super quick and easy. Once you're done
that you can take the piece out of the die. Makes sure that you're
careful with it because it is vellum, it will stick in some areas. And if you pull too
hard, it can break. Not as stable as doing
this with card stock. This part, especially it's
just a really thin area. It's really, you have to be really
careful with that part. If by chance you do
happen to break it while you're taking it
out than what I would. I just broke off the antenna, but I did that on the
first one as well. What I would do
is you can either glue those pieces in place on the project or just move your elements around
to hide some of the imperfections or hide what it is that you don't
want people to see. Most of the time, especially
with mixed media, there's so much going on
that people don't see those things that you
view as imperfections. Unless you're pointing
them out most of the time, they
don't even see them. If by chance they do. You could just say it was
a completely intentional. Alright, so most of
these pieces are out, any of the pieces that
haven't already come out, they're easy to pull rate out. So I'll do that off camera. Last step in these accents here. Now that the alcohol ink
has dried on my leaves, I'm just going to add a
little bit of foundry wax, boundary wax, not alcohol ink. Definitely need to
grab the right bottle. Going to add those accents
around the leaves. And then I want to
use my heat gun to make that leafing
come to the surface. And I'm only doing
them around the leaf. I don't want to cover the
entire thing and silver. One of those things that
often less is more. If you completely
covered in silver, it just is a silver object. But by highlighting
the outer edges and just accenting it, it looks a lot more interesting. Girl, Let's get this
off of the mat. I'll clean it a
bit better later. I'm just going to
use my die picked to hold it in place
while I am leaving. You'll notice in some
of the thicker areas that leafing what Boyle and bubble and I love it when that happens, it
adds more texture. See how if you
don't hold it down and it kind of moves on its own. Once the heat gun is warmed up, it takes way less time. Alright, we've got our accents, they're all ready to go. I will see you in the
next video and we will do one more step and then start
gluing these pieces down.
7. Stamping Background Texture & Adding Accents to the Tile: Alright, so we've got all our
accents made ready to go. So what we're gonna
do for this video, we're going to
place them or we're not going to have to
glue them down yet. Before we glue them down, we're just going to
add a little bit of stamped texture to
the background. And it's much easier to do it before anything's glued down. But after we've placed it so we kinda know what
areas are open. So to do that, we're just using I just have
a script stamp. It can be whatever
stamp that you want. It doesn't necessarily
have to be a script stamp. And I've got some
archival ink here. Now the archival ink
that I have is black. And if you do all
of this in black, it's going to compete
with everything. We're just wanting
some subtle texture. What you're gonna do to get
it a little bit lighter, a little bit more subtle
is dip it in the ink but then put it on some paper
towel or some paper in order to get some of that excess ink off of
there and lighten it. So I'm going to put my leaves and my little accents where I'm wanting them to go. Just so that I can
see what area I feel needs some extra
little bit of texture. If you don't want to do
this, you don't have to. If you feel that there's
enough texture there, you don't need to add
anything else to it. Then you don't have
to. But sometimes it's just those subtle little bits that you don't even necessarily notice that add a
lot to your piece. All right, so I've got everything
where I want it to go. When I get it glued. I'm going to tip it in
ink pad and then I'm just going to lightly stamp it. Now, if that's still
too dark for you, this takes a little
while to dry, so what you can do, It's just blot it
with your finger. Just keep in mind that you've now got a
little bit of ink on your fingers so you don't want
to touch it anywhere else. This script goes all sorts
of different directions. So you don't necessarily
need to worry about making sure it is the right way. You can't read what it says. It's just adding some subtle texture to that
background there. If you don't want to
touch it with your finger and you feel it's a
little bit too dark, just blot it with
your paper towel. When you do do that though, if you blot it and then
immediately blot it again, you will get some transfer. That is okay. But just know that
it's going to happen. So if you don't like that or
don't want that to happen, then blot it and then brought it in a
completely separate area. If you're wanting to make
sure that it's totally clean. I'm just going to put a
tiny little bit right there and right there
and then I'm done. I don't think it
needs a whole lot. It's just just a subtle
thing in the background. Now we can glue bits in place. I'm using some distress
collage medium to do this, this glue. You can glue wood, you can glute on tile, you can glue all sorts of
different surfaces with it. And it glues really well. The one thing though
is you do need to let it sit and dry. So I'm going to
glue everything in place and then I
am going to leave the room and not touch it for a little while
till it's dry. How long? I actually don't know. I've never timed it. I typically will glue stuff, leave the room and then go do
some housework or whatever. So just be aware that it
doesn't dry immediately. It does take a
little bit to dry. I'm just going for
the butterfly. I'm just going to glue the center of the body and just a little bit
into the leaves. I want 30 be a little bit of
it that is not glued down. Obviously, I didn't take
this part of the wing off. What I'm going to do is once everything is glued
down and dried, I'll just take some
scissors and snippet. If you prefer to snip
it ahead of time, you absolutely can do that.
Depending on what it is. You may need to hold it for a few seconds just
till it sticks. The glue starts to
dry a little bit. I personally don't like it when my butterflies
face the same way, so I usually have them
facing different ways. Again, as a personal
preference thing, if you like them
to face the same way, that's totally fine. Or you can space
them the other ways. So I'm gonna leave that
completely there to dry. I will see you in the
next video and we're going to add our last
little bit of leafing.
8. Final Leafing Accents: All right, Our glue is
all completely dried. Just going to flip this over and cut my big butterfly here. I'm not trying to cut that smaller one that's
laying on top of it. Go now you could leave it
exactly as is if you wanted or I wanted to make
some of the leafing. I wanted to intensify it a little bit and just add a
little bit of drips coming down because I
thought that would be a nice texture on there. So once again, make sure it's
shaken really, really well. I'm going to lift the tile up. That as I'm pouring
this on here, it can go a little bit down. Because I want those drips to look a little
bit more natural. Then I'm going to let it dry. I'm gonna do the same
thing on this side. Now. I'm doing it deliberately
so that it's not the drops are not all exactly the same
length because that would look fairly unnatural out a little bit at the bottom here. Then a little bit coming down from the butterfly
and then leaves. Once again, it's as much
or as little as you want. Wanted a little bit
coming down from here. I want to look at wanted
to look like drips, but I also don't want it
going down the entire thing. So I do want to try
control it a little bit. I'm going to let that
dry for a few seconds. It doesn't need
to completely dry before using the heat gun on it. So I'm going to pause
this video until it's fully dry and then
I'll grab the heat. All right, it has
had a chance to dry, so let's hit it with
a heat gun to bring that leaving to the surface. Takes a few minutes or a few seconds or whatever
because my heat gun is in bold as well as that tile. So just like the embossing, we need to heat up that tile. Now obviously I put it on
fairly thick because I wanted the lusciousness of a nice thick drip
with the leafing. You could use a
paintbrush and do it thinner if you wanted
it to be more subtle. I believe I said it before, but the leafing does have to be done with the embossing
gun because it's the heat that makes
that reaction form that brings that leaping to
the surface, not the air. We do definitely need
two different tools for the different jobs
for this project. All right, so our tile is
completely done there. Like I said earlier, I do plan on just propping
this up on a shelf. I don't plan on
hanging on a wall. If you were wanting
to hang it on a wall, you could add
hanger to the back. You'd would need to make
sure that you're using a type of hanger and
type of glue that's going to stick to the
back of the tile. But I am going to leave
it just like that. I love all the texture in there. I loved the silver accents. Really, I'm having a
hard time deciding which version I like better. Once again, like I said before, we embossed the verse in black. If you wanted on this one, you could do silver
embossing powder, or in this one you could
do golden blasting powder completely your choice. Neither is right or wrong,
it's just personal preference. But there you go. I hope you enjoyed this
and I'll see you soon.
9. Media Tile Class Thank You: Thank you so much for joining me for the mixed media tile class. I hope you enjoyed
learning how to go through this process and have fun
making one on your own. Don't forget that
this is my list is included in this class. So it'll list all
the things that we used to create this peace. Hope to see you
back in class soon.
 Artsy. Island Girl, Teacher