Transcripts
1. Introduction: Do you enjoy exploring the possibilities of
mixed media art making? Have you ever wished you could
travel to a mythical land? Hi, I'm Elizabeth and
welcome to my class Mixed Media Mythical
Land Map Making. I'm a professionally trained
artist and art educator, as well as a published
author illustrator, and I love sharing my
own artistic journey and creative expression
and growth as an artist with my students
and fellow creatives. I've been teaching
classes on Skillshare since 2020, sharing my Creative approaches, ways that I break down art slumps and different approaches
to media and technique and the creative
process with my students, and I am super excited to
share my newest class, mixed media Mythical
Land mapmaking with you. In this class, we'll incorporate a variety of art materials and mixed media techniques to create our own
mythical land map. This class is intended for creatives of all skill levels as a way to use mixed media
art making in a new way, dust off maybe some
old collage papers that you have created or
collected that are lying around and explore
some of the ways that we can work with
mark making to give our maps some interesting
geography and personality and
mystery and magic and to incorporate
our imaginations into our art practice as we create really fun mixed
media art projects. By the end of this
class, you'll have brainstormed ideas for
your own mythical land. You'll have learned
how to use collage as a foundation for
imaginary mapmaking. Learned mixed media techniques
to add mapmaking details, explored mark making to define sections of
your mythical land, letting our imaginations and mark making potential run wild. Join me on this fun trip of mixed media art making as we bring our mythical
lands to life.
2. Class Project: Okay. Thanks for joining me. We'll take a look at
some map examples, as well as dive a little bit
into the history of making, as we brainstorm ideas for personalizing our own
mythical land maps. For this class, we'll
be incorporating a variety of mixed media
materials and techniques, but feel free to use whatever art supplies you have on hand. In the next lesson,
we'll talk about some art supplies that you
might want to have on hand, as well as a few key
essential ones as we begin brainstorming and preparing to create our mythical land
maps. See you there.
3. Materials: Okay. Let's talk about what materials you might
want to use for class. The great thing about mixed
media art making is that you can really work with whatever art supplies you have on hand. For this project, we'll be using collage materials to
define our land masses. And then whatever drawing and painting supplies you
have on hand can then be added to further
enhance and add character and detail to
your mythical land mass. So the materials for
a mixed media class tend to vary widely, and a lot of them depend
on what you have at home. And I highly encourage
you to really kind of dig around and find some interesting things to work with. But the ones that we're going to definitely want to
have on hand would be some watercolor or
mixed media paper, something that can
handle collaging onto it as well as drawing
or painting back into it. We're going to do
some brainstrmming. I also want to have
some scrap paper or a sketchbook that
I can brainstrm into. This sketchbook here works
great for everything. And then we're going
to be collaging. So we're going to need
some decorative papers that you either find
or you've created. Because we're creating
mythical land maps, it doesn't really matter
what colors you choose. My idea is to do an island. I want to find or create some blue paper for my background that I'm going
to build everything up on. I'm going to want some green, some earth tones, maybe even
some fun colored stuff. I'm just going to d through my different decorative
textured papers in my collage dash and see
what I have going there. And then because this
is a little thicker, I'm going to be
doing the bulk of my collaging with
white liquid glue. But if your papers
are thinner or you're using magazine images
or construction paper, a glue stick might work
just fine for you. So to glue this down, I'm going to get
an old paint brush so that I can easily
put that down, some scrap paper, so I can
keep my work area clean. I'm going to be
tearing all my papers, but if you wanted to
have cleaner lines, feel free to grab a
pair of scissors, then I might want to
make some new paper. I haven't decided yet. So I've got my water colors
on hand and a brush. Cup of water, some cloth, just so that I have
the option to create a larger background
for my ocean or some more decorative papers depending on where
the idea takes me. And then for the
mixed media elements, I'm going to use my fine liner, I've got a paint pen, a sharpie. I've got some acrylic markers, a white pasta because you just never know when
you might want to put some white back into it as
well as my colored pencils. You could also use soft
pestel oil pastel, acrylic paint, ink. So when we get to
the mark making and the mixed media
element after we've built up our collage
land masses, Feel free to get out anything that you have that you think would make for an
interesting addition to your mythical land map. If you're interested in creating your own decorative textured
papers for collage, you might want to
check out some of my other Skillshare classes, as well as the art
demonstration videos that I share on my
YouTube channel. You can find links to
suggested classes as well as my YouTube channel
on the projects and resources section
of our class. Let's head it over to
our next lesson and brainstorm some mark
making approaches we might want to take to defining the various sections of
our maps. See you as soon.
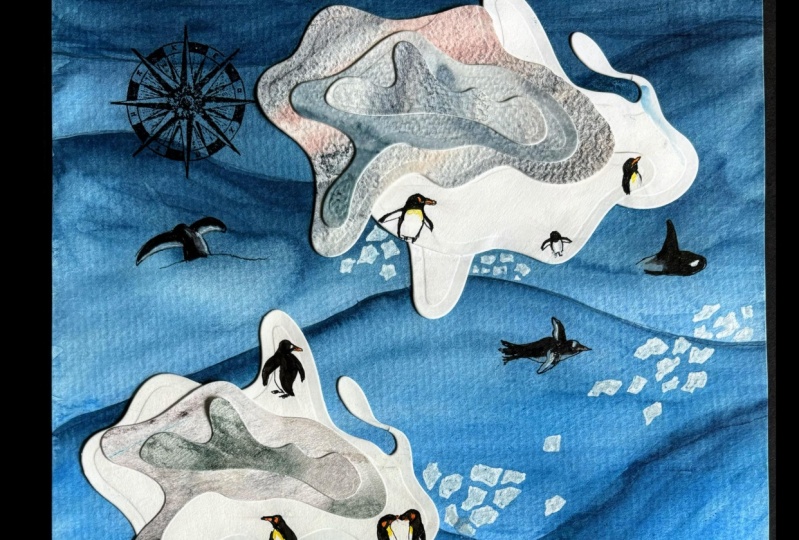
4. Map Symbol Brainstorming: Okay. Maps have been an important part of
human history dating back to what is believed to
be the oldest surviving map, a Babylonian world
map created in 600 B, which was a symbolic clay
tablet map of the world. In the Pacific Islands and navigational maps
such as this one, were created using
sticks, plants, and shells to define the
islands and ocean currents to help islanders
navigate the waters around the Pacific islands. Paper maps have been created
as people have explored and documented the types of
geography they discovered, the mists they couldn't
explain or legends they heard and shared that with others who followed
in their footsteps. Authors of fantasy
have created maps to define the imagined worlds
of their characters. And we can draw from
all of these as we find inspiration for our
own mythical land maps. There's a couple of key things that you
might want to think about when you're
designing your map. But this is your map, so feel free to get as creative and imaginative
as you possibly can. Maps are filled with markings to help communicate information. So what information do you
want to share with someone who is considering exploring
your mythical land? Do you want to have a compass on it, indicating direction? Is that compass going to be traditional north
Southeast and West? Is your mythical land perhaps
not even on this planet, and the direction you might
indicate with a compass would be different because you're in a different part
of the solar system? Who knows? It might
be a key on your map. You can keep easily communicate to someone looking at your map, what the symbols that
you've created represent, especially if you are
going to other planets? What marks could
you make to help define the geographic sections and various biomes
that one might find if they explored
your mythical land? What creatures live in and
around your mythical land? So now we're going to
brainstorm some ideas for symbols that we might want
to incorporate on our map. So, the first thing I'm
going to do is create a list of different
types of geography, different types of vegetation, anything that I can think of that I might want to
incorporate on a map or that I've remembered
seeing on other maps and map keys so that I
can have a great list of ideas to draw from
as I really start developing and building up the character of
my mythical land. So I've got mountains,
hills, rocks, trees, or forest, water,
flowers, berries, cliffs, kind of thinking about
different ways to indicate elevation and big changes
in elevation, sand. And then I'm going to go
through and I'm going to create ways that I could depict that
with some simple ink lines. There's a variety of different
ways that we can do this. So really have some fun playing around with mark making and line to figure out ways that you can communicate to
somebody looking at your map, what type of land it is and what different things
they might find if they had traveled
there to explore it. And I really wanted
to come up with several different ways
to depict each of these so that I could have
a lot to pick and choose from within
each category. And figuring that there were
different types of trees. There were different kind of
ways you could depict rocks. There were different
types of hills, different ways we could depict the variety that one can find in mountains
across the world. All the sort of ways.
And then a lot of them were kind of
stereotypical ways, you know, the little
swoopy scallop shapes that are used to depict water. I also tried to think about
ways that I could depict inland water versus ocean
water and currents, perhaps was what I
was going for with kind of the two
parallel running lines. And then different
ways you could depict flowers very simply with ink. And then as I had new ideas, I kind of kept jumping
back around because as you're going to get into
your brainstormming process, you're going to get even
more inspiration and ideas, and you're going to have
it grow and grow and grow. So I recommend
exploring this step of the brainstorming process
until you run out of ideas. And then you can even come
back to it another time, too, because as we kind
of think about things and kind of put it
in the back of our minds, sometimes new things pop up. You notice I jumped
up to the trees and I added a way to indicate
a fruiting tree because that's kind of a
significant thing on a map if one was looking for
ways to sustain oneself. Clifts were kind of tricky, but I wasn't sure if I
was going to use it, but I just thought it'd
be kind of interesting to have different elevation
changes on my map. And then I wanted to get into what animals might be there, what creatures one might find. So I've got some
stereotypical images of different ways you
can depict fish very simply. That's
the other thing. As you're thinking
about your map symbols, we want to go for simplicity. How can you with a
very minimal amount of lines communicate to someone what's going
on in a part of your map. So think about that, too, because you can
get very detailed. Some maps are very ornate, but I would start with
the most basic ideas for different ways to depict
things and then you can add more elements
as you go along. So have some fun with us. Brainstorm as many ideas
as you can come up with. And then we'll move on to the
next step of our project. Now that we brainstorm
some symbols that we might want to
include on our maps. We're going to head on over
to the next lesson and begin peging our land
masses. See you soon.
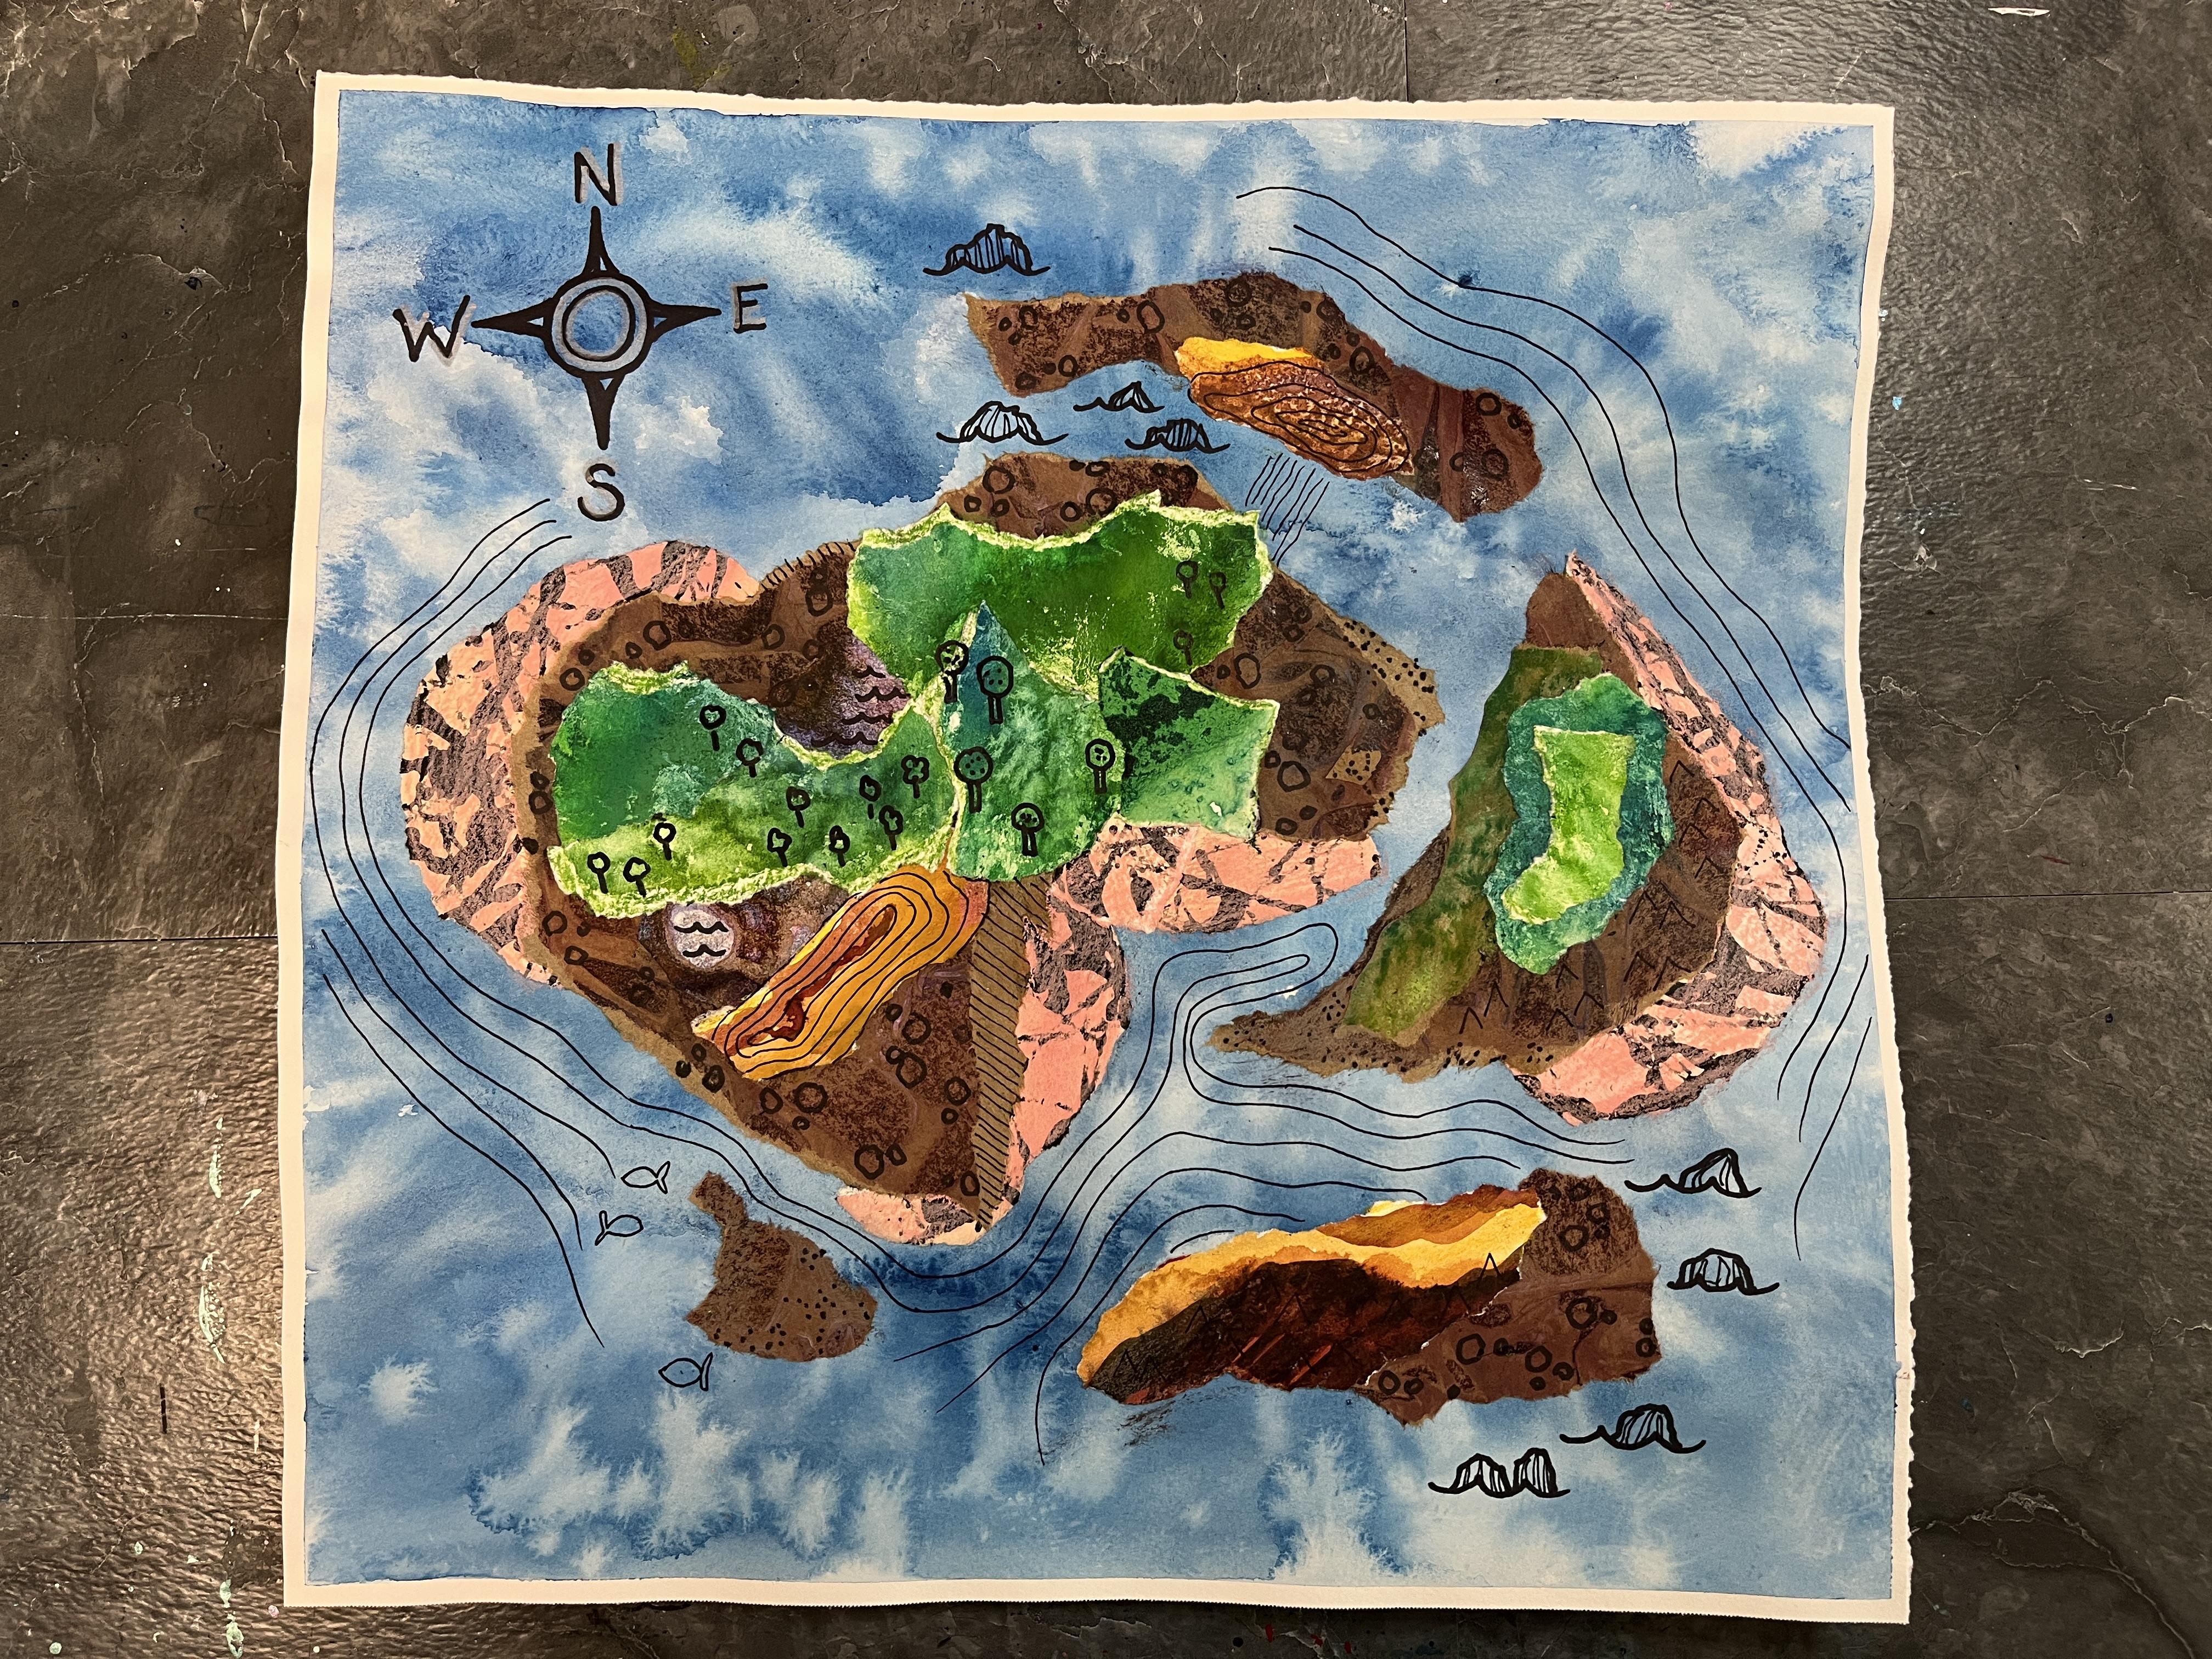
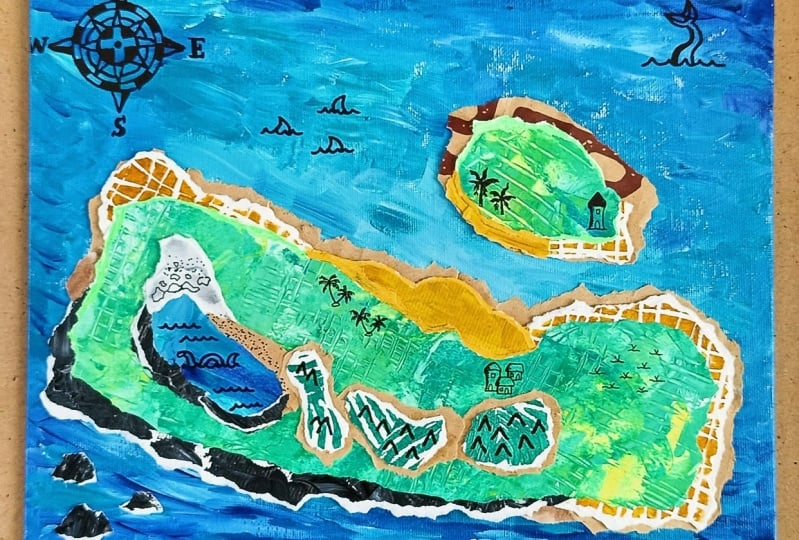
5. Collaging: First, we need to
define our land and waterways using
collage materials. So the first thing
that I want to do is, I want to go through
my collection of collage materials and
pull out papers that might work for different
types of land that I might want to include in
my mythical land map, as well as water features, really anything that kind
of speaks to me that could work for different
types of geography. You could brainstorm
this in a different way. You could kind of, you know, make a list if you prefer or kind of do some
little sketches, kind of thinking of
the different types of geography you might want to include in your mythical landmp. I really love to approach collage through an
intuitive nature, and I love getting inspired by the type of
collage materials that I have. So a lot of these
papers are actually, I think all of these papers
in this box are ones that I created using different
watercolor techniques, watercolor and ink, playing
around with acrylic, acrylic inks, ink inks. So I have quite a collection of different collage materials that I can draw from for this. But I did find that
I don't have a lot of browns and
oranges and yellows. So that was kind of
a stretch for me to kind of find the little bits
and pieces that had those. So the other thing you could do, if you don't have
papers that would work for your idea for your mythical land,
you could make some. And there's a lot
of ways you can do that using whatever art
supplies you have on hand. You can also look at magazines, and you can use
construction paper. You can find some already
patterned collage materials at the store or at resale shops. So lots of different ways
you can work with fledge. You could even use, you know, brown paper bags
from the store or packing materials that you might be used to kind of
fill boxes that come in. So really kind of think
about how you can creatively collect and curate
collage materials for this portion of the class. So I'm just kind of
I'm going to pull out anything that could
be something, and then I'm going to organize them into color piles of like, what could be lush greenland, what could be beaches
and rocks and different kind of coastal
type pieces of paper. And then what could be water features and jungles however you want to organize it to I did decide that I wanted to create a new ocean
background paper because I didn't have any more large blue decorative papers
in my collection. So I'm just doing some wet
on wet application with blue water color and a couple of different blue hues that I
happen to have in my palette. And really getting up
some nice juicy color. I'm trying to play
with value variation so that it's not just
a solid wash of blue. But if you like a
solid wash of blue, feel free to use blue
paper or to paint it in a way that gives you that
blue wash. I love texture. So any chance I can play with texture,
I'm going to take it. And then I wanted to
do a little bit with splattering water so that I had some really cool blooms
in the background. And then I decided to take
my cloth and kind of pull up some of the areas where I had some puddling so that
it could dry faster. And then while that was drying, I didn't want to
stop mapping out my collage aspects
for my picture. So I cut another piece
of paper that was the same size as my
watercolor background so that I could use
that as a template. Almost like a collage sketch where I can kind of map out
where things are going to go, brains from some ideas, and then translate that when my background ocean is dry when I go to
glue down my pieces. So the next step for me
was to start putting in different details
and figuring out my composition on my page. So I'm tearing out papers from my stash just to kind of build up the basic island formations, because I knew I wanted to do a grouping of
islands for my land. You wouldn't have
to do an island. You could have it, you
know, land coming off. The whole thing could be
land. It wouldn't have to have any water at all if
you didn't want it to. But I really liked what the
idea of islands gave me as far as possibilities for what could be happening
in my mythical land. So now I'm just taking
different pieces of decorative papers,
textured papers, and kind of tearing them out, letting it have a real
organic feeling and intuitively building up
different sections of my land. I did end up using some very
textured papers for this. So I did find later
on that limited me a little bit in
defining my marks, but it was also really fun to use my decorative
papers in this way. And I'm using pieces
of decorative paper together that I
wouldn't normally collage in a different scenario. So that was also fun because
it allowed me to approach mixed media collage making in a way that was not common in the other ways that
I had to incorporate collage into my mixed
media art practice. So I'm just playing around, digging through finding
different ways to combine it, and then rough sketching
in some ideas of things I might want to add later when I get into the
mark making portion. So I'm inspired by the brainstorming map symbols that I created in
the previous lesson. I'm kind of thinking about
how can I indicate currents? Where do I want to put marks to add more character to this, and how do I continue to
personalize and add character and kind of complete the
idea of my mythical land. So now my watercolor
paper is dry. So I'm going to use
some white liquid glue, and I'm going to use
an old paper brush, and I'm going to gradually
build up my collage. So you saw me move it over from the template paper
to the actual paper. Some things got shifted between the two
steps. That's okay. I didn't mean to take a picture of it when it was
in template form, so I had a guide to follow, but that step got forgotten and the excitement of planning
out my mythical land. So I'm just letting
it evolve organically and kind of go loosely
off of my original idea. Now, depending on how thick or thin your
decorative paper is, you might be able to get
away with a glue stick. My papers tend to be on
watercolor and mixed media paper, so I tend to always use the white liquid glue
and painted on so that I can guarantee I have some
really good adhesion as I'm building up my collages. And then just lifting and putting things down
and getting things settled for their
final destination on my Mythical and map. And this step was really fun. It was really great
to kind of commit to location and really start
letting it come together. So just keep blowing and getting everything settled
in along the way so that everything is attached really well so that
we can let it dry and then get to the map symbol Mark making in the next lesson. And then once I had
everything glued down, I used my template paper to put over the top and
kind of furnish it, as well as flipping it
upside down and furnishing again so that everything
was adhered really, really well for the final step. And then I'm going to let this
step of the project before moving on to adding in the map symbols and other
mixed media techniques. Our next lesson. We
are going to be using Inc to define different
sections of our map. Using the marks and the
different map symbols that we came up with in
our brainstorming lesson. Then we're also
going to work with any other mixed media
materials that you have to further define
your land mass, what's happening in the ocean. Maybe you want to
add some creatures, either on your
land in the water. Maybe you want to
have some indication of currents or types of water that one
might encounter if they were sailing
to your land mass. Let's head on over to
our next lesson to add the finishing details
to our mythical land maps. See sil. Okay.
6. Mixed Media Map Markings: Now that our collage
lands are dry, we're ready to further
define our maps and their various parts using
mixed media techniques. I refer back to your brainstorming
sheet at any point in time to get ideas
for what ones would actually work with the
land masses that you've created as well as any new
ones that might come up. I'm all for intuitive
inspiration and in the moment
organic creating. So anything that comes to mind, go ahead and add it to your
map because it is your world, and you get to make it
whatever you want it to be. As you think about
different things that you might want to add to your map, you might want to
consider, are there elevation changes?
Are there dangers? Are there mysteries that someone might come across?
Is there treasure? Who knows. So really let your imaginations run wild as you bring your mythical
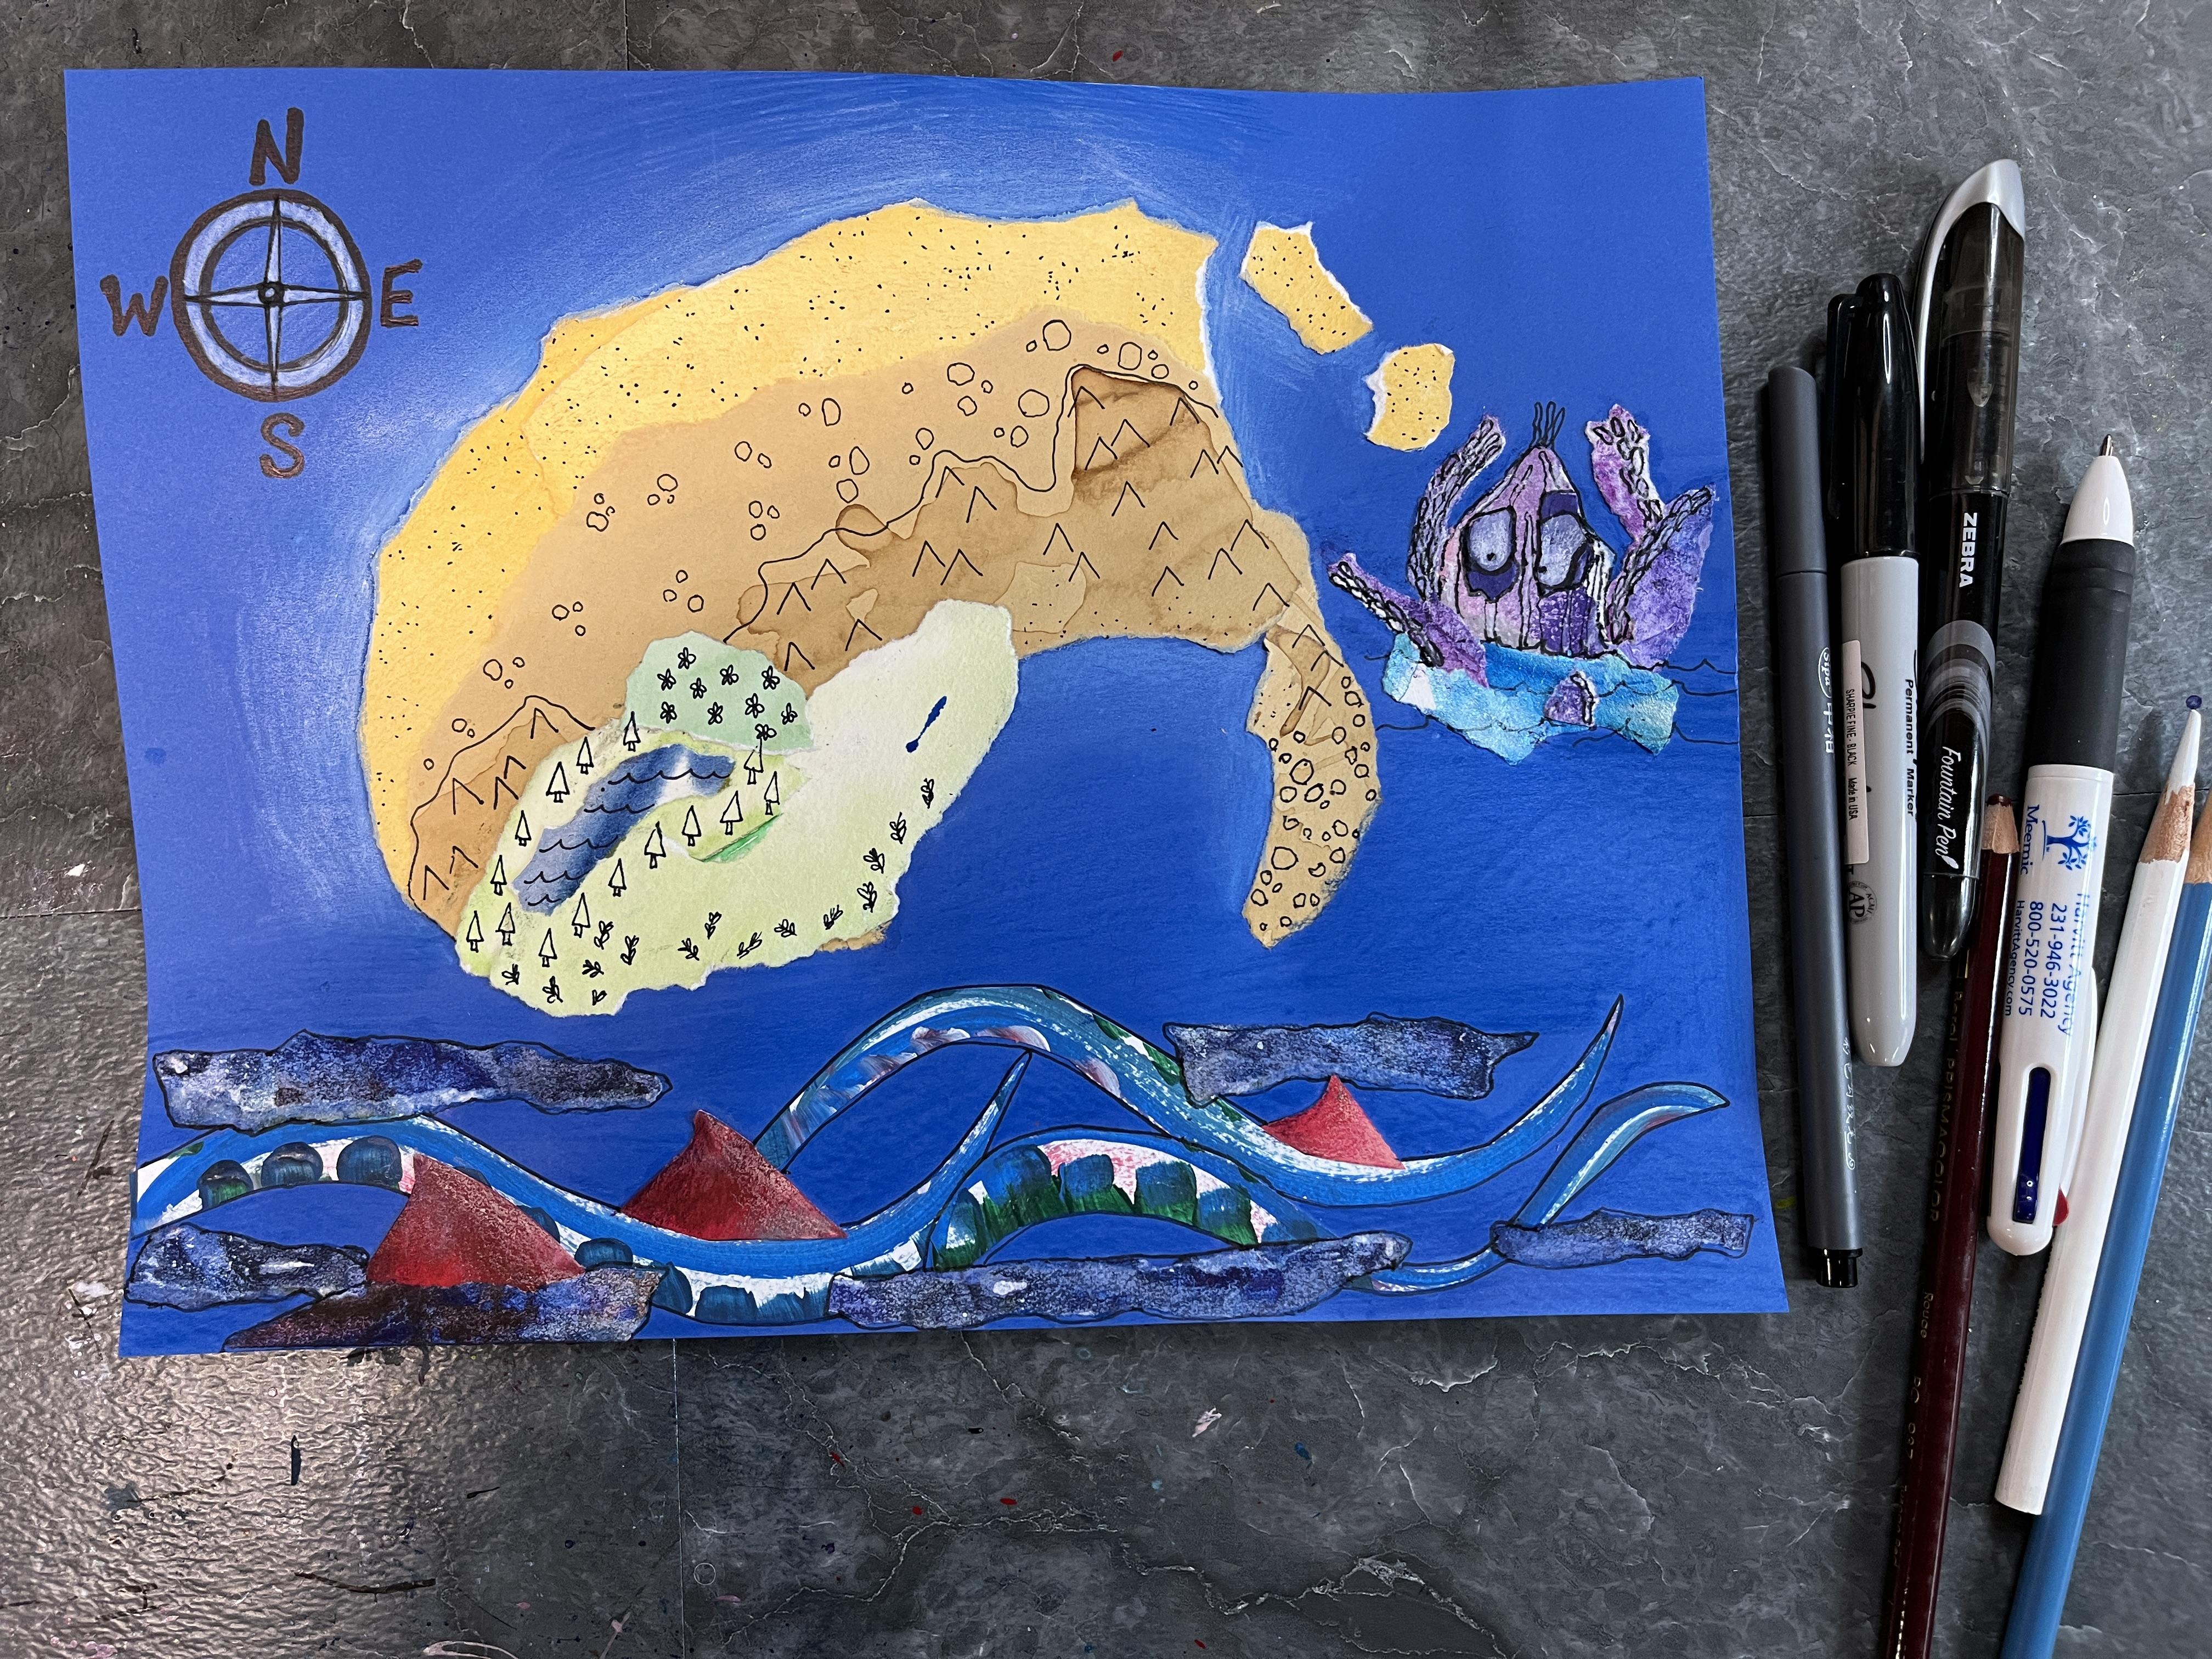
land maps to life. Now I'm going to use my map
symbol brainstorming list and sketches as
inspiration for adding marks to my mythical
and map college. So I knew I wanted to
have a compass and I knew my world was existing
somewhere on Earth. So I went ahead and
put in and created a design for a north
South East West compass. Using inspiration
from other compasses on other maps that I've seen. I wanted to keep
it fairly simple, but I also wanted to have a
bold graphic element to it. So I just free handed
in the circles. You could also trace them if you were concerned about
the neatness of that, and then I went in and put in the letters to indicate
each of the directions. Then I'm going to get out
some colored pencils. I really loved
this soft pink and orange with the high contrast black
splattered ink decorative paper. But when I thought about
it as a sandy beach, which is what I kind of wanted
it to indicate on my map, the black was just a
little too intense. So I decided to use
some colored pencil. Color over that and add
another layer to it, and it works perfectly because
it muted out that black. So I still had that
bold contrast there. It just wasn't so overpowering
and made it kind of sit back and become a less
dominant collage element. So that's something
really great you can consider is how can you layer things on to change the intensity of
your collage papers. Colord pencil is a
great idea for this because depending on how
thickly you put it on, it can have more of a
transparent nature to it. So it ended up beefing
up the color of the watercolor that I had
put down on that paper, but then it also allowed out the black marks and created
a really lovely kind of ghosting image that was one of my favorite
parts of this collage. And then I wanted to
do a little bit more. I wanted the torn
paper because I wanted the organic nature of
land and really didn't want to have the smoothness
because I wanted it to feel rugged and kind of
freshly unexplored. But that leaves you with the
rough edge of the paper, which sometimes is great. But in this case, I felt like
it was a little jarring. So I decided to do something similar with the colored
pencil that I had done for the sandy beaches and
go in with colors that match the textured paper
and color over the white, any areas where it
was kind of creating a jarring contrast for
me that I didn't like. And then it became
another part of the landscape for the greens
and the oranges and yellows. And then I did try to kind of
add some different variety to some of my less
exciting textured papers just to put it in
a colored pencil, to add some more of
my land definition. You can really go as far with the different media
as you want to, and there's so many varieties to mixed media that you can incorporate in a
project like this. It's really fun to see how each of them adds a
new element to this. Now, because of my collage
papers for this one, were so textured, I
did decide to go with a sharpie over a fine liner for putting in my
different texture. So I'd have really
bold water lines for those inland lakes. I've put in some dots and
speckling to indicate sand the sandy beaches and
some of the other areas. I could have put that
over where I kind of lightened up the peachy
sandy beaches too, but I wanted that to
be a different feel. And then I'm just
using different size rough circle organic shapes to indicate rocky
beaches as well, because I wanted to have
a lot of variation, which is why I went with so
many different collage papers in my initial step
of this project. And then I wanted to just
continue to further that and add more character and
definition to my land forms. And then I'm doing because I
did a lot of repetition of different types of
papers to create a unity to my mythical land. I wanted to mirror that
also in my mark making, so that it really kind of came together as a group of islands that were connected by their
shared geography elements. And that's just something to consider when you're making
any artwork, you know, repetition and connections that you can make across your
page so that you have a piece that feels
cohesive and feels unified while still having as much variety and
variation as you like. Now, when I went
in with my trees, I did feel a little
unprepared for this step. I think I could have taken a little more time to make
some decisions about that. But I also had a lot of different green types of collage papers that
I had put down. So that became my
guiding line as far as different types of trees and vegetation that could
exist on these islands. I do sort of wish that
I had gone in with a fine liner for this part and made them a little
bit more delicate. But I do like the unity of the sharpie across all the marks that I've made on my map, and I do like that
those bold lines really stand out against the
texture papers beneath them. Then I wanted to create
some definition in my waterways and
kind of indicate that this connecting
channel between islands wasn't necessarily
such a safe one. There's some big
rocks in the water in my imagination for this area. And there's some safe, easy parts you can navigate
if you were in the water. You know, traversing
this area of my land and then some danger zones that you'd
want to watch out for. And those were indicated based on the type of
collaged land I had. I figure if there
were rocky beaches, there were probably rocks out in the water, too, potentially. And then it's kind of like a safe connection there
on the top right, and then I want to
indicate that there were some fish in
the bottom left. And that's kind of
my safe water area. Figure there's no rocks there. It's sandy beaches. It's a great place
to get some fish. If you need some
food and sustenance, while you were out exploring
this mythical land. And then I wanted to
add even more to it. So I decided to go in with
a fine liner for this part, just to create some current
lines just to help give some motion and help to
unify the whole map, but also just add another layer of communication to anyone who was looking at it
and kind of trying to decide what type
of land is this? What are some things
I need to consider. And then for one final
mixed media touch, I decided to do some elevation
lines to kind of show that the orangey yellow
were areas that had raised elevation in
a different sort of way. So I just really like
that line element to it. And then I wanted to also
add some mountains where I had some darker textured
paper on some of the spots just because
I really liked that mark when I created it
in my brainstumming map, and I found some places
where it worked on this one. So at this point, you can
add as much as you want to. And then whenever it feels
finished and resolved, that's a good place to step. And I am super happy with
how this turned out. I absolutely love this map, and I'm really excited
to make more of these mixed media
collage maps and explore other lands that could
exist in my imagination. So have so much fun adding the mixed media details
go as far and wide with materials as you want to and share in the
discussion section and in your class projects, what you did and how
you think about it, and give us all some
inspiration for how we can continue to explore
mythical land maps ourselves. I am so happy with how my
mythical andmap turned out, and I think this k becomes something that I do
on a regular basis. It was really fun.
I hope you also had fun brainstorming and bringing to life your mythical land maps. Let's turn over to
the next lesson and wrap up the
glass. See you soon.
7. Final Thoughts: Okay. Thank you so much for taking this
class and exploring mixed media mythical
land mapmaking with me. I hope you had as much fun
as I did and that mapmaking, mythical land
mapmaking and any art farm might become
a continued part of your artistic practice. The other idea I
had is that this could become part of a
sketchbook practice. I did mine rather large because I like working big
because that gives me lots of flexibility with the options I have for collaging and mixed
media art making. But I could easily see this being something
in a small sketchbook. Even a theme sketchbook
would be so fun. If you just collage down
a couple of sheets of paper and then create
a little mini maps. That is a really fun idea. I think I might have to do
that pretty soon because this was so much fun and incorporated all of the things that I love about art making. At once, I'd love to see
how your mythical and maps turned out and your brainstorming sheets,
anything you want to share. So please head it over
to the projects and Resources section of class and click the button that
says, create a project. You can upload as many
images as you like. You can add text,
you can title it. You can share as
much as you want to with myself as well as
a fellow classmates. And if you like me, find yourself on a mythical
land mapmaking spree, Feel free to add to your
project and update us on your land maps and
where we might find you exploring your
imagination anytime you like. And if you update the cover
image for your project, I'll get a new notification to make sure that I
can pop on over and check out the lands that
you're creating and how much fun you're having
with your imagination, collage, and mixed
media mark making. I greatly appreciate if you took the time to leave a review. Student feedback is the best way for me to grow as a teacher, and I'm a very
reflective teacher. I love to hear what my students thought about
my classes as I consider ways to tweak and
improve and enhance past classes as well
as all the future fun ideas I have for
future Skillshare classes. I really appreciate
the opportunity to leave a review from
the student side. Because when I take a class, I use that as an opportunity to think back to all
that I've learned, the creative journey
that I went on, what I might apply to the
future and how I've grown, as well as to give the teacher
feedback on how I think the class went and
what I really enjoyed, as well as even
suggestions for what they might add to
a class to further enhance it because we
are always looking for ways to make our
classes even better. And it's a really fun way
to engage and kind of wrap things up as
you're ready to move on to the next
art adventure. So I hope you'll consider
leaving a review. And if you have any questions
along the way or comments or anything that you
want to share while you're working on your
mythical land maps. Don't hesitate to pop on over to the discussion section
of class and post there. I will quickly get back to
you with a reply, a comment, a suggestion, encouragement, whatever it is that you need. It's a wonderful way to connect while you're in the
process of taking a class. So I hope to chat with
you there real soon. If you post your mythical
land maps to Instagram, I would love it if you
tagged me so that I could follow your art
journey over there. It's a really fun way
to connect outside of class if that's a social media platform that you're on, and I know that I
use it to document my artistic journey
and share it with anyone who wants to stop
by and check it out. Feel free to tag me at
Elizabeth underscore Welfare anytime you post
Mythical Land Maps. You can also follow
my art journey and continue to connect with me
through my YouTube channel. On there, I have
art demonstrations, I have timelaps videos, I have art dates that I
go on where I'm exploring different things in our area and anywhere I travel to
that has an art twist. A things art really. Or what
you can find over there. So that's under Elizabeth
Welfare on YouTube. And if you pop on over there, be sure to click the
subscribe button so that you'll get notified
when I add new videos, so we can continue
to stay connected through our creative journeys. If you want to
stay up to date on my newest Skillshare classes, be sure to click
the Follow button, and I'll see you next time.
8. Bonus: Mythical Map Sketchbook: So I had so much fun creating my mythical mixed media maps for my skillshare class that I had this idea of doing a
mythical map sketchbook. So I wanted to create a handmade
sketchbook using some of the sketchbook techniques that I really enjoy doing for
handmade bookmaking. And then within those pages, I wanted to create
miniature maps. So each spread is an ocean
with some collaged islands. So taking the ideas. So this takes the ideas from my mythical Mixed
Media map class and turns it into a
sketchbook format. So here is the process for how I created my mixed
media map sketchbook. So at this point, I'm
going to start putting together my pages to
create my sketchbook. But actually, there was
an easier way to do this that I should
have done that comes from my mixed media collage sketchbook class
that's on Skill Share. So if you haven't
checked that one out, check that one out because
there's some really great it's a great
class in itself, but it also shows you a little bit easier way to
put together your sketchbook. The way that I did this one, I was really trying to
get all of the backside of my watercolor papers to
vanish into the folded pages. So I glued them together,
and then I was going to do a perfect binding for
the sketchbook binding. But I don't know if
it was the glue I used or the humidity
or what it was, but I did run into a
little bit of trouble actually getting all of the
pages to stick together. And if I had just
used the process from my mixed media sketchbook class, it would have gone a lot easier. So definitely check that
one out if you want to learn another way to
construct a sketchbook. The same principles, you
don't have to worry about the binding the pages adhere to themselves in a
really great way. So while I'm waiting
for my binding to try for my sketchbook pages, I'm going to start tearing
out some collage materials. I'm looking for interesting
papers to create my island and land
mass shapes that are the foundation for the
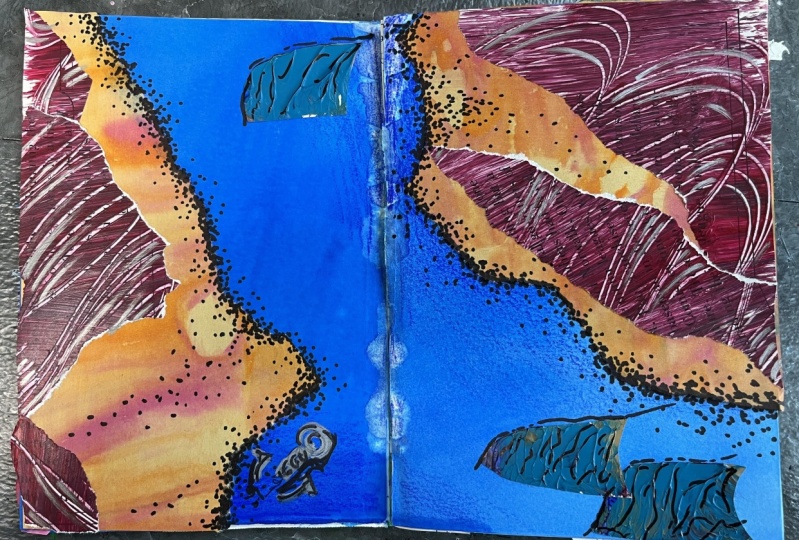
starts of my mythical maps. So now the fun can really begin. So what I'm going
to do is the inside of each spread of the
sketchbook is an ocean. So I deliberately created these blue giant
sheets of paper that I then cut down and assembled
into the sketchbook. And now I'm using my
decorative collage paper that I've made in different for different reasons and
fun experiments and stuff to begin creating
the land masses. So this too is similar
to collage being a jumping off
inspiration that is done in a different way in the mixed media collage
sketchbook class. But here, I'm merging that idea with a little
bit of more intention in the collage materials that I'm choosing with the
map class in mind. So I'm just creating some
really interesting collages. Very simple. I've got the ocean and now I'm
putting the land masses. And then after that,
I can build up the land mass details as much as I want to with
additional collage, and then I can also add any other mixed media materials that I want to to define my map. So I can create
different depths in my ocean and I can add
foliage and simples from different maps to kind of represent what type of land and ocean these pages represent
and just have a lot of fun. Stylizing it and
playing with it and embellishing it and
really creating some beautiful
sketchbook spreads that look really cool as
an abstract element, but then also have some nods to map making and the
artistry of that. And now I'm going
to start going in with the mixed media elements. So I'm going to be using
sharpie, colored pencil. You can paint back into
your scotch Book spreads. You can get out your paint
markers, fine liners, really anything you
have on hand that would add an interesting element
to further advance the mixed media collage
side of this and define whatever elements of
your maps that you want to. I really loved the idea with this particular spread with kind of alluding
to things but not being as literal for most
of the map and just really enjoying the play of color
and texture and mark making, as I kind of built up the idea of these land masses
and the water around them. So the original idea for this sketchbook was that I would collage into the spreads, and then I would circle back to them to add in the
mixed media details, so I could just like the
mixed media sketchbook class. I could just kind of open to a spread and based
off that, go for it. So I have some spreads where
I've just collaged into it, and those collages are
just kind of waiting to be brought to life
as mythical maps. And then I have the two spreads that I'm doing in this video where I went straight from the collage into the
mixed media details. So however you do it
doesn't really matter. I have the option to do both because I still have some
spreads where I haven't collaged any additional paper
into to define land masses, and it's really
fun to kind of let your collage materials
inspire you. And then as far as how
you tear them and how you glue them and what types of land formations you create, and then use that new
composition that you've created with your collaging to inspire
the mapmaking elements at. So I really enjoy this process for the class
that I created on Skill Share, and I am loving
this sketchbook as another unique way to have an easy way to kind of get
a jump start on creating. Whenever I have some time,
I can circle back to it. I can pause it, I can finish
a whole spread, and move on. I can really spend as much or as little time on these
as I want to and just have some fun and kind of do a thematic
sketchbook this way. So thanks for checking
out my video and seeing how I translated the idea of my mythical map projects to my mythical Map sketchbook. If you're watching
this over on YouTube, don't forget to give
the video a like, subscribe for more
videos in the future, and I'll see you next time.
 Elisabeth Wellfare, Artist, Art Educator