Transcripts
1. Introduction: Do you enjoy exploring new ways to work with figurative art? Do you enjoy
exploring doodles and mark making in your
artistic practice? Hi, I'm Elizabeth,
and welcome to my class Magazine
Figurative Doodles. I'm a professionally trained
artist and art educator, as well as a published
author Illustrator. And in 2020, I began teaching
classes on Skillshare, sharing my artistic passion and process and creative
approaches with my students. I love coming up with new
ways to work mark making and mixed media and collage and interesting materials
into my artwork. In this class, we are
going to explore that in a fun, new figurative way. We'll be using magazine figures
as a jumping off point. Then we'll be breaking
up our negative space and then filling that negative space with a
wide range of fun mark making, doodles, patterns, angles, whatever
interesting mark making you would like to add. This class is intended for creatives of all skill levels as a fun way to work figurative art making into
your artistic practice, as well as shake
that up by getting out some markers and having
some really fun times, creating marks, doodles,
patterns, designs, as we really create and wonderful background for
our figures to live in. The end of this class,
you'll have brainstormed new ways to approach mark
making and Doodling. Learn the value of breaking
up your background, L earned a new way to
approach figurative art, and created a mixed media magazine figurative
Doodle artwork. I hope you'll join
me in class as we create our magazine
figurative Doodles.
2. Class Project: Thanks for joining me.
For our class project, we'll be looking through
magazines to find interesting figures that we can incorporate into
our art project. Then we will use the mark making brainstorming sheet to come up with as many different doodles, pattern, Zentangles, mark making designs
as you can think of. Then we glue our magazine
figures to our background, break up that negative space and fill that negative
space with a variety of inspiring mark
making doodles as we create a really fun environment for our figure to exist in. Class is designed for creatives
of all skill levels as a really fun way to
incorporate collage, mark making, mixed media, in a really easy, fun, quick art project. The first step is to gather
up our art supplies. So let's head over to the
next lesson to talk about what materials you're
going to want to have on hand for class. See you there.
3. Materials: Now, let's talk about
what art supplies we're going to want to
have on hand for class. We don't need that many
materials for class. One of the most important things that we're going to need are a sharpie and a five liner or any two markers that
you'd like to use, but you're going to
want to have some thickness variation so that you have some line variation in your doodles for
your background. Then you need a
pair of scissors, a glue stick, and some
magazine figures. You can use a full figure or
you can use one that's just kind of the upper half of
a figure kind of chest up. And then you're going to want to have a sheet of paper
to glue that down to. Take some time to gather
up your materials, then head on over to the
next lesson to begin brainstorming our doodle
designs. See you soon.
4. Mark Making Brainstorm: Now, let's brainstorm some different dual
designs that we might want to incorporate into our
magazine figurative artwork. I've created a mark making brainstorming worksheet that
you can download and print. It's located on the projects and resources section of class. You can also just
do this by drawing some squares onto a blank sheet of paper or in your sketchbook. Now we have our mark
making technique shee. This is our brainstorming
doodle sheet. You can print this out as
many times as you like. You can also hand
draw your squares or rectangles into a sketchbook around a scrap sheet of paper. So you don't have to
use the worksheet. But the great thing
about this is that by having a preset
number of squares, it forces you to keep
pushing yourself as far as Doodle and mark making
and pattern making variety. It gets you to go beyond the obvious ways that you can incorporate doodles
into your artwork. It also by having the small bound boxes gets you to really
see what a doodle or pattern or mark
will look like in repetition and how it might end up then
translating to your project, whether for this class or in future mark making projects,
artworks that you work on. It also helps you not
get too far into it. You could have a sheet
where you just made a line. But by making the line
over and over and over, it changes the way you
perceive it and helps open up your mind
to different ways that you can
incorporate those marks beyond a small scale thing. In a lot of different
ways, a sheet like this, whether hand drawn out in
advance or printed from the class helps get your mind thinking about
doodles and expanding those. Now, I'm going to go
ahead and start creating marks on my technique page. I'm going to just go with
whatever makes sense. I might start with some
really obvious ones. You can also jump all
around the page or go more linearly from top left a cross to the
right and then down. Let's see. If I go
to my first one, I might just play with the
idea of zigzag lines and not worry too much about
doing anything groundbreaking with my marks. I just want to get myself going. We also don't have to
worry about perfection and definitely go straight
in with your pen or your marker so that you're
not really getting stuck in that trap of obsessive straight
lines or certain angles. That's all that one has to be. Now, maybe I want to do
something with shapes. Maybe I really like ovals. There are a shape that bring me a lot of leisure
when I draw them. Maybe I'm going to fill
a space with ovals. I've got some extra space there, so maybe I'll
imagine that there's some more oval shapes
coming in from off the page, like that. Idea. You can also work
back into these and make these a little
bit more involved. Maybe between my ovals, maybe I want to fill
in some of the space with black and have more of
a high contrast pattern. This is also something
you can just decide in the moment when you're working
the different patterns and designs and doodles
into your big project. This is where you want to
have a variety of sizes. Because no matter
how careful you are, that thicker tip sharpie versus a fin liner is going to give
you a different quality. And we're not worrying
about perfect doodles, but we do want to get
the idea of what it's going to look like and work
out some of the kinks. Better to figure
out what size pen or marker tip you're
going to want to have for the different doodles that
you're thinking of adding now than having to work around some of those
problems on your page. But every ops in Inc can be corrected and
modified and adjusted. More than anything,
just have fun with this stage of our class because it's really
fun to doodle and it's really fun to think
of abstract designs, go with the ones that are
more appealing to you. I'm hoping that
as students share their project on the
student gallery, that they also share photos of the dole brainstorming sheet because it's really fun when
you're in a class setting, whether it's online like this or in person to get inspired
by those around you. Then that changes
it to have versus the outlines of the ovals
to the filled in sides. I'm just going to keep going. You initially break up the
space, and then from there, you can decide some other ways
that you want to go at it. If you have some
Zenangle experience, this is a great opportunity
to incorporate those as well. You can also just do
said, basic shapes. So whole space could
just be filled in with spaced out circles. Then I say for this project
is to really when we get to the big project is to have a variety, have some variation. You can also do some
repetition, of course, because that's
always interesting and aesthetically
pleasing and design. But repetition is great as well. You could repeat any
of your designs as we fill up the different negative
space of our background. I'm going to play with
doing something else. You can also have design
elements in your boxes. You could start with a
floral thing like this. Then you know, maybe
in the background, it's going to be
kind of a roughed in vertical line to kind of
contrast with those curves. It could be simple.
It could just be as a child of the 80s and
teen of the early 90s. This stuff really
appeals to me and feels nostalgic and fun. It's confetti angle shapes. I could also do Let's see.
There are some other guns. Playing off of the corners. I could just let that have that negative space or I could do something
kind of like this one. But I could do a cleaner
thinner line that goes across at a
more even spacing. Again, it's giving
me that contrast of straight lines
with curve lines. Contrast is always
a nice principle of design to play off of. I think one project that
I want to do for myself this year because I've
got a busy schedule coming up as we move into
the fall and shift out of the pace and the kind of. Nice, relaxed, yet
erratic nature of summer. I'm going to think
I'm going to make myself a mini Sketchbook. That's just going to
be all about doodles. It'll be something
that I can return to as a creative warm up space as just a really low stake
spot to create and add. In the end, it'll
be a really cool visually pleasing
collection of doodles, but it would also be
a Doodle library. So maybe I'll share how I
create that in a future class. But I just want to have somewhere that I can go to this year coming into
the school year. That is something I can
pick up and put down, but then but is working
towards a bigger thing. I think that's going to be and that's really good for me to
have something like that. This is a good starting
point for that. Then I recently taught a camp. It was for kiddos,
but it will apply to any age where I used the same worksheet,
but I shrunk it down. They had sketch
books for the camp, so we were doing sketching
and brainstorming and thumbnails and all
that stuff to plan out the projects we were working
on in our fine arts camp. But I wanted them to
really have a place to consider doodles and mark making for some of
the projects that we did. So within the sketchbook, they were able to then glue
down the half size of this. We filled this out and then when they were done,
they glued in. But that would
definitely be something you could easily do too, just to you already
have the boxes laid out because sometimes the layout of a page can be an obstacle. By having printing these out half size or reformatting them, you were two on a page and you printed out cut them in half, you can make your own
really easy doodle library in the making kind of thing.
That could be really cool. Because oftentimes I get
stuck in the setup of stuff. I have these ideas, but if I have to take too
long setting it up, then that ends up being
where things get stuck. Maybe that's what I'll
do. Maybe I'll just print off a bunch of
these miniature and do it that way or or just two quadrants on
the page or something. Something where it's going
to be visually interesting, but also, easy to create to get it set the system set up and then
easy to add into. No matter how busy life gets, struggling my teaching
schedules and my kiddo schedules
for school and activities and our
family schedules. That may be something
that helps you too. I like the bigger marks too. I like having these wide ones. I'm just going to do
some big spirals. Fill the space with spirals. You play with going off
the page because you know that when you're doing
this in your project, your space is going to
be bigger than a square, potentially, depending on
where your project it goes. You get yourself used to what happens when the
design meets the edge. Simple, but nice. I think wavy lines would be good just like way ones across. And they can follow
each other or they can morph and distort away from
that original wave as you go. I must have been really
interested in op art lately. So the effects and the optical illusions
that happen when you manipulate the lines. This could become even more intense if when they curved up, if they got closer together
and the spaced out, you would create this
illusion of a hill. Pieces like that
are really cool. Okay. I'm going to do
another one with a diagonal. And then this time,
I'm going to have some triangles coming off a bit on either side,
that'll form diamonds. This is another design that I've been gravitating
towards a little bit. Please of that op
we're talking about. Looks like a spider.
Then just lines that go across and
break up the space. Can be really great, too. Then even within those, you
could have more going on. Take some time, use whatever
kinds of pens you want to, whatever you have
on hand is great, while pin Pen would even
work to and fill up your technique sheet with 12
different doodle designs. You can do as many of
these as you want, but I want to do at least 12 because when we get
to our project, we're going to have definitely 12 spaces that we're
going to want to fill. As you transition from
this to the project, be thinking about which
ones you enjoyed more? How could you modify them? How do they change
when they go into your different negative
space background spaces? And then how can you think about repetition and variation too? Now that we have
an inspiring page of mark making
doodles to draw from, let's head over to
the next lesson to begin putting together our magazine figurative
artworks. See you there.
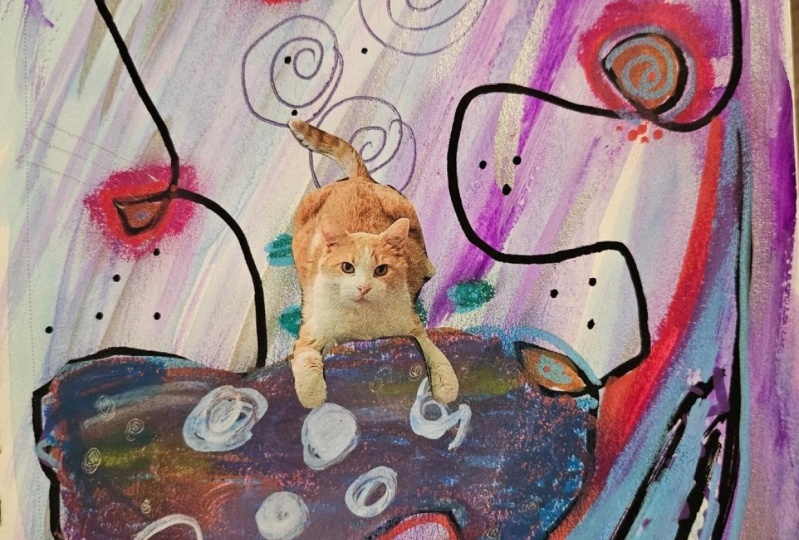
5. Magazine Figure Doodle: Welcome back. Now, let's begin creating our
project for class. To prepare for a class project, I have found a figure from
a magazine and cut it out. And now I'm using a
glue stick to adhere it to my nine by 12
inch drawing paper. You really could
work any size you wanted to kind of depending
on the figure that you chose from the magazine and then what size paper
you wanted to have for your background and how much space you wanted
to have for your doodles. One thing that's
important though is to make sure that
your figure is well glued down to your paper so that it's not going to
wiggle anywhere. Its flaps are going to come up when you're trying to
go in with the doodles. And then I'm using
a fine tip sharpie, as well as a fine liner. The first step with
either marker, however, you want to do it is to break up the negative space
around your figure. I chose to just kind of do radiating wavy lines
coming out from her, but you could make this any
sort of design you wanted to. They could be straight lines, you could grit out
your background. It really is
completely up to you. And then from here,
you just start doodling into the space and kind of really kind of playing
around with lines lined, scale, shape,
pattern, repetition, and then the high contrast
of the black and white. So, for example,
for this section, I filled it with half circles coming in from the outer edges, and now I'm going in with my
sharpie to really fill in some nice bold black in the negative space
between my half circles. And the goal is to
little by little, line and mark by line and mark. Fill in all of the
negative space with really interesting pattern
and design elements, and you can have it be as minimalistic or as
complex as you want to. If you're someone who really is interested in doodles or
you have a background in sent tangling or really
mark making of any sort, this is a great
chance for you to really play with
that in a new way. So I'm just continuing
to break up the space and kind
of find new ways and areas to create even smaller segments
radiating out from her. And then just starting to do whatever intuitive mark
making comes to mind. I really went for
step by step with it. I didn't have a clear
plan other than the general overall idea for what I wanted to
do for this class. So that is the guiding principle for the project
that I'm creating But in the moment is when I'm deciding what kind of
marks I want to make, how I want to vary my lines, how many details I want to add to the different sections
of my background, and then also playing with the idea of high
contrast where we have bold black areas and
open white areas, and then all of the mark
making textures in between. The more variety that you add, the more interesting
it's going to get, but another thing that makes for good design is also repetition. So you do want to think
about what can you add to your background in a way that's going to make
it aesthetically pleasing. And that's esthetically
pleasing to you. There's really no wrong
way to go about this. If you do have an area where you make a mark
or you do a section, and you're really
not happy with it, because you're working
with black and white, you can easily transform an ops or a mis mark into something that's really
interesting and appealing. So don't be afraid
to just dive in, start breaking it
up, make marks, and see what happens. I did decide that
I wanted to play with more variation
for line weight. So that's why I grabbed
the fine liner. At this point, I felt like I had enough bold
things going on with the Sharpie marks
that I needed to have a little bit more variance
with line weight. So even though I'm doing a
more energetic pattern there, and I'm doing some
more detail work now that I've got
the fine liner, it's still a smaller line, right, even though there's
more marks happening. So the variety that it provides is really
fun and wonderful. And I'm also hearkening back
to a project that I did. I think I did it
in middle school. I was kind of similar. We
broke up our background space. I think we were doing it
kind of like Mandala style. If I'm remembering correctly, we had radiating
circles coming out. And then within those circles, we broke them up even further, and we added different
doodle marks. So these bubbles
always remind me of that project and how much
fun I have working on it. So it is circles are something
I like to come back to. So the more doodling you do and the more
mark making you do, you're going to kind of
start to notice that you've got certain things that you
gravitate back towards. And that's very much part
of your own artistic style. That's kind of your own artistic fingerprint that
you're putting on it. But if you do need more
ideas and inspiration, I did include a mark making
brainstorming sheet. It's just a page
that has a bunch of squares on it so that you could really plan out and
brainstorm ahead of time, what kind of marks you
would want to incorporate. I also included mine that has different marks that I created in the process
of brainstorming out, different mark making
projects that I've worked on recently in the
last month or so. So this is also
something that's really fun to come back to
this mark making sheet because it can give you inspiration
when you're doing future Doodle projects
or Zentangles or whatever kind of
artwork you're working on, we're adding some variety
of line and marks and shapes and different patterns or whatever can really add
some visual interest. But for this specific project, I went at it very intuitively and just let each section
build up from the next and then decided what
it needed as I kept re evaluating it along its
process towards completion. The more that I
fell into a rhythm for adding in my
different doodle marks, I did find myself kind
of being drawn to adding more design
elements instead of breaking away from
just filling in the section with repeated
shapes and lines and marks. And then I really enjoyed the break up of these kind of
pedal like fan out shapes. So I started kind
of putting those in the bulk of the
open spaces and then adding different design
elements around them to kind of fill in the rest
of each of those segments. It really provided an
interesting variation from what I'd already
been doing with my marks, but it also provided a
really nice repetition as well as variation of scale because I
was working within the remaining open segments that I still had in
my negative space. That was a really lovely thing to stumble across and come up with over the course of working on the marks that I was
putting into the background. Then also playing with some
bit more loose line making and being a little bit
freer with applying the sharpie and kind of letting things morph a little
bit as I kind of got further into finishing up my background details
on this project. So really have some fun with it. Don't let yourself kind of
get, you know, inhibited. There's no wrong mark. There's no wrong shape.
There's nothing. It's just meant to be a really fun project
that kind of plays with this idea of figure and mark making combined
in an art project. I'm so happy with how my magazine figurative
doodles turned out. It was really fun to incorporate my brainstorm
doodle designs into the negative space to fill the whole background
with exciting, interesting lines, and patterns,
designs, shapes, marks, to really add some
dynamic energy to my magazine
figurative collage. Now, let's send over
to the final lesson to wrap up the
class. So you see.
6. Final Thoughts: Thank you so much
for joining me and exploring magazine
figurative Doodle artworks. I hope you had as much fun as I did incorporating
Doodling, mark making, magazine, page, figurative art
into a really fun project. This is definitely
something that I can see myself returning to
time and time again, either as an
independent project, or even as a warm up
in my sketchbook. And I am super excited to
have a filled up mark making doodle sheet that I can draw on for a wide range of art
projects in the future. And the great thing is you can print that sheet out over and over again to continue
adding to your Dole library. After you finish your
project for class, don't forget to
take a photo of it and a photo of your
Doodle worksheet, and upload those to the Projects and Resources
section of class. It is a really fun way
to connect as a class, see the amazing approaches that people took to the project, share doodle inspiration
for future art making. And celebrate the amazing work that you've created in class? I also really appreciate it if you took the time
to leave a review. Your feedback is invaluable
as I grow as a teacher both in editing and revising
current and past classes, as well as in the preparation for creating future classes? As a student of
skill share myself, I really love the opportunity
to leave a review as a time for reflection to think
back on, what did I learn? How could I incorporate
it into my art practice? How did I grow through the
project that I created? What feedback could I offer to the teacher to help them
on their teaching journey? I love sharing my
artwork on Skillshare, and I love connecting with
other people on social media. If you happen to post your
project to Instagram, please tag me at Elizabeth
Underscore Welfare so that I can find your artwork online and celebrate with you. You can also click
the Follow button below to stay connected on Skillshare and find out about future classes that
I have in the works, and we can also connect
over on YouTube. On my YouTube channel, I share art processes, art adventures I go on. I take you with me when I go out and about
sketching and painting. And share all the art happenings that are going on in my world. It's been really fun
to have you in class, and I'll see you next time.
 Elisabeth Wellfare, Artist, Art Educator