Transcripts
1. Introduction: Hi, I'm Elisabeth and welcome
to my Artist inspirers Series class focused on the figurative artwork
of Ana Mendieta. I am an artist and art educator, as well as a published
author illustrator, and I've been teaching
on Skillshare, creating classes that
cover a wide range of art materials and
practices and processes, as well as my passion for art history and sharing
how we can get inspired by artists of the past and
put our own spin on it and help further push and explore and drive our
own creative practice. Miata is a really amazing artist to look at because she
was really pushing the boundaries of what was
possible for art making and all of her art
explores the figure and the human body and different
ways that both it can be manipulated in some of her
more fun playful works and the photography
that she created, as well as in the more land
based artworks, the land art, the way she was manipulating natural resources and materials and going on site to create
some really dynamic pieces. She has a wide range
of work during her short life that we can
take a lot of ideas from and get inspired by I'm
hoping that you will really enjoy working on
the class projects as much as I our class project, I'll show you several ways
that I have been exploring Ana Mendieta's work as an inspiration for
my own art making. I don't often do figurative art. This was a really fun
way for me to push myself into a subject matter
that isn't my natural go to, but weave in some of the art processes that I
really love and just see what came out of it and hopefully
get you inspired both by looking at Anna's work and ways that I'm interpreting it
in my own art practice. I hope you'll join
me in class as we look at the amazing
work in life of Ana Mendieta and explore figurative art making in
some unconventional ways. Let's send it over to our next lesson to talk a little bit more in detail about
our class project. I'll see you there.
2. Class Project: Before you dive into
your class project, take advantage of
the lesson that I've created about Ana Mendieta
life and her artwork. I show you a ton of different imagery of
the work that she created and talk you through some of her
artistic processes, some of the themes and
concepts that she was exploring and hopefully get you really excited and get the wheels turning
about ways that you can incorporate figurative
art making in a very meaningful way or a fun, playful way, however
you want to go about that into your
own artistic practice. For our class project,
I'm going to demonstrate several ways that I've been exploring Anna's work
in my own art making. I lean into a wide
range of art media as an artist and I love
getting excited about ways that I can take little bits and pieces from
artists that I really love the work of and admire and
play with how that can be woven into practice
both with what I'm comfortable with as well as pushing me outside
my comfort zone. Class project is one where you're going to be incorporating
figurative artwork. I have a PDF that
I've created that has four different takes on
figurative artwork that you can absolutely print out and
then just work right into or transfer that onto whatever based background
material you want to work on, but you're more than welcome
to sketch them freehand. I talk you through how
I do that as well. Then we go from
sketching the figure to planning out some ideas, what material we
want to work with, what we're getting inspired by. Then I've got the
project where I actually walk you through from start to
finish the artwork. But then I also show
you some sped up time laps ones that I created in
anticipation of this class. I had a couple of
different ideas that I really wanted to explore. I ended up exploring those before I actually sat
down to make the class. You get to hang out with me outside the art studio
because I'm actually making those pieces in my living room and
playing around with some ideas for this concept ahead of starting the
actual class production. I loved making those
pieces so much that I really wanted to
bring you into my home. And invite you a fly on the wall to see how those
pieces were made as well. You have a lot of
different options. There's no limitations here as far as how you explore
your cast project. It's going to be
really exciting to see how everyone interprets this figurative art
making and gets inspired by Ana and puts their
own spin on it. Let's turn it over
to the next lesson where I talk through some of the material options that you might want to explore
as you consider your own figurative
artwork inspired by the work of Ana Mendieta.
I'll see you there.
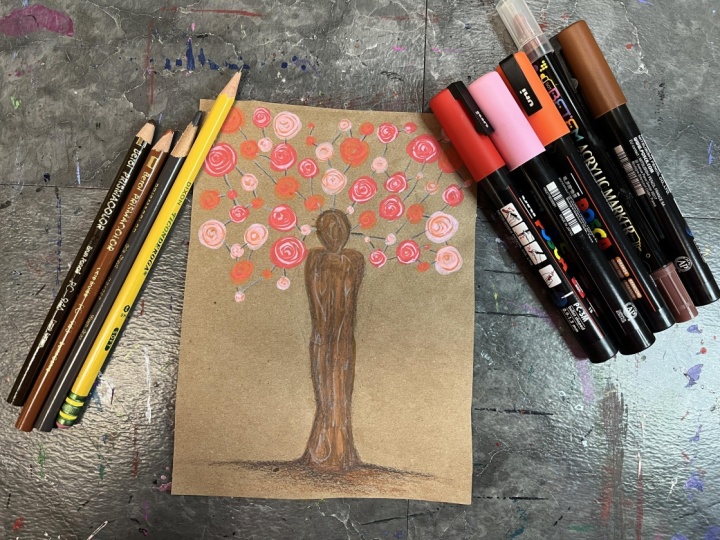
3. Materials : Amazing. There's a lot
of different ways you can go with your on a Mendieta inspired figurative artwork. I have explored several
different ones. The very first one that I did, I gathered up images of flowers and called them out of different magazines and
created a giant pile of them, and then I built up the collage of them around the
sketched figure. So this started as a piece
of construction paper. And then I sketched
out my figure, much like this the This is just grocery grocery bag that
I'm repurposing for ours. And then around the
sketched figurative image inspired by Anna's work, I filled in with flowers, kind of letting it
overlap and kind of to make it so that the
figure wasn't as obvious, just kind of as the flowers, made the most sense for
creating my composition. Then I went in with
colored pencil. So this one I've used
construction paper, magazine, images of flowers, and I've
used some colored pencils. This one I really wanted to
play with text as pattern, and I really love
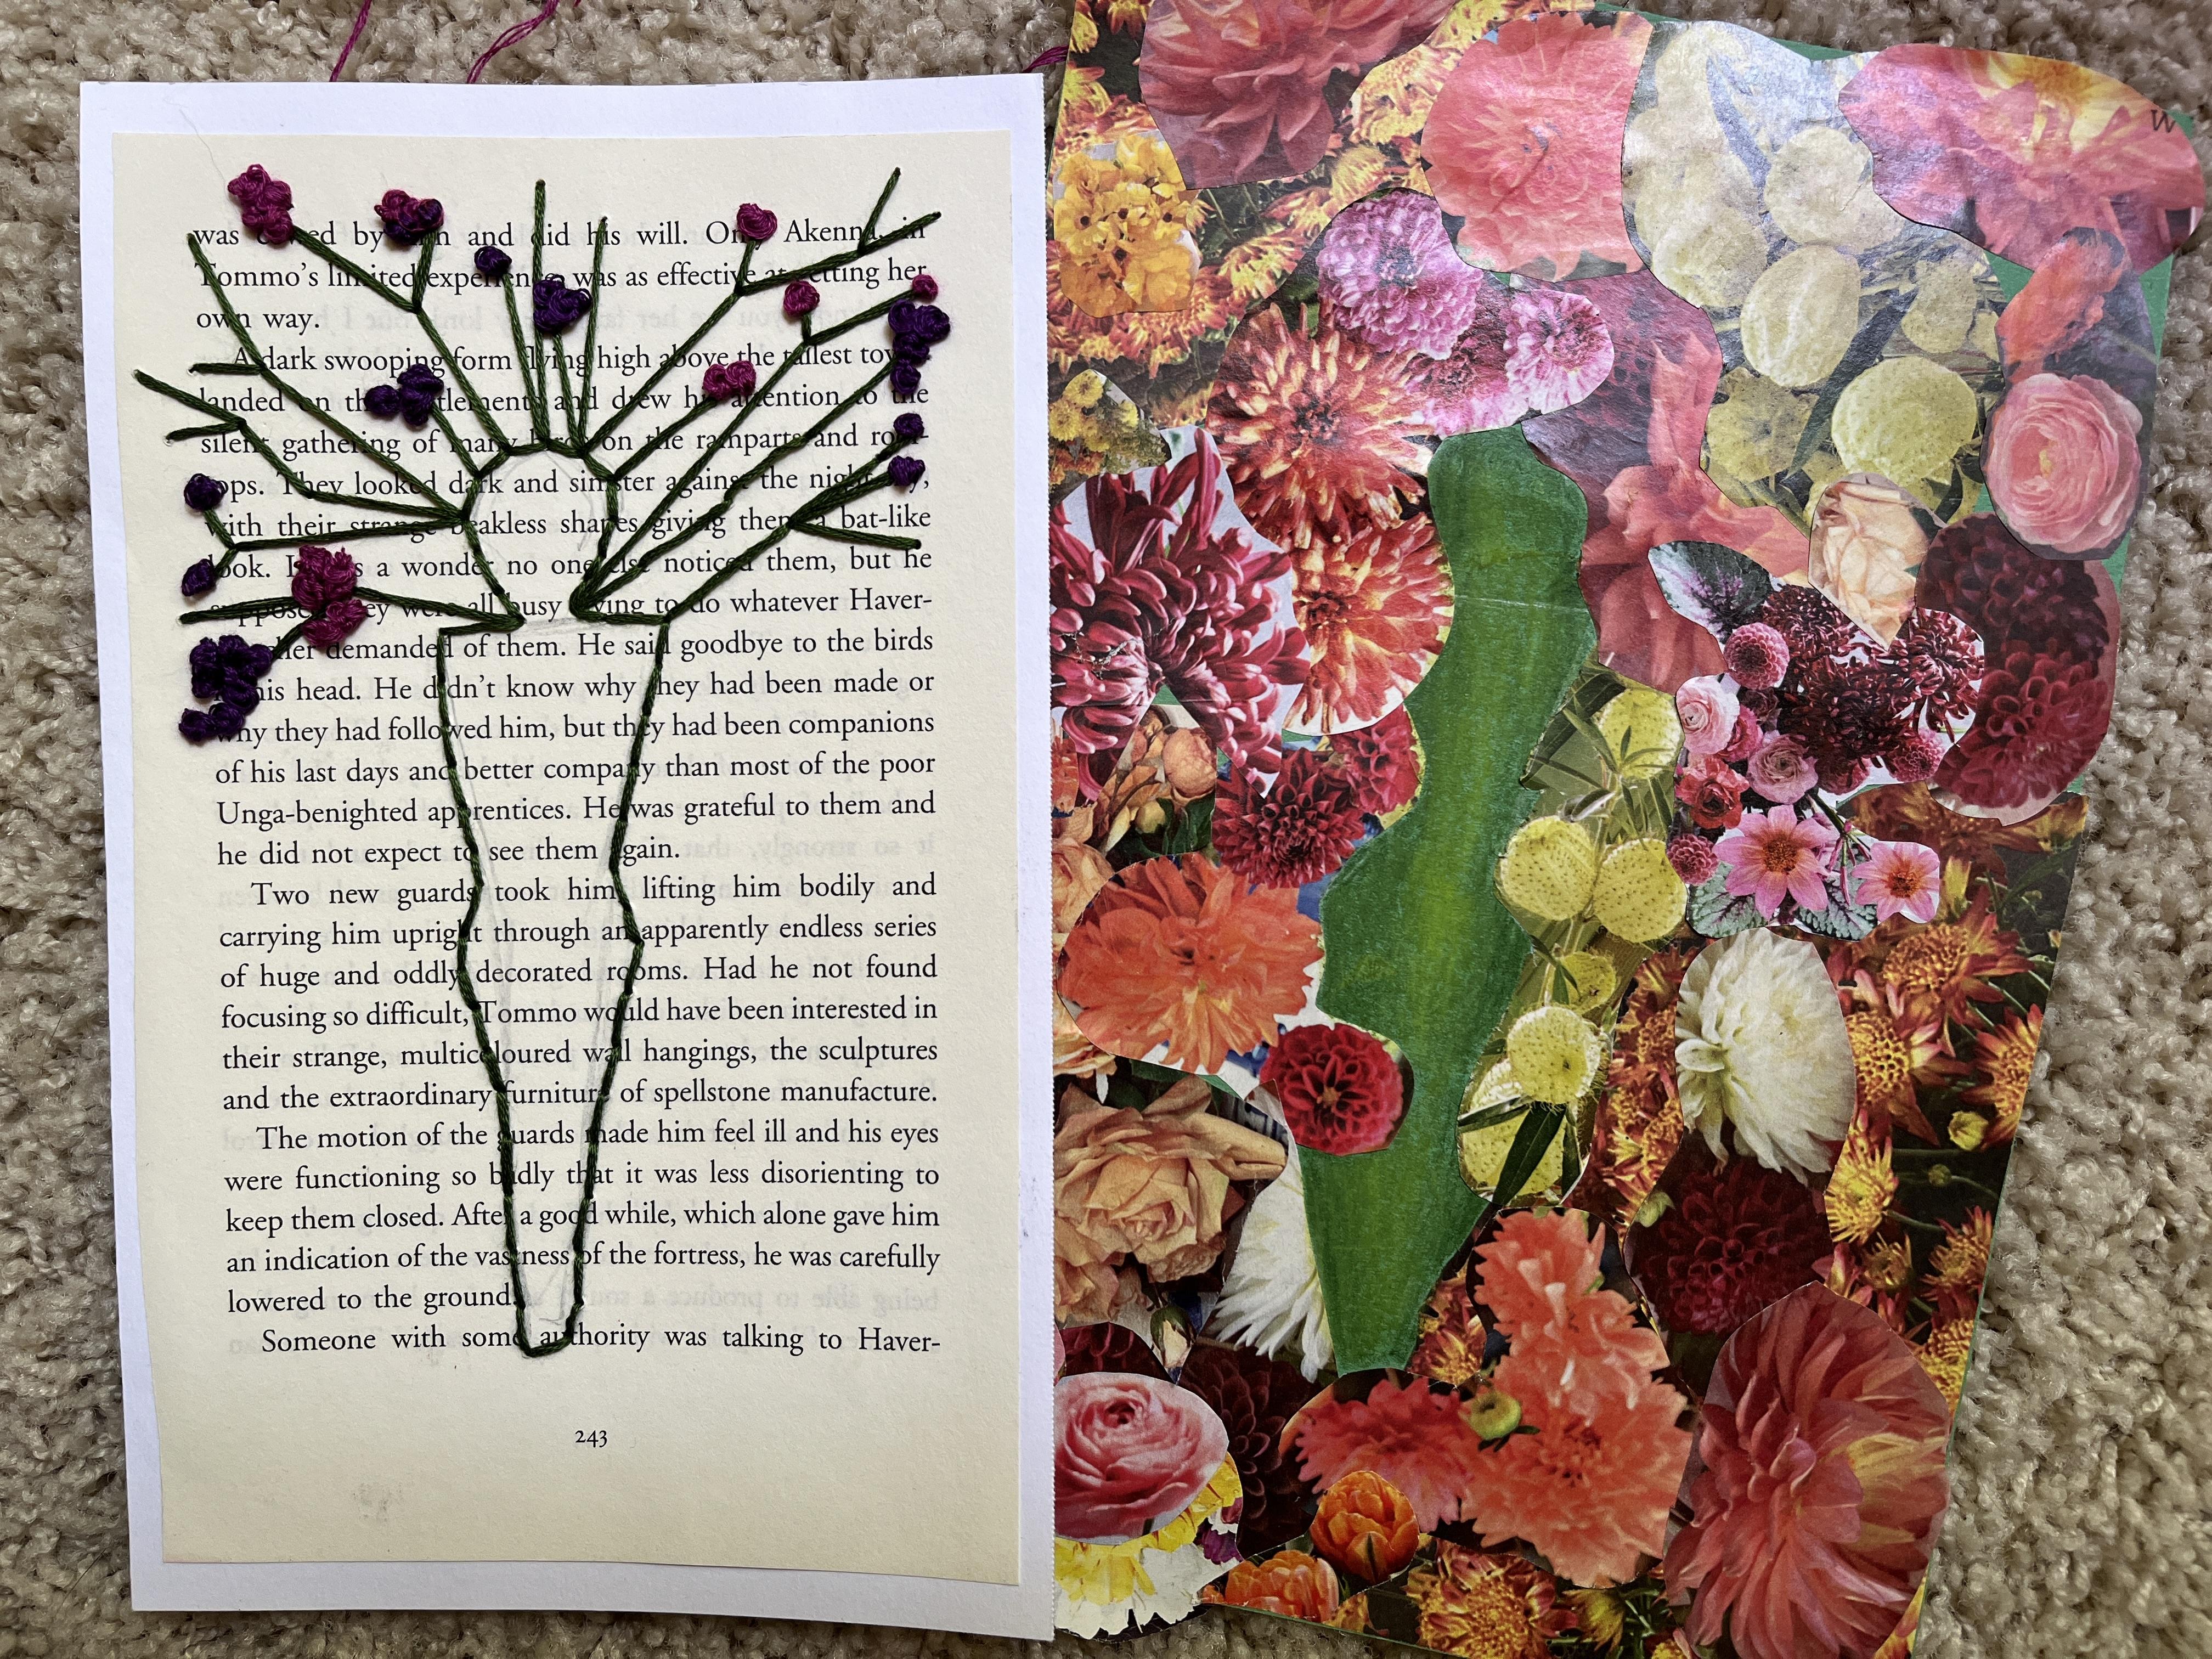
embroidering in my artwork. And I really felt drawn
to creating this. This was the piece that I was so driven to do after seeing Anna's work and this just really felt like something
that was very true to me, but also honored her in her artwork in a
very wonderful way. So I like to gut books and
turn them into sketchbooks. So I have lots of
different papers around that are the insides of the books that
I then repurpose in my collages and
other artworks. So this is just a
page from a book. Paper and books is pretty thin, so I glued this down to a mixed media paper because I knew I wanted to
embroider into it. Then again, I sketched
out my figure very similarly to this one that I'm going to start working
on in our class. And then I chose colors
that spoke to me, the earthy natural
colors for the base. So I chose a green thread. This is embroidery floss. And then I chose colors
for the flowers that are kind of my symbolic
significant colors. So blue, purple, and magenta. So if you want to do
some embroidery work, like I demonstrate in one of the videos down the
road in the class, you're going to need
embroidery floss. You're going to need an
embroidery needle or a needle that has a
fairly large eye to it. To poke the holes for where I do the stitches because
you pre poke them, you're going to want to
have a push pen or an owl. Either one works great
because you kind of you do your drawing
of your figure, and then you poke the holes where you want
the stitches to go, and then you can just
start stitching as you go. I have a class where
I embroider into my other paintings into
watercolor paintings. So if you are curious more about this technique
and it's new to you, definitely check that one out. I also taught this
class as an in person one at our local
community center. So for this one, I started
with black hard stock, but you could also do
construction paper. I wanted to use the pattern
from inside an envelope. So the security envelopes, if you haven't noticed, all of them have these gorgeous
patterns inside. So take a look the next
time the mail comes and start to save your envelopes because there's really
great patterns, and they come in different blue designs and black designs. They might be different colors
in different countries. I'm not sure, but blue
and black seem to be the ones that I get in
the mail in the US. What I did was I
sketched my shape out on the white side of
this for my figure, cut that out, glued that
down onto my card stock. So here I needed scissors
and glue for this one. And then I wanted to work back into it with
colored pencil. I really wanted to
emphasize the shape because with the black and white pattern and the black card stock, it was a little too similar. Then I just started
playing around with different shading ideas. I was just playing with small artwork while my students
were working on theirs. So this is just kind
of one that came about during teaching
this class in person. So if you're looking for the basic art supplies you're
going to want to have on hand, you're going to need some
sort of paper to work with. I recommend picking
a paper that's going to fit whatever art
material you want to use. Going to be sketching
out the figures, you're going to want a
pencil with an eraser. If you want to go collage, you're going to want
to have scissors and a gloosta and then you're going to want to have
different kinds of papers, either magazine or
decorative papers or papers that you collect
and find along the way. Through this one, because
the next one I'm going to make is going to be
on grocery bag paper, I'm probably going to mount this on another sheet of
paper just so it's a little stiffer because the grocery paper is
a little flimsy. Drawing back into it with
anything that you want to, if you want to
draw back into it, you could also paint into it. So I've got a fine liner. I've got some colored pencils. I've got some paint pens. I might see what
else I come up with. I'm not sure where I
want this one to go yet. I want to explore
something different from what I've already done
in the other pieces. So I'm going to kind of see what inspiration strikes me when I get to the demonstration
for the class, but these are the basics of materials that you might want to lean into for your project. So, now that I have
an idea of what we could do for our project, let's head it over
to our next lesson and learn a little bit more about the life and art of Ana Mendieta. See you there.
4. About Ana Mendieta: Ana Mendieta was born in
Havana, Cuba in 1948, in the beginning of
her artistic career, explored a lot of expressionism. So color representing emotion
and feeling and just really dynamic ways of
playing with color and the emotion behind
that that we can look to. She explored many
challenging topics, including displacement,
violence, and the female body. She was exploring
performance and body art as well as
land art and art and nature and definitely
was very much influenced by the feminist
movements of the 1970s. So all of these elements
influenced Anna's development, both as a woman
and as an artist. She explored a wide
range of media, and I love that because there is a commonality
of addressing related topics that were
really important to her and things that she was processing
and working through. And there's a lot of darker art that she made
also kind of as part of her need to express
and kind of put out the things that she experienced and kind
of work through them. Flooring. A lot of her
pieces involve photography because what she is doing
with the art making process, the only way for it to live
on is through a photograph. Between the performance element and unconventional materials, she is in that genre of artists, where there's the work of art, and then there's the
documenting of it that becomes the art that we
get to see after the fact, because the art can
exist beyond time. Her main subject
matter was her body, the Earth, and then she was working with organic material. So blood, fire, feathers, wood. She just has such beautiful ways of incorporating the
figure into her pieces. So for Ana, she is
quoted as saying, My art is the way I re establish the bonds that unite
me to the universe. It is a return to
the maternal source. So let's head it over to the next lesson to start
learning some options that we have for how we
draw out our figure for our Ana Mendieta inspired
artworks. I'll see you there.
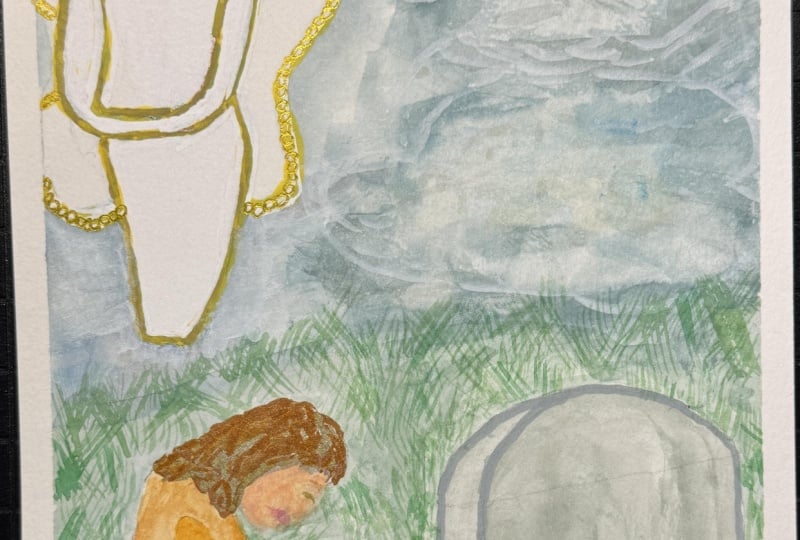
5. Drawing the Figure: T. Ana Mendieta worked with a couple of
different versions of the silhouetted figure. You can look at the
different symbolism behind the different ways
that she chose to do it. I'm kind of leaning into my own art aesthetic with
her figurative imagery. So kind of trying to make
it personal while using her figurative approach and then kind of playing with that. So I'm just going to quick
sketch out some options. The one that I've
been going for has kind of a round head and then
kind of an angled torso. And then a roundness at
the hips and then going down as if the legs were
together, very simplified. Something like that. That's what I've been enjoying doing. Another option we
could play with would be the rounded head. We can still have our
torso sometimes on a head, the arms up raised
above the head. And we don't have to worry too much about realistic
proportions. You can just let
it be exaggerated. And then the legs
are always together. But you could
absolutely play with whatever kind of figurative representations you wanted to. That's very angular. That's how I just like
to do the figure. So that's my own
artist that it kind of layered on top of us. Another option would be to
do something more rounded. So the hands are still
going above the head. There's more of a
roundness and less of an angularness to the body. Then this could just be a
little bit more simplified. Maybe we don't define the hips. This doesn't feel as true to my own aesthetic
as these two do. I'm going to lean into
somewhere along here and I like when the arms
are not visible, I like them just down. Now, I could make this more
a little less defined. I like that approach too, so the arms are more
represented there. You can also play
with some other ways to represent the figure. Maybe layer in some of
your own symbolism. Maybe we start with the same
straight boxiness here. But maybe one arm goes up. Like, something
like that. And then maybe another arm kind of comes out down there.
Almost like a dancer. Like this kind of feels more like we're representing
a figure in motion. You create your own symbolism for what that might
represent for you. I think I'm going to lean into this one and kind
of go from there.
6. Planning the Design: So I'm going to set my
sketches off to the side, and I'm going to
go to this paper. I just feel really drawn to
working on grocery paper. I'm not sure why. No idea
why. It's calling to me. So I'm going to sketch
my figure out following the shapes that feel make
the most sense where I am. She always, even
though she was doing this work a lot of this
work out in nature, I feel like when she
photographed it, everything was still
very centered. You can absolutely also
play with composition and explore different ways that
you want to represent that. I still kind of want
to have the hips, just so it becomes a
more feminine figure. The other thing we
could play with is she's representing the
figure straight out. You could absolutely
turn the figure different ways if you wanted
to have it more sideways. I wonder now that I'm
doing a longer body, I wonder if I want to
do almost a little bit into an almost a little bit into fashion sketching and have the arms that maybe maybe
even change the bottom, it goes out more. I don't want to stray
too much from it, and my original idea was going to be to do
something more like this. This is more along the lines
of what I've been doing. I wonder if this
becomes too much. Feels like too much. I do like the idea of
changing the shape of the bottom though
for style reasons, aesthetic reasons
and having it more belled I could still do a curve. I like the strong shoulders. Maybe I'll do that. Maybe I'll do a little bit more hourglass. I'm going to do that.
Gonna change it up. Now that I've done a couple, I want to push the
boundaries a little bit, kind of see what else
I can do with this. All put this one
off to the side. I have to figure out
what I want to do here. This one I put it
down so that I could have a little bit
more room at the top, like I have in the
embroidered example. I'm not sure what I
want to do up there. So I think I'm going to start sketching some lines
and kind of see. I liked this tie into nature. I felt like this
was a way that I could tie nature
in to the piece. And I think I kind of want to
play with some paint pens. So let's grab a couple of colors and just start putting together a
color scheme here. I like the worms, and that's going to look really
nice on here. Maybe not a peach. Maybe a white, and then I might grab my
color pencils, too. So just kind of a nice
way to pop in some color.
7. Embellishments: I'm going to start
creating just kind of some big shapes that are kind of sort of blobby that lean a little
bit into the floral. So kind of a variation
on the embroidered one, but I want to keep it pretty
loose. Play with scale. So I'm trying to
get the nature in, I guess, without
pushing it too hard. I also want to play with value. So that's the other great
thing about the colors I chose is they're a
family of worms, but they're also varying values. They're going to give
me a nice range. Do I want the figure to be light or do I want the
figure to be dark? I guess I want the
figure to be dark. Let's stick in the neutrals. I did. Recently, I learn I've been using my pastas
the wrong way. I was kind of battling
the paint pen. Instead of coloring, I
want to kind of fill in. And it's important to
not go over a wet area. So make sure that you're gonna add more that you have
to wait til it dries. I have some other ones,
a different brand. These betams acrylic margars, they're
not they don't do that. But pastas need to dry before
you go back over them. So this has been a game changer, just to kind of
better understand the tool and how I
need to work with it. That's very neutral. I
want that to go darker, so I'm actually going
to grab this one. That is pulling up the paint. All right. You got
to let it dry. I'm going to come
back to the figure. I'm going to play with the
three colors that I use. I'm going to have them create some texture inside
of the other colors. Sometimes it's important
if you're using paint pen to turn your paper so you
don't smear through it. Then what I can do is I can
go back even while it's wet. Sometimes it's nice to work
back into the wet paint. This is a great
trick if you don't have fine liner paint pens. I'm probably going
to go back into these with some swirls of colored pencil too just to add a little bit more color
variation and value. I may go back into
some of my pinks. The orange and the
red are pretty close as far as hue value, pretty close in
the same fightness and just the
darkness of the hue. So it's going to be
less noticeable, but still it's going to be
great. I might not need. I'm going to do even less orange and back into
it because I don't want to just paint
back over when they're so similar. Love
those. All right. Now my figures dry. I'm going to go in
with a darker brown. Actually, that's funny. On
the paper, it's lighter. That's right. We'll
make it textured. My paper gets too wet, it's
going to start to also tear. We're leading into the wood. Going to play with
some geometry and some straight lines here and just connect these through that. This is going to
be super subtle. I'm going to just to let
that dry a little bit, and then I'm going to go in
with some darker colors. I've got some warm
gray colored pencil, so I'm going over the marks
that I already put in, but I'm also sloppily going
off to the side on purpose. It's going to add
a little bit of a drop shadow,
which I love to do. I love to just add that
little bit off line. You can do the same thing
with a highlight too. If you've got a light line
and you want it to stand out, or a dark line that you want to minimize, it's a
great way to do it. Because now I can absolutely see all those lines
that I put in. I like that a lot. Painted figure is
still kind of wet. I want to be careful not to rip the grocery bag because
it's very thin. But I do want to
add a teeny bit. I'm shading around my figure. I can use that
shadowing to emphasize the roundness without outlining
it. It's too too much. Normally, as figures are down and they're either built up from the surface or they're
in the surface. I like the idea that
this is becoming more landscape and I want
to raise it up a bit. I'm going to play with
alluding to a ground. She also did a lot of
performance art where she had armatures where
the figures were vertical, perpendicular to the ground, and then something
happened to the armature. So I'm going to kind of
lean into that idea, letting this one stand up. And prior to doing this, I
was feeling that I kind of needed to add something to that ground, but I
don't think I do. I think I'm just loving
the simplicity of this. I do want to pull some of
that brown down, though. I'm going to do it though
with colored pencil. I want the focus to
be on the figure and the floral tree feeling, and I just want the ground to kind of be a support for it. And if I put the
paint down here, I feel like I would lose some of that So I'm just going to do little dusting of some brown, a light one, just to kind of pull some of that lightness
from the paint pen down. I'm going to go back in with my warm prey and just pop
those darks a little darker. And then now that
my paint's dry, I can pull some of those
darks up a little bit better to create some unity
but also some separation. I love that. Oh, my gosh. Okay. I think it's done. Like, that was the fastest one I've done. Everything else took
so much longer. This is fast, and this is
gorgeous. I love it so much. You can explore this
project anyway you want to. As you can see, I have explored
it four different ways. I've learned so much and
grown from each of them. So this is the order
that I created them in. This was, like,
the original idea. I started with this one, though, because I knew the embroidery
would take a long time. So I started with
the collage flowers, kind of leaning into that. Then I finally found
the time to work on the one that had been
haunting me for quite some time. Then I taught the
class in person. So I wanted to create alongside my students when
they didn't need me. And so I did a really quick
little one like this. And then today for our class
project demonstration, I've created this one,
and this is my favorite. This is my absolute favorite, and I feel like with each one, I was exploring different
ideas, but I was also growing. So I would highly encourage
you whenever possible in any of your art
practices and journeys, to return to things
and kind of revisit some ideas and give yourself permission to play in new ways. See what else comes out of
it, because oftentimes, even when we're exploring
the same ideas, it's virtually
impossible to create the same thing twice and to have the same art experience twice. Have the same
artwork come out of the same or similar
experiences just because every minute,
you're a different person. You're in a different
place, you're inspired by different things, you're feeling different things. This is an especially great one to revisit in a couple
of different ways. I would encourage you to do that in any chance that you get to in your art
practice with whatever kind of art brings you joy. Now that we have explored
on Mendieta artwork, before we head over to our last lesson to
wrap up the class, I've added a couple sneak peeks. I've got just kind
of a very quick time lapse video
of creating this. I was doing this upstairs
in my living room, but one of my kiddos
was homesick. So I wasn't able to get down
and record at my art table, but I still wanted to be able to share some of that
process with you. Within that same couple
days that he was homesick, I had some time to
work on this piece. So, unfortunately, this also
wasn't captured on film, except I was able to sneak
down for one evening and do a little bit of the embroidery to show adding the French knots. So if you have any embroidery
background at all, the flowers were done
using French knots. You can kind of see the build
of all of that on the back. But I do have another
class where I explore sewing back into paintings embroidering back
into your artwork. This is something that
is enticing to you. Definitely check out
that class and get a little bit more information
about that process. Check out some of
those mini videos of Nick working on
these two projects, and after you do
that, I'll see you in the last lesson to wrap up
the class. See you there.
8. Flower Collage Demo: You you the and and and and
9. Adding Embroidery: You know you
10. Final Thoughts: Thank you so much
for joining me in another artist
inspired series Glass. I hope you really
enjoyed learning about the amazing
life and artwork of Ana Mendieta and that the class got you excited,
got you exploring, so maybe some things that
aren't your regular go tos that you've really stretched a little bit
and your art journey, and that you have
some takeaways that maybe you'll want
to return to as you continue to explore art in your life and your
creative practice. I loved creating
this class for you, and I feel so inspired by Ana and I think that maybe figurative
art making and some of the approaches that I explored
through the creation of this class are going
to be ones that are going to live with
me for a long time, which I really love when
there's these things bubble up again in our art
making practice and it's not just a one
and done and move on. They're pieces to a
puzzle as we figure out all the different ways
that we can get expressive and explore art making in
our journey through life. I hope that you are
interested in sharing your artwork over in
the Student Gallery on the Projects and
Resources section. You can upload images
of your artwork, you can add some text,
writing about your process. You can share what you really enjoyed about learning
about honest life and her art and different elements
that you try to explore in your own process and
maybe even some ideas for some future art making. I love that in the projects and resources section in
the Student Gallery, that we can keep coming back. I have several classes
that I have created and the practices that
I have shared in those have become standards
in my art making. I love circling back
and sharing with my students and fellow
artists what else I've done and how that's continued to impact me
in my artmking practice. Has work is definitely
one that has done that. I'm very excited to
share several pieces that I've created and I hope you are excited to
share your work too. After you shared your project
to the Student Gallery, please take some
time to pop on over to the review section and share your thoughts
about the class. Class reviews are
a fantastic way to share the student perspective
of what the class was like, what you got out of it, maybe ways that it's impacted
your art making, and anything else that
you want to share with students that might be
considering taking the class. I know that perhaps you like me are someone
that before you click By online or before you dive into a class if you're unsure if it's
the right fit for you, I love going to
review section and getting some student
feedback as I make some decisions
about how to spend my time and where to
put my creative energy. Greatly appreciate
any thoughts you want to share in the
review section of class. I would love to stay connected. If you aren't
following me already, be sure to click the
follow button below. That way, you'll get notified
as new classes come out. I also love to
share what classes I'm taking because I'm
not just a teacher. I'm a Skillshare
student and I love hearing from you
what classes you are taking and following
your art journey, and I love sharing my own with
anyone who follows along. You can also follow me
over on Instagram where I share regular updates on
my art making journey, what's coming up in both my in person and online teaching, Art Adventures I go on, I just want to thank
you so much for taking this class and coming along
on this art journey with me. I have loved creating
classes here on Skillshare, both art focused ones
and then art history inspired ones and I have a ton more ideas of
future classes to come. I hope that I will
get to see you in class again real
soon till next time.
 Elisabeth Wellfare, Artist, Art Educator