Transcripts
1. Introduction Illustrative Character Collage: Have you been wanting
to learn how to incorporate collage
into your art practice? Do you find character
illustration intimidating? Or are you looking to find
your illustrated art style? If you answered yes to
any of these questions, then this is the class for you. Hi, I'm Elizabeth and welcome to my class, illustrative
character Hawaii. I've been teaching
art since 2005, and I am so excited to share this really fun approach
to art-making with you. I'm an artist and high
school art teacher, as well as a published
author and illustrator. And in 2020, I began
teaching for Skillshare, developing classes that explore a wide range of
materials techniques, and start making approaches. I love all things art, and often love mixing
art techniques and materials to create new
fun, illustrative images. I also love finding
new ways to use decorative papers that I collect and ones that
I've made myself. In this class, we'll
be digging for our decorative paper
piles to create fun, illustrative
character collages. I know the character design, it can be intimidating
subject for some people, but this class will break down those barriers
and help you get into illustrative character
art-making using a really fun,
whimsical approach. We'll build up our
character's piece by piece as we consider what paper combinations
that work fast to achieve the illustration
style that we most prefer. I love to create my own
decorative papers or give papers that I
find unique flare. And I have a few other
classes that focus on decorative paper
techniques that you might find helpful as we
began this class, you can explore those by going to my Skillshare profile page. All you have to do is
click on my name below. This class is intended for
creatives of all skill levels, and it is a simple
way to approach illustrated character design
using the fun of collage. By the end of this class, you'll have an easy way to
approach character design, inspiration for future
illustrative artworks and some new skills making it enhancing dear
decorative papers. I hope you'll join me in
the span class as we create playful characters using
illustrative collage techniques. Let's head on over to
the next lesson to learn more about what we'll
be doing in this class. I'll meet you there.
2. Class Project: Thanks for joining me
for our class project. We'll be gathering up
our decorative papers, learning how to
break the character down into its most basic shapes. And then building it
up piece by piece. You'll have the option to
add an other art media to enhance your collage
as you discover your own illustrative
collage style, the type of character
you create. It's completely up to you, but I'll be demonstrating how to create an imagined
character that you can further stylize using
either your own inspiration or the reference
sketches I share on the Projects and Resources
page of our class. It's always so fun
to see how everyone approaches collage and
illustrated character design. So please share your
collage artworks in the class project section and tell us how approaching illustrative characters
this way works for you. If you create sketches
ahead of your projects, please share those as
well as it's always so fun to see an artwork go
from concept to creation. The first step is gathering
up your art supplies. So let's head on over to the next lesson
to take a look at some of the possible art
supplies you may want to use. See you there.
3. Materials: Welcome back. Now let's talk about
the art supplies you might want to have a
hand for this class. You can create this character
in any size you prefer. But since pelagic small pieces can be challenging and
potentially frustrating, I recommend you go no
smaller than nine by 12 ". We're going to be building
up our illustrations on a background papers. So consider your options as you collect and create
decorative papers. I like to start my papers by size and store them
in boxes so I can easily find papers that fit for various parts
of my collages. I've included a list of necessary and
optional art supplies in the class description, but let's also go
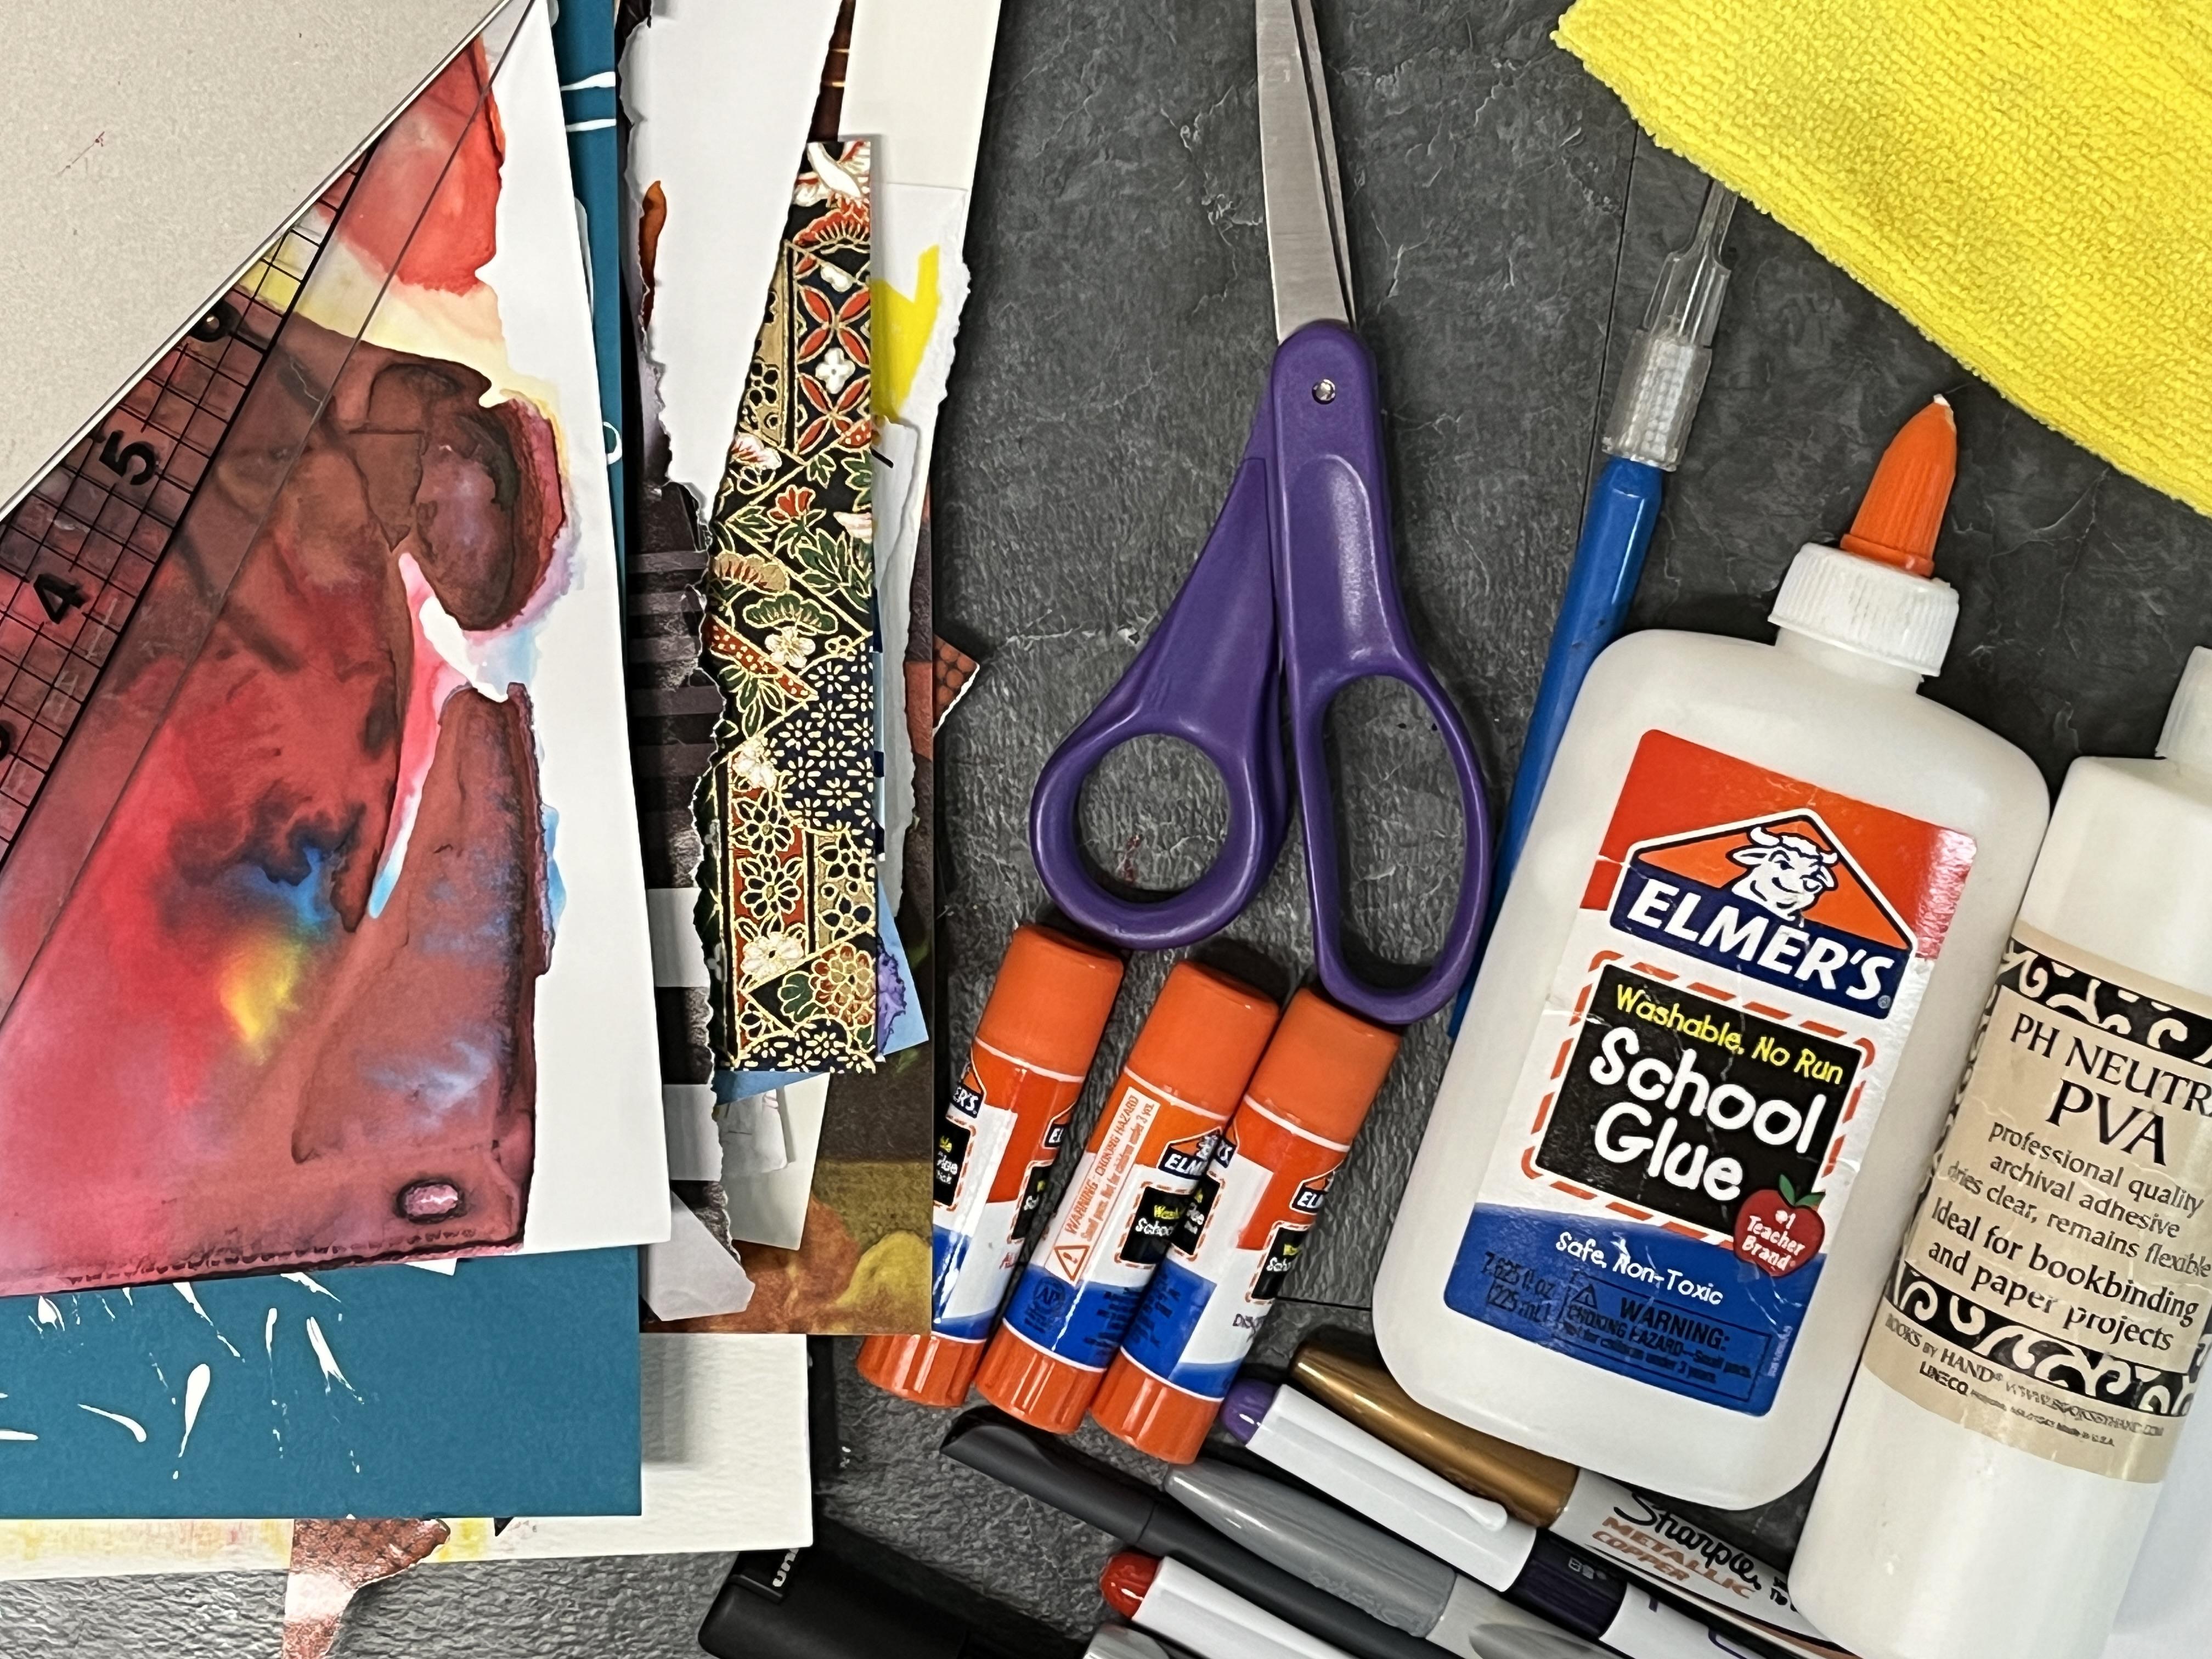
through those here. The supplies that
we need for class are decorative papers. I have a mix of magazine
images that I've collected, as well as some decorative
papers that I've made myself through
different ART processes, playing with brush marks and stamping and
watercolor techniques, liquid watercolor techniques. I, first step, the first
step is to kinda go through your papers and magazines
or make some fun papers. This is lettuce, but this is
such a beautiful texture. I can definitely imagine using this as a background texture in an illustrative
collage or as part of the fashion design
fashion as well. I also really enjoyed
vintage pictures, so I might use the berries or the texture on this
side of the cake. We're just looking
for advertisements that can have some fun. Designs in the background, or the bold colors or
the fashion itself. But I might want to cut up and I've got lots of
different texture papers in your art projects that I want to repurpose
or something else. So a nice collection of decorative papers is the first supply that
you're going to need. And it doesn't really
matter how small they are. And I always kinda keep a
bunch of these lying around. So I have boxes, these and folders of these. And you never know when an art project one day or an experimental
or something, one day will turn into a beautiful illustrative
collage the next. So it's decorative papers is the first thing
you're going to need. Then you're also going
to want something to cut the paper wet. You're going to want to
have scissors as well as an exacto knife because our
portraits are going to, you can go as large
as you want to. But we might have
some small details. So you might want to
have an exacto knife on hand for the small
detail cutting. And because we're
gonna be cutting, you're going to want to
protect your surface. I recommend you either have a cutting mat like
this one or you can just use the back of an old notebook or a
piece of cardboard. I always save my empty
paper pads and use the back for cutting
or if I just need a surface to protect
whatever I'm doing. So either of these are great, but we will kinda want to protect our surface
if we're doing some small fine cuts with the exemption they've
down the road. Then you're also going
to want something to glue down your
decorative papers. So I recommend that you have bunch of glue
sticks on hand. You can also you can
also paint it on you. You could use
watered-down white glue, whether that be something like Omar's or if you happen to. I also do bookmaking. So I often have a big
thing of PVA glue around. So then I would want
to have a little cup and a brush to apply that. But for the most part I'm gonna be working with my glue sticks. So a glue stick is really all
you need to get into doing. Illustrative collage. Collage gets a little messy. So you're going to want to have a class on hand or
some wet paper towel. I like to have a damp one. It's going to wipe
off gluey fingers as well as a dry one
because I don't want wet hands going on
my decorative papers and impacting their integrity
or the quality of those. So a damped a damp cloth and a dry cloth so that I can easily wipe off my
fingers as I'm working. And then after we create
our decorative collage, we are going to go into it
with mixed media techniques. I like to have some bold Posca
markers and some Sharpies. Metallics are always
really fun to add a little pop
to your picture, but any, even just
black Sharpie is great. Our portraits, depending
on how large ego might have some smaller details
that you want to Incan. So I like having a fine liner. And then I also kind of
having some fountain pens, really any kind of drawing
tools that you have around that you might want
to add into it are great. You could even add some
more ephemera to it. If you are a scrapped
burger or you are someone who just collects
interesting things, you might have
somewhere to go beyond decorative paper that has some fun details that you
could add into your collage. So think about that, but this is the basics of the supplies that you're
going to need for class. Oh, one more thing. I always have a stack of
just regular printer paper, copy paper on hand because
this way I can put this down, I can glue my piece on it. I can move it aside
to stick it so I can keep my glue mass contained and then just move the paper
aside as I need a fresh one. So definitely have a
couple of sheets of scrap paper around or copy paper that you can use to keep
your work surface glue free. So we have the materials
that we're using in class that you have
to have to make. Your collages,
decorative papers, glue, scissors, exacto knives. But there are optional
materials you can add, because once you
create your collage, you might want to go in and add some little details just to kinda help bring
even more character, personality and
illustration style to what you're working on. So to do that, you're going to want to have some drawing supplies on hand. My zebra fountain
pen works great on all kinds of papers,
including magazine papers. So if you have a fountain pen around or civics,
a ballpoint pen, whatever, kind of test them out, at least to have a little
test sheet on hand. So I can kinda see depending
on the type of papers, if I'm using an art
paper that I've done any sort of
or media work on. This paper is going
to handle any kind of pen I put to it,
which is great. And he had a pad and marker, the magazine paper
on the other hand, because it's got
that sheen to it is going to be a little
more challenging. So it's good to test it. So we'll have lots
of scraps of paper lying around before
we get to this step. But when you are ready to draw this or some of the things you might
want to have on hand. Another optional one to consider would be
colored pencils, oil pastels, and soft
pastels get a little messy. And I want to be able
to stack these up and not worry about
anything smudging off. So I tend to stick to colored pencil if I want
something where I can create some value variation or mixed color mixing,
anything like that. But they also are nice and
bright and bold on the paper. So they stand up Great against whatever your collage
has going on. And they do a pretty
good job on magazines. I can do a little
test sample here if this my black in the app does a pretty
good job on the magazine. But especially if you are using any of your decorative
papers that you've made yourself or art projects
that you are repurposing, colored pencil will
be great on those. So these are some of
the optional materials that you might want to
consider having on hand. But don't worry, if you
don't have any of these, you can just do the project
with collage itself, but I think you're going to want to have some
drawing tools too. So any of these
options will work great for adding in those
touches to our collages. After we are done,
gluing them together, take some time to
gather your materials, think about what type of character you would
like to create. And I'll meet you
in the next lesson, where we'll learn how to break
down our characters into their most basic shapes and start designing
them. The layer
4. Character Design Basics: Before we get into our
class project, lots, learn how to break
down our character into its simplest shapes and start brainstorming how we
want to design our character. There are many shapes, so you can choose from
for your character. I often let the collage
materials inspire me when I'm working from a reference image or
a sketch, I like to. I look for decorative
papers that are large enough for the project. And then I cut out
the shape I want for that character's body
or facial features. You can also draw the
shape on the back of the decorative paper
and then cut it out. If you don't want to
freehand cut the shape. You can also do a Frankenstein approach where
you can create a bunch of different pieces and options and actually have those collaged
pieces cut out and ready. And then you can start
piecing them together. This can create kind of a really wild and
kinda funky character that might be a little odd
ball, but super awesome. When doing a character collage, we need to imagine the end
result because it will take a little bit of time to go from ideation to creation. I like to add facial features as a mix of collage
elements and drawn in details which are often
some of the last things that I add when creating
a collage character. And I like to work
very intuitively. I often start with
the head shape, but the body shapes and start
building up those shapes and kind of imagined as I go. Whose character is this
creature and what, what their personality
might be like. And really let, let the collage process and the character designing process inspire other final character. Turns out, I recommend you try all the methods and
really experiment. We only have one class
project for this class. But I would love
to see you create more than one collage
character and really have fun and play with
how you can design them and illustrate them and make them come
alive in your artwork. We're going to start
by thinking about different shapes we
can have for the head. I'm just going to kind of
create a little reference here that I can then look back to as I'm
creating characters. So some different head shapes. You can look around at
different cartoons, different people, different
references on the Internet. Look around your family, however you want to do it. But because we're having
some fun with this, we can have more kind
of a mask like shape. Then you can obviously run
that up as you need to. That's also the great
thing about the paper. So we're going to cut this
shape out, for example. Let's say I'm going to
do it out of this paper. I can, one-step I can
do is on the back, I can draw that shape. And let's say it's
not totally perfect. It doesn't matter
or totally exact. I can then cut it out and kinda clean up my cuts and kinda
make some edits as I go. And the flatter, the curve tap is more so if you were doing, you know, if you're
gonna get hair or hat. Now, something to consider. My sharpie bled through. I'm using sharpie to
make sure you can see it on the camera. But if I was gonna do this
in an actual collage, I'd want to use a pencil. So let's do that. Let's do this again. I'm going
to draw it on the backside because I don't want to
have my pencil marks on my collage. Try not to get too
fussy with this, where it's a collage class
and not a drawing class. And we're all coming at this from different
experience levels. So I just want you to feel open to play
and experiment and create without getting too
caught up in the details. So there I would draw, I drew it in pencil,
I cut it out. Now I have that shape. So this is one possible
head shape and how you could create
it with the paper. You can also have more
of a football character. Head shape. That's another way to go. You can have an oval. Even have more of like a
sweetheart shape to your person. Have it point to each
in a more strong jaw. You could have more like that. You can just do a nice elegant
upper part of the body, of a part of the head
and then the lower part. And it doesn't even have
to be a realistic shape. Maybe you kinda just wanna You know, do something
wild and crazy, or do something
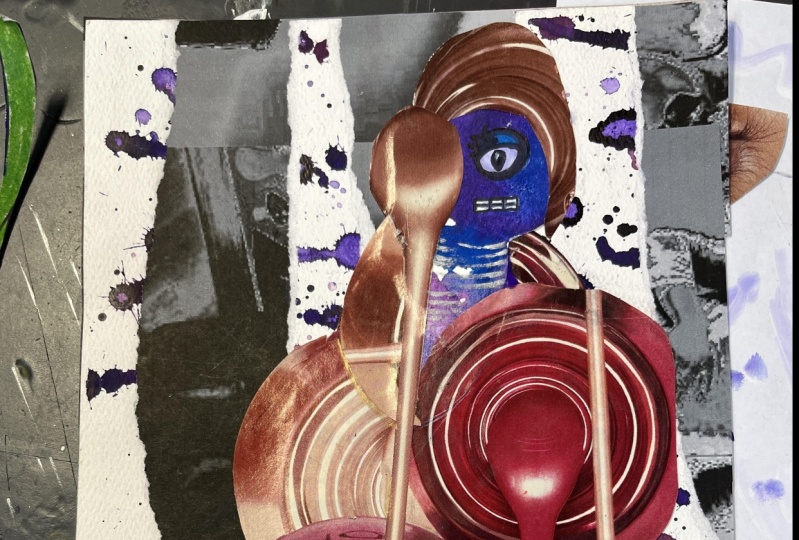
more rectangular. Maybe you're making a robot. This doesn't have to be a human. It could be anything you want. You can also get inspired
by the shapes like this. So these are just
watercolor plays. I can use these as my starting off point
and say like, okay, so you can say what do I see him this or what can
I turn this into? So it's really funny
because now that to me, just because I'm in the
mindset of a portrait, because we're making faces. I see the purple now is hair. And now I kinda see this
is a person in profile. Like there's their nose,
there's their lips are, is they're checking, their
eyes are going to be closed. So you can kind of start to look around for
different inspiration. So these are some
of the hardships you might want to consider. Now, let's think about how
we might want to do noses. Now, some of these,
like this portrait, the nose is very small. I kept it with
just a basic line. I wanted it to be long. I didn't want it to be
a major focal point. I wanted to say simple. It can just be a line
that you draw on there. This one is more of an
alien type creature. It doesn't have analysis. So that's another
way to go for it. But if you wanted to draw
a nose or cut out a nose, let's think about the different
ways we could do that. So let's see. I could I can do just
a line, the nose line. I can do the standard
one like that. You can draw it in the nostrils and then
kinda build the nose out. Have kind of more
of a boxy nose. You can just do kind of
like a cute little nose. Have kind of a straight nose. Kind of goes like that. So those are all ways
to draw the nose. But you could also
just cut it out or have a piece of
paper indicate it. So we're just don't
happen at all. So now let's think
about that. I shapes. I almost always draw the eyes. But you put start with the
shape being something you collaged first and then you
drew into to add more detail. And then you have to think
about the facial expression like is it gonna be
kinda like a mugshot? Or is it going to
be a standard base? Or is it just gonna be dots are going to be more cartoony. You know, what is the
expression of the person? Is the person sleeping? You want to give them
eyebrows. You want to do. Are they angry? Person? That's coming across as angry? Maybe we give it the
right kind of eyebrows. They disliked later. You don't have to overthink. This can just be
pretty, pretty basic. Is it gonna be more of a, more of a character? Just kinda have a
standard like a minion, I've sorted it kinda. The other fun thing to do is to add this to include
the reflection now and you can draw it
in or you can ink it back in with a white pen. You want to, but that
kind of gives it a little bit more personality. Let's see. Wherever your reflection
is gonna be on one eye, it should be the
same on the other. The light sources coming
from the same spot. I'll be there. Those are angry your eyes? Yeah. Then you want to think
about the mouth shape. So can you see the mouth? Do you want to have a mouth? And these I often do as
a combination of drawing them in or collaging
them in this character. I put the white box
and then over that, I drew the edges of it as
well as defined some teeth. So this is all drawn
on after the fact. This one, I collaged it on
and then I drew over it. So I cut off the
bottom lip shape. I cut out the top shape, I trimmed it up a
little bit with a small exacto knife and then after it was
dry, I drew back in. So this is a collage and drying. So if your character
has a mouth, what kind of mouth do
you want to give them? Do you want to define the lips? I'm just going to hang it out. Are they mean even when, you know, what kind of
what's going on there? I don't even know
it's happening here. This one got weird fast. But this is great because
collage and drawing, I can just get rid of that weirdness in
the middle and now it just becomes some buck teeth. And that's great. I can just be a circle. It can be a sweetheart lips, the super howdy lips. It can be a line. Just swoop. It can be just the
teeth, whatever. These are just some things
to think about as you are thinking about your character and how to bring them to life. Once you are done with the collage portion are mostly
don't have gouache brush. This is a really fun part of it. And there's no limit
to how far you can go in adding personality
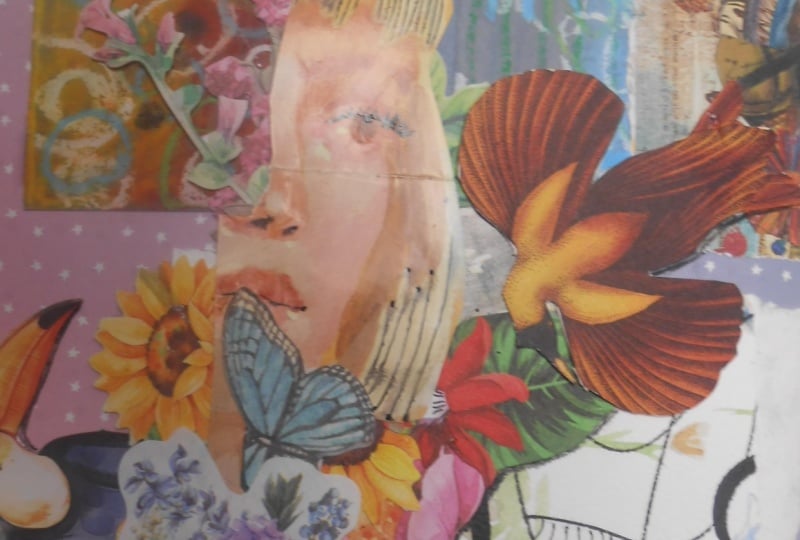
to your curvature. The other thing you
want to think about is what kind of details
do you want to add? So this character, I added a band across your fun
at flour in there. I added some hair texture
just a little bit. I went in and did a little
bit of gold detailing on bottom edge of her
blouse and her coughs. I added some dots just to kind
of dress up the skirt and how to make it look like it had a slip there that was
closed up with buttons. This one I just did the face. I didn't add any texture
because there was plenty going on with what was alluding
to her hair and fabric. I did add some texture
on the neck a little bit there just to kinda was feeling a little flat to
get a little roundness. This one is another one where I drew in the eye is I added a little bit of shading
with colored pencil. I did some band work. I created a backhaul, still needs definition,
their design on it. It's got an
engraving. And then I did a little shading and
some line work there. But ultimately the face, I just darken the lip
and I drew in the eyes. It doesn't have to be much, but you can really have a lot of fun with this step
of the project. So don't be afraid
to be experimental and play and have fun. And think about what kind of
characters you want to make. Now that we've
learned the basics, we're ready to get into her illustrated
character collage. Next up, I'll demonstrate how
to create an illustrative, stylized, flawed character
from our imagination. So let's head on over to the
next lesson and get started. See you there?
5. Collage Portrait Part 1: Hello, I'm going to show you how to create an illustrated
character collages. If you are nervous
about this stuff, I've included some
portrait sketches and Frankenstein facial features on the projects and resources
section of our class. So feel free to use
those references as a loose guide
or print them out, trace them whatever
works best for you, what, these are PDFs. So if you are watching this
class on the Skillshare app, you'll need to make
sure that you go to the Skillshare
website to download those so that you have easy access to them as
you do some character. Alright, let's begin working on one of our illustrated
portrait collages. I just grabbed a piece of
paper that I had around. This is pastel paper from
a different project. I wanted something
to start as my base. And then I'm going to build
up my collage from here. Now, if you are new to collage, you might want to cure rate your collection and figure out what's going to
go well together. You might probably like, okay, I like this color scheme works. And then here's some teal. Then maybe I want to have
something contrasting that with the browns
kind of mimic that. So maybe I'll grab this paper. You probably won't end
up using all of this, but you might, who knows? The red kinda works in there. So I might hang on to that. I might wanna do kind of a warm, cool contrast, but maybe not. So I'm just gonna kinda
go through what I've got. I'm kinda figure out
what I wanted to do here as far as a
color scheme maybe. And then I'm gonna go ahead
and build it up from there. So I'm just kind of going
through making some decisions. This is kinda throwing me off. So I'm going to scooch
my cake to the side. It doesn't mean that it's not going to be in this collage. It just means that it's kind of, it's causing me to get a little confused about what
I'm trying to do here. Alright? These aren't
speaking to me. There's no wrong. There's nothing wrong
you can do here. Let's see this now. So I'm just kind of getting
myself a starting point. Something I'll speak to you. I like to work really
intuitively in general when I'm creating art. So a lot of that comes from the kind of Marie Kondo
philosophy of stuff like, does this give me joy? Yes, no. Maybe, maybe it would work
in a certain circumstance. I don't know. Then I just use that
as my starting point. Like that. But again, just
because I like them doesn't mean they're going
to work in this collage. So I think what I'm gonna do, I want something, I want to start with a
texture in the back. Just as a starting point. I really like this and
it's almost the same size. And I can always
turn my paper down. So I'm gonna start with
that and see where it goes. And I can always abandon this or set it aside and start
a different one. I can jump between my collages. I can have a series
going if I want to. So I need my white paper. All right. I've
got my scrap paper that I've got my glue sticks. The very first thing I want
to do is glue this to there because I kinda wanted
to establish my colors. Now, this isn't necessarily a masterpiece that we're
worried about being archival. And it's not really, it's not something that we're needing to put a lot of
work into gluing down, but I like my collages to stick. So I'm going to scooch
this to this side. I've got this nice include. You may want an extra
sheet of paper to put down under this and kind of
have a working area and then a gluing area. But I'm pretty
confident that this is going to be alright and that cause a huge mess on my table. And it's an art table. If it does, I can watch them. Not a big deal. I really want this to stick. So I'm gonna kinda really
kind of rare it with my hands and get that
to attach there. So now I have a background. They might not stay
oriented that way. I actually like that better. So now I'm going to
just kinda figure out where else to go from here. I can keep building
up the background. Or I can go right
in with a figure. I like to have some
layering and overlap. So I think I'm
going to just start sharing papers and kind
of adding to this and see, see what happens. Now. If you don't want to tear
your paper, that's fine. You do want to
think about though. So look if I tear, if I if I turn this way, you can't see it because the
paper is, is the impeller. Okay, let's do it
on a white sheet. If I if I tear this, I get the white edge. Now, if I tear I whatever way you whatever
side you want to keep. If you don't want
that white edge, just have that be the
part that you tear away. I don't mind the white
edge and it gets going to work just fine with
what's happening here. I'm not sure what's
happening here is playing and having fun. And because I don't really
have a set plan for this one, I'm going to just glue stuff
down until I kind of get a feeling that it's
enough and it gets an exploration to move
on to a new section. So now why did I put
this one over here? I felt there was too much white. I just my intuition said
add something there. So I did lot of raring. Its a watercolor paper or mixed media paper, so
it's a little thicker. So I just have to work a little harder to get it to stick. Because I'm sticking
it to a thinner paper. It's getting a little worse. It's kind of humid right now. The Midwest. So whether is not helping
me here, but that's okay. Now, if it ends up
going over my edge because of where I want it
to be here, That's fine. I can just trim it off. Just to kinda you can do it at the end or you can
do it as you go. I usually had to do it as I
go just so I can kinda keep a clear clear
perspective on what's happening where but I'm not exactly sure where
it's going to fall. So I'm at this time I'm
going to put the glue right on the background paper. Then I'm going to put
this down like that. And then I'm going to trim. Then I might do some
touch-up gluing because I'm not waiting
for the glue to set and getting a
little bit of wiggle. I can just adjust it. Then I'm gonna go ahead and
add a little bit more glue to secure this section there. So now I have a more
interesting background than if I had just kept it. One sheet of paper. I'm gonna go ahead
and trim this off though because they
don't want to see the background paper
through there. Okay. The background is done. If your paper is a little works like this because it is
humid where you are, there's a lot of
moisture in the air. You might want to let
this dry a little bit. I'm not too worried about it. So I'm just going to keep going. But you can also put
scrap paper over it. Kinda rare, it just kinda keeps it from sliding
to have that buffer paper. Back in my photo, my glue stack. Alright, so now I
have a background. I get to decide what character is going
to come out of this. And I think I want to go with
some contrasting colors. So I'm gonna go
back into my pile of papers and kinda look for some colors and patterns and fabrics that will add a
nice contrast to this. I did kinda like the
texture on this. But now that this
has come through, I'm thinking I want something
a little more buried. So actually, since the opposite of the opposite color
of blue is orange, and I happen to have
some fruit here. I'm gonna go ahead and
use this as a foundation. I personally, that's
going to be their head. But I wanted to
have some options. So it's okay to cut
out a couple of different shapes and kinda see what kind of person Can
I have to like Envision. Envision it like Is there? If they have a head, what is their head look like? Maybe. Kinda like the idea of that. The lemon being a beard. Kinda wild. We're gonna go for it. This is gonna be,
That's the beer. There probably should
be a mustache. Maybe we turn this
other section. Mustache shape. I'm entering into the
shape of the foot orange, but I do really like that color. Yeah, I like it. Okay. That can be as
that is right now. This could be the body. It's kinda looks like a
super cute bearded bug. Maybe it's going to be a
bearded, but that's okay. Or maybe I can give This character some hair. Then that'll kind of
help define it further. So maybe I can cut out some
more of this advertisement. That's pretty small character
for that background. Works with a beard. It doesn't, but I can create
more layers behind it. I don't know. That might be a little weird, but maybe there's your legs. Maybe abuser likes
to this person. Pick up belly. And then there's this
little character or maybe he has a great big hat on it. Like there's potential there. I'm not sure that
this is the way I'm going with this,
but who knows? Alright, I'm going
to save the scraps. I'm going to move
these other ones aside and kinda clean up as I go. It doesn't get too chaotic. If you're making a lot of
cutting and thinking decisions, you might want to make sure
you put your cap back on your glue so that
that doesn't dry out, but have that on hand. Let's see, I'm going to go
back to some more orange. Back into my pile,
see what I've got. Need something that's
going to contrast with the background, which is pretty
loud so I can keep my character pretty mellow. Some rub. That's tricky. Tricky fellow. Kinda like those textures. The red. That might work. Alright, let me get this
box out of the way. Let's see here. I think I just need to
make some decisions. So I'm gonna go ahead and commit to the mustache
and the beard because I really like, anyway paper. And I'm slowly making
some decisions here about what's happening. I still am probably going
to trim the face a bit. If you end up with really
tiny pieces of paper, you can always get out some
tweezers to help with that. Let me go ahead and trim
his jaw line a bit. So it lines up better
with the beard. There. Let's try scripts
out of the way. All right, We're
getting somewhere. Now. I'm gonna go had cut off some of the weight
so that I can kind of think about this paper. Sometimes the way I find is distracting when I'm looking
at some of my papers. So sometimes it
helps to just get it down to the pattern
that I'm interested in. I'm also going to move this body off to the side because I'm not sure that that's
where I wanted to go. But I do feel like this guy
needs a pretty awesome hat. The other thing you have to
think about it is you need a little imagination
here because we're not adding really defining
details and how the end. When we go in with the
pens and markers and kinda really start to
give it some character. So I have to think about what, what is he going to
look like in the end. Now, I also I do really want them to have
some hair in the back. So what I'm gonna do, this has way too big. Let's, he's going way down here. He could he could just
be like a little guy. I could make him a lot shorter and that would
make more sense. I can also just draw in
some little legs too. Alright. I think I like the
stance of a cowboy. What if I just use
the yellow part? Still going to have to
make the hat smaller. That's okay. Those are his legs. Then that could be his body. I can also make it smaller. It's caught on the thing. It's kinda fun. Maybe we don't need this at all. Maybe he's actually like
clustering bean, never fell off. Maybe those are his pants. Okay. I'm gonna make some commitments here because really we could
we could be here all day. What if those are his pants? Leave some space because I
kind of want to give them some boots. Let's see. All right. Do we need for
collage portrait part two, where we will finish putting the collage details on
our character design. I'll see you there.
6. Collage Portrait Part 2: Now he needs a shirt. I want to give him
something different. You could have kind of a
pattern shirt like this. Let's try that. Now because I've
already laid down. I can do a little measuring. I could've done this beforehand. It could have outlaid the laid that fabric
on here and then made some marks
and measured and, and kinda cut it
out but I didn't. So I'm just gonna
do it this way. I say that's roughly
where that goes. So now get rid of this extra
that I don't mean like huts. Just going to keep
it pretty straight. I can always layer
on more stuff. I want to give them
more to his body. Then I'm going to add a
belt buckle and stuff too. So that'll kind of now this
is this falls into much. So we're going to
actually get rid of that. We are going to
repeat some of this. This is where you could
really get into this and start looking at some
different fashion styles. The lucky want to
give your characters. Like it works. It does still blend
in a little too much, but that's okay. I can fix that by adding in. It's because this is too white. That's why it's bothering me. So I'm going to go
ahead and rip off. I just want to keep yeah. See, now the half hops. So I'm going to switch him. I'm going to glue this down. Add an add this piece. Here. I can go ahead and
put the body on. I am gonna give him some arms. I just want to get some of this established
kinda commit to it. All right. Go ahead and glue on the head of the beer is already attached. We go careful when you have
smaller pieces on top there. So now I'm gonna go ahead
and create some arms. Trim those up. Let's go along. So this is where
you kinda wanna, where it's good to
not glue very well. Because you're
going to want to be sneaking other sections and they can always read
here anything that needs to be touched up. His legs are pretty long. I kinda like that other
one curves and then try to a little curve there. Actually, I bet I can
get that one to bed. I'm going to chop it short. I bet. I bet I can use this section. Yeah, here we go. Okay. I'm going to put a
little glue on this arm. And I put some glue here. Oh no, not enough glue. This is where I
need my wet rag so that I can take care of
these gluey fingers. Their class dry section. Okay. So we have a figure. You need speech. Speech, he needs hands. Now. They don't have more of that orange from
the advertisement. But I do have some other
orange thing that could work. You could also be
wearing gloves. And ultimately it
doesn't really matter But I do kinda like to
match up the colors. So let's see. There's some orange and the
advertisement actually I'm gonna, I can do it. I'm just gonna kinda cut some generic shapes out of what's left section. I also like to talk
these underneath the sleeves because then it
looks like the hand is coming out of coming out of the shirt. Just adds a nice touch. Be careful. I just pulled them right off. Sorry buddy. Patients. Instead of the rubbing,
it kinda helps to do more of a dabbing
technique when you're gluing small sections like that to get this hand on and then I'm going to
wipe my hands off again. Fingers, sticky. Hands, dry the hands. Okay. So he has he has closed
the foundation of a body. I am going to I think I'm going to
use some of this for some detailing on his hat. It's kind of like a band. Pretty cool. Now, it doesn't all
have to line up. You can kinda let it, let it be a little
characteristic. We're going for illustrative. So that means that
it's a style here. There's these are characters. So they don't have
to be, you know, it doesn't have to be logical, it doesn't have to
make much sense. The other thing I
like to do is I have a very small exacto knife. Just kinda a little touch knife. I'm very careful. I hold the glued piece down. They don't want it to
slide and I kinda jump. Cut. I can cut that off without cutting this section beneath it. I have to be careful. The glue is not dried, so I have to be set to go slow. But this is a really cool trick. If you need to get
some geoscience, I'm going to let that kinda
hang because I like that. And then we're gonna
define that even further with markers. So let's see. I'm
gonna go ahead and do his face with the markers. But I do want to give him
some shoes of Samatha alluded issue is at least maybe that's where
this fun paper gets to come out and play. So one cool thing
you can do when you want to hide the cartoon, choose where they go
different directions. I could just do, you know, pumps at the bottom to
Captain, very tempting. I'm going to fold it in half. And then I'm just
gonna kinda hutch, an illustrated style shoe shape. Get my little heel. I might not decide to use these, but this has at least getting
me closer to what I want. So pretty cute. Now the question is can I yeah, I didn't seal it down very well. I can I can get
the boot on there. I can put some glue
line the bootup, I can get it to go
under the shoe, I mean under the pants. Then I can kinda
secure the toes. Heel. And then I need to secure
the pants over the tab. Works. That's fine. Alright, for this one,
I'll glue it over here. I'll move it over so it
works a little easier to make sure that I
get good coverage. Gently lift the pants
down over the boot. Here, the pants just a
little bit more there. And all of this, I can define more from the
background as I go. So that is the,
that's the basics. I have a figure. So I'm gonna go ahead
and let all of this dry. What you can do is just to kinda help make sure that everything is stuck down. I can take a clean
sheet of paper. I'm going to go ahead
and put it over the top. And I'm just going to press Press and burnish a little bit. Press and burnish,
Preston burnish. And that'll kinda make sure and be careful you want
anything to stick to the paper. Now I know that everything is glued down,
everything is secure. I'm gonna go ahead and let
this dry for a little bit so that everything gets
adhered how I want to be. Then I'm gonna go
back into this one with some different
drawing techniques to really define his background from the figure and give
him some more character. So I will see you in the
next lesson where we will add details to our clash
7. Adding Mixed Media Details: Alright, now our collage has dried and we want to
go back in and we want to really give our portrait or figure or character,
some personality. And this is where it becomes
even more illustrative. So what I like to do oftentimes
is start with the eyes. Now because I have
this darkish orange, I'm going to go in and kinda
define the eyes first. So I'm going to use my pasco white just to kind of
give it a basic shape. And this is where you can kind
of think about what shape you want your character's
eyes to have. Are they going to,
how are you going to define them and
their personality? I'm just gonna start with
some basic white bear because it's under magazine. That's been a need
to dry a little bit so then I can kinda jump down. This is where I like
to have my fine liner. I really love this, this super brand of fine liners. They do a great job. They come into big set
and not too expensive. I can kind of use that kind
of define ellipse here. Now, this isn't really great, fine liner or working on paper, but it doesn't work
so great on Magazine. So this is the same
final fine liner I used to do the inking on the watercolor paper in
the background that I try out to make the
background textures. But on the magazine,
It's not loving it. That's where there's a little
bit of trial and error. So what you might want
to do if you have a little less experience
working with mixed media, you might want to
get some scraps of magazine paper and then
kinda test it out and I go, Okay, how is Costco
going to work? Hospital works. Great. I was Sharpie going to work. Sharpie gonna do on there. Therapies a little less
opaque, but that's okay. Now, same thing if you're using colored sharpies
or other markers. How are they going to respond? Now the fine liner,
I already know, it doesn't really work so
well on this shiny or paper. Whereas if I was drawing
on watercolor paper, any other drawing paper,
it would work great. So I can use my posca on some of these sections where
it's art paper, but anything that's
a magazine image, this isn't going to work
so well for me now I know. So let's see. I have a zebra fountain pen. What does that word? Pretty good. That looks pretty great. So that's gonna be
what I'm going to use for my fine liner details. You can do as much experimenting
as you want it to. I just really excited
to get into this. So I'm not gonna go too much. I also have some different
colored fountains. If I wanted to use other colors, you could try some
jelly Jelly Roll pens. It's completely up to you. This is where we can kinda get in here and we can start adding some details to the
clothes we wanted to. We can also just let them be
the textures that they are. I'm gonna define this
guy a little bit more. So I'm gonna go ahead and put in some texture along the
edges of his shirt. Kind of give them some creases. Find the elbow is a little bit It's just the small stuff and kind of jump around and figure
out what you wanna do. Now, you can also
add some dementia. I have some colored
pencils here. I don't have all of the colors
of our friends, my house, but I do have some
that I can play with if I wanted to add
some shading in here, I'll give some more
dimension to the figure. I can do that. I can also go back
and with page, and if I want to go in
with some watercolors, were some water down ink. This shirt is pretty basic, even though it's got a lot of
moving lines from the ink. Original, the original EEG work. But I might still want to
give it just a little bit. A little touch here, add a
little roundness to his body. I don't need to do
this on the pants, Bobo necessarily that
it's enough to give him it's enough to give
him some dimension here. So play around with it. I mean, this is, we're
just making these for fun. Who knows where this
practice could go for you as far as doing some
illustrative collage, portraits and little characters. Just really enjoy it. Don't be afraid
to try stuff out. Worst thing that
could happen is you discover that you
really messed up, something that you're
really unhappy with it. You can cut it off or
you can collage over. It. Doesn't have to be, it doesn't have to be a
ruined experience. It can just be a continual
work in progress. I'm gonna do the same
thing for his hat. I really am liking that. So I'm gonna go ahead and add
in just some really rough Value fading out from the ends
to round out a little bit. It's a little texture,
a little more texture. Because we're building
these up as we go. We want to occasionally
I stopped, step back. Just like you would
in any artwork, will get some distance from it and decided on the next
steps that you want to take. A little bit down here. This is also allowing
time for that to dry. I can still see a Shane, some of the center
of those I shaped. So this jump, It's just like
when you were watercolor, you kinda need to jump
around sometimes. What area is dry and
kind of stabilized? Same thing. Especially when we're drawing on shiny material. I was all watercolor and mixed media paper with
Haskell would already be dry. It looks a little
strange without any definition to his eyes. Think it's safe to
go in and start adding more detail here. Eyes. If you notice that your
pen isn't making no, it's kinda resisting
coming down on that. It's still wet. Just take a beat. The middle still wet there. Alright, so let's,
I've got some texture there that there I think
the ISO me to dry. They're looking a little
crazy, but that's okay. Now, what else do
I wanna do here? My law may add some shine
through just kinda fun. And the Sharpie does a pretty good job going
over the magazine. I give them a belt buckle. Belt. Going to have to let that dry. Let's see, what
else can I do here? I wanna give ham, might use this gold
again, me about this one, green to give them a little
like a detail near the green upon his hot air. And then I'm going
to use the poll, give them a little fancy cowboy. Some texture lines. The pools. It takes the pattern
that's already there. I'm from else going
on blackberry dry. I'm going to let that dry
some more and then I'll go back in with my fountain pen. Guys are dry now. Think that didn't cover as much crime is
going to go ahead. Urine, some of that. I'm not gonna do
the eyes lie lines darker than I want it to
look like these grains make. I just wanted to find his brows. Ben, that dries, I can go in
at some light reflection. I like to just do that even with my illustrated
characters percentage. A little more realistic. I did want to add some
details to its shoes. I'm gonna go ahead and get my
black colored pencil again. And I want to kinda put in, I just want to put it in
kinda like a little shading. It doesn't have to be
anything realistic. This is something that you
don't have experience with. This is a great time
to practice and play. But if you don't feel
comfortable or you just don't want to go
their character, their eyes, great,
that's totally fine. This is meant to be
fun and it's kind of a neat way to get at
illustration and portraits, and character design and color. Hello, I mentioned down
here allude to a soul. I like that. Glenn do the same
thing over here. Now, you do not have to have
a body on your character. You can check the ultimate goal is on this part of it, right? This, I just, it's fun. It's fun to design the fashion. It's fun to use even
more collage papers. And it's just really
fascinating character design. So you decide how far
into this you want to go. But as long as you're
playing with collage, what kind of playing
with illustration sorta kinda finding your illustration
style a little bit and having fun making
portraits. You're right. Alright, I'm going to
call out one done. I really loved him. He's super cute. You could
even give them names. It would be really fun
to give them names. So this is my made-up,
made-up character. This has been so
much fun and I am so excited to see what types of
characters you've created. Join me in our
final lesson as we wrap up the class.
I'll see you there.
8. Final Thoughts: Thank you so much for
taking this class and exploring illustrative
character collages with me. I hope you had as much fun taking the glass as
I have creating it, and that you have added
a new art medium and, or subject matter to
your artistic practice. I'd love to see your
finished character collages as well as the director
of tapers you worked at. So please go on over to the projects and resources
area and click on the Create Project
button to share your creations in
the student gallery. You can add texture in
your thoughts about what you created and this
way of trading. I love sharing my art adventures and my students work
on my Instagram. So if you feel comfortable, please include your
Instagram name and your project so I
can take you online. And if you post
your art Instagram, please use the hashtag
Elizabeth welfare Skillshare, and tag me so that I
can find it online. I greatly appreciate it if you left a review on this class, student feedback is the best way for me to continue
growing as a teacher. And I really value what my students have to
say about my classes. So I hope you'll consider
leaving a review. And if you'd like
to stay up-to-date on my newest classes, be sure to click the
follow button below. You can also join me on YouTube where I post
art process videos, sketchbook tours, and
share my art adventures. And I'll see you next time.
 Elisabeth Wellfare, Artist, Art Educator