Transcripts
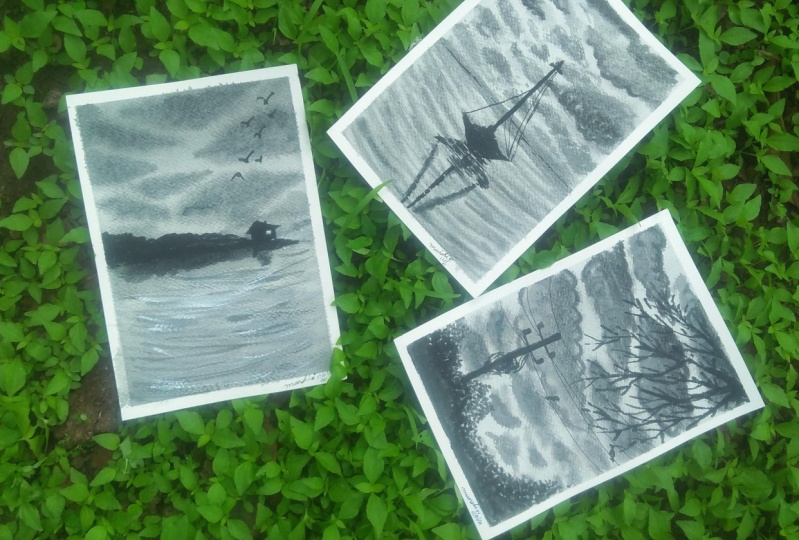
1. Introduction: Hello everyone and welcome back to another Skillshare class. With me. I am an artist and an art educator. I put up my paintings on Instagram under the handle, creating from the heart. I mentioned evoke with wash and water contours. And I love exploring these two mediums to the fullest. Before this, I have four classes on Skillshare, which are all with quash medium. So this time I have come up with a glass of water color painting. And we will be painting these three beautiful paintings with just one color and black color to add the highlights. Before beginning our final class projects, we will first walked through all the materials that we will be requiring for the spin things. Then we will look into some basic techniques for painting. These paintings. That is, we'll see how to use one color and different values to create these different tones and do the painting using that one Kano. And then we will move to a Finally class projects. I hope you guys enjoy painting these three buildings with me today. So see you in the next section wherein we discuss all the materials.
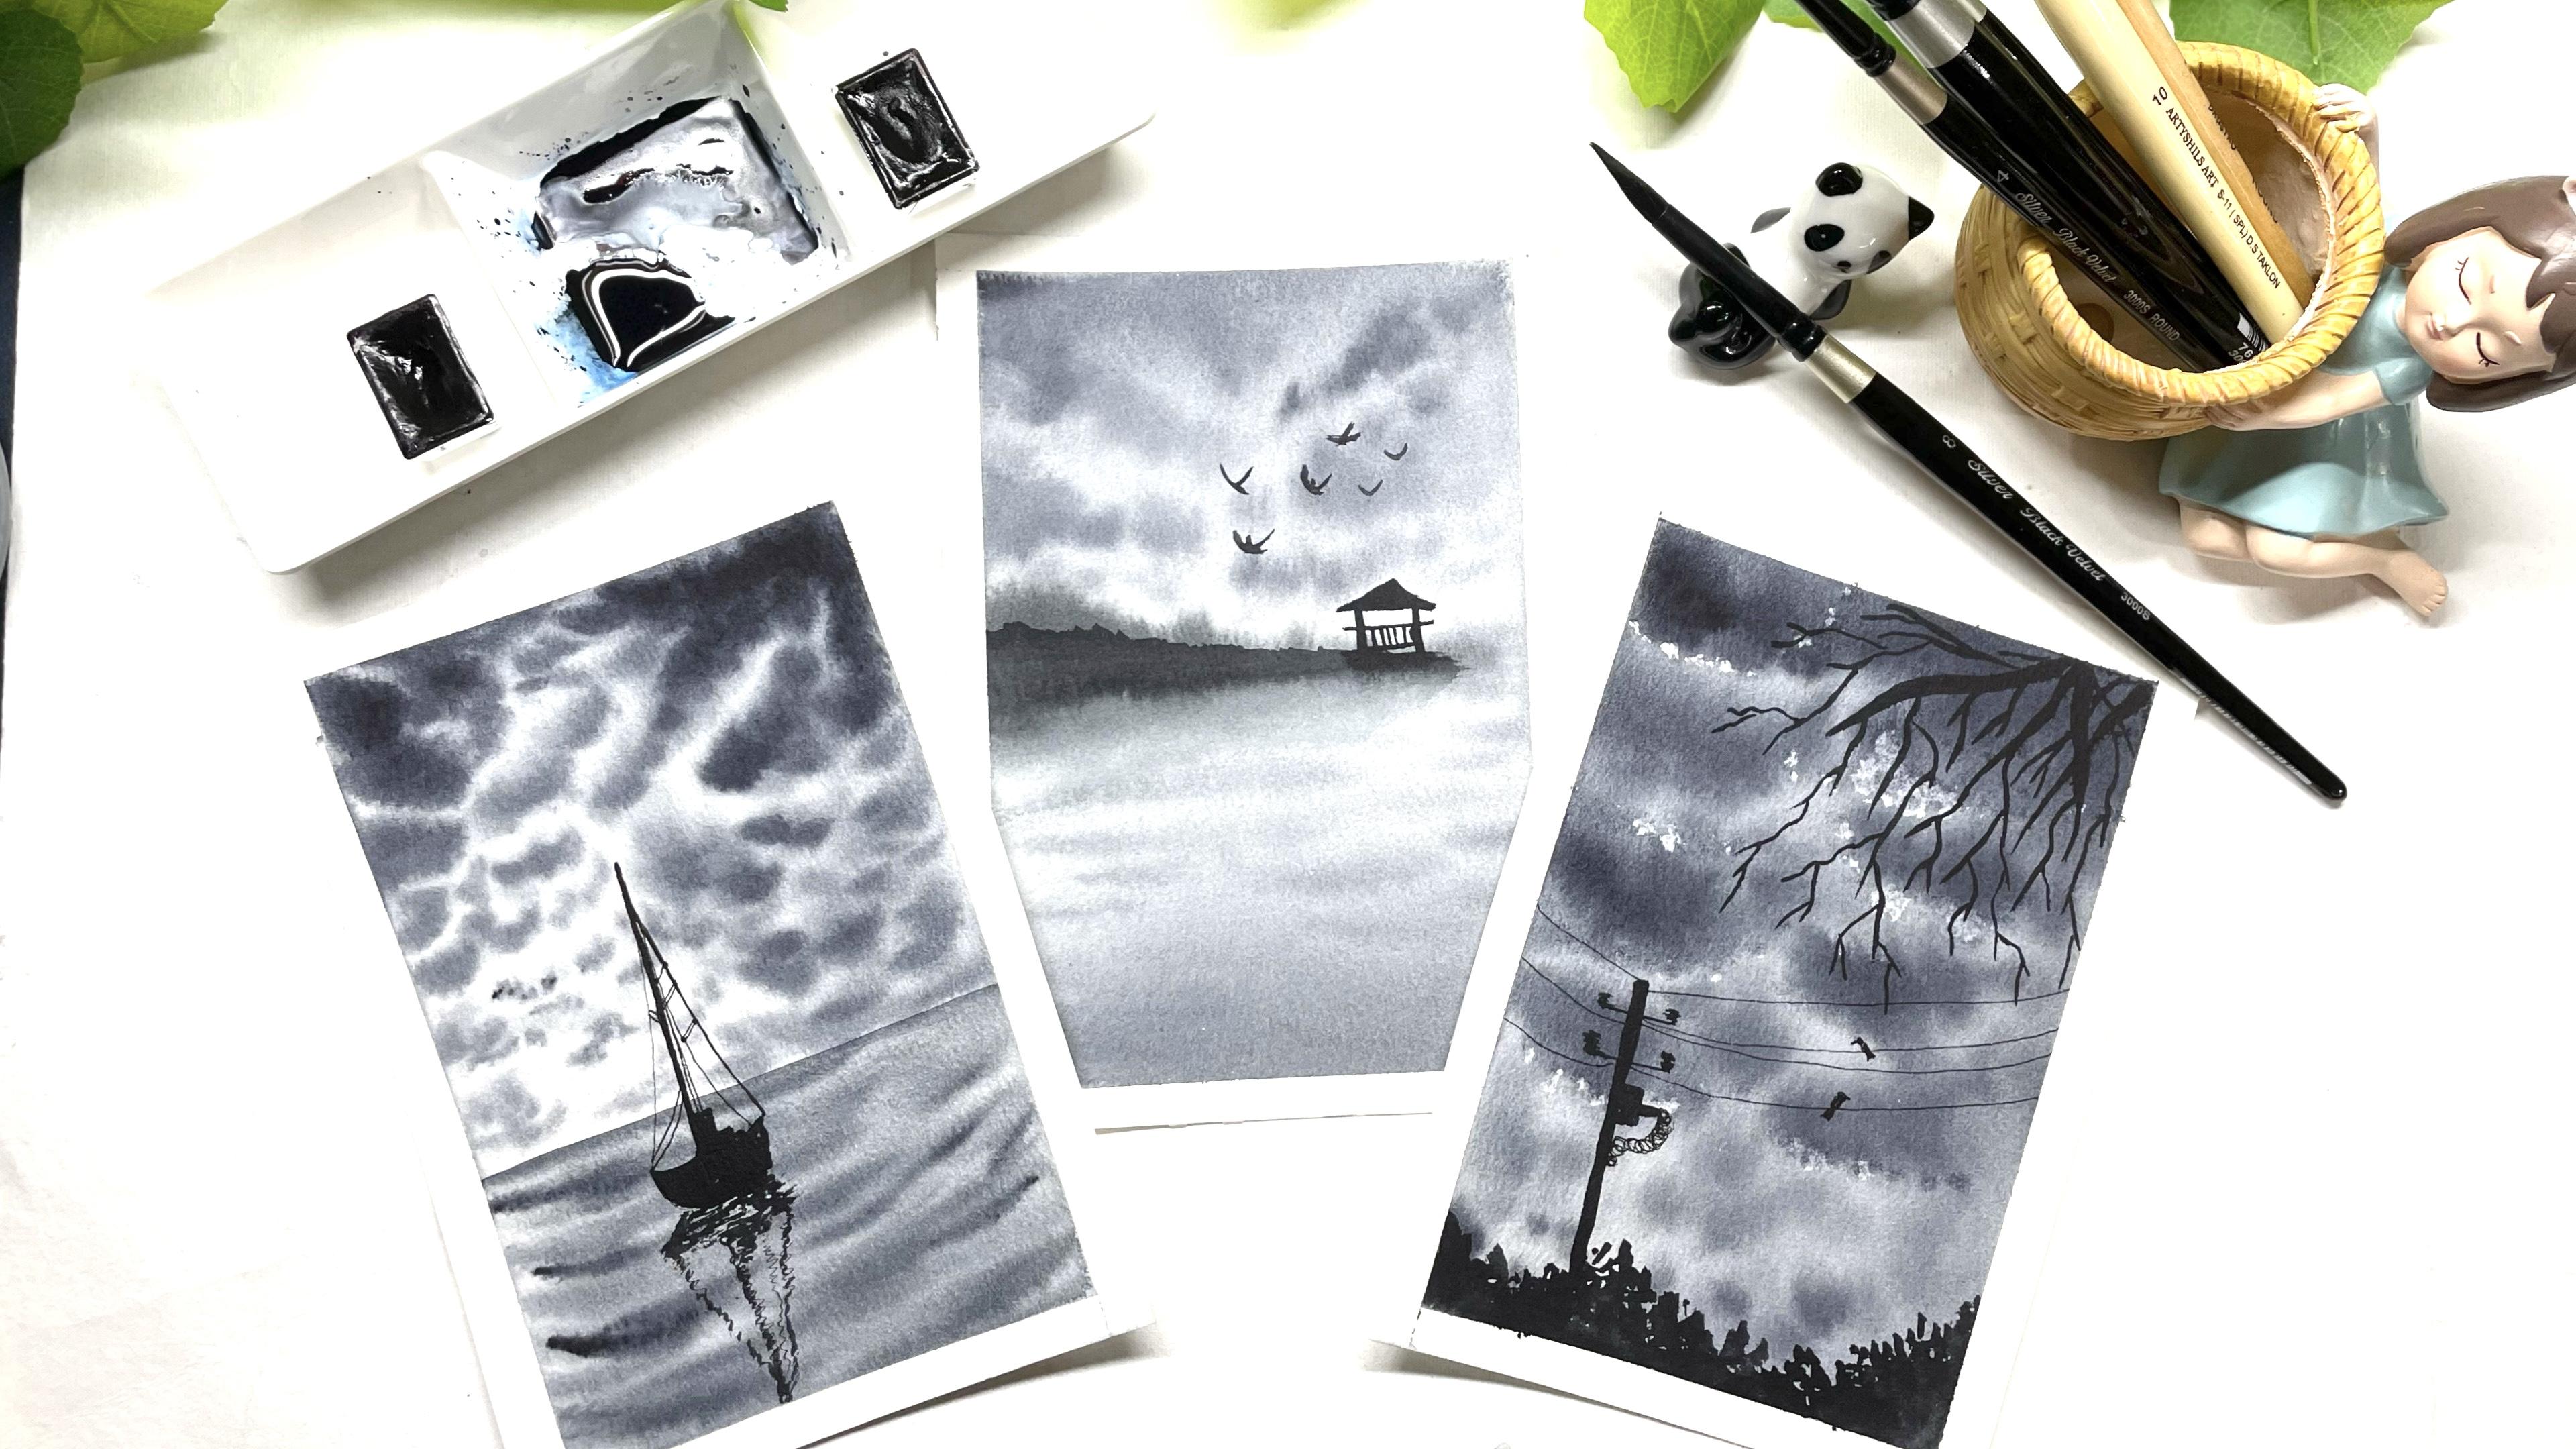
2. Materials Required: So let's have a look at the materials that we'll be needing for this class. Firstly, I'll be using this academy watercolor paper pad. This is 300 GSM, 100 percent cotton paper, and it is almost a little smaller than the A5 size. You can go ahead and use any brand watercolor paper that is 300 GSM and at least a 100 percent cotton to get better results. Also, you can use it either in an A5 size or a postcard size or even on a smaller or a bigger size as you would want. Then moving on to the piece, I will just be using two colors. That is a Payne's gray and the black color. And I will be using this palette during all our projects. Then we will be requiring two jars of clean water. One job has to remain clean throughout for adding washes. Now, moving ahead to the brushes, I'll be using these four brushes from the brand silver black velvet brushes. These are size 12, 8, 4, and 2. I'll be using size 24. My background washes size eight, filing the clouds, Size 4 and 2, 4, adding the details. And then I will be using this wash brush for applying the background water wash. Before beginning every painting. I will be needing a fine liner pen for adding some thin lines. I will also be needing a pencil to just mark horizon line in one of the paintings. Apart from this will be needing some tissues under graph clot. And lastly, we'll be needing a masking for forming the clean edges. So these are all the supplies that we'll be needing. Feel free to go ahead with applies you have at your end. And join me in the next section where we'll discuss the basic techniques first and then move to a final class projects.
3. Technique 1- Tonal value: So the first technique that we look into is looking at the different tonal values of this shape, that is the Payne's gray sheet. Okay, So first we'll begin with a very diluted. So I'm adding a lot of water to my Payne's gray here. So if you can see this is such a light color because there is very less pigment into this. So it is this lighter color that we'll be using as the forced wash in almost all of our paintings today. Then we'll be using a darker color than this. So this will be less than new debt. That is, there will be less water and more of pigment. So now if you can see this is one shade darker than our background color. And the third shade would be even darker than the second sheet. So this will be having almost equal to low water into it and only pigment. So this Docker bundle. So we'll be using these three different values of our beans gray color for painting up paintings today in this monochrome section. Now, if you do not have Payne's gray, then you can try mixing a little bit of indigo with the black color. So I am taking out some indigo onto my palette. And I will mix it with a little bit of black. So this is my black color anymore. I'm just adding a little mix of plaque to the indigo color. So you can go ahead and use this color. Maybe if you need a little more black value, you can add in more of plaque and less of indigo to this. So this comes to the perfect shade. So in this I had a little more of indigo and less of black. But when I added more black, it looks almost like pins gray color. So you can use a mix of indigo. And so accordingly, you can vary the proportion of the sheet indigo and black and create a mix that looks almost equal to Payne's gray color. And use it in your painting if you do not have ODD Payne's gray available. So this is about the payloads that will be needed. And apart from this, we'll just be using this black color for adding elements to our paintings. I hope you guys were able to understand the colors that we'll be using for our lab in things today. In the next technique, we learned to paint fluffy clouds with these color tones. So see you in the next technique.
4. Techniques 2- Fluffy Clouds: Now we learned to paint some fluffy clouds. So I am first applying a wash onto a small area. You are alphas give it the background wash with a very light tone of Payne's gray. Now, this is the base of my sky. To add clouds to this, I have to read for my background to GI almost 40 percent, so a charge amine and 55 to 60 percent width still. So this is still a lot bed. So you know, you need to read for a few seconds maybe depending on the paper that we're using. And then leaving pick up the same Payne's gray color, but this time in a little thicker consistency than previous. That is a little darker. The second tone that we had seen. So that has been picking up the tone now in this color consistency. And now my beach has begun to dry as much I needed. And now I'm just dropping the darker tones you're so I'm dropping it in a little circular motion so that they form the cloud-like structures. So this is how you drop beans. Now when you need smaller clouds, you use the tip of your brush or uses smaller brush and you just drop it with the help of the tip like this. So that is the force clear of clouds that we have added. Now to add a darker layer will be using this darkest consistency that is with very less water. So now I'll pick up again this Payne's gray color without much water into it. And background is still wet. Not too wet, although now I'll apply this Taco Bell at all, true. But this time, this darker color I will apply in smaller areas so that my first layer of the clouds also remains visible. And the second layer also comes into existence. And your, again, I'm just using the tip to drop smaller clouds. So now you can see that lightest tone that is obese layer, the second layer, that was the medium tone and the darkest layer that we have added. So this is the v, how we are going to add clouds wet-on-wet in this monochrome painting exercise. Also, in one of the paintings will be using a tissue to give some silver lining to these clouds. So in that, we pick up a tissue, we create a very small pointed edge to this tissue like this. Okay? And now, while this is still wet from this edge that I created and just give us smooth lining to this cloud. So this is basically happening to create a small white line around the Cloud. So when this happens to give a very tundra like look to the pin D. So if you can see this, so this is how we lift up little paint from some of the clouds in one of our paintings to give a little tundra like look to a painting. So that's about the Cloud study. Now, in the next technique, we look about the water that we'll be painting, but this monochrome color. And then we'll begin with our final class projects.
5. Techniques 3- Simple Sea Waves: Now the other thing that we need to understand is about painting a C and adding light CVs to that. So just to show up your, I'm using this lighter tone of Payne's gray forced, giving it a background. So this is typically RC. Now, while this is still wet, that is again, it is a vet around 60 percent still bed. So I am picking a Payne's gray in the second tone, that is a medium tone. And now I'll just be adding CVs like this in a curvy manner like this. So it's a little curve that I am using to add the CVs, the sea waves that are neuro to me that this from this end the would be larger than size and the ones that is new to the horizon line would be a little smaller. So this is how we'll be adding CVs. Now. Similarly, as in the clouds, we added the second little bit of a darker tone in the sea also, we can use this darker tone and add some darker leaves which stand out after they dry. So that is how we will be painting the CBMs for our pin D. Also, can you see after joining cloud is looking the tissue areas that we had mapped. So it is giving a candlelight stone look. Also, I would check commend all of you to first try out these techniques on a rough paper three to four times, so that you get a hang of these techniques so that it becomes easier for you when we paint our final class projects. So go ahead and practice this, and I will see you guys in our fourth class project.
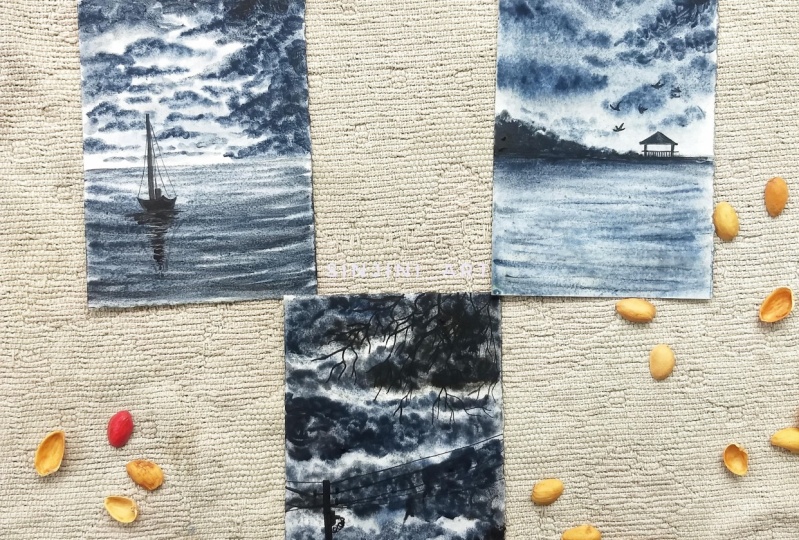
6. Simple Seaside View- Part 1- Background: So let us begin with our first class project. We'll begin with taping down up people with buffer masking tape. After taping down the paper, remember to run your fingers on all the four edges so that there is no point lift by for the water to see true otherwise, the edges of the painting minutes. Now I'll begin with applying a wash of water. I'm running my brush multiple times through the entire ADR so that the water is applied evenly and it remains wet for the time that I want to paint the background. I will first begin with the Payne's gray color. So I'm using this Payne's gray from the plan right now. I'll just remove it and do a pilot. So I've taken Payne's gray and or medium consistency or little watery for the first wash. And I'll begin at applying from the top. And I'll run through completely tilted down. The color will begin to 3D as it comes down words, I want a dark area or little darker, so I'll apply another wash, just have the dog. I'm picking up a little more of beans create to make it a little thicker and applying from the water, just making the bottom a little darker. Similarly, the top area also. So in the center, I want a lighter color and at the top and the bottom, I need a little darker tone. So I'm not adding any new water, just picking a directory from the band and giving these darker shades. And to get that smooth gradient, I'm running it till the center, not completely, but just a little so that it looks a proper gradient throughout. Now, I am switching to my smaller sized round brush that is size four from silver black velvet. And I'll add little clouds. You're, so, I am picking up the Payne's gray in a little thicker consistency now and just randomly dropping by. Remember to do this when your page is about 50 percent dry. Or it will begin to merge with the background and the Cloud effects will not be visible. Also, the pains shouldn't be in too watery consistency to drop these clouds. Or as David, again, you know, this pose into the background and as a neutral shade again. So if you can see, I'm picking up the paint directly from the band without introducing any new water. Some verges dropping small clouds. Now, I'll just give a rough light horizon line looks so that sky and the sea looks a little separated. Just defined line and some ripples in the water. So I'm adding these ribosomes and my page is around 50 percent dry so that they do not go, you know, all spread too much. And again, I'm just picking the paint thick consistency without adding any much what DO now? The element that we're going to add, I am mixing a little of black to my Payne's gray. I'm mixing a little bit of black to my Payne's Gray to get a darker tone. And you put directly even use hello. And now I'll just give this a little darker loop. That's a little foggy Mountain looked at. We want to remember to do this when your page is a little more dry. If you normally, your pH will be due weight. This will also begin to spread and will not retain its shape. And just moved in this endure so that it acts as the shadow of the mountain. Find off lifting some of the paint below the horizon line. And adding a little shadow to this and to see with the lighter tone. And now we wait for this to dry and then add the final details with the black color.
7. Simple Seaside View- Part 2-Details: Don't have straight. And I have picked up some black color into my palate. And now at the horizon line will give a small mountain range with this black color. Remember to not cover the entire blood mountain effect with this darker mountain range. Let that blow the mountain on to be visible. That set, I'll leave it there. And now we'll be marking a small frog leg structure. But before that, let me just move in this. So just run a damp brush, a little bit damp brush underneath so that the edges gets moved enough, acts as a shadow. Now I'm shifting to another point, the brush size to, because my brush has a pointed tip. If you do not have a brush with a pointed tip, you can shift to a detailer brush. So that's a little flakes structure that are sitting under the roof that we have formed there. And I'll just clean this up a bit. Now the last thing is we'll just add a few boards into a sky. That's it. We won't have too many. Now, let's remove the masking tape. Always remember to remove your masking tape at an angle from the paper that is a 45 degree angle length is also move your masking tape. Once your painting is completely dry, the painting will begin to spread into these edges and it will against foil the clean edge look. Since I'm using a steak fat, quickly remove this sheet from the bad. I hope you guys enjoyed painting this post-class project with me. So see you guys in the next class project.
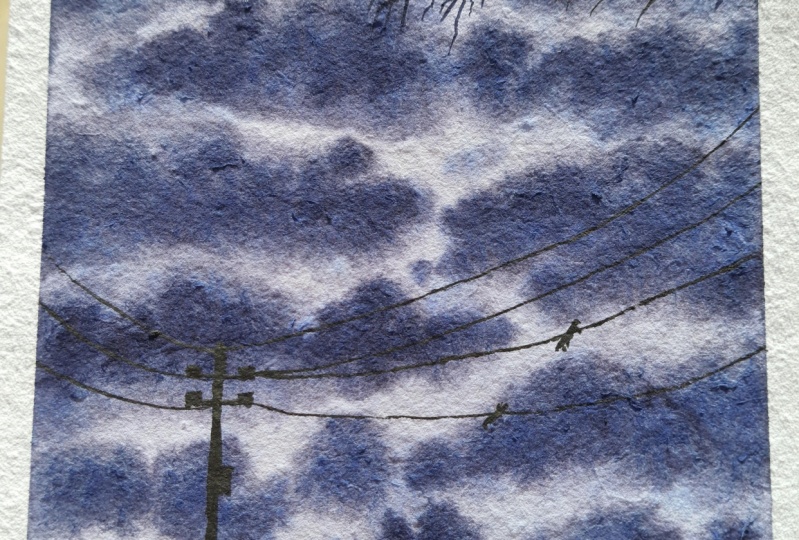
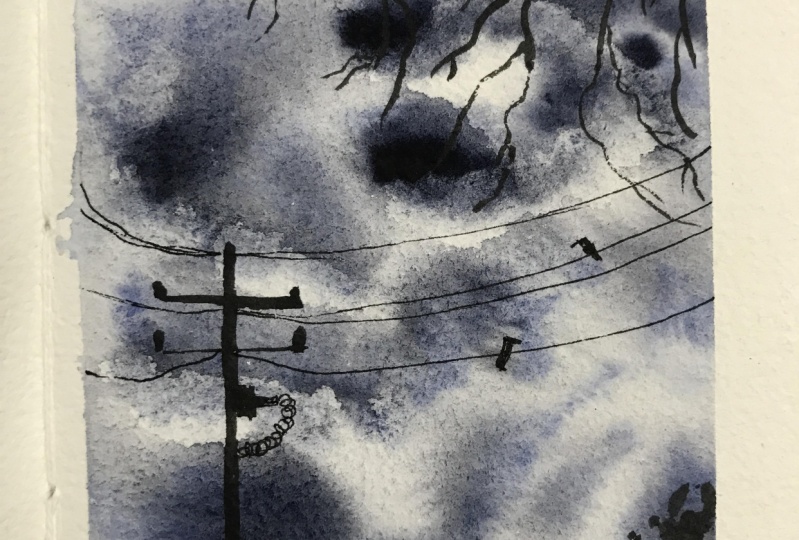
8. Thunder Clouds- Part 1- Clouds: So let us begin with our second class project. We will begin with taping down, up on all the four edges. We do not have any pencil sketch for this painting. But this time we'll be painting clouds in much detail at all, much. So we'll begin with first applying a clean pot of water throughout our pH. Make sure that your photo is even throughout. There are no bought tools found anywhere. Also, again, when you're doing a watercolor painting, remember to run your brush multiple times if your people is not though. Also, during a watercolor painting when we want our background to remain wet for a longer time, remember to run your brush multiple times so that the paper remains wet for a longer time. So my quota of water is done. Now, I'll begin picking up some color into my palette first, first picking up the beans in a very light constancy. And we'll apply it to out. Now, I'll wait for this force LEO to dry a little bit at almost o say 40 percent of GI and 60 percent of it. And then I'll shift to my smallest size brush. So I'm picking up my size eight silver black velvet brush. And I'll prepare a column mix of Payne's gray. But this time little tick God, and darker than the base color. But remember to not pick it up directly from the band. Arcbest consistency. Because after this layer also will be adding the darkest layer to add depth to our clouds. So now my paper is almost 40 percent dry. And I'll begin with applying clouds. Remember to not use too much water while applying this, or is it will begin to merge completely with the background and will not have a different look from the sky. So I'm randomly just moving around my brush in a little circular motions and dropping these cloud-like structures. If you notice, I'm leaving gaps between the cloud said I'm dropping so that the background color is still visible, that is a lighter tone. Also, these are being painted on a white background. So automatically when these will be giant, they would all, you know, module it didn't do those gaps that we're leaving and formed the perfect tonal variation. Now, I'll pick up the Payne's gray and much thicker consistency than and also so that I have a much darker look. So if you can see now there is hardly any water into my Payne's gray color. And again onto these clouds that I have pleased, I'll be dropping in beans, but this time smaller than the previous one also. So now if you can see there are three layers of colors visible. The base Leon, which was the lightest though second layer, which was a little darker than the base layer, and now the third layer of final clouds, which is the darkness. As I'm moving downwards, I'm making the Cloud smaller and just using the tip of my brush to drop these cloud-like structures. After placing these clouds, I'll quickly pick up my tissue and give some silver lining loop into a hand buffer. Issue. The top area your, I need very dark clouds, so I'm adding more beans green directly from my band, yours so that they retain the darker look here. Now, I have picked up a tissue and I'll draw it in such a way such that I have a very pointed. And with the help of that, I'll just give some silver lining to the Clouds for that is I'm just trying to pick up these things with the help of tissue so that the Cloud will automatically turn white arrow there and have a little silver line. Nope. Remember this tissue begging technique has to be done when your sky is still wet. Otherwise, after the paints have dried, you will not be able to lift up these beans. You could even do that with the head. Nash barred. The effect with the tissue comes much better than that of a brush. I'll do. If you're not confident about doing this, you can leave it like that. I'm just adding some darker color to these clouds because they look completely just one word. Now I'll wait for the background to dry. And then with the help of a black color, we'll add in the power pole detail and some tree branches. So let's wait for this to dry and then add the details to this.
9. Thunder Clouds- Part 2- Details: Now I'm shifting to my size four round brush, which has a pointed tip. And I have picked up some black color onto my palette. And I'll begin with false giving some tree branches look from the top area here. So basically, what we are trying to show is just from the right side, some of the branches are falling from a gene which is not visible to our site present me. So as you can see, I'm just adding some branches. So as you can see, I'm adding branches and different radiation. Not so much. So that does it for the branches bark. Now Buddha bottom area, I'll just add some bushes. So using black color directly without mixing it with Payne's gray. So that I have just DACA and I'm just dabbing my brush to get this work. I'm just giving some structure so that the bad bits to my bushes. Now I'm picking up black color and then just mark a small bubble boy and then add some bias to use appointed gosh, order to add this. If you're not confident, you can even use a fine liner pen tool market first and then add these things also with the help of a fine liner or a marker. You're just diving into the details to this probability here. With the head bulbar fine liner, I will be adding the parabola if you wanted to you so that they'll help both being crushed did agree of edifying graph that is say the point 0 or entrepreneurs IDO brush. But I prefer adding it the dead, but we're fine liner so that they are very thin. Some good and just adding in lines. Connecting this to the pool. Your daughter died before. Spider wired NORC are now under these buyers are just really tiny ones for this beam. And it's time for us to remove the masking. Again. Remember to remove the masking tape for Betty gave me off right figure from the paper and move it when you are painting is completely dry. And you'll see the water that has been collected. After the war. He gave me a gun with my second foldy being due. I hope you guys enjoyed this class project.
10. Misty Seascape- Part 1- Sky: Let's begin with our last and final class project. So we'll begin with taping people. So I'm done masking, done by people. For this painting, we'll just mark or very light horizon line at almost 30 percent below the people or market with a very light pencil marks so that after the painting, this is still not be visible. Now for this one, we'll first paint the sky. So I'm just wetting the background of my sky and giving a wash only to the sky. So after applying the backbone lush, I'll be forced picking up Payne's gray, innovated by consistency. That is really good to pigment and water flooded. And I'll apply it to my entire sky first. Now till the time the strides are legitimate, I'll prepare my second color, like there's a little darker tone than this. So my second color is ready humor. But we'll have to wait for this background to dry a little so that Wendy please, these clouds, they do not disperse into the sky completely. My people has dried a little as much as I needed. Now I'm picking up the Payne's gray Carlo in a little thicker consistency. And remember to not add too much water. Also make sure that your brush does not have any excess water. So you could actually, you know, dab like this excess water so that only majorly pigment remains onto the brush and then begin to add these structures, leaving white spaces in between. So if you'll notice, every time that I'm picking up fish fin, I'm dabbing my brush on to the tissue so that the excess water is out your undoes not spread much onto my painting. Now this time, our clouds will majorly be on the top right side. And you all the area is going to be very light or very small and lighter clouds. I'm making the law and making them far from each other. So I'm just using the tip of my brush to drop little paint to form those cloud-like structures. Now, again, I'll be picking up Payne's gray, but in a darker consistency then this Leo. So that is more or less of water now and much of pigment. And I'll begin dropping them again human. So this time there's already not much water onto my brush because I did not dipping it into water. So I'm gently applying it without dabbing off. So if you'll notice, I'm just picking up the paint from the band and just blending it belonged to my palette and directly applying it onto the clouds here. Now these darker tones will be applied in much smaller or ADRs because also that the first layer of clouds still be visible. And this will again add one more tone to your clouds. I still have one area a little darker. So now I'm picking up more of 501c3 very thick and just dropping it humor. Just have this top right corner. And then later on the left home. Anywhere if you feel you need a little darker, you can just drop a little bit of AD or pointed tip on our smallest size brush. So that matches enough for my sky. So I'll wait for my sky to dry and then we'll be painting our C with a boat element in it. So let's wait for this to dry and then go ahead.
11. Misty Seascape- Part 2- Sea: So now this area that is next to my horizon line has dried completely so I can begin painting my seizure. Remember to only apply watch onto your area and do not drive at your sky. Otherwise, the colors from the sky will begin to bleed into your See. If you're not confident about using such a large brush, you can use any smallest size flat brush to do so. Now to the sea first, I'll apply a wash of very light beans green. Now as we did during US guy, but I'll wait for this to GI 40 percent. And then I'll add little CBGB stood with the same beans, Greek Hello, in our little thicker consistency. So till then, I'm just made preparing the proper mix of my pins gray color. If you apply the viz without waiting for people to dry a little, then the waves will merge into the background and you would not have a look to your weaves. So that is the reason you need to read a little bit for this background to dry first and then are these beliefs while to remember, while adding these waves dab off the excess water so that you are not introducing any new motto. So every time that I'm picking up fish beans, I'm dabbing off my brush so that I remove the excess water. And now randomly, I'm giving these CVs, the ones that are closer to me. I'm making them a little tip. At the bottom. And at the top, I'll be giving very small structures. If your brush does not have a pointed tip, you should do so with the brush. Just making this horizon line a little darker. And now adding much darker deflections. So if you notice as belonged in the technique section, this is just a little Calvi stroke that I'm using to give the CVs. And I guess that much is enough for our CVs will again be it for this to dry and then add our final boat to it.
12. Misty Seascape- Part 3- Details: I'll be marking the outline of the board first so that you can understand the shape of the what. So this is roughly going to be the shape of what? Now I'm just filling this completely with black. Now, adding details to this. What? So again, if you're not confident about the adding this line with the help of a brush, you can use all de Dino brush auto marker to add this. I'm just adding small boxes to add detail to this. What? I'll be adding the other fine lines with the help of a fine liner scheme. But before that, I'm shifting to my final size brush, that is a size two brush. And I'll just add and reflection of this board to my C. So the deflection will be exactly the shape that the moon is by just some fine lines to depict that reflection. So you know where the boxes being reflected. I'm just having some square-like structure put up here as a reflection. And now the reflection of this borehole. And the lines that we'll be doing with the fine liner I just and those bulldoze who today I'm using my fine liner and how adding these details. So just adding some tiny DPOs or joins to these. What's the reason for adding these reflections in on? Because what? It is not stable. So since the water is moving, the reflection is also in a zigzag pattern and not exactly a seam still reflection. Having a small line. I have added these lines vary randomly to add detail to my boat. And we are done with our third and final painting of this class. It's time to remove the masking. Again. Remember to remove it when you are painting is completely dry and remove it at an angle off almost 45-degree from your paper. So your final painting, I hope you guys enjoyed painting this with me.
13. Thank You: Thank you all for joining me in this Skillshare class of building these three moody landscapes in monochrome. I hope all of you guys enjoy painting these paintings with me. I would love to see all of your projects and do the class project section of this class. Also, if you put them up on Instagram, you can tag me. My Instagram handle is creating from the heart. I would love to reshape your buildings there. Thank you once again to everyone for joining me in this class.
 Umashree Taparia, Artist, Art Instructor, Entrepreneur